windscreen RENAULT MEGANE 2017 4.G Owners Manual
[x] Cancel search | Manufacturer: RENAULT, Model Year: 2017, Model line: MEGANE, Model: RENAULT MEGANE 2017 4.GPages: 346, PDF Size: 7.04 MB
Page 28 of 346
1.22
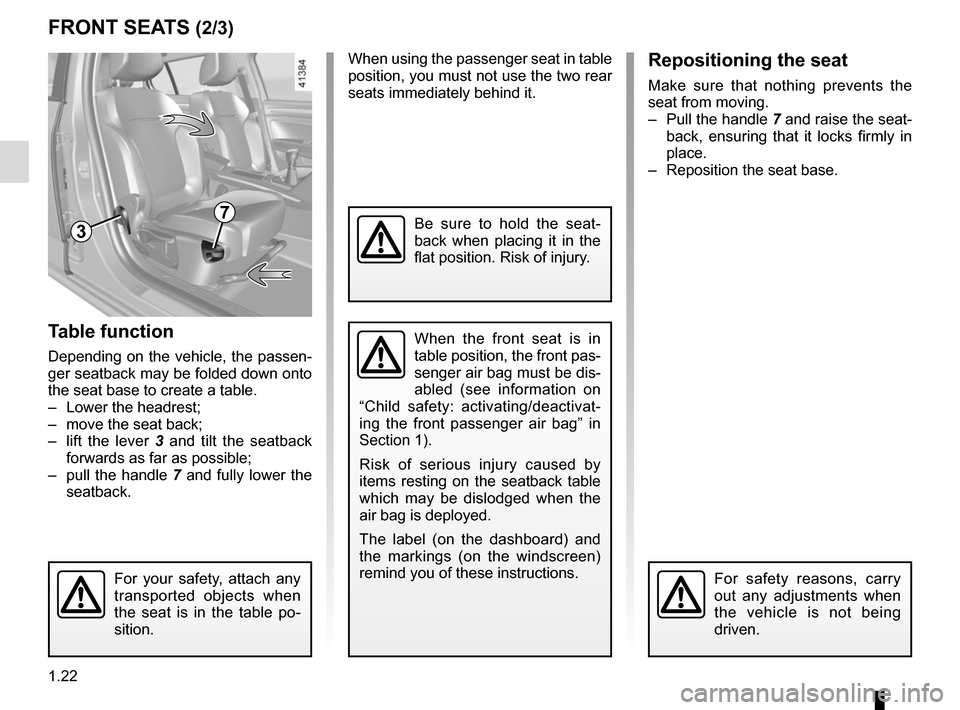
Table function
Depending on the vehicle, the passen-
ger seatback may be folded down onto
the seat base to create a table.
– Lower the headrest;
– move the seat back;
– lift the lever 3 and tilt the seatback
forwards as far as possible;
– pull the handle 7 and fully lower the
seatback.
FRONT SEATS (2/3)
When the front seat is in
table position, the front pas-
senger air bag must be dis-
abled (see information on
“Child safety: activating/deactivat-
ing the front passenger air bag” in
Section 1).
Risk of serious injury caused by
items resting on the seatback table
which may be dislodged when the
air bag is deployed.
The label (on the dashboard) and
the markings (on the windscreen)
remind you of these instructions.
7
For your safety, attach any
transported objects when
the seat is in the table po-
sition.
When using the passenger seat in table
position, you must not use the two rear
seats immediately behind it.Repositioning the seat
Make sure that nothing prevents the
seat from moving.
– Pull the handle 7 and raise the seat-
back, ensuring that it locks firmly in
place.
– Reposition the seat base.
Be sure to hold the seat-
back when placing it in the
flat position. Risk of injury.
For safety reasons, carry
out any adjustments when
the vehicle is not being
driven.
3
Page 35 of 346
1.29
METHODS OF RESTRAINT IN ADDITION TO THE FRONT SEAT BELTS (2/4)
Load limiter
Above a certain severity of impact, this
mechanism is used to limit the force of
the belt against the body so that it is at
an acceptable level.
airbags for driver and
passenger
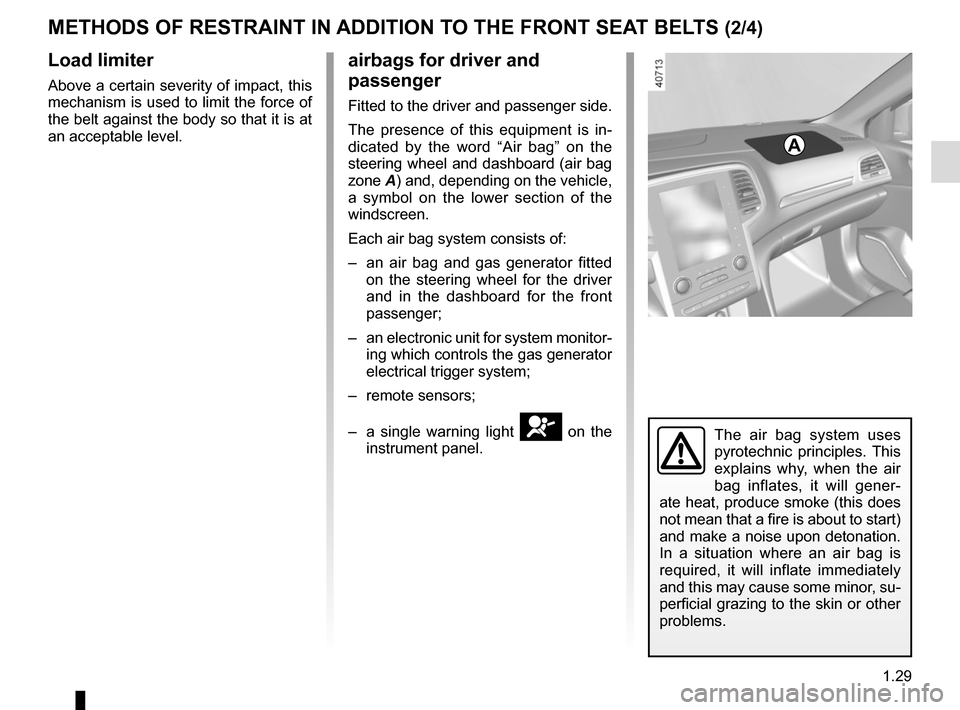
Fitted to the driver and passenger side.
The presence of this equipment is in-
dicated by the word “Air bag” on the
steering wheel and dashboard (air bag
zone A) and, depending on the vehicle,
a symbol on the lower section of the
windscreen.
Each air bag system consists of:
– an air bag and gas generator fitted on the steering wheel for the driver
and in the dashboard for the front
passenger;
– an electronic unit for system monitor- ing which controls the gas generator
electrical trigger system;
– remote sensors;
– a single warning light
å on the
instrument panel.
A
The air bag system uses
pyrotechnic principles. This
explains why, when the air
bag inflates, it will gener-
ate heat, produce smoke (this does
not mean that a fire is about to start)
and make a noise upon detonation.
In a situation where an air bag is
required, it will inflate immediately
and this may cause some minor, su-
perficial grazing to the skin or other
problems.
Page 39 of 346
1.33
SIDE PROTECTION DEVICES
Warning concerning the side air bag
– Fitting seat covers: seats equipped with an air bag require covers
specifically designed for your vehicle. Contact an approved Dealer to fi\
nd
out if these covers are available. The use of any covers other than those
designed for your vehicle (including those designed for another vehicle\
) may
affect the operation of the air bags and reduce your protection.
– Do not place any accessories, objects or even pets between the seatback,\
the door and the internal fittings. Do not cover the seatback with any items\
such as
clothes or accessories. This may prevent the air bag from operating correctly
or cause injury when the air bag is deployed.
– No work or modification whatsoever may be carried out on the seat or int\
ernal fittings, except by qualified personnel from an approved dealer.
Side air bags
These air bags are fitted to the front
seats and are activated at the sides of
the seats (door side) to protect the oc-
cupants in the event of a severe side
impact.
Curtain air bags
These are airbags fitted along the sides
of the vehicle in the ceiling which trigger
along the front and rear door side win-
dows to protect the passengers in case
of a severe side impact.
Depending on the vehicle, a mark-
ing on the windscreen informs you
of the presence of additional means
of restraint (airbags, pretensioners,
etc.) in the passenger compartment.
Page 97 of 346
1.91
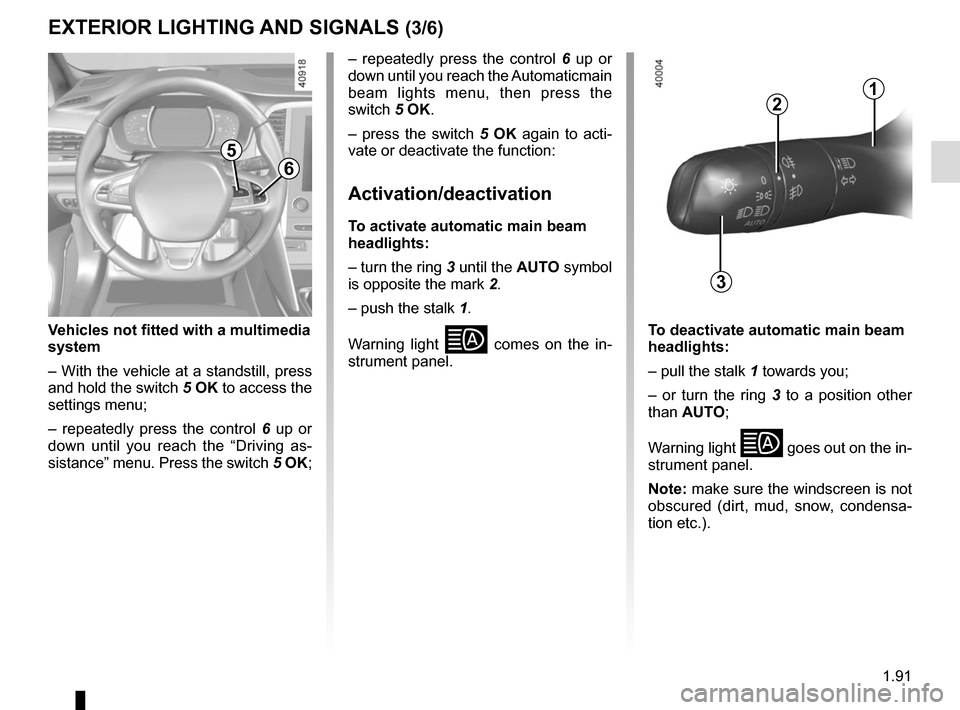
3
2
EXTERIOR LIGHTING AND SIGNALS (3/6)
1
5
6
Vehicles not fitted with a multimedia
system
– With the vehicle at a standstill, press
and hold the switch 5 OK to access the
settings menu;
– repeatedly press the control 6 up or
down until you reach the “Driving as-
sistance” menu. Press the switch 5 OK; – repeatedly press the control
6 up or
down until you reach the Automaticmain
beam lights menu, then press the
switch 5 OK.
– press the switch 5 OK again to acti-
vate or deactivate the function:
Activation/deactivation
To activate automatic main beam
headlights:
– turn the ring 3 until the AUTO symbol
is opposite the mark 2.
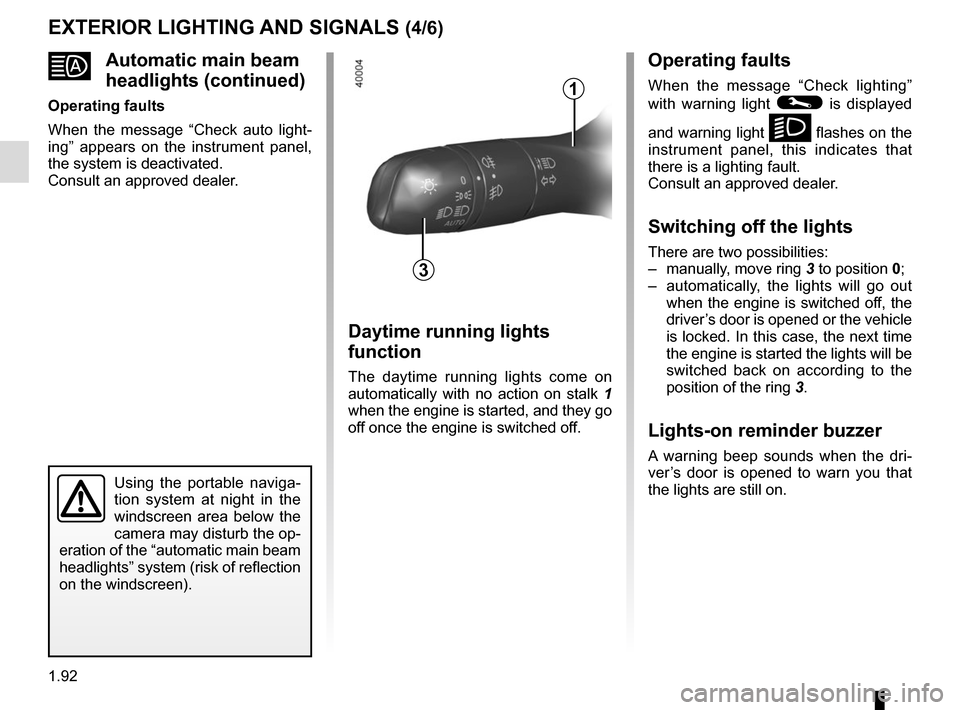
– push the stalk 1.
Warning light
comes on the in-
strument panel. To deactivate automatic main beam
headlights:
– pull the stalk 1 towards you;
– or turn the ring 3 to a position other
than AUTO;
Warning light
goes out on the in-
strument panel.
Note: make sure the windscreen is not
obscured (dirt, mud, snow, condensa-
tion etc.).
Page 98 of 346
1.92
Automatic main beam
headlights (continued)
Operating faults
When the message “Check auto light-
ing” appears on the instrument panel,
the system is deactivated.
Consult an approved dealer.
EXTERIOR LIGHTING AND SIGNALS (4/6)Operating faults
When the message “Check lighting”
with warning light
© is displayed
and warning light
k flashes on the
instrument panel, this indicates that
there is a lighting fault.
Consult an approved dealer.
Switching off the lights
There are two possibilities:
– manually, move ring 3 to position 0;
– automatically, the lights will go out when the engine is switched off, the
driver’s door is opened or the vehicle
is locked. In this case, the next time
the engine is started the lights will be
switched back on according to the
position of the ring 3.
Lights-on reminder buzzer
A warning beep sounds when the dri-
ver’s door is opened to warn you that
the lights are still on.
Daytime running lights
function
The daytime running lights come on
automatically with no action on stalk 1
when the engine is started, and they go
off once the engine is switched off.
3
1
Using the portable naviga-
tion system at night in the
windscreen area below the
camera may disturb the op-
eration of the “automatic main beam
headlights” system (risk of reflection
on the windscreen).
Page 101 of 346
1.95
Special note
When driving the vehicle, the wiping
speed slows down whenever the ve-
hicle stops. For example, fast wiping
speed will slow to normal wiping speed.
As soon as the vehicle moves off,
wiping will return to the speed originally
selected.
If stalk 1 is operated, it overrides and
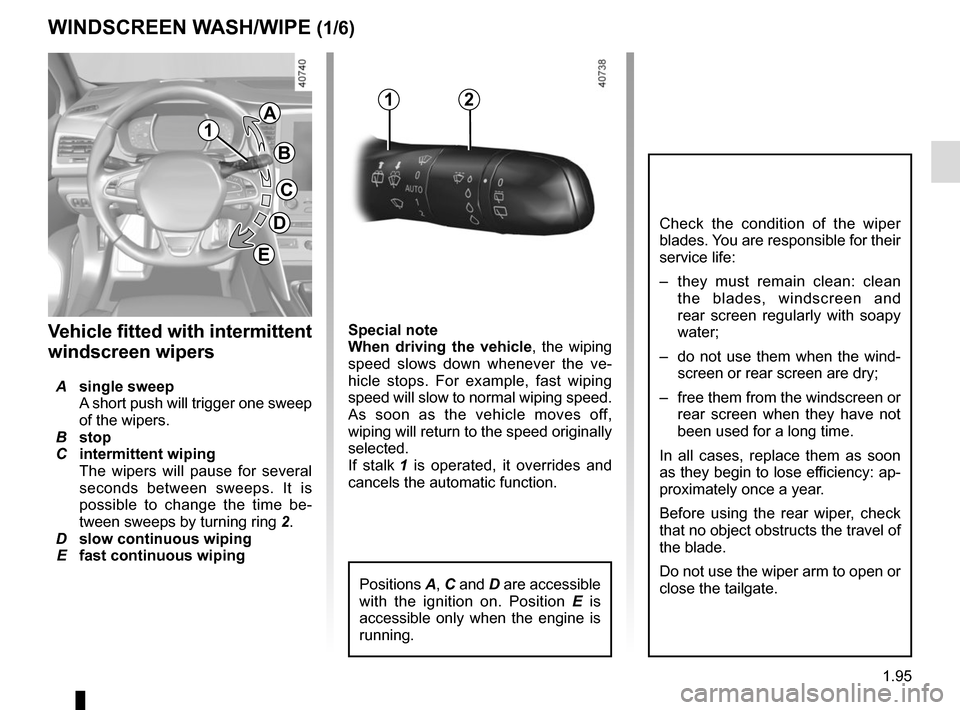
cancels the automatic function.Vehicle fitted with intermittent
windscreen wipers
A single sweep
A short push will trigger one sweep
of the wipers.
B stop
C intermittent wiping
The wipers will pause for several
seconds between sweeps. It is
possible to change the time be-
tween sweeps by turning ring 2.
D slow continuous wiping
E fast continuous wiping
WINDSCREEN WASH/WIPE (1/6)
1
1A
B
C
D
2
Positions A, C and D are accessible
with the ignition on. Position E is
accessible only when the engine is
running.
Check the condition of the wiper
blades. You are responsible for their
service life:
– they must remain clean: clean the blades, windscreen and
rear screen regularly with soapy
water;
– do not use them when the wind- screen or rear screen are dry;
– free them from the windscreen or rear screen when they have not
been used for a long time.
In all cases, replace them as soon
as they begin to lose efficiency: ap-
proximately once a year.
Before using the rear wiper, check
that no object obstructs the travel of
the blade.
Do not use the wiper arm to open or
close the tailgate.
E
Page 102 of 346
1.96
WINDSCREEN WASH/WIPE (2/6)
1
F
2
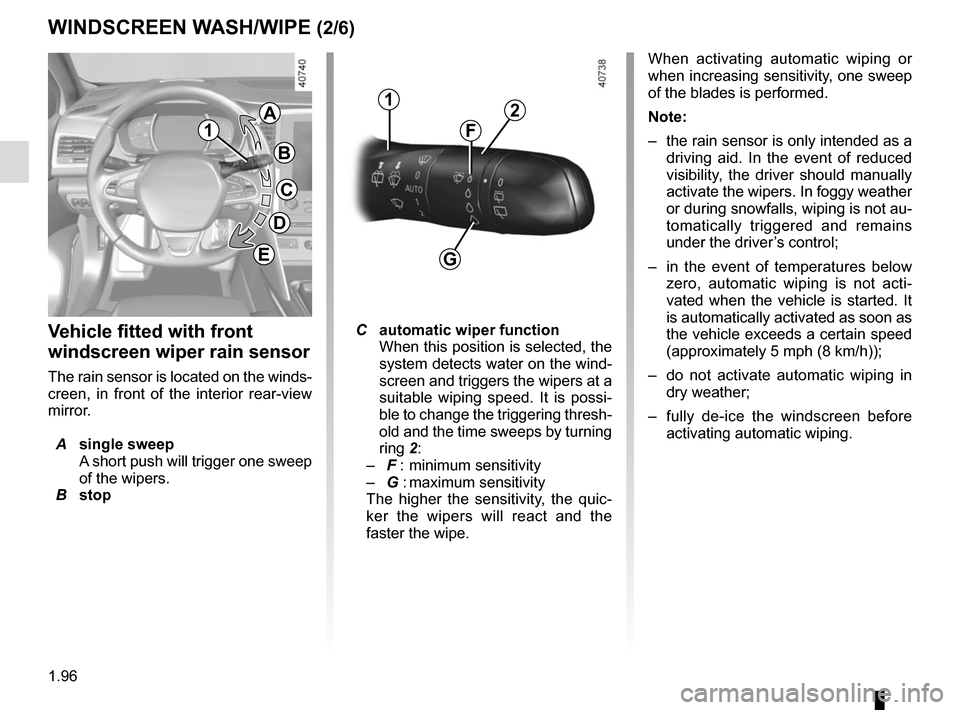
Vehicle fitted with front
windscreen wiper rain sensor
The rain sensor is located on the winds-
creen, in front of the interior rear-view
mirror.
A single sweep
A short push will trigger one sweep
of the wipers.
B stop
C automatic wiper function
When this position is selected, the
system detects water on the wind-
screen and triggers the wipers at a
suitable wiping speed. It is possi-
ble to change the triggering thresh-
old and the time sweeps by turning
ring 2:
– F : minimum sensitivity
– G : maximum sensitivity
The higher the sensitivity, the quic-
ker the wipers will react and the
faster the wipe. When activating automatic wiping or
when increasing sensitivity, one sweep
of the blades is performed.
Note:
–
the rain sensor is only intended as a
driving aid. In the event of reduced
visibility, the driver should manually
activate the wipers. In foggy weather
or during snowfalls, wiping is not au-
tomatically triggered and remains
under the driver’s control;
– in the event of temperatures below
zero, automatic wiping is not acti-
vated when the vehicle is started. It
is automatically activated as soon as
the vehicle exceeds a certain speed
(approximately 5 mph (8 km/h));
– do not activate automatic wiping in
dry weather;
– fully de-ice the windscreen before
activating automatic wiping.
G
1
A
B
C
D
E
Page 103 of 346
1.97
WINDSCREEN WASH/WIPE (3/6)
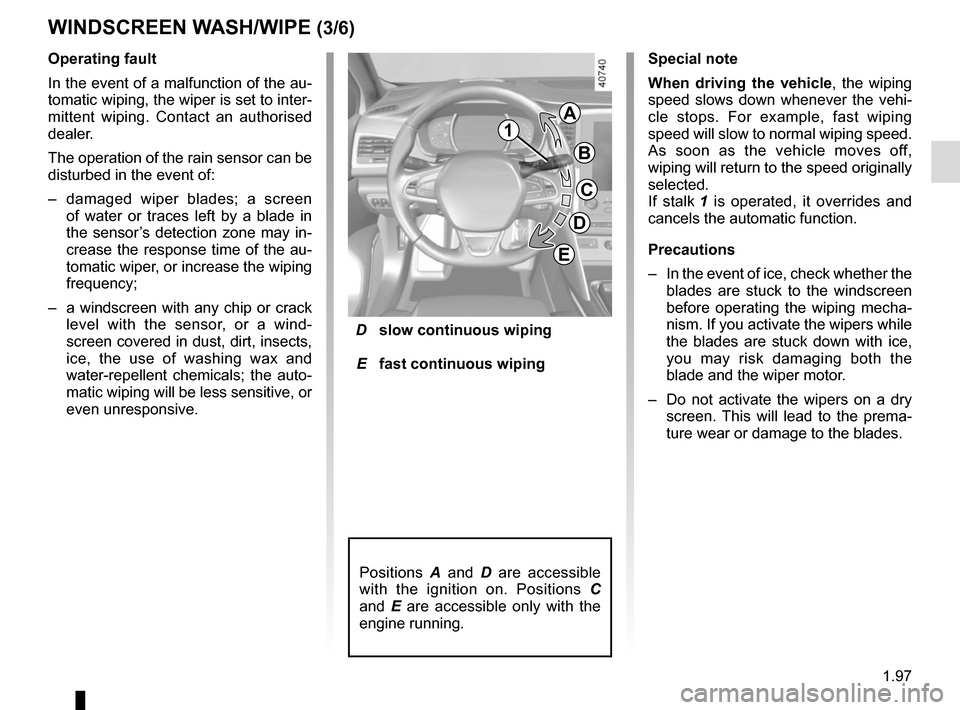
D slow continuous wiping
E fast continuous wiping
Operating fault
In the event of a malfunction of the au-
tomatic wiping, the wiper is set to inter-
mittent wiping. Contact an authorised
dealer.
The operation of the rain sensor can be
disturbed in the event of:
–
damaged wiper blades; a screen
of water or traces left by a blade in
the sensor’s detection zone may in-
crease the response time of the au-
tomatic wiper, or increase the wiping
frequency;
– a windscreen with any chip or crack
level with the sensor, or a wind-
screen covered in dust, dirt, insects,
ice, the use of washing wax and
water-repellent chemicals; the auto-
matic wiping will be less sensitive, or
even unresponsive. Special note
When driving the vehicle, the wiping
speed slows down whenever the vehi-
cle stops. For example, fast wiping
speed will slow to normal wiping speed.
As soon as the vehicle moves off,
wiping will return to the speed originally
selected.
If stalk
1 is operated, it overrides and
cancels the automatic function.
Precautions
– In the event of ice, check whether the
blades are stuck to the windscreen
before operating the wiping mecha-
nism. If you activate the wipers while
the blades are stuck down with ice,
you may risk damaging both the
blade and the wiper motor.
– Do not activate the wipers on a dry
screen. This will lead to the prema-
ture wear or damage to the blades.
Positions A and D are accessible
with the ignition on. Positions C
and E are accessible only with the
engine running.
1
A
B
C
D
E
Page 104 of 346
1.98
WINDSCREEN WASH/WIPE (4/6)
Note:
After your intervention, to reposition the
blades correctly, make sure the blades
are resting on the windscreen, switch
on the ignition and activate the wiper
control.
Specific front wiper position
(service position)
This position enables the blades to be
lifted to remove them from the winds-
creen.
It may be useful to:
– to clean the blades;
– to release the blades from the winds-creen in winter;
– to replace the blades (please refer to the information on the “Wiper
blades” in Section 5).
With the ignition on and the engine off,
lower the windscreen wiper stalk fully
(fast continuous wipe position). The
wiper arms stop in a position away from
the bonnet.
To return the blades to position, make
sure they have been placed on the
windscreen, then move the stalk to po-
sition B (stop) with the ignition on.
Before switching on the ignition,
place the wipers on the windscreen.
Otherwise, there may a risk of damage
to the bonnet or the wipers when they
are switched on.
In the event of obstacles present
on the windscreen (dirt, snow, ice,
etc.), clean the windscreen (inclu-
ding the central area located behind
the interior rear-view mirror) and
the rear screen before starting the
wipers (risk of motor overheating).
If an object is preventing a blade
from moving, it may stop functio-
ning. Remove the obstacle and
reactivate the wiper using the wiper
stalk.
Before any action involving
the windscreen (washing
the vehicle, de-icing,
cleaning the windscreen,
etc.) return stalk 1 to position B
(stop).
Risk of injury and/or damage.
Page 105 of 346
1.99
WINDSCREEN WASH/WIPE (5/6)
Note:
In temperatures below zero, the washer
liquid risks freezing to the windscreen,
thereby reducing visibility. Heat the
windscreen using the demister control
before cleaning.
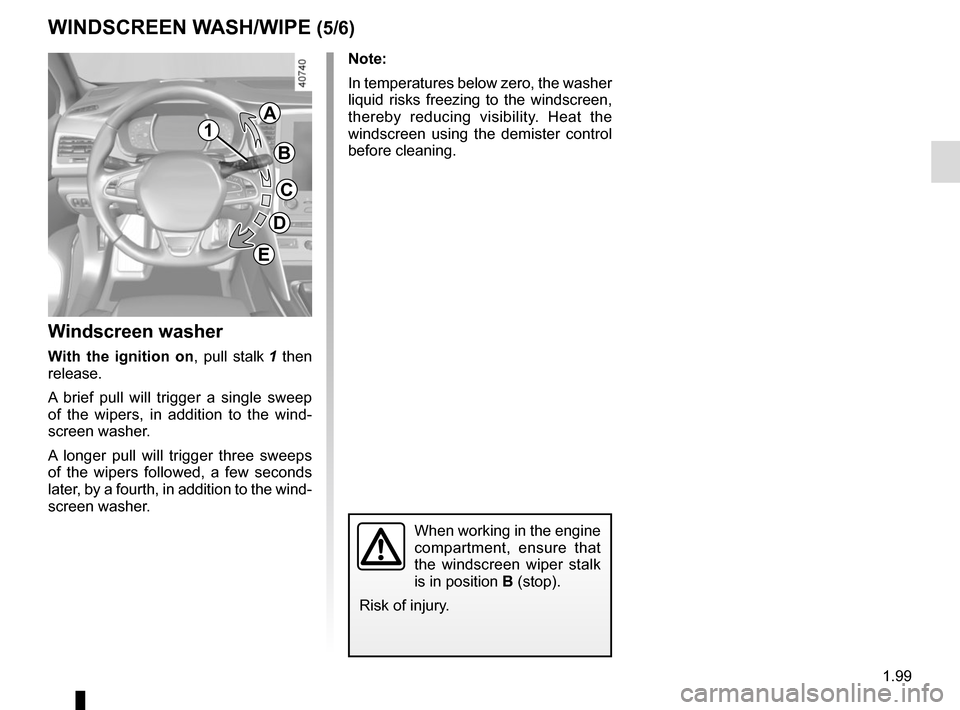
Windscreen washer
With the ignition on, pull stalk 1 then
release.
A brief pull will trigger a single sweep
of the wipers, in addition to the wind-
screen washer.
A longer pull will trigger three sweeps
of the wipers followed, a few seconds
later, by a fourth, in addition to the wind-
screen washer.
When working in the engine
compartment, ensure that
the windscreen wiper stalk
is in position B (stop).
Risk of injury.
1
A
B
C
D
E