check oil RENAULT SCENIC 2011 J95 / 3.G Engine And Peripherals EDC16 Injection Workshop Manual
[x] Cancel search | Manufacturer: RENAULT, Model Year: 2011, Model line: SCENIC, Model: RENAULT SCENIC 2011 J95 / 3.GPages: 236, PDF Size: 1.32 MB
Page 8 of 236
13B - 8
DIESEL INJECTION
Fault finding - Introduction13B
V10 MR-372-J84-13B150$047.mif
EDC16 INJECTION
Program No.: C1
Vdiag No.: 44, 48 and 4C
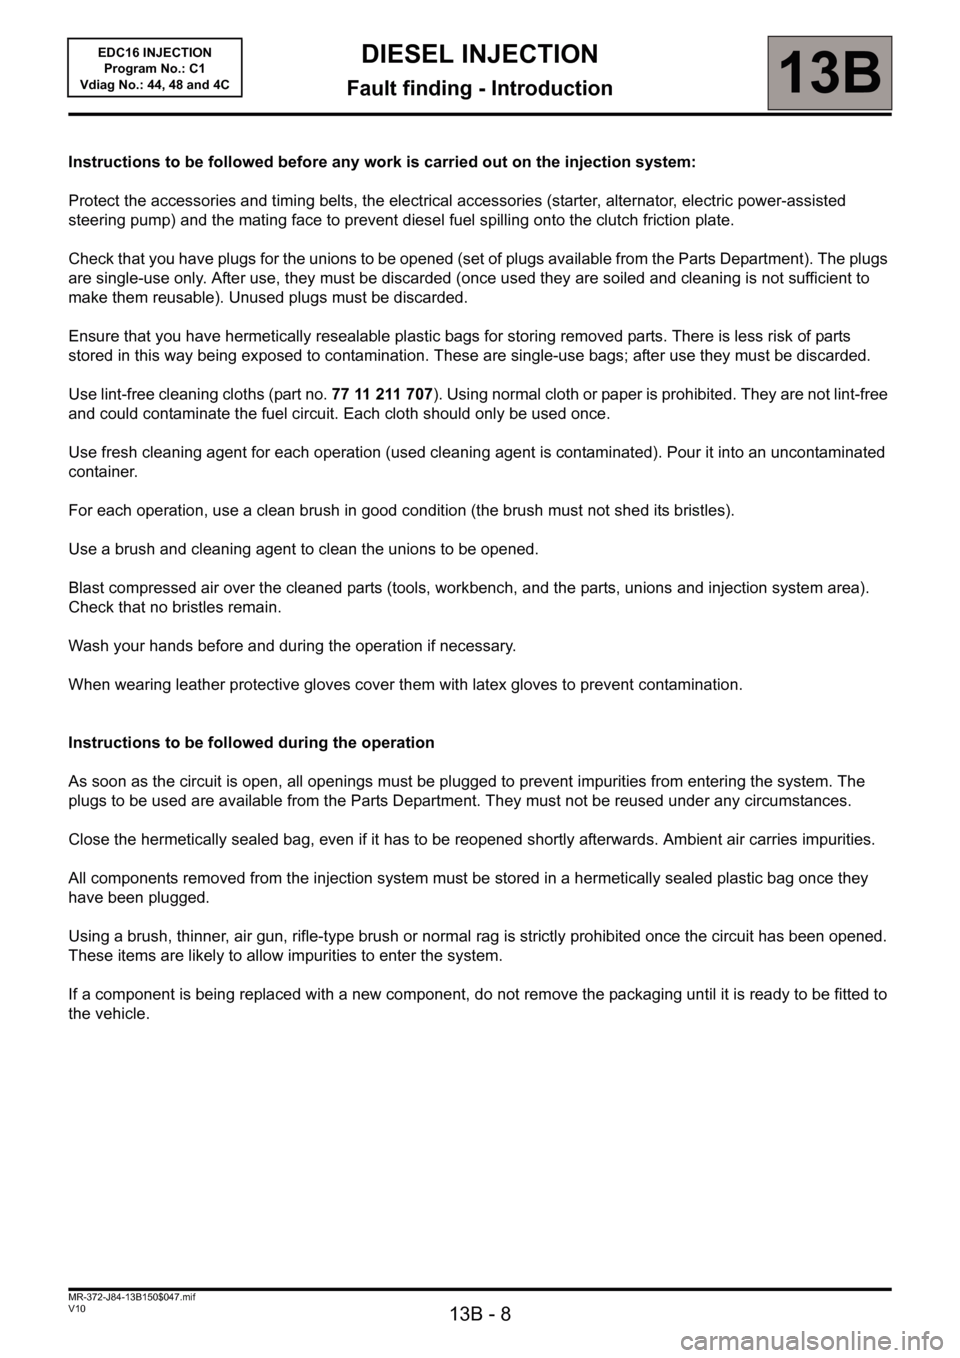
Instructions to be followed before any work is carried out on the injection system:
Protect the accessories and timing belts, the electrical accessories (starter, alternator, electric power-assisted
steering pump) and the mating face to prevent diesel fuel spilling onto the clutch friction plate.
Check that you have plugs for the unions to be opened (set of plugs available from the Parts Department). The plugs
are single-use only. After use, they must be discarded (once used they are soiled and cleaning is not sufficient to
make them reusable). Unused plugs must be discarded.
Ensure that you have hermetically resealable plastic bags for storing removed parts. There is less risk of parts
stored in this way being exposed to contamination. These are single-use bags; after use they must be discarded.
Use lint-free cleaning cloths (part no. 77 11 211 707). Using normal cloth or paper is prohibited. They are not lint-free
and could contaminate the fuel circuit. Each cloth should only be used once.
Use fresh cleaning agent for each operation (used cleaning agent is contaminated). Pour it into an uncontaminated
container.
For each operation, use a clean brush in good condition (the brush must not shed its bristles).
Use a brush and cleaning agent to clean the unions to be opened.
Blast compressed air over the cleaned parts (tools, workbench, and the parts, unions and injection system area).
Check that no bristles remain.
Wash your hands before and during the operation if necessary.
When wearing leather protective gloves cover them with latex gloves to prevent contamination.
Instructions to be followed during the operation
As soon as the circuit is open, all openings must be plugged to prevent impurities from entering the system. The
plugs to be used are available from the Parts Department. They must not be reused under any circumstances.
Close the hermetically sealed bag, even if it has to be reopened shortly afterwards. Ambient air carries impurities.
All components removed from the injection system must be stored in a hermetically sealed plastic bag once they
have been plugged.
Using a brush, thinner, air gun, rifle-type brush or normal rag is strictly prohibited once the circuit has been opened.
These items are likely to allow impurities to enter the system.
If a component is being replaced with a new component, do not remove the packaging until it is ready to be fitted to
the vehicle.
Page 76 of 236
13B-76
DIESEL INJECTION
Fault finding - Interpretation of faults13B
V10 MR-372-J84-13B150$329.mif
EDC16 INJECTION
Program No.: C1
Vdiag No.: 44, 48 and 4C
DF056
CONTINUED 2
1.DEF
2.DEF
NOTESNone.
3.DEF
4.DEF
NOTESConditions for applying the fault finding procedure to
a stored fault:
The fault is declared present after the ignition has been
switched off for 15 seconds.
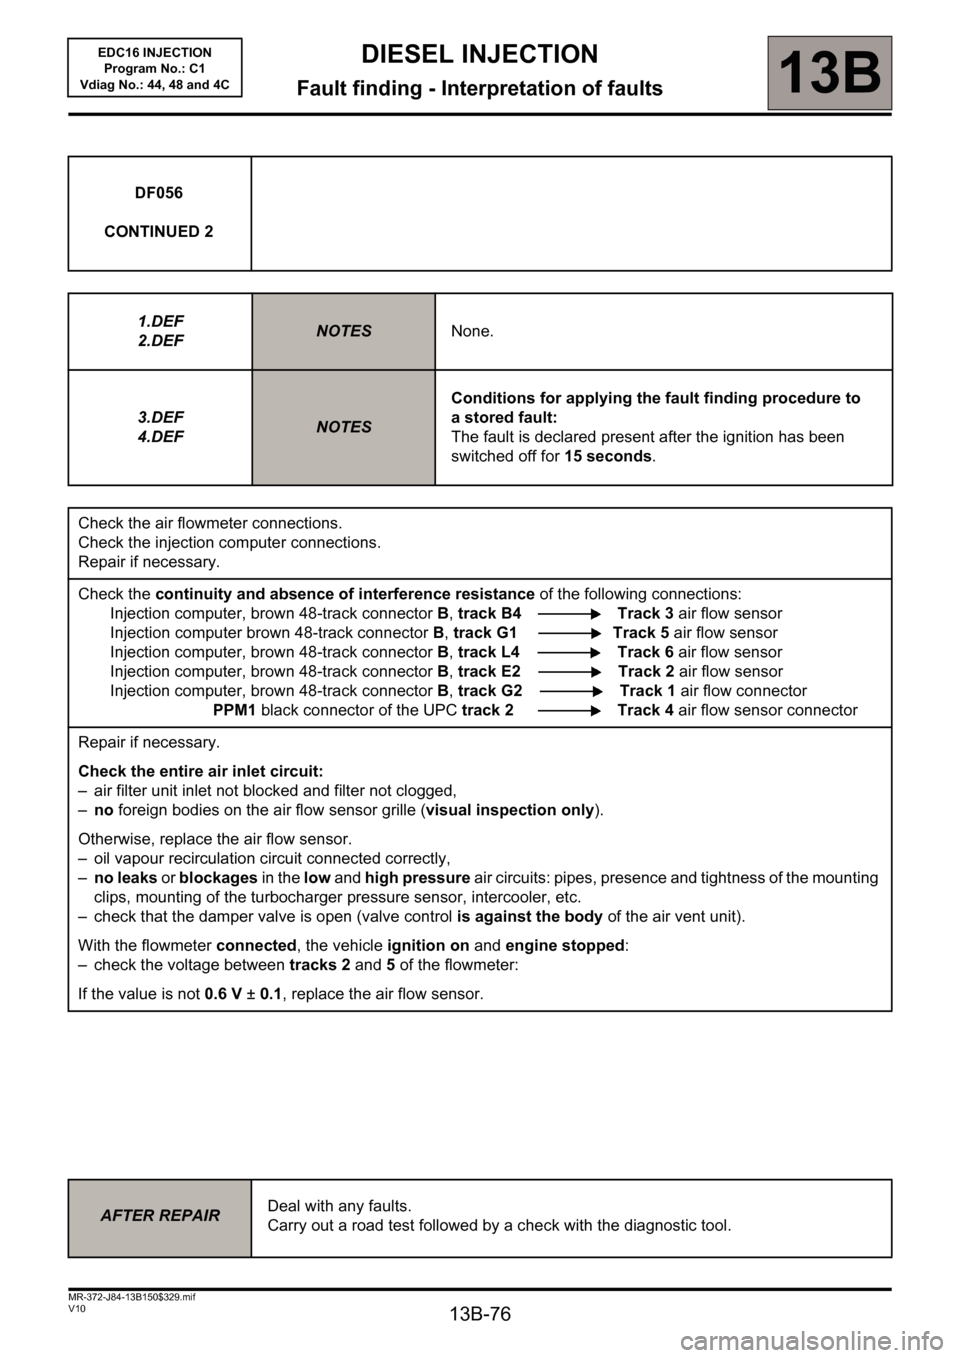
Check the air flowmeter connections.
Check the injection computer connections.
Repair if necessary.
Check the continuity and absence of interference resistance of the following connections:
Injection computer, brown 48-track connector B, track B4 Track 3 air flow sensor
Injection computer brown 48-track connector B, track G1 Track 5 air flow sensor
Injection computer, brown 48-track connector B, track L4 Track 6 air flow sensor
Injection computer, brown 48-track connector B, track E2 Track 2 air flow sensor
Injection computer, brown 48-track connector B, track G2 Track 1 air flow connector
PPM1 black connector of the UPC track 2 Track 4 air flow sensor connector
Repair if necessary.
Check the entire air inlet circuit:
– air filter unit inlet not blocked and filter not clogged,
–no foreign bodies on the air flow sensor grille (visual inspection only).
Otherwise, replace the air flow sensor.
– oil vapour recirculation circuit connected correctly,
–no leaks or blockages in the low and high pressure air circuits: pipes, presence and tightness of the mounting
clips, mounting of the turbocharger pressure sensor, intercooler, etc.
– check that the damper valve is open (valve control is against the body of the air vent unit).
With the flowmeter connected, the vehicle ignition on and engine stopped:
– check the voltage between tracks 2 and 5 of the flowmeter:
If the value is not 0.6 V ± 0.1, replace the air flow sensor.
AFTER REPAIRDeal with any faults.
Carry out a road test followed by a check with the diagnostic tool.
Page 202 of 236
13B - 202
DIESEL INJECTION
Fault finding - Customer complaints13B
V10 MR-372-J84-13B150$799.mif
EDC16 INJECTION
Program No.: C1
Vdiag No.: 44, 48 and 4CDIESEL INJECTION
Fault finding - Customer complaints
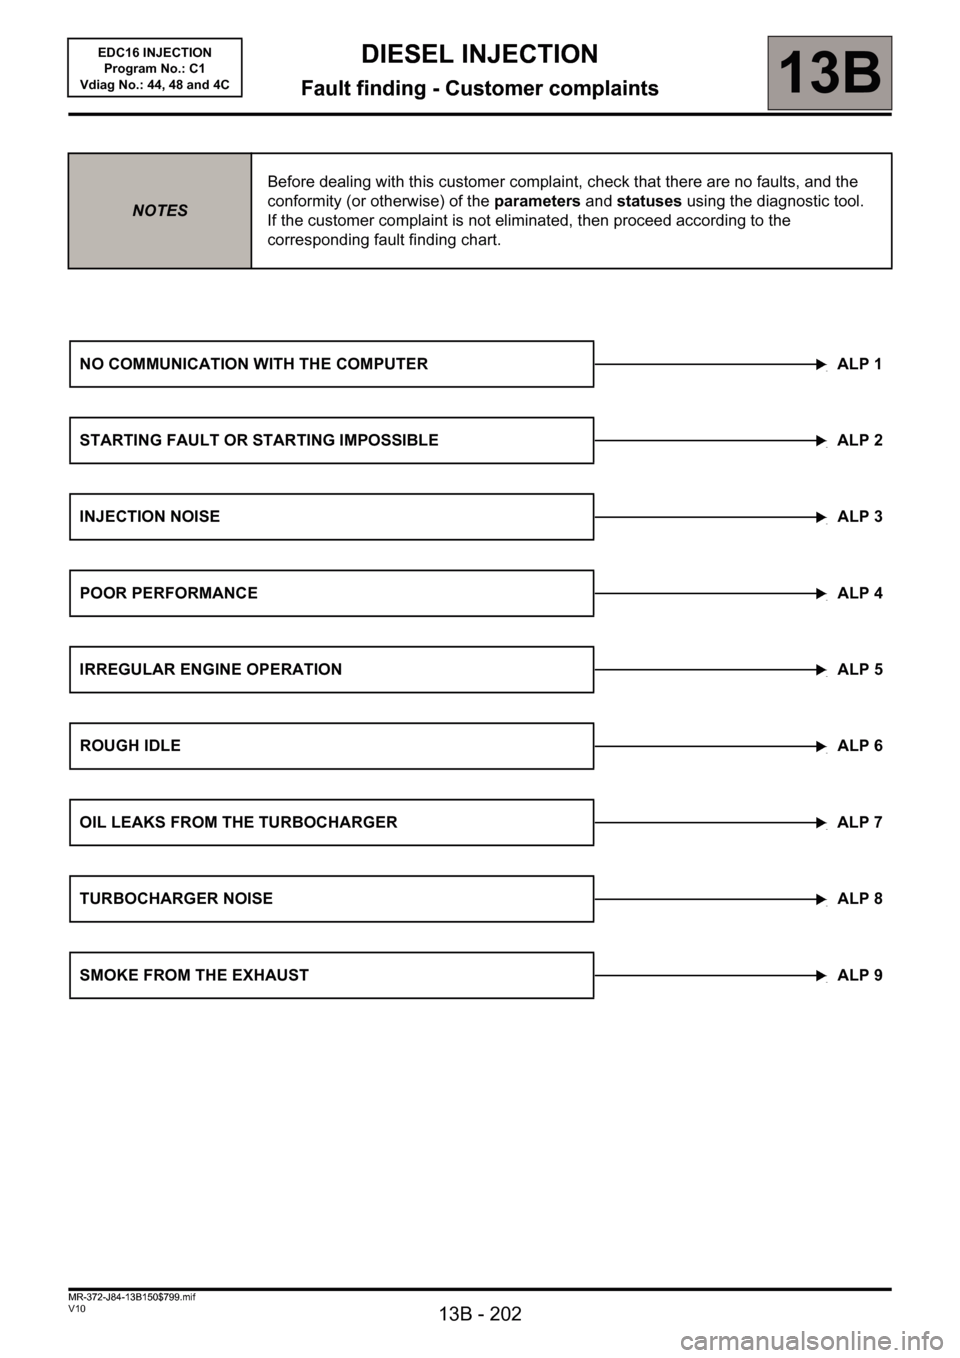
NOTESBefore dealing with this customer complaint, check that there are no faults, and the
conformity (or otherwise) of the parameters and statuses using the diagnostic tool.
If the customer complaint is not eliminated, then proceed according to the
corresponding fault finding chart.
NO COMMUNICATION WITH THE COMPUTER ALP 1
STARTING FAULT OR STARTING IMPOSSIBLE ALP 2
INJECTION NOISEALP 3
POOR PERFORMANCEALP 4
IRREGULAR ENGINE OPERATION ALP 5
ROUGH IDLE ALP 6
OIL LEAKS FROM THE TURBOCHARGER ALP 7
TURBOCHARGER NOISEALP 8
SMOKE FROM THE EXHAUSTALP 9
MR-372-J84-13B150$799.mif
Page 208 of 236
13B-208
MR-372-J84-13B150$846.mif
V10
DIESEL INJECTION
Fault finding - Fault finding chart13B
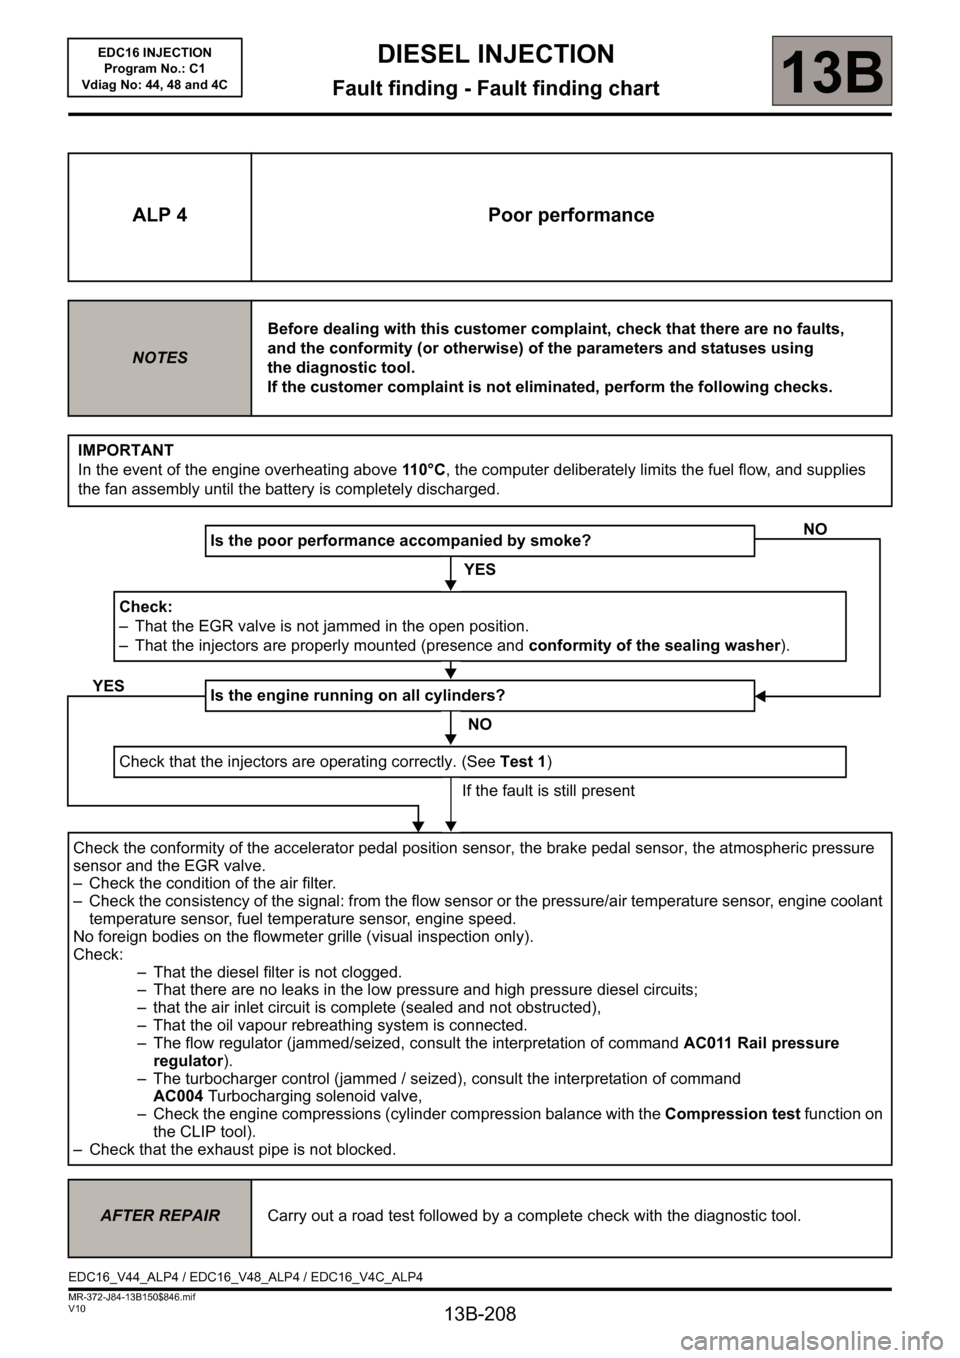
ALP 4 Poor performance
NOTESBefore dealing with this customer complaint, check that there are no faults,
and the conformity (or otherwise) of the parameters and statuses using
the diagnostic tool.
If the customer complaint is not eliminated, perform the following checks.
IMPORTANT
In the event of the engine overheating above 11 0 ° C, the computer deliberately limits the fuel flow, and supplies
the fan assembly until the battery is completely discharged.
Is the poor performance accompanied by smoke?
YES
Check:
– That the EGR valve is not jammed in the open position.
– That the injectors are properly mounted (presence and conformity of the sealing washer).
Is the engine running on all cylinders?
NO
Check that the injectors are operating correctly. (See Test 1)
If the fault is still present
Check the conformity of the accelerator pedal position sensor, the brake pedal sensor, the atmospheric pressure
sensor and the EGR valve.
– Check the condition of the air filter.
– Check the consistency of the signal: from the flow sensor or the pressure/air temperature sensor, engine coolant
temperature sensor, fuel temperature sensor, engine speed.
No foreign bodies on the flowmeter grille (visual inspection only).
Check:
– That the diesel filter is not clogged.
– That there are no leaks in the low pressure and high pressure diesel circuits;
– that the air inlet circuit is complete (sealed and not obstructed),
– That the oil vapour rebreathing system is connected.
– The flow regulator (jammed/seized, consult the interpretation of command AC011 Rail pressure
regulator).
– The turbocharger control (jammed / seized), consult the interpretation of command
AC004Turbocharging solenoid valve,
– Check the engine compressions (cylinder compression balance with the Compression test function on
the CLIP tool).
– Check that the exhaust pipe is not blocked.
NO
YES
AFTER REPAIRCarry out a road test followed by a complete check with the diagnostic tool.
EDC16_V44_ALP4 / EDC16_V48_ALP4 / EDC16_V4C_ALP4
EDC16 INJECTION
Program No.: C1
Vdiag No: 44, 48 and 4C
Page 211 of 236
13B-211
MR-372-J84-13B150$846.mif
V10
DIESEL INJECTION
Fault finding - Fault finding chart13B
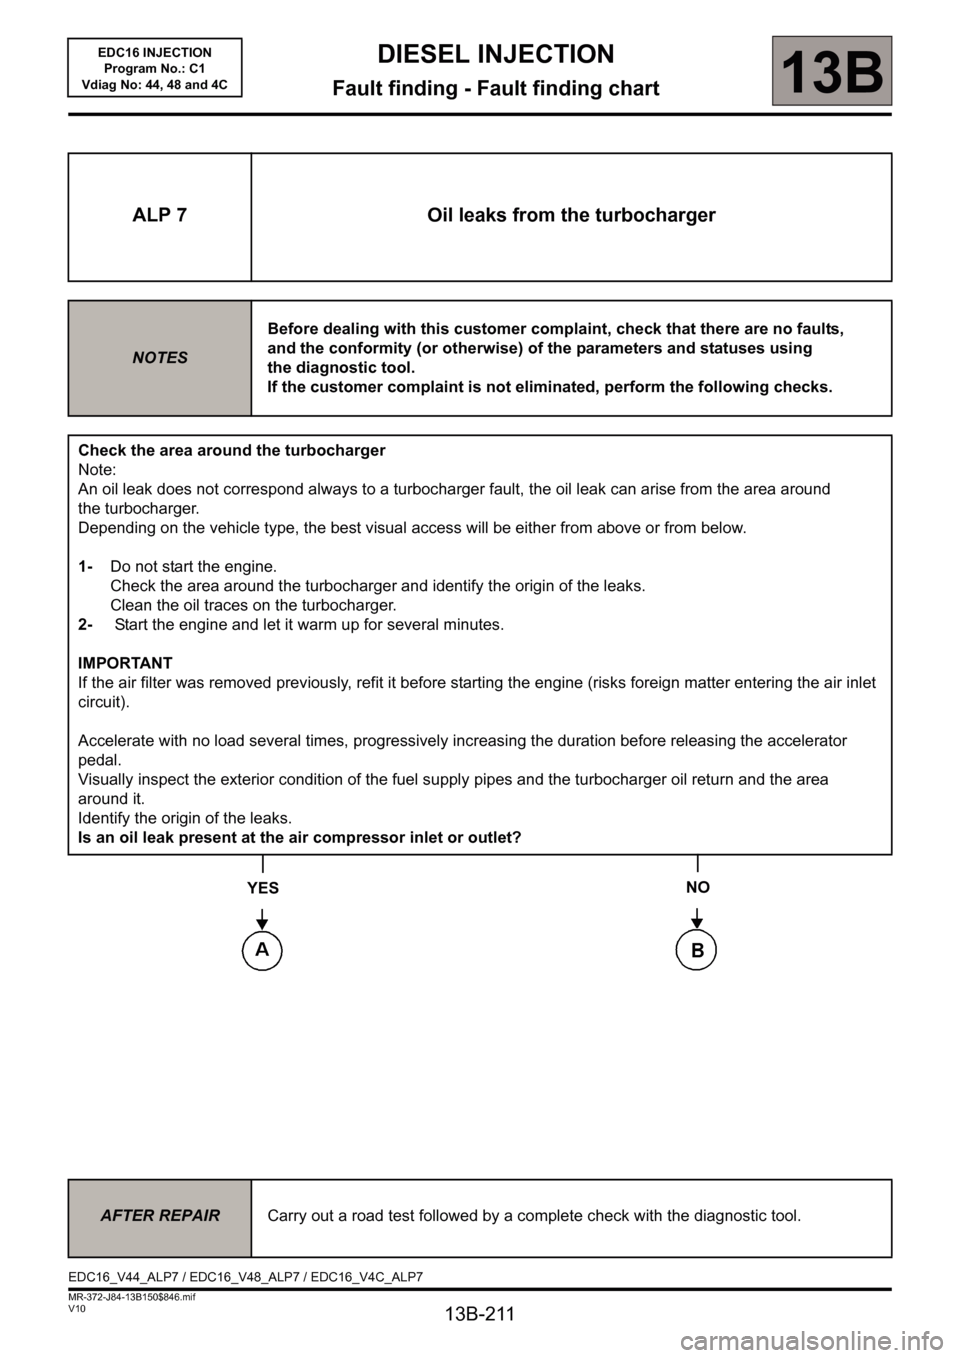
ALP 7 Oil leaks from the turbocharger
NOTESBefore dealing with this customer complaint, check that there are no faults,
and the conformity (or otherwise) of the parameters and statuses using
the diagnostic tool.
If the customer complaint is not eliminated, perform the following checks.
Check the area around the turbocharger
Note:
An oil leak does not correspond always to a turbocharger fault, the oil leak can arise from the area around
the turbocharger.
Depending on the vehicle type, the best visual access will be either from above or from below.
1-Do not start the engine.
Check the area around the turbocharger and identify the origin of the leaks.
Clean the oil traces on the turbocharger.
2- Start the engine and let it warm up for several minutes.
IMPORTANT
If the air filter was removed previously, refit it before starting the engine (risks foreign matter entering the air inlet
circuit).
Accelerate with no load several times, progressively increasing the duration before releasing the accelerator
pedal.
Visually inspect the exterior condition of the fuel supply pipes and the turbocharger oil return and the area
around it.
Identify the origin of the leaks.
Is an oil leak present at the air compressor inlet or outlet?
YES
NO
AFTER REPAIRCarry out a road test followed by a complete check with the diagnostic tool.
EDC16_V44_ALP7 / EDC16_V48_ALP7 / EDC16_V4C_ALP7EDC16 INJECTION
Program No.: C1
Vdiag No: 44, 48 and 4C
Page 212 of 236
13B-212
MR-372-J84-13B150$846.mif
V10
DIESEL INJECTION
Fault finding - Fault finding chart13B
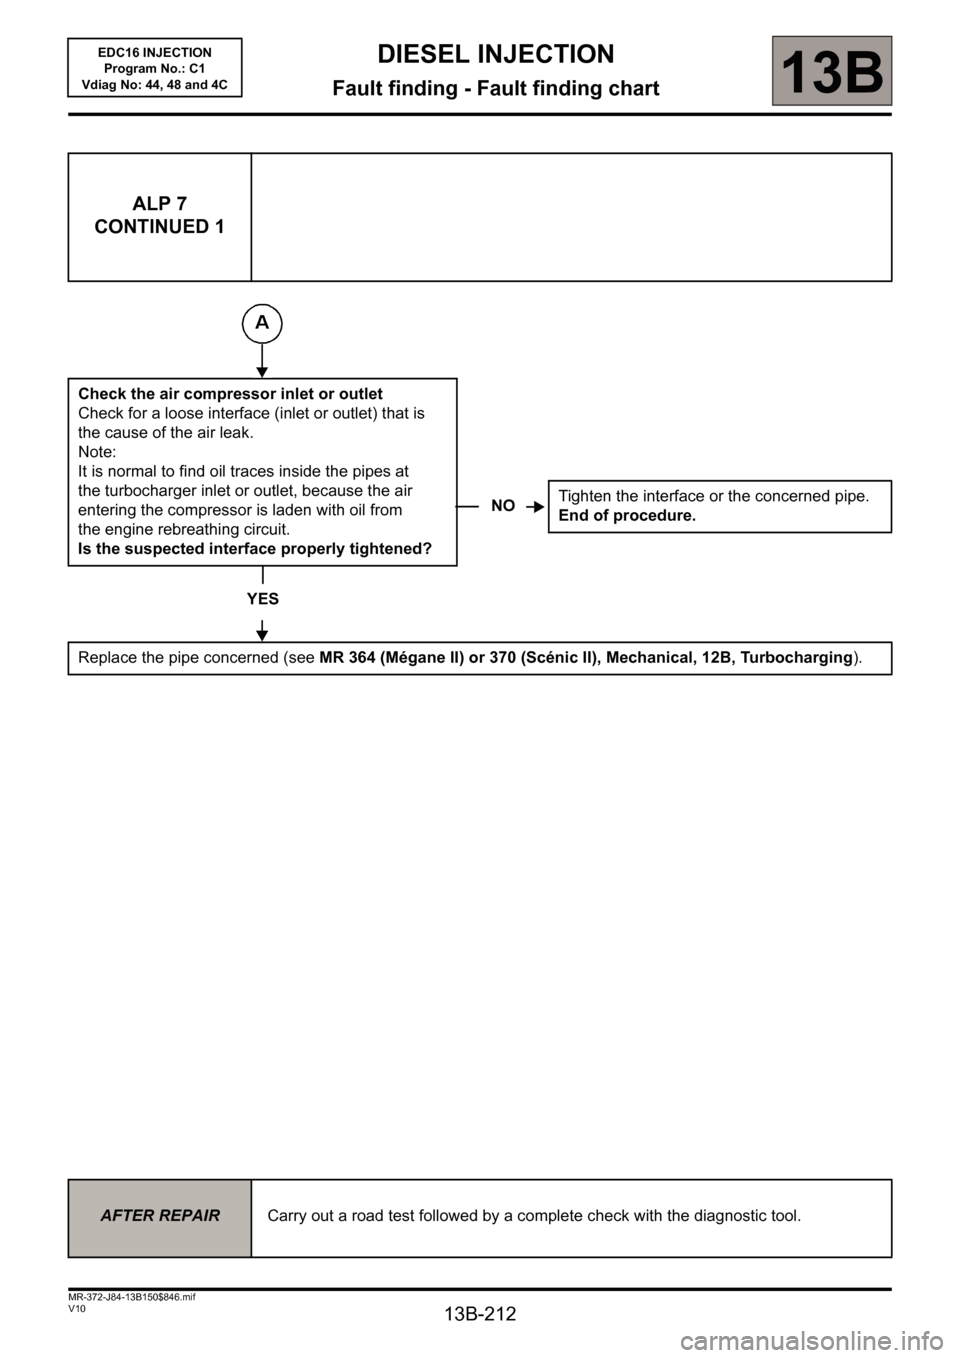
ALP 7
CONTINUED 1
Check the air compressor inlet or outlet
Check for a loose interface (inlet or outlet) that is
the cause of the air leak.
Note:
It is normal to find oil traces inside the pipes at
the turbocharger inlet or outlet, because the air
entering the compressor is laden with oil from
the engine rebreathing circuit.
Is the suspected interface properly tightened?
YES
Replace the pipe concerned (see MR 364 (Mégane II) or 370 (Scénic II), Mechanical, 12B, Turbocharging).
NOTighten the interface or the concerned pipe.
End of procedure.
AFTER REPAIRCarry out a road test followed by a complete check with the diagnostic tool.
EDC16 INJECTION
Program No.: C1
Vdiag No: 44, 48 and 4C
Page 213 of 236
13B-213
MR-372-J84-13B150$846.mif
V10
DIESEL INJECTION
Fault finding - Fault finding chart13B
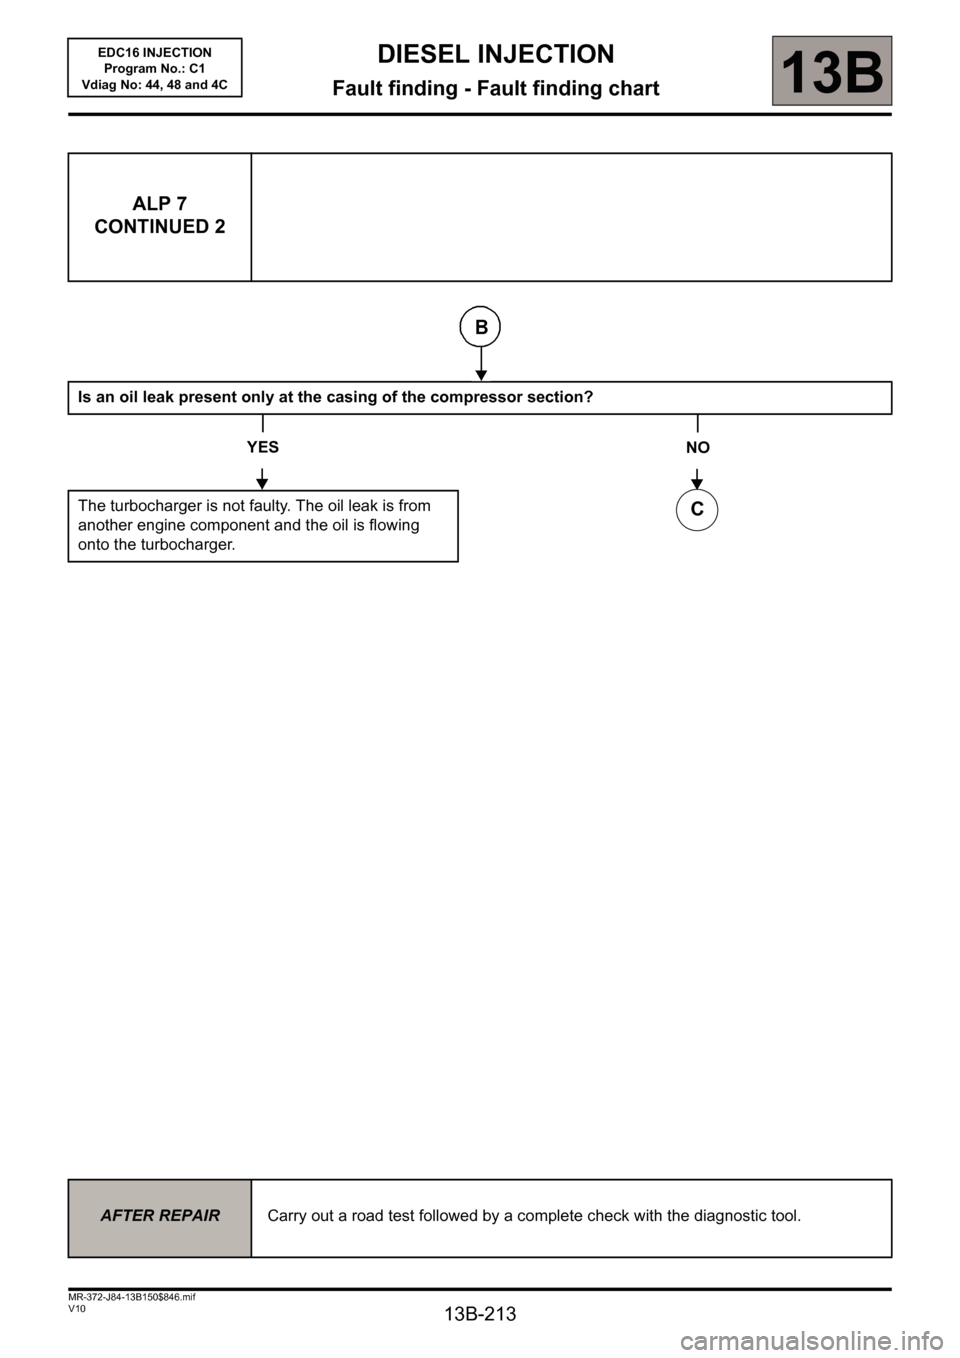
ALP 7
CONTINUED 2
Is an oil leak present only at the casing of the compressor section?
YES
The turbocharger is not faulty. The oil leak is from
another engine component and the oil is flowing
onto the turbocharger.
NO
AFTER REPAIRCarry out a road test followed by a complete check with the diagnostic tool.
C
EDC16 INJECTION
Program No.: C1
Vdiag No: 44, 48 and 4C
Page 214 of 236
13B-214
MR-372-J84-13B150$846.mif
V10
DIESEL INJECTION
Fault finding - Fault finding chart13B
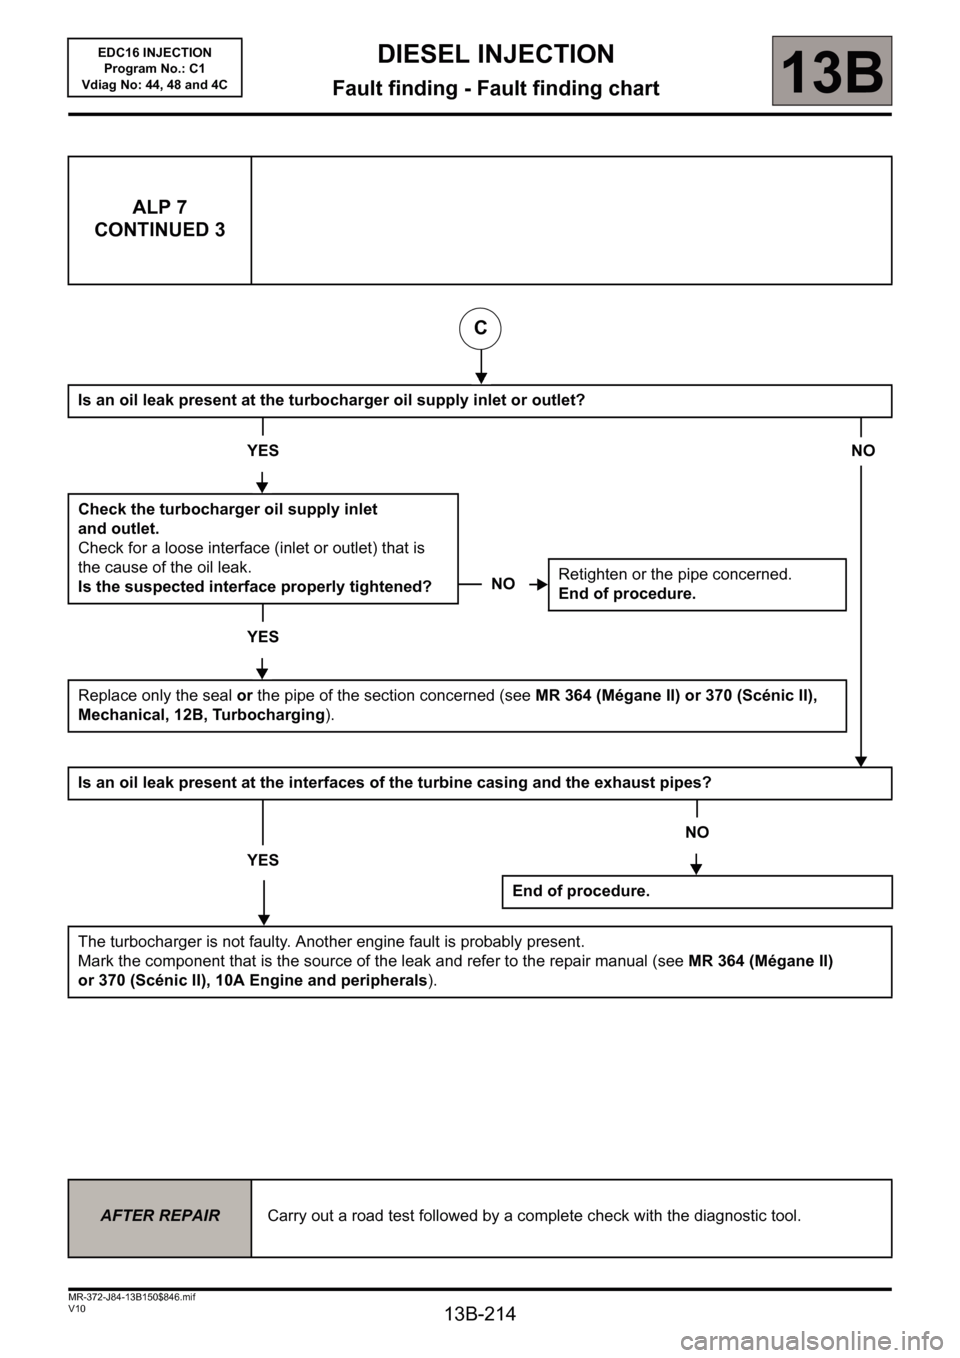
ALP 7
CONTINUED 3
Is an oil leak present at the turbocharger oil supply inlet or outlet?
YESNO
Check the turbocharger oil supply inlet
and outlet.
Check for a loose interface (inlet or outlet) that is
the cause of the oil leak.
Is the suspected interface properly tightened?
YES
Replace only the seal or the pipe of the section concerned (see MR 364 (Mégane II) or 370 (Scénic II),
Mechanical, 12B, Turbocharging).
Is an oil leak present at the interfaces of the turbine casing and the exhaust pipes?
YES
The turbocharger is not faulty. Another engine fault is probably present.
Mark the component that is the source of the leak and refer to the repair manual (see MR 364 (Mégane II)
or 370 (Scénic II), 10A Engine and peripherals).
NORetighten or the pipe concerned.
End of procedure.
NO
End of procedure.
AFTER REPAIRCarry out a road test followed by a complete check with the diagnostic tool.
C
EDC16 INJECTION
Program No.: C1
Vdiag No: 44, 48 and 4C
Page 218 of 236
13B-218
MR-372-J84-13B150$893.mif
V10
DIESEL INJECTION
Fault finding - Tests
EDC16 INJECTION
Program No.: C1
Vdiag No.: 44, 48 and 4C
13B
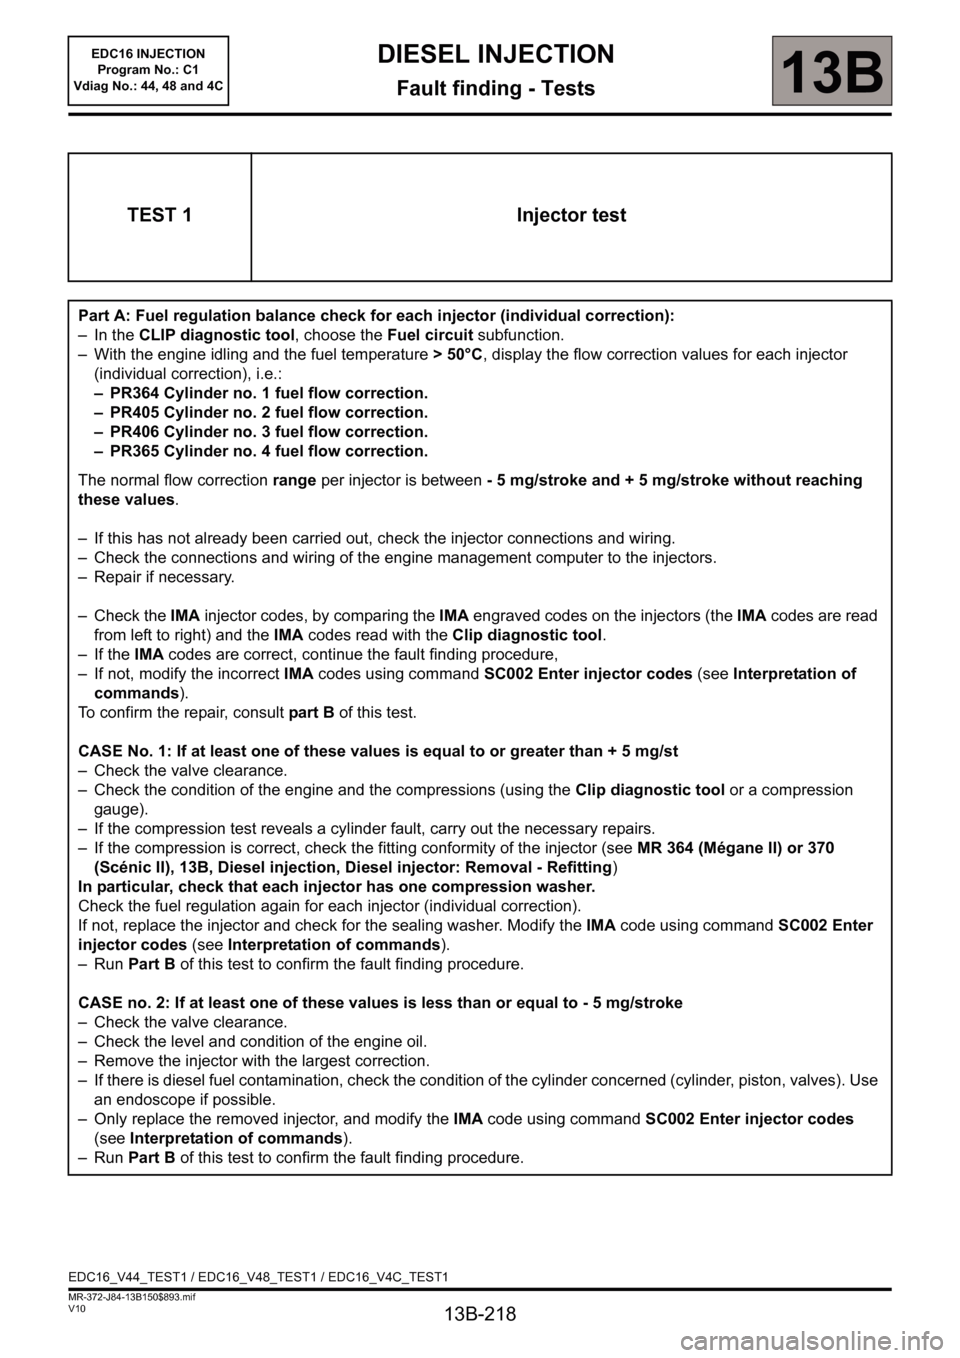
TEST 1 Injector test
Part A: Fuel regulation balance check for each injector (individual correction):
– In the CLIP diagnostic tool, choose the Fuel circuit subfunction.
– With the engine idling and the fuel temperature > 50°C, display the flow correction values for each injector
(individual correction), i.e.:
– PR364 Cylinder no. 1 fuel flow correction.
– PR405 Cylinder no. 2 fuel flow correction.
– PR406 Cylinder no. 3 fuel flow correction.
– PR365 Cylinder no. 4 fuel flow correction.
The normal flow correction range per injector is between - 5 mg/stroke and + 5 mg/stroke without reaching
these values.
– If this has not already been carried out, check the injector connections and wiring.
– Check the connections and wiring of the engine management computer to the injectors.
– Repair if necessary.
– Check the IMA injector codes, by comparing the IMA engraved codes on the injectors (the IMA codes are read
from left to right) and the IMA codes read with the Clip diagnostic tool.
– If the IMA codes are correct, continue the fault finding procedure,
– If not, modify the incorrect IMA codes using command SC002 Enter injector codes (see Interpretation of
commands).
To confirm the repair, consult part B of this test.
CASE No. 1: If at least one of these values is equal to or greater than + 5 mg/st
– Check the valve clearance.
– Check the condition of the engine and the compressions (using the Clip diagnostic tool or a compression
gauge).
– If the compression test reveals a cylinder fault, carry out the necessary repairs.
– If the compression is correct, check the fitting conformity of the injector (see MR 364 (Mégane II) or 370
(Scénic II), 13B, Diesel injection, Diesel injector: Removal - Refitting)
In particular, check that each injector has one compression washer.
Check the fuel regulation again for each injector (individual correction).
If not, replace the injector and check for the sealing washer. Modify the IMA code using command SC002 Enter
injector codes (see Interpretation of commands).
–Run Part B of this test to confirm the fault finding procedure.
CASE no. 2: If at least one of these values is less than or equal to - 5 mg/stroke
– Check the valve clearance.
– Check the level and condition of the engine oil.
– Remove the injector with the largest correction.
– If there is diesel fuel contamination, check the condition of the cylinder concerned (cylinder, piston, valves). Use
an endoscope if possible.
– Only replace the removed injector, and modify the IMA code using command SC002 Enter injector codes
(see Interpretation of commands).
–Run Part B of this test to confirm the fault finding procedure.
EDC16_V44_TEST1 / EDC16_V48_TEST1 / EDC16_V4C_TEST1
Page 230 of 236
13B-230
MR-372-J84-13B150$893.mif
V10
13B
EDC16 INJECTION
Program No.: C1
Vdiag No.: 44, 48 and 4CDIESEL INJECTION
Fault finding - Tests
TEST5
CONTINUED
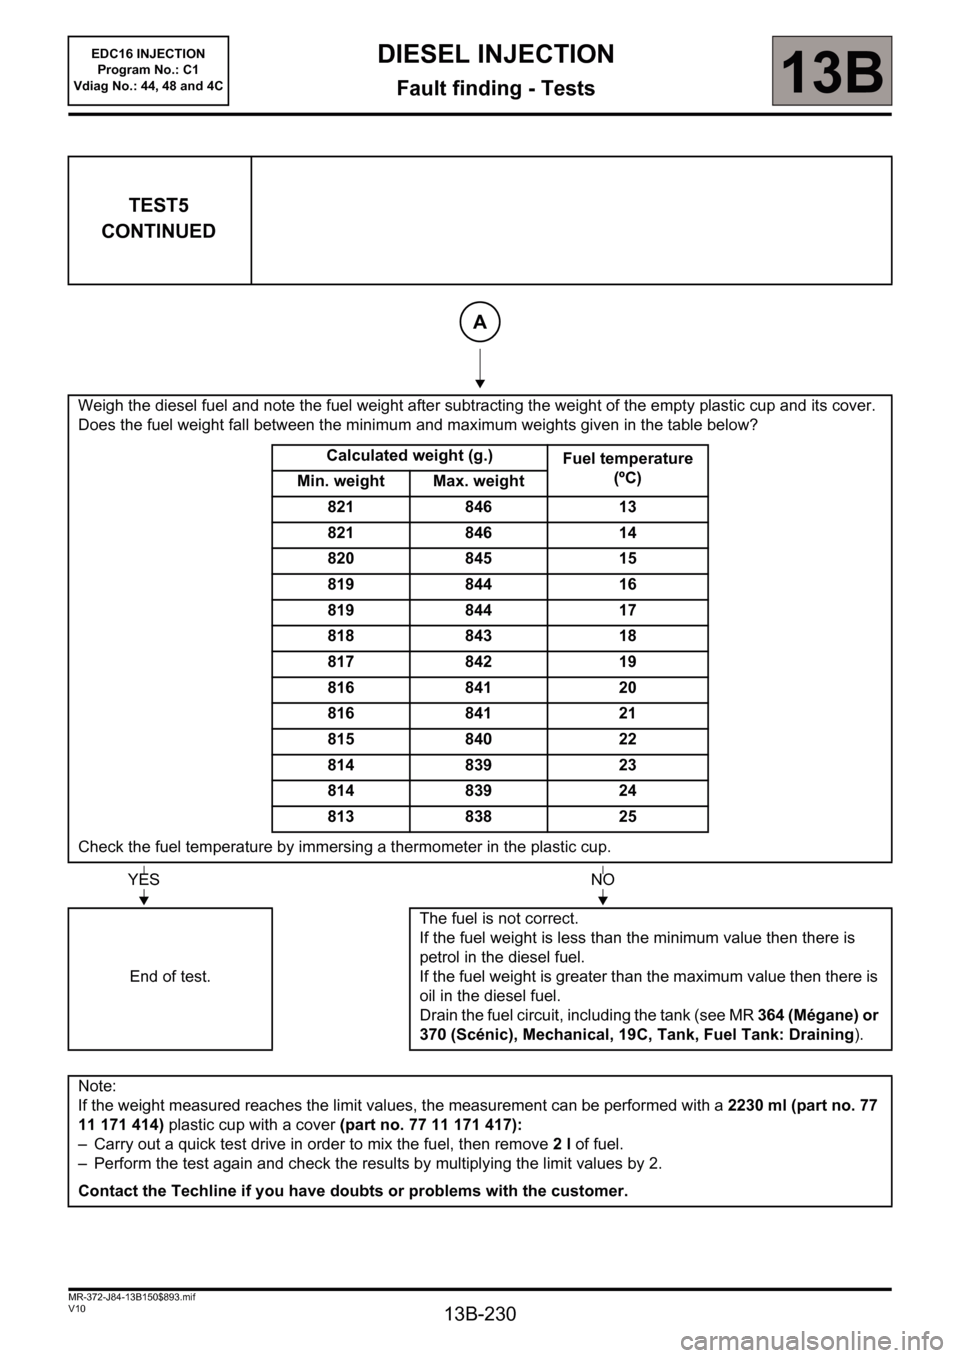
Weigh the diesel fuel and note the fuel weight after subtracting the weight of the empty plastic cup and its cover.
Does the fuel weight fall between the minimum and maximum weights given in the table below?
Calculated weight (g.)
Fuel temperature
(ºC)
Min. weight Max. weight
821 846 13
821 846 14
820 845 15
819 844 16
819 844 17
818 843 18
817 842 19
816 841 20
816 841 21
815 840 22
814 839 23
814 839 24
813 838 25
Check the fuel temperature by immersing a thermometer in the plastic cup.
End of test.The fuel is not correct.
If the fuel weight is less than the minimum value then there is
petrol in the diesel fuel.
If the fuel weight is greater than the maximum value then there is
oil in the diesel fuel.
Drain the fuel circuit, including the tank (see MR 364 (Mégane) or
370 (Scénic), Mechanical, 19C, Tank, Fuel Tank: Draining).
Note:
If the weight measured reaches the limit values, the measurement can be performed with a 2230 ml (part no. 77
11 171 414) plastic cup with a cover (part no. 77 11 171 417):
– Carry out a quick test drive in order to mix the fuel, then remove 2 l of fuel.
– Perform the test again and check the results by multiplying the limit values by 2.
Contact the Techline if you have doubts or problems with the customer.
A
YESNO