RENAULT SCENIC 2011 J95 / 3.G Engine And Peripherals EDC16 Workshop Manual
Manufacturer: RENAULT, Model Year: 2011, Model line: SCENIC, Model: RENAULT SCENIC 2011 J95 / 3.GPages: 365, PDF Size: 2.11 MB
Page 111 of 365

13B-111
MR-372-J84-13B200$324.mif
V13
DIESEL INJECTION
Fault finding – Interpretation of faults
EDC16
Program No.: C1
Vdiag no.: 18, 1C, 20
13B
DF176
CONTINUED
CC.1
NOTESNone.
Check the continuity and insulation from + 12 V of connection 3JN between components 597 and 120.
If the connection is faulty and there is a repair procedure (see Technical Note 6015A, Electrical wiring repair,
Wiring: Precautions for repair), repair the wiring, otherwise replace it.
1. DEF
NOTESNone.
Check the condition of the connections:
– on the low-speed fan unit relay connector,
– on the injection computer grey connector C.
Repair if necessary.
Check the continuity and absence of interference resistance between the following connections:
– connection code 3JN between components 120 and 597.
– connection code 3FB between components 983 and 700.
If the connection or connections are faulty and there is a repair method (see Technical Note 6015A, Repairing
electrical wiring, Wiring: Precautions for repair), repair the wiring, otherwise replace it.
AFTER REPAIRDeal with any faults.
Carry out a road test followed by another check with the diagnostic tool.
Page 112 of 365

13B-112
MR-372-J84-13B200$324.mif
V13
DIESEL INJECTION
Fault finding – Interpretation of faults
EDC16
Program No.: C1
Vdiag no.: 18, 1C, 20
13B
DF177
PRESENT
OR
STOREDHIGH-SPEED FAN ASSEMBLY CIRCUIT
CO: Open circuit
CC.0: Short circuit to earth
CC.1: Short circuit to + 12 V
1.DEF: Inconsistent signal
NOTESConditions for applying the fault finding procedure to a stored fault:
The fault is declared present after:
– an attempted start, or with engine running,
– command AC039 High-speed fan unit run.
Special notes:
Use bornier Elé. 1681 for all operations on the injection computer connectors.
CO
NOTESNone.
Check the + 12 V after relay supply to the fan assembly relay mounting R10 on connection 3FB.
Check the condition of the connections and the correct operation of the relay.R10
Replace the relay if necessary.
Check the continuity and the absence of interference resistance of connection 3JP between components 120
and 597.
If the connection is faulty and there is a repair procedure (see Technical Note 6015A, Electrical wiring repair,
Wiring: Precautions for repair), repair the wiring, otherwise replace it.
CC.0
NOTESNone.
Check the continuity and insulation to earth of connection 3FB between components 120 and 983.
If the connection is faulty and there is a repair procedure (see Technical Note 6015A, Electrical wiring repair,
Wiring: Precautions for repair), repair the wiring, otherwise replace it.
AFTER REPAIRDeal with any faults.
Carry out a road test followed by another check with the diagnostic tool.
EDC16_V18_DF177/EDC16_V1C_DF177/EDC16_V20_DF177
Page 113 of 365
13B-113
MR-372-J84-13B200$324.mif
V13
DIESEL INJECTION
Fault finding – Interpretation of faults
EDC16
Program No.: C1
Vdiag no.: 18, 1C, 20
13B
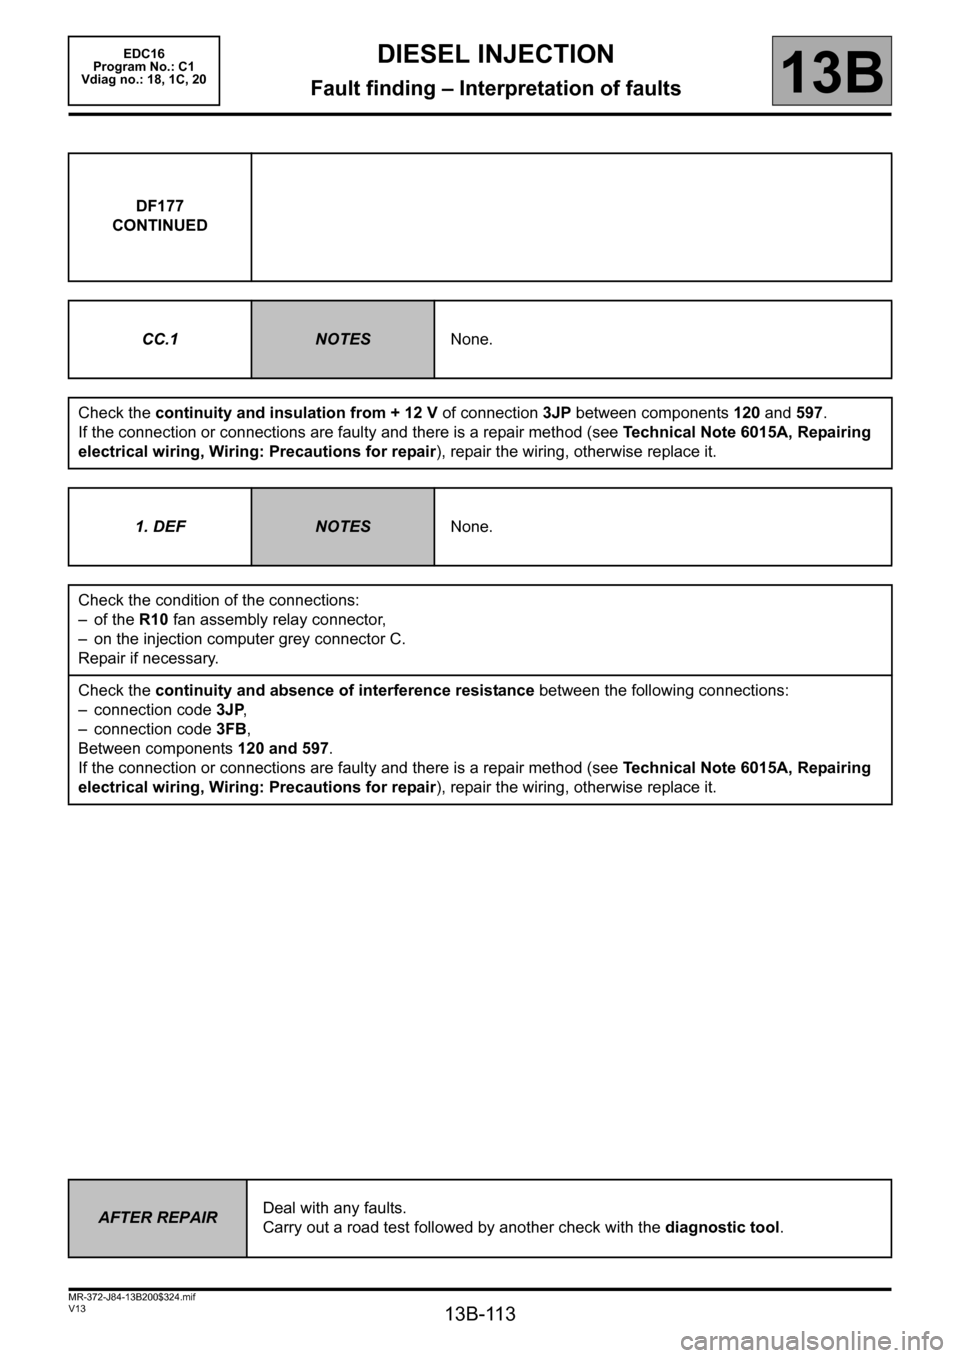
DF177
CONTINUED
CC.1
NOTESNone.
Check the continuity and insulation from + 12 V of connection 3JP between components 120 and 597.
If the connection or connections are faulty and there is a repair method (see Technical Note 6015A, Repairing
electrical wiring, Wiring: Precautions for repair), repair the wiring, otherwise replace it.
1. DEF
NOTESNone.
Check the condition of the connections:
– of the R10 fan assembly relay connector,
– on the injection computer grey connector C.
Repair if necessary.
Check the continuity and absence of interference resistance between the following connections:
– connection code 3JP,
– connection code 3FB,
Between components 120 and 597.
If the connection or connections are faulty and there is a repair method (see Technical Note 6015A, Repairing
electrical wiring, Wiring: Precautions for repair), repair the wiring, otherwise replace it.
AFTER REPAIRDeal with any faults.
Carry out a road test followed by another check with the diagnostic tool.
Page 114 of 365
13B-114
MR-372-J84-13B200$324.mif
V13
13B
DIESEL INJECTION
Fault finding – Interpretation of faults
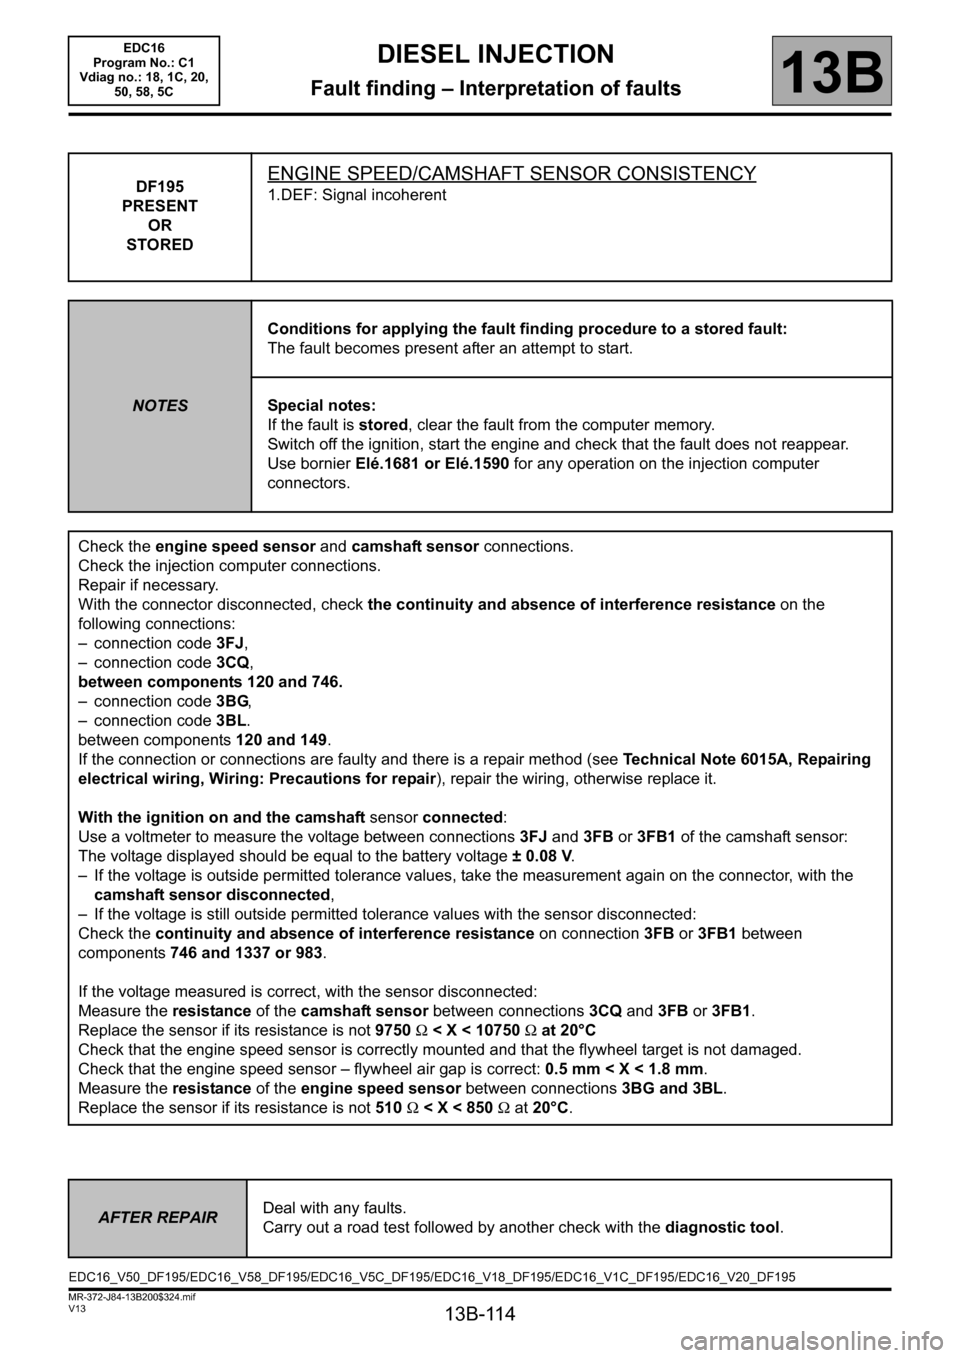
DF195
PRESENT
OR
STOREDENGINE SPEED/CAMSHAFT SENSOR CONSISTENCY
1.DEF: Signal incoherent
NOTESConditions for applying the fault finding procedure to a stored fault:
The fault becomes present after an attempt to start.
Special notes:
If the fault is stored, clear the fault from the computer memory.
Switch off the ignition, start the engine and check that the fault does not reappear.
Use bornier Elé.1681 or Elé.1590 for any operation on the injection computer
connectors.
Check the engine speed sensor and camshaft sensor connections.
Check the injection computer connections.
Repair if necessary.
With the connector disconnected, check the continuity and absence of interference resistance on the
following connections:
– connection code 3FJ,
– connection code 3CQ,
between components 120 and 746.
– connection code 3BG,
– connection code 3BL.
between components120 and 149.
If the connection or connections are faulty and there is a repair method (see Technical Note 6015A, Repairing
electrical wiring, Wiring: Precautions for repair), repair the wiring, otherwise replace it.
With the ignition on and the camshaft sensor connected:
Use a voltmeter to measure the voltage between connections 3FJ and 3FB or 3FB1 of the camshaft sensor:
The voltage displayed should be equal to the battery voltage ± 0.08 V.
– If the voltage is outside permitted tolerance values, take the measurement again on the connector, with the
camshaft sensor disconnected,
– If the voltage is still outside permitted tolerance values with the sensor disconnected:
Check the continuity and absence of interference resistance on connection 3FB or 3FB1 between
components 746 and 1337 or 983.
If the voltage measured is correct, with the sensor disconnected:
Measure the resistance of the camshaft sensor between connections 3CQ and 3FB or 3FB1.
Replace the sensor if its resistance is not 9750 Ω < X < 10750 Ω at 20°C
Check that the engine speed sensor is correctly mounted and that the flywheel target is not damaged.
Check that the engine speed sensor – flywheel air gap is correct: 0.5 mm < X < 1.8 mm.
Measure the resistance of the engine speed sensor between connections 3BG and 3BL.
Replace the sensor if its resistance is not 510 Ω < X < 850 Ω at 20°C.
AFTER REPAIRDeal with any faults.
Carry out a road test followed by another check with the diagnostic tool.
EDC16_V50_DF195/EDC16_V58_DF195/EDC16_V5C_DF195/EDC16_V18_DF195/EDC16_V1C_DF195/EDC16_V20_DF195EDC16
Program No.: C1
Vdiag no.: 18, 1C, 20,
50, 58, 5C
Page 115 of 365

13B-115
MR-372-J84-13B200$324.mif
V13
DIESEL INJECTION
Fault finding – Interpretation of faults
EDC16
Program No.: C1
Vdiag no.: 18, 1C, 20,
50, 58, 5C
13B
DF209
PRESENT
OR
STOREDEGR POSITION SENSOR CIRCUIT
CO.0: Open circuit or short circuit to earth
CC.1: Short circuit to + 12 V
1.DEF: Micro-breaks
NOTESConditions for applying the fault finding procedure to stored faults:
The fault is declared present after the engine is started or following a road test.
Special notes:
If the fault is present:
– there is smoke coming from the exhaust,
– the EGR offset fault finding function is disabled,
– the OBD warning light illuminates after three consecutive driving cycles (starting
+ 5 seconds + switch off the ignition and wait 1 minute).
Use bornier Elé.1681 or Elé.1590 for any operation on the injection computer
connectors.
Priorities when dealing with a number of faults:
–DF012 Sensor supply voltage no. 2 if it is present or stored.
IMPORTANT
This fault can result in a rapid and significant fouling of the particle filter.
If dealing with this fault requires the EGR valve to be replaced, run command SC036
Reinitialise programming and select EGR valve to reinitialise the EGR valve offsets
(see Replacement of components).
WARNING
This fault may appear if the wiring harness has been damaged.
Follow the procedure described in the Wiring Check in the Introduction.
This check enables the condition and the conformity of the engine wiring harness to be checked.
CO.0
NOTESNone
Check the EGR valve connections.
Check the injection computer connections.
Repair if necessary.
Check the continuity and insulation to earth of the following connections:
– connection code 3EL,
– connection code 3GC.
between components 120 and 1460.
If the connection or connections are faulty and there is a repair method (see Technical Note 6015A, Repairing
electrical wiring, Wiring: Precautions for repair), repair the wiring, otherwise replace it.
AFTER REPAIRDeal with any faults.
Carry out a road test followed by another check with the diagnostic tool.
EDC16_V50_DF209/EDC16_V58_DF209/EDC16_V5C_DF209/EDC16_V18_DF209/EDC16_V1C_DF209/EDC16_V20_DF209
Page 116 of 365
13B-116
MR-372-J84-13B200$324.mif
V13
DIESEL INJECTION
Fault finding – Interpretation of faults
EDC16
Program No.: C1
Vdiag no.: 18, 1C, 20,
50, 58, 5C
13B
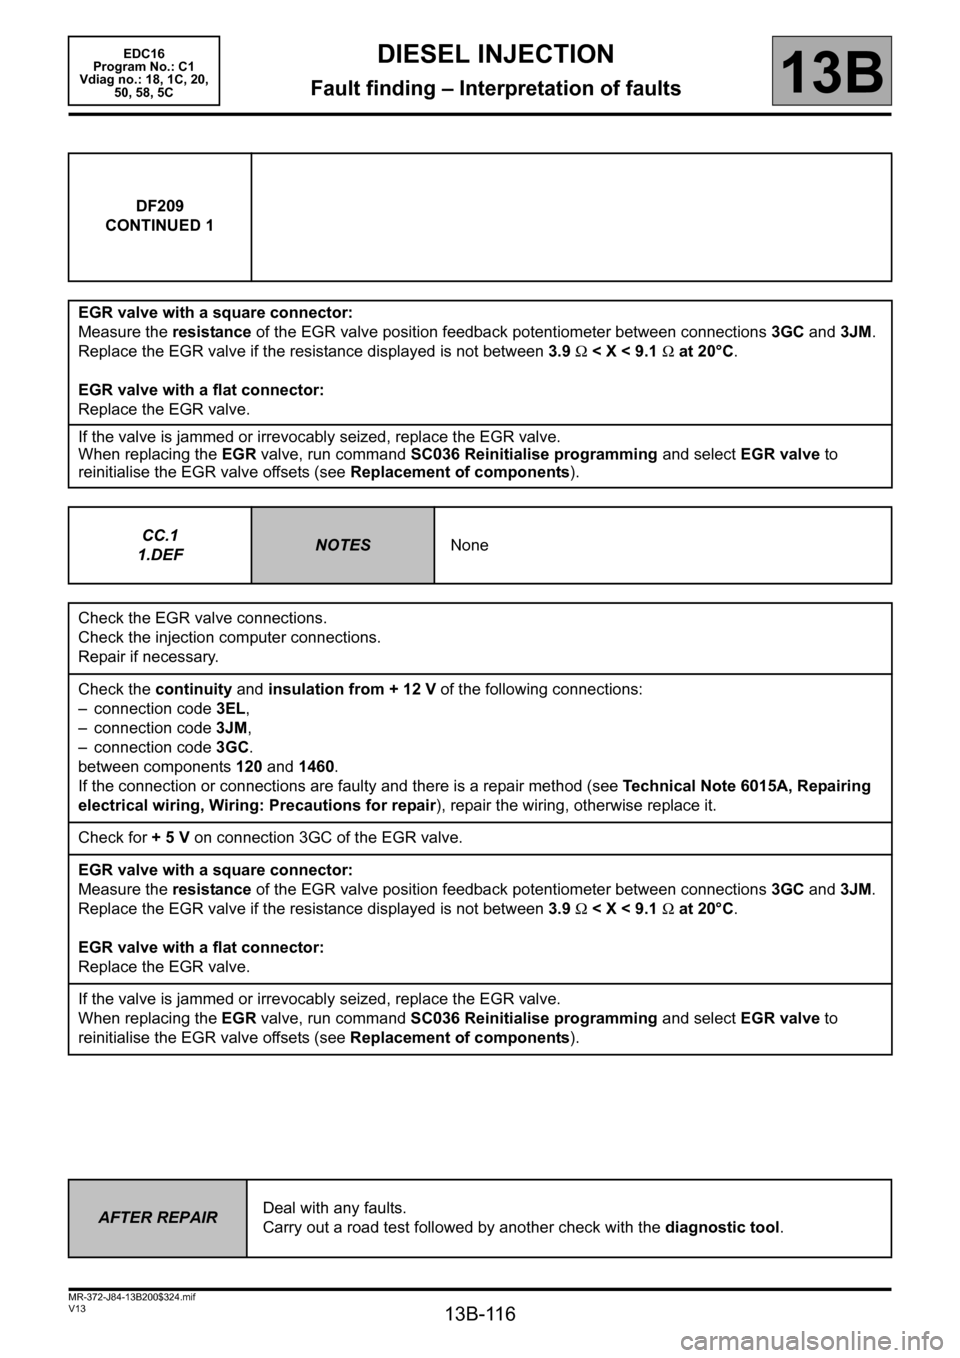
DF209
CONTINUED 1
EGR valve with a square connector:
Measure the resistance of the EGR valve position feedback potentiometer between connections 3GC and 3JM.
Replace the EGR valve if the resistance displayed is not between 3.9 Ω < X < 9.1 Ω at 20°C.
EGR valve with a flat connector:
Replace the EGR valve.
If the valve is jammed or irrevocably seized, replace the EGR valve.
When replacing the EGR valve, run command SC036 Reinitialise programming and select EGR valve to
reinitialise the EGR valve offsets (see Replacement of components).
CC.1
1.DEF
NOTESNone
Check the EGR valve connections.
Check the injection computer connections.
Repair if necessary.
Check the continuity and insulation from + 12 V of the following connections:
– connection code 3EL,
– connection code 3JM,
– connection code 3GC.
between components 120 and 1460.
If the connection or connections are faulty and there is a repair method (see Technical Note 6015A, Repairing
electrical wiring, Wiring: Precautions for repair), repair the wiring, otherwise replace it.
Check for + 5 V on connection 3GC of the EGR valve.
EGR valve with a square connector:
Measure the resistance of the EGR valve position feedback potentiometer between connections 3GC and 3JM.
Replace the EGR valve if the resistance displayed is not between 3.9 Ω < X < 9.1 Ω at 20°C.
EGR valve with a flat connector:
Replace the EGR valve.
If the valve is jammed or irrevocably seized, replace the EGR valve.
When replacing the EGR valve, run command SC036 Reinitialise programming and select EGR valve to
reinitialise the EGR valve offsets (see Replacement of components).
AFTER REPAIRDeal with any faults.
Carry out a road test followed by another check with the diagnostic tool.
Page 117 of 365

13B-117
MR-372-J84-13B200$324.mif
V13
DIESEL INJECTION
Fault finding – Interpretation of faults
EDC16
Program No.: C1
Vdiag no.: 18, 1C, 20,
50, 58, 5C
13B
DF209
CONTINUED 2
Check for + 5 V on connection 3GC of the EGR valve.
EGR valve with a square connector:
Measure the resistance of the EGR valve position feedback potentiometer between connections 3GC and 3JM.
Replace the EGR valve if the resistance displayed is not between 3.9 Ω < X < 9.1 Ω at 20°C.
EGR valve with a flat connector:
Replace the EGR valve.
If the valve is jammed or irrevocably seized, replace the EGR valve.
When replacing the EGR valve, run command SC036 Reinitialise programming and select EGR valve to
reinitialise the EGR valve offsets (see Replacement of components).
AFTER REPAIRDeal with any faults.
Carry out a road test followed by another check with the diagnostic tool.
Page 118 of 365
13B-118
MR-372-J84-13B200$324.mif
V13
DIESEL INJECTION
Fault finding – Interpretation of faults
EDC16
Program No.: C1
Vdiag no.: 18, 1C, 20,
50, 58, 5C
13B
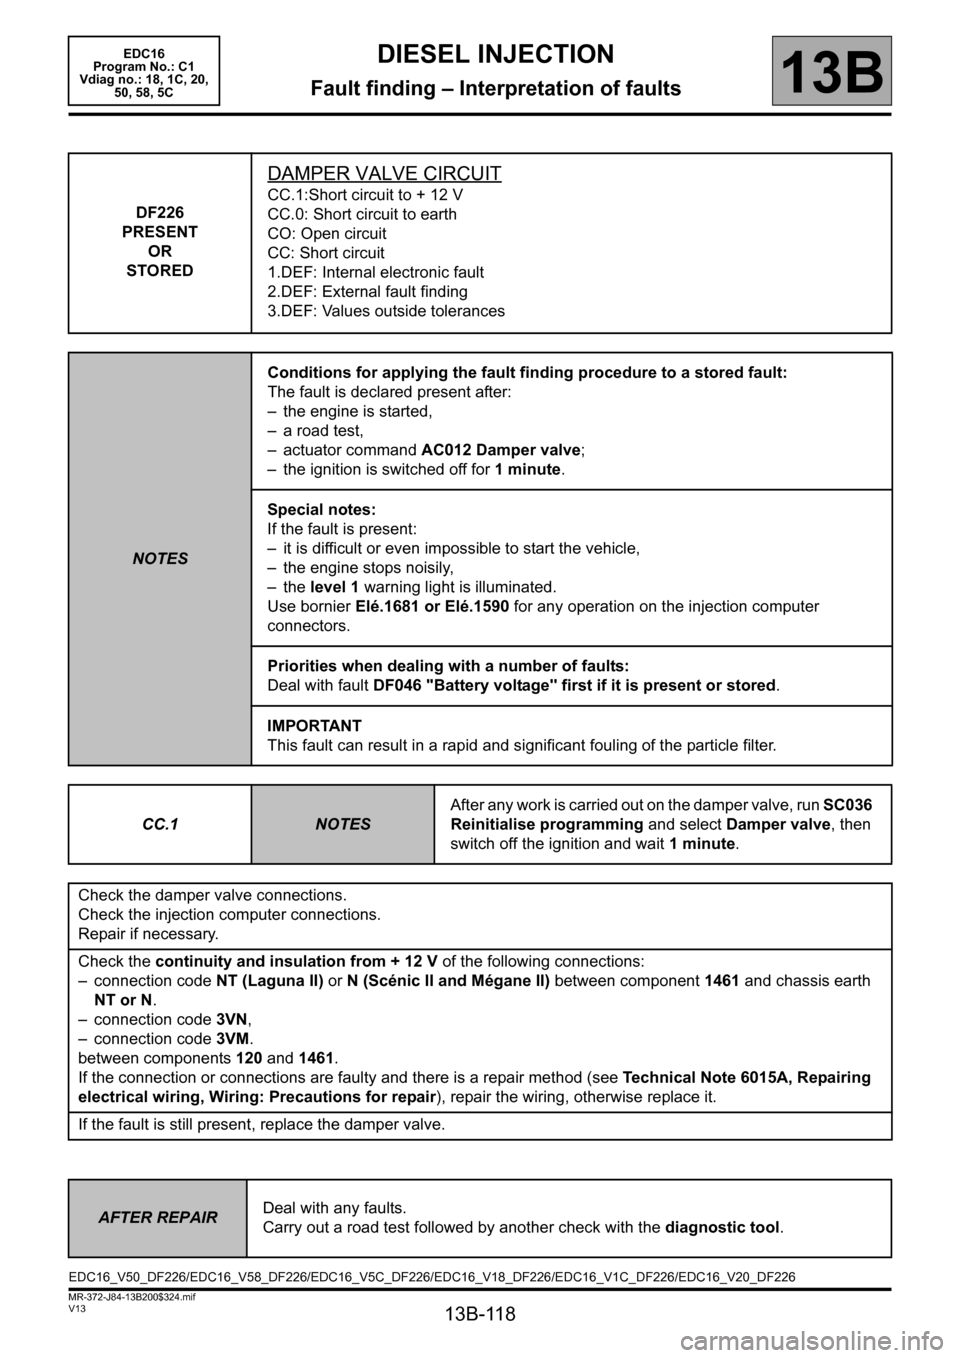
DF226
PRESENT
OR
STORED
DAMPER VALVE CIRCUIT
CC.1:Short circuit to + 12 V
CC.0: Short circuit to earth
CO: Open circuit
CC: Short circuit
1.DEF: Internal electronic fault
2.DEF: External fault finding
3.DEF: Values outside tolerances
NOTESConditions for applying the fault finding procedure to a stored fault:
The fault is declared present after:
– the engine is started,
– a road test,
– actuator command AC012 Damper valve;
– the ignition is switched off for 1 minute.
Special notes:
If the fault is present:
– it is difficult or even impossible to start the vehicle,
– the engine stops noisily,
– the level 1 warning light is illuminated.
Use bornier Elé.1681 or Elé.1590 for any operation on the injection computer
connectors.
Priorities when dealing with a number of faults:
Deal with fault DF046 "Battery voltage" first if it is present or stored.
IMPORTANT
This fault can result in a rapid and significant fouling of the particle filter.
CC.1
NOTESAfter any work is carried out on the damper valve, run SC036
Reinitialise programming and select Damper valve, then
switch off the ignition and wait 1 minute.
Check the damper valve connections.
Check the injection computer connections.
Repair if necessary.
Check the continuity and insulation from + 12 V of the following connections:
– connection code NT (Laguna II) or N (Scénic II and Mégane II) between component 1461 and chassis earth
NT or N.
– connection code 3VN,
– connection code 3VM.
between components 120 and 1461.
If the connection or connections are faulty and there is a repair method (see Technical Note 6015A, Repairing
electrical wiring, Wiring: Precautions for repair), repair the wiring, otherwise replace it.
If the fault is still present, replace the damper valve.
AFTER REPAIRDeal with any faults.
Carry out a road test followed by another check with the diagnostic tool.
EDC16_V50_DF226/EDC16_V58_DF226/EDC16_V5C_DF226/EDC16_V18_DF226/EDC16_V1C_DF226/EDC16_V20_DF226
Page 119 of 365
13B-119
MR-372-J84-13B200$324.mif
V13
DIESEL INJECTION
Fault finding – Interpretation of faults
EDC16
Program No.: C1
Vdiag no.: 18, 1C, 20,
50, 58, 5C
13B
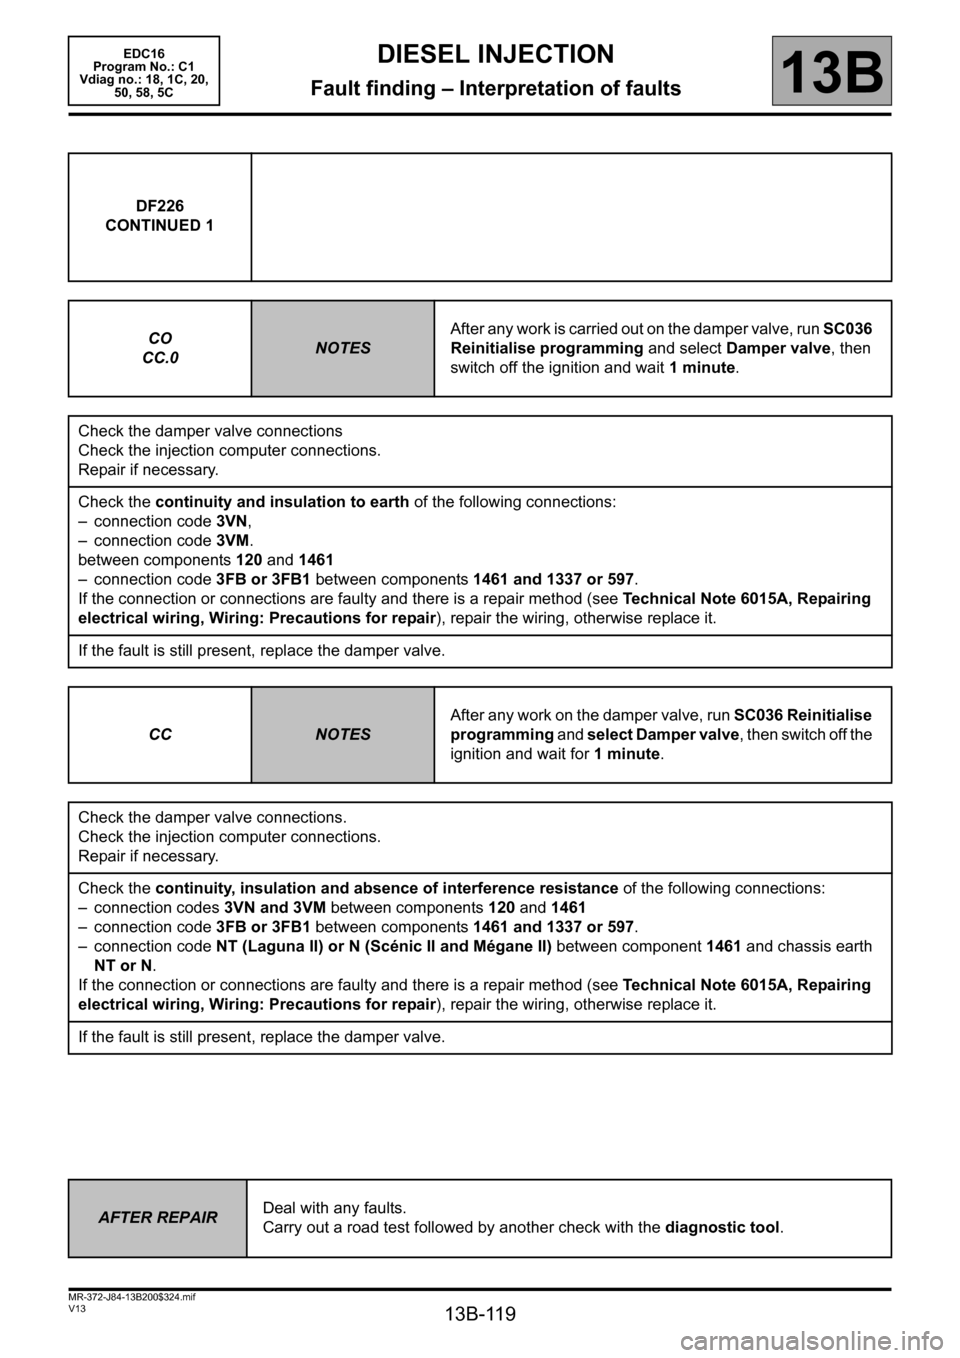
DF226
CONTINUED 1
CO
CC.0
NOTESAfter any work is carried out on the damper valve, run SC036
Reinitialise programming and select Damper valve, then
switch off the ignition and wait 1 minute.
Check the damper valve connections
Check the injection computer connections.
Repair if necessary.
Check the continuity and insulation to earth of the following connections:
– connection code 3VN,
– connection code 3VM.
between components 120 and 1461
– connection code 3FB or 3FB1 between components 1461 and 1337 or 597.
If the connection or connections are faulty and there is a repair method (see Technical Note 6015A, Repairing
electrical wiring, Wiring: Precautions for repair), repair the wiring, otherwise replace it.
If the fault is still present, replace the damper valve.
CC
NOTESAfter any work on the damper valve, run SC036 Reinitialise
programming and select Damper valve, then switch off the
ignition and wait for 1 minute.
Check the damper valve connections.
Check the injection computer connections.
Repair if necessary.
Check the continuity, insulation and absence of interference resistance of the following connections:
– connection codes 3VN and 3VM between components 120 and 1461
– connection code 3FB or 3FB1 between components 1461 and 1337 or 597.
– connection code NT (Laguna II) or N (Scénic II and Mégane II) between component 1461 and chassis earth
NT or N.
If the connection or connections are faulty and there is a repair method (see Technical Note 6015A, Repairing
electrical wiring, Wiring: Precautions for repair), repair the wiring, otherwise replace it.
If the fault is still present, replace the damper valve.
AFTER REPAIRDeal with any faults.
Carry out a road test followed by another check with the diagnostic tool.
Page 120 of 365
13B-120
MR-372-J84-13B200$324.mif
V13
DIESEL INJECTION
Fault finding – Interpretation of faults
EDC16
Program No.: C1
Vdiag no.: 18, 1C, 20,
50, 58, 5C
13B
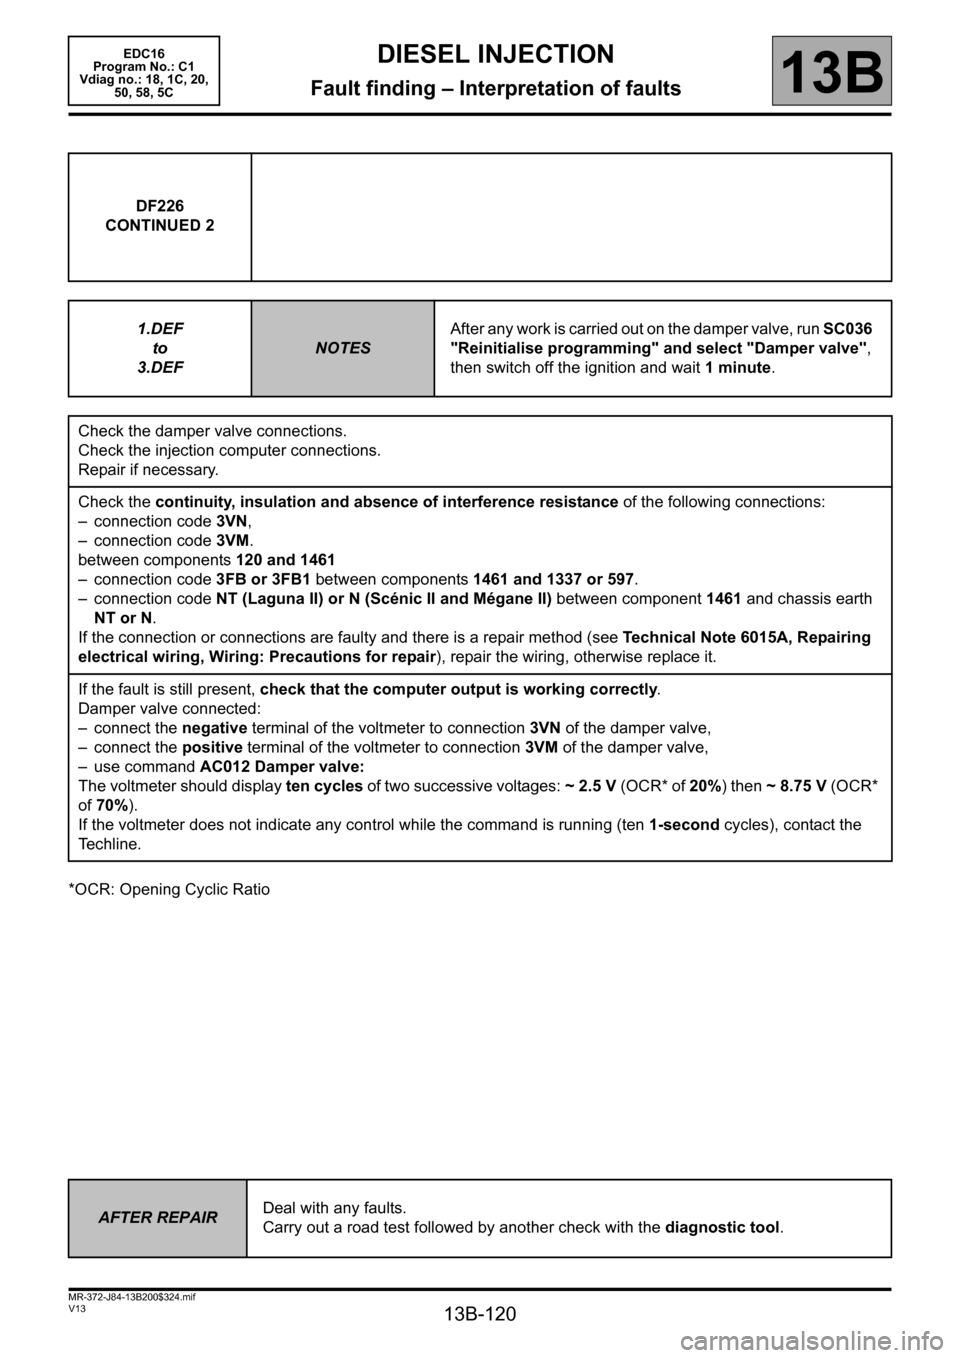
*OCR: Opening Cyclic RatioDF226
CONTINUED 2
1.DEF
to
3.DEF
NOTESAfter any work is carried out on the damper valve, run SC036
"Reinitialise programming" and select "Damper valve",
then switch off the ignition and wait 1 minute.
Check the damper valve connections.
Check the injection computer connections.
Repair if necessary.
Check the continuity, insulation and absence of interference resistance of the following connections:
– connection code 3VN,
– connection code 3VM.
between components 120 and 1461
– connection code 3FB or 3FB1 between components 1461 and 1337 or 597.
– connection code NT (Laguna II) or N (Scénic II and Mégane II) between component 1461 and chassis earth
NT or N.
If the connection or connections are faulty and there is a repair method (see Technical Note 6015A, Repairing
electrical wiring, Wiring: Precautions for repair), repair the wiring, otherwise replace it.
If the fault is still present, check that the computer output is working correctly.
Damper valve connected:
– connect the negative terminal of the voltmeter to connection 3VN of the damper valve,
– connect the positive terminal of the voltmeter to connection 3VM of the damper valve,
– use command AC012 Damper valve:
The voltmeter should display ten cycles of two successive voltages: ~2.5V (OCR* of 20%) then ~8.75V (OCR*
of 70%).
If the voltmeter does not indicate any control while the command is running (ten 1-second cycles), contact the
Techline.
AFTER REPAIRDeal with any faults.
Carry out a road test followed by another check with the diagnostic tool.