air condition RENAULT SCENIC 2011 J95 / 3.G Engine And Peripherals EDC16 Workshop Manual
[x] Cancel search | Manufacturer: RENAULT, Model Year: 2011, Model line: SCENIC, Model: RENAULT SCENIC 2011 J95 / 3.GPages: 365, PDF Size: 2.11 MB
Page 310 of 365
13B-310
MR-372-J84-13B200$756.mif
V13
DIESEL INJECTION
Fault finding – Interpretation of commands
EDC16
Program No: C1
Vdiag No: 18, 1C, 20,
50, 58, 5C
13B
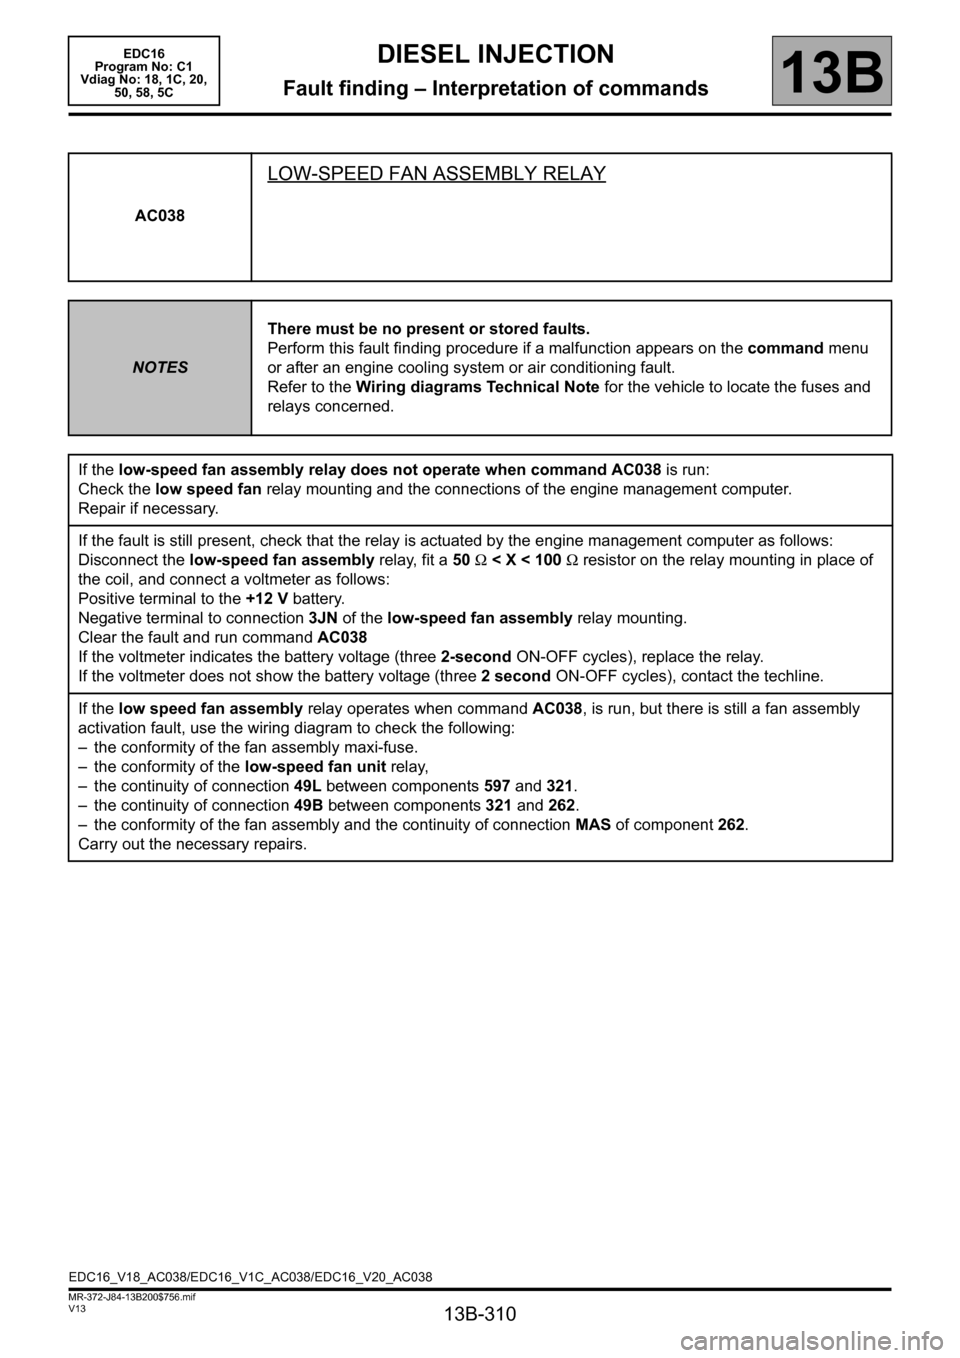
AC038
LOW-SPEED FAN ASSEMBLY RELAY
NOTESThere must be no present or stored faults.
Perform this fault finding procedure if a malfunction appears on the command menu
or after an engine cooling system or air conditioning fault.
Refer to the Wiring diagrams Technical Note for the vehicle to locate the fuses and
relays concerned.
If the low-speed fan assembly relay does not operate when command AC038 is run:
Check the low speed fan relay mounting and the connections of the engine management computer.
Repair if necessary.
If the fault is still present, check that the relay is actuated by the engine management computer as follows:
Disconnect the low-speed fan assembly relay, fit a 50 Ω < X < 100 Ω resistor on the relay mounting in place of
the coil, and connect a voltmeter as follows:
Positive terminal to the +12 V battery.
Negative terminal to connection 3JN of the low-speed fan assembly relay mounting.
Clear the fault and run command AC038
If the voltmeter indicates the battery voltage (three 2-second ON-OFF cycles), replace the relay.
If the voltmeter does not show the battery voltage (three 2 second ON-OFF cycles), contact the techline.
If the low speed fan assembly relay operates when command AC038, is run, but there is still a fan assembly
activation fault, use the wiring diagram to check the following:
– the conformity of the fan assembly maxi-fuse.
– the conformity of the low-speed fan unit relay,
– the continuity of connection 49L between components 597 and 321.
– the continuity of connection 49B between components 321 and 262.
– the conformity of the fan assembly and the continuity of connection MAS of component 262.
Carry out the necessary repairs.
EDC16_V18_AC038/EDC16_V1C_AC038/EDC16_V20_AC038
Page 311 of 365
13B-311
MR-372-J84-13B200$756.mif
V13
DIESEL INJECTION
Fault finding – Interpretation of commands
EDC16
Program No: C1
Vdiag No: 18, 1C, 20,
50, 58, 5C
13B
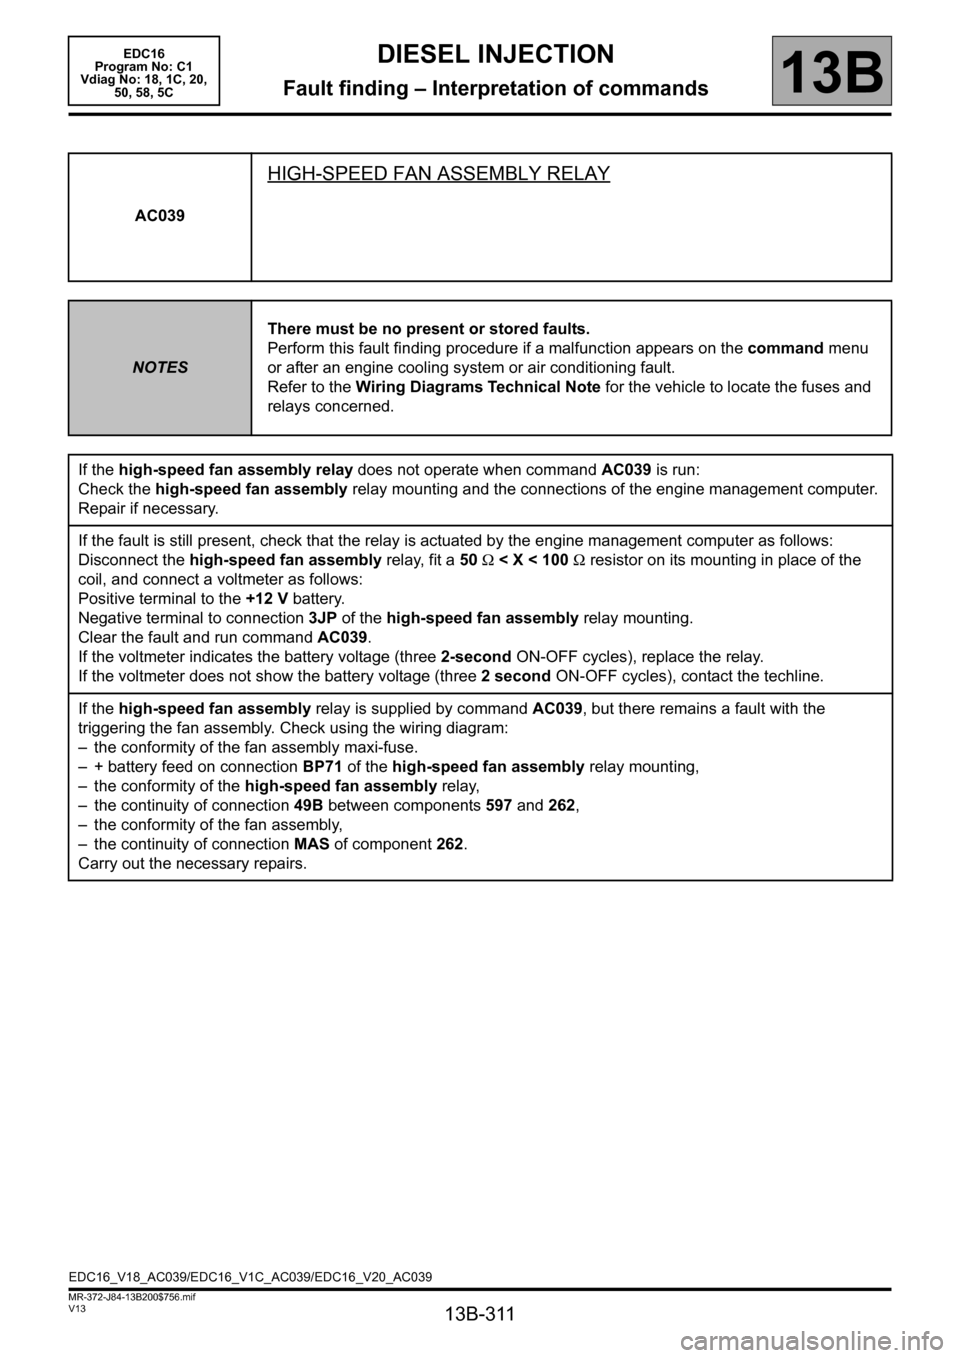
AC039
HIGH-SPEED FAN ASSEMBLY RELAY
NOTESThere must be no present or stored faults.
Perform this fault finding procedure if a malfunction appears on the command menu
or after an engine cooling system or air conditioning fault.
Refer to the Wiring Diagrams Technical Note for the vehicle to locate the fuses and
relays concerned.
If the high-speed fan assembly relay does not operate when command AC039 is run:
Check the high-speed fan assembly relay mounting and the connections of the engine management computer.
Repair if necessary.
If the fault is still present, check that the relay is actuated by the engine management computer as follows:
Disconnect the high-speed fan assembly relay, fit a 50 Ω < X < 100 Ω resistor on its mounting in place of the
coil, and connect a voltmeter as follows:
Positive terminal to the +12 V battery.
Negative terminal to connection 3JP of the high-speed fan assembly relay mounting.
Clear the fault and run command AC039.
If the voltmeter indicates the battery voltage (three 2-second ON-OFF cycles), replace the relay.
If the voltmeter does not show the battery voltage (three 2 second ON-OFF cycles), contact the techline.
If the high-speed fan assembly relay is supplied by command AC039, but there remains a fault with the
triggering the fan assembly. Check using the wiring diagram:
– the conformity of the fan assembly maxi-fuse.
– + battery feed on connection BP71 of the high-speed fan assembly relay mounting,
– the conformity of the high-speed fan assembly relay,
– the continuity of connection 49B between components 597 and 262,
– the conformity of the fan assembly,
– the continuity of connection MAS of component 262.
Carry out the necessary repairs.
EDC16_V18_AC039/EDC16_V1C_AC039/EDC16_V20_AC039
Page 318 of 365
13B-318
MR-372-J84-13B200$828.mif
V13
13B
DIESEL INJECTION
Fault finding – Fault Finding Chart
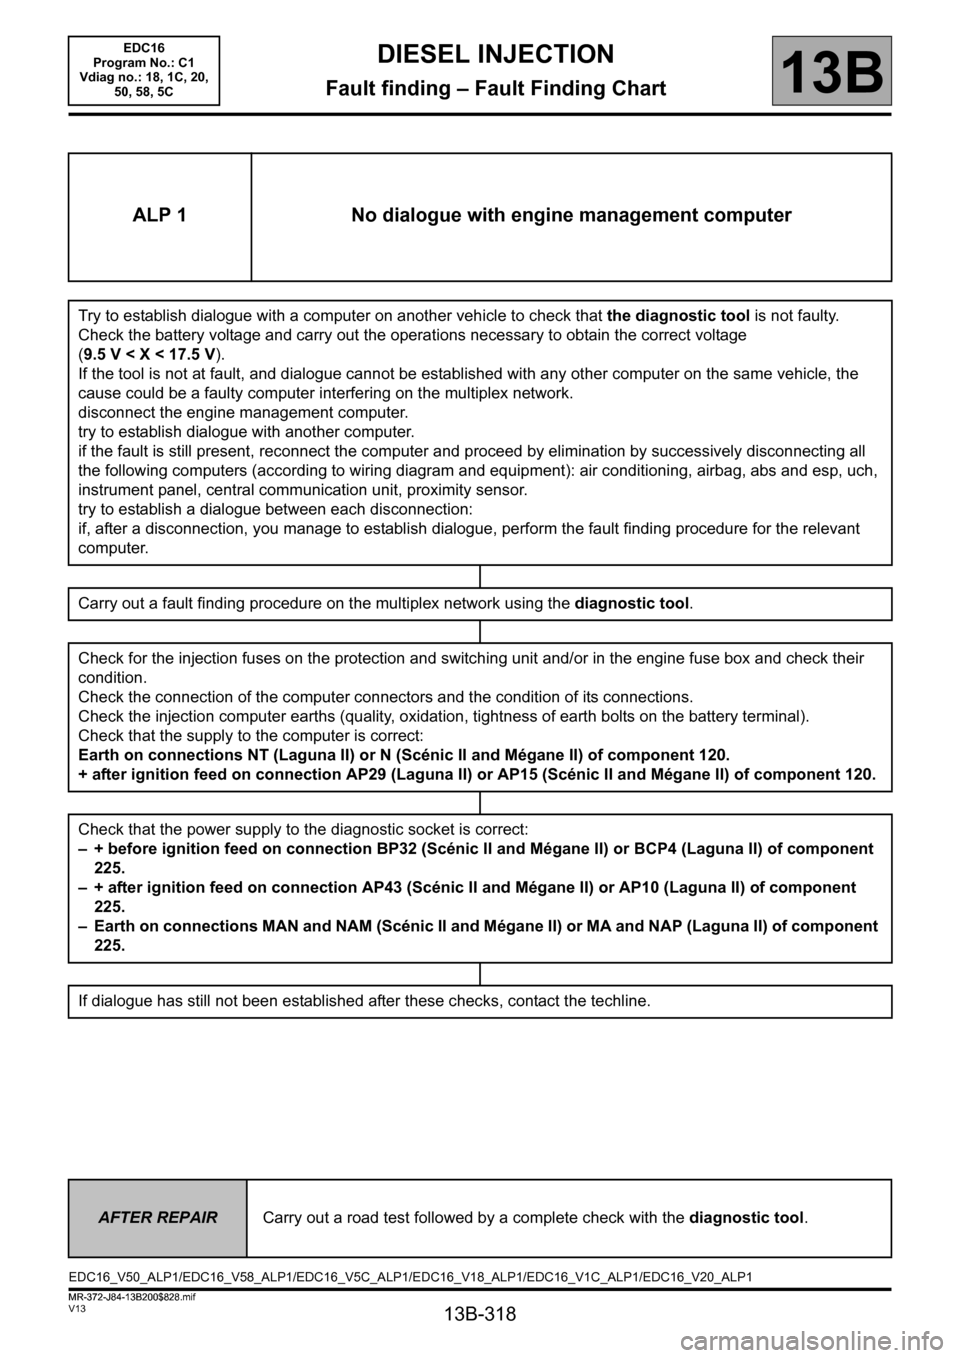
ALP 1 No dialogue with engine management computer
Try to establish dialogue with a computer on another vehicle to check that the diagnostic tool is not faulty.
Check the battery voltage and carry out the operations necessary to obtain the correct voltage
(9.5V
cause could be a faulty computer interfering on the multiplex network.
disconnect the engine management computer.
try to establish dialogue with another computer.
if the fault is still present, reconnect the computer and proceed by elimination by successively disconnecting all
the following computers (according to wiring diagram and equipment): air conditioning, airbag, abs and esp, uch,
instrument panel, central communication unit, proximity sensor.
try to establish a dialogue between each disconnection:
if, after a disconnection, you manage to establish dialogue, perform the fault finding procedure for the relevant
computer.
Carry out a fault finding procedure on the multiplex network using the diagnostic tool.
Check for the injection fuses on the protection and switching unit and/or in the engine fuse box and check their
condition.
Check the connection of the computer connectors and the condition of its connections.
Check the injection computer earths (quality, oxidation, tightness of earth bolts on the battery terminal).
Check that the supply to the computer is correct:
Earth on connections NT (Laguna II) or N (Scénic II and Mégane II) of component 120.
+ after ignition feed on connection AP29 (Laguna II) or AP15 (Scénic II and Mégane II) of component 120.
Check that the power supply to the diagnostic socket is correct:
– + before ignition feed on connection BP32 (Scénic II and Mégane II) or BCP4 (Laguna II) of component
225.
– + after ignition feed on connection AP43 (Scénic II and Mégane II) or AP10 (Laguna II) of component
225.
– Earth on connections MAN and NAM (Scénic II and Mégane II) or MA and NAP (Laguna II) of component
225.
If dialogue has still not been established after these checks, contact the techline.
AFTER REPAIRCarry out a road test followed by a complete check with the diagnostic tool.
EDC16_V50_ALP1/EDC16_V58_ALP1/EDC16_V5C_ALP1/EDC16_V18_ALP1/EDC16_V1C_ALP1/EDC16_V20_ALP1 EDC16
Program No.: C1
Vdiag no.: 18, 1C, 20,
50, 58, 5C
MR-372-J84-13B200$828.mif
Page 319 of 365
13B-319
MR-372-J84-13B200$828.mif
V13
EDC16
Program No.: C1
Vdiag no.: 18, 1C, 20,
50, 58, 5CDIESEL INJECTION
Fault finding – Fault Finding Chart13B
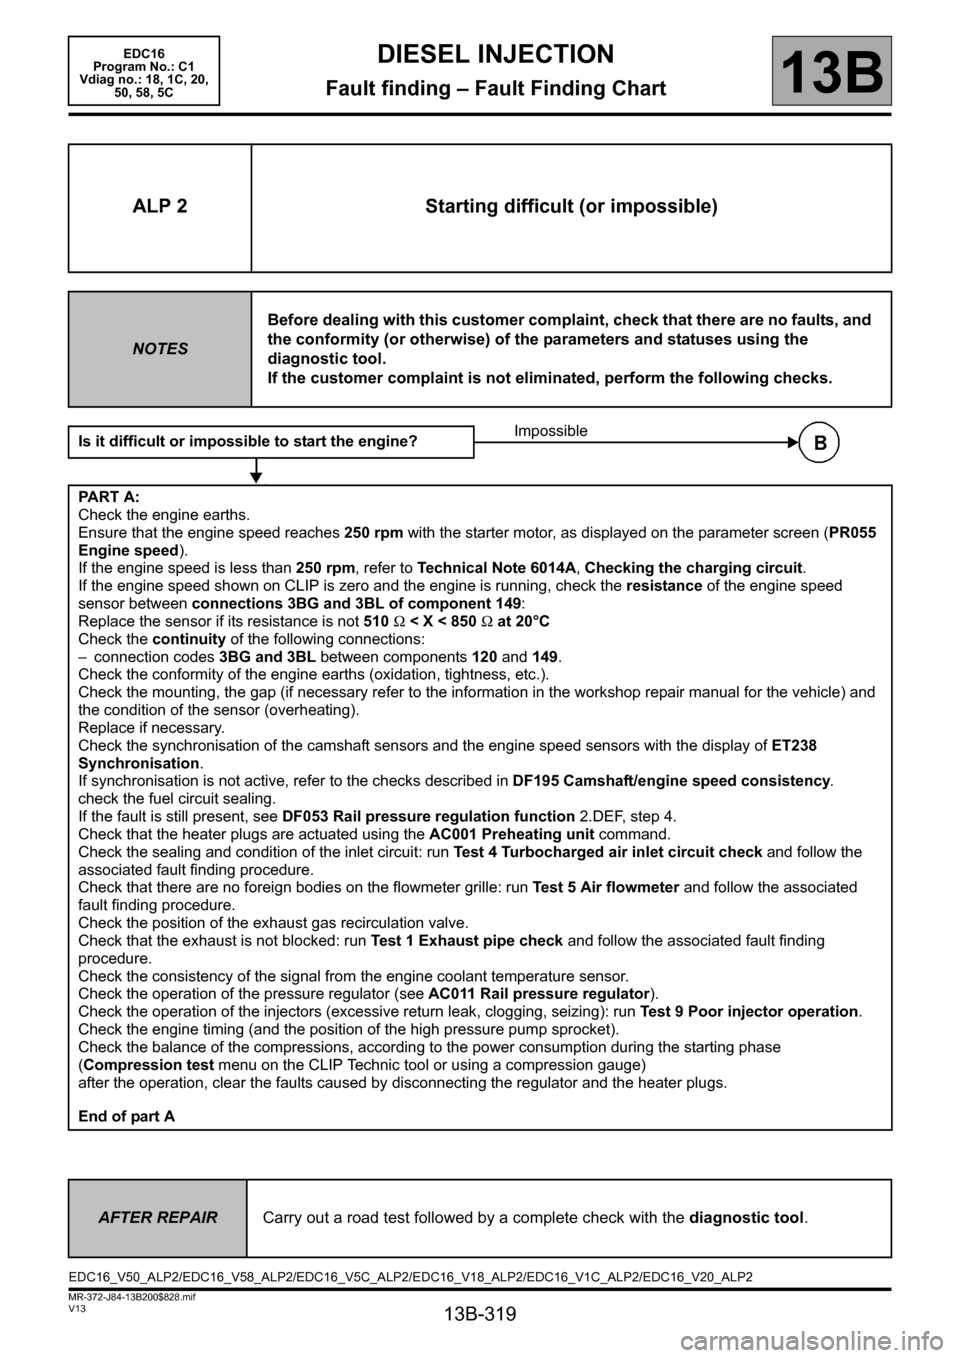
ALP 2 Starting difficult (or impossible)
NOTESBefore dealing with this customer complaint, check that there are no faults, and
the conformity (or otherwise) of the parameters and statuses using the
diagnostic tool.
If the customer complaint is not eliminated, perform the following checks.
Is it difficult or impossible to start the engine?
PART A:
Check the engine earths.
Ensure that the engine speed reaches 250 rpm with the starter motor, as displayed on the parameter screen (PR055
Engine speed).
If the engine speed is less than 250 rpm, refer to Technical Note 6014A, Checking the charging circuit.
If the engine speed shown on CLIP is zero and the engine is running, check the resistance of the engine speed
sensor between connections 3BG and 3BL of component 149:
Replace the sensor if its resistance is not 510 Ω < X < 850 Ω at 20°C
Check the continuity of the following connections:
– connection codes 3BG and 3BL between components 120 and 149.
Check the conformity of the engine earths (oxidation, tightness, etc.).
Check the mounting, the gap (if necessary refer to the information in the workshop repair manual for the vehicle) and
the condition of the sensor (overheating).
Replace if necessary.
Check the synchronisation of the camshaft sensors and the engine speed sensors with the display of ET238
Synchronisation.
If synchronisation is not active, refer to the checks described in DF195 Camshaft/engine speed consistency.
check the fuel circuit sealing.
If the fault is still present, see DF053 Rail pressure regulation function 2.DEF, step 4.
Check that the heater plugs are actuated using the AC001 Preheating unit command.
Check the sealing and condition of the inlet circuit: run Test 4 Turbocharged air inlet circuit check and follow the
associated fault finding procedure.
Check that there are no foreign bodies on the flowmeter grille: run Test 5 Air flowmeter and follow the associated
fault finding procedure.
Check the position of the exhaust gas recirculation valve.
Check that the exhaust is not blocked: run Test 1 Exhaust pipe check and follow the associated fault finding
procedure.
Check the consistency of the signal from the engine coolant temperature sensor.
Check the operation of the pressure regulator (see AC011 Rail pressure regulator).
Check the operation of the injectors (excessive return leak, clogging, seizing): run Test 9 Poor injector operation.
Check the engine timing (and the position of the high pressure pump sprocket).
Check the balance of the compressions, according to the power consumption during the starting phase
(Compression test menu on the CLIP Technic tool or using a compression gauge)
after the operation, clear the faults caused by disconnecting the regulator and the heater plugs.
End of part AImpossible
AFTER REPAIRCarry out a road test followed by a complete check with the diagnostic tool.
EDC16_V50_ALP2/EDC16_V58_ALP2/EDC16_V5C_ALP2/EDC16_V18_ALP2/EDC16_V1C_ALP2/EDC16_V20_ALP2
Page 321 of 365
13B-321
MR-372-J84-13B200$828.mif
V13
DIESEL INJECTION
Fault finding – Fault Finding Chart
EDC16
Program No.: C1
Vdiag no.: 18, 1C, 20,
50, 58, 5C
13B
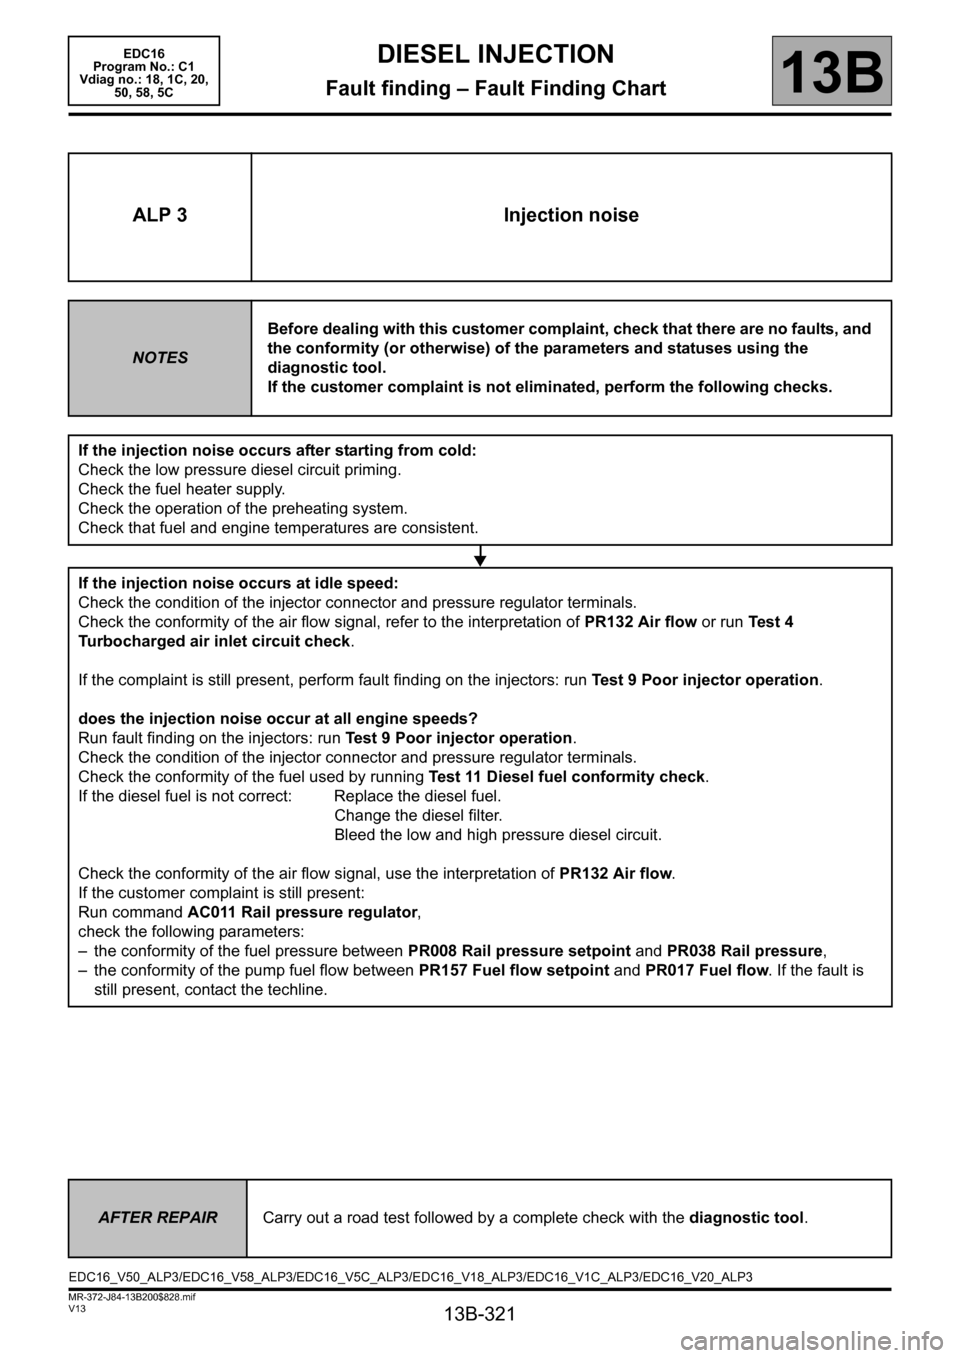
ALP 3 Injection noise
NOTESBefore dealing with this customer complaint, check that there are no faults, and
the conformity (or otherwise) of the parameters and statuses using the
diagnostic tool.
If the customer complaint is not eliminated, perform the following checks.
If the injection noise occurs after starting from cold:
Check the low pressure diesel circuit priming.
Check the fuel heater supply.
Check the operation of the preheating system.
Check that fuel and engine temperatures are consistent.
If the injection noise occurs at idle speed:
Check the condition of the injector connector and pressure regulator terminals.
Check the conformity of the air flow signal, refer to the interpretation of PR132 Air flow or run Test 4
Turbocharged air inlet circuit check.
If the complaint is still present, perform fault finding on the injectors: run Test 9 Poor injector operation.
does the injection noise occur at all engine speeds?
Run fault finding on the injectors: run Test 9 Poor injector operation.
Check the condition of the injector connector and pressure regulator terminals.
Check the conformity of the fuel used by running Test 11 Diesel fuel conformity check.
If the diesel fuel is not correct: Replace the diesel fuel.
Change the diesel filter.
Bleed the low and high pressure diesel circuit.
Check the conformity of the air flow signal, use the interpretation of PR132 Air flow.
If the customer complaint is still present:
Run command AC011 Rail pressure regulator,
check the following parameters:
– the conformity of the fuel pressure between PR008 Rail pressure setpoint and PR038 Rail pressure,
– the conformity of the pump fuel flow between PR157 Fuel flow setpoint and PR017 Fuel flow. If the fault is
still present, contact the techline.
AFTER REPAIRCarry out a road test followed by a complete check with the diagnostic tool.
EDC16_V50_ALP3/EDC16_V58_ALP3/EDC16_V5C_ALP3/EDC16_V18_ALP3/EDC16_V1C_ALP3/EDC16_V20_ALP3
Page 322 of 365
13B-322
MR-372-J84-13B200$828.mif
V13
EDC16
Program No.: C1
Vdiag no.: 18, 1C, 20,
50, 58, 5CDIESEL INJECTION
Fault finding – Fault Finding Chart13B
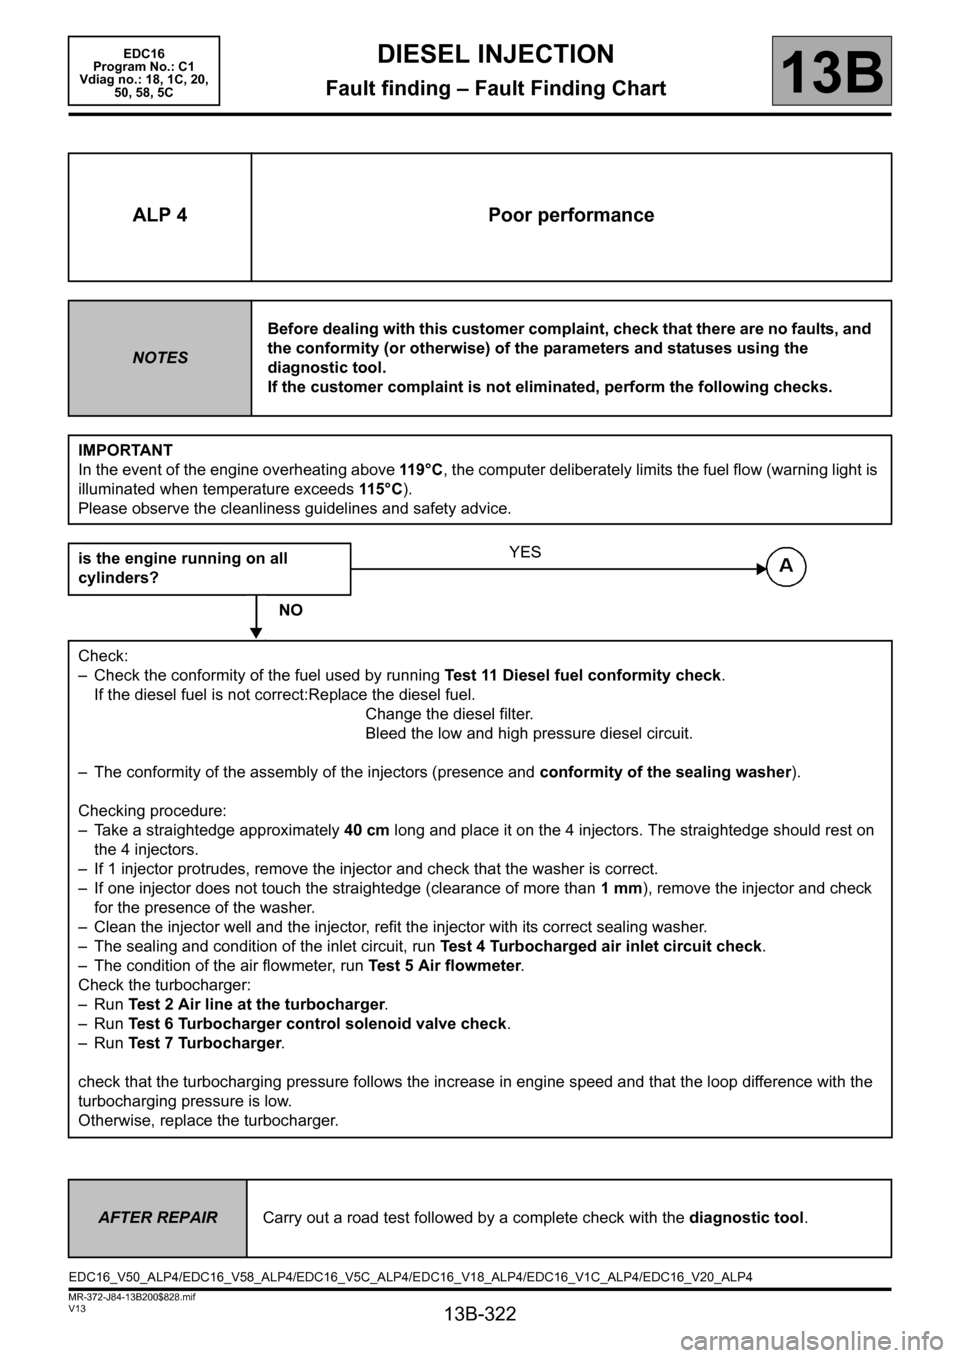
ALP 4 Poor performance
NOTESBefore dealing with this customer complaint, check that there are no faults, and
the conformity (or otherwise) of the parameters and statuses using the
diagnostic tool.
If the customer complaint is not eliminated, perform the following checks.
IMPORTANT
In the event of the engine overheating above 119°C, the computer deliberately limits the fuel flow (warning light is
illuminated when temperature exceeds 115 ° C).
Please observe the cleanliness guidelines and safety advice.
is the engine running on all
cylinders?
NO
Check:
– Check the conformity of the fuel used by running Test 11 Diesel fuel conformity check.
If the diesel fuel is not correct:Replace the diesel fuel.
Change the diesel filter.
Bleed the low and high pressure diesel circuit.
– The conformity of the assembly of the injectors (presence and conformity of the sealing washer).
Checking procedure:
– Take a straightedge approximately 40 cm long and place it on the 4 injectors. The straightedge should rest on
the 4 injectors.
– If 1 injector protrudes, remove the injector and check that the washer is correct.
– If one injector does not touch the straightedge (clearance of more than 1 mm), remove the injector and check
for the presence of the washer.
– Clean the injector well and the injector, refit the injector with its correct sealing washer.
– The sealing and condition of the inlet circuit, run Test 4 Turbocharged air inlet circuit check.
– The condition of the air flowmeter, run Test 5 Air flowmeter.
Check the turbocharger:
–Run Test 2 Air line at the turbocharger.
–Run Test 6 Turbocharger control solenoid valve check.
–Run Test 7 Turbocharger.
check that the turbocharging pressure follows the increase in engine speed and that the loop difference with the
turbocharging pressure is low.
Otherwise, replace the turbocharger.
YES
AFTER REPAIRCarry out a road test followed by a complete check with the diagnostic tool.
EDC16_V50_ALP4/EDC16_V58_ALP4/EDC16_V5C_ALP4/EDC16_V18_ALP4/EDC16_V1C_ALP4/EDC16_V20_ALP4
Page 324 of 365
13B-324
MR-372-J84-13B200$828.mif
V13
DIESEL INJECTION
Fault finding – Fault Finding Chart
EDC16
Program No.: C1
Vdiag no.: 18, 1C, 20,
50, 58, 5C
13B
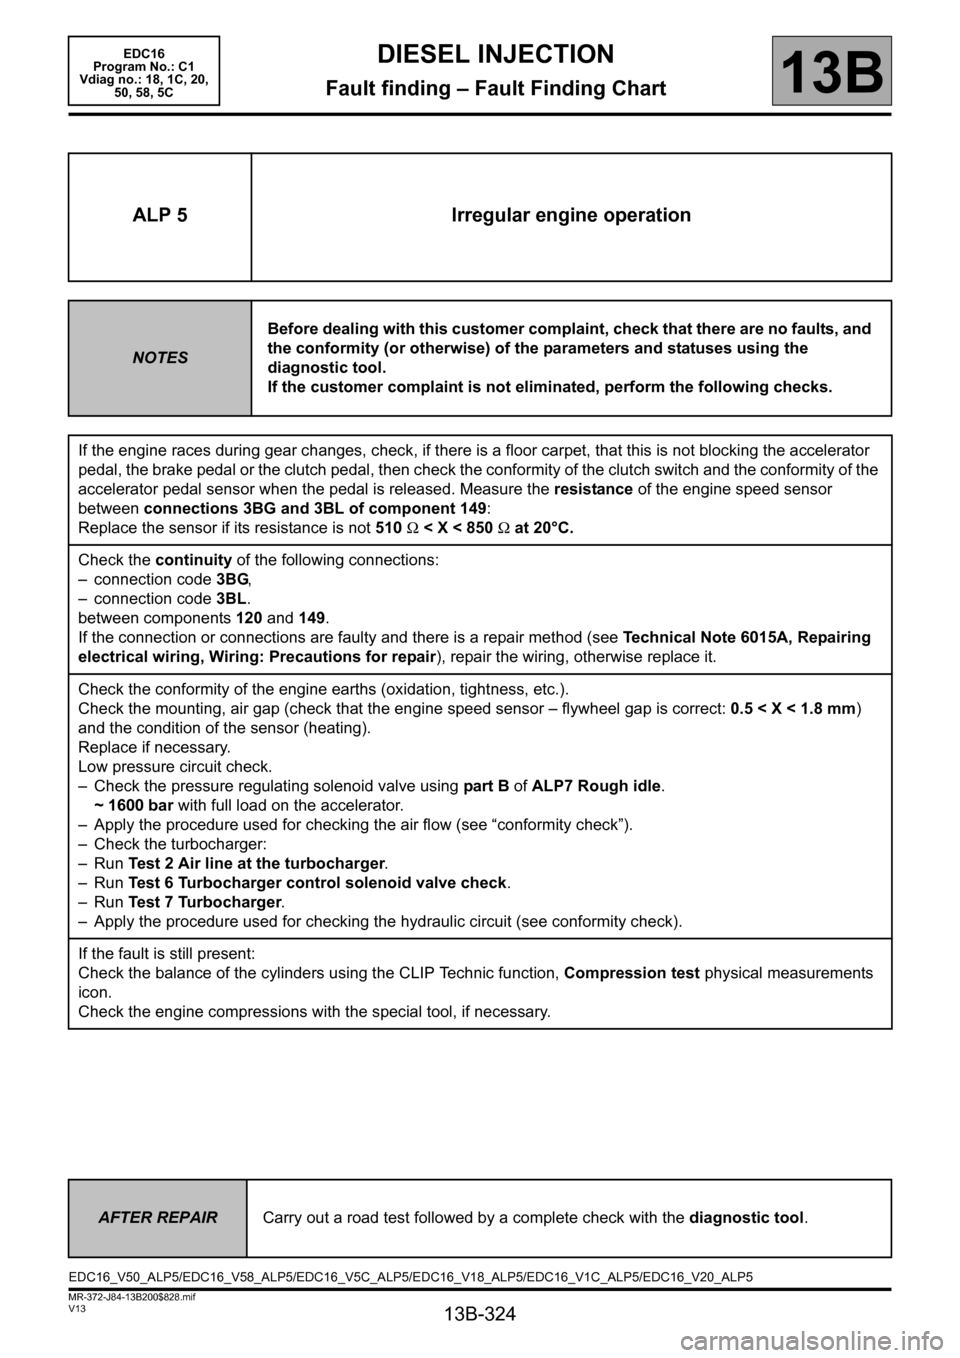
ALP 5 Irregular engine operation
NOTESBefore dealing with this customer complaint, check that there are no faults, and
the conformity (or otherwise) of the parameters and statuses using the
diagnostic tool.
If the customer complaint is not eliminated, perform the following checks.
If the engine races during gear changes, check, if there is a floor carpet, that this is not blocking the accelerator
pedal, the brake pedal or the clutch pedal, then check the conformity of the clutch switch and the conformity of the
accelerator pedal sensor when the pedal is released. Measure the resistance of the engine speed sensor
between connections 3BG and 3BL of component 149:
Replace the sensor if its resistance is not 510 Ω < X < 850 Ω at 20°C.
Check the continuity of the following connections:
– connection code 3BG,
– connection code 3BL.
between components 120 and 149.
If the connection or connections are faulty and there is a repair method (see Technical Note 6015A, Repairing
electrical wiring, Wiring: Precautions for repair), repair the wiring, otherwise replace it.
Check the conformity of the engine earths (oxidation, tightness, etc.).
Check the mounting, air gap (check that the engine speed sensor – flywheel gap is correct: 0.5 < X < 1.8 mm)
and the condition of the sensor (heating).
Replace if necessary.
Low pressure circuit check.
– Check the pressure regulating solenoid valve using part B of ALP7 Rough idle.
~ 1600 bar with full load on the accelerator.
– Apply the procedure used for checking the air flow (see “conformity check”).
– Check the turbocharger:
–Run Test 2 Air line at the turbocharger.
–Run Test 6 Turbocharger control solenoid valve check.
–Run Test 7 Turbocharger.
– Apply the procedure used for checking the hydraulic circuit (see conformity check).
If the fault is still present:
Check the balance of the cylinders using the CLIP Technic function, Compression test physical measurements
icon.
Check the engine compressions with the special tool, if necessary.
AFTER REPAIRCarry out a road test followed by a complete check with the diagnostic tool.
EDC16_V50_ALP5/EDC16_V58_ALP5/EDC16_V5C_ALP5/EDC16_V18_ALP5/EDC16_V1C_ALP5/EDC16_V20_ALP5
Page 325 of 365
13B-325
MR-372-J84-13B200$828.mif
V13
EDC16
Program No.: C1
Vdiag no.: 18, 1C, 20,
50, 58, 5CDIESEL INJECTION
Fault finding – Fault Finding Chart13B
ALP 6 Fuel system leaks
NOTESBefore dealing with this customer complaint, check that there are no faults, and
the conformity (or otherwise) of the parameters and statuses using the
diagnostic tool.
If the customer complaint is not eliminated, perform the following checks.
IMPORTANT
Please observe the cleanliness guidelines and safety advice.
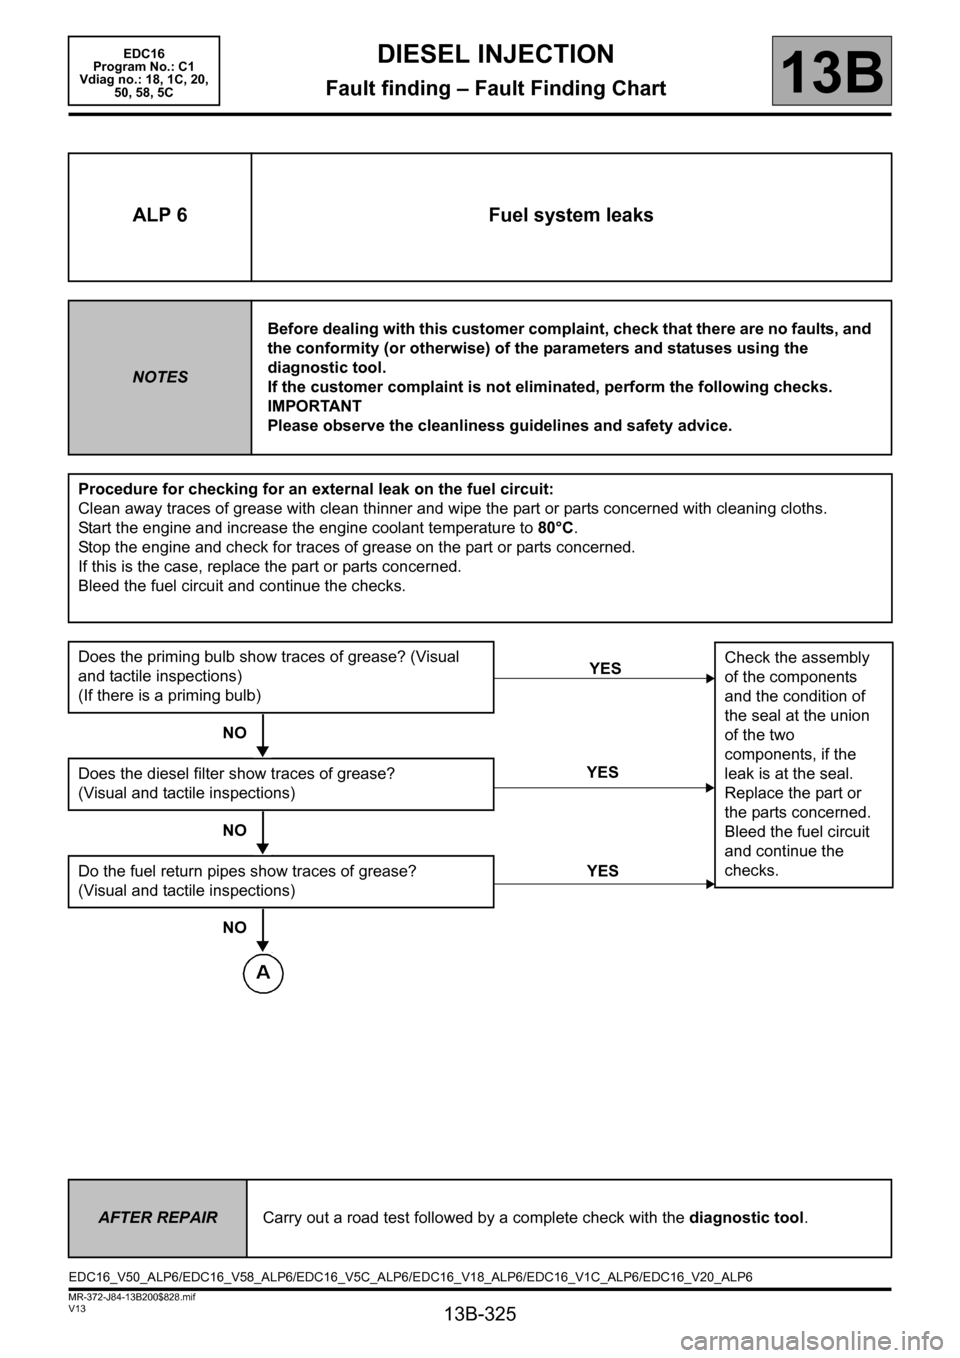
Procedure for checking for an external leak on the fuel circuit:
Clean away traces of grease with clean thinner and wipe the part or parts concerned with cleaning cloths.
Start the engine and increase the engine coolant temperature to 80°C.
Stop the engine and check for traces of grease on the part or parts concerned.
If this is the case, replace the part or parts concerned.
Bleed the fuel circuit and continue the checks.
Does the priming bulb show traces of grease? (Visual
and tactile inspections)
(If there is a priming bulb)
NO
Does the diesel filter show traces of grease?
(Visual and tactile inspections)
NO
Do the fuel return pipes show traces of grease?
(Visual and tactile inspections)
NO
YESCheck the assembly
of the components
and the condition of
the seal at the union
of the two
components, if the
leak is at the seal.
Replace the part or
the parts concerned.
Bleed the fuel circuit
and continue the
checks.
YES
YES
AFTER REPAIRCarry out a road test followed by a complete check with the diagnostic tool.
EDC16_V50_ALP6/EDC16_V58_ALP6/EDC16_V5C_ALP6/EDC16_V18_ALP6/EDC16_V1C_ALP6/EDC16_V20_ALP6
Page 327 of 365
13B-327
MR-372-J84-13B200$828.mif
V13
DIESEL INJECTION
Fault finding – Fault Finding Chart
EDC16
Program No.: C1
Vdiag no.: 18, 1C, 20,
50, 58, 5C
13B
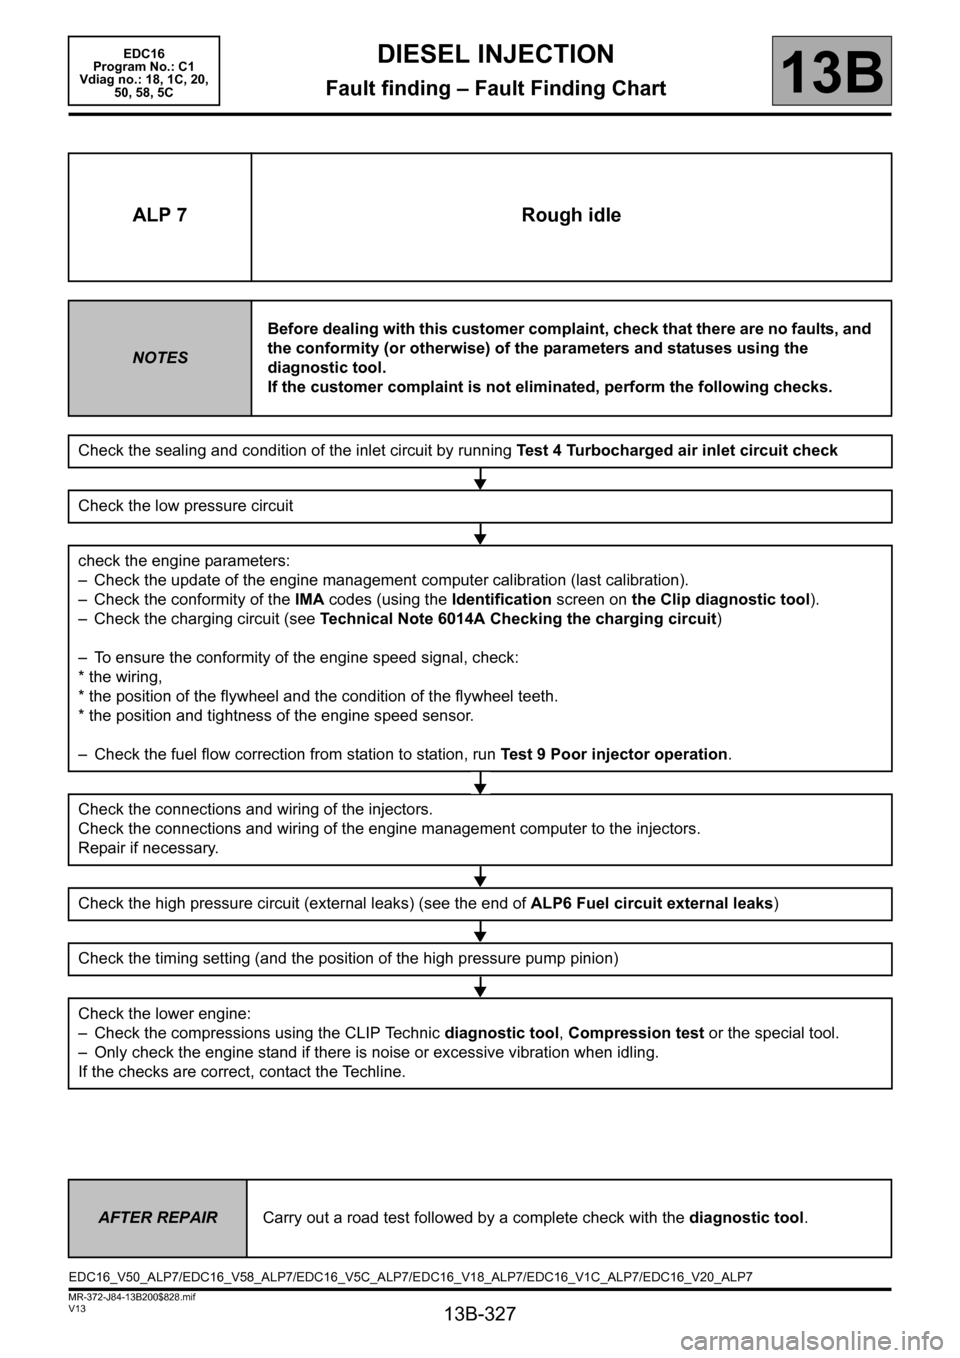
ALP 7 Rough idle
NOTESBefore dealing with this customer complaint, check that there are no faults, and
the conformity (or otherwise) of the parameters and statuses using the
diagnostic tool.
If the customer complaint is not eliminated, perform the following checks.
Check the sealing and condition of the inlet circuit by running Test 4 Turbocharged air inlet circuit check
Check the low pressure circuit
check the engine parameters:
– Check the update of the engine management computer calibration (last calibration).
– Check the conformity of the IMA codes (using the Identification screen on the Clip diagnostic tool).
– Check the charging circuit (see Technical Note 6014A Checking the charging circuit)
– To ensure the conformity of the engine speed signal, check:
* the wiring,
* the position of the flywheel and the condition of the flywheel teeth.
* the position and tightness of the engine speed sensor.
– Check the fuel flow correction from station to station, run Test 9 Poor injector operation.
Check the connections and wiring of the injectors.
Check the connections and wiring of the engine management computer to the injectors.
Repair if necessary.
Check the high pressure circuit (external leaks) (see the end of ALP6 Fuel circuit external leaks)
Check the timing setting (and the position of the high pressure pump pinion)
Check the lower engine:
– Check the compressions using the CLIP Technic diagnostic tool, Compression test or the special tool.
– Only check the engine stand if there is noise or excessive vibration when idling.
If the checks are correct, contact the Techline.
AFTER REPAIRCarry out a road test followed by a complete check with the diagnostic tool.
EDC16_V50_ALP7/EDC16_V58_ALP7/EDC16_V5C_ALP7/EDC16_V18_ALP7/EDC16_V1C_ALP7/EDC16_V20_ALP7
Page 328 of 365
13B-328
MR-372-J84-13B200$828.mif
V13
EDC16
Program No.: C1
Vdiag no.: 18, 1C, 20,
50, 58, 5CDIESEL INJECTION
Fault finding – Fault Finding Chart13B
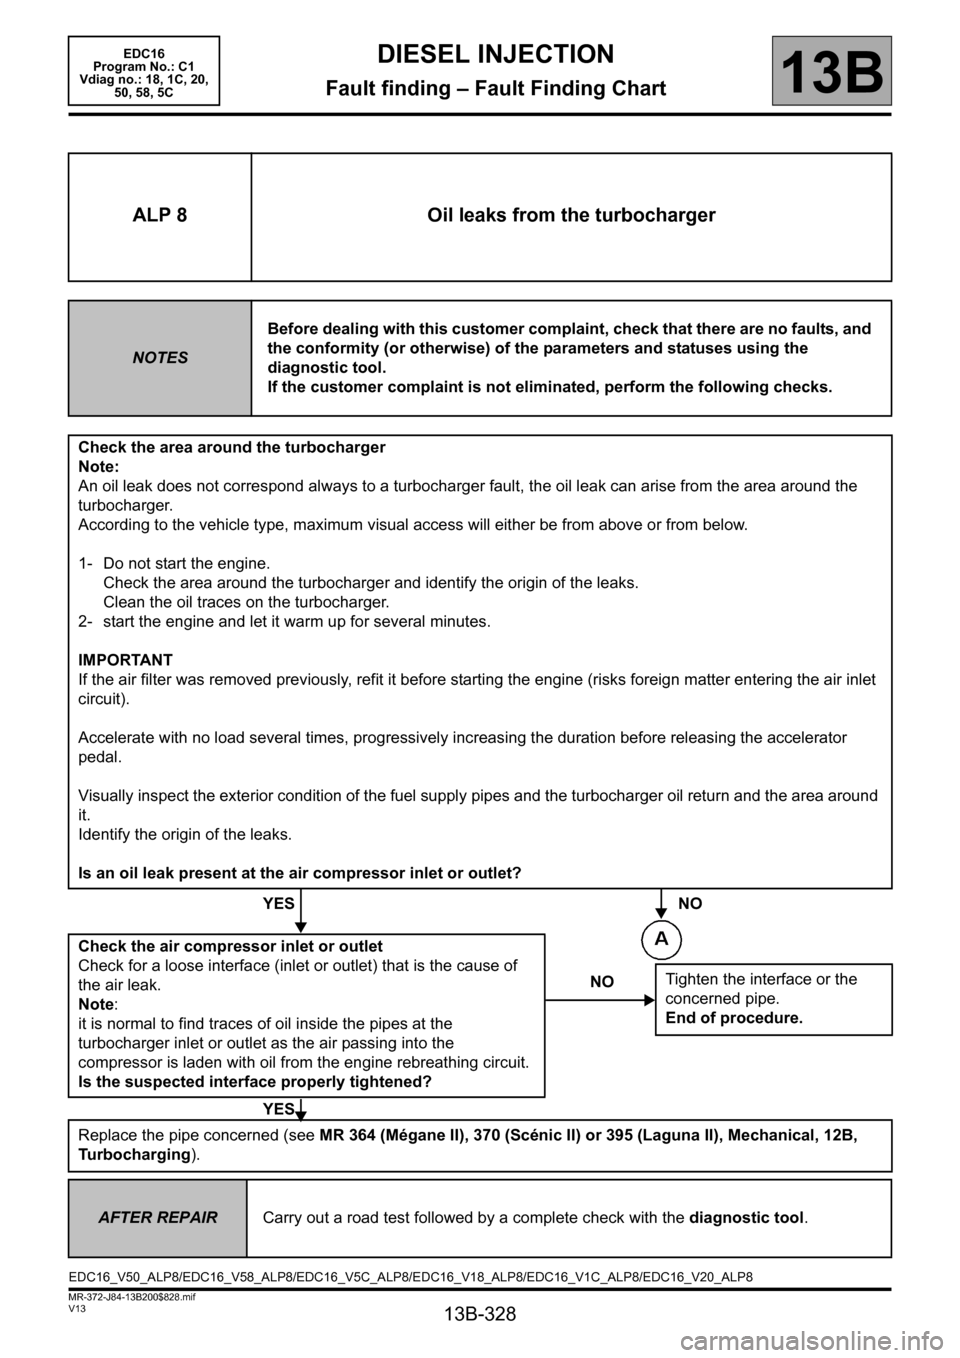
ALP 8 Oil leaks from the turbocharger
NOTESBefore dealing with this customer complaint, check that there are no faults, and
the conformity (or otherwise) of the parameters and statuses using the
diagnostic tool.
If the customer complaint is not eliminated, perform the following checks.
Check the area around the turbocharger
Note:
An oil leak does not correspond always to a turbocharger fault, the oil leak can arise from the area around the
turbocharger.
According to the vehicle type, maximum visual access will either be from above or from below.
1- Do not start the engine.
Check the area around the turbocharger and identify the origin of the leaks.
Clean the oil traces on the turbocharger.
2- start the engine and let it warm up for several minutes.
IMPORTANT
If the air filter was removed previously, refit it before starting the engine (risks foreign matter entering the air inlet
circuit).
Accelerate with no load several times, progressively increasing the duration before releasing the accelerator
pedal.
Visually inspect the exterior condition of the fuel supply pipes and the turbocharger oil return and the area around
it.
Identify the origin of the leaks.
Is an oil leak present at the air compressor inlet or outlet?
YES NO
Check the air compressor inlet or outlet
Check for a loose interface (inlet or outlet) that is the cause of
the air leak.
Note:
it is normal to find traces of oil inside the pipes at the
turbocharger inlet or outlet as the air passing into the
compressor is laden with oil from the engine rebreathing circuit.
Is the suspected interface properly tightened?
YES
Replace the pipe concerned (see MR 364 (Mégane II), 370 (Scénic II) or 395 (Laguna II), Mechanical, 12B,
Turbocharging).
NOTighten the interface or the
concerned pipe.
End of procedure.
AFTER REPAIRCarry out a road test followed by a complete check with the diagnostic tool.
EDC16_V50_ALP8/EDC16_V58_ALP8/EDC16_V5C_ALP8/EDC16_V18_ALP8/EDC16_V1C_ALP8/EDC16_V20_ALP8