diagram RENAULT SCENIC 2011 J95 / 3.G Engine And Peripherals Siemens Injection Workshop Manual
[x] Cancel search | Manufacturer: RENAULT, Model Year: 2011, Model line: SCENIC, Model: RENAULT SCENIC 2011 J95 / 3.GPages: 329, PDF Size: 1.71 MB
Page 1 of 329
1Engine and peripherals
V17 MR-372-J84-13B050$TOC.mif
V17
13B
"The repair procedures given by the manufacturer in this document are based on the
technical specifications current when it was prepared.
The procedures may be modified as a result of changes introduced by the
manufacturer in the production of the various component units and accessories from
which his vehicles are constructed."
V17
All rights reserved by Renault s.a.s.
Edition Anglaise
Copying or translating, in part or in full, of this document or use of the service part
reference numbering system is forbidden without the prior written authority of
Renault s.a.s.
© Renault s.a.s. 2011
DIESEL INJECTION
Siemens Injection
SID301 and 304
Vdiag No.: 44-45-48-49-4D-4C
Program No.: B1 and B2
Fault finding – Introduction 13B - 2
Fault finding – Cleanliness guidelines 13B - 7
Fault finding – List and location of components 13B - 9
Fault finding – Operating diagram 13B - 12
Fault finding – Function 13B - 13
Fault finding – Defect and safe modes 13B - 25
Fault finding – Replacement of components 13B - 26
Fault finding – Configurations and programming 13B - 30
Fault finding – Fault summary table 13B - 31
Fault finding – Interpretation of faults 13B - 35
Fault finding – Conformity check 13B - 124
Fault finding – Status summary table 13B - 125
Fault finding – Interpretation of statuses 13B - 127
Fault finding – Parameter summary table 13B - 186
Fault finding – Interpretation of parameters 13B - 189
Fault finding – Interpretation of commands 13B - 258
Fault finding – Customer complaints 13B - 271
Fault finding – Fault Finding Chart 13B - 273
Fault finding – Tests 13B - 301
Page 2 of 329
13B-2
MR-372-J84-13B050$039.mif
V17
13B
DIESEL INJECTION
Fault finding – Introduction
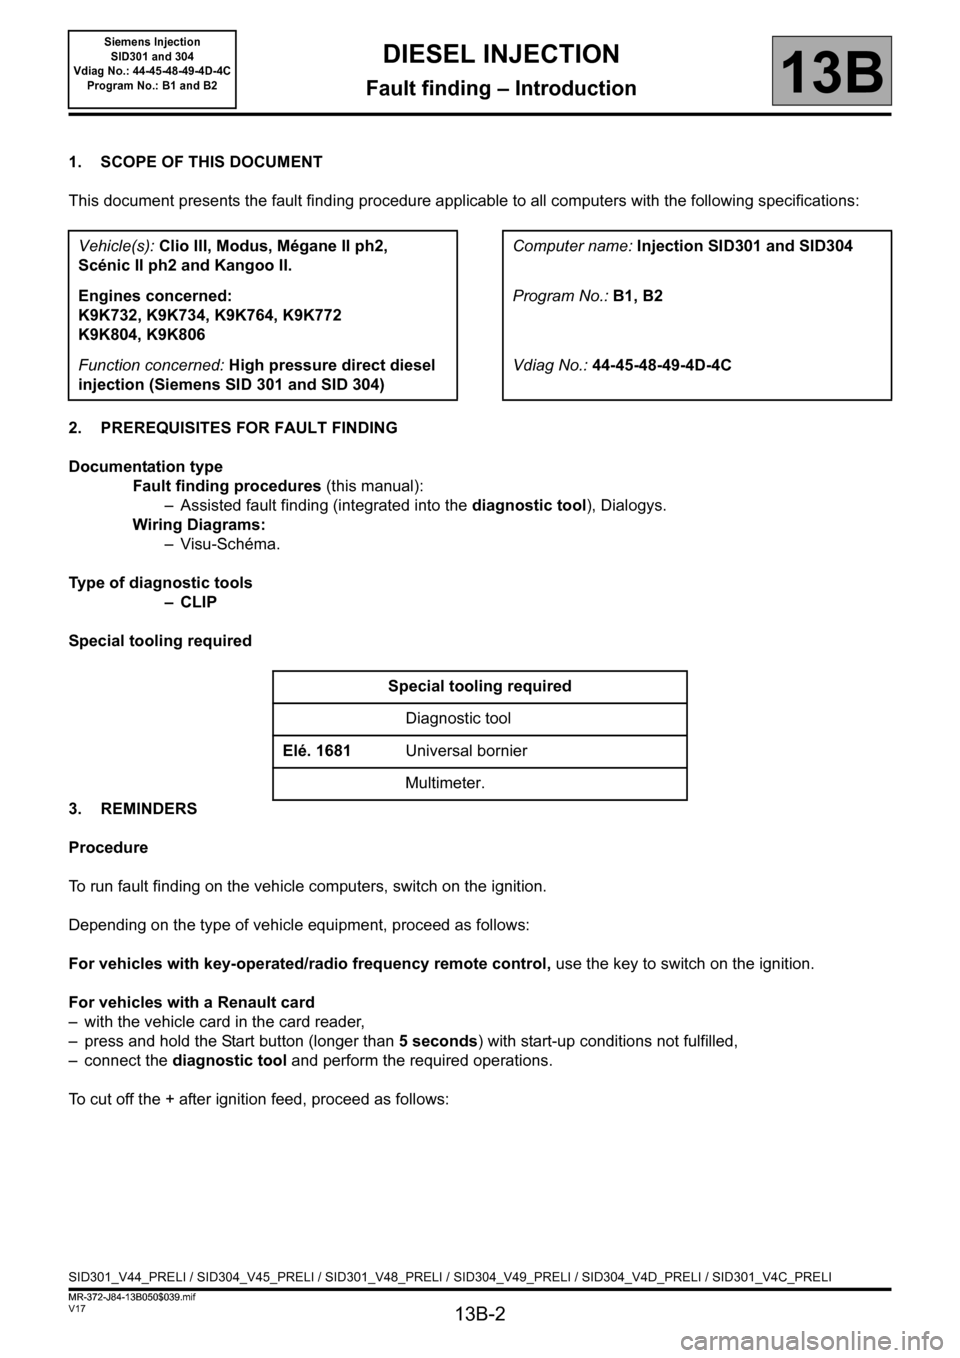
1. SCOPE OF THIS DOCUMENT
This document presents the fault finding procedure applicable to all computers with the following specifications:
2. PREREQUISITES FOR FAULT FINDING
Documentation type
Fault finding procedures (this manual):
– Assisted fault finding (integrated into the diagnostic tool), Dialogys.
Wiring Diagrams:
–Visu-Schéma.
Type of diagnostic tools
–CLIP
Special tooling required
3. REMINDERS
Procedure
To run fault finding on the vehicle computers, switch on the ignition.
Depending on the type of vehicle equipment, proceed as follows:
For vehicles with key-operated/radio frequency remote control, use the key to switch on the ignition.
For vehicles with a Renault card
– with the vehicle card in the card reader,
– press and hold the Start button (longer than 5 seconds) with start-up conditions not fulfilled,
– connect the diagnostic tool and perform the required operations.
To cut off the + after ignition feed, proceed as follows:Vehicle(s): Clio III, Modus, Mégane II ph2,
Scénic II ph2 and Kangoo II.Computer name: Injection SID301 and SID304
Engines concerned:
K9K732, K9K734, K9K764, K9K772
K9K804, K9K806Program No.: B1, B2
Function concerned: High pressure direct diesel
injection (Siemens SID 301 and SID 304)Vdiag No.: 44-45-48-49-4D-4C
Special tooling required
Diagnostic tool
Elé. 1681Universal bornier
Multimeter.
SID301_V44_PRELI / SID304_V45_PRELI / SID301_V48_PRELI / SID304_V49_PRELI / SID304_V4D_PRELI / SID301_V4C_PRELI
MR-372-J84-13B050$039.mif
Siemens Injection
SID301 and 304
Vdiag No.: 44-45-48-49-4D-4C
Program No.: B1 and B2
Page 12 of 329
13B-12
MR-372-J84-13B050$156.mif
V17
13B
DIESEL INJECTION
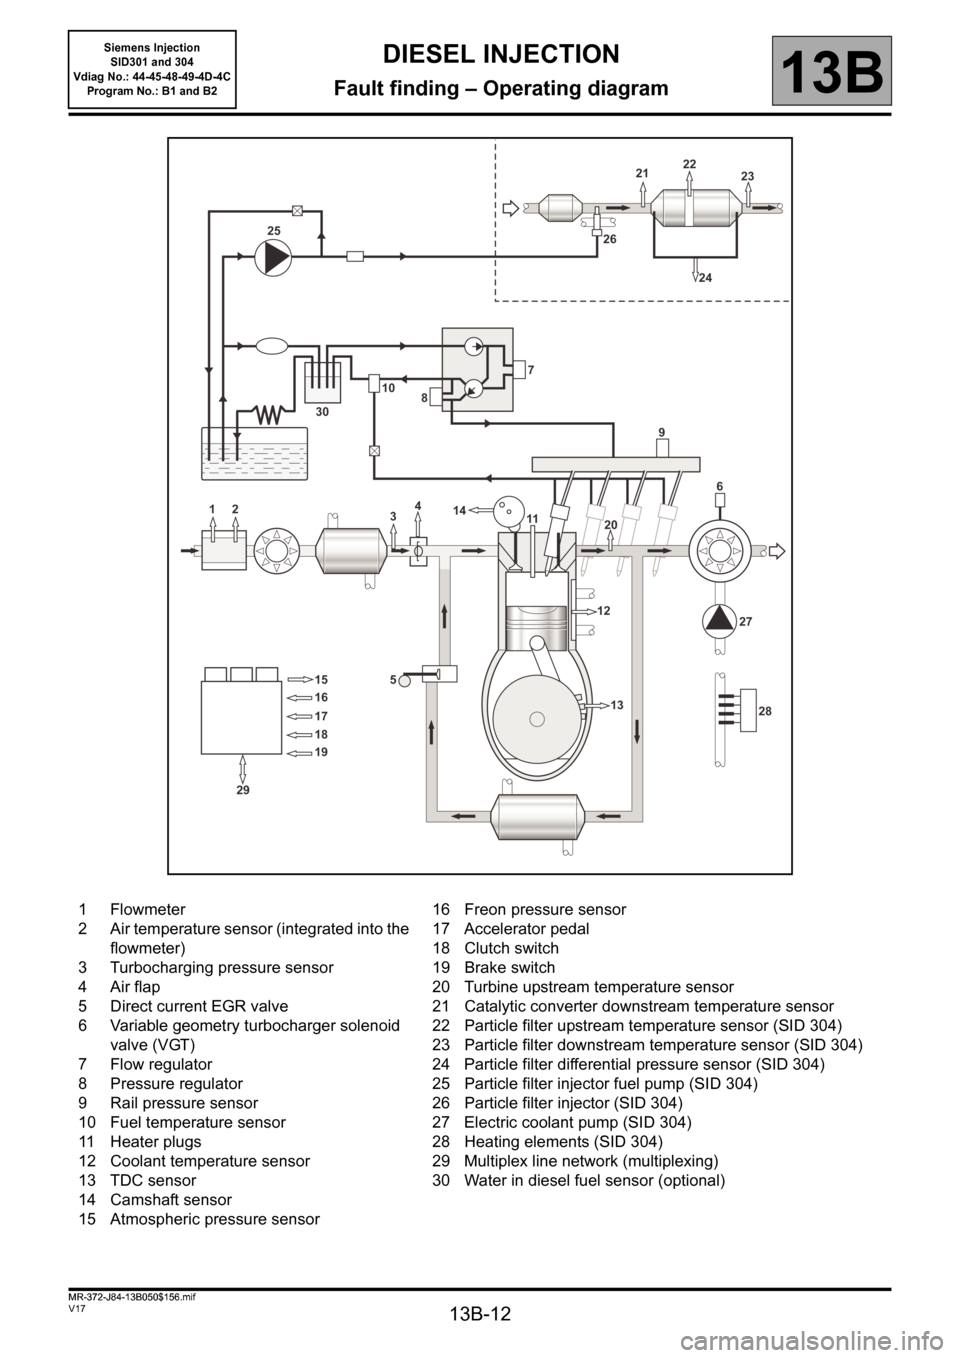
Fault finding – Operating diagram
1 Flowmeter
2 Air temperature sensor (integrated into the
flowmeter)
3 Turbocharging pressure sensor
4 Air flap
5 Direct current EGR valve
6 Variable geometry turbocharger solenoid
valve (VGT)
7 Flow regulator
8 Pressure regulator
9 Rail pressure sensor
10 Fuel temperature sensor
11 Heater plugs
12 Coolant temperature sensor
13 TDC sensor
14 Camshaft sensor
15 Atmospheric pressure sensor16 Freon pressure sensor
17 Accelerator pedal
18 Clutch switch
19 Brake switch
20 Turbine upstream temperature sensor
21 Catalytic converter downstream temperature sensor
22 Particle filter upstream temperature sensor (SID 304)
23 Particle filter downstream temperature sensor (SID 304)
24 Particle filter differential pressure sensor (SID 304)
25 Particle filter injector fuel pump (SID 304)
26 Particle filter injector (SID 304)
27 Electric coolant pump (SID 304)
28 Heating elements (SID 304)
29 Multiplex line network (multiplexing)
30 Water in diesel fuel sensor (optional)
MR-372-J84-13B050$156.mif
Siemens Injection
SID301 and 304
Vdiag No.: 44-45-48-49-4D-4C
Program No.: B1 and B2
Page 35 of 329
13B-35
MR-372-J84-13B050$390.mif
V17
13B
DIESEL INJECTION
Fault finding – Interpretation of faults
DF001
PRESENT
OR
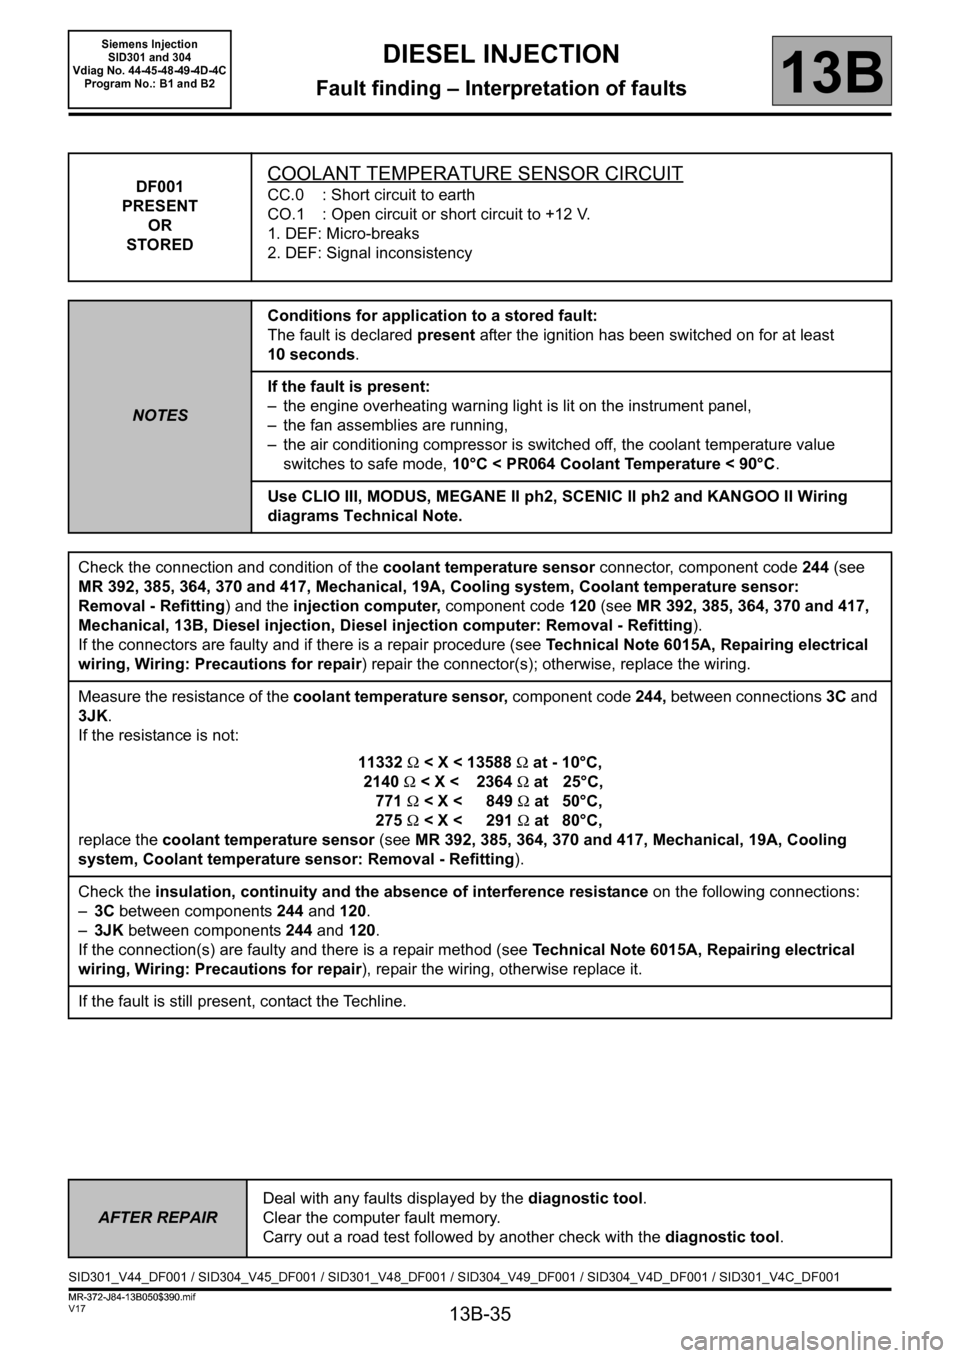
STOREDCOOLANT TEMPERATURE SENSOR CIRCUIT
CC.0 : Short circuit to earth
CO.1 : Open circuit or short circuit to +12 V.
1. DEF: Micro-breaks
2. DEF: Signal inconsistency
NOTESConditions for application to a stored fault:
The fault is declared present after the ignition has been switched on for at least
10 seconds.
If the fault is present:
– the engine overheating warning light is lit on the instrument panel,
– the fan assemblies are running,
– the air conditioning compressor is switched off, the coolant temperature value
switches to safe mode, 10°C < PR064 Coolant Temperature < 90°C.
Use CLIO III, MODUS, MEGANE II ph2, SCENIC II ph2 and KANGOO II Wiring
diagrams Technical Note.
Check the connection and condition of the coolant temperature sensor connector, component code244 (see
MR 392, 385, 364, 370 and 417, Mechanical, 19A, Cooling system, Coolant temperature sensor:
Removal - Refitting) and the injection computer, component code120 (see MR 392, 385, 364, 370 and 417,
Mechanical, 13B, Diesel injection, Diesel injection computer: Removal - Refitting).
If the connectors are faulty and if there is a repair procedure (see Technical Note 6015A, Repairing electrical
wiring, Wiring: Precautions for repair) repair the connector(s); otherwise, replace the wiring.
Measure the resistance of the coolant temperature sensor, component code 244, between connections 3C and
3JK.
If the resistance is not:
11332Ω < X < 13588Ω at - 10°C,
2140Ω < X < 2364Ω at 25°C,
771Ω < X < 849Ω at 50°C,
275Ω < X < 291Ω at 80°C,
replace the coolant temperature sensor (see MR 392, 385, 364, 370 and 417, Mechanical, 19A, Cooling
system, Coolant temperature sensor: Removal - Refitting).
Check the insulation, continuity and the absence of interference resistance on the following connections:
–3C between components 244 and 120.
–3JK between components 244 and 120.
If the connection(s) are faulty and there is a repair method (see Technical Note 6015A, Repairing electrical
wiring, Wiring: Precautions for repair), repair the wiring, otherwise replace it.
If the fault is still present, contact the Techline.
AFTER REPAIRDeal with any faults displayed by the diagnostic tool.
Clear the computer fault memory.
Carry out a road test followed by another check with the diagnostic tool.
SID301_V44_DF001 / SID304_V45_DF001 / SID301_V48_DF001 / SID304_V49_DF001 / SID304_V4D_DF001 / SID301_V4C_DF001
MR-372-J84-13B050$390.mif
Siemens Injection
SID301 and 304
Vdiag No. 44-45-48-49-4D-4C
Program No.: B1 and B2
Page 37 of 329
13B-37
MR-372-J84-13B050$390.mif
V17
DIESEL INJECTION
Fault finding – Interpretation of faults
Siemens Injection
SID301 and 304
Vdiag No. 44-45-48-49-4D-4C
Program No.: B1 and B2
13B
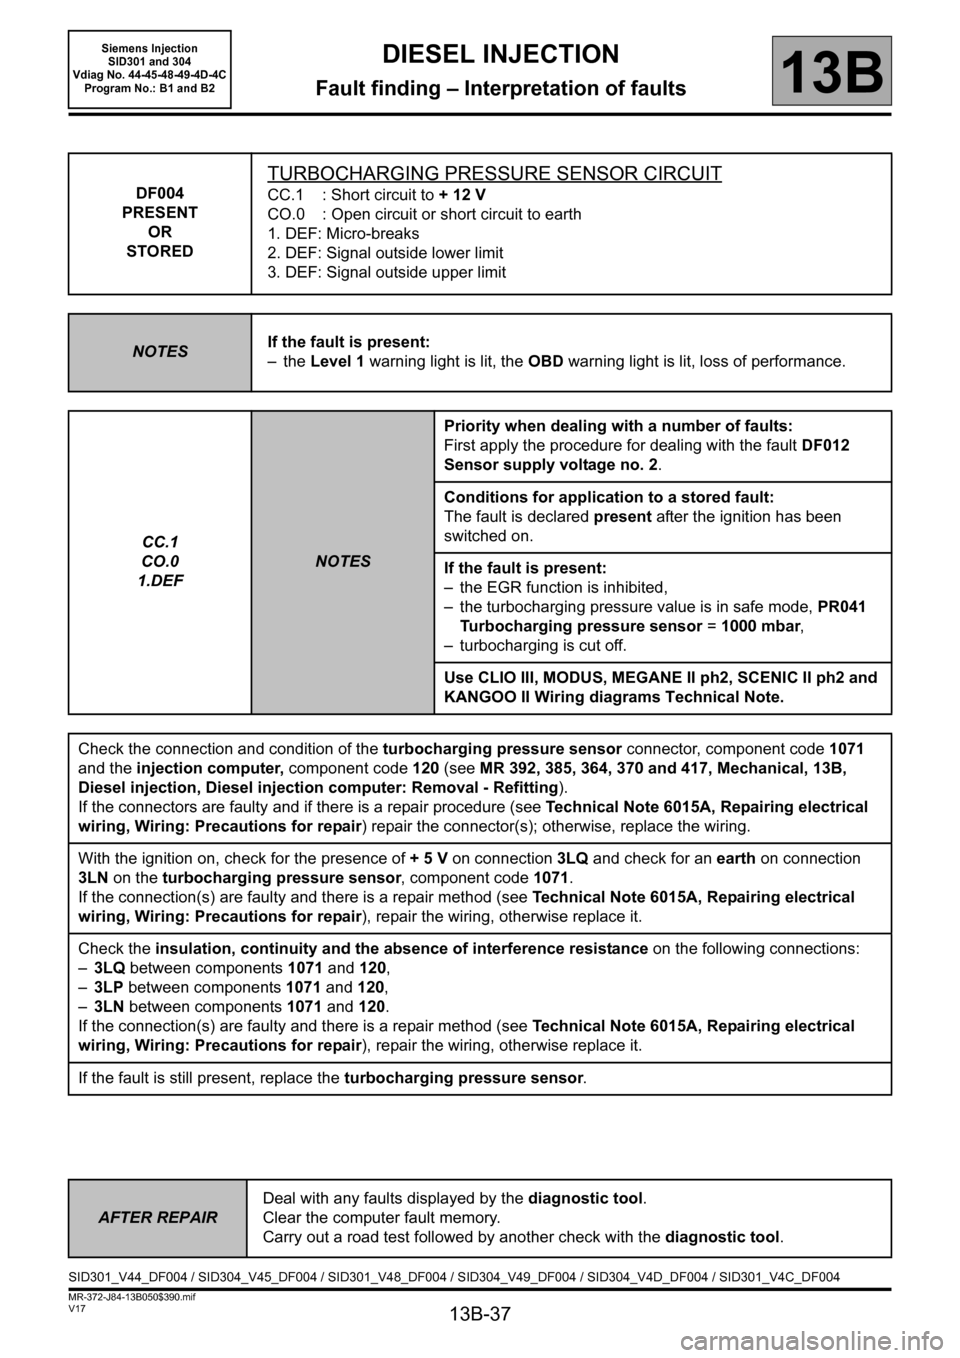
DF004
PRESENT
OR
STORED
TURBOCHARGING PRESSURE SENSOR CIRCUIT
CC.1 : Short circuit to + 12 V
CO.0 : Open circuit or short circuit to earth
1. DEF: Micro-breaks
2. DEF: Signal outside lower limit
3. DEF: Signal outside upper limit
NOTESIf the fault is present:
– the Level 1 warning light is lit, the OBD warning light is lit, loss of performance.
CC.1
CO.0
1.DEF
NOTESPriority when dealing with a number of faults:
First apply the procedure for dealing with the fault DF012
Sensor supply voltage no. 2.
Conditions for application to a stored fault:
The fault is declared present after the ignition has been
switched on.
If the fault is present:
– the EGR function is inhibited,
– the turbocharging pressure value is in safe mode, PR041
Turbocharging pressure sensor = 1000 mbar,
– turbocharging is cut off.
Use CLIO III, MODUS, MEGANE II ph2, SCENIC II ph2 and
KANGOO II Wiring diagrams Technical Note.
Check the connection and condition of the turbocharging pressure sensor connector, component code1071
and the injection computer, component code120 (see MR 392, 385, 364, 370 and 417, Mechanical, 13B,
Diesel injection, Diesel injection computer: Removal - Refitting).
If the connectors are faulty and if there is a repair procedure (see Technical Note 6015A, Repairing electrical
wiring, Wiring: Precautions for repair) repair the connector(s); otherwise, replace the wiring.
With the ignition on, check for the presence of + 5 V on connection 3LQ and check for an earth on connection
3LN on the turbocharging pressure sensor, component code 1071.
If the connection(s) are faulty and there is a repair method (see Technical Note 6015A, Repairing electrical
wiring, Wiring: Precautions for repair), repair the wiring, otherwise replace it.
Check the insulation, continuity and the absence of interference resistance on the following connections:
–3LQ between components 1071 and 120,
–3LP between components 1071 and 120,
–3LN between components 1071 and 120.
If the connection(s) are faulty and there is a repair method (see Technical Note 6015A, Repairing electrical
wiring, Wiring: Precautions for repair), repair the wiring, otherwise replace it.
If the fault is still present, replace the turbocharging pressure sensor.
AFTER REPAIRDeal with any faults displayed by the diagnostic tool.
Clear the computer fault memory.
Carry out a road test followed by another check with the diagnostic tool.
SID301_V44_DF004 / SID304_V45_DF004 / SID301_V48_DF004 / SID304_V49_DF004 / SID304_V4D_DF004 / SID301_V4C_DF004
Page 38 of 329
13B-38
MR-372-J84-13B050$390.mif
V17
DIESEL INJECTION
Fault finding – Interpretation of faults
Siemens Injection
SID301 and 304
Vdiag No. 44-45-48-49-4D-4C
Program No.: B1 and B2
13B
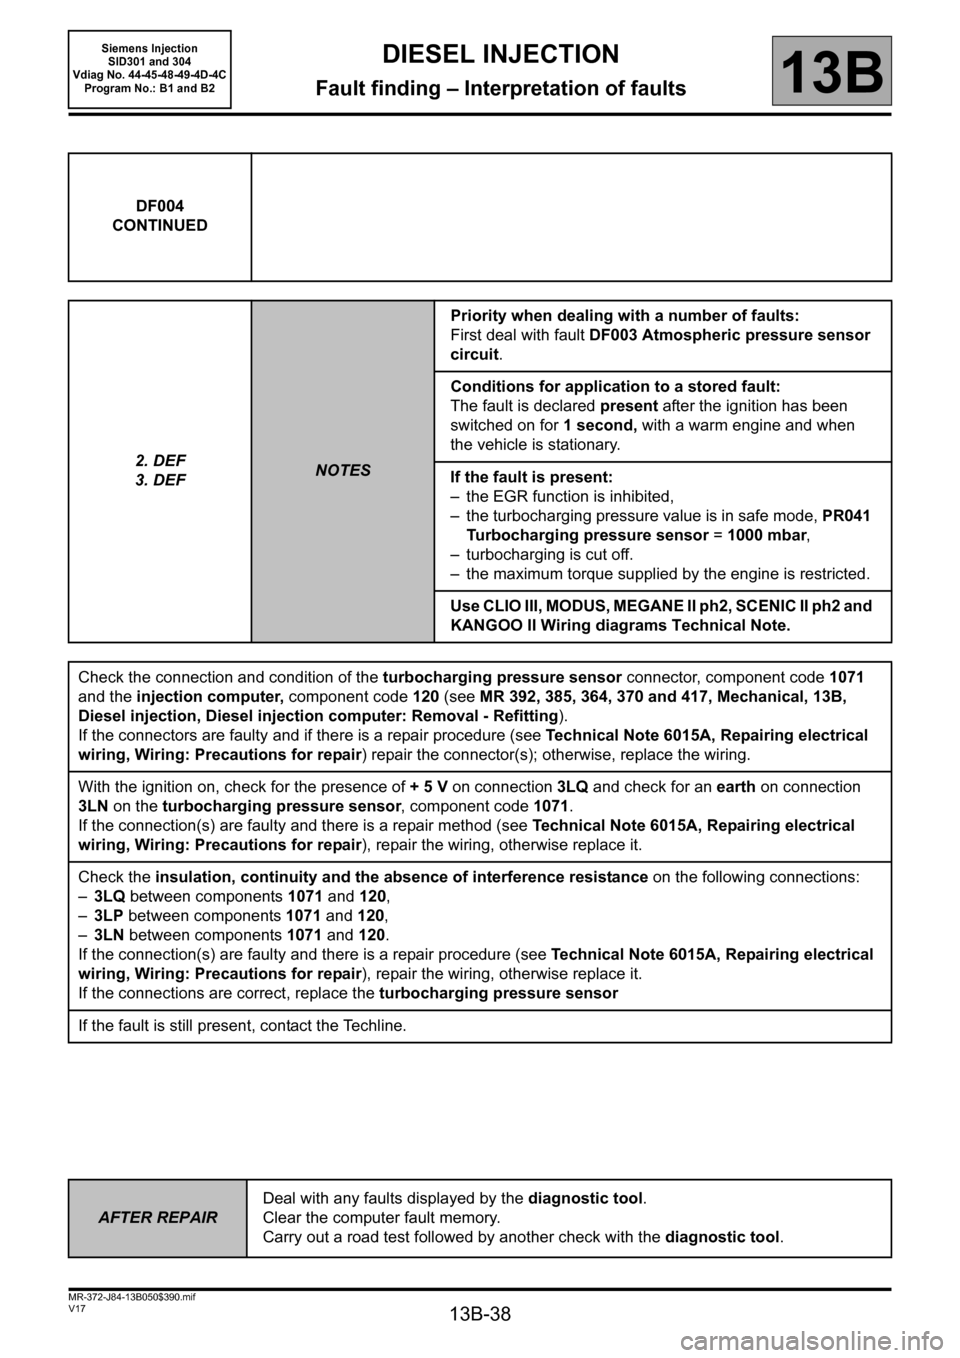
DF004
CONTINUED
2. DEF
3. DEF
NOTESPriority when dealing with a number of faults:
First deal with fault DF003 Atmospheric pressure sensor
circuit.
Conditions for application to a stored fault:
The fault is declared present after the ignition has been
switched on for 1 second, with a warm engine and when
the vehicle is stationary.
If the fault is present:
– the EGR function is inhibited,
– the turbocharging pressure value is in safe mode, PR041
Turbocharging pressure sensor = 1000 mbar,
– turbocharging is cut off.
– the maximum torque supplied by the engine is restricted.
Use CLIO III, MODUS, MEGANE II ph2, SCENIC II ph2 and
KANGOO II Wiring diagrams Technical Note.
Check the connection and condition of the turbocharging pressure sensor connector, component code1071
and the injection computer, component code120 (see MR 392, 385, 364, 370 and 417, Mechanical, 13B,
Diesel injection, Diesel injection computer: Removal - Refitting).
If the connectors are faulty and if there is a repair procedure (see Technical Note 6015A, Repairing electrical
wiring, Wiring: Precautions for repair) repair the connector(s); otherwise, replace the wiring.
With the ignition on, check for the presence of + 5 V on connection 3LQ and check for an earth on connection
3LN on the turbocharging pressure sensor, component code 1071.
If the connection(s) are faulty and there is a repair method (see Technical Note 6015A, Repairing electrical
wiring, Wiring: Precautions for repair), repair the wiring, otherwise replace it.
Check the insulation, continuity and the absence of interference resistance on the following connections:
–3LQ between components 1071 and 120,
–3LP between components 1071 and 120,
–3LN between components 1071 and 120.
If the connection(s) are faulty and there is a repair procedure (see Technical Note 6015A, Repairing electrical
wiring, Wiring: Precautions for repair), repair the wiring, otherwise replace it.
If the connections are correct, replace the turbocharging pressure sensor
If the fault is still present, contact the Techline.
AFTER REPAIRDeal with any faults displayed by the diagnostic tool.
Clear the computer fault memory.
Carry out a road test followed by another check with the diagnostic tool.
Page 39 of 329
13B-39
MR-372-J84-13B050$390.mif
V17
DIESEL INJECTION
Fault finding – Interpretation of faults
Siemens Injection
SID301 and 304
Vdiag No. 44-45-48-49-4D-4C
Program No.: B1 and B2
13B
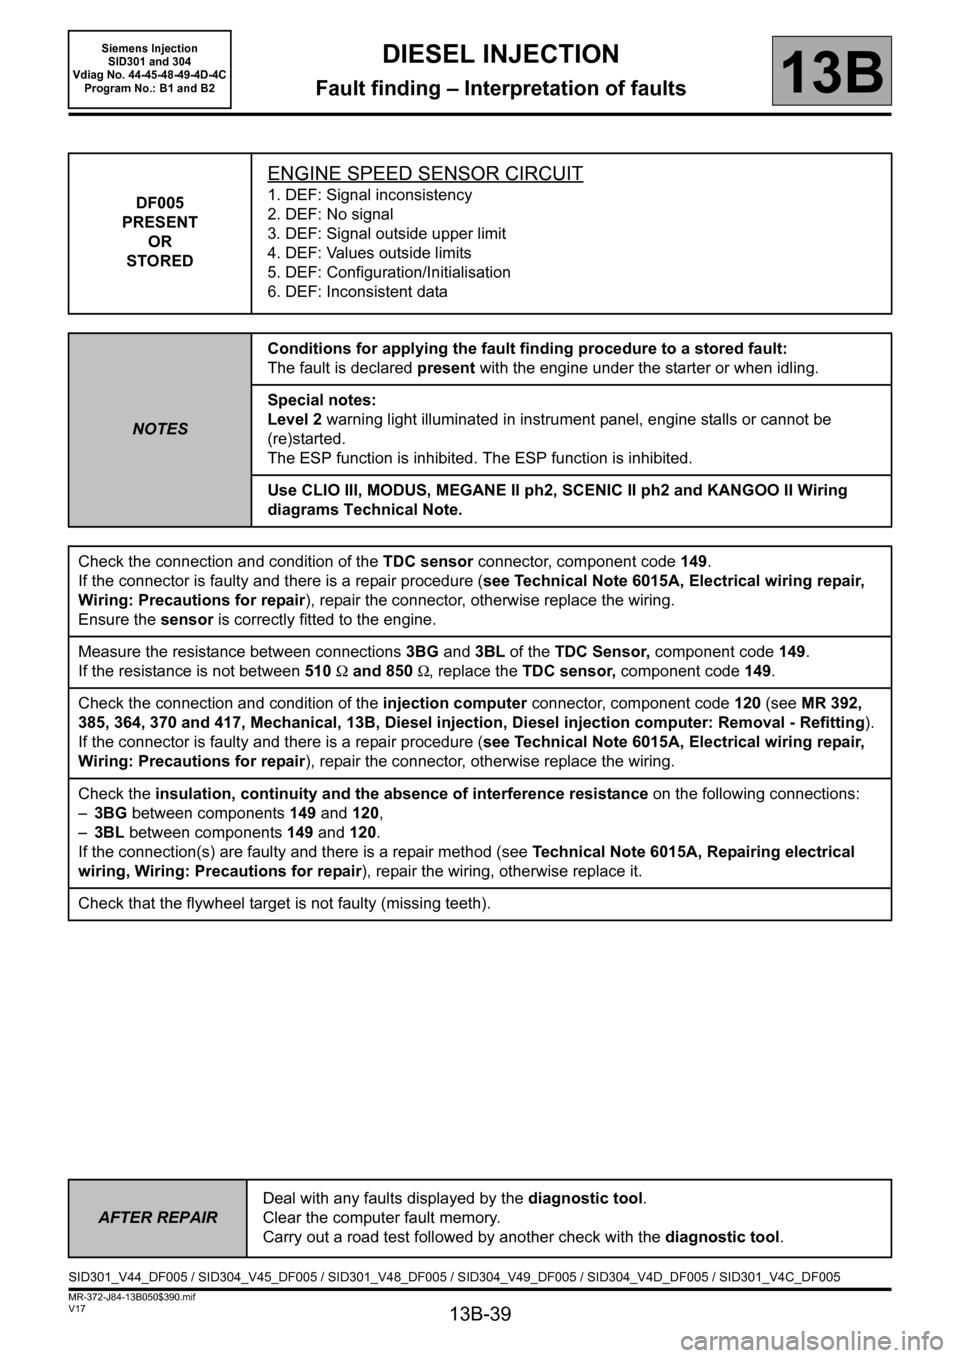
DF005
PRESENT
OR
STORED
ENGINE SPEED SENSOR CIRCUIT
1. DEF: Signal inconsistency
2. DEF: No signal
3. DEF: Signal outside upper limit
4. DEF: Values outside limits
5. DEF: Configuration/Initialisation
6. DEF: Inconsistent data
NOTESConditions for applying the fault finding procedure to a stored fault:
The fault is declared present with the engine under the starter or when idling.
Special notes:
Level 2 warning light illuminated in instrument panel, engine stalls or cannot be
(re)started.
The ESP function is inhibited. The ESP function is inhibited.
Use CLIO III, MODUS, MEGANE II ph2, SCENIC II ph2 and KANGOO II Wiring
diagrams Technical Note.
Check the connection and condition of the TDC sensor connector, component code 149.
If the connector is faulty and there is a repair procedure (see Technical Note 6015A, Electrical wiring repair,
Wiring: Precautions for repair), repair the connector, otherwise replace the wiring.
Ensure the sensor is correctly fitted to the engine.
Measure the resistance between connections3BG and 3BL of the TDC Sensor, component code149.
If the resistance is not between 510Ω and 850Ω, replace the TDC sensor, component code149.
Check the connection and condition of the injection computer connector, component code120 (see MR 392,
385, 364, 370 and 417, Mechanical, 13B, Diesel injection, Diesel injection computer: Removal - Refitting).
If the connector is faulty and there is a repair procedure (see Technical Note 6015A, Electrical wiring repair,
Wiring: Precautions for repair), repair the connector, otherwise replace the wiring.
Check the insulation, continuity and the absence of interference resistance on the following connections:
–3BG between components 149 and 120,
–3BL between components 149 and 120.
If the connection(s) are faulty and there is a repair method (see Technical Note 6015A, Repairing electrical
wiring, Wiring: Precautions for repair), repair the wiring, otherwise replace it.
Check that the flywheel target is not faulty (missing teeth).
AFTER REPAIRDeal with any faults displayed by the diagnostic tool.
Clear the computer fault memory.
Carry out a road test followed by another check with the diagnostic tool.
SID301_V44_DF005 / SID304_V45_DF005 / SID301_V48_DF005 / SID304_V49_DF005 / SID304_V4D_DF005 / SID301_V4C_DF005
Page 40 of 329
13B-40
MR-372-J84-13B050$390.mif
V17
DIESEL INJECTION
Fault finding – Interpretation of faults
Siemens Injection
SID301 and 304
Vdiag No. 44-45-48-49-4D-4C
Program No.: B1 and B2
13B
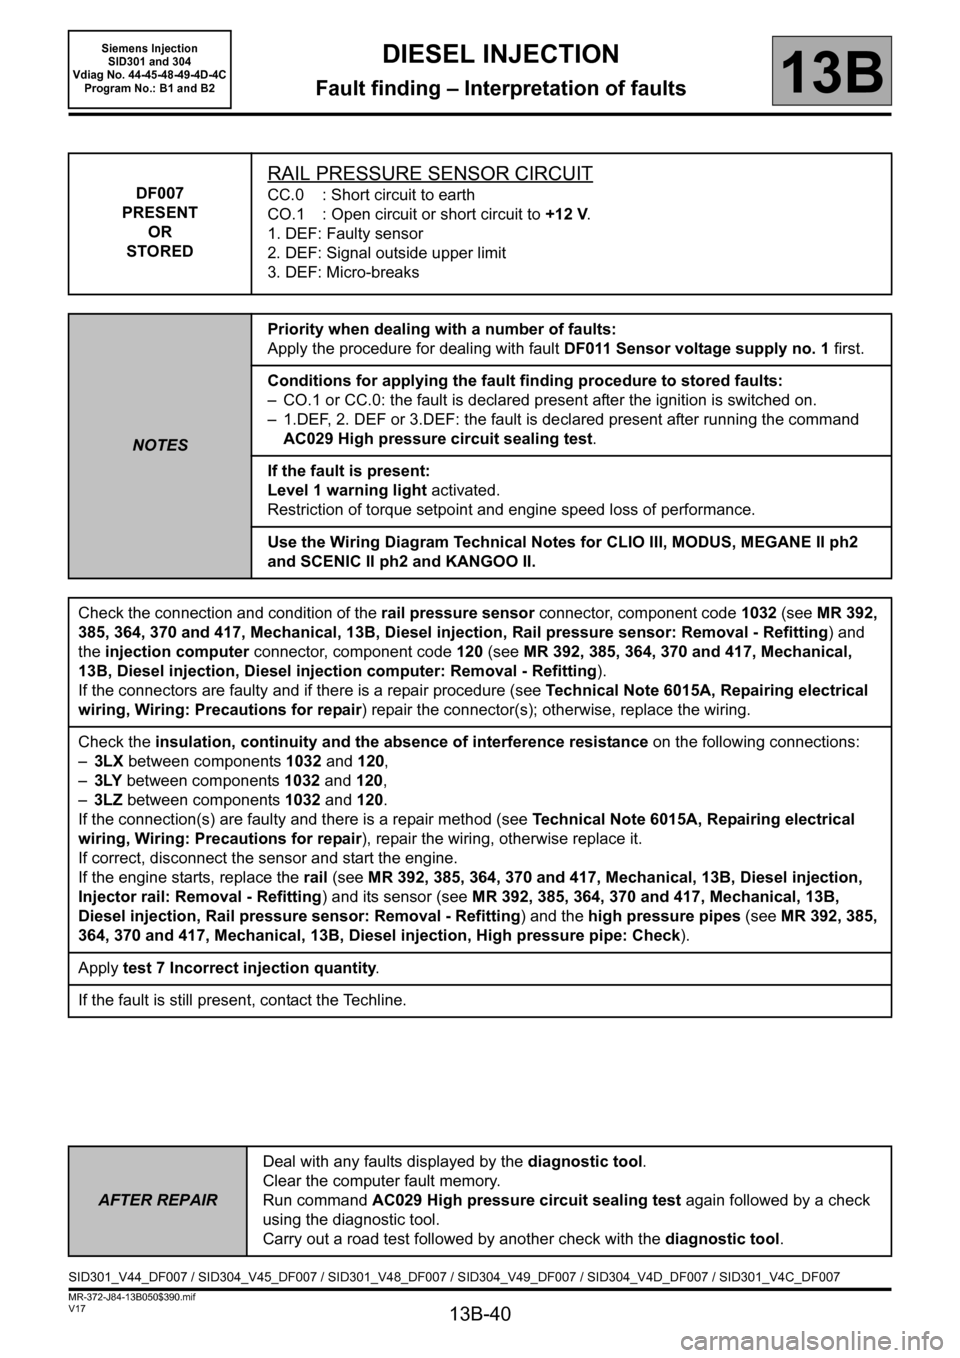
DF007
PRESENT
OR
STORED
RAIL PRESSURE SENSOR CIRCUIT
CC.0 : Short circuit to earth
CO.1 : Open circuit or short circuit to +12 V.
1. DEF: Faulty sensor
2. DEF: Signal outside upper limit
3. DEF: Micro-breaks
NOTESPriority when dealing with a number of faults:
Apply the procedure for dealing with fault DF011 Sensor voltage supply no. 1 first.
Conditions for applying the fault finding procedure to stored faults:
– CO.1 or CC.0: the fault is declared present after the ignition is switched on.
– 1.DEF, 2. DEF or 3.DEF: the fault is declared present after running the command
AC029 High pressure circuit sealing test.
If the fault is present:
Level 1 warning light activated.
Restriction of torque setpoint and engine speed loss of performance.
Use the Wiring Diagram Technical Notes for CLIO III, MODUS, MEGANE II ph2
and SCENIC II ph2 and KANGOO II.
Check the connection and condition of the rail pressure sensor connector, component code1032 (see MR 392,
385, 364, 370 and 417, Mechanical, 13B, Diesel injection, Rail pressure sensor: Removal - Refitting) and
the injection computer connector, component code120 (see MR 392, 385, 364, 370 and 417, Mechanical,
13B, Diesel injection, Diesel injection computer: Removal - Refitting).
If the connectors are faulty and if there is a repair procedure (see Technical Note 6015A, Repairing electrical
wiring, Wiring: Precautions for repair) repair the connector(s); otherwise, replace the wiring.
Check the insulation, continuity and the absence of interference resistance on the following connections:
–3LX between components 1032 and 120,
–3LY between components 1032 and 120,
–3LZ between components 1032 and 120.
If the connection(s) are faulty and there is a repair method (see Technical Note 6015A, Repairing electrical
wiring, Wiring: Precautions for repair), repair the wiring, otherwise replace it.
If correct, disconnect the sensor and start the engine.
If the engine starts, replace the rail (see MR 392, 385, 364, 370 and 417, Mechanical, 13B, Diesel injection,
Injector rail: Removal - Refitting) and its sensor (see MR 392, 385, 364, 370 and 417, Mechanical, 13B,
Diesel injection, Rail pressure sensor: Removal - Refitting) and the high pressure pipes (see MR 392, 385,
364, 370 and 417, Mechanical, 13B, Diesel injection, High pressure pipe: Check).
Apply test 7 Incorrect injection quantity
.
If the fault is still present, contact the Techline.
AFTER REPAIRDeal with any faults displayed by the diagnostic tool.
Clear the computer fault memory.
Run command AC029 High pressure circuit sealing test again followed by a check
using the diagnostic tool.
Carry out a road test followed by another check with the diagnostic tool.
SID301_V44_DF007 / SID304_V45_DF007 / SID301_V48_DF007 / SID304_V49_DF007 / SID304_V4D_DF007 / SID301_V4C_DF007
Page 41 of 329
13B-41
MR-372-J84-13B050$390.mif
V17
DIESEL INJECTION
Fault finding – Interpretation of faults
Siemens Injection
SID301 and 304
Vdiag No. 44-45-48-49-4D-4C
Program No.: B1 and B2
13B
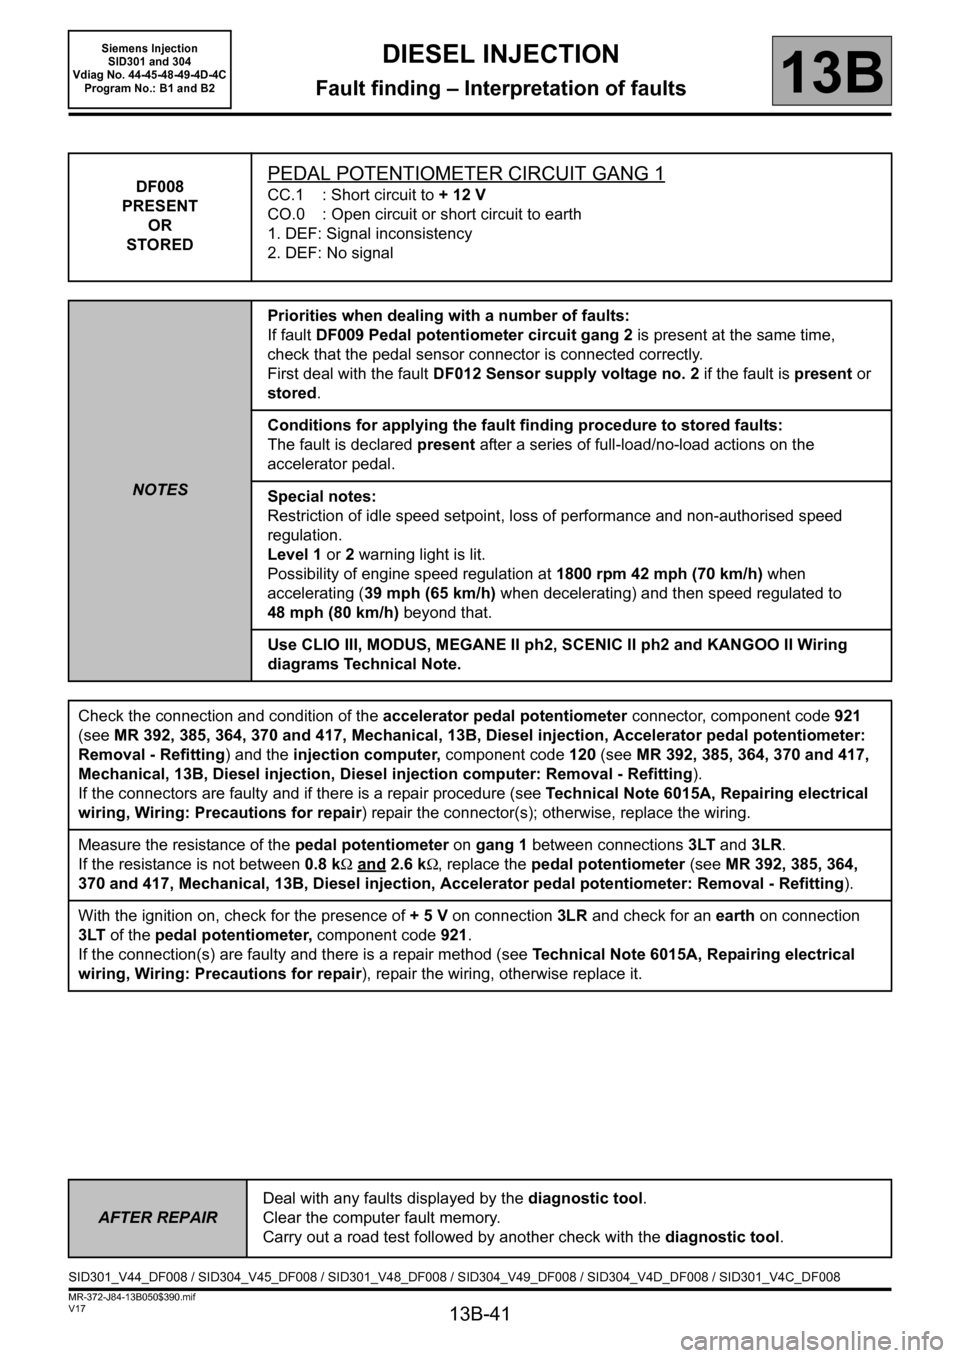
DF008
PRESENT
OR
STOREDPEDAL POTENTIOMETER CIRCUIT GANG 1
CC.1 : Short circuit to + 12 V
CO.0 : Open circuit or short circuit to earth
1. DEF: Signal inconsistency
2. DEF: No signal
NOTESPriorities when dealing with a number of faults:
If fault DF009 Pedal potentiometer circuit gang 2 is present at the same time,
check that the pedal sensor connector is connected correctly.
First deal with the fault DF012 Sensor supply voltage no. 2 if the fault is present or
stored.
Conditions for applying the fault finding procedure to stored faults:
The fault is declared present after a series of full-load/no-load actions on the
accelerator pedal.
Special notes:
Restriction of idle speed setpoint, loss of performance and non-authorised speed
regulation.
Level 1 or 2 warning light is lit.
Possibility of engine speed regulation at 1800 rpm 42 mph (70 km/h) when
accelerating (39 mph (65 km/h) when decelerating) and then speed regulated to
48 mph (80 km/h) beyond that.
Use CLIO III, MODUS, MEGANE II ph2, SCENIC II ph2 and KANGOO II Wiring
diagrams Technical Note.
Check the connection and condition of the accelerator pedal potentiometer connector, component code921
(see MR 392, 385, 364, 370 and 417, Mechanical, 13B, Diesel injection, Accelerator pedal potentiometer:
Removal - Refitting) and the injection computer, component code120 (see MR 392, 385, 364, 370 and 417,
Mechanical, 13B, Diesel injection, Diesel injection computer: Removal - Refitting).
If the connectors are faulty and if there is a repair procedure (see Technical Note 6015A, Repairing electrical
wiring, Wiring: Precautions for repair) repair the connector(s); otherwise, replace the wiring.
Measure the resistance of the pedal potentiometer on gang 1 between connections3LT and 3LR.
If the resistance is not between 0.8 kΩ and
2.6 kΩ, replace the pedal potentiometer (see MR 392, 385, 364,
370 and 417, Mechanical, 13B, Diesel injection, Accelerator pedal potentiometer: Removal - Refitting).
With the ignition on, check for the presence of + 5 V on connection 3LR and check for an earth on connection
3LT of the pedal potentiometer, component code 921.
If the connection(s) are faulty and there is a repair method (see Technical Note 6015A, Repairing electrical
wiring, Wiring: Precautions for repair), repair the wiring, otherwise replace it.
AFTER REPAIRDeal with any faults displayed by the diagnostic tool.
Clear the computer fault memory.
Carry out a road test followed by another check with the diagnostic tool.
SID301_V44_DF008 / SID304_V45_DF008 / SID301_V48_DF008 / SID304_V49_DF008 / SID304_V4D_DF008 / SID301_V4C_DF008
Page 43 of 329
13B-43
MR-372-J84-13B050$390.mif
V17
DIESEL INJECTION
Fault finding – Interpretation of faults
Siemens Injection
SID301 and 304
Vdiag No. 44-45-48-49-4D-4C
Program No.: B1 and B2
13B
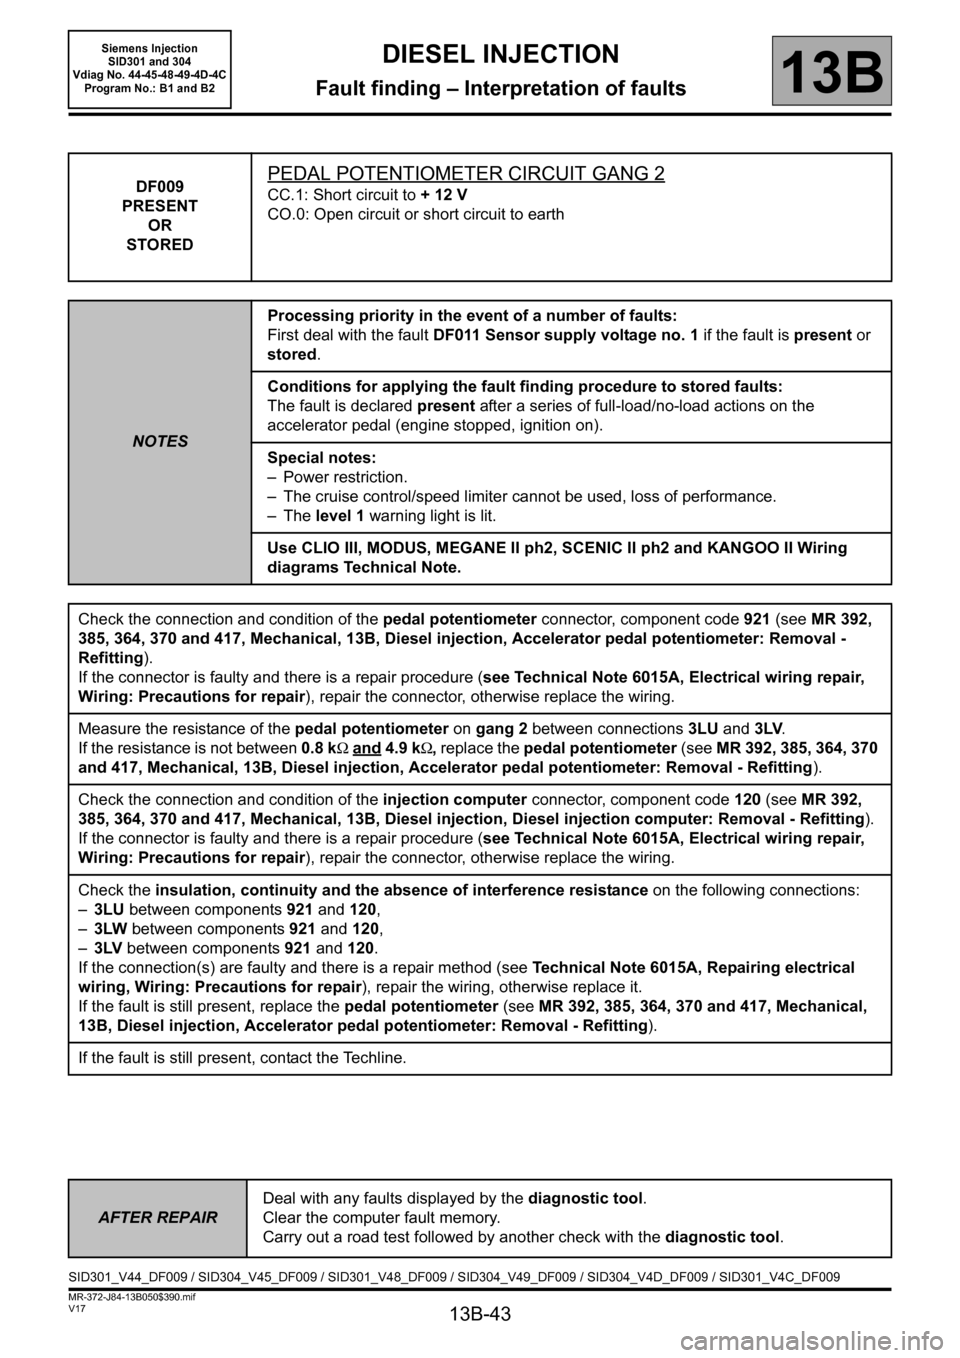
DF009
PRESENT
OR
STOREDPEDAL POTENTIOMETER CIRCUIT GANG 2
CC.1: Short circuit to + 12 V
CO.0: Open circuit or short circuit to earth
NOTESProcessing priority in the event of a number of faults:
First deal with the fault DF011 Sensor supply voltage no. 1 if the fault is present or
stored.
Conditions for applying the fault finding procedure to stored faults:
The fault is declared present after a series of full-load/no-load actions on the
accelerator pedal (engine stopped, ignition on).
Special notes:
– Power restriction.
– The cruise control/speed limiter cannot be used, loss of performance.
–The level 1 warning light is lit.
Use CLIO III, MODUS, MEGANE II ph2, SCENIC II ph2 and KANGOO II Wiring
diagrams Technical Note.
Check the connection and condition of the pedal potentiometer connector, component code921 (see MR 392,
385, 364, 370 and 417, Mechanical, 13B, Diesel injection, Accelerator pedal potentiometer: Removal -
Refitting).
If the connector is faulty and there is a repair procedure (see Technical Note 6015A, Electrical wiring repair,
Wiring: Precautions for repair), repair the connector, otherwise replace the wiring.
Measure the resistance of the pedal potentiometer on gang 2 between connections 3LU and 3LV.
If the resistance is not between 0.8 kΩ and
4.9 kΩ, replace the pedal potentiometer (see MR 392, 385, 364, 370
and 417, Mechanical, 13B, Diesel injection, Accelerator pedal potentiometer: Removal - Refitting).
Check the connection and condition of the injection computer connector, component code 120 (see MR 392,
385, 364, 370 and 417, Mechanical, 13B, Diesel injection, Diesel injection computer: Removal - Refitting).
If the connector is faulty and there is a repair procedure (see Technical Note 6015A, Electrical wiring repair,
Wiring: Precautions for repair), repair the connector, otherwise replace the wiring.
Check the insulation, continuity and the absence of interference resistance on the following connections:
–3LU between components921 and 120,
–3LW between components 921 and 120,
–3LV between components 921 and 120.
If the connection(s) are faulty and there is a repair method (see Technical Note 6015A, Repairing electrical
wiring, Wiring: Precautions for repair), repair the wiring, otherwise replace it.
If the fault is still present, replace the pedal potentiometer (see MR 392, 385, 364, 370 and 417, Mechanical,
13B, Diesel injection, Accelerator pedal potentiometer: Removal - Refitting).
If the fault is still present, contact the Techline.
AFTER REPAIRDeal with any faults displayed by the diagnostic tool.
Clear the computer fault memory.
Carry out a road test followed by another check with the diagnostic tool.
SID301_V44_DF009 / SID304_V45_DF009 / SID301_V48_DF009 / SID304_V49_DF009 / SID304_V4D_DF009 / SID301_V4C_DF009