relay RENAULT SCENIC 2012 J95 / 3.G Engine And Peripherals EDC16CP33 User Guide
[x] Cancel search | Manufacturer: RENAULT, Model Year: 2012, Model line: SCENIC, Model: RENAULT SCENIC 2012 J95 / 3.GPages: 510, PDF Size: 2.98 MB
Page 64 of 510
13B-64
AFTER REPAIRDeal with any other faults. Clear the fault memory.
Switch off the ignition until the end of the power-latch phase, and carry out a road test
followed by a check with the diagnostic tool.
V12 MR-372-J84-13B300$071.mif
DIESEL INJECTION
Fault finding – Interpretation of faults13B
EDC16CP33
Program No.: C4
Vdiag No.: 04, 08, 18, 1C,
20, 24, 26, 28, 34, 38, 44,
4C, 54, 58, 5C, 60, 62, 74
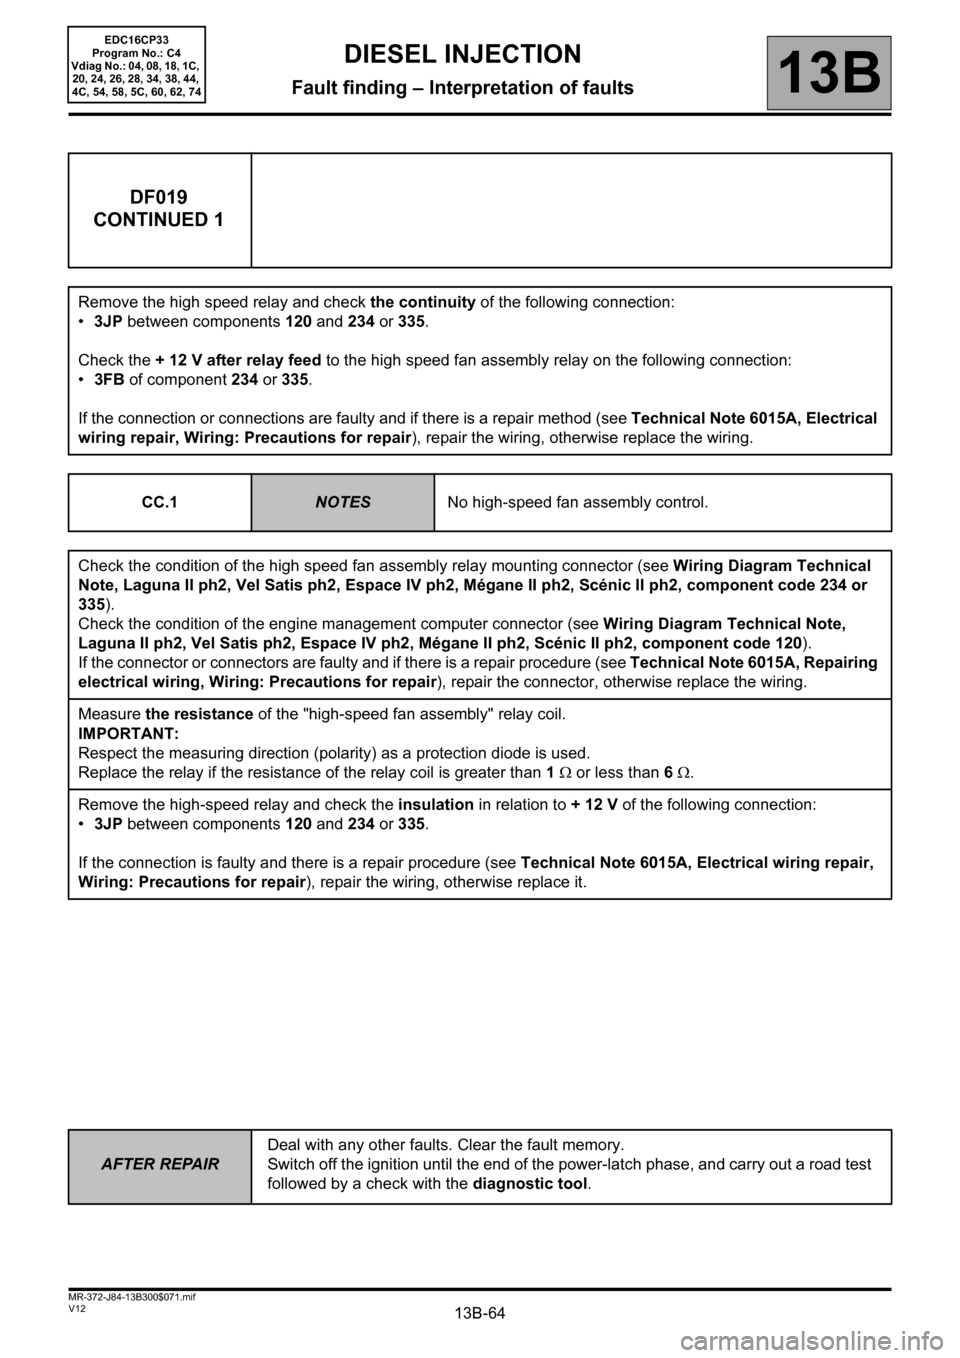
DF019
CONTINUED 1
Remove the high speed relay and check the continuity of the following connection:
•3JP between components 120 and 234 or 335.
Check the + 12 V after relay feed to the high speed fan assembly relay on the following connection:
•3FB of component 234 or 335.
If the connection or connections are faulty and if there is a repair method (see Technical Note 6015A, Electrical
wiring repair, Wiring: Precautions for repair), repair the wiring, otherwise replace the wiring.
CC.1
NOTESNo high-speed fan assembly control.
Check the condition of the high speed fan assembly relay mounting connector (see Wiring Diagram Technical
Note, Laguna II ph2, Vel Satis ph2, Espace IV ph2, Mégane II ph2, Scénic II ph2, component code 234 or
335).
Check the condition of the engine management computer connector (see Wiring Diagram Technical Note,
Laguna II ph2, Vel Satis ph2, Espace IV ph2, Mégane II ph2, Scénic II ph2, component code 120).
If the connector or connectors are faulty and if there is a repair procedure (see Technical Note 6015A, Repairing
electrical wiring, Wiring: Precautions for repair), repair the connector, otherwise replace the wiring.
Measure the resistance of the "high-speed fan assembly" relay coil.
IMPORTANT:
Respect the measuring direction (polarity) as a protection diode is used.
Replace the relay if the resistance of the relay coil is greater than 1 Ω or less than 6 Ω.
Remove the high-speed relay and check the insulation in relation to + 12 V of the following connection:
•3JP between components 120 and 234 or 335.
If the connection is faulty and there is a repair procedure (see Technical Note 6015A, Electrical wiring repair,
Wiring: Precautions for repair), repair the wiring, otherwise replace it.
Page 65 of 510
13B-65
AFTER REPAIRDeal with any other faults. Clear the fault memory.
Switch off the ignition until the end of the power-latch phase, and carry out a road test
followed by a check with the diagnostic tool.
V12 MR-372-J84-13B300$071.mif
DIESEL INJECTION
Fault finding – Interpretation of faults13B
EDC16CP33
Program No.: C4
Vdiag No.: 04, 08, 18, 1C,
20, 24, 26, 28, 34, 38, 44,
4C, 54, 58, 5C, 60, 62, 74
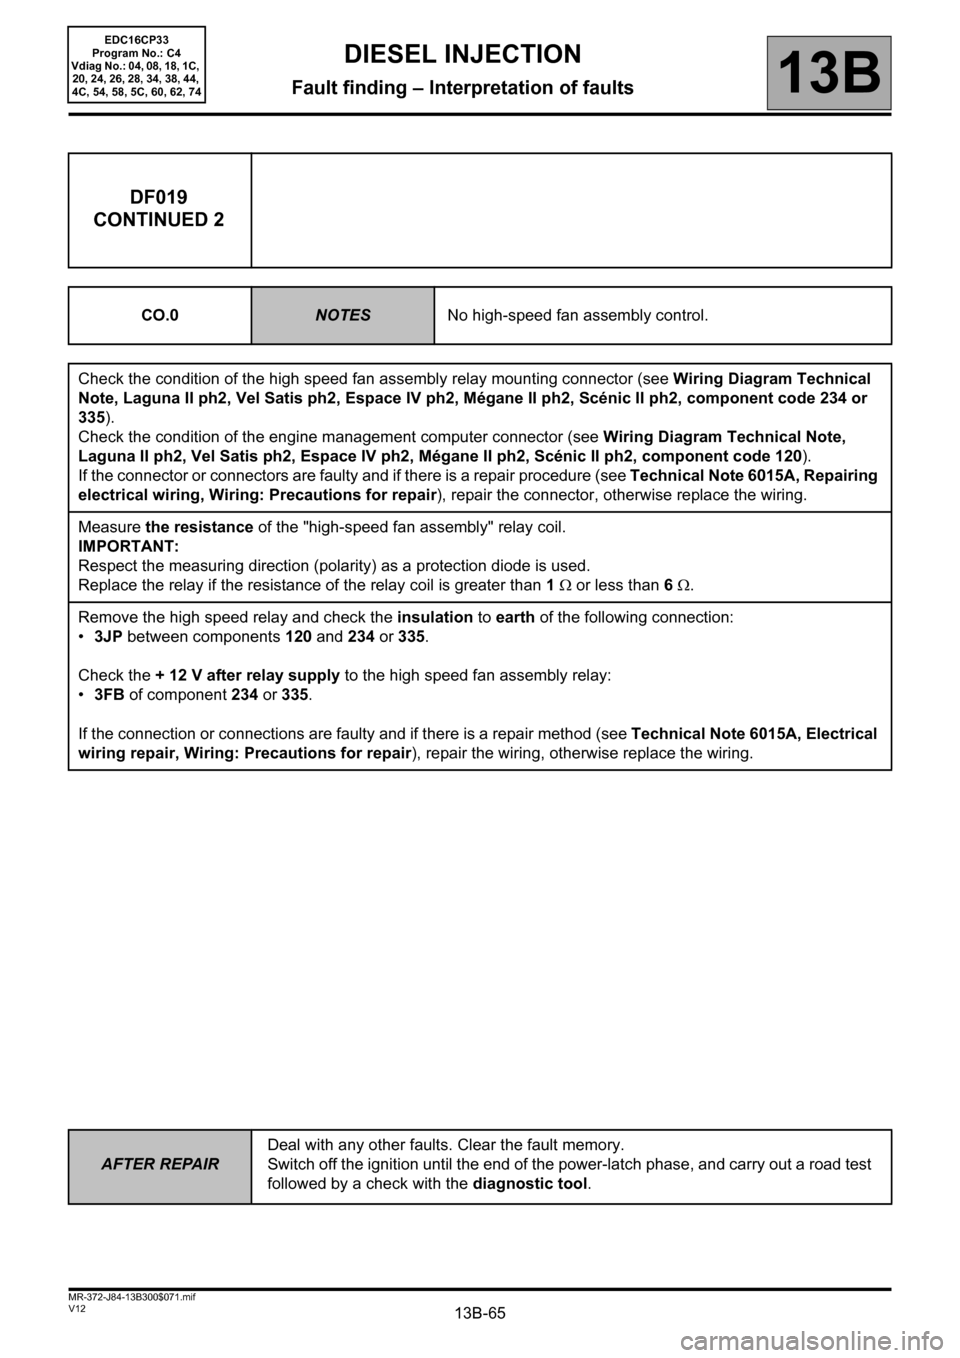
DF019
CONTINUED 2
CO.0NOTESNo high-speed fan assembly control.
Check the condition of the high speed fan assembly relay mounting connector (see Wiring Diagram Technical
Note, Laguna II ph2, Vel Satis ph2, Espace IV ph2, Mégane II ph2, Scénic II ph2, component code 234 or
335).
Check the condition of the engine management computer connector (see Wiring Diagram Technical Note,
Laguna II ph2, Vel Satis ph2, Espace IV ph2, Mégane II ph2, Scénic II ph2, component code 120).
If the connector or connectors are faulty and if there is a repair procedure (see Technical Note 6015A, Repairing
electrical wiring, Wiring: Precautions for repair), repair the connector, otherwise replace the wiring.
Measure the resistance of the "high-speed fan assembly" relay coil.
IMPORTANT:
Respect the measuring direction (polarity) as a protection diode is used.
Replace the relay if the resistance of the relay coil is greater than 1 Ω or less than 6 Ω.
Remove the high speed relay and check the insulation to earth of the following connection:
•3JP between components 120 and 234 or 335.
Check the + 12 V after relay supply to the high speed fan assembly relay:
•3FB of component 234 or 335.
If the connection or connections are faulty and if there is a repair method (see Technical Note 6015A, Electrical
wiring repair, Wiring: Precautions for repair), repair the wiring, otherwise replace the wiring.
Page 66 of 510
13B-66
AFTER REPAIRDeal with any other faults. Clear the fault memory.
Switch off the ignition until the end of the power-latch phase, and carry out a road test
followed by a check with the diagnostic tool.
V12 MR-372-J84-13B300$071.mif
DIESEL INJECTION
Fault finding – Interpretation of faults13B
EDC16CP33
Program No.: C4
Vdiag No.: 04, 08, 18, 1C,
20, 24, 26, 28, 34, 38, 44,
4C, 54, 58, 5C, 60, 62, 74
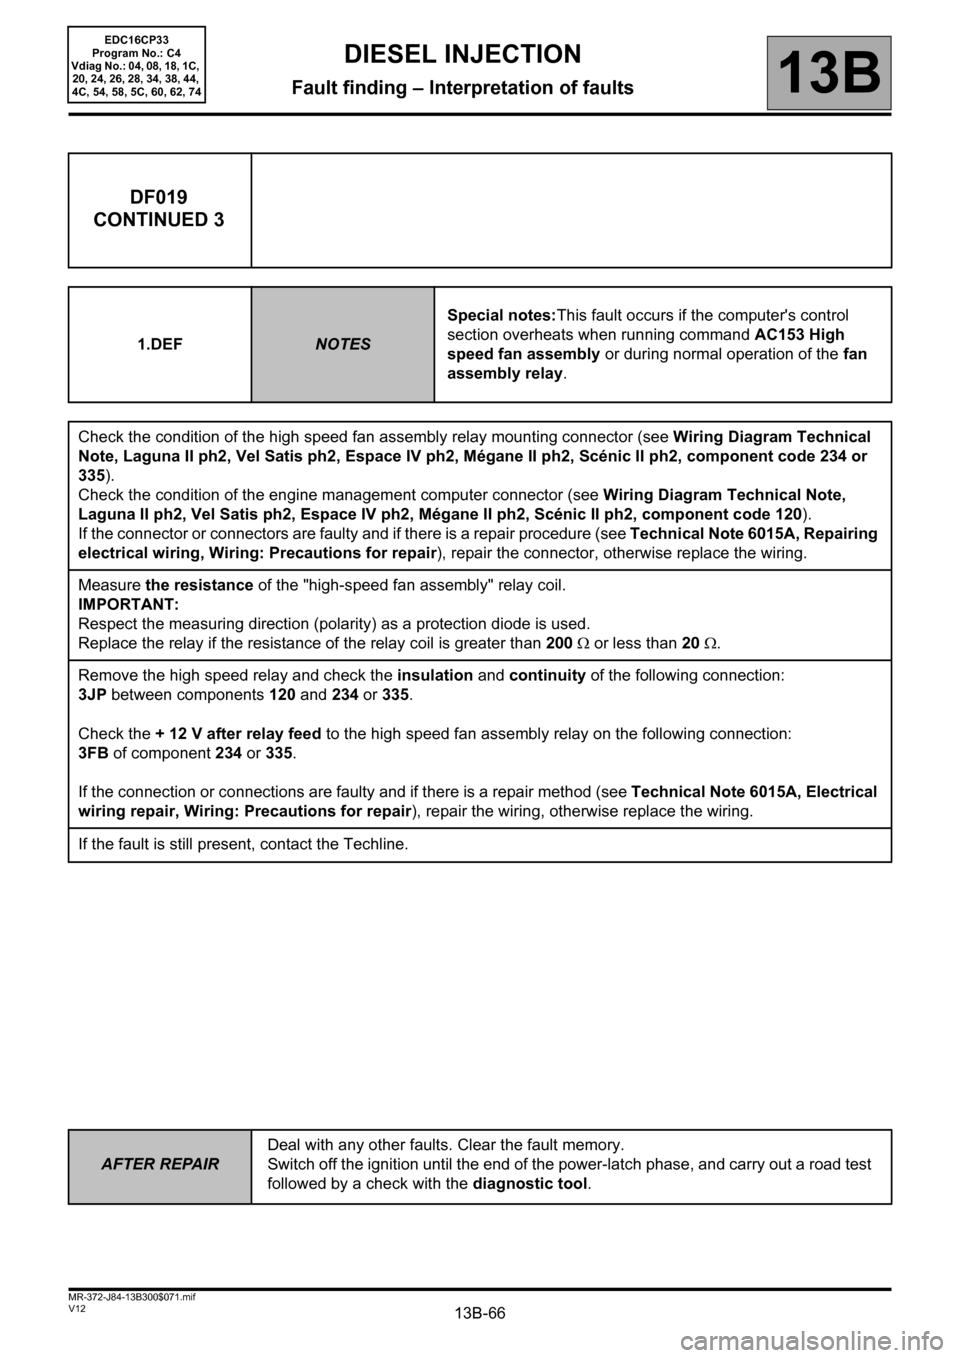
DF019
CONTINUED 3
1.DEFNOTESSpecial notes:This fault occurs if the computer's control
section overheats when running command AC153 High
speed fan assembly or during normal operation of the fan
assembly relay.
Check the condition of the high speed fan assembly relay mounting connector (see Wiring Diagram Technical
Note, Laguna II ph2, Vel Satis ph2, Espace IV ph2, Mégane II ph2, Scénic II ph2, component code 234 or
335).
Check the condition of the engine management computer connector (see Wiring Diagram Technical Note,
Laguna II ph2, Vel Satis ph2, Espace IV ph2, Mégane II ph2, Scénic II ph2, component code 120).
If the connector or connectors are faulty and if there is a repair procedure (see Technical Note 6015A, Repairing
electrical wiring, Wiring: Precautions for repair), repair the connector, otherwise replace the wiring.
Measure the resistance of the "high-speed fan assembly" relay coil.
IMPORTANT:
Respect the measuring direction (polarity) as a protection diode is used.
Replace the relay if the resistance of the relay coil is greater than 200 Ω or less than 20 Ω.
Remove the high speed relay and check the insulation and continuity of the following connection:
3JP between components 120 and 234 or 335.
Check the + 12 V after relay feed to the high speed fan assembly relay on the following connection:
3FB of component 234 or 335.
If the connection or connections are faulty and if there is a repair method (see Technical Note 6015A, Electrical
wiring repair, Wiring: Precautions for repair), repair the wiring, otherwise replace the wiring.
If the fault is still present, contact the Techline.
Page 67 of 510
13B-67
AFTER REPAIRDeal with any other faults. Clear the fault memory.
Switch off the ignition until the end of the power-latch phase, and carry out a road test
followed by a check with the diagnostic tool.
V12 MR-372-J84-13B300$071.mif
DIESEL INJECTION
Fault finding – Interpretation of faults13B
EDC16CP33
Program No.: C4
Vdiag No.: 04, 08, 18, 1C,
20, 24, 26, 28, 34, 38, 44,
4C, 54, 58, 5C, 60, 62, 74
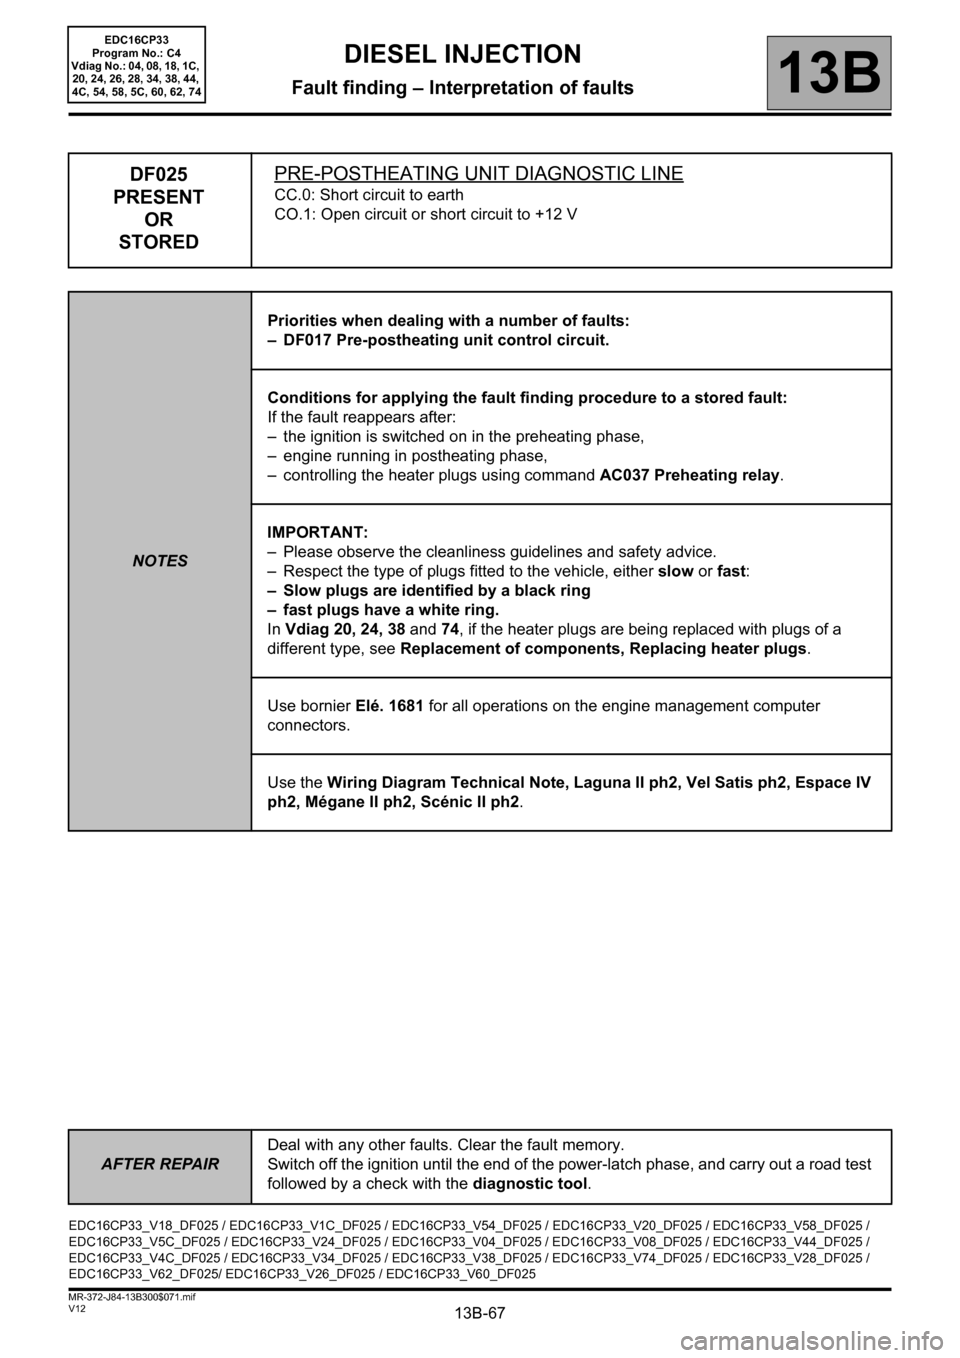
DF025
PRESENT
OR
STOREDPRE-POSTHEATING UNIT DIAGNOSTIC LINE
CC.0: Short circuit to earth
CO.1: Open circuit or short circuit to +12 V
NOTESPriorities when dealing with a number of faults:
– DF017 Pre-postheating unit control circuit.
Conditions for applying the fault finding procedure to a stored fault:
If the fault reappears after:
– the ignition is switched on in the preheating phase,
– engine running in postheating phase,
– controlling the heater plugs using command AC037 Preheating relay.
IMPORTANT:
– Please observe the cleanliness guidelines and safety advice.
– Respect the type of plugs fitted to the vehicle, either slow or fast:
– Slow plugs are identified by a black ring
– fast plugs have a white ring.
In Vdiag 20, 24, 38 and 74, if the heater plugs are being replaced with plugs of a
different type, see Replacement of components, Replacing heater plugs.
Use bornier Elé. 1681 for all operations on the engine management computer
connectors.
Use the Wiring Diagram Technical Note, Laguna II ph2, Vel Satis ph2, Espace IV
ph2, Mégane II ph2, Scénic II ph2.
EDC16CP33_V18_DF025 / EDC16CP33_V1C_DF025 / EDC16CP33_V54_DF025 / EDC16CP33_V20_DF025 / EDC16CP33_V58_DF025 /
EDC16CP33_V5C_DF025 / EDC16CP33_V24_DF025 / EDC16CP33_V04_DF025 / EDC16CP33_V08_DF025 / EDC16CP33_V44_DF025 /
EDC16CP33_V4C_DF025 / EDC16CP33_V34_DF025 / EDC16CP33_V38_DF025 / EDC16CP33_V74_DF025 / EDC16CP33_V28_DF025 /
EDC16CP33_V62_DF025/ EDC16CP33_V26_DF025 / EDC16CP33_V60_DF025
Page 68 of 510
13B-68
AFTER REPAIRDeal with any other faults. Clear the fault memory.
Switch off the ignition until the end of the power-latch phase, and carry out a road test
followed by a check with the diagnostic tool.
V12 MR-372-J84-13B300$071.mif
DIESEL INJECTION
Fault finding – Interpretation of faults13B
EDC16CP33
Program No.: C4
Vdiag No.: 04, 08, 18, 1C,
20, 24, 26, 28, 34, 38, 44,
4C, 54, 58, 5C, 60, 62, 74
DF025
CONTINUED 1
CC.0
CO.1NOTESNone.
Check the condition of the preheating unit connector (see Wiring Diagram Technical Note, Laguna II ph2, Vel
Satis ph2, Espace IV ph2, Mégane II ph2, Scénic II ph2, component code 257).
Check the condition of all of the heater plugs (see Wiring Diagram Technical Note, Laguna II ph2, Vel Satis
ph2, Espace IV ph2, Mégane II ph2, Scénic II ph2, component codes 680, 681, 682, 683).
If the connector or connectors are faulty and if there is a repair procedure (see Technical Note 6015A, Repairing
electrical wiring, Wiring: Precautions for repair), repair the connector, otherwise replace the wiring.
During a phase where the heater plugs are actuated by command AC037 Preheating relay, measure the current
across the heater plugs.
Replace heater plugs with currents less than 1A or greater than 6A after 5 seconds' actuation.
Check the continuity of the following connections:
•37AB between components 257 and 682,
•37AA, between components 257 and 681,
•37Z between components 257 and 680,
•37AC between components 257 and 683.
If the connection or connections are faulty and if there is a repair method (see Technical Note 6015A, Electrical
wiring repair, Wiring: Precautions for repair), repair the wiring, otherwise replace the wiring.
Page 69 of 510
13B-69
AFTER REPAIRDeal with any other faults. Clear the fault memory.
Switch off the ignition until the end of the power-latch phase, and carry out a road test
followed by a check with the diagnostic tool.
V12 MR-372-J84-13B300$071.mif
DIESEL INJECTION
Fault finding – Interpretation of faults13B
EDC16CP33
Program No.: C4
Vdiag No.: 04, 08, 18, 1C,
20, 24, 26, 28, 34, 38, 44,
4C, 54, 58, 5C, 60, 62, 74
DF025
CONTINUED 2
Check the + 12 V battery supply to the preheating unit on the following connection:
•BP35 of component 257.
Check the engine earthing.
If the connection is faulty and there is a repair procedure (see Technical Note 6015A, Electrical wiring repair,
Wiring: Precautions for repair), repair the wiring, otherwise replace it.
Interpret command AC037 Preheating relay.
Check the condition of the engine management computer connector (see Wiring Diagram Technical Note,
Laguna II ph2, Vel Satis ph2, Espace IV ph2, Mégane II ph2, Scénic II ph2, component code 120).
If the connector is faulty and there is a repair method (see Technical Note 6015A, Repairing electrical wiring,
Wiring: Precautions for repair), repair the connector, otherwise replace the wiring.
Check the continuity and absence of interference resistance on the following connection (preheating relay unit
diagnostic line):
•3FY between components 120 and 257.
If the connection is faulty and there is a repair procedure (see Technical Note 6015A, Electrical wiring repair,
Wiring: Precautions for repair), repair the wiring, otherwise replace it.
If the fault is still present, contact the Techline.
Page 90 of 510
13B-90
AFTER REPAIRDeal with any other faults. Clear the fault memory.
Switch off the ignition until the end of the power-latch phase, and carry out a road test
followed by a check with the diagnostic tool.
V12 MR-372-J84-13B300$071.mif
DIESEL INJECTION
Fault finding – Interpretation of faults13B
EDC16CP33
Program No.: C4
Vdiag No.: 04, 08, 18, 1C,
20, 24, 26, 28, 34, 38, 44,
4C, 54, 58, 5C, 60, 62, 74
DF032
PRESENT
OR
STOREDTHERMOPLUNGER 1 RELAY CONTROL CIRCUITCO: Open circuit
CC.1: Short circuit to + 12 V
CC.0: Short circuit to earth
1.DEF: Internal electronic fault
NOTESConditions for applying the fault finding procedure to a stored fault:
If the fault becomes present following an actuator command AC063 Thermoplunger
no. 1 relay.
Special notes:
Use bornier Elé. 1681 for all operations on the engine management computer
connectors.
Use the Wiring Diagram Technical Note, Laguna II ph2, Vel Satis ph2, Espace IV
ph2, Mégane II ph2, Scénic II ph2.
CO
NOTESNone.
Check the conformity of fuse: FM14 (70A) or FM3 (30A) (see MR364 (Mégane II ph2), MR370 (Scénic II ph2),
MR 395 (Laguna II ph2), 402 (Vel Satis ph2), 405 (Espace IV ph2) Mechanical, 81C, Fuses, Fuses: List and
location of components).
Check the condition of the thermoplunger 1 relay mounting connector on the engine fuse box or additional heater
interface unit (see Wiring Diagram Technical Note, Laguna II ph2, Vel Satis ph2, Espace IV ph2, Mégane II
ph2, Scénic II ph2, component code 1067 or 1550).
Check the condition of the engine management computer connector (see Wiring Diagram Technical Note,
Laguna II ph2, Vel Satis ph2, Espace IV ph2, Mégane II ph2, Scénic II ph2, component code 120).
If the connector or connectors are faulty and if there is a repair procedure (see Technical Note 6015A, Repairing
electrical wiring, Wiring: Precautions for repair), repair the connector, otherwise replace the wiring.
Check the conformity of the thermoplunger 1 relay (with the relay removed) or the additional heater interface unit:
–Insulation between connections BP9 and 3JB of component 1067 or 1550.
– Measure the resistance between connections3FB and 3JA of component1067 or 1550.
Replace the relay if its resistance is greater than 1 kΩ or less than 6 Ω.
Replace the unit if its resistance is greater than 2 kΩ (M9R721).
EDC16CP33_V18_DF032 / EDC16CP33_V1C_DF032 / EDC16CP33_V54_DF032 / EDC16CP33_V20_DF032 / EDC16CP33_V58_DF032 /
EDC16CP33_V5C_DF032 / EDC16CP33_V24_DF032 / EDC16CP33_V04_DF032 / EDC16CP33_V08_DF032 / EDC16CP33_V44_DF032 /
EDC16CP33_V4C_DF032 / EDC16CP33_V34_DF032 / EDC16CP33_V38_DF032 / EDC16CP33_V74_DF032 / EDC16CP33_V28_DF032 /
EDC16CP33_V62_DF032 / EDC16CP33_V26_DF032 / EDC16CP33_V60_DF032
Page 91 of 510
13B-91
AFTER REPAIRDeal with any other faults. Clear the fault memory.
Switch off the ignition until the end of the power-latch phase, and carry out a road test
followed by a check with the diagnostic tool.
V12 MR-372-J84-13B300$071.mif
DIESEL INJECTION
Fault finding – Interpretation of faults13B
EDC16CP33
Program No.: C4
Vdiag No.: 04, 08, 18, 1C,
20, 24, 26, 28, 34, 38, 44,
4C, 54, 58, 5C, 60, 62, 74
DF032
CONTINUED 1
Check the continuity of the following connection:
•3JA between components 120 and 1067 or 1550.
Check the + 12 V after relay supply to the thermoplunger 1 relay mounting or the additional heater interface unit
on the following connection:
•3FB of component 1067 or 1550.
If the connection or connections are faulty and if there is a repair method (see Technical Note 6015A, Electrical
wiring repair, Wiring: Precautions for repair), repair the wiring, otherwise replace the wiring.
CC.1
NOTESNone.
Check the conformity of fuse: FM14 (70A) or FM3 (30A) (see MR364 (Mégane II ph2), MR370 (Scénic II ph2),
MR 395 (Laguna II ph2), 402 (Vel Satis ph2), 405 (Espace IV ph2) Mechanical, 81C, Fuses, Fuses: List and
location of components).
Check the condition of the thermoplunger 1 relay mounting connector on the engine fuse box or additional heater
interface unit (see Wiring Diagram Technical Note, Laguna II ph2, Vel Satis ph2, Espace IV ph2, Mégane II
ph2, Scénic II ph2, component code 1067 or 1550).
Check the condition of the engine management computer connector (see Wiring Diagram Technical Note,
Laguna II ph2, Vel Satis ph2, Espace IV ph2, Mégane II ph2, Scénic II ph2, component code 120).
If the connector or connectors are faulty and if there is a repair procedure (see Technical Note 6015A, Electrical
wiring repair, Wiring: Precautions for repair), repair the connector, otherwise replace the wiring.
Check the conformity of the thermoplunger 1 relay (with the relay removed) or the additional heater interface unit:
–Insulation between connections BP9 and 3JB of component 1067 or 1550.
– Measure the resistance between connections3FB and 3JA of component1067 or 1550.
Replace the relay if its resistance is greater than 1 kΩ or less than 6 Ω.
Replace the unit if its resistance is greater than 1 kΩ (M9R721).
Check the insulation in relation to +12 V of the following connection:
•3JA between components 120 and 1067 or 1550.
If the connection is faulty and there is a repair procedure (see Technical Note 6015A, Electrical wiring repair,
Wiring: Precautions for repair), repair the wiring, otherwise replace it.
Page 92 of 510
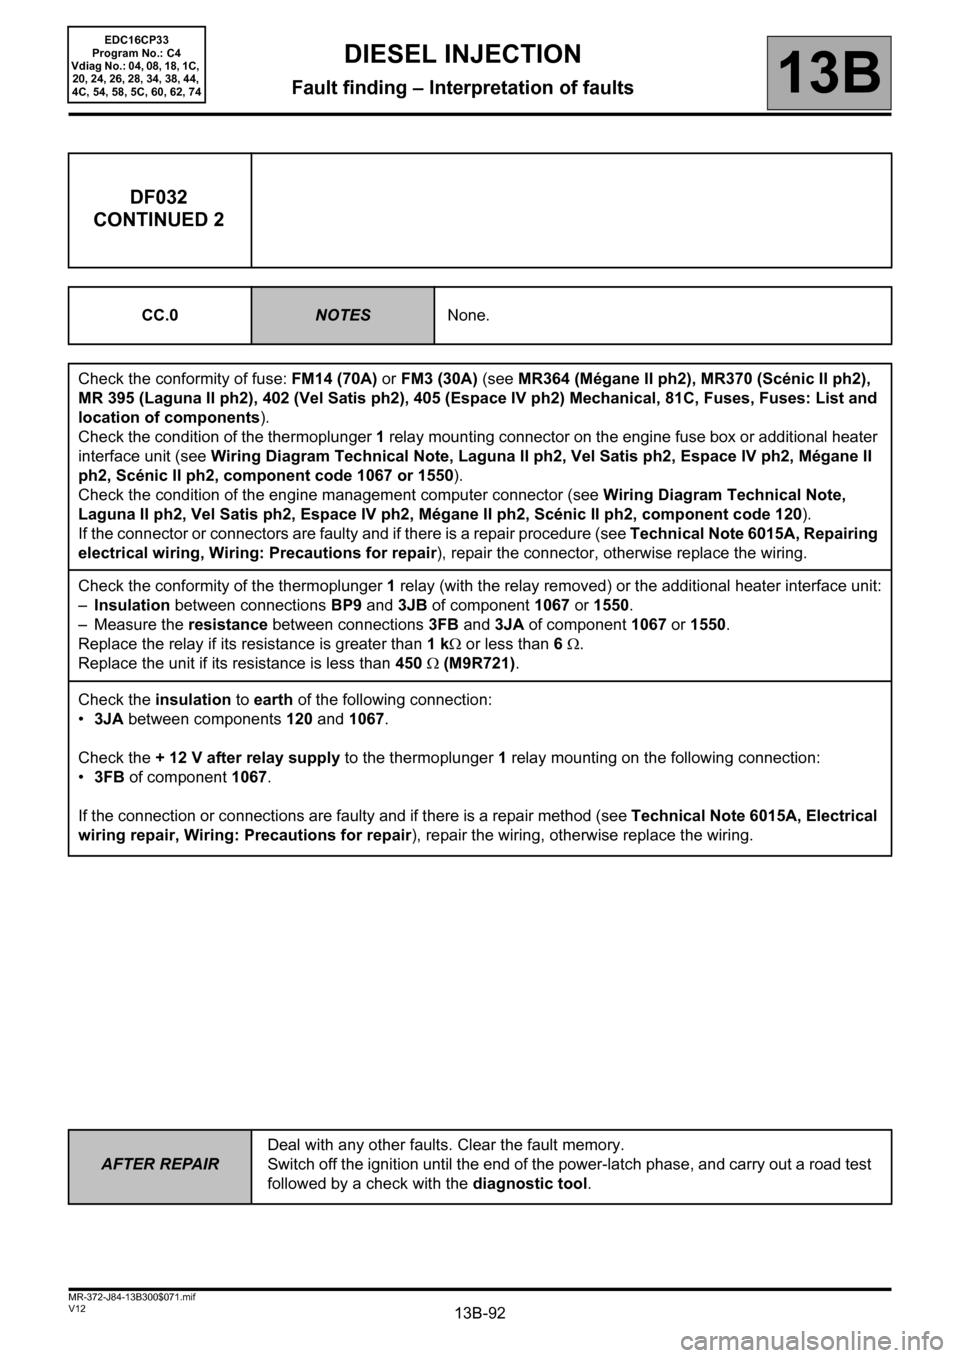
13B-92
AFTER REPAIRDeal with any other faults. Clear the fault memory.
Switch off the ignition until the end of the power-latch phase, and carry out a road test
followed by a check with the diagnostic tool.
V12 MR-372-J84-13B300$071.mif
DIESEL INJECTION
Fault finding – Interpretation of faults13B
EDC16CP33
Program No.: C4
Vdiag No.: 04, 08, 18, 1C,
20, 24, 26, 28, 34, 38, 44,
4C, 54, 58, 5C, 60, 62, 74
DF032
CONTINUED 2
CC.0NOTESNone.
Check the conformity of fuse: FM14 (70A) or FM3 (30A) (see MR364 (Mégane II ph2), MR370 (Scénic II ph2),
MR 395 (Laguna II ph2), 402 (Vel Satis ph2), 405 (Espace IV ph2) Mechanical, 81C, Fuses, Fuses: List and
location of components).
Check the condition of the thermoplunger 1 relay mounting connector on the engine fuse box or additional heater
interface unit (see Wiring Diagram Technical Note, Laguna II ph2, Vel Satis ph2, Espace IV ph2, Mégane II
ph2, Scénic II ph2, component code 1067 or 1550).
Check the condition of the engine management computer connector (see Wiring Diagram Technical Note,
Laguna II ph2, Vel Satis ph2, Espace IV ph2, Mégane II ph2, Scénic II ph2, component code 120).
If the connector or connectors are faulty and if there is a repair procedure (see Technical Note 6015A, Repairing
electrical wiring, Wiring: Precautions for repair), repair the connector, otherwise replace the wiring.
Check the conformity of the thermoplunger 1 relay (with the relay removed) or the additional heater interface unit:
–Insulation between connections BP9 and 3JB of component 1067 or 1550.
– Measure the resistance between connections3FB and 3JA of component1067 or 1550.
Replace the relay if its resistance is greater than 1 kΩ or less than 6 Ω.
Replace the unit if its resistance is less than 450 Ω (M9R721).
Check the insulation to earth of the following connection:
•3JA between components 120 and 1067.
Check the + 12 V after relay supply to the thermoplunger 1 relay mounting on the following connection:
•3FB of component 1067.
If the connection or connections are faulty and if there is a repair method (see Technical Note 6015A, Electrical
wiring repair, Wiring: Precautions for repair), repair the wiring, otherwise replace the wiring.
Page 93 of 510
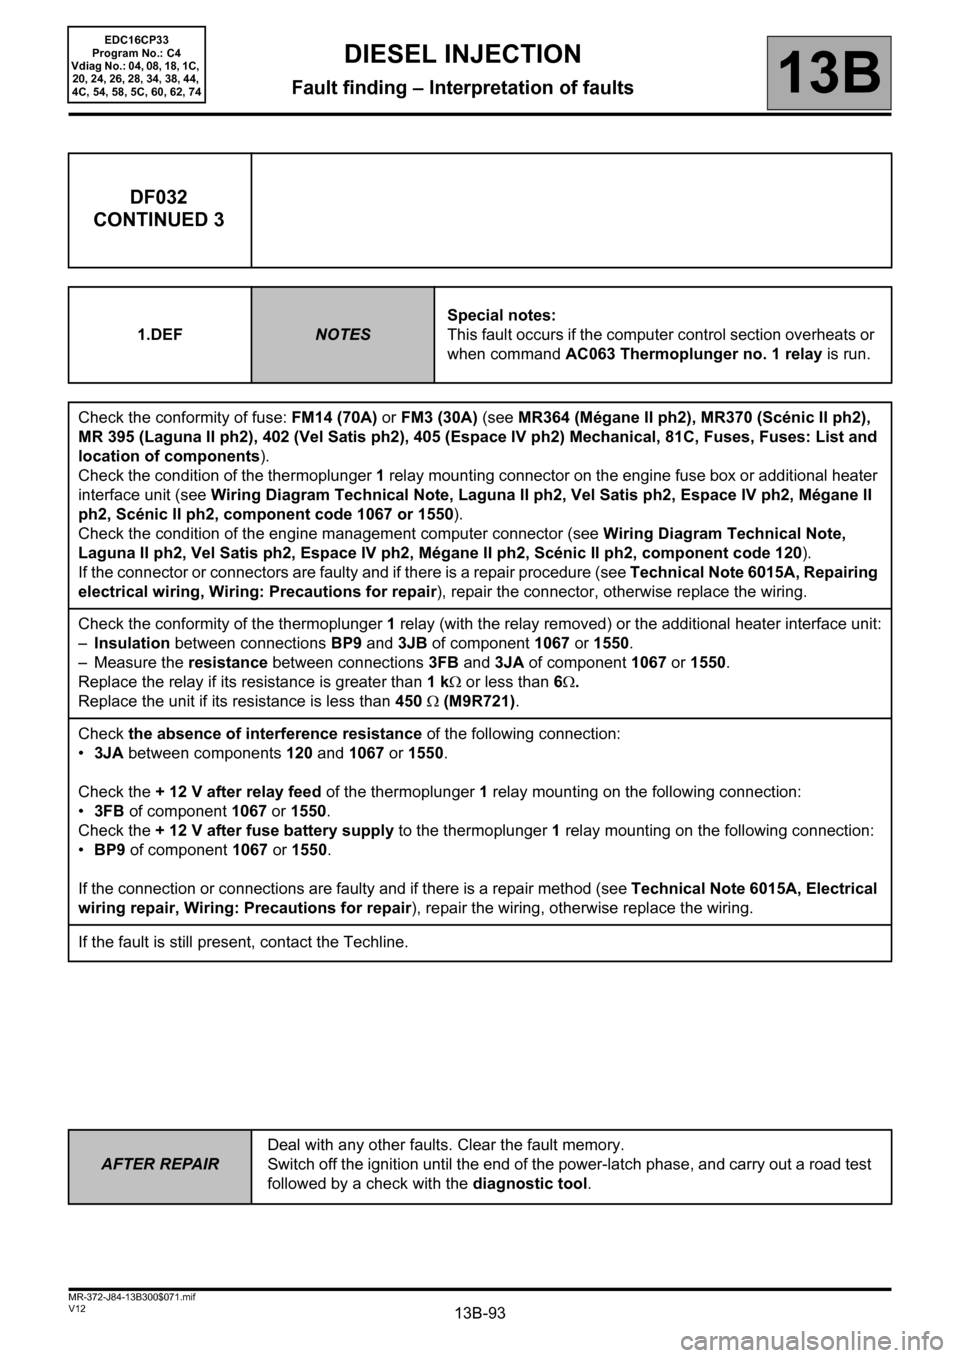
13B-93
AFTER REPAIRDeal with any other faults. Clear the fault memory.
Switch off the ignition until the end of the power-latch phase, and carry out a road test
followed by a check with the diagnostic tool.
V12 MR-372-J84-13B300$071.mif
DIESEL INJECTION
Fault finding – Interpretation of faults13B
EDC16CP33
Program No.: C4
Vdiag No.: 04, 08, 18, 1C,
20, 24, 26, 28, 34, 38, 44,
4C, 54, 58, 5C, 60, 62, 74
DF032
CONTINUED 3
1.DEFNOTESSpecial notes:
This fault occurs if the computer control section overheats or
when command AC063 Thermoplunger no. 1 relay is run.
Check the conformity of fuse: FM14 (70A) or FM3 (30A) (see MR364 (Mégane II ph2), MR370 (Scénic II ph2),
MR 395 (Laguna II ph2), 402 (Vel Satis ph2), 405 (Espace IV ph2) Mechanical, 81C, Fuses, Fuses: List and
location of components).
Check the condition of the thermoplunger 1 relay mounting connector on the engine fuse box or additional heater
interface unit (see Wiring Diagram Technical Note, Laguna II ph2, Vel Satis ph2, Espace IV ph2, Mégane II
ph2, Scénic II ph2, component code 1067 or 1550).
Check the condition of the engine management computer connector (see Wiring Diagram Technical Note,
Laguna II ph2, Vel Satis ph2, Espace IV ph2, Mégane II ph2, Scénic II ph2, component code 120).
If the connector or connectors are faulty and if there is a repair procedure (see Technical Note 6015A, Repairing
electrical wiring, Wiring: Precautions for repair), repair the connector, otherwise replace the wiring.
Check the conformity of the thermoplunger 1 relay (with the relay removed) or the additional heater interface unit:
–Insulation between connections BP9 and 3JB of component 1067 or 1550.
– Measure the resistance between connections3FB and 3JA of component1067 or 1550.
Replace the relay if its resistance is greater than 1 kΩ or less than 6Ω.
Replace the unit if its resistance is less than 450 Ω (M9R721).
Check the absence of interference resistance of the following connection:
•3JA between components 120 and 1067 or 1550.
Check the + 12 V after relay feed of the thermoplunger 1 relay mounting on the following connection:
•3FB of component 1067 or
1550.
Check the + 12 V after fuse battery supply to the thermoplunger 1 relay mounting on the following connection:
•BP9 of component 1067 or 1550.
If the connection or connections are faulty and if there is a repair method (see Technical Note 6015A, Electrical
wiring repair, Wiring: Precautions for repair), repair the wiring, otherwise replace the wiring.
If the fault is still present, contact the Techline.