stop start RENAULT SCENIC 2018 Workshop Manual
[x] Cancel search | Manufacturer: RENAULT, Model Year: 2018, Model line: SCENIC, Model: RENAULT SCENIC 2018Pages: 364, PDF Size: 10.43 MB
Page 236 of 364
3.20
AIR CONDITIONING: information and operating instructions (2/2)
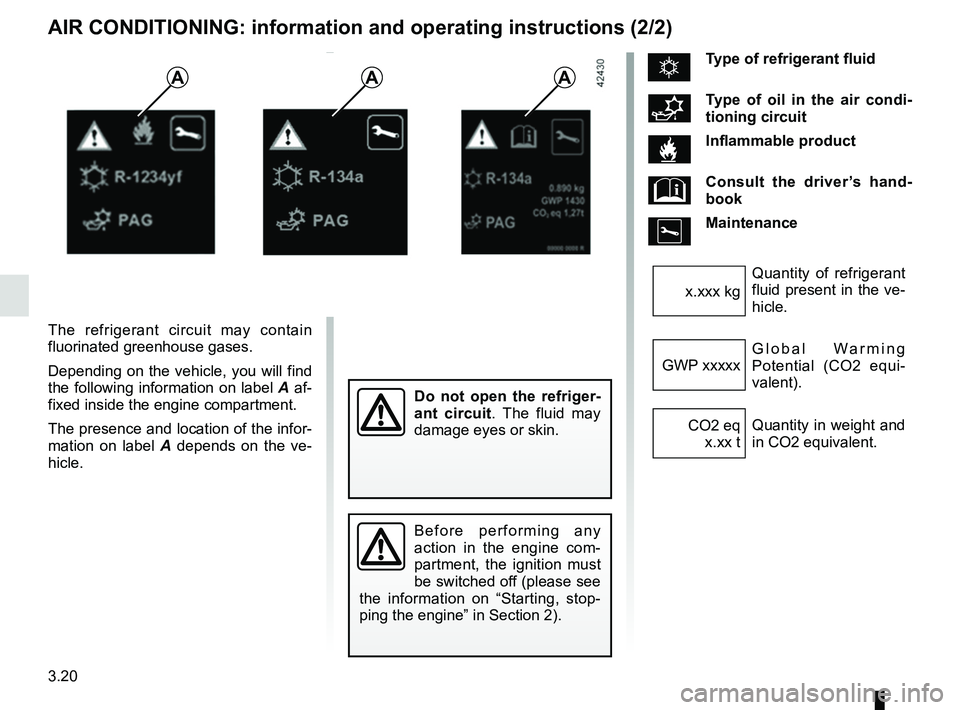
The refrigerant circuit may contain
fluorinated greenhouse gases.
Depending on the vehicle, you will find
the following information on label A af-
fixed inside the engine compartment.
The presence and location of the infor-
mation on label A depends on the ve-
hicle.
Do not open the refriger-
ant circuit . The fluid may
damage eyes or skin.
Before performing any
action in the engine com-
partment, the ignition must
be switched off (please see
the information on “Starting, stop-
ping the engine” in Section 2).
ÑType of refrigerant fluid
Type of oil in the air condi-
tioning circuit
Inflammable product
Consult the driver’s hand-
book
Maintenance
Quantity of refrigerant
fluid present in the ve-
hicle.
x.xxx kg
Global Warming
Potential (CO2 equi-
valent).
GWP xxxxx
Quantity in weight and
in CO2 equivalent.
CO2 eq
x.xx t
AAA
Page 242 of 364
3.26
FIXED GLASS ROOF
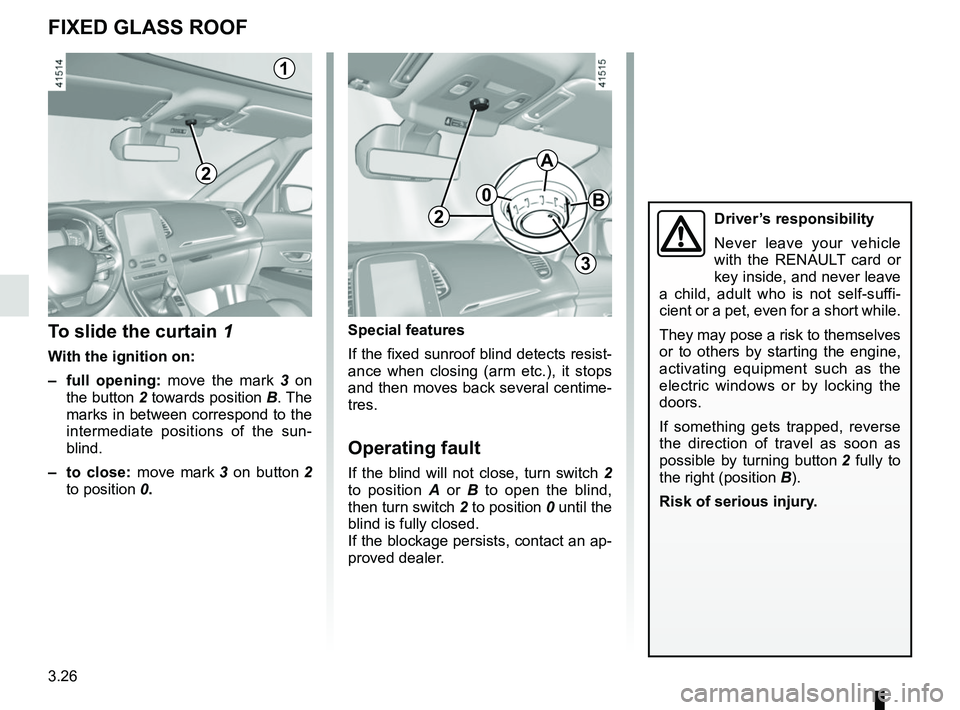
To slide the curtain 1
With the ignition on:
– full opening: move the mark 3 on
the button 2 towards position B. The
marks in between correspond to the
intermediate positions of the sun-
blind.
– to close: move mark 3 on button 2
to position 0.
1
Driver’s responsibility
Never leave your vehicle
with the RENAULT card or
key inside, and never leave
a child, adult who is not self-suffi-
cient or a pet, even for a short while.
They may pose a risk to themselves
or to others by starting the engine,
activating equipment such as the
electric windows or by locking the
doors.
If something gets trapped, reverse
the direction of travel as soon as
possible by turning button 2 fully to
the right (position B).
Risk of serious injury.
3
0
A
B2
Special features
If the fixed sunroof blind detects resist-
ance when closing (arm etc.), it stops
and then moves back several centime-
tres.
Operating fault
If the blind will not close, turn switch 2
to position A or B to open the blind,
then turn switch 2 to position 0 until the
blind is fully closed.
If the blockage persists, contact an ap-
proved dealer.
2
Page 274 of 364
4.2
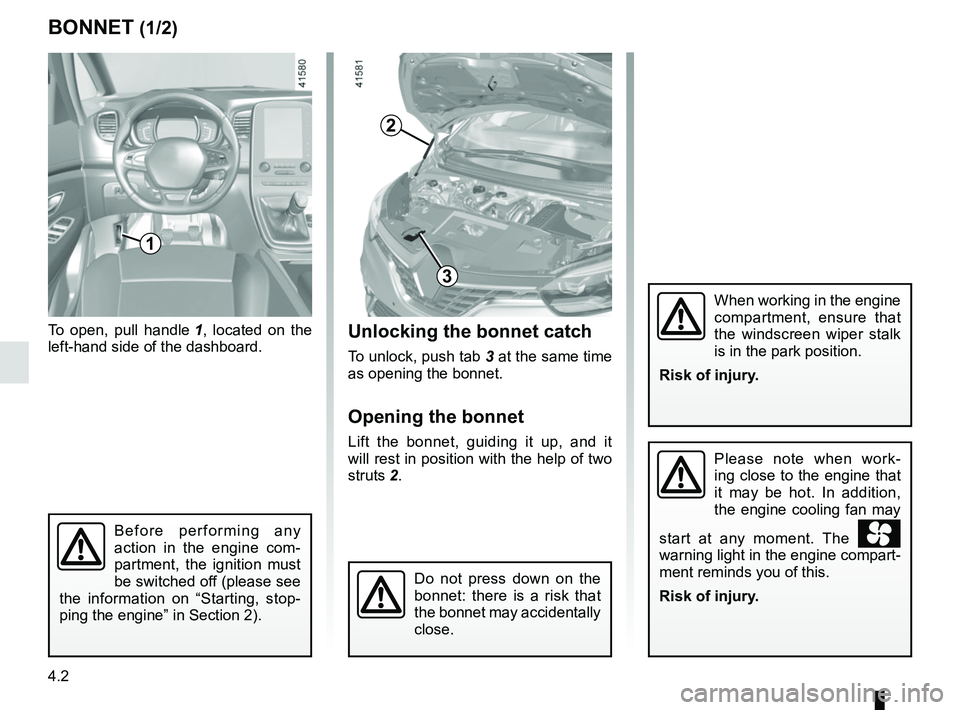
BONNET (1/2)Unlocking the bonnet catch
To unlock, push tab 3 at the same time
as opening the bonnet.
Opening the bonnet
Lift the bonnet, guiding it up, and it
will rest in position with the help of two
struts 2.
To open, pull handle
1, located on the
left-hand side of the dashboard.Please note when work-
ing close to the engine that
it may be hot. In addition,
the engine cooling fan may
start at any moment. The
warning light in the engine compart-
ment reminds you of this.
Risk of injury.
1
Do not press down on the
bonnet: there is a risk that
the bonnet may accidentally
close.
Before performing any
action in the engine com-
partment, the ignition must
be switched off (please see
the information on “Starting, stop-
ping the engine” in Section 2).
When working in the engine
compartment, ensure that
the windscreen wiper stalk
is in the park position.
Risk of injury.
2
3
Page 276 of 364
4.4
ENGINE OIL LEVEL: general information
It is normal for an engine to use oil for
lubrication and cooling of moving parts
and it is normal to top up the level be-
tween oil changes.
However, contact your approved
Dealer if more than 0.5 litres is being
consumed every 600 miles (1,000 km)
after the running in period.
Oil change frequency: check the oil
level from time to time and certainly
before any long journey to avoid the
risk of damaging your engine.
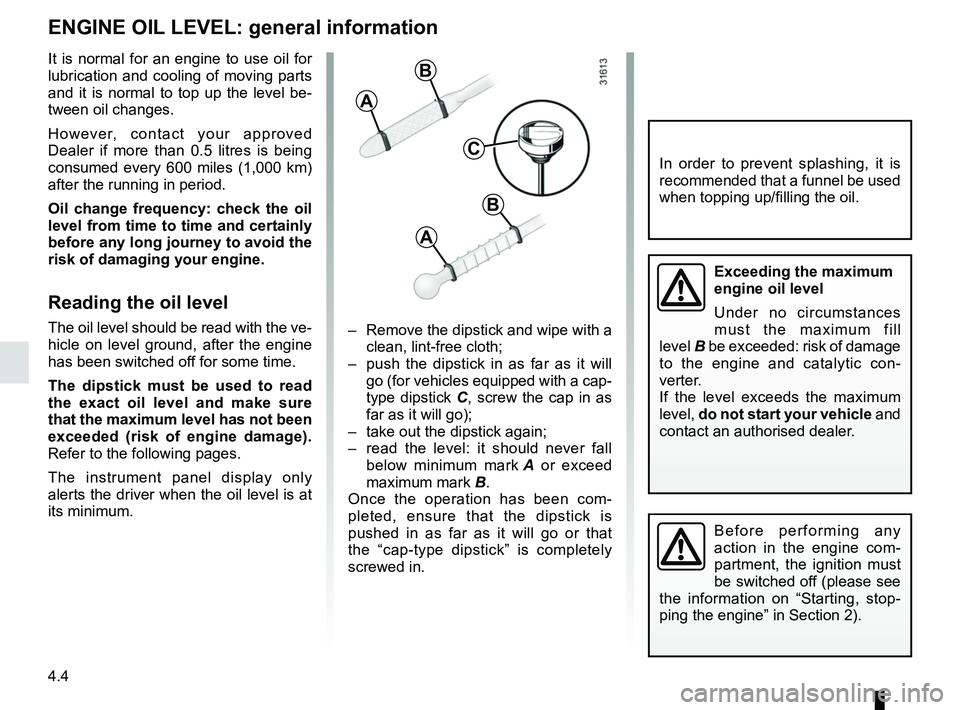
Reading the oil level
The oil level should be read with the ve-
hicle on level ground, after the engine
has been switched off for some time.
The dipstick must be used to read
the exact oil level and make sure
that the maximum level has not been
exceeded (risk of engine damage).
Refer to the following pages.
The instrument panel display only
alerts the driver when the oil level is at
its minimum. – Remove the dipstick and wipe with a
clean, lint-free cloth;
– push the dipstick in as far as it will go (for vehicles equipped with a cap-
type dipstick C, screw the cap in as
far as it will go);
– take out the dipstick again;
– read the level: it should never fall below minimum mark A or exceed
maximum mark B.
Once the operation has been com-
pleted, ensure that the dipstick is
pushed in as far as it will go or that
the “cap-type dipstick” is completely
screwed in.
C
A
B
A
B
In order to prevent splashing, it is
recommended that a funnel be used
when topping up/filling the oil.
Before performing any
action in the engine com-
partment, the ignition must
be switched off (please see
the information on “Starting, stop-
ping the engine” in Section 2).
Exceeding the maximum
engine oil level
Under no circumstances
must the maximum fill
level B be exceeded: risk of damage
to the engine and catalytic con-
verter.
If the level exceeds the maximum
level, do not start your vehicle and
contact an authorised dealer.
Page 277 of 364
4.5
ENGINE OIL LEVEL: topping up, filling (1/3)
Topping up/Filling
The vehicle must be parked on level
ground and the engine should be cold
(for instance, before the engine is
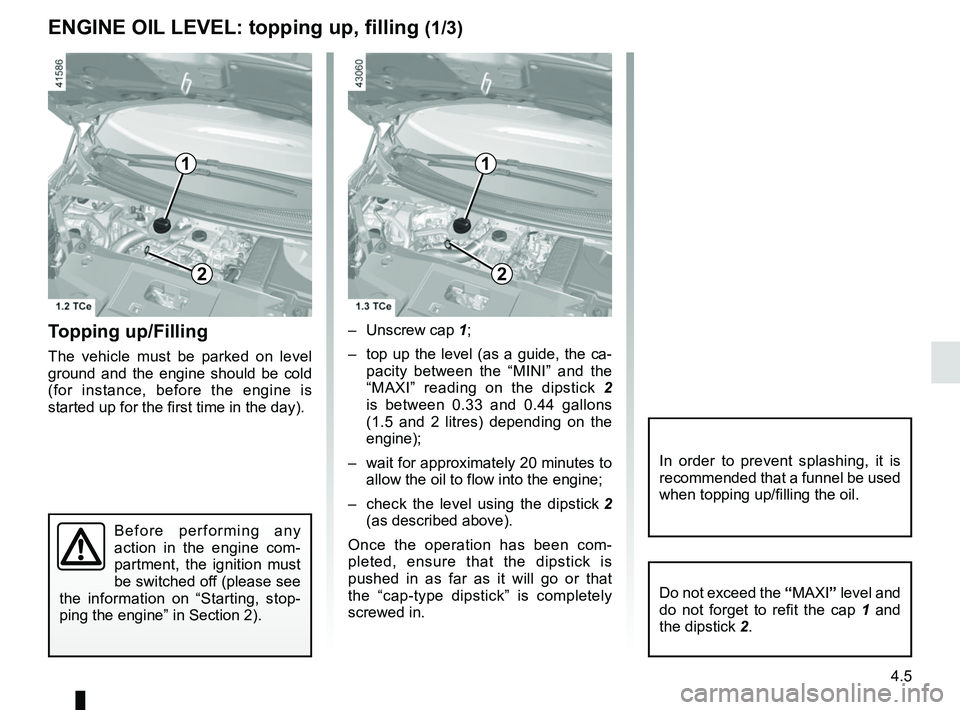
started up for the first time in the day).– Unscrew cap
1;
– top up the level (as a guide, the ca- pacity between the “MINI” and the
“MAXI” reading on the dipstick 2
is between 0.33 and 0.44 gallons
(1.5 and 2 litres) depending on the
engine);
– wait for approximately 20 minutes to allow the oil to flow into the engine;
– check the level using the dipstick 2
(as described above).
Once the operation has been com-
pleted, ensure that the dipstick is
pushed in as far as it will go or that
the “cap-type dipstick” is completely
screwed in.
1
2
Before performing any
action in the engine com-
partment, the ignition must
be switched off (please see
the information on “Starting, stop-
ping the engine” in Section 2).
1
2
Do not exceed the “MAXI” level and
do not forget to refit the cap 1 and
the dipstick 2.
In order to prevent splashing, it is
recommended that a funnel be used
when topping up/filling the oil.
Page 278 of 364
4.6
ENGINE OIL LEVEL: topping up, filling (2/3)
1
2
1
2
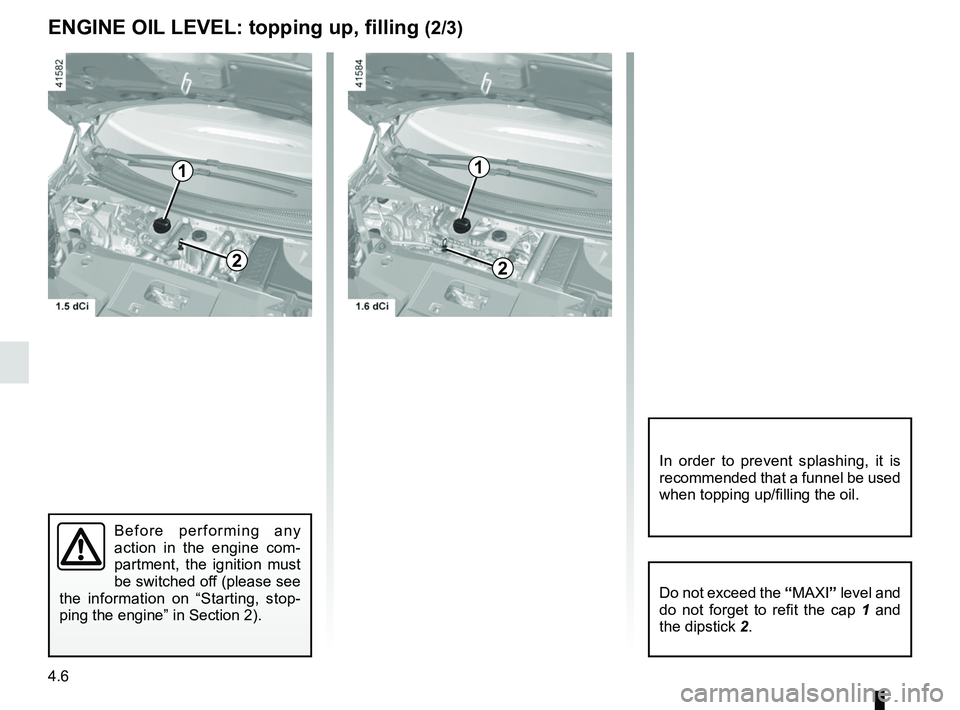
Do not exceed the “MAXI” level and
do not forget to refit the cap 1 and
the dipstick 2.
In order to prevent splashing, it is
recommended that a funnel be used
when topping up/filling the oil.
Before performing any
action in the engine com-
partment, the ignition must
be switched off (please see
the information on “Starting, stop-
ping the engine” in Section 2).
Page 280 of 364
4.8
Replacement intervals
Refer to the Maintenance Document for
your vehicle.
Checking intervals
Check the coolant level regularly
(very severe damage is likely to be
caused to the engine if it runs out of
coolant).
If the level needs to be topped up, only
use products approved by our Technical
Department which ensure:
– protection against freezing;
– anticorrosion protection of the cool- ing system.
LEVELS (1/3)
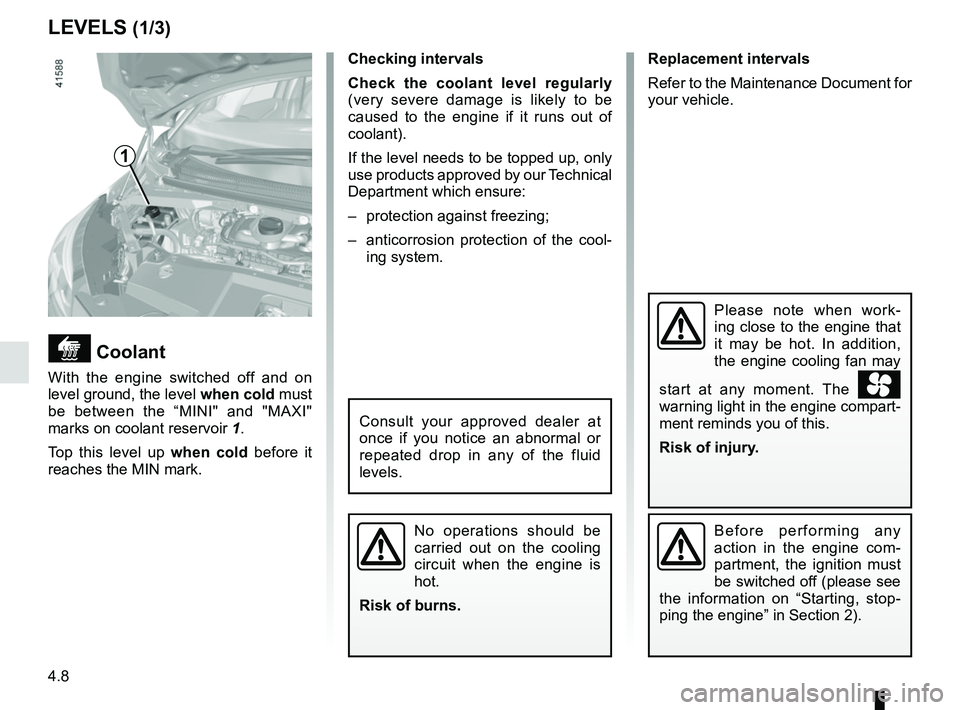
Coolant
With the engine switched off and on
level ground, the level when cold must
be between the “MINI" and "MAXI"
marks on coolant reservoir 1.
Top this level up when cold before it
reaches the MIN mark.
No operations should be
carried out on the cooling
circuit when the engine is
hot.
Risk of burns.
Consult your approved dealer at
once if you notice an abnormal or
repeated drop in any of the fluid
levels.
Please note when work-
ing close to the engine that
it may be hot. In addition,
the engine cooling fan may
start at any moment. The
warning light in the engine compart-
ment reminds you of this.
Risk of injury.
1
Before performing any
action in the engine com-
partment, the ignition must
be switched off (please see
the information on “Starting, stop-
ping the engine” in Section 2).
Page 281 of 364
4.9
LEVELS (2/3)
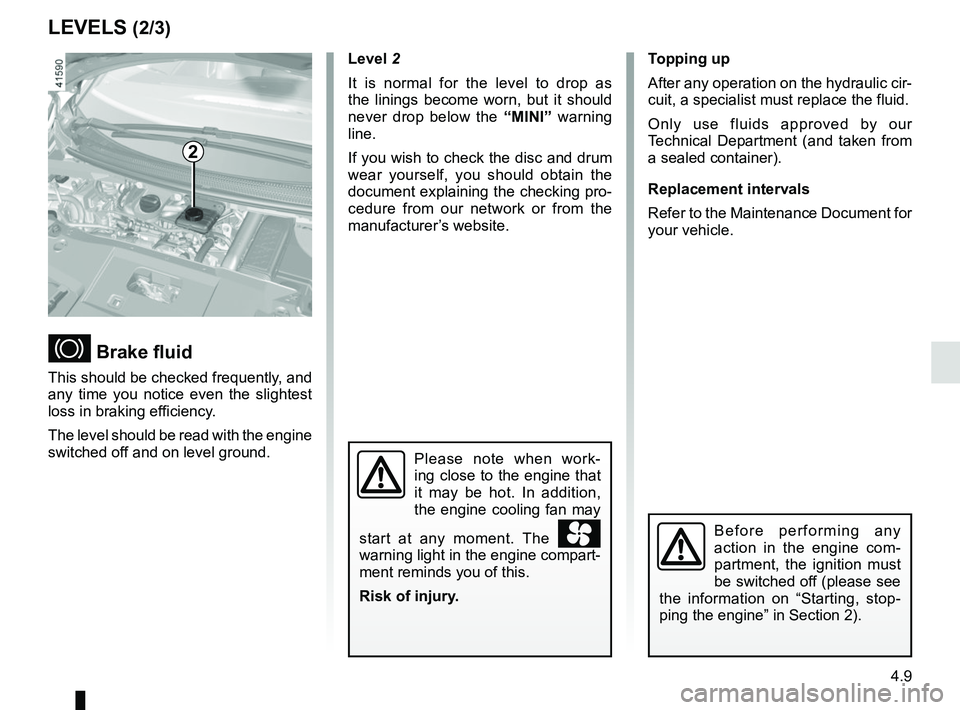
Brake fluid
This should be checked frequently, and
any time you notice even the slightest
loss in braking efficiency.
The level should be read with the engine
switched off and on level ground.Level 2
It is normal for the level to drop as
the linings become worn, but it should
never drop below the “MINI” warning
line.
If you wish to check the disc and drum
wear yourself, you should obtain the
document explaining the checking pro-
cedure from our network or from the
manufacturer’s website. Topping up
After any operation on the hydraulic cir-
cuit, a specialist must replace the fluid.
Only use fluids approved by our
Technical Department (and taken from
a sealed container).
Replacement intervals
Refer to the Maintenance Document for
your vehicle.
Please note when work-
ing close to the engine that
it may be hot. In addition,
the engine cooling fan may
start at any moment. The
warning light in the engine compart-
ment reminds you of this.
Risk of injury.
2
Before performing any
action in the engine com-
partment, the ignition must
be switched off (please see
the information on “Starting, stop-
ping the engine” in Section 2).
Page 283 of 364
4.11
12 VOLT BATTERY (1/2)
1
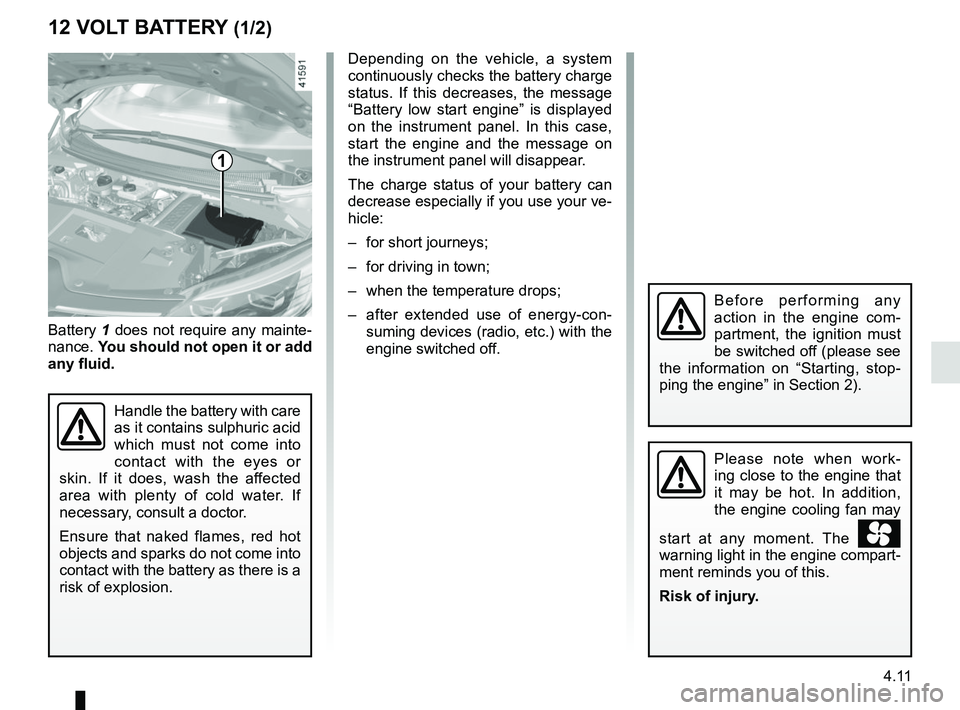
Battery 1 does not require any mainte-
nance. You should not open it or add
any fluid.
Handle the battery with care
as it contains sulphuric acid
which must not come into
contact with the eyes or
skin. If it does, wash the affected
area with plenty of cold water. If
necessary, consult a doctor.
Ensure that naked flames, red hot
objects and sparks do not come into
contact with the battery as there is a
risk of explosion.
Depending on the vehicle, a system
continuously checks the battery charge
status. If this decreases, the message
“Battery low start engine” is displayed
on the instrument panel. In this case,
start the engine and the message on
the instrument panel will disappear.
The charge status of your battery can
decrease especially if you use your ve-
hicle:
– for short journeys;
– for driving in town;
– when the temperature drops;
– after extended use of energy-con- suming devices (radio, etc.) with the
engine switched off.
Please note when work-
ing close to the engine that
it may be hot. In addition,
the engine cooling fan may
start at any moment. The
warning light in the engine compart-
ment reminds you of this.
Risk of injury.
Before performing any
action in the engine com-
partment, the ignition must
be switched off (please see
the information on “Starting, stop-
ping the engine” in Section 2).
Page 299 of 364
5.7
If the recommended pressure of
1.8 bar cannot be achieved after
15 minutes, repair is impossible. Do
not drive the vehicle. Consult an au-
thorised dealer.
TYRE INFLATION KIT (3/4)
Nothing should be placed
around the driver’s feet
as such objects may slide
under the pedals during
sudden braking manoeuvres and
obstruct their use.
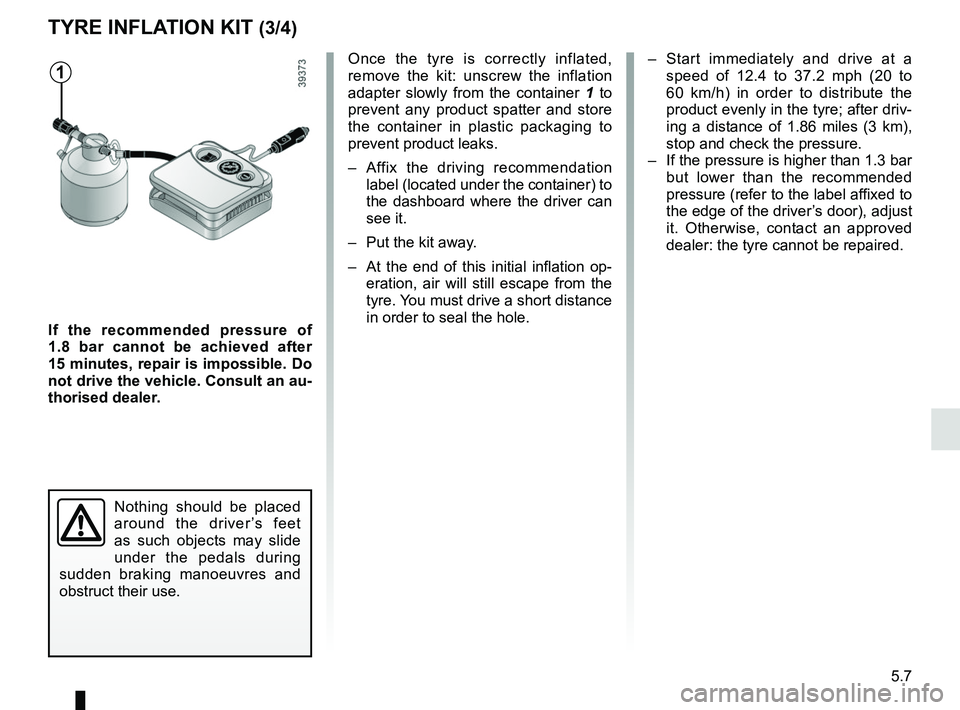
Once the tyre is correctly inflated,
remove the kit: unscrew the inflation
adapter slowly from the container 1 to
prevent any product spatter and store
the container in plastic packaging to
prevent product leaks.
– Affix the driving recommendation label (located under the container) to
the dashboard where the driver can
see it.
– Put the kit away.
– At the end of this initial inflation op- eration, air will still escape from the
tyre. You must drive a short distance
in order to seal the hole.1– Start immediately and drive at a speed of 12.4 to 37.2 mph (20 to
60 km/h) in order to distribute the
product evenly in the tyre; after driv-
ing a distance of 1.86 miles (3 km),
stop and check the pressure.
– If the pressure is higher than 1.3 bar but lower than the recommended
pressure (refer to the label affixed to
the edge of the driver’s door), adjust
it. Otherwise, contact an approved
dealer: the tyre cannot be repaired.