RENAULT TRAFIC 2018 Owners Manual
TRAFIC 2018
RENAULT
RENAULT
https://www.carmanualsonline.info/img/7/58407/w960_58407-0.png
RENAULT TRAFIC 2018 Owners Manual
Trending: alternator, fuel additives, coolant, low beam, emergency towing, heater, engine oil capacity
Page 191 of 298
3.27
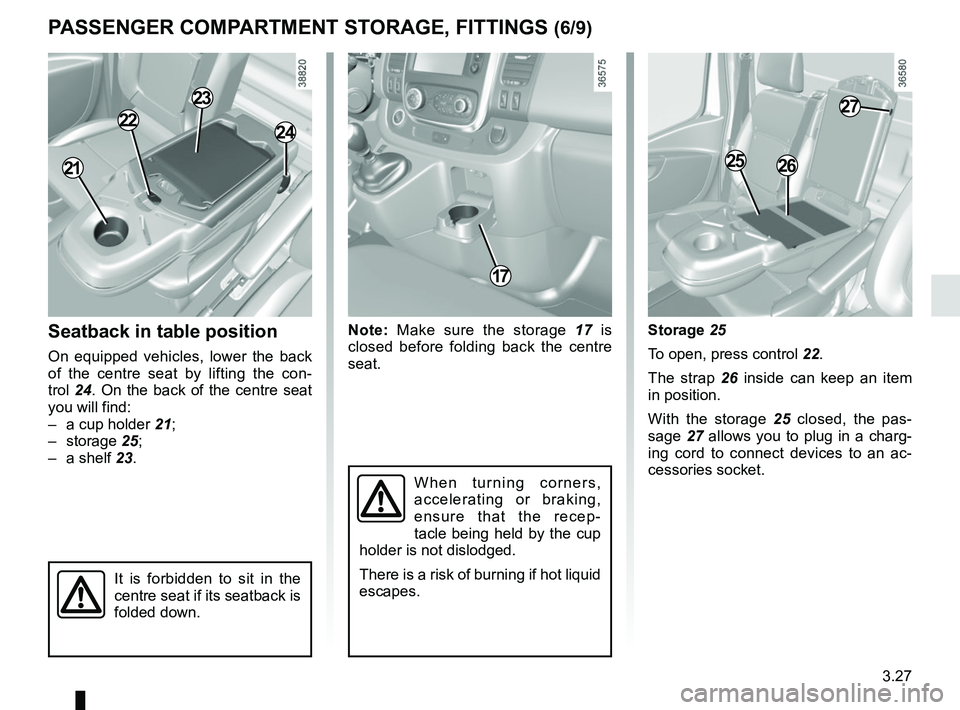
Storage 25
To open, press control 22.
The strap 26 inside can keep an item
in position.
With the storage 25 closed, the pas-
sage 27 allows you to plug in a charg-
ing cord to connect devices to an ac-
cessories socket.Seatback in table position
On equipped vehicles, lower the back
of the centre seat by lifting the con-
trol 24. On the back of the centre seat
you will find:
– a cup holder 21;
– storage 25;
– a shelf 23.
When turning corners,
accelerating or braking,
ensure that the recep-
tacle being held by the cup
holder is not dislodged.
There is a risk of burning if hot liquid
escapes.
It is forbidden to sit in the
centre seat if its seatback is
folded down.
24
PASSENGER COMPARTMENT STORAGE, FITTINGS (6/9)
23
2526
Note: Make sure the storage 17 is
closed before folding back the centre
seat.
17
21
2227
Page 192 of 298
3.28
Ensure that no hard, heavy
or pointed objects are
placed in the open storage
compartments in such a
way that they may fall on any pas-
sengers during sudden turning, bra-
king or in the event of an accident.
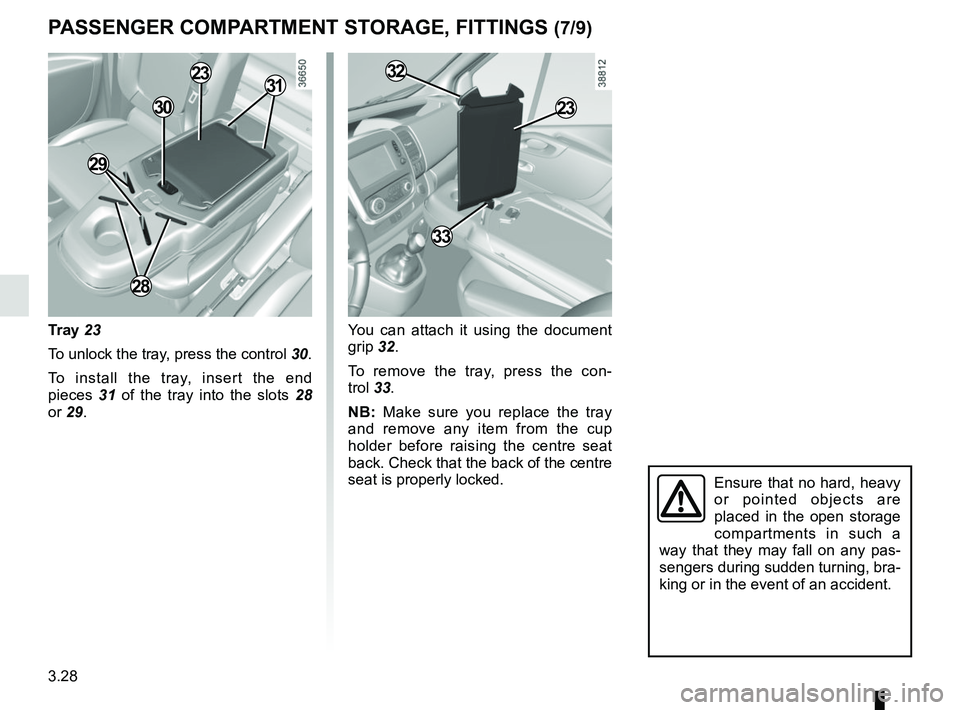
You can attach it using the document
grip 32.
To remove the tray, press the con-
trol 33.
NB: Make sure you replace the tray
and remove any item from the cup
holder before raising the centre seat
back. Check that the back of the centre
seat is properly locked.Tray 23
To unlock the tray, press the control 30.
To install the tray, insert the end
pieces 31 of the tray into the slots 28
or 29.
23
28
29
31
PASSENGER COMPARTMENT STORAGE, FITTINGS (7/9)
2330
33
32
Page 193 of 298
3.29
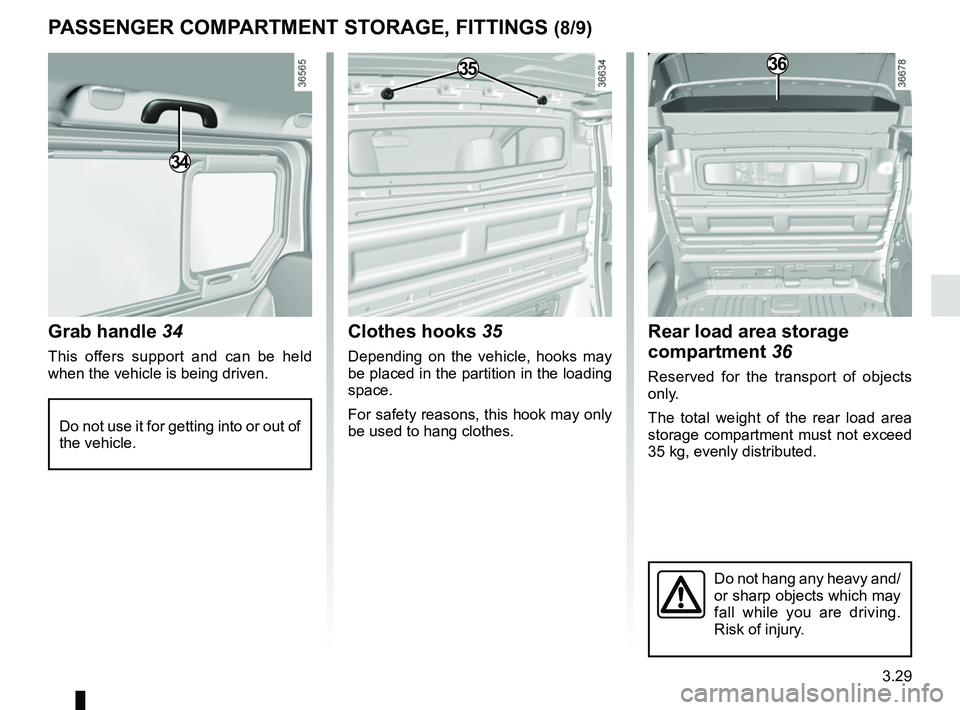
Grab handle 34
This offers support and can be held
when the vehicle is being driven.
PASSENGER COMPARTMENT STORAGE, FITTINGS (8/9)
Do not use it for getting into or out of
the vehicle.
34
Clothes hooks 35
Depending on the vehicle, hooks may
be placed in the partition in the loading
space.
For safety reasons, this hook may only
be used to hang clothes.
3536
Rear load area storage
compartment 36
Reserved for the transport of objects
only.
The total weight of the rear load area
storage compartment must not exceed
35 kg, evenly distributed.
Do not hang any heavy and/
or sharp objects which may
fall while you are driving.
Risk of injury.
Page 194 of 298
3.30
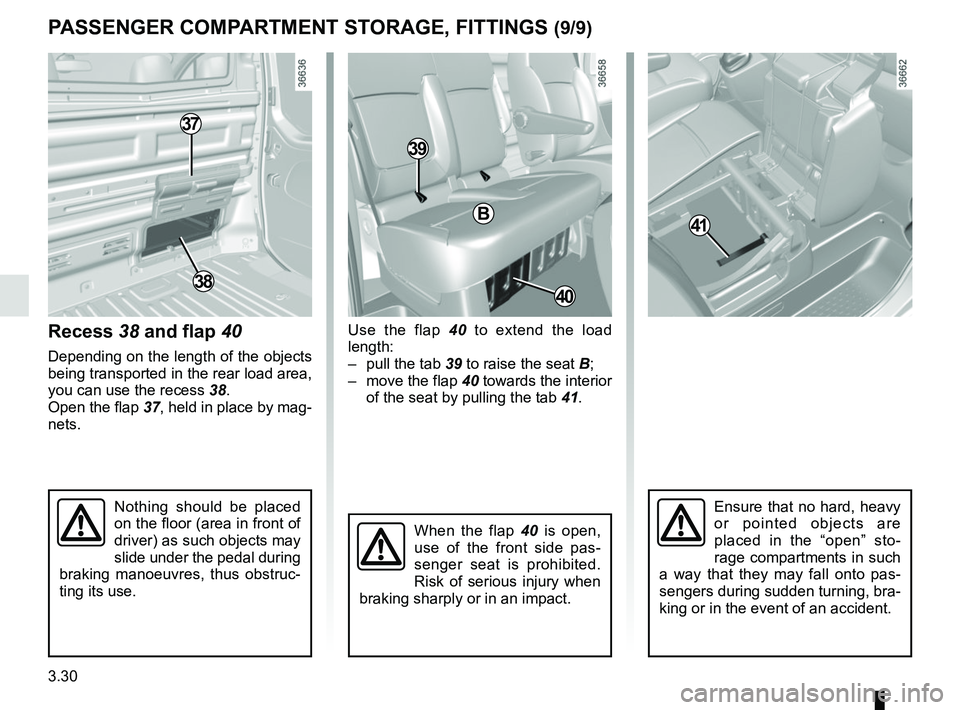
Use the flap 40 to extend the load
length:
– pull the tab 39 to raise the seat B;
– move the flap 40 towards the interior of the seat by pulling the tab 41.
PASSENGER COMPARTMENT STORAGE, FITTINGS (9/9)
37
Recess 38 and flap 40
Depending on the length of the objects
being transported in the rear load area,
you can use the recess 38.
Open the flap 37, held in place by mag-
nets.
40
B41
Nothing should be placed
on the floor (area in front of
driver) as such objects may
slide under the pedal during
braking manoeuvres, thus obstruc-
ting its use.Ensure that no hard, heavy
or pointed objects are
placed in the “open” sto-
rage compartments in such
a way that they may fall onto pas-
sengers during sudden turning, bra-
king or in the event of an accident.
38
39
When the flap 40 is open,
use of the front side pas-
senger seat is prohibited.
Risk of serious injury when
braking sharply or in an impact.
Page 195 of 298
3.31
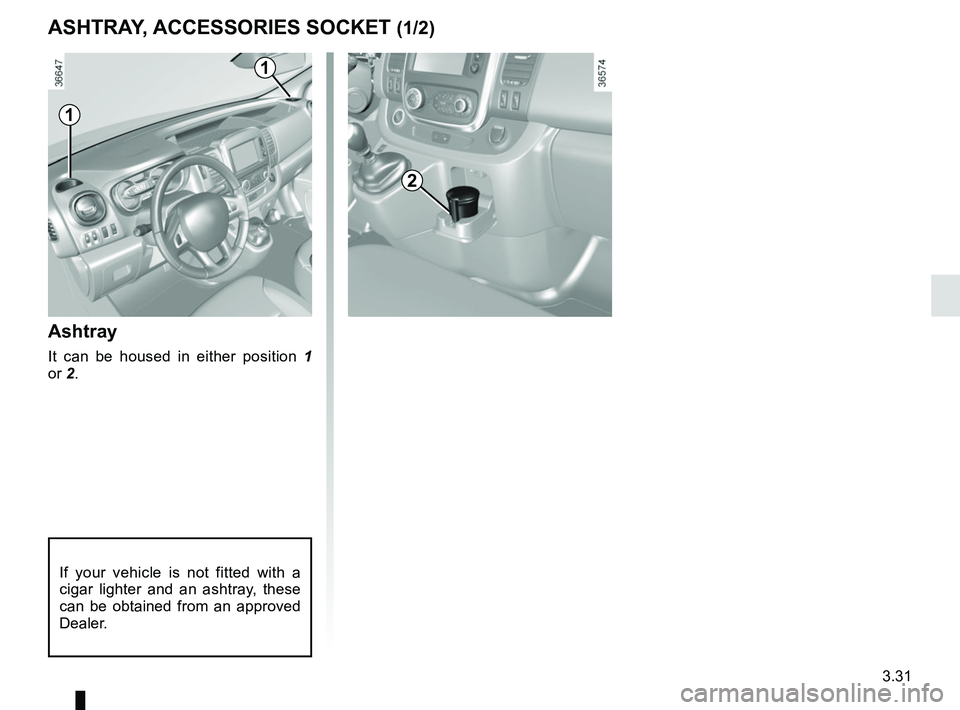
ASHTRAY, ACCESSORIES SOCKET (1/2)
Ashtray
It can be housed in either position 1
or 2.
If your vehicle is not fitted with a
cigar lighter and an ashtray, these
can be obtained from an approved
Dealer.
1
1
2
Page 196 of 298
3.32
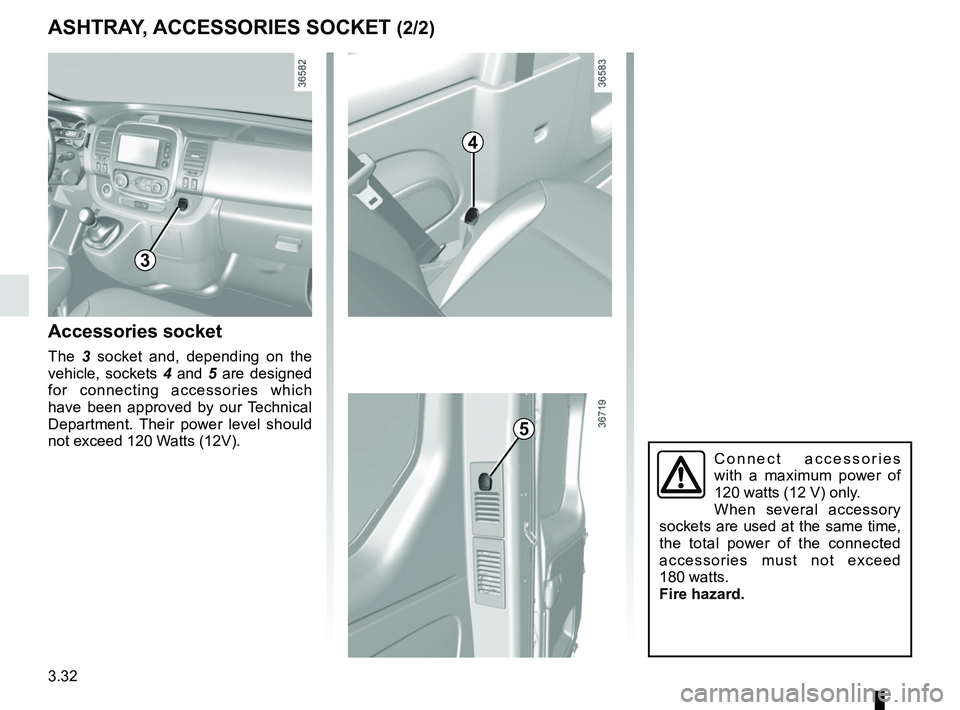
ASHTRAY, ACCESSORIES SOCKET (2/2)
Accessories socket
The 3 socket and, depending on the
vehicle, sockets 4 and 5 are designed
for connecting accessories which
have been approved by our Technical
Department. Their power level should
not exceed 120 Watts (12V).
Connect accessories
with a maximum power of
120 watts (12 V) only.
When several accessory
sockets are used at the same time,
the total power of the connected
accessories must not exceed
180 watts.
Fire hazard.
3
4
5
Page 197 of 298
3.33
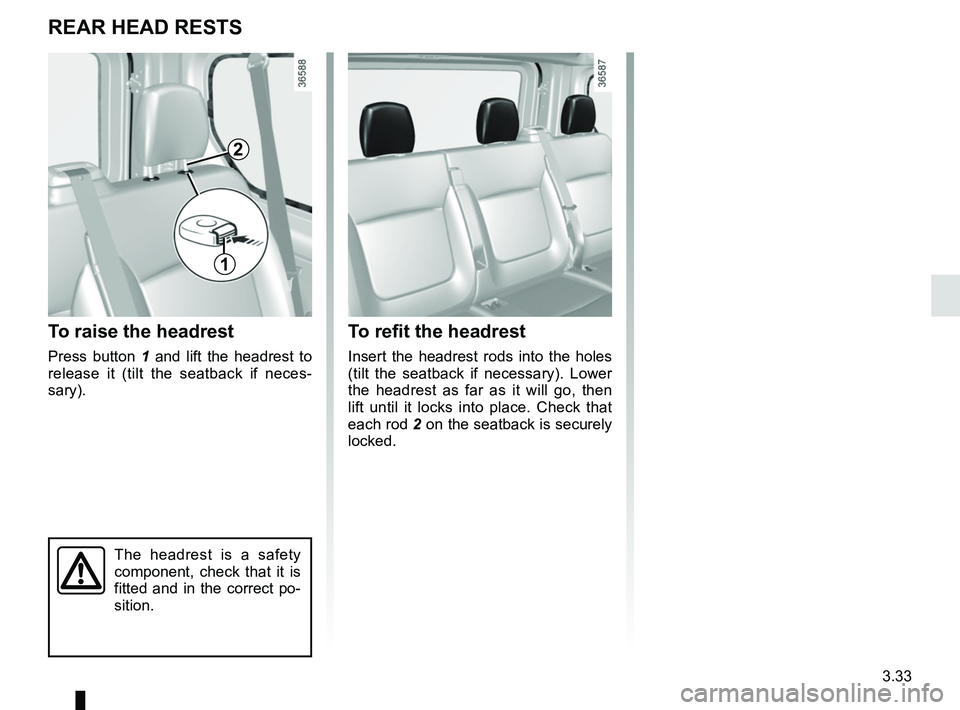
To refit the headrest
Insert the headrest rods into the holes
(tilt the seatback if necessary). Lower
the headrest as far as it will go, then
lift until it locks into place. Check that
each rod 2 on the seatback is securely
locked.
The headrest is a safety
component, check that it is
fitted and in the correct po-
sition.
To raise the headrest
Press button 1 and lift the headrest to
release it (tilt the seatback if neces-
sary).
REAR HEAD RESTS
1
2
Page 198 of 298
3.34
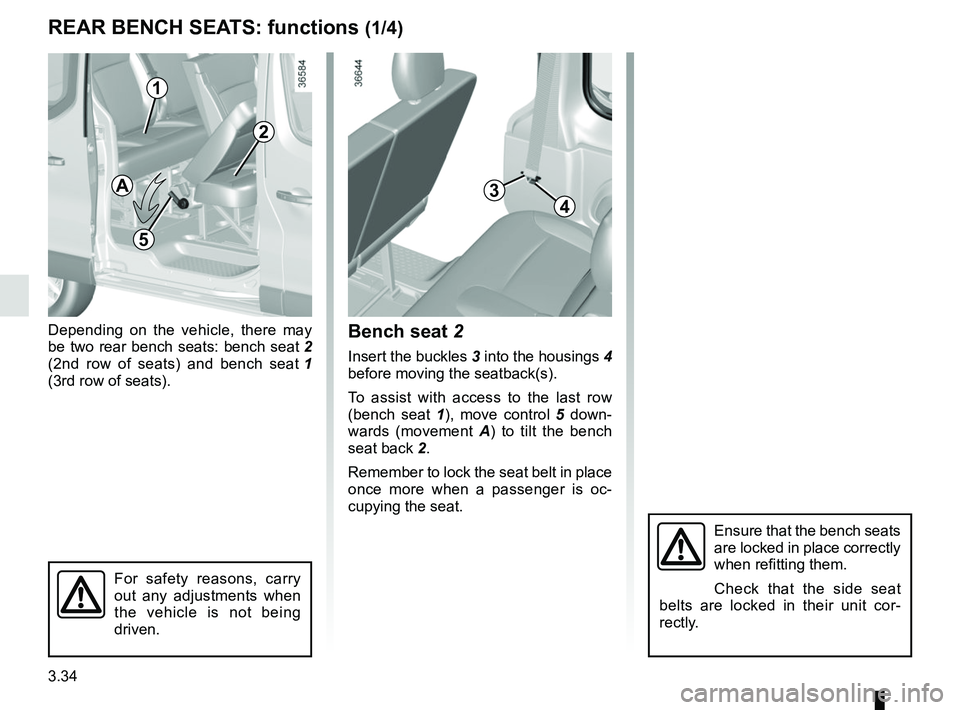
REAR BENCH SEATS: functions (1/4)
Depending on the vehicle, there may
be two rear bench seats: bench seat 2
(2nd row of seats) and bench seat 1
(3rd row of seats).Bench seat 2
Insert the buckles 3 into the housings 4
before moving the seatback(s).
To assist with access to the last row
(bench seat 1 ), move control 5 down-
wards (movement A) to tilt the bench
seat back 2.
Remember to lock the seat belt in place
once more when a passenger is oc-
cupying the seat.
Ensure that the bench seats
are locked in place correctly
when refitting them.
Check that the side seat
belts are locked in their unit cor-
rectly.
2
1
4
5
A
For safety reasons, carry
out any adjustments when
the vehicle is not being
driven.
3
Page 199 of 298
3.35
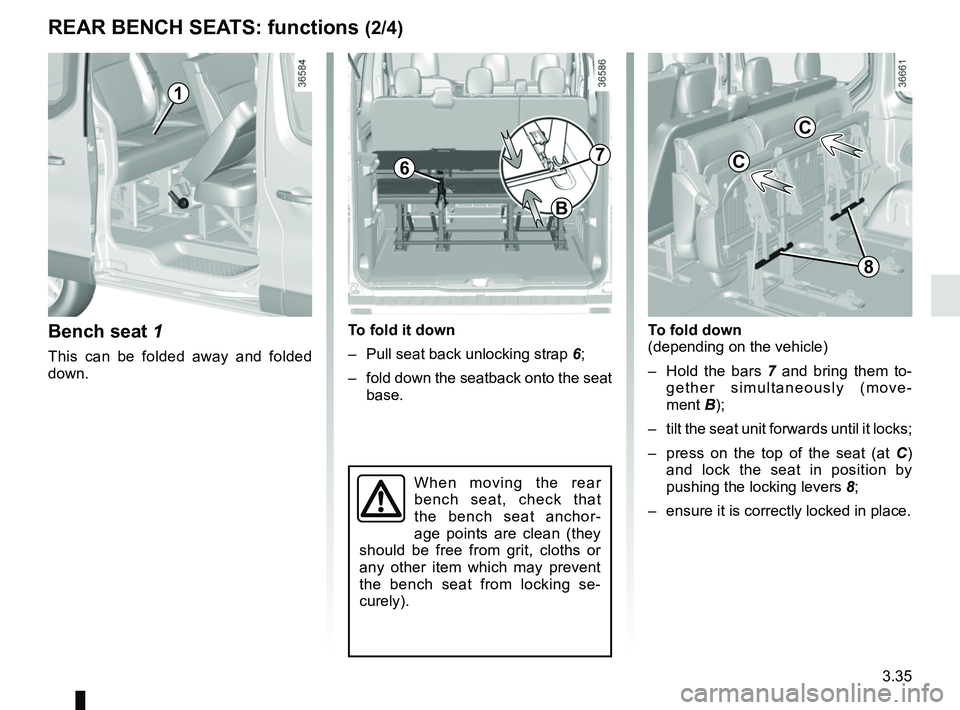
Bench seat 1
This can be folded away and folded
down.
To fold it down
– Pull seat back unlocking strap 6;
– fold down the seatback onto the seat base.
1
7
B
To fold down
(depending on the vehicle)
– Hold the bars 7 and bring them to-
gether simultaneously (move-
ment B);
– tilt the seat unit forwards until it locks;
– press on the top of the seat (at C)
and lock the seat in position by
pushing the locking levers 8;
– ensure it is correctly locked in place.
When moving the rear
bench seat, check that
the bench seat anchor-
age points are clean (they
should be free from grit, cloths or
any other item which may prevent
the bench seat from locking se-
curely).
REAR BENCH SEATS: functions (2/4)
6
8
C
C
Page 200 of 298
3.36
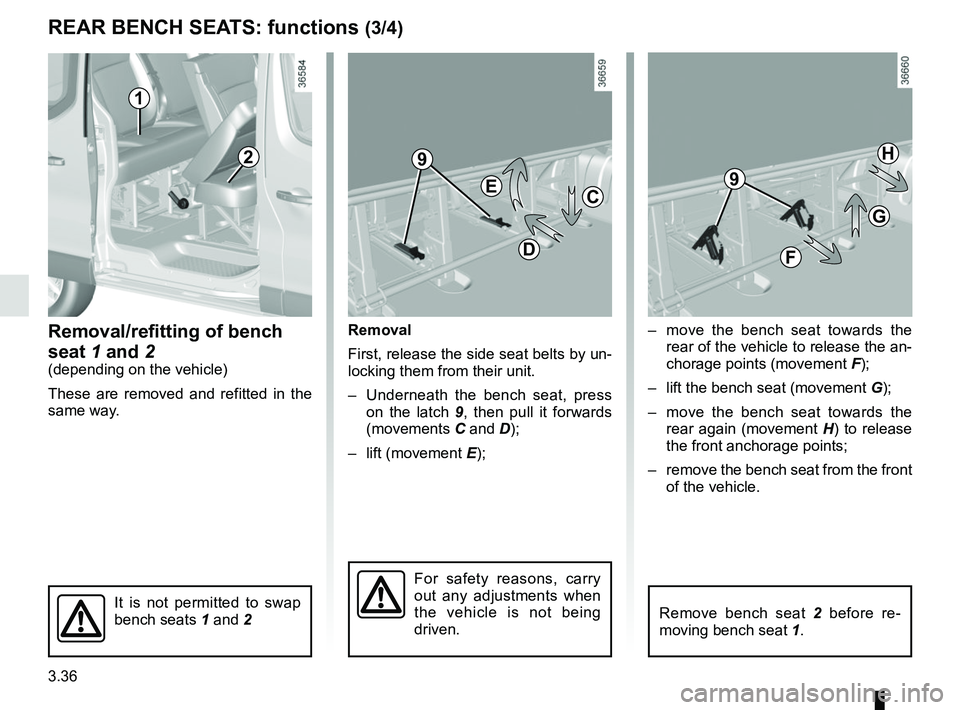
– move the bench seat towards the rear of the vehicle to release the an-
chorage points (movement F);
– lift the bench seat (movement G);
– move the bench seat towards the rear again (movement H) to release
the front anchorage points;
– remove the bench seat from the front of the vehicle.
REAR BENCH SEATS: functions (3/4)
Removal/refitting of bench
seat 1 and 2
(depending on the vehicle)
These are removed and refitted in the
same way. Removal
First, release the side seat belts by un-
locking them from their unit.
– Underneath the bench seat, press
on the latch 9, then pull it forwards
(movements C and D);
– lift (movement E);
It is not permitted to swap
bench seats 1 and 2
1
2
C
D
E
F
G
H
For safety reasons, carry
out any adjustments when
the vehicle is not being
driven.
Remove bench seat 2 before re-
moving bench seat 1.
9
9
Trending: check engine, tow, ECU, steering, climate control, seat adjustment, fog light bulb
