ESP RENAULT TRAFIC 2018 Service Manual
[x] Cancel search | Manufacturer: RENAULT, Model Year: 2018, Model line: TRAFIC, Model: RENAULT TRAFIC 2018Pages: 298, PDF Size: 8.05 MB
Page 180 of 298
3.16
WINDOWS (1/2)
Avoid resting any objects against a
half-open window: there is a risk that
the electric window winder could be
damaged.
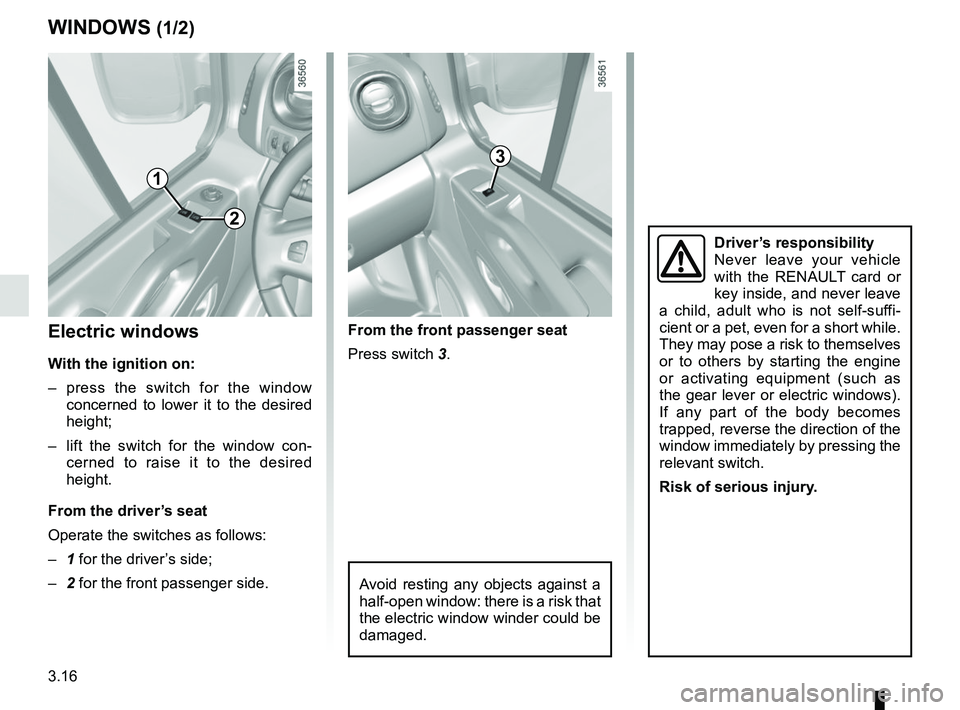
1
2
3
Electric windows
With the ignition on:
– press the switch for the window concerned to lower it to the desired
height;
– lift the switch for the window con- cerned to raise it to the desired
height.
From the driver’s seat
Operate the switches as follows:
– 1 for the driver’s side;
– 2 for the front passenger side. From the front passenger seat
Press switch 3.
Driver’s responsibility
Never leave your vehicle
with the RENAULT card or
key inside, and never leave
a child, adult who is not self-suffi-
cient or a pet, even for a short while.
They may pose a risk to themselves
or to others by starting the engine
or activating equipment (such as
the gear lever or electric windows).
If any part of the body becomes
trapped, reverse the direction of the
window immediately by pressing the
relevant switch.
Risk of serious injury.
Page 202 of 298
3.38
LUGGAGE COVER
Do not place any objects,
especially heavy or solid
objects on the luggage
cover. These may pose a
risk to the vehicle occupants if the
driver has to brake suddenly or if the
vehicle is involved in an accident.
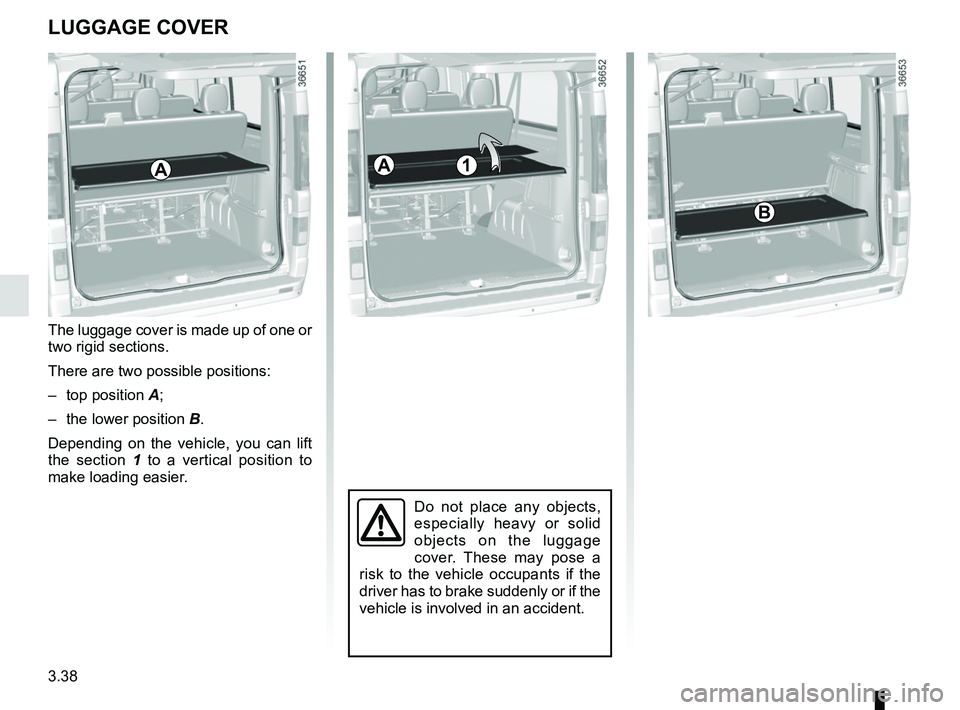
AA
B
The luggage cover is made up of one or
two rigid sections.
There are two possible positions:
– top position A;
– the lower position B.
Depending on the vehicle, you can lift
the section 1 to a vertical position to
make loading easier.
1
Page 207 of 298
3.43
TRANSPORTING OBJECTS towbar
Fitting the towbar coupling
ball
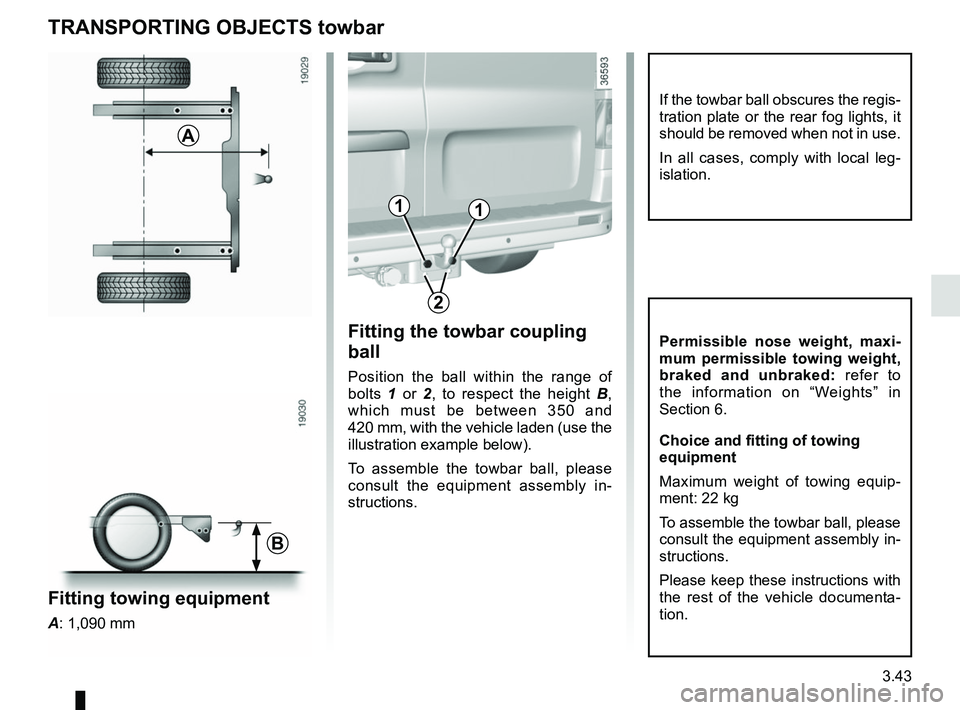
Position the ball within the range of
bolts 1 or 2 , to respect the height B,
which must be between 350 and
420 mm, with the vehicle laden (use the
illustration example below).
To assemble the towbar ball, please
consult the equipment assembly in-
structions.
A
If the towbar ball obscures the regis-
tration plate or the rear fog lights, it
should be removed when not in use.
In all cases, comply with local leg-
islation.
Permissible nose weight, maxi-
mum permissible towing weight,
braked and unbraked: refer to
the information on “Weights” in
Section 6.
Choice and fitting of towing
equipment
Maximum weight of towing equip-
ment: 22 kg
To assemble the towbar ball, please
consult the equipment assembly in-
structions.
Please keep these instructions with
the rest of the vehicle documenta-
tion.
2
B
11
Fitting towing equipment
A: 1,090 mm
Page 222 of 298
4.14
BODYWORK MAINTENANCE (1/3)
You should
Wash your car frequently, with the
engine off, with cleaning products rec-
ommended by the manufacturer (never
use abrasive products). Rinse thor-
oughly beforehand with a jet:
– spots of tree resin and industrial
grime;
– mud in the wheel arches and under-
neath the body which forms damp
patches;
– bird droppings , which cause a
chemical reaction with the paint that
rapidly discolours paintwork and
may even cause the paint to peel
off;
wash the vehicle immediately to
remove these marks since it is im-
possible to remove them by polish-
ing;
– salt, particularly in the wheel arches
and underneath the body after driv-
ing in areas where the roads have
been gritted.
Remove any plant matter (resin, leaves,
etc.) from the vehicle regularly.
A well-maintained vehicle will last
longer. It is therefore recommended to
maintain the exterior of the vehicle reg-
ularly.
Your vehicle has been treated with very
effective anti-corrosion products. It is
nevertheless subject to various outside
influences.
Corrosive agents in the atmosphere
–
atmospheric pollution (built-up and
industrial areas);
– saline atmospheres (near the sea,
particularly in hot weather);
– seasonal and damp weather condi-
tions (e.g. road salt in winter, water
from road cleaners, etc.).
Minor impacts
Abrasive action
Dust and sand in the air, mud, road grit
thrown up by other vehicles, etc.
You should take a number of minor pre-
cautions in order to safeguard your ve-
hicle against such risks. Respect local regulations about wash-
ing vehicles (e.g. do not wash your ve-
hicle on a public highway).
Observe the vehicle stopping distances
when driving on gravelled surfaces to
prevent paint damage.
Repair, or have repaired quickly, areas
where the paint has been damaged, to
prevent corrosion spreading.
Remember to visit the body shop pe-
riodically in order to maintain your
anti-corrosion warranty. Refer to the
Maintenance Document.
If it is necessary to clean mechani-
cal components, hinges, etc., spray
them with products approved by our
Technical Department to protect them
after they have been cleaned.
We have selected special products
to care for your vehicle and you can
obtain these from the manufactur-
er’s accessory outlets.
Page 250 of 298
5.24
Operating faultsIf the battery is too weak to ensure cor-
rect operation, you can still start (insert
the RENAULT card in the card reader)
and lock/unlock the vehicle (refer to the
information on "Locking/unlocking the
doors" in Section 1).
RENAULT CARD: battery
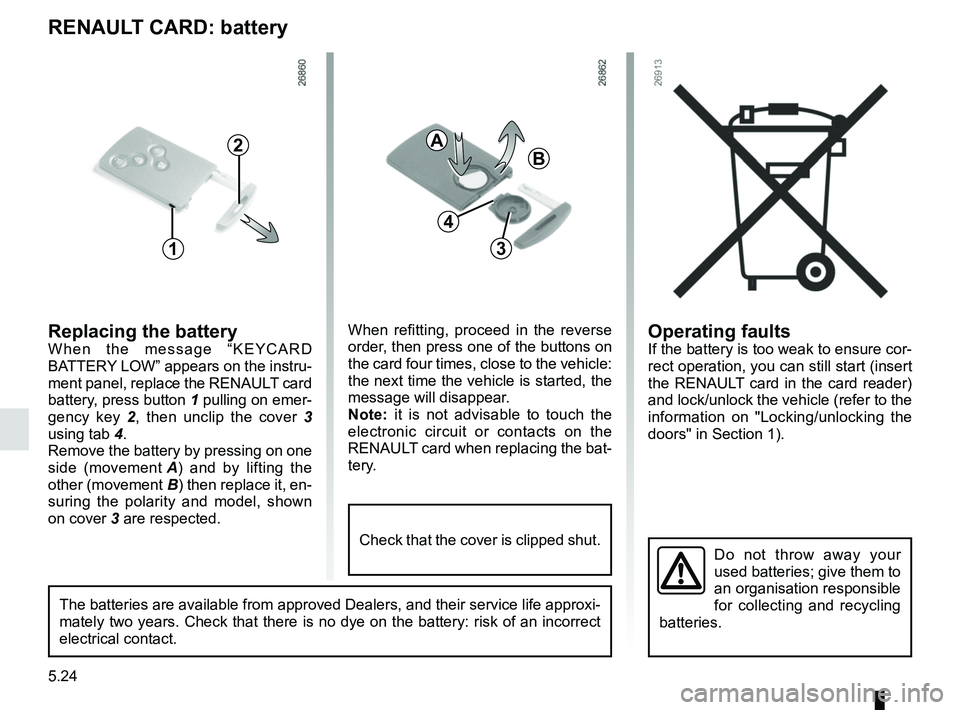
Replacing the batteryWhen the message “KEYCARD
BATTERY LOW” appears on the instru-
ment panel, replace the RENAULT card
battery, press button 1 pulling on emer-
gency key 2, then unclip the cover 3
using tab 4.
Remove the battery by pressing on one
side (movement A) and by lifting the
other (movement B) then replace it, en-
suring the polarity and model, shown
on cover 3 are respected.
Do not throw away your
used batteries; give them to
an organisation responsible
for collecting and recycling
batteries.
1
2
When refitting, proceed in the reverse
order, then press one of the buttons on
the card four times, close to the vehicle:
the next time the vehicle is started, the
message will disappear.
Note: it is not advisable to touch the
electronic circuit or contacts on the
RENAULT card when replacing the bat-
tery.
A
B
3
The batteries are available from approved Dealers, and their service lif\
e approxi-
mately two years. Check that there is no dye on the battery: risk of an \
incorrect
electrical contact.
4
Check that the cover is clipped shut.
Page 257 of 298
5.31
WINDSCREEN WIPER BLADES (1/2)
– In frosty weather, make
sure that the wiper blades
are not stuck by ice (to
avoid the risk of the motor
overheating).
– Check the condition of the wiper
blades.
Replace the wiper blades as soon
as they begin to lose efficiency
(approximately once a year).
Whilst changing the blade, take care
not to drop the arm onto the window
after it has been removed as this
may break the window.
Check the condition of the wiper
blades. You are responsible for their
service life:
– clean the blades, windscreen and rear screen regularly with soapy
water;
– do not use them when the wind- screen or rear screen are dry;
– free them from the windscreen or rear screen when they have not
been used for a long time.
To refit
To refit the wiper blade, proceed in re-
verse order to removal. Make sure that
the blade is correctly locked in position.
Raise the windscreen wiper stalk fully:
the front windscreen wiper blades will
settle down onto the bonnet.
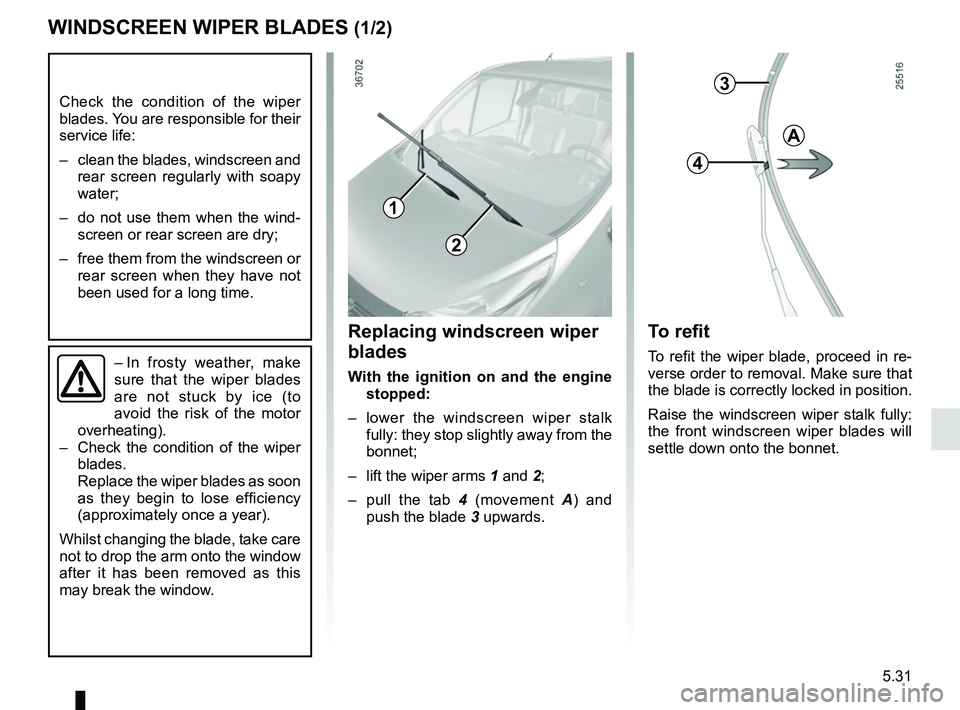
Replacing windscreen wiper
blades
With the ignition on and the engine stopped:
– lower the windscreen wiper stalk fully: they stop slightly away from the
bonnet;
– lift the wiper arms 1 and 2;
– pull the tab 4 (movement A) and
push the blade 3 upwards.
3
4
A
1
2
Page 270 of 298
6.2
VEHICLE IDENTIFICATION PLATES
The information shown on the ve-
hicle identification plate should be
quoted on all correspondence or
orders.
The presence and location of the in-
formation depends on the vehicle.
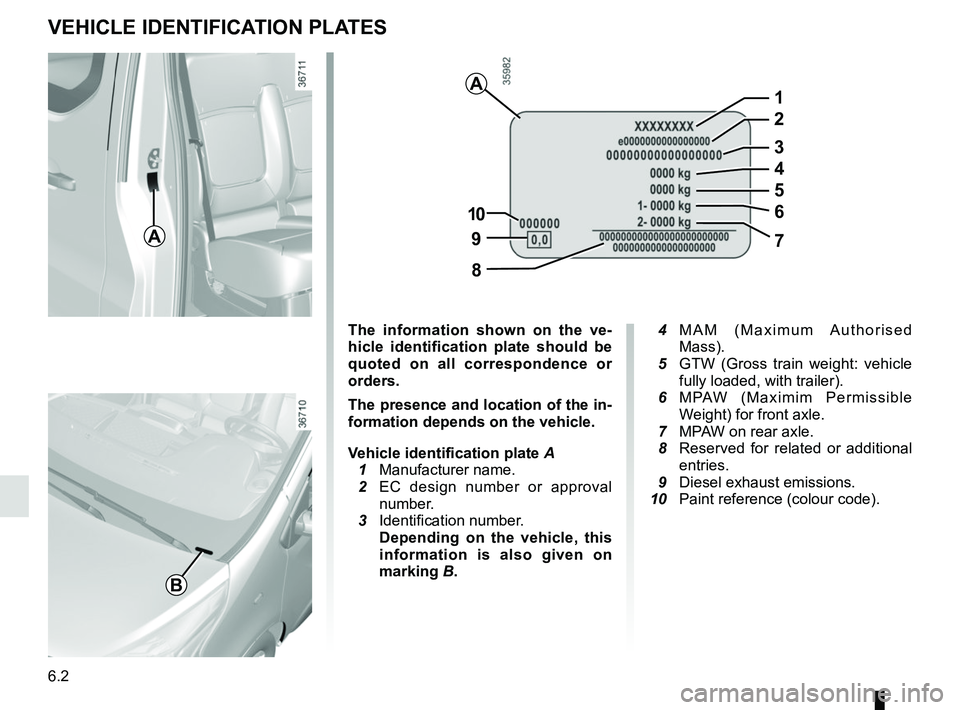
Vehicle identification plate A
1 Manufacturer name.
2 EC design number or approval
number.
3 Identification number.
Depending on the vehicle, this
information is also given on
marking B.
4 MAM (Maximum Authorised
Mass).
5 GTW (Gross train weight: vehicle
fully loaded, with trailer).
6 MPAW (Maximim Permissible
Weight) for front axle.
7 MPAW on rear axle.
8 Reserved for related or additional
entries.
9 Diesel exhaust emissions.
10 Paint reference (colour code).
A
97
8
10
5
1
2
3
4
6
B
A