check engine RENAULT TWINGO 2016 3.G User Guide
[x] Cancel search | Manufacturer: RENAULT, Model Year: 2016, Model line: TWINGO, Model: RENAULT TWINGO 2016 3.GPages: 216, PDF Size: 7.15 MB
Page 88 of 216

2.14
MAINTENANCE AND ANTIPOLLUTION ADVICE
Your vehicle complies with criteria for
recycling and recovering vehicles at the
end of their service life which will come
into force in 2015.
Some parts of your vehicle have there-
fore been designed to facilitate future
recycling.
These parts are easy to remove so
that they can be recovered and reproc-
essed by recycling companies.
By virtue of its design, moderate fuel
consumption and initial settings, your
vehicle also conforms to current anti-
pollution regulations. The manufac-
turer is actively striving to reduce pol-
lutant exhaust gas emissions and to
save energy. But the fuel consumption
of your vehicle and the level of pollutant
exhaust gas emissions are also your
responsibility. Ensure that it is main-
tained and used correctly.
Maintenance
It is important to remember that fail-
ure to respect anti-pollution regulations
could lead to legal action being taken
against the vehicle owner.In addition, replacing engine, fuel
supply system and exhaust compo-
nents with parts other than those origi-
nally recommended by the manufac-
turer may alter your vehicle so that it
no longer complies with anti-pollution
regulations.
Have your vehicle adjusted and
checked by an authorised dealer, in ac-
cordance with the instructions given in
your maintenance schedule: they will
have all the equipment necessary for
ensuring that your vehicle is maintained
to its original standard.
Engine adjustments
– Spark plugs:
for optimum condi-
tions of use, output and performance
the specifications laid down by our
Design Department must be strictly
applied.
If the spark plugs have to be changed, use the make, type and gap specified
for your vehicle’s engine. Contact an
authorised dealer for this.
– Air filter, fuel filter: a choked ele-
ment will reduce efficiency. It must
be replaced.
– Ignition and idle speed: no adjust-
ment is needed.
Exhaust gas monitoring
system
The exhaust gas monitoring system will
detect any operating faults in the vehi-
cle’s antipollution system.
If this system malfunctions, toxic sub-
stances may be released into the at-
mosphere or damage may occur.
ÄThis warning light on the in-
strument panel will indicate if
there are any faults in the system:
This lights up when the ignition is
switched on and goes out when the
engine is started.
– If it lights up continuously, consult an approved Dealer as soon as possi-
ble;
– if it flashes, reduce the engine speed until the light stops flashing. Contact
an authorised dealer as soon as pos-
sible.
Page 111 of 216
2.37
AUTOMATIC TRANSMISSION (2/3)
Special circumstances
– If the road contours and bends
do not allow you to stay in auto-
matic mode (e.g.: in the mountains),
we recommend that you change to
manual mode.
This will prevent the automatic gear-
box from changing gears repeatedly
when climbing, and permit engine
braking on long descents.
– In cold weather, to prevent the
engine from stalling, wait a few mo-
ments before shifting the selector
lever from position P or N and en-
gaging D or R.
Driving in manual mode
With the selector lever in position D,
move the lever to the left. Shifting the
lever repeatedly allows you to change
gears manually:
– To move down through the gears, push the lever backwards;
– To move up through the gears, push the lever forwards.
The gear selected is displayed on the
instrument panel.
Special cases
Under certain driving conditions (e.g.
engine protection, electronic stability
program (ESP) operational etc.: ESC))
the automatic system may change the
gear automatically.
Likewise, to prevent incorrect manoeu-
vres, a gear change may be refused by
the automatic system: in this case the
gear display flashes for a few seconds
as a warning.
In very cold weather, the system
may prevent the gears from being
shifted in manual mode until the
gearbox reaches the right tempera-
ture.
Parking the vehicle
When the vehicle is stopped, move the
lever to position P while keeping your
foot on the brake pedal: the gearbox is
in neutral and the drive wheels are me-
chanically locked by the driveshaft.
Apply the handbrake.
An impact to the under-
side of the vehicle while
manoeuvring (e.g.: strik-
ing a post, raised kerb or
other street furniture) may result in
damage to the vehicle (e.g.: defor-
mation of an axle).
To avoid any risk of accident, have
your vehicle checked by an ap-
proved Dealer.
Page 123 of 216
3.11
Operating faults
As a general rule, contact your ap-
proved dealer in the event of an oper-
ating fault.
– Reduction in de-icing, demisting or air conditioning performance.
This may be caused by the passen-
ger compartment filter cartridge be-
coming clogged.
– No cold air is being produced .
Check that the controls are set cor-
rectly and that the fuses are sound.
Otherwise, switch off the system.
Presence of water under the
vehicle
After prolonged use of the air condi-
tioning system, it is normal for water
to be present under the vehicle. This is
caused by condensation.
AIR CONDITIONING: information and advice on use
Do not open the refriger-
ant fluid circuit. The fluid
may damage eyes or skin.
Fuel consumption
You will normally notice an increase in
fuel consumption (especially in town)
when the air conditioning is operating.
For vehicles fitted with air conditioning
with no automatic mode, switch off the
system when it is not required.
Advice for reducing consumption
and helping to preserve the environ-
ment
Drive with the air vents open and the
windows closed.
If the vehicle has been parked in the
sun, open the doors for a few moments
to let the hot air escape before starting
the engine.
Advice on use
In some situations, (air conditioning
off, air recirculation activated, ventila-
tion speed at zero or low, etc.) you may
notice that condensation starts to form
on the windows and windscreen.
If there is condensation, use the “Clear
View” function to remove it, then use
the air conditioning in automatic mode
to stop it forming again.
Maintenance
Refer to the Maintenance Document
for your vehicle for the inspection fre-
quency.
Do not add anything to the
vehicle’s ventilation circuit
(for example, to remove
bad odours).
There is a risk of damage or of
fire.
Page 126 of 216
3.14
SUNROOF
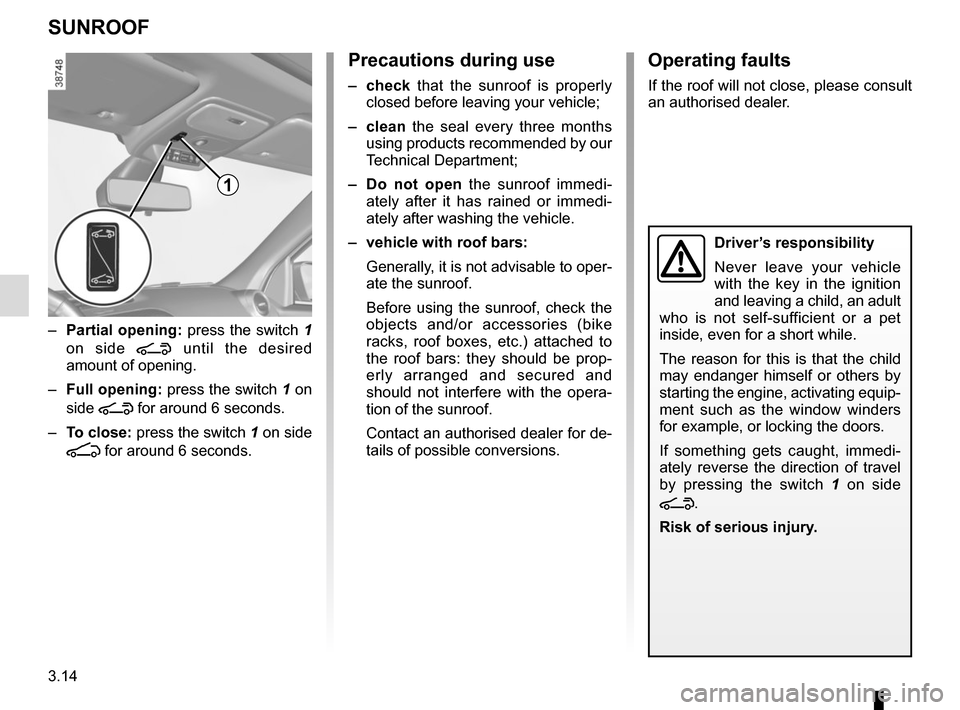
1
– Partial opening: press the switch 1
on side
\ until the desired
amount of opening.
– Full opening: press the switch 1 on
side
\ for around 6 seconds.
– To close: press the switch 1 on side
[ for around 6 seconds.
Precautions during use
– check that the sunroof is properly
closed before leaving your vehicle;
– clean the seal every three months using products recommended by our
Technical Department;
– Do not open the sunroof immedi-
ately after it has rained or immedi-
ately after washing the vehicle.
– vehicle with roof bars: Generally, it is not advisable to oper-
ate the sunroof.
Before using the sunroof, check the
objects and/or accessories (bike
racks, roof boxes, etc.) attached to
the roof bars: they should be prop-
erly arranged and secured and
should not interfere with the opera-
tion of the sunroof.
Contact an authorised dealer for de-
tails of possible conversions.
Operating faults
If the roof will not close, please consult
an authorised dealer.
Driver’s responsibility
Never leave your vehicle
with the key in the ignition
and leaving a child, an adult
who is not self-sufficient or a pet
inside, even for a short while.
The reason for this is that the child
may endanger himself or others by
starting the engine, activating equip-
ment such as the window winders
for example, or locking the doors.
If something gets caught, immedi-
ately reverse the direction of travel
by pressing the switch 1 on side
\.
Risk of serious injury.
Page 142 of 216
4.2
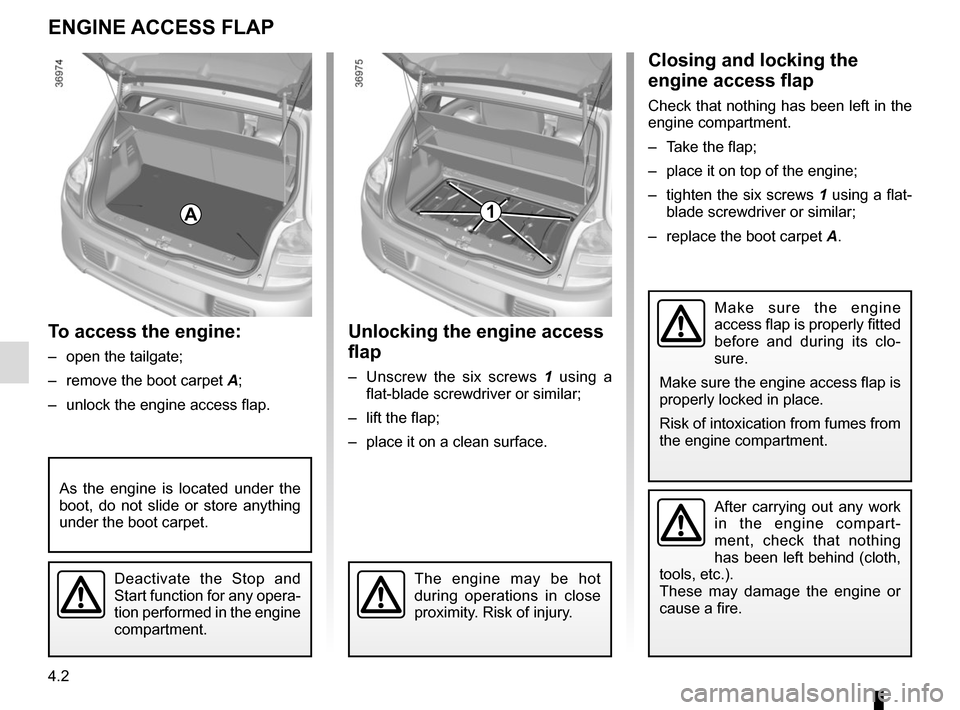
To access the engine:
– open the tailgate;
– remove the boot carpet A;
– unlock the engine access flap.
ENGINE ACCESS FLAP
Unlocking the engine access
flap
– Unscrew the six screws 1 using a
flat-blade screwdriver or similar;
– lift the flap;
– place it on a clean surface.
Closing and locking the
engine access flap
Check that nothing has been left in the
engine compartment.
– Take the flap;
– place it on top of the engine;
– tighten the six screws 1 using a flat- blade screwdriver or similar;
– replace the boot carpet A.
After carrying out any work
in the engine compart-
ment, check that nothing
has been left behind (cloth,
tools, etc.).
These may damage the engine or
cause a fire.
Make sure the engine
access flap is properly fitted
before and during its clo-
sure.
Make sure the engine access flap is
properly locked in place.
Risk of intoxication from fumes from
the engine compartment.
1A
Deactivate the Stop and
Start function for any opera-
tion performed in the engine
compartment.The engine may be hot
during operations in close
proximity. Risk of injury.
As the engine is located under the
boot, do not slide or store anything
under the boot carpet.
Page 143 of 216
4.3
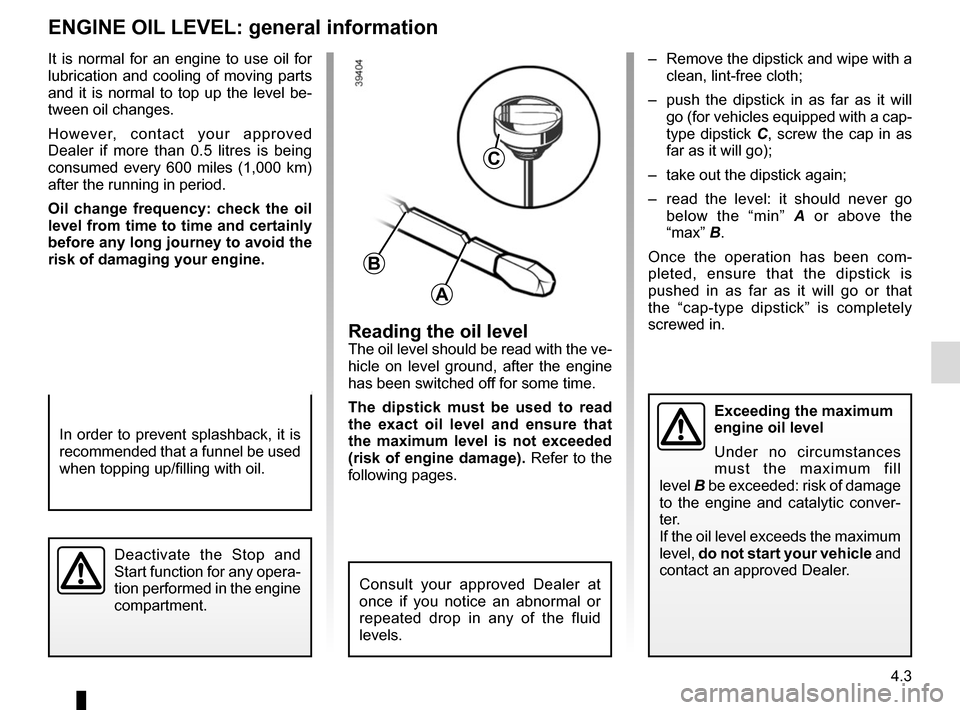
Reading the oil levelThe oil level should be read with the ve-
hicle on level ground, after the engine
has been switched off for some time.
The dipstick must be used to read
the exact oil level and ensure that
the maximum level is not exceeded
(risk of engine damage). Refer to the
following pages.
It is normal for an engine to use oil for
lubrication and cooling of moving parts
and it is normal to top up the level be-
tween oil changes.
However, contact your approved
Dealer if more than 0.5 litres is being
consumed every 600 miles (1,000 km)
after the running in period.
Oil change frequency: check the oil
level from time to time and certainly
before any long journey to avoid the
risk of damaging your engine.
ENGINE OIL LEVEL: general information
A
B
C
In order to prevent splashback, it is
recommended that a funnel be used
when topping up/filling with oil.
– Remove the dipstick and wipe with a
clean, lint-free cloth;
– push the dipstick in as far as it will go (for vehicles equipped with a cap-
type dipstick C, screw the cap in as
far as it will go);
– take out the dipstick again;
– read the level: it should never go below the “min” A or above the
“max” B.
Once the operation has been com-
pleted, ensure that the dipstick is
pushed in as far as it will go or that
the “cap-type dipstick” is completely
screwed in.
Deactivate the Stop and
Start function for any opera-
tion performed in the engine
compartment.
Consult your approved Dealer at
once if you notice an abnormal or
repeated drop in any of the fluid
levels.
Exceeding the maximum
engine oil level
Under no circumstances
must the maximum fill
level B be exceeded: risk of damage
to the engine and catalytic conver-
ter.
If the oil level exceeds the maximum
level, do not start your vehicle and
contact an approved Dealer.
Page 144 of 216
4.4
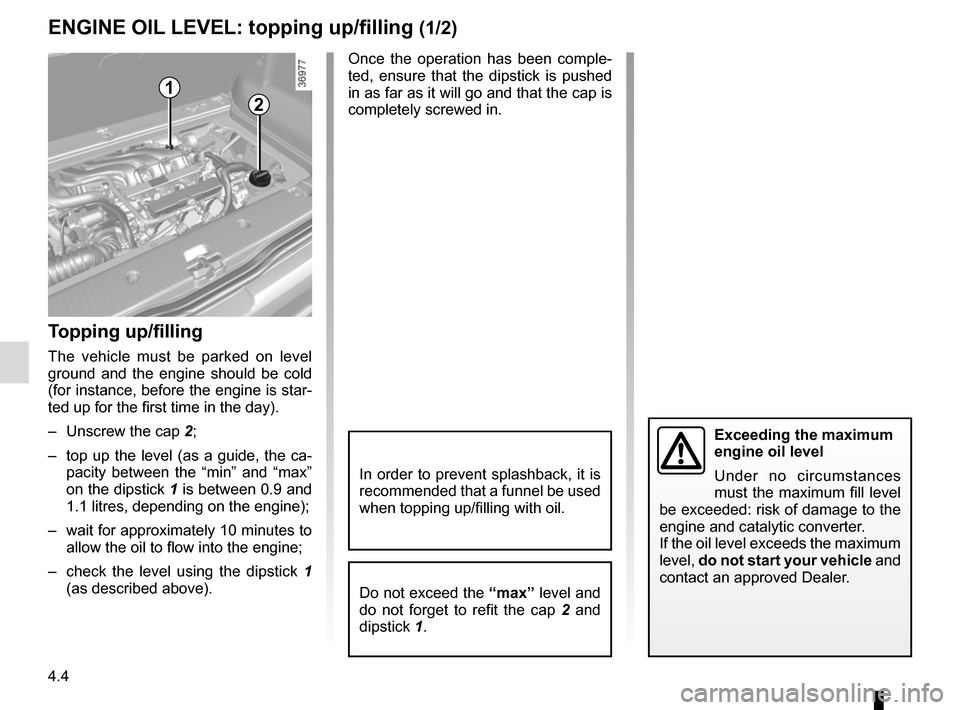
Topping up/filling
The vehicle must be parked on level
ground and the engine should be cold
(for instance, before the engine is star-
ted up for the first time in the day).
– Unscrew the cap 2;
– top up the level (as a guide, the ca-pacity between the “min” and “max”
on the dipstick 1 is between 0.9 and
1.1 litres, depending on the engine);
– wait for approximately 10 minutes to allow the oil to flow into the engine;
– check the level using the dipstick 1
(as described above). Once the operation has been comple-
ted, ensure that the dipstick is pushed
in as far as it will go and that the cap is
completely screwed in.
ENGINE OIL LEVEL: topping up/filling (1/2)
Do not exceed the
“max” level and
do not forget to refit the cap 2 and
dipstick 1.
In order to prevent splashback, it is
recommended that a funnel be used
when topping up/filling with oil.
2
1
Exceeding the maximum
engine oil level
Under no circumstances
must the maximum fill level
be exceeded: risk of damage to the
engine and catalytic converter.
If the oil level exceeds the maximum
level, do not start your vehicle and
contact an approved Dealer.
Page 145 of 216
4.5
ENGINE OIL LEVEL: topping up, filling (2/2)OIL CHANGE
Never run the engine in an
enclosed space as exhaust
gases are poisonous.
Engine oil change: if you
are changing the oil when
the engine is hot, be careful
not to scald yourself if the
oil overflows.
Filling: take care when
topping up the oil that
no oil drips onto engine
components - risk of fire.
Remember to refit the cap securely
as there is a risk of fire if oil splashes
onto hot engine components.
The engine may be hot
when carrying out opera-
tions in close proximity. In
addition, the engine cooling
fan can come on at any moment.
Risk of injury.
Consult your approved dealer at
once if you notice an abnormal or
repeated drop in any of the fluid
levels.
Deactivate the Stop and
Start function for any opera-
tion performed in the engine
compartment.
Oil changeService interval: refer to the
Maintenance Service Booklet for your
vehicle.
Oil change capacity
Please refer to the maintenance docu-
ment for your vehicle, or contact an au-
thorised dealer.
Always check the engine oil level using
the dipstick, as explained previously (it
should never fall below the minimum
level, or be over the maximum level on
the dipstick).
Engine oil gradeRefer to the Maintenance Service
Booklet for your vehicle.
Page 148 of 216
4.8
Frequency of checking coolant level
Check the coolant level regularly
(very severe damage is likely to be
caused to the engine if it runs out of
coolant).
If the level needs to be topped up, only
use products approved by our Technical
Department which ensure:
– protection against freezing;
– an anti-corrosion protection for the cooling system.
No operations should be
carried out on the cooling
circuit when the engine is
hot.
Risk of burns.
Replacement interval
Refer to the Maintenance Document for
your vehicle.
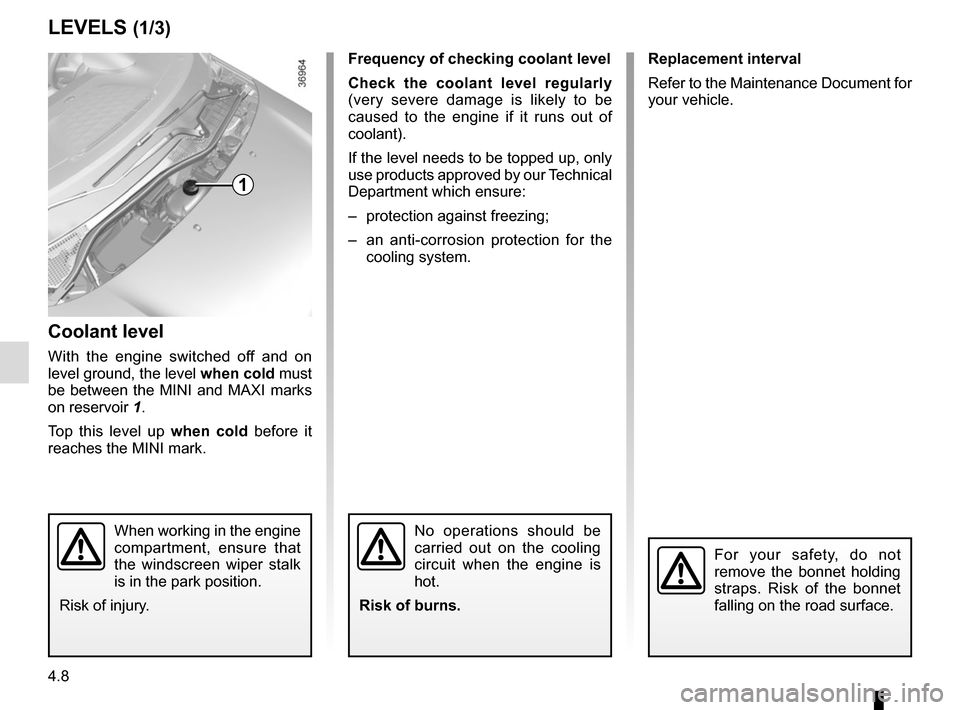
Coolant level
With the engine switched off and on
level ground, the level when cold must
be between the MINI and MAXI marks
on reservoir 1.
Top this level up when cold before it
reaches the MINI mark.
LEVELS (1/3)
1
When working in the engine
compartment, ensure that
the windscreen wiper stalk
is in the park position.
Risk of injury.
For your safety, do not
remove the bonnet holding
straps. Risk of the bonnet
falling on the road surface.
Page 149 of 216
4.9
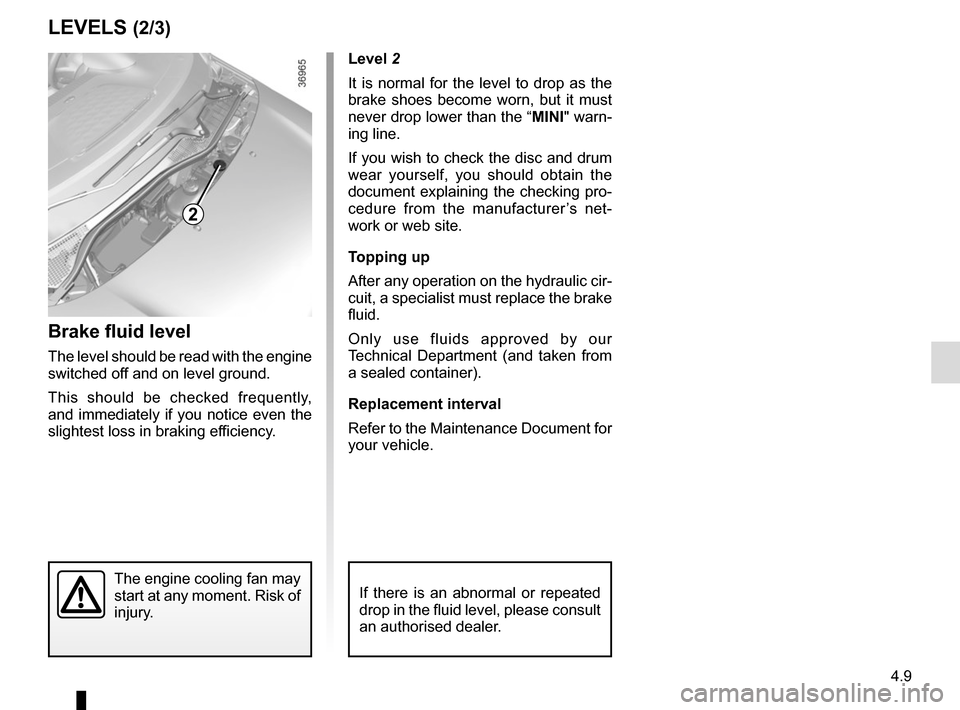
Level 2
It is normal for the level to drop as the
brake shoes become worn, but it must
never drop lower than the “MINI" warn-
ing line.
If you wish to check the disc and drum
wear yourself, you should obtain the
document explaining the checking pro-
cedure from the manufacturer’s net-
work or web site.
Topping up
After any operation on the hydraulic cir-
cuit, a specialist must replace the brake
fluid.
Only use fluids approved by our
Technical Department (and taken from
a sealed container).
Replacement interval
Refer to the Maintenance Document for
your vehicle.
Brake fluid level
The level should be read with the engine
switched off and on level ground.
This should be checked frequently,
and immediately if you notice even the
slightest loss in braking efficiency.
LEVELS (2/3)
2
The engine cooling fan may
start at any moment. Risk of
injury.If there is an abnormal or repeated
drop in the fluid level, please consult
an authorised dealer.