stop start RENAULT TWINGO 2016 3.G Owner's Manual
[x] Cancel search | Manufacturer: RENAULT, Model Year: 2016, Model line: TWINGO, Model: RENAULT TWINGO 2016 3.GPages: 216, PDF Size: 7.15 MB
Page 88 of 216

2.14
MAINTENANCE AND ANTIPOLLUTION ADVICE
Your vehicle complies with criteria for
recycling and recovering vehicles at the
end of their service life which will come
into force in 2015.
Some parts of your vehicle have there-
fore been designed to facilitate future
recycling.
These parts are easy to remove so
that they can be recovered and reproc-
essed by recycling companies.
By virtue of its design, moderate fuel
consumption and initial settings, your
vehicle also conforms to current anti-
pollution regulations. The manufac-
turer is actively striving to reduce pol-
lutant exhaust gas emissions and to
save energy. But the fuel consumption
of your vehicle and the level of pollutant
exhaust gas emissions are also your
responsibility. Ensure that it is main-
tained and used correctly.
Maintenance
It is important to remember that fail-
ure to respect anti-pollution regulations
could lead to legal action being taken
against the vehicle owner.In addition, replacing engine, fuel
supply system and exhaust compo-
nents with parts other than those origi-
nally recommended by the manufac-
turer may alter your vehicle so that it
no longer complies with anti-pollution
regulations.
Have your vehicle adjusted and
checked by an authorised dealer, in ac-
cordance with the instructions given in
your maintenance schedule: they will
have all the equipment necessary for
ensuring that your vehicle is maintained
to its original standard.
Engine adjustments
– Spark plugs:
for optimum condi-
tions of use, output and performance
the specifications laid down by our
Design Department must be strictly
applied.
If the spark plugs have to be changed, use the make, type and gap specified
for your vehicle’s engine. Contact an
authorised dealer for this.
– Air filter, fuel filter: a choked ele-
ment will reduce efficiency. It must
be replaced.
– Ignition and idle speed: no adjust-
ment is needed.
Exhaust gas monitoring
system
The exhaust gas monitoring system will
detect any operating faults in the vehi-
cle’s antipollution system.
If this system malfunctions, toxic sub-
stances may be released into the at-
mosphere or damage may occur.
ÄThis warning light on the in-
strument panel will indicate if
there are any faults in the system:
This lights up when the ignition is
switched on and goes out when the
engine is started.
– If it lights up continuously, consult an approved Dealer as soon as possi-
ble;
– if it flashes, reduce the engine speed until the light stops flashing. Contact
an authorised dealer as soon as pos-
sible.
Page 91 of 216
2.17
Note
The standard tyre pressure cannot be
less than that recommended and indi-
cated on the door frame.
Display
Check tyre pressure
The warning light
comes on (not
flashing).
This indicates that at least one tyre is
flat.
Check and, if necessary, readjust the
pressures of the four wheels when cold.
The warning light
goes off after a
few minutes’ driving.
Puncture
Warning light
comes on steady,
accompanied by a beep and warning
light
®They indicate that at least one wheel
is punctured or severely underinfla-
ted. Replace it or contact an approved
dealer if it is punctured. Top up the tyre
pressure if the wheel is deflated.
Check tyre sensors
The warning light
flashes for
several seconds, then stays on, along
with the warning light
©.
They indicate that at least one wheel is
not fitted with sensors. In other cases,
contact an authorised dealer.
TYRE PRESSURE LOSS WARNING (2/3)
2
Warning light ® re-
quires you to stop immedi-
ately, for your own safety,
as soon as traffic conditions
allow.
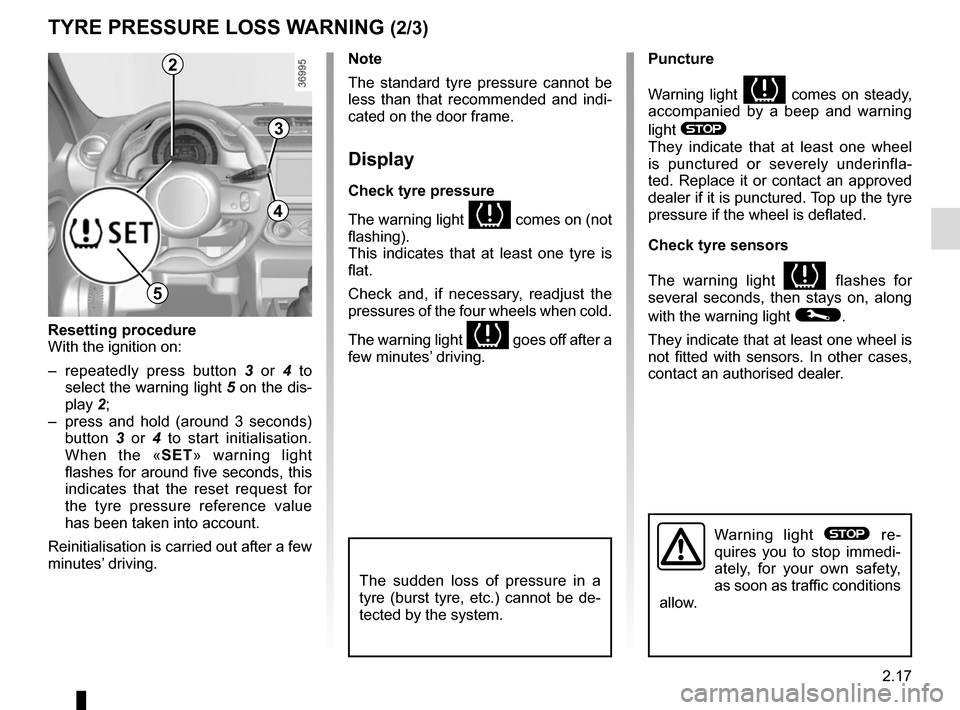
Resetting procedure
With the ignition on:
– repeatedly press button 3 or 4 to
select the warning light 5 on the dis-
play 2;
– press and hold (around 3 seconds) button 3 or 4 to start initialisation.
When the «SET» warning light
flashes for around five seconds, this
indicates that the reset request for
the tyre pressure reference value
has been taken into account.
Reinitialisation is carried out after a few
minutes’ driving.
3
4
The sudden loss of pressure in a
tyre (burst tyre, etc.) cannot be de-
tected by the system.
5
Page 93 of 216
2.19
Depending on the vehicle, this is com-
posed of:
– anti-lock braking system (ABS);
– electronic stability control (ESC) with understeer control, traction
control and assistance with side
winds;
– emergency brake assist;
– hill start assistance.Operating faults:
–
© and x come on on the
instrument panel: ABS, ESC and
emergency brake assist are deacti-
vated. Braking is always enabled;
–
x, D, © and ®
come on on the instrument panel:
this indicates a fault in the brak-
ing system.
In both cases, consult an approved
Dealer.
Anti-lock braking system
(ABS)
Under heavy braking, the ABS prevents
the wheels from locking, allowing the
stopping distance to be managed and
keeping control of the vehicle.
Under these circumstances, the vehi-
cle can be steered to avoid an obstacle
whilst braking. In addition, this system
can increase stopping distances, par-
ticularly on roads with low surface grip
(wet ground etc.).
You will feel a pulsation through the
brake pedal each time the system is
activated. The ABS does not in any
way improve the vehicle's physical per-
formance relating to the road surface
and road-holding. It is still essential to
follow the rules of good driving practice
(such as driving at a safe distance from
the vehicle in front etc.).
DRIVER CORRECTION DEVICES AND AIDS (1/4)
These functions are an ad-
ditional aid in the event of
critical driving conditions,
enabling the vehicle behav-
iour to be adapted to suit the driving
conditions.
However, the functions do not take
the place of the driver. They do
not increase the vehicle’s limits
and should not encourage you
to drive more quickly. Therefore,
they can under no circumstances
replace the vigilance or responsibil-
ity of the driver when manoeuvring
the vehicle (the driver must always
be ready for sudden incidents which
may occur when driving).
In an emergency, apply firm and
continuous pressure to the brake
pedal. There is no need to pump
it repeatedly. The ABS will modu-
late the force applied in the braking
system.
Your braking systems
are partially operational.
However, it is dangerous
to brake suddenly and
it is essential to stop immediately,
as soon as traffic conditions allow.
Contact an approved dealer.
Page 96 of 216
2.22
DRIVER CORRECTION DEVICES AND AIDS (4/4)
Hill start assistance
Depending on the gradient of the in-
cline, this system assists the driver
when starting on a hill. It prevents the
vehicle from rolling backwards, de-
pending on the slope, by automatically
applying the brakes when the driver lifts
his/her foot off the brake pedal to de-
press the accelerator pedal.
It only operates when the gear lever is
in a position other than neutral (other
than N or P for automatic transmis-
sions) and the vehicle is completely
stationary (brake pedal depressed)
The system holds the vehicle for ap-
proximately 2 seconds. The brakes are
then gradually released (the vehicle will
move according to the slope).The hill start assistance
system cannot completely
prevent the vehicle from
rolling backwards in all sit-
uations (extremely steep gradients,
etc.).
In all cases, the driver may depress
the brake pedal to prevent the ve-
hicle from rolling forwards or back-
wards.
The hill start assistance function
should not be used for prolonged
stops: use the brake pedal.
This function is not designed to im-
mobilise the vehicle permanently.
If necessary, use the brake pedal to
stop the vehicle.
The driver must remain particularly
vigilant when driving on slippery or
low-grip surfaces and/or on hills.
Risk of serious injury.
Page 110 of 216
2.36
AUTOMATIC TRANSMISSION (1/3)
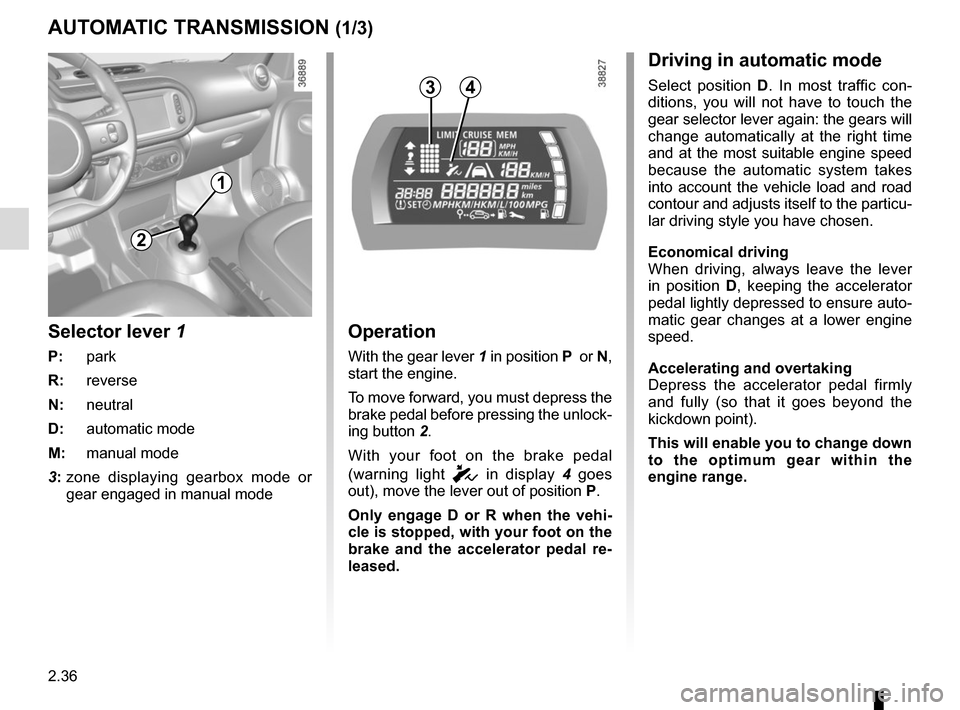
Operation
With the gear lever 1 in position P or N,
start the engine.
To move forward, you must depress the
brake pedal before pressing the unlock-
ing button 2.
With your foot on the brake pedal
(warning light
c in display 4 goes
out), move the lever out of position P.
Only engage D or R when the vehi-
cle is stopped, with your foot on the
brake and the accelerator pedal re-
leased.
2
1
Selector lever 1
P: park
R: reverse
N: neutral
D: automatic mode
M: manual mode
3: zone displaying gearbox mode or
gear engaged in manual mode
43
Driving in automatic mode
Select position D . In most traffic con-
ditions, you will not have to touch the
gear selector lever again: the gears will
change automatically at the right time
and at the most suitable engine speed
because the automatic system takes
into account the vehicle load and road
contour and adjusts itself to the particu-
lar driving style you have chosen.
Economical driving
When driving, always leave the lever
in position D, keeping the accelerator
pedal lightly depressed to ensure auto-
matic gear changes at a lower engine
speed.
Accelerating and overtaking
Depress the accelerator pedal firmly
and fully (so that it goes beyond the
kickdown point).
This will enable you to change down
to the optimum gear within the
engine range.
Page 112 of 216
2.38
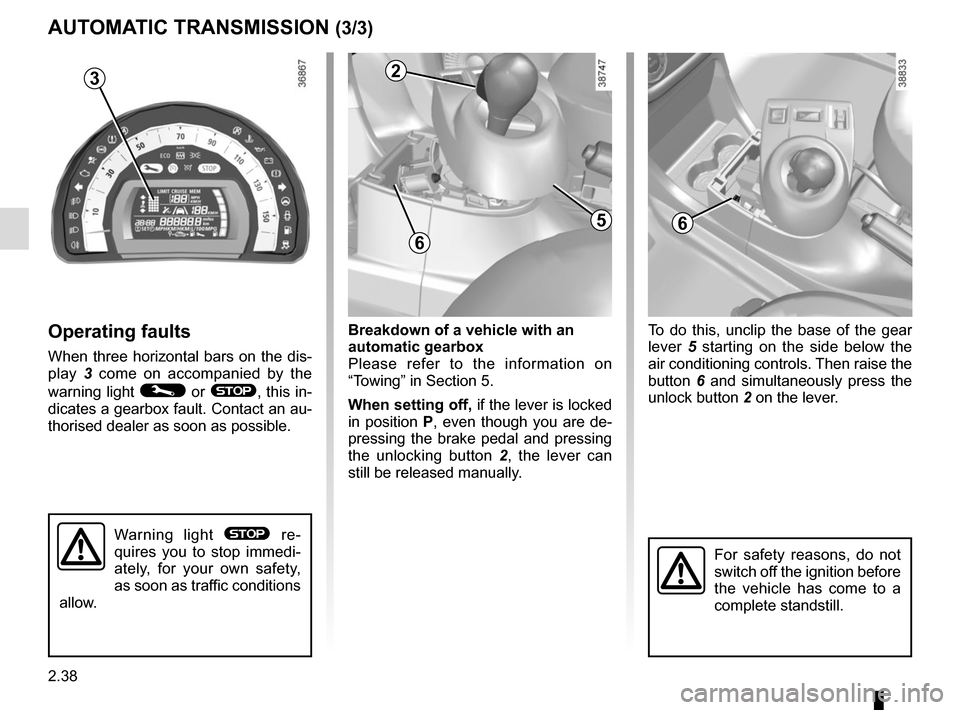
Breakdown of a vehicle with an
automatic gearbox
Please refer to the information on
“Towing” in Section 5.
When setting off, if the lever is locked
in position P, even though you are de-
pressing the brake pedal and pressing
the unlocking button 2, the lever can
still be released manually.
AUTOMATIC TRANSMISSION (3/3)
Operating faults
When three horizontal bars on the dis-
play 3 come on accompanied by the
warning light
© or ®, this in-
dicates a gearbox fault. Contact an au-
thorised dealer as soon as possible. To do this, unclip the base of the gear
lever
5 starting on the side below the
air conditioning controls. Then raise the
button 6 and simultaneously press the
unlock button 2 on the lever.
For safety reasons, do not
switch off the ignition before
the vehicle has come to a
complete standstill.
5
2
3
6
6
3
Warning light ® re-
quires you to stop immedi-
ately, for your own safety,
as soon as traffic conditions
allow.
Page 119 of 216
3.7
Varying the ventilation speed
In automatic mode, the system uses
the most suitable amount of air to reach
and maintain the desired comfort level.
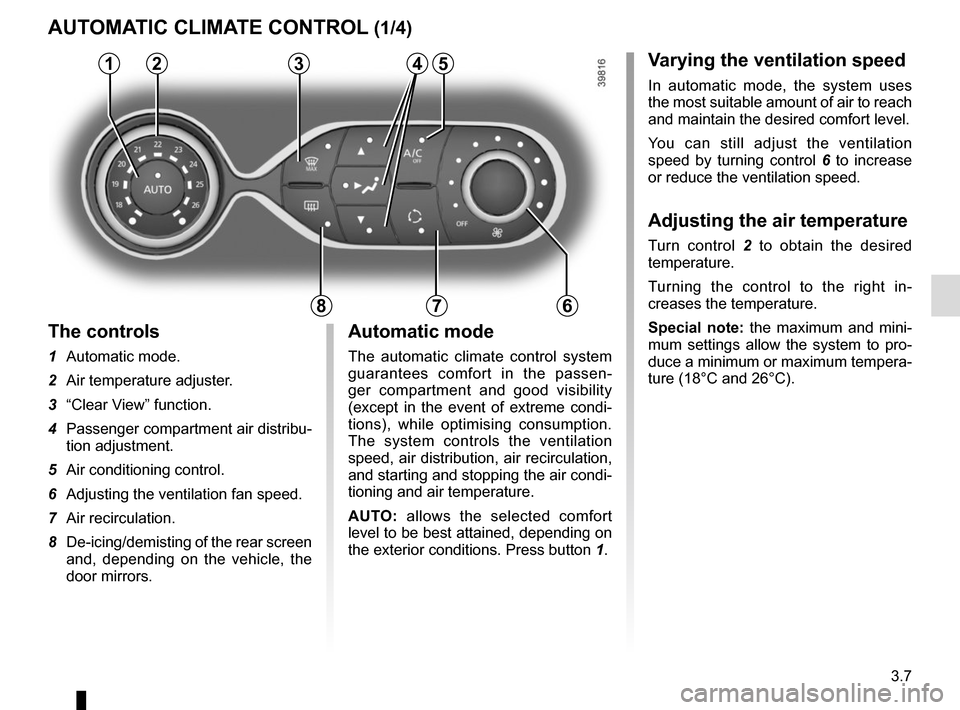
You can still adjust the ventilation
speed by turning control 6 to increase
or reduce the ventilation speed.
Adjusting the air temperature
Turn control 2 to obtain the desired
temperature.
Turning the control to the right in-
creases the temperature.
Special note: the maximum and mini-
mum settings allow the system to pro-
duce a minimum or maximum tempera-
ture (18°C and 26°C).
The controls
1 Automatic mode.
2 Air temperature adjuster.
3 “Clear View” function.
4 Passenger compartment air distribu-
tion adjustment.
5 Air conditioning control.
6 Adjusting the ventilation fan speed.
7 Air recirculation.
8 De-icing/demisting of the rear screen
and, depending on the vehicle, the
door mirrors.
AUTOMATIC CLIMATE CONTROL (1/4)
235
786
Automatic mode
The automatic climate control system
guarantees comfort in the passen-
ger compartment and good visibility
(except in the event of extreme condi-
tions), while optimising consumption.
The system controls the ventilation
speed, air distribution, air recirculation,
and starting and stopping the air condi-
tioning and air temperature.
AUTO: allows the selected comfort
level to be best attained, depending on
the exterior conditions. Press button 1.
14
Page 122 of 216
3.10
AUTOMATIC CLIMATE CONTROL (4/4)
76
Air recirculation (isolation of
the passenger compartment)
K
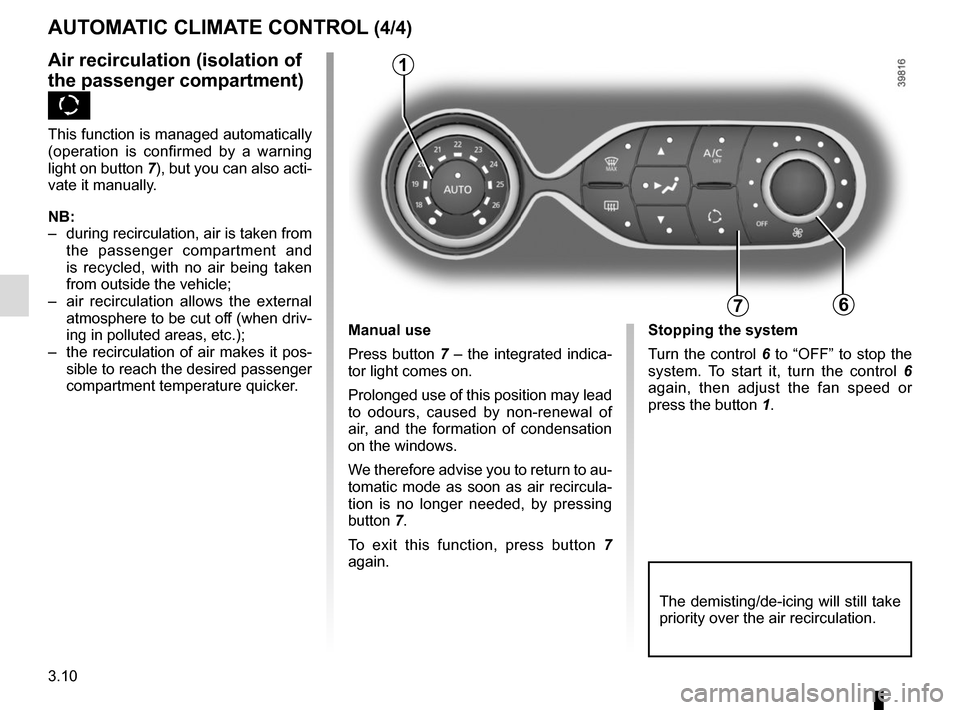
This function is managed automatically
(operation is confirmed by a warning
light on button 7), but you can also acti-
vate it manually.
NB:
– during recirculation, air is taken from the passenger compartment and
is recycled, with no air being taken
from outside the vehicle;
– air recirculation allows the external atmosphere to be cut off (when driv-
ing in polluted areas, etc.);
– the recirculation of air makes it pos- sible to reach the desired passenger
compartment temperature quicker.
1
The demisting/de-icing will still take
priority over the air recirculation.
Manual use
Press button 7 – the integrated indica-
tor light comes on.
Prolonged use of this position may lead
to odours, caused by non-renewal of
air, and the formation of condensation
on the windows.
We therefore advise you to return to au-
tomatic mode as soon as air recircula-
tion is no longer needed, by pressing
button 7.
To exit this function, press button 7
again. Stopping the system
Turn the control 6 to “OFF” to stop the
system. To start it, turn the control
6
again, then adjust the fan speed or
press the button 1.
Page 123 of 216
3.11
Operating faults
As a general rule, contact your ap-
proved dealer in the event of an oper-
ating fault.
– Reduction in de-icing, demisting or air conditioning performance.
This may be caused by the passen-
ger compartment filter cartridge be-
coming clogged.
– No cold air is being produced .
Check that the controls are set cor-
rectly and that the fuses are sound.
Otherwise, switch off the system.
Presence of water under the
vehicle
After prolonged use of the air condi-
tioning system, it is normal for water
to be present under the vehicle. This is
caused by condensation.
AIR CONDITIONING: information and advice on use
Do not open the refriger-
ant fluid circuit. The fluid
may damage eyes or skin.
Fuel consumption
You will normally notice an increase in
fuel consumption (especially in town)
when the air conditioning is operating.
For vehicles fitted with air conditioning
with no automatic mode, switch off the
system when it is not required.
Advice for reducing consumption
and helping to preserve the environ-
ment
Drive with the air vents open and the
windows closed.
If the vehicle has been parked in the
sun, open the doors for a few moments
to let the hot air escape before starting
the engine.
Advice on use
In some situations, (air conditioning
off, air recirculation activated, ventila-
tion speed at zero or low, etc.) you may
notice that condensation starts to form
on the windows and windscreen.
If there is condensation, use the “Clear
View” function to remove it, then use
the air conditioning in automatic mode
to stop it forming again.
Maintenance
Refer to the Maintenance Document
for your vehicle for the inspection fre-
quency.
Do not add anything to the
vehicle’s ventilation circuit
(for example, to remove
bad odours).
There is a risk of damage or of
fire.
Page 124 of 216
3.12
ELECTRIC WINDOWS (1/2)
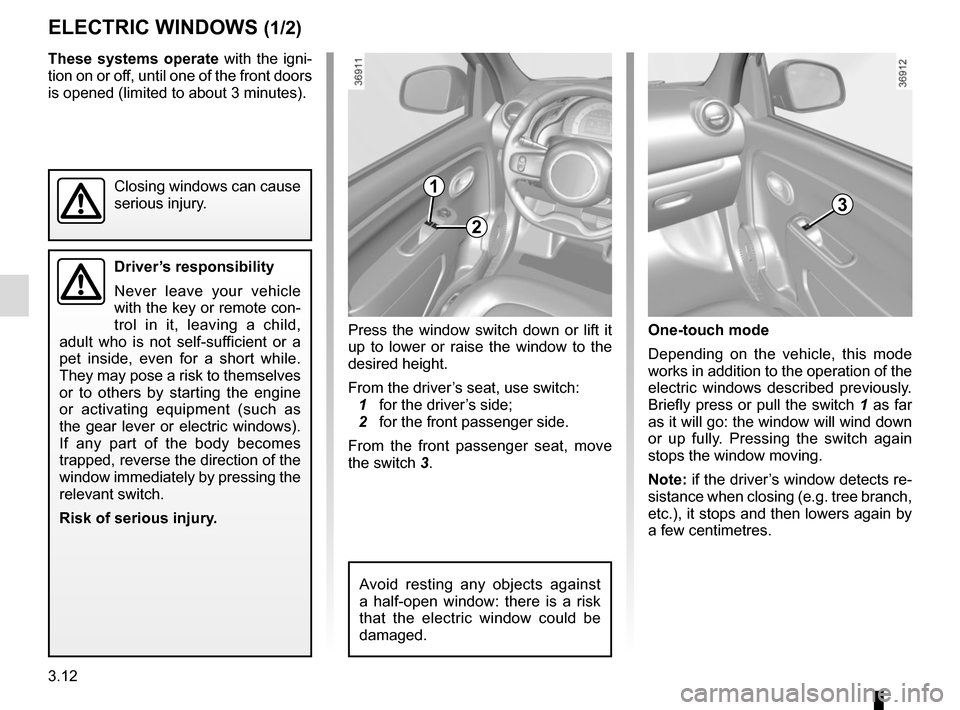
Press the window switch down or lift it
up to lower or raise the window to the
desired height.
From the driver’s seat, use switch:
1 for the driver’s side;
2 for the front passenger side.
From the front passenger seat, move
the switch 3.
1
2
3
One-touch mode
Depending on the vehicle, this mode
works in addition to the operation of the
electric windows described previously.
Briefly press or pull the switch 1 as far
as it will go: the window will wind down
or up fully. Pressing the switch again
stops the window moving.
Note: if the driver’s window detects re-
sistance when closing (e.g. tree branch,
etc.), it stops and then lowers again by
a few centimetres.
Avoid resting any objects against
a half-open window: there is a risk
that the electric window could be
damaged.
These systems operate with the igni-
tion on or off, until one of the front doors
is opened (limited to about 3 minutes).
Driver’s responsibility
Never leave your vehicle
with the key or remote con-
trol in it, leaving a child,
adult who is not self-sufficient or a
pet inside, even for a short while.
They may pose a risk to themselves
or to others by starting the engine
or activating equipment (such as
the gear lever or electric windows).
If any part of the body becomes
trapped, reverse the direction of the
window immediately by pressing the
relevant switch.
Risk of serious injury.
Closing windows can cause
serious injury.