lock RENAULT TWINGO 2016 3.G Owner's Guide
[x] Cancel search | Manufacturer: RENAULT, Model Year: 2016, Model line: TWINGO, Model: RENAULT TWINGO 2016 3.GPages: 216, PDF Size: 7.15 MB
Page 66 of 216
1.60
EXTERIOR LIGHTING AND SIGNALS (3/3)
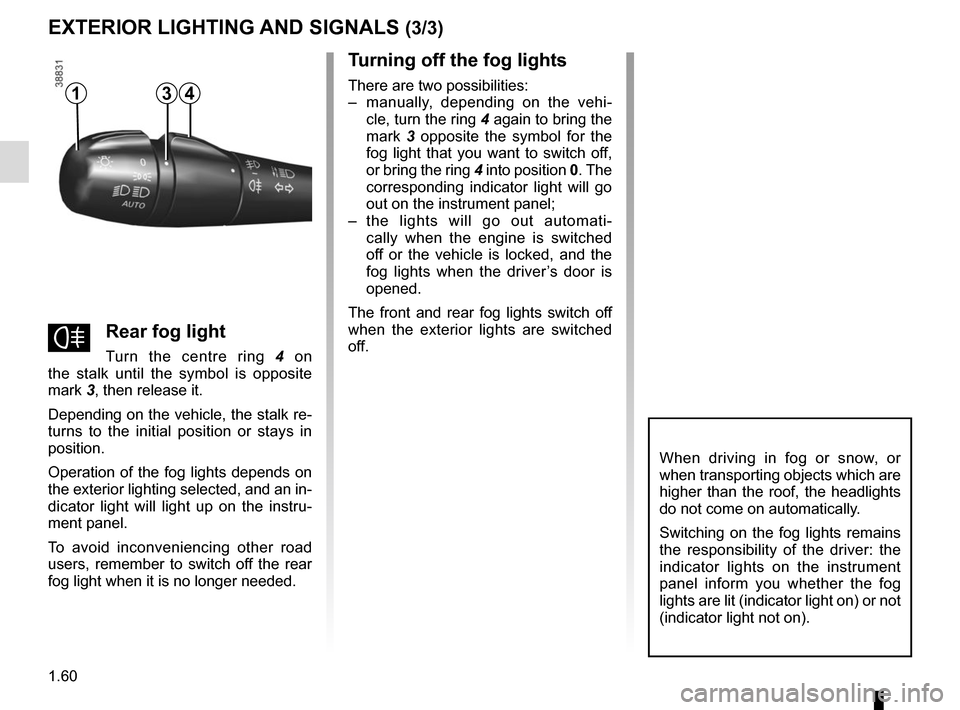
fRear fog light
Turn the centre ring 4 on
the stalk until the symbol is opposite
mark 3, then release it.
Depending on the vehicle, the stalk re-
turns to the initial position or stays in
position.
Operation of the fog lights depends on
the exterior lighting selected, and an in-
dicator light will light up on the instru-
ment panel.
To avoid inconveniencing other road
users, remember to switch off the rear
fog light when it is no longer needed.
Turning off the fog lights
There are two possibilities:
– manually, depending on the vehi- cle, turn the ring 4 again to bring the
mark 3 opposite the symbol for the
fog light that you want to switch off,
or bring the ring 4 into position 0. The
corresponding indicator light will go
out on the instrument panel;
– the lights will go out automati- cally when the engine is switched
off or the vehicle is locked, and the
fog lights when the driver’s door is
opened.
The front and rear fog lights switch off
when the exterior lights are switched
off.
When driving in fog or snow, or
when transporting objects which are
higher than the roof, the headlights
do not come on automatically.
Switching on the fog lights remains
the responsibility of the driver: the
indicator lights on the instrument
panel inform you whether the fog
lights are lit (indicator light on) or not
(indicator light not on).
413
Page 76 of 216
2.2
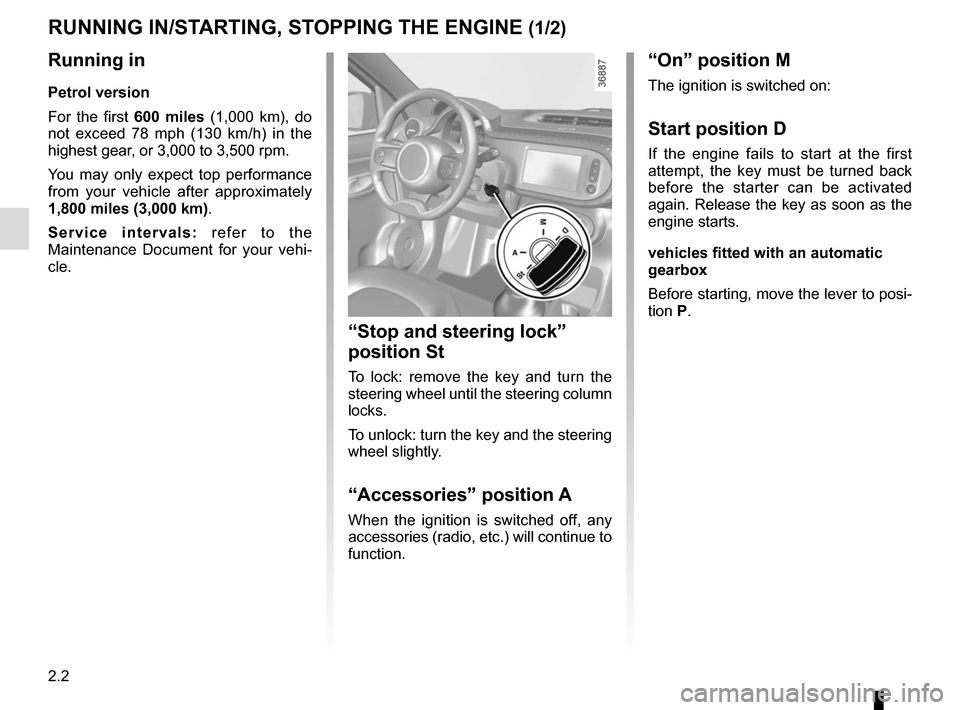
“On” position M
The ignition is switched on:
Start position D
If the engine fails to start at the first
attempt, the key must be turned back
before the starter can be activated
again. Release the key as soon as the
engine starts.
vehicles fitted with an automatic
gearbox
Before starting, move the lever to posi-
tion P.
“Stop and steering lock”
position St
To lock: remove the key and turn the
steering wheel until the steering column
locks.
To unlock: turn the key and the steering
wheel slightly.
“Accessories” position A
When the ignition is switched off, any
accessories (radio, etc.) will continue to
function.
RUNNING IN/STARTING, STOPPING THE ENGINE (1/2)
Running in
Petrol version
For the first 600 miles (1,000 km), do
not exceed 78 mph (130 km/h) in the
highest gear, or 3,000 to 3,500 rpm.
You may only expect top performance
from your vehicle after approximately
1,800 miles (3,000 km) .
Service intervals: refer to the
Maintenance Document for your vehi-
cle.
Page 77 of 216
2.3
Stopping the engine
With the engine idling, turn the key
back to the Stop position.
Starting the engine
Engine warm or cold
– Turn the key to the start position
without depressing the accel-
erator.
– release the key as soon as the
engine starts.
STARTING, STOPPING THE ENGINE (2/2)
If the outside temperature is below
-10° C, hold the clutch pedal de-
pressed when starting the engine.
Driver’s responsibility
when parking or stopping
the vehicle
Never leave an animal,
child or adult who is not self-suffi-
cient alone in your vehicle, even for
a short time.
They may pose a risk to themselves
or to others by starting the engine,
activating equipment such as the
electric windows or locking the
doors, for example.
Also, in hot and/or sunny weather,
please remember that the tempera-
ture inside the passenger compart-
ment increases very quickly.
RISK OF DEATH OR SERIOUS
INJURY.
Never switch off the igni-
tion before the vehicle has
stopped completely. Once
the engine has stopped, the
brake servo, power-assisted steer-
ing, etc. and the passive safety de-
vices such as airbags and preten-
sioners will no longer operate.
Page 80 of 216
2.6
FUNCTION STOP AND START (3/4)
Conditions preventing the
standby of the engine
Certain conditions prevent the system
from using the engine standby function,
including when:
– reverse gear is engaged;
– the bonnet is not locked;
– the outdoor temperature is too low or too high (less than around 0 °C or
higher than around 30 °C);
– the battery is not sufficiently charged;
– the difference between the vehicle interior temperature and the auto-
matic climate control instruction is
too high;
– for vehicles with automatic gear- boxes, the gradient is steeper than
approximately 5%;
– the “Clear View” function is activated (please see “Automatic Climate
Control” in Section 3); – the engine temperature is too low;
– the emission control system is being
regenerated;
or
– ...
Warning light
is displayed on the
instrument panel. This notifies you that
engine standby is not available.
Deactivate the Stop and
Start function when per-
forming any operations in
the engine compartment.
Special feature of the automatic
engine re-start
Under certain conditions, the engine
can restart on its own in order to guar-
antee your safety and comfort.
This can occur especially when:
– the outdoor temperature is too low or too high (less than around 0 °C or
higher than around 30 °C);
– the “Clear View” function is activated (please see “Automatic Climate
Control” in Section 3);
– the battery is not sufficiently charged;
– the vehicle speed is above 3 mph (5 km/h) (downhill slope, etc.); ;
– repeated pressing on the brake pedal or braking system require-
ment;
– ...
Special note: for some of these
conditions, automatic restarting of
the engine is deactivated if a front
door or the tailgate is open.
Page 93 of 216
2.19
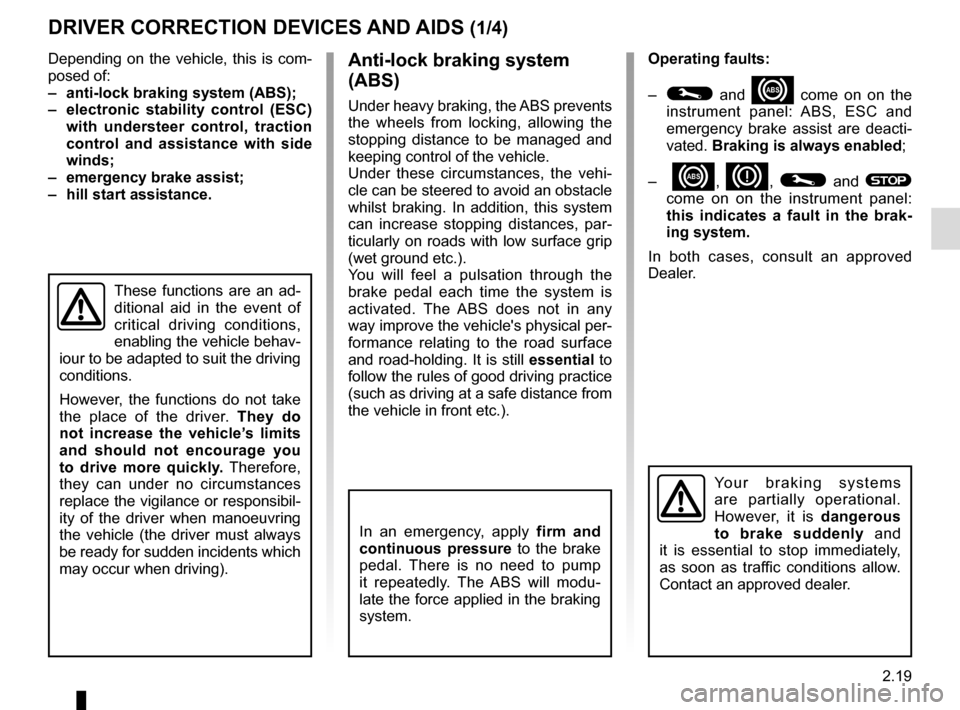
Depending on the vehicle, this is com-
posed of:
– anti-lock braking system (ABS);
– electronic stability control (ESC) with understeer control, traction
control and assistance with side
winds;
– emergency brake assist;
– hill start assistance.Operating faults:
–
© and x come on on the
instrument panel: ABS, ESC and
emergency brake assist are deacti-
vated. Braking is always enabled;
–
x, D, © and ®
come on on the instrument panel:
this indicates a fault in the brak-
ing system.
In both cases, consult an approved
Dealer.
Anti-lock braking system
(ABS)
Under heavy braking, the ABS prevents
the wheels from locking, allowing the
stopping distance to be managed and
keeping control of the vehicle.
Under these circumstances, the vehi-
cle can be steered to avoid an obstacle
whilst braking. In addition, this system
can increase stopping distances, par-
ticularly on roads with low surface grip
(wet ground etc.).
You will feel a pulsation through the
brake pedal each time the system is
activated. The ABS does not in any
way improve the vehicle's physical per-
formance relating to the road surface
and road-holding. It is still essential to
follow the rules of good driving practice
(such as driving at a safe distance from
the vehicle in front etc.).
DRIVER CORRECTION DEVICES AND AIDS (1/4)
These functions are an ad-
ditional aid in the event of
critical driving conditions,
enabling the vehicle behav-
iour to be adapted to suit the driving
conditions.
However, the functions do not take
the place of the driver. They do
not increase the vehicle’s limits
and should not encourage you
to drive more quickly. Therefore,
they can under no circumstances
replace the vigilance or responsibil-
ity of the driver when manoeuvring
the vehicle (the driver must always
be ready for sudden incidents which
may occur when driving).
In an emergency, apply firm and
continuous pressure to the brake
pedal. There is no need to pump
it repeatedly. The ABS will modu-
late the force applied in the braking
system.
Your braking systems
are partially operational.
However, it is dangerous
to brake suddenly and
it is essential to stop immediately,
as soon as traffic conditions allow.
Contact an approved dealer.
Page 110 of 216
2.36
AUTOMATIC TRANSMISSION (1/3)
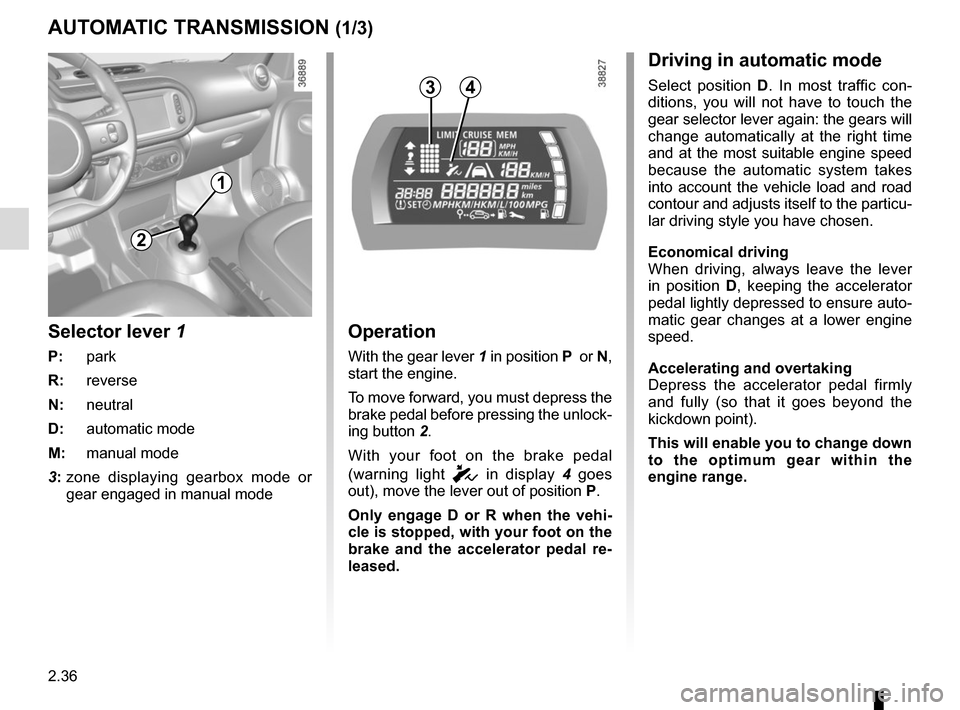
Operation
With the gear lever 1 in position P or N,
start the engine.
To move forward, you must depress the
brake pedal before pressing the unlock-
ing button 2.
With your foot on the brake pedal
(warning light
c in display 4 goes
out), move the lever out of position P.
Only engage D or R when the vehi-
cle is stopped, with your foot on the
brake and the accelerator pedal re-
leased.
2
1
Selector lever 1
P: park
R: reverse
N: neutral
D: automatic mode
M: manual mode
3: zone displaying gearbox mode or
gear engaged in manual mode
43
Driving in automatic mode
Select position D . In most traffic con-
ditions, you will not have to touch the
gear selector lever again: the gears will
change automatically at the right time
and at the most suitable engine speed
because the automatic system takes
into account the vehicle load and road
contour and adjusts itself to the particu-
lar driving style you have chosen.
Economical driving
When driving, always leave the lever
in position D, keeping the accelerator
pedal lightly depressed to ensure auto-
matic gear changes at a lower engine
speed.
Accelerating and overtaking
Depress the accelerator pedal firmly
and fully (so that it goes beyond the
kickdown point).
This will enable you to change down
to the optimum gear within the
engine range.
Page 111 of 216
2.37
AUTOMATIC TRANSMISSION (2/3)
Special circumstances
– If the road contours and bends
do not allow you to stay in auto-
matic mode (e.g.: in the mountains),
we recommend that you change to
manual mode.
This will prevent the automatic gear-
box from changing gears repeatedly
when climbing, and permit engine
braking on long descents.
– In cold weather, to prevent the
engine from stalling, wait a few mo-
ments before shifting the selector
lever from position P or N and en-
gaging D or R.
Driving in manual mode
With the selector lever in position D,
move the lever to the left. Shifting the
lever repeatedly allows you to change
gears manually:
– To move down through the gears, push the lever backwards;
– To move up through the gears, push the lever forwards.
The gear selected is displayed on the
instrument panel.
Special cases
Under certain driving conditions (e.g.
engine protection, electronic stability
program (ESP) operational etc.: ESC))
the automatic system may change the
gear automatically.
Likewise, to prevent incorrect manoeu-
vres, a gear change may be refused by
the automatic system: in this case the
gear display flashes for a few seconds
as a warning.
In very cold weather, the system
may prevent the gears from being
shifted in manual mode until the
gearbox reaches the right tempera-
ture.
Parking the vehicle
When the vehicle is stopped, move the
lever to position P while keeping your
foot on the brake pedal: the gearbox is
in neutral and the drive wheels are me-
chanically locked by the driveshaft.
Apply the handbrake.
An impact to the under-
side of the vehicle while
manoeuvring (e.g.: strik-
ing a post, raised kerb or
other street furniture) may result in
damage to the vehicle (e.g.: defor-
mation of an axle).
To avoid any risk of accident, have
your vehicle checked by an ap-
proved Dealer.
Page 112 of 216
2.38
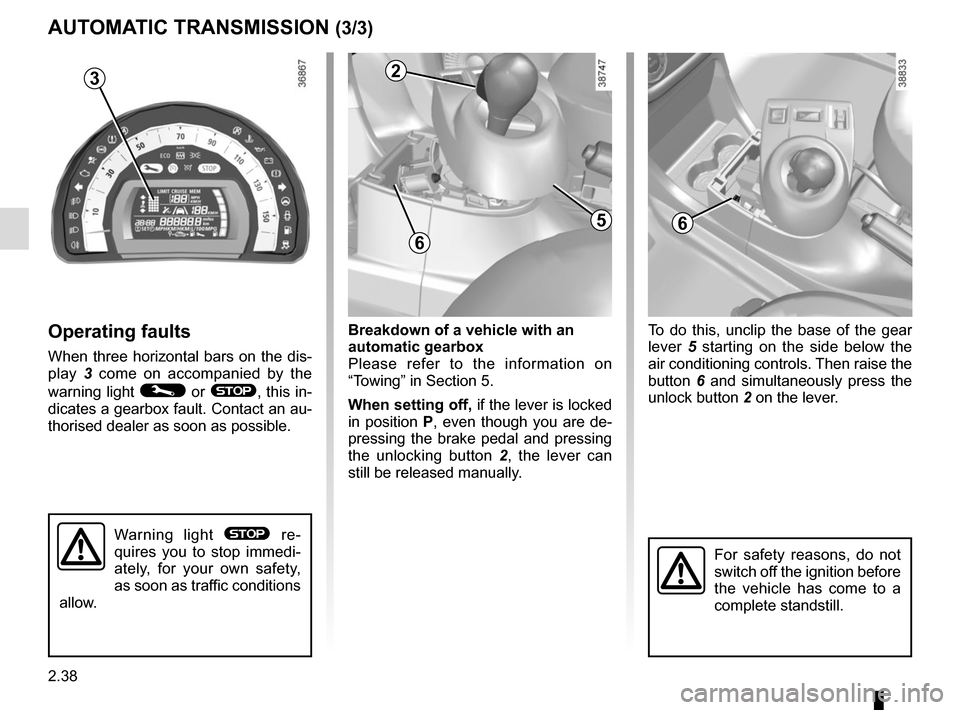
Breakdown of a vehicle with an
automatic gearbox
Please refer to the information on
“Towing” in Section 5.
When setting off, if the lever is locked
in position P, even though you are de-
pressing the brake pedal and pressing
the unlocking button 2, the lever can
still be released manually.
AUTOMATIC TRANSMISSION (3/3)
Operating faults
When three horizontal bars on the dis-
play 3 come on accompanied by the
warning light
© or ®, this in-
dicates a gearbox fault. Contact an au-
thorised dealer as soon as possible. To do this, unclip the base of the gear
lever
5 starting on the side below the
air conditioning controls. Then raise the
button 6 and simultaneously press the
unlock button 2 on the lever.
For safety reasons, do not
switch off the ignition before
the vehicle has come to a
complete standstill.
5
2
3
6
6
3
Warning light ® re-
quires you to stop immedi-
ately, for your own safety,
as soon as traffic conditions
allow.
Page 125 of 216
3.13
ELECTRIC WINDOWS (2/2)
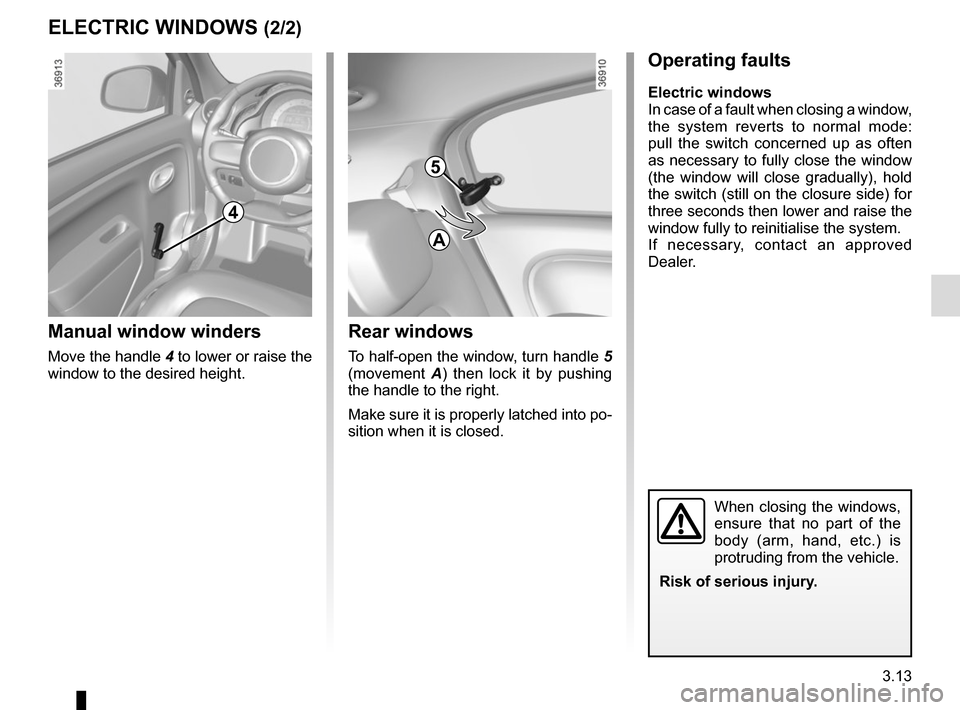
4
Manual window winders
Move the handle 4 to lower or raise the
window to the desired height.
Rear windows
To half-open the window, turn handle 5
(movement A) then lock it by pushing
the handle to the right.
Make sure it is properly latched into po-
sition when it is closed.
5
A
Operating faults
Electric windows
In case of a fault when closing a window,
the system reverts to normal mode:
pull the switch concerned up as often
as necessary to fully close the window
(the window will close gradually), hold
the switch (still on the closure side) for
three seconds then lower and raise the
window fully to reinitialise the system.
If necessary, contact an approved
Dealer.
When closing the windows,
ensure that no part of the
body (arm, hand, etc.) is
protruding from the vehicle.
Risk of serious injury.
Page 126 of 216
3.14
SUNROOF
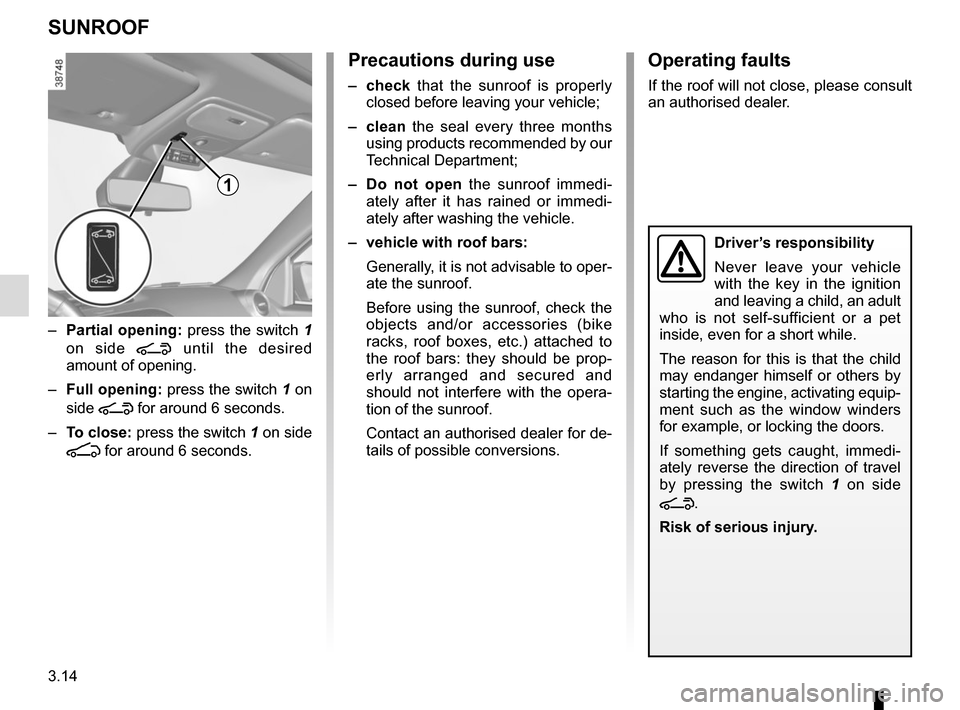
1
– Partial opening: press the switch 1
on side
\ until the desired
amount of opening.
– Full opening: press the switch 1 on
side
\ for around 6 seconds.
– To close: press the switch 1 on side
[ for around 6 seconds.
Precautions during use
– check that the sunroof is properly
closed before leaving your vehicle;
– clean the seal every three months using products recommended by our
Technical Department;
– Do not open the sunroof immedi-
ately after it has rained or immedi-
ately after washing the vehicle.
– vehicle with roof bars: Generally, it is not advisable to oper-
ate the sunroof.
Before using the sunroof, check the
objects and/or accessories (bike
racks, roof boxes, etc.) attached to
the roof bars: they should be prop-
erly arranged and secured and
should not interfere with the opera-
tion of the sunroof.
Contact an authorised dealer for de-
tails of possible conversions.
Operating faults
If the roof will not close, please consult
an authorised dealer.
Driver’s responsibility
Never leave your vehicle
with the key in the ignition
and leaving a child, an adult
who is not self-sufficient or a pet
inside, even for a short while.
The reason for this is that the child
may endanger himself or others by
starting the engine, activating equip-
ment such as the window winders
for example, or locking the doors.
If something gets caught, immedi-
ately reverse the direction of travel
by pressing the switch 1 on side
\.
Risk of serious injury.