light RENAULT TWINGO 2017 3.G Owner's Manual
[x] Cancel search | Manufacturer: RENAULT, Model Year: 2017, Model line: TWINGO, Model: RENAULT TWINGO 2017 3.GPages: 228, PDF Size: 6.76 MB
Page 51 of 228
1.45
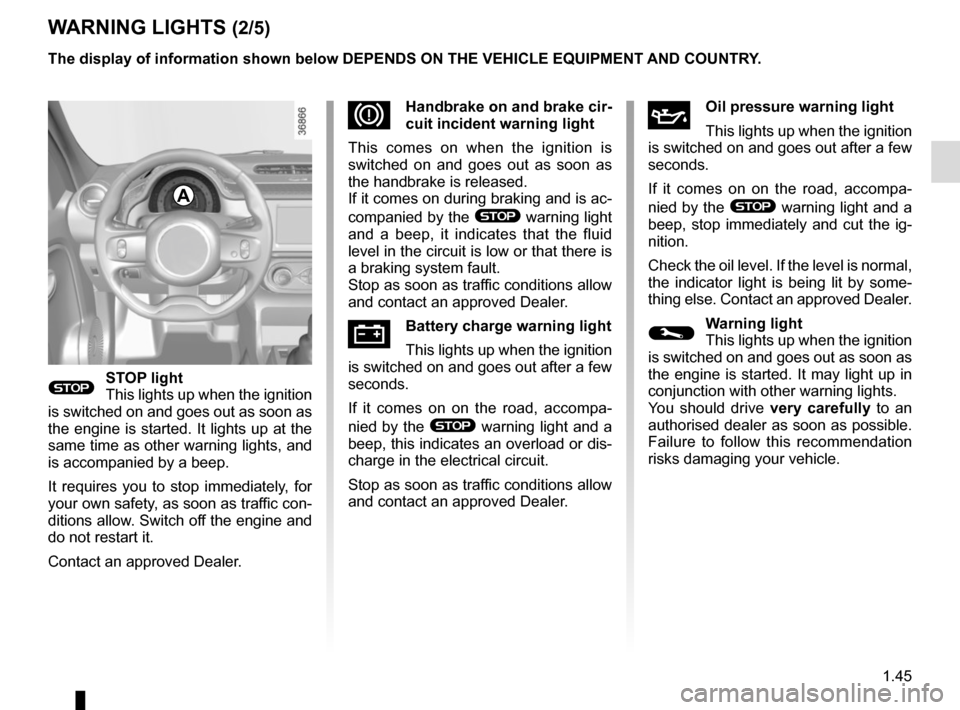
WARNING LIGHTS (2/5)
®STOP light
This lights up when the ignition
is switched on and goes out as soon as
the engine is started. It lights up at the
same time as other warning lights, and
is accompanied by a beep.
It requires you to stop immediately, for
your own safety, as soon as traffic con-
ditions allow. Switch off the engine and
do not restart it.
Contact an approved Dealer.
ÀOil pressure warning light
This lights up when the ignition
is switched on and goes out after a few
seconds.
If it comes on on the road, accompa-
nied by the
® warning light and a
beep, stop immediately and cut the ig-
nition.
Check the oil level. If the level is normal,
the indicator light is being lit by some-
thing else. Contact an approved Dealer.
©Warning light
This lights up when the ignition
is switched on and goes out as soon as
the engine is started. It may light up in
conjunction with other warning lights.
You should drive very carefully to an
authorised dealer as soon as possible.
Failure to follow this recommendation
risks damaging your vehicle.
DHandbrake on and brake cir-
cuit incident warning light
This comes on when the ignition is
switched on and goes out as soon as
the handbrake is released.
If it comes on during braking and is ac-
companied by the
® warning light
and a beep, it indicates that the fluid
level in the circuit is low or that there is
a braking system fault.
Stop as soon as traffic conditions allow
and contact an approved Dealer.
ÚBattery charge warning light
This lights up when the ignition
is switched on and goes out after a few
seconds.
If it comes on on the road, accompa-
nied by the
® warning light and a
beep, this indicates an overload or dis-
charge in the electrical circuit.
Stop as soon as traffic conditions allow
and contact an approved Dealer.
The display of information shown below DEPENDS ON THE VEHICLE EQUIPMENT \
AND COUNTRY.
A
Page 52 of 228
1.46
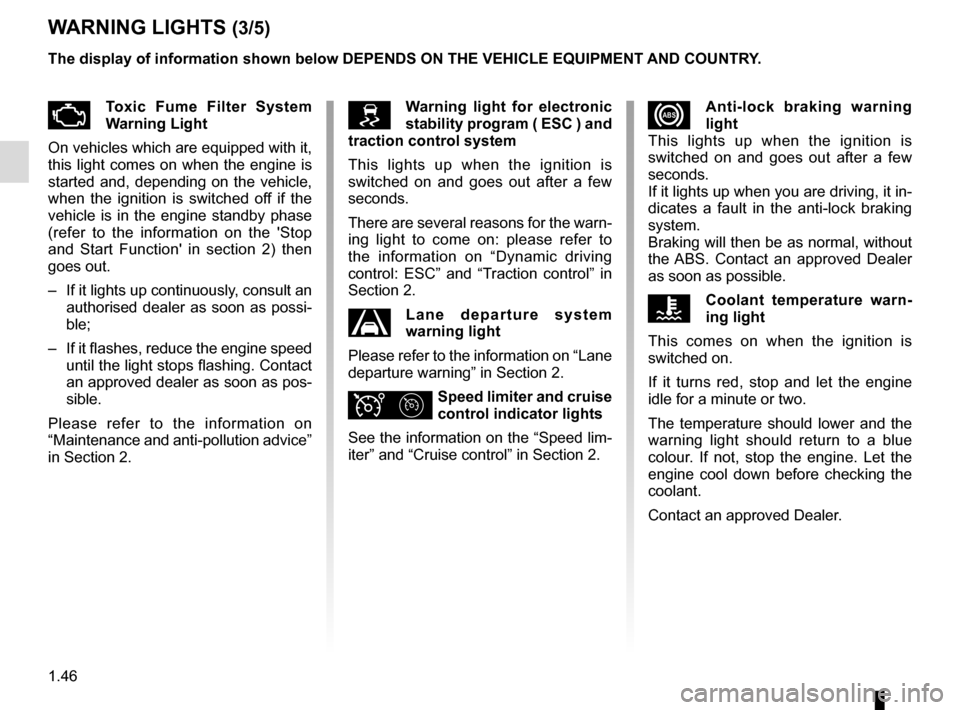
xAnti-lock braking warning
light
This lights up when the ignition is
switched on and goes out after a few
seconds.
If it lights up when you are driving, it in-
dicates a fault in the anti-lock braking
system.
Braking will then be as normal, without
the ABS. Contact an approved Dealer
as soon as possible.
ÔCoolant temperature warn-
ing light
This comes on when the ignition is
switched on.
If it turns red, stop and let the engine
idle for a minute or two.
The temperature should lower and the
warning light should return to a blue
colour. If not, stop the engine. Let the
engine cool down before checking the
coolant.
Contact an approved Dealer.
WARNING LIGHTS (3/5)
ÄToxic Fume Filter System
Warning Light
On vehicles which are equipped with it,
this light comes on when the engine is
started and, depending on the vehicle,
when the ignition is switched off if the
vehicle is in the engine standby phase
(refer to the information on the 'Stop
and Start Function' in section 2) then
goes out.
– If it lights up continuously, consult an authorised dealer as soon as possi-
ble;
– If it flashes, reduce the engine speed until the light stops flashing. Contact
an approved dealer as soon as pos-
sible.
Please refer to the information on
“Maintenance and anti-pollution advice”
in Section 2.Warning light for electronic
stability program ( ESC ) and
traction control system
This lights up when the ignition is
switched on and goes out after a few
seconds.
There are several reasons for the warn-
ing light to come on: please refer to
the information on “Dynamic driving
control: ESC” and “Traction control” in
Section 2.
Lane departure system
warning light
Please refer to the information on “Lane
departure warning” in Section 2.
ΦSpeed limiter and cruise
control indicator lights
See the information on the “Speed lim-
iter” and “Cruise control” in Section 2.
The display of information shown below DEPENDS ON THE VEHICLE EQUIPMENT \
AND COUNTRY.
Page 53 of 228
1.47
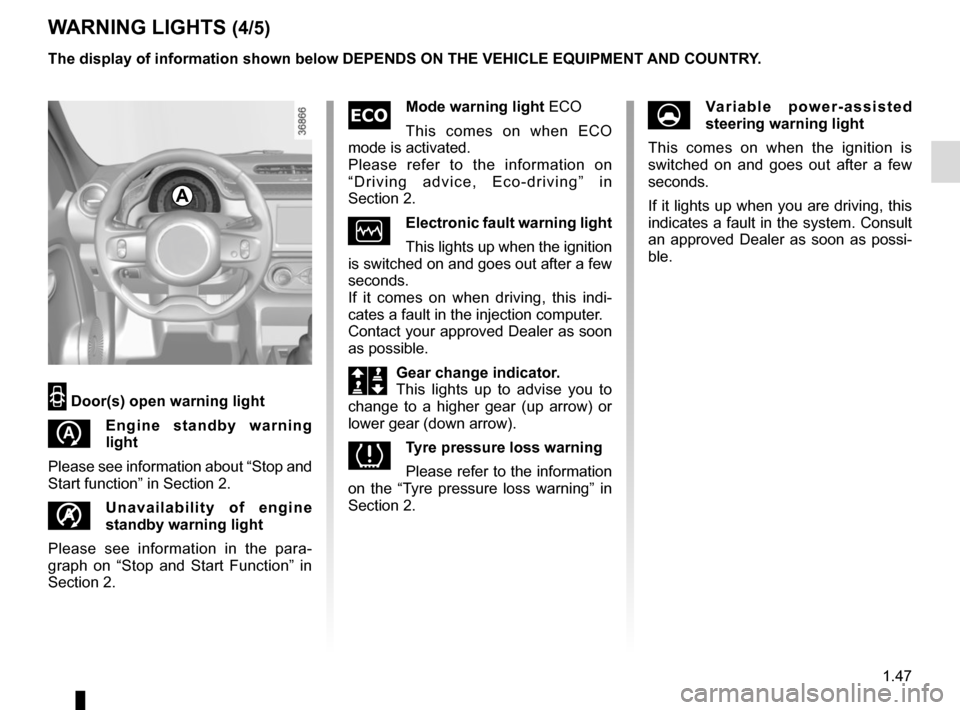
WARNING LIGHTS (4/5)
2 Door(s) open warning light
Engine standby warning
light
Please see information about “Stop and
Start function” in Section 2.
Unavailability of engine
standby warning light
Please see information in the para-
graph on “Stop and Start Function” in
Section 2.
Mode warning light ECO
This comes on when ECO
mode is activated.
Please refer to the information on
“Driving advice, Eco-driving” in
Section 2.
ÒElectronic fault warning light
This lights up when the ignition
is switched on and goes out after a few
seconds.
If it comes on when driving, this indi-
cates a fault in the injection computer.
Contact your approved Dealer as soon
as possible.
Š‰Gear change indicator.
This lights up to advise you to
change to a higher gear (up arrow) or
lower gear (down arrow).
\bTyre pressure loss warning
Please refer to the information
on the “Tyre pressure loss warning” in
Section 2.
The display of information shown below DEPENDS ON THE VEHICLE EQUIPMENT \
AND COUNTRY.
UVariable power-assisted
steering warning light
This comes on when the ignition is
switched on and goes out after a few
seconds.
If it lights up when you are driving, this
indicates a fault in the system. Consult
an approved Dealer as soon as possi-
ble.
A
Page 54 of 228
1.48
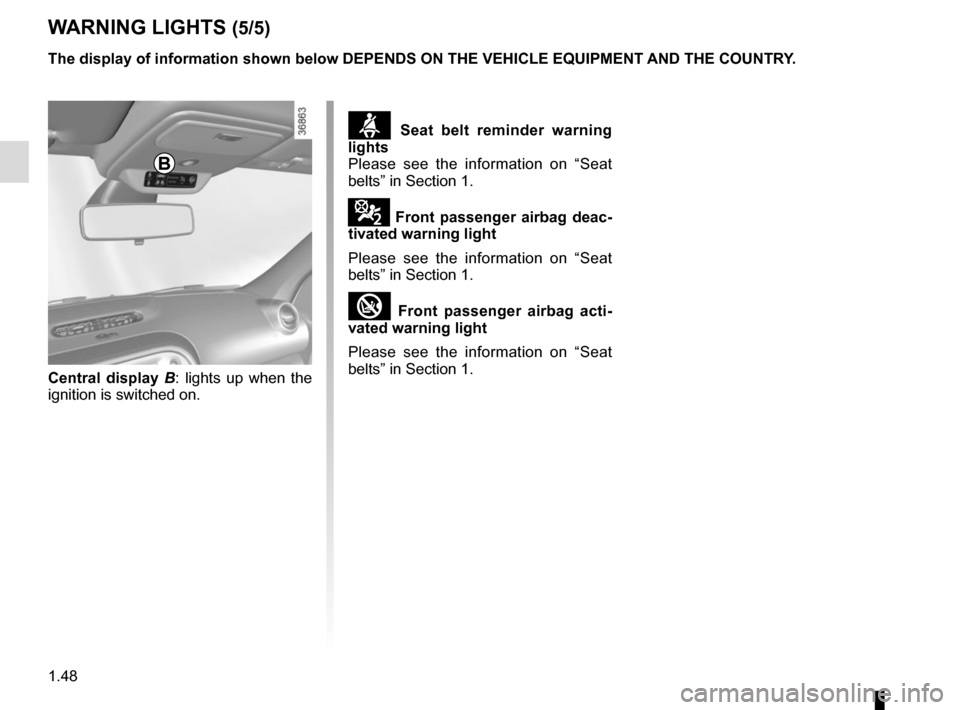
Central display B: lights up when the
ignition is switched on.
B
ß Seat belt reminder warning
lights
Please see the information on “Seat
belts” in Section 1.
¹ Front passenger airbag deac-
tivated warning light
Please see the information on “Seat
belts” in Section 1.
Front passenger airbag acti-
vated warning light
Please see the information on “Seat
belts” in Section 1.
WARNING LIGHTS (5/5)
The display of information shown below DEPENDS ON THE VEHICLE EQUIPMENT \
AND THE COUNTRY.
Page 60 of 228
1.54
ON-BOARD COMPUTER: trip settings (3/4)
The display of information shown below DEPENDS ON THE VEHICLE EQUIPMENT \
AND COUNTRY.
Examples of selectionsInterpreting the display selected
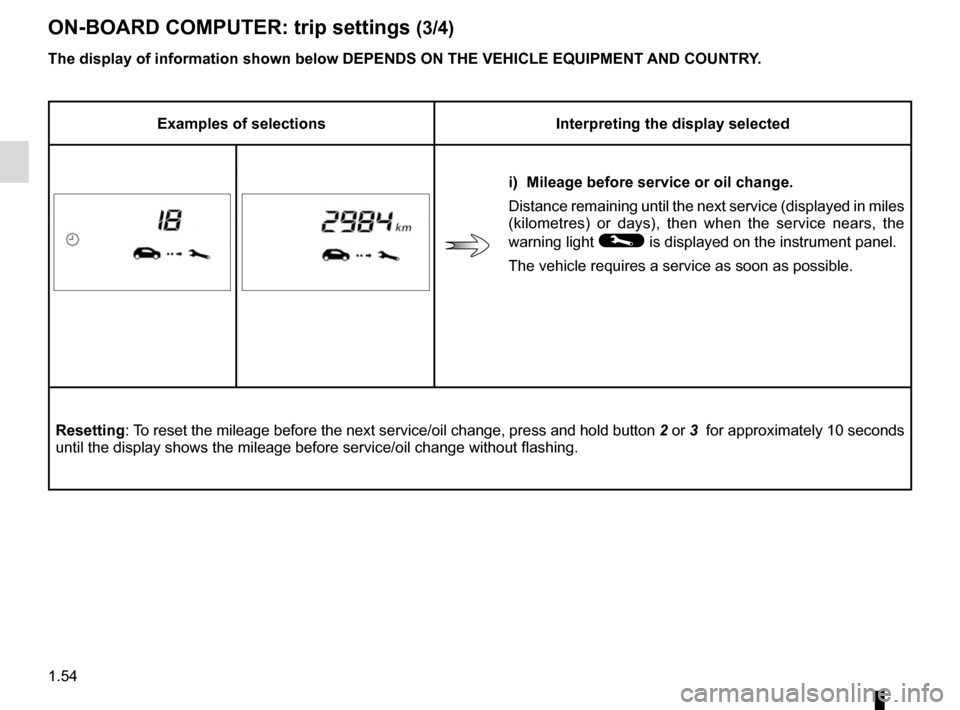
i) Mileage before service or oil change.
Distance remaining until the next service (displayed in miles
(kilometres) or days), then when the service nears, the
warning light
© is displayed on the instrument panel.
The vehicle requires a service as soon as possible.
Resetting: To reset the mileage before the next service/oil change, press and hold b\
utton 2 or 3 for approximately 10 seconds
until the display shows the mileage before service/oil change without fl\
ashing.
Page 64 of 228
1.58
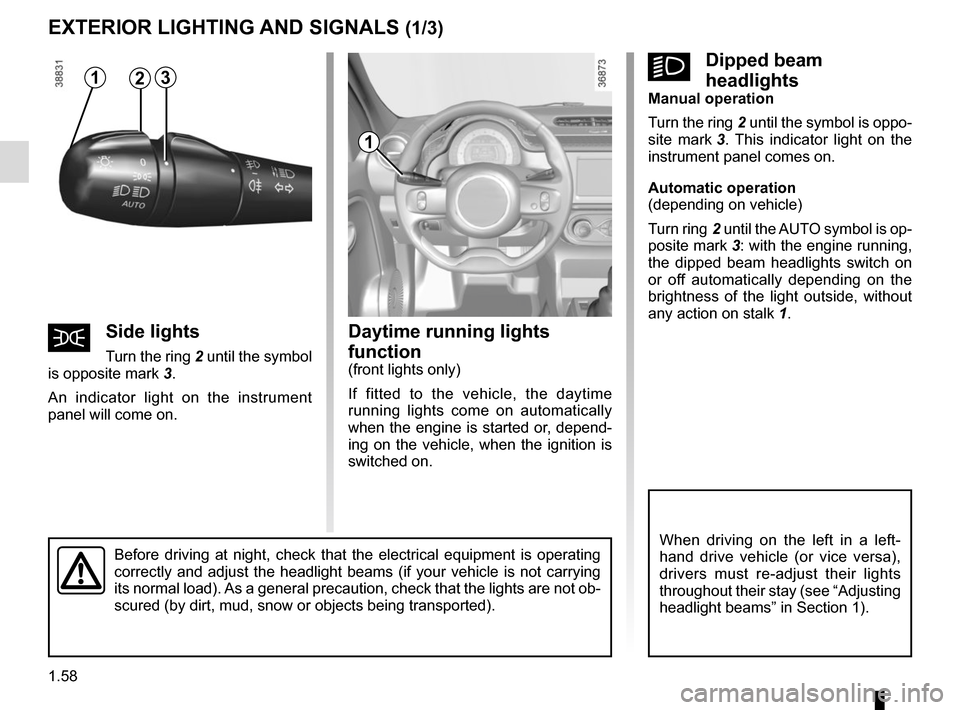
Daytime running lights
function
(front lights only)
If fitted to the vehicle, the daytime
running lights come on automatically
when the engine is started or, depend-
ing on the vehicle, when the ignition is
switched on.
EXTERIOR LIGHTING AND SIGNALS (1/3)
šSide lights
Turn the ring 2 until the symbol
is opposite mark 3.
An indicator light on the instrument
panel will come on.
1
Before driving at night, check that the electrical equipment is operatin\
g
correctly and adjust the headlight beams (if your vehicle is not carryi\
ng
its normal load). As a general precaution, check that the lights are not ob-
scured (by dirt, mud, snow or objects being transported).
kDipped beam
headlights
Manual operation
Turn the ring 2 until the symbol is oppo-
site mark 3. This indicator light on the
instrument panel comes on.
Automatic operation
(depending on vehicle)
Turn ring 2 until the AUTO symbol is op-
posite mark 3: with the engine running,
the dipped beam headlights switch on
or off automatically depending on the
brightness of the light outside, without
any action on stalk 1.
When driving on the left in a left-
hand drive vehicle (or vice versa),
drivers must re-adjust their lights
throughout their stay (see “Adjusting
headlight beams” in Section 1).
312
Page 65 of 228
1.59
EXTERIOR LIGHTING AND SIGNALS (2/3)
Switching off the lights
There are two possibilities:
– manually, move ring 2 to position 0;
– automatically, if the ring 2 is in
AUTO position and if the main beam
headlights are not switched on. The
lights will go out automatically when
the engine is switched off, the dri-
ver’s door is opened or the vehicle
is locked. In this case, the next time
the engine is started, the lights will
be switched back on according to the
position of the ring 2, taking into ac-
count the exterior light level, without
moving the stalk 1.
Lights-on reminder buzzer
When the lights have been left on after
turning the engine off, a warning beep
will sound when the driver’s door is
opened to remind you that the lights
are still on.
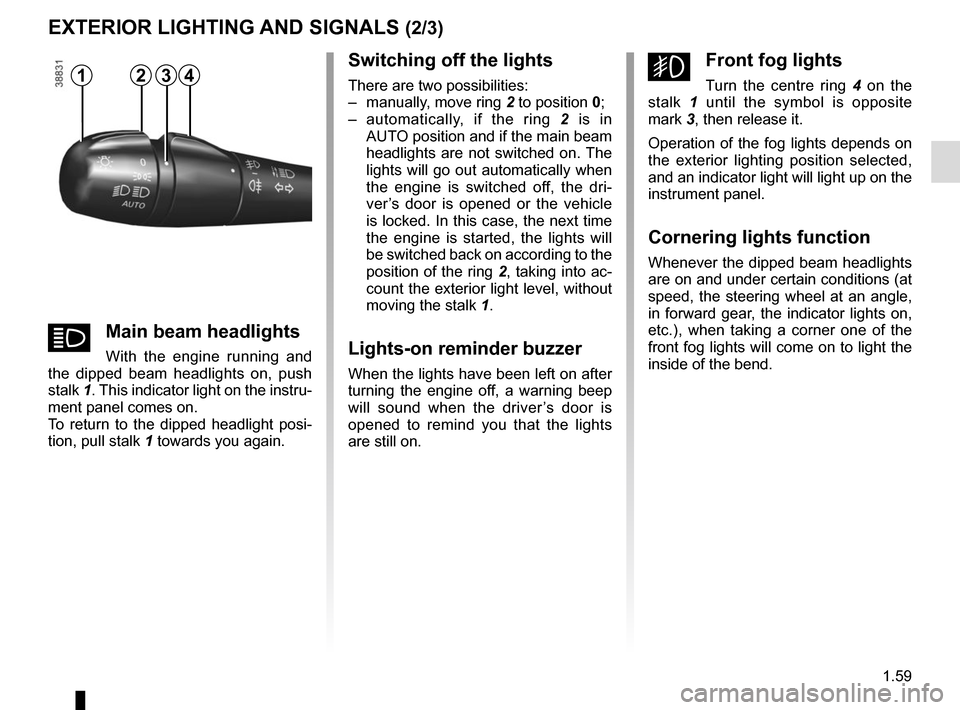
gFront fog lights
Turn the centre ring 4 on the
stalk 1 until the symbol is opposite
mark 3, then release it.
Operation of the fog lights depends on
the exterior lighting position selected,
and an indicator light will light up on the
instrument panel.
Cornering lights function
Whenever the dipped beam headlights
are on and under certain conditions (at
speed, the steering wheel at an angle,
in forward gear, the indicator lights on,
etc.), when taking a corner one of the
front fog lights will come on to light the
inside of the bend.
12
áMain beam headlights
With the engine running and
the dipped beam headlights on, push
stalk 1. This indicator light on the instru-
ment panel comes on.
To return to the dipped headlight posi-
tion, pull stalk 1 towards you again.
43
Page 66 of 228
1.60
EXTERIOR LIGHTING AND SIGNALS (3/3)
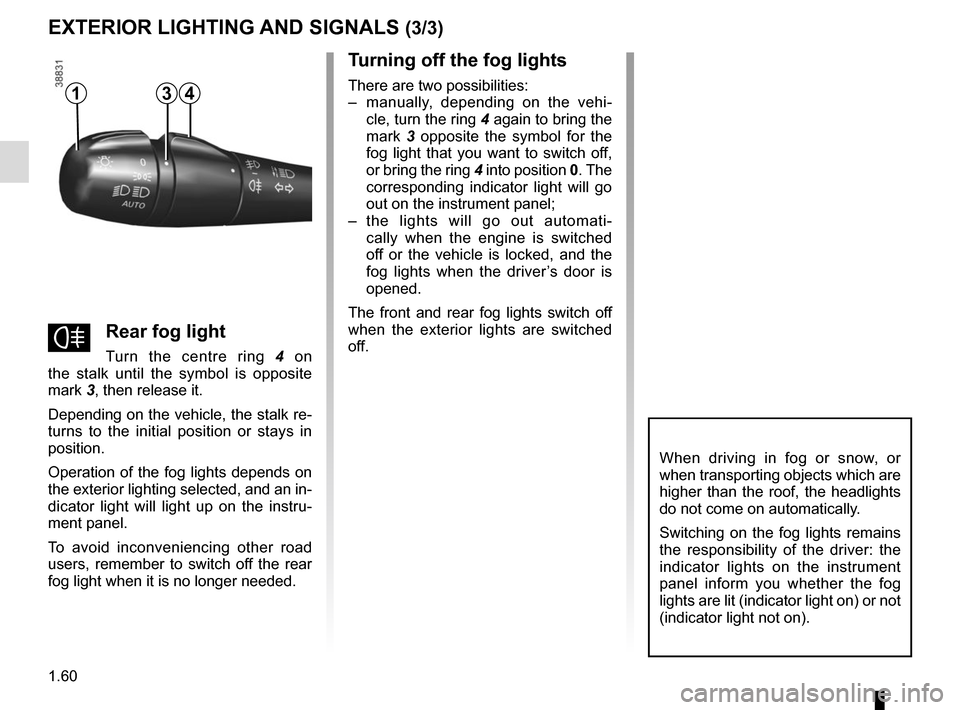
fRear fog light
Turn the centre ring 4 on
the stalk until the symbol is opposite
mark 3, then release it.
Depending on the vehicle, the stalk re-
turns to the initial position or stays in
position.
Operation of the fog lights depends on
the exterior lighting selected, and an in-
dicator light will light up on the instru-
ment panel.
To avoid inconveniencing other road
users, remember to switch off the rear
fog light when it is no longer needed.
Turning off the fog lights
There are two possibilities:
– manually, depending on the vehi- cle, turn the ring 4 again to bring the
mark 3 opposite the symbol for the
fog light that you want to switch off,
or bring the ring 4 into position 0. The
corresponding indicator light will go
out on the instrument panel;
– the lights will go out automati- cally when the engine is switched
off or the vehicle is locked, and the
fog lights when the driver’s door is
opened.
The front and rear fog lights switch off
when the exterior lights are switched
off.
When driving in fog or snow, or
when transporting objects which are
higher than the roof, the headlights
do not come on automatically.
Switching on the fog lights remains
the responsibility of the driver: the
indicator lights on the instrument
panel inform you whether the fog
lights are lit (indicator light on) or not
(indicator light not on).
413
Page 67 of 228
1.61
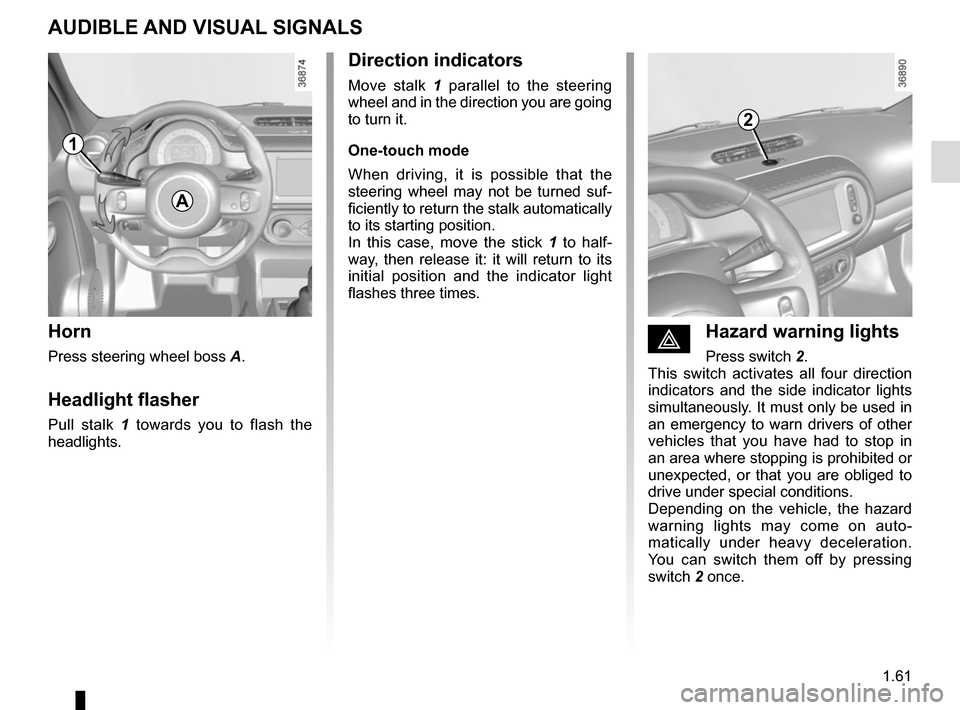
éHazard warning lights
Press switch 2.
This switch activates all four direction
indicators and the side indicator lights
simultaneously. It must only be used in
an emergency to warn drivers of other
vehicles that you have had to stop in
an area where stopping is prohibited or
unexpected, or that you are obliged to
drive under special conditions.
Depending on the vehicle, the hazard
warning lights may come on auto-
matically under heavy deceleration.
You can switch them off by pressing
switch 2 once.
Direction indicators
Move stalk 1 parallel to the steering
wheel and in the direction you are going
to turn it.
One-touch mode
When driving, it is possible that the
steering wheel may not be turned suf-
ficiently to return the stalk automatically
to its starting position.
In this case, move the stick 1 to half-
way, then release it: it will return to its
initial position and the indicator light
flashes three times.
Horn
Press steering wheel boss A.
Headlight flasher
Pull stalk 1 towards you to flash the
headlights.
AUDIBLE AND VISUAL SIGNALS
A
1
2
Page 68 of 228
1.62
HEADLIGHT BEAM ADJUSTMENT (1/2)
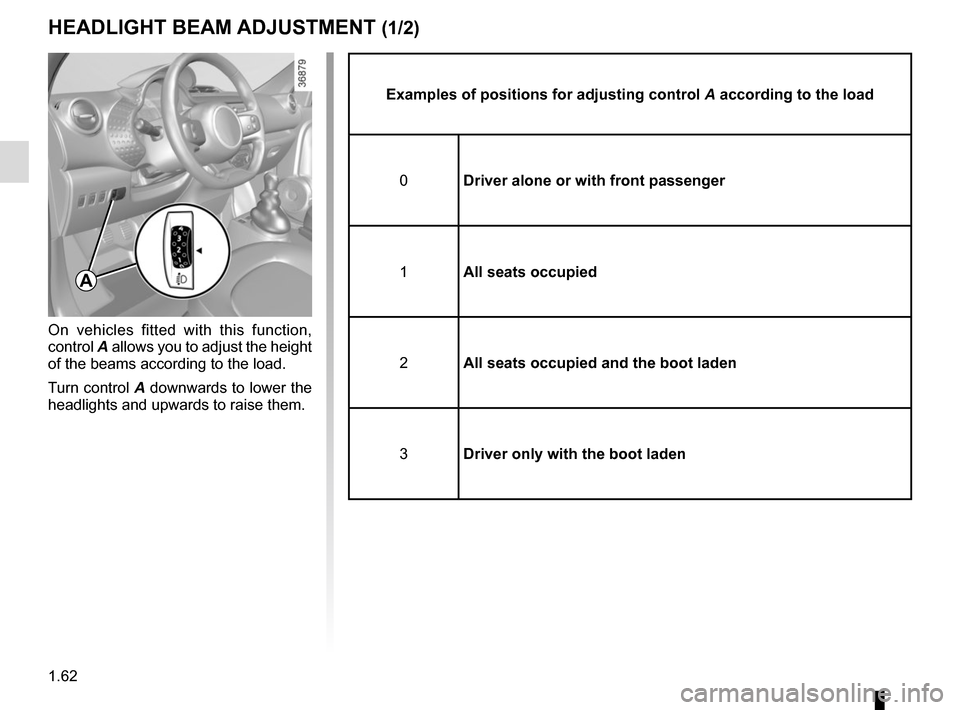
On vehicles fitted with this function,
control A allows you to adjust the height
of the beams according to the load.
Turn control A downwards to lower the
headlights and upwards to raise them.
Examples of positions for adjusting control A according to the load
0 Driver alone or with front passenger
1 All seats occupied
2 All seats occupied and the boot laden
3 Driver only with the boot laden
A