SAAB 9-3 2003 Owners Manual
Manufacturer: SAAB, Model Year: 2003, Model line: 9-3, Model: SAAB 9-3 2003Pages: 256, PDF Size: 21.66 MB
Page 161 of 256
161 Starting and driving
Driving with a roof rack
loadThe maximum permissible roof load is
220 lbs. (100 kg). Note that the roof load
must be included in the car’s maximum per-
missible payload and axle load.
Strong, sturdy roof carriers designed spe-
cially for your car are available from your
Saab dealer. Always secure roof loads
securely.
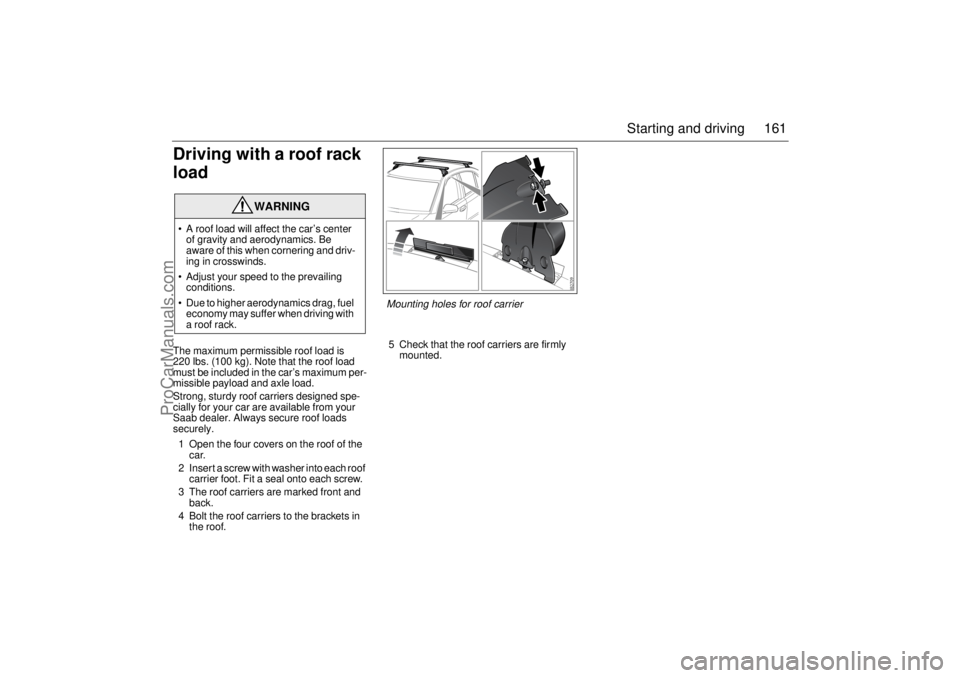
1 Open the four covers on the roof of the
car.
2 Insert a screw with washer into each roof
carrier foot. Fit a seal onto each screw.
3 The roof carriers are marked front and
back.
4 Bolt the roof carriers to the brackets in
the roof.5 Check that the roof carriers are firmly
mounted.
WARNING
A roof load will affect the car’s center
of gravity and aerodynamics. Be
aware of this when cornering and driv-
ing in crosswinds.
Adjust your speed to the prevailing
conditions.
Due to higher aerodynamics drag, fuel
economy may suffer when driving with
a roof rack.
Mounting holes for roof carrier
ProCarManuals.com
Page 162 of 256
162 Starting and drivingDriving with a loadThe handling characteristics are affected by
how the car is loaded.
Place the heaviest load as far forward and
as low as possible in the trunk.
Secure the load to the lashing eyes (see
page 118).
Heavy loads mean that the car’s center of
gravity is further back. As a result, the car
will sway more during evasive steering.
Never exceed the permissible load of the
roof box, even if there is room for more.
Ensure that the tire pressure is correct –
slight overinflation is preferable to under-
inflation.
The braking distance of a loaded car is
always greater. Keep your distance from
the vehicle in front.
Do not exceed the car’s permissible
gross vehicle weight or axle load (see
page 236).
Roof loads can negatively affect telecom-
munication.
TiresNote: Low tire pressure also causes prema-
ture tire wear and increased fuel consump-
tion.
Tire pressure should match the current load
and speed of the car (see page 245).
The tire pressures given apply to cold tires,
that is tires that are the same temperature
as the outside air temperature.
The tire pressure increases approximately
4 psi/27 kPa as the tires become warm (e.g.
during highway driving). When the temper-
ature of the tires changes by 50°F (10°C),
the tire pressure will change 2 psi/13 kPa.Never reduce the pressure of a hot tire. If the
tires are hot when you check them, only
increase the pressure, if necessary.
Underinflated tires wear more quickly than
slightly overinflated tires.
If a valve is leaking, simply unscrew it and fit
a new one.
Note: Remember to adjust the tire pres-
sures if you change the load in the car sig-
nificantly or intend to drive at substantially
lower or higher speeds than normal.
Automatic tire pressure monitoring, see
page 207.
WARNING
Check the tire pressure at least once a
month and before long journeys. Under-
inflation can result in:
punctures
separation of the tire and tread
damage to the sidewalls
damage to the rims on poor roads
poor handling characteristics
premature tire wear
increased fuel consumption.
ProCarManuals.com
Page 163 of 256

163 Starting and driving
Driving with the trunk lid
openAvoid driving with the trunk lid partly or fully
open, since exhaust fumes can be drawn
into the cabin.
If you must drive with the trunk lid open,
close all windows and the sunroof (if fitted)
and set the cabin fan to its highest speed
setting.
Driving in deep water Driving at night
Bear in mind the following points, especially
when driving at night:
Nighttime driving requires your full
concentration
Do not rush. Count on your journey taking
slightly longer.
The number of drivers under the influence
of drugs is likely to be greater at night than
during the day.
Do not stare at the headlights of oncom-
ing vehicles.
Avoid driving at night if you have poor
eyesight. Night vision deteriorates with
age.
Keep your car’s headlights, windows and
mirrors clean. Also, if you wear glasses,
make sure they are clean.
Make sure you are well rested before
starting a long journey. Take a break
every other hour.
Only eat light meals. Heavy meals have a
tendency to induce tiredness.
Wild animals prefer to move at dusk and
dawn.
Check the headlight levelling setting (see
page 73).
NOTICEDo not drive in puddles or water deeper
than 7 in. (20 cm) and do not drive faster
than at idling speed. Water can otherwise
be sucked into the engine. The engine will
be damaged if water enters the intake
system.
ProCarManuals.com
Page 164 of 256
164 Starting and drivingTowing the car
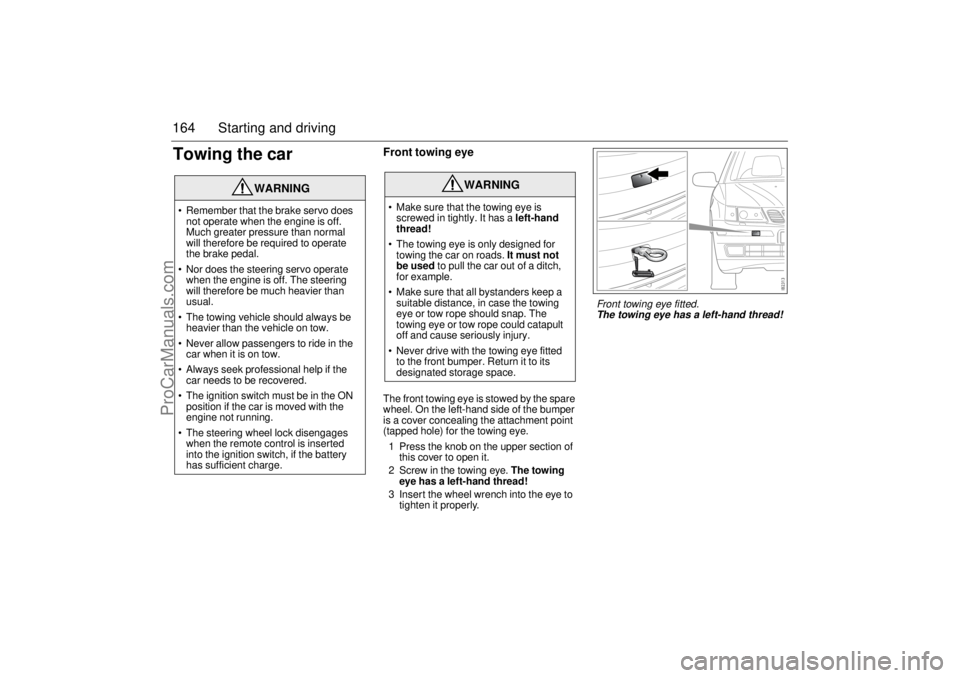
Front towing eyeThe front towing eye is stowed by the spare
wheel. On the left-hand side of the bumper
is a cover concealing the attachment point
(tapped hole) for the towing eye.
1 Press the knob on the upper section of
this cover to open it.
2 Screw in the towing eye. The towing
eye has a left-hand thread!
3 Insert the wheel wrench into the eye to
tighten it properly.
WARNING
Remember that the brake servo does
not operate when the engine is off.
Much greater pressure than normal
will therefore be required to operate
the brake pedal.
Nor does the steering servo operate
when the engine is off. The steering
will therefore be much heavier than
usual.
The towing vehicle should always be
heavier than the vehicle on tow.
Never allow passengers to ride in the
car when it is on tow.
Always seek professional help if the
car needs to be recovered.
The ignition switch must be in the ON
position if the car is moved with the
engine not running.
The steering wheel lock disengages
when the remote control is inserted
into the ignition switch, if the battery
has sufficient charge.
WARNING
Make sure that the towing eye is
screwed in tightly. It has a left-hand
thread!
The towing eye is only designed for
towing the car on roads. It must not
be used to pull the car out of a ditch,
for example.
Make sure that all bystanders keep a
suitable distance, in case the towing
eye or tow rope should snap. The
towing eye or tow rope could catapult
off and cause seriously injury.
Never drive with the towing eye fitted
to the front bumper. Return it to its
designated storage space.
Front towing eye fitted.
The towing eye has a left-hand thread!
ProCarManuals.com
Page 165 of 256
165 Starting and driving
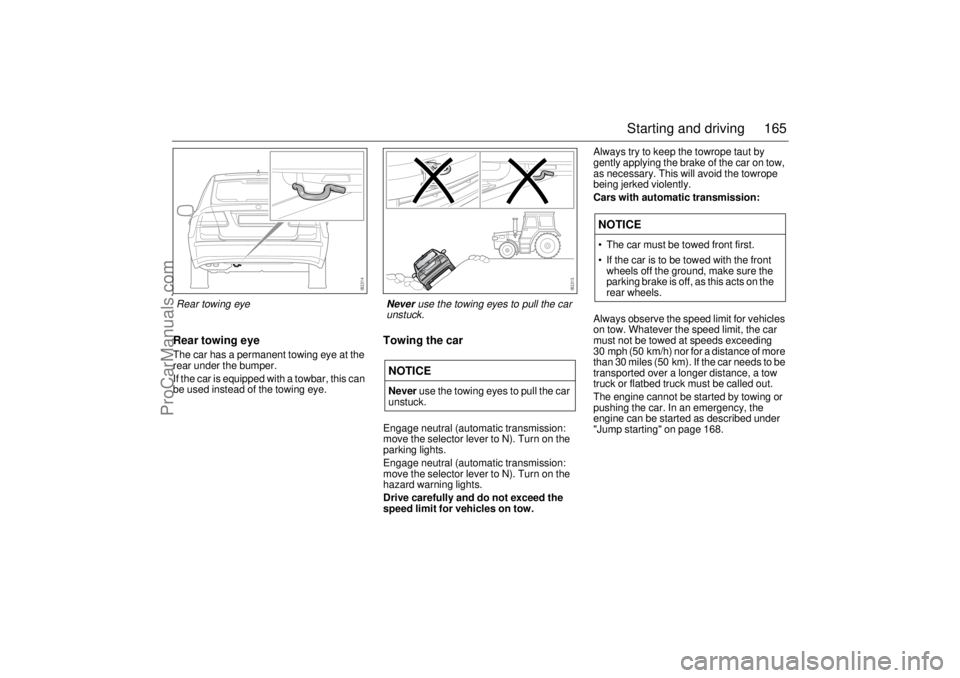
Rear towing eyeThe car has a permanent towing eye at the
rear under the bumper.
If the car is equipped with a towbar, this can
be used instead of the towing eye.
Towing the carEngage neutral (automatic transmission:
move the selector lever to N). Turn on the
parking lights.
Engage neutral (automatic transmission:
move the selector lever to N). Turn on the
hazard warning lights.
Drive carefully and do not exceed the
speed limit for vehicles on tow.Always try to keep the towrope taut by
gently applying the brake of the car on tow,
as necessary. This will avoid the towrope
being jerked violently.
Cars with automatic transmission:
Always observe the speed limit for vehicles
on tow. Whatever the speed limit, the car
must not be towed at speeds exceeding
30 mph (50 km/h) nor for a distance of more
than 30 miles (50 km). If the car needs to be
transported over a longer distance, a tow
truck or flatbed truck must be called out.
The engine cannot be started by towing or
pushing the car. In an emergency, the
engine can be started as described under
"Jump starting" on page 168.NOTICENever use the towing eyes to pull the car
unstuck.
NOTICE The car must be towed front first.
If the car is to be towed with the front
wheels off the ground, make sure the
parking brake is off, as this acts on the
rear wheels.
Rear towing eye
Never use the towing eyes to pull the car
unstuck.
ProCarManuals.com
Page 166 of 256
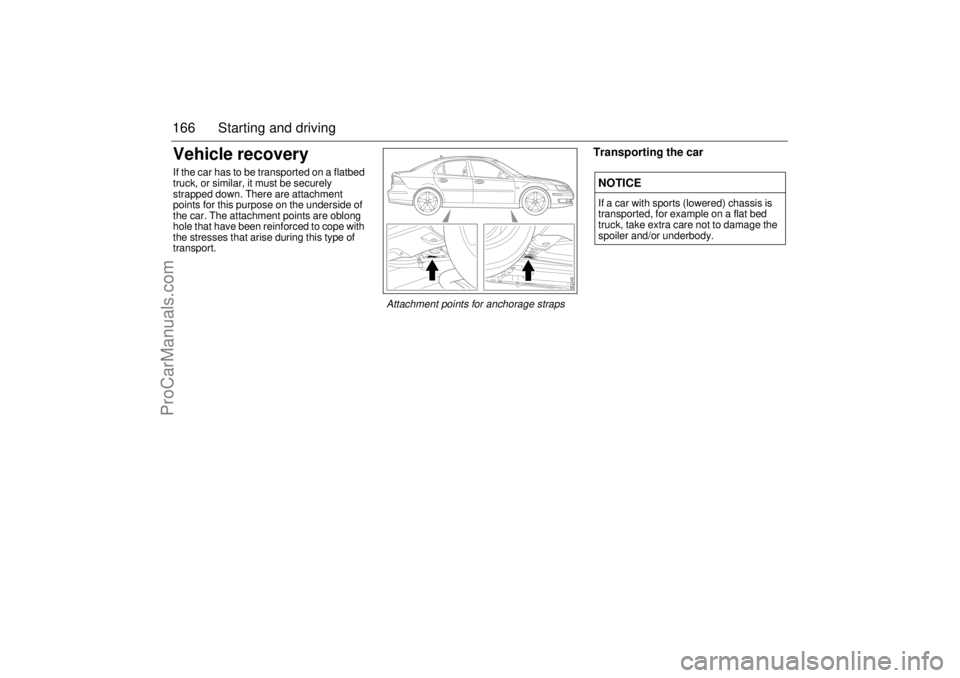
166 Starting and drivingVehicle recoveryIf the car has to be transported on a flatbed
truck, or similar, it must be securely
strapped down. There are attachment
points for this purpose on the underside of
the car. The attachment points are oblong
hole that have been reinforced to cope with
the stresses that arise during this type of
transport.
Transporting the car
NOTICEIf a car with sports (lowered) chassis is
transported, for example on a flat bed
truck, take extra care not to damage the
spoiler and/or underbody.
Attachment points for anchorage straps
ProCarManuals.com
Page 167 of 256
167 Starting and driving
Driving with the
compact spare wheelObserve the following when the compact
spare wheel is fitted:
The compact spare is light and easy to
handle when changing a wheel.
Do not drive further than necessary with
the compact spare fitted - the maximum
life of the wheel is only just over
2,000 miles (approx. 3,500 km).
Refit the standard wheel as soon as
possible.Important considerations when driving with
a compact spare wheel:
The car’s ground clearance is reduced.
The car must not be driven with more than
one compact spare wheel at a time.
Avoid driving against the curb.
Do not use snow chains.
Do not fit the wheel cover - this would
conceal the warning text.
WARNING
Do not exceed 50 mph (80 km/h). The
tire can overheat affecting the car’s
roadholding.
Tire pressure: refer to page 243.
The spare wheel or punctured wheel
must be stowed under the trunk floor,
and secured in place with the retaining
nut.
NOTICETo avoid damaging a punctured alloy
wheel, this can be temporarily placed
outside up in the spare wheel well but
only while driving to the closest work-
shop.
As a general rule, all heavy loads must be
well secured in the trunk (see page 118).
ProCarManuals.com
Page 168 of 256
168 Starting and drivingJump starting
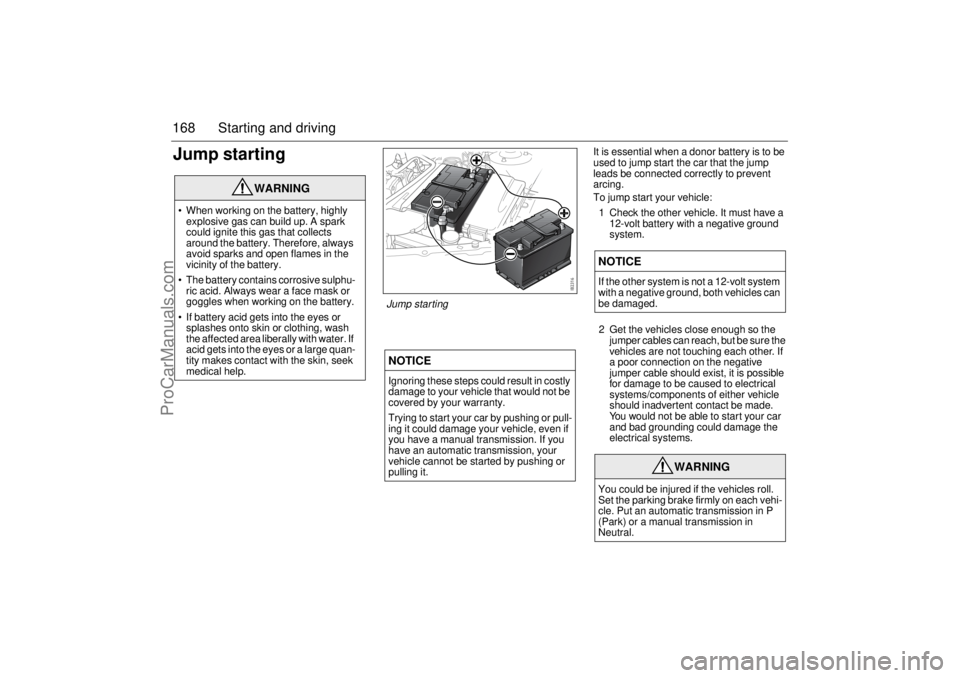
It is essential when a donor battery is to be
used to jump start the car that the jump
leads be connected correctly to prevent
arcing.
To jump start your vehicle:
1 Check the other vehicle. It must have a
12-volt battery with a negative ground
system.
2 Get the vehicles close enough so the
jumper cables can reach, but be sure the
vehicles are not touching each other. If
a poor connection on the negative
jumper cable should exist, it is possible
for damage to be caused to electrical
systems/components of either vehicle
should inadvertent contact be made.
You would not be able to start your car
and bad grounding could damage the
electrical systems.
WARNING
When working on the battery, highly
explosive gas can build up. A spark
could ignite this gas that collects
around the battery. Therefore, always
avoid sparks and open flames in the
vicinity of the battery.
The battery contains corrosive sulphu-
ric acid. Always wear a face mask or
goggles when working on the battery.
If battery acid gets into the eyes or
splashes onto skin or clothing, wash
the affected area liberally with water. If
acid gets into the eyes or a large quan-
tity makes contact with the skin, seek
medical help.
NOTICEIgnoring these steps could result in costly
damage to your vehicle that would not be
covered by your warranty.
Trying to start your car by pushing or pull-
ing it could damage your vehicle, even if
you have a manual transmission. If you
have an automatic transmission, your
vehicle cannot be started by pushing or
pulling it.
NOTICEIf the other system is not a 12-volt system
with a negative ground, both vehicles can
be damaged.
WARNING
You could be injured if the vehicles roll.
Set the parking brake firmly on each vehi-
cle. Put an automatic transmission in P
(Park) or a manual transmission in
Neutral.
Jump starting
ProCarManuals.com
Page 169 of 256
169 Starting and driving
3 Turn off the ignition on both vehicles.
Turn off all lights that are not needed,
and radios. This will avoid sparks and
help save both batteries and it could
save your radio.
4 Open the hood and locate the battery.
Find the positive (+) and negative (–) termi-
nals on the battery.
5 Check that the jumper cables do not
have loose or missing insulation. If they
do, you could get a shock and also the
vehicles could be damaged.
Before you connect the cables, here are
some basic things you should know.
Positive (+) will go to positive (+) and
negative (–) will go to negative (–). Do
not connect (+) to (–) or you will get a
short that could injure you or would
damage the battery and maybe other
parts as well.
6 Connect the red positive (+) cable to the
positive (+) terminal of the vehicle with
the discharged battery.7 Do not let the other end touch metal.
Connect it to the positive (+) terminal of
the good battery. Use a remote positive
(+) terminal if the vehicle has one.
8 Now connect the negative (–) cable to
the good battery’s negative terminal.
9 Attach the cable to the discharged
battery’s negative terminal.
10 Start the vehicle with the good battery
and run the engine for a while.
11 Try to start the vehicle with the
discharged battery. If it does not start
after a few tries, it probably needs
service.
12 Remove the cables in reverse order to
prevent electrical shorting. Take care
that they do not touch each other or any
other metal.NOTICEIf you leave your radio on, it could be
badly damaged. The repairs would not be
covered by your warranty.
WARNING
An electric fan can start up even when the
engine is not running and can injure you.
Keep hands, clothing and tools away from
any underhood electric fan.
WARNING
Using a match or flame of any kind near a
battery can cause battery gas to explode.
You can suffer burns or be blinded. Use a
flashlight if you need more light.
Be sure the electrolyte in the battery is not
frozen. Discharged batteries will freeze.
When connecting jumper cables to a
frozen battery, gas from the chemical
reaction inside the battery can build up
under the ice and cause an explosion.
Battery fluid contains acid that can burn
you. Do not get it on you. If you acciden-
tally get it in your eyes or on your skin,
flush the area with water and get medical
help immediately.
ProCarManuals.com
Page 170 of 256

170 Starting and drivingFor long tripsBefore starting off on a long journey, it is
advisable to have your car inspected by
your Saab dealer.
Obtain a few important items to take along
on your journey, such as spare bulbs, wiper
blades, fuses, a drive belt (poly-V-belt) and
the like.
You can check some points yourself before-
hand:
Check that no oil or fuel leaks out of the
engine or gearbox/transmission.
Check the coolant and power steering
fluid levels. Check also for leaks.
Inspect the drive belt (poly-V-belt) and
replace if it shows any signs of wear.
Check the battery charge.
Check the tires for tread pattern and air
pressure, including the compact spare
wheel.
Take an extra remote control and keep it
separate.
Check the brakes.
Check all bulbs.
Check for the presence of the tool kit and
jack in the car.
ProCarManuals.com