SAAB 9-3 2003 Owners Manual
Manufacturer: SAAB, Model Year: 2003, Model line: 9-3, Model: SAAB 9-3 2003Pages: 256, PDF Size: 21.66 MB
Page 211 of 256
211 Car care
TemperatureThe temperature grades are A (the highest),
B, and C, representing the tire’s resistance
to the generation of heat and its ability to dis-
sipate heat when tested under controlled
conditions on a specified indoor laboratory
test wheel. Sustained high temperature can
cause the material of the tire to degenerate
and reduce tire life. Excessive temperature
can lead to sudden tire failure. The grade C
corresponds to a level of performance
which all passenger car tires must meet
under the Federal Motor Vehicle Safety
Standard No. 109.
Grades B and A represent higher levels of
performance on the laboratory test wheel
than the minimum required by law.
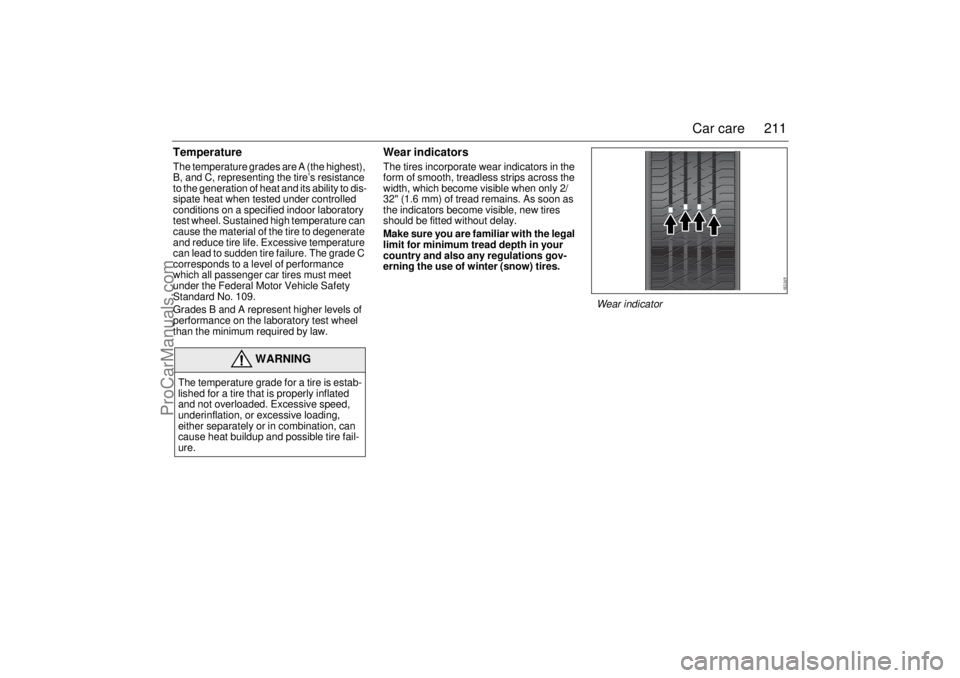
Wear indicatorsThe tires incorporate wear indicators in the
form of smooth, treadless strips across the
width, which become visible when only 2/
32" (1.6 mm) of tread remains. As soon as
the indicators become visible, new tires
should be fitted without delay.
Make sure you are familiar with the legal
limit for minimum tread depth in your
country and also any regulations gov-
erning the use of winter (snow) tires.
WARNING
The temperature grade for a tire is estab-
lished for a tire that is properly inflated
and not overloaded. Excessive speed,
underinflation, or excessive loading,
either separately or in combination, can
cause heat buildup and possible tire fail-
ure.
Wear indicator
ProCarManuals.com
Page 212 of 256
212 Car careTire date codeTires should be regarded as perishable
goods. As the tires age, the rubber becomes
progressively harder, and the roadholding
ability of the tires diminishes. This is partic-
ularly true on winter tires.
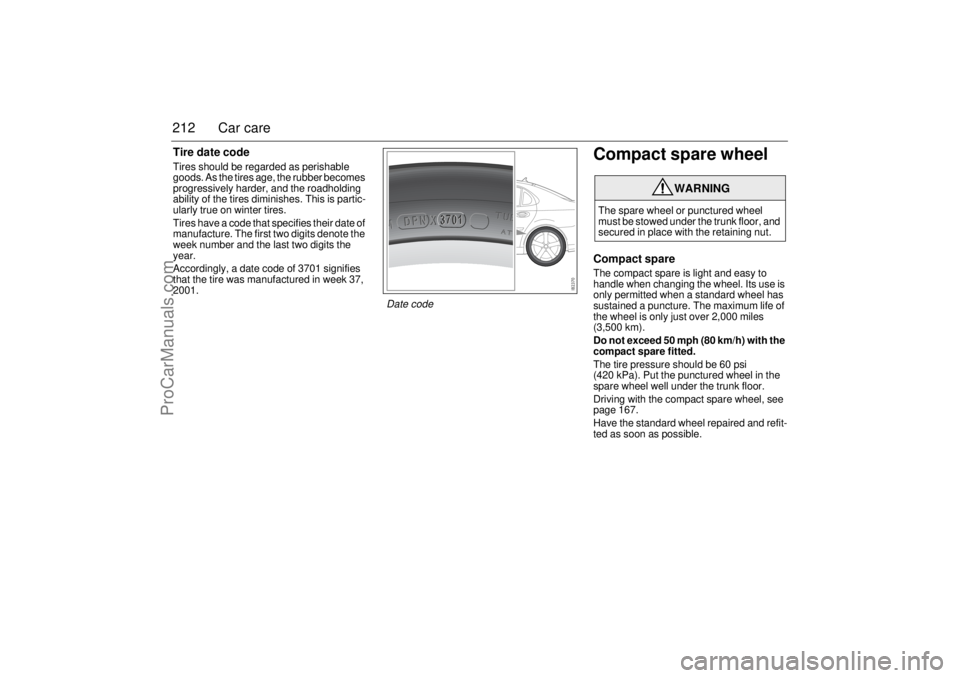
Tires have a code that specifies their date of
manufacture. The first two digits denote the
week number and the last two digits the
year.
Accordingly, a date code of 3701 signifies
that the tire was manufactured in week 37,
2001.
Compact spare wheelCompact spareThe compact spare is light and easy to
handle when changing the wheel. Its use is
only permitted when a standard wheel has
sustained a puncture. The maximum life of
the wheel is only just over 2,000 miles
(3,500 km).
Do not exceed 50 mph (80 km/h) with the
compact spare fitted.
The tire pressure should be 60 psi
(420 kPa). Put the punctured wheel in the
spare wheel well under the trunk floor.
Driving with the compact spare wheel, see
page 167.
Have the standard wheel repaired and refit-
ted as soon as possible.
WARNING
The spare wheel or punctured wheel
must be stowed under the trunk floor, and
secured in place with the retaining nut.
Date code
ProCarManuals.com
Page 213 of 256
213 Car care
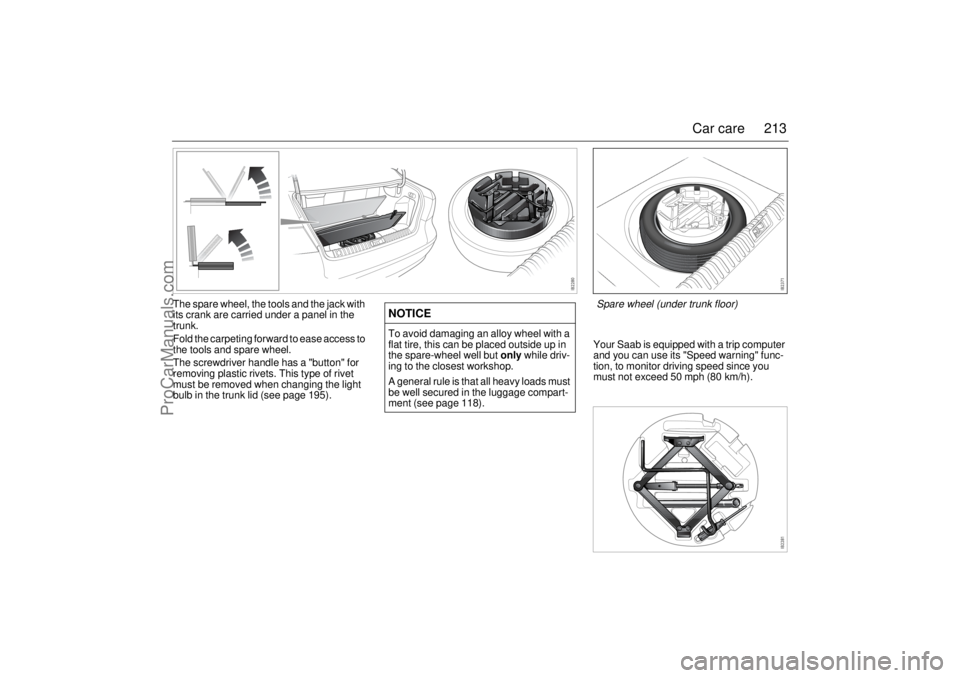
The spare wheel, the tools and the jack with
its crank are carried under a panel in the
trunk.
Fold the carpeting forward to ease access to
the tools and spare wheel.
The screwdriver handle has a "button" for
removing plastic rivets. This type of rivet
must be removed when changing the light
bulb in the trunk lid (see page 195).Your Saab is equipped with a trip computer
and you can use its "Speed warning" func-
tion, to monitor driving speed since you
must not exceed 50 mph (80 km/h).
NOTICETo avoid damaging an alloy wheel with a
flat tire, this can be placed outside up in
the spare-wheel well but only while driv-
ing to the closest workshop.
A general rule is that all heavy loads must
be well secured in the luggage compart-
ment (see page 118).
Spare wheel (under trunk floor)
ProCarManuals.com
Page 214 of 256

214 Car careChanging a wheel
WARNING
The car jack is designed solely for use
in changing a wheel or fitting snow
chains. It must not be used to
support the car during repair work
or servicing.
Never crawl under a car that is
supported only by a jack.
Special care must be taken if the car is
on a slope - use wedge-shaped wheel
chocks!
Position chocks, one ahead and one
behind, the wheel that is diagonally
opposite to the one to be changed.
Switch on the hazard warning lights if
the car is on a road.
Apply the parking brake and leave the
car in gear (1st or reverse). Automatic
transmission: move the selector lever
to the P position.
Ensure that everybody is out of the car
before jacking it up.
Never start the engine while the car is
jacked up.
If possible, make sure the jack is
standing on a firm, level surface.
The jack should be stored correctly
under the carpeting in the trunk. If it
lies loose in the car, it could thrown
forward and cause personal injury in
the event of a crash or if the car rolls
over.
Do not use the jack on a car other than
your Saab 9-3.
Grit, salt and rust can clog the inner
threads if the car has been driven for
several years exclusively with alloy
wheels.
If steel wheels are now fitted, the bolt
hole threads in the brake hubs should
be cleaned before the thinner steel
wheels are fitted. It may otherwise not
be possible to achieve the correct
clamping force, despite tightening the
wheel bolts to the correct torque.
ProCarManuals.com
Page 215 of 256
215 Car care
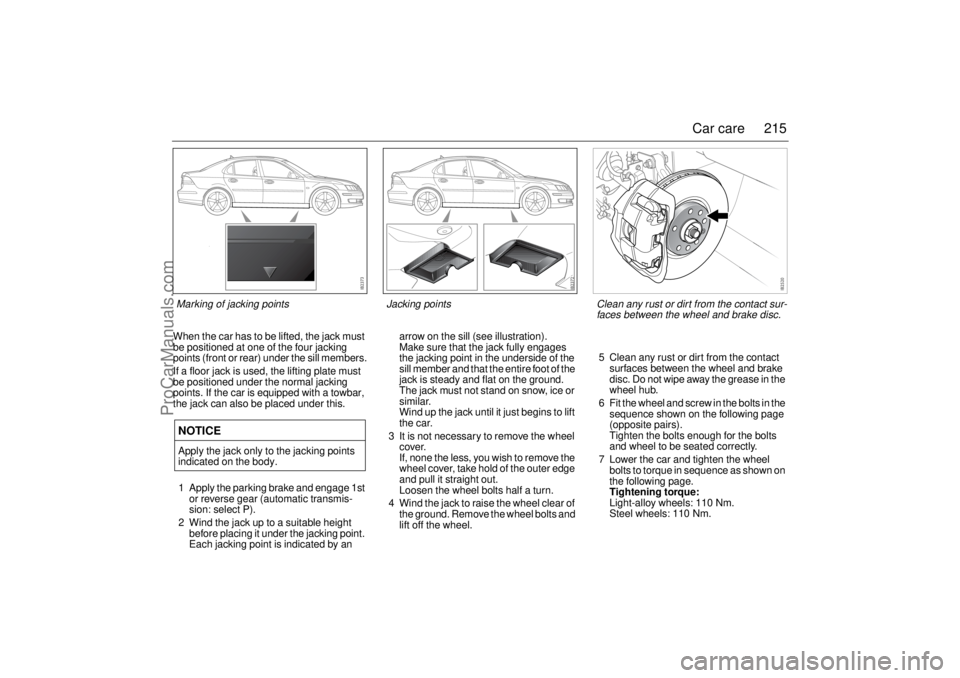
When the car has to be lifted, the jack must
be positioned at one of the four jacking
points (front or rear) under the sill members.
If a floor jack is used, the lifting plate must
be positioned under the normal jacking
points. If the car is equipped with a towbar,
the jack can also be placed under this.
1 Apply the parking brake and engage 1st
or reverse gear (automatic transmis-
sion: select P).
2 Wind the jack up to a suitable height
before placing it under the jacking point.
Each jacking point is indicated by an arrow on the sill (see illustration).
Make sure that the jack fully engages
the jacking point in the underside of the
sill member and that the entire foot of the
jack is steady and flat on the ground.
The jack must not stand on snow, ice or
similar.
Wind up the jack until it just begins to lift
the car.
3 It is not necessary to remove the wheel
cover.
If, none the less, you wish to remove the
wheel cover, take hold of the outer edge
and pull it straight out.
Loosen the wheel bolts half a turn.
4 Wind the jack to raise the wheel clear of
the ground. Remove the wheel bolts and
lift off the wheel.5 Clean any rust or dirt from the contact
surfaces between the wheel and brake
disc. Do not wipe away the grease in the
wheel hub.
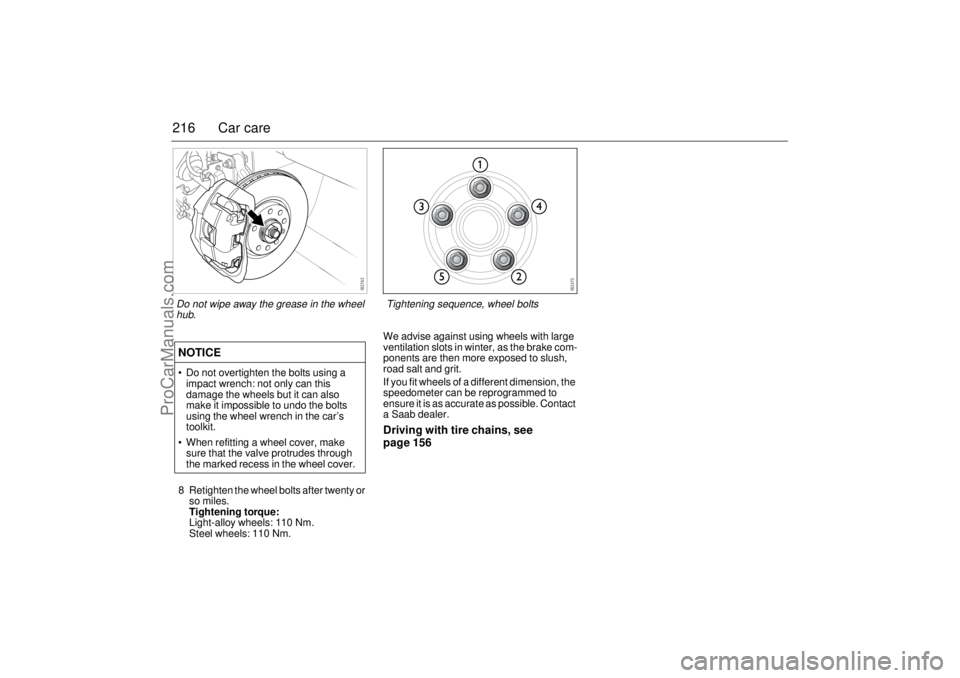
6 Fit the wheel and screw in the bolts in the
sequence shown on the following page
(opposite pairs).
Tighten the bolts enough for the bolts
and wheel to be seated correctly.
7 Lower the car and tighten the wheel
bolts to torque in sequence as shown on
the following page.
Tightening torque:
Light-alloy wheels: 110 Nm.
Steel wheels: 110 Nm.NOTICEApply the jack only to the jacking points
indicated on the body.
Jacking points
Marking of jacking points
Clean any rust or dirt from the contact sur-
faces between the wheel and brake disc.
ProCarManuals.com
Page 216 of 256
216 Car care8 Retighten the wheel bolts after twenty or
so miles.
Tightening torque:
Light-alloy wheels: 110 Nm.
Steel wheels: 110 Nm.We advise against using wheels with large
ventilation slots in winter, as the brake com-
ponents are then more exposed to slush,
road salt and grit.
If you fit wheels of a different dimension, the
speedometer can be reprogrammed to
ensure it is as accurate as possible. Contact
a Saab dealer.
Driving with tire chains, see
page 156 NOTICE
Do not overtighten the bolts using a
impact wrench: not only can this
damage the wheels but it can also
make it impossible to undo the bolts
using the wheel wrench in the car’s
toolkit.
When refitting a wheel cover, make
sure that the valve protrudes through
the marked recess in the wheel cover.
Tightening sequence, wheel bolts
Do not wipe away the grease in the wheel
hub.
ProCarManuals.com
Page 217 of 256

217 Car care
Flat spottingAll tires get hot, especially on long journeys
or when the car is driven hard. After the car
has been parked with hot tires and the tires
have cooled down, a flat spot can form in the
tire, where it is in contact with the ground.
The same can occur if the car has not been
moved for a long time.
Flat spots can cause vibration that can be
felt through the steering wheel, similar to
that experienced when the wheels need bal-
ancing.
Flat spots of this type disappear once the
tires get hot again, usually after 10–15 miles
(20–25 km) of driving at cruising speed.
Safety beltsCheck the function of the safety belts regu-
larly as follows:
Hold the diagonal strap and pull it sharply.
The safety belt should lock and it should
not be possible to withdraw it further.
Check the anchorage points in the floor.
They must not have suffered rust damage.
If a belt is worn or has any fraying edges, it
should be replaced.
Safety belts must not come into contact with
substances such as polishes, oil or chemi-
cals. If the belts get dirty, wash them with
warm water and a detergent or have them
replaced.
Upholstery and trimTo remove fluff and hairs from the seats,
door armrests and headlining, use a
vacuum cleaner, a moist lint-free cloth, or a
clothes brush. Remove spots and dirt using
a cloth moistened with lukewarm soapy
water.
When using a stain remover, always work
from the outside towards the centre to avoid
leaving a ring. If a soiled ring or spot should
remain, it can usually be removed using
lukewarm soapy water or water alone.
Spots left by liquids, such as soft drinks or
thin oil, must be removed at once with an
absorbent material, such as kitchen towel-
ling. Then clean with a stain remover.
White spirit is recommended for removing
grease and oil stains. A medium stiff brush
may also be used.
WARNING
If the car is involved in a crash, the safety
belts, belt pretensioners and other asso-
ciated components must be inspected at
a Saab dealer.
Never make any alterations or repairs to
the safetybelts yourself but visit a Saab
dealer.
ProCarManuals.com
Page 218 of 256

218 Car careCleaning and caring for leather
upholsteryThe principal reason for treating leather
upholstery is to maintain its elegant appear-
ance and to provide it with a protective film.
Discolouration caused by dust and wear
mainly affects the lighter shades, although
this is not detrimental to the leather, indeed,
the patina resulting from use is often consid-
ered desirable in leather. But if the leather is
allowed to become too grubby, it can start to
look shabby.
The leather upholstery should be cleaned
and reconditioned twice a year in conjunc-
tion with spring and autumn inspections. In
very warm, dry climates the leather may
need more regular reconditioning. Recom-
mended conditioner – Saab Leather Care
Lotion.
Do not use unknown harsh polishing
agents, cleaning agents, sprays, coarse
soap or hot water.
Textile carpetingTextile carpeting should be vacuum
cleaned regularly. Carpeting can also be
cleaned using a brush or sponge and carpet
shampoo.
For safety reasons, vacuum cleaners that
are not earthed (grounded) must not be
used out of doors.Engine bayThe engine bay should be cleaned with an
engine degreasant and rinsed with hot
water. The headlights must be covered
over. Do not use a pressure washer.
Do not use petrol as a cleaning agent or sol-
vent when carrying out repairs or mainte-
nance. Saab recommends the use of envi-
ronmentally-friendly degreasants.
WashingThe bodywork must be washed frequently.
When the car is new, the body should be
washed by hand using plain cold water and
a clean, soft brush through which the water
flows. Automatic carwashes should be
avoided when the car is new.
After 5–6 months the paintwork will have
hardened. To facilitate cleaning, a suitable
detergent can be added to the water, which
should be lukewarm.
Remove any bird droppings without delay,
as these can discolour the paintwork and
prove difficult to polish out. Lay a wad of wet
paper on the patch of dirt and leave it for a
minute or so. It will then be easy to wash off
the dirt.
Use a soft cloth moistened with white spirit
to remove splashes of tar or asphalt. Do not
use strong cleaners, as these can dry out
the paintwork.
The underside of the car also needs wash-
ing regularly, and this should be done extra NOTICEDo not use alcohol-based cleaners on the
plastic lenses of the front or rear lights, as
these can cause a crackling effect on the
lenses.
The door mirrors should be folded in
before the car enters an automatic car
wash.
ProCarManuals.com
Page 219 of 256

219 Car care
thoroughly at the end of winter. Clean the
underside of the car by hand if the car is usu-
ally washed in an automatic car wash with-
out special facilities for underbody cleaning.
Never wash or leave the car to dry in the
sun, but wipe it dry with a chamois leather
immediately after washing to avoid smears
and streaks.
Clean the inside of window glass using a
proprietary window cleaner. This is particu-
larly important when the car is new, as
upholstery and trim have a tendency to
sweat a little at first.
Keep the glass well polished, as this helps
to prevent misting.
Clean the outside of the windows with Saab
washer fluid. This is especially important if
the car has been washed in an automatic
car wash, as sometimes a wax treatment is
used that can contaminate the windshield
and impair the performance of the wipers.
Waxing and polishingDo not wax a new car during the first three
or four months. In fact, there is no need to
polish the car before the paintwork has
started to go dull through oxidation. Other
than in exceptional cases, do not use abra-
sive polishes containing a cutting agent on
a new car. Always wash the car thoroughly
before waxing or polishing.
Touching up the paintDamaged paintwork should be treated as
soon as it is discovered: the longer it is left,
the greater the risk of corrosion. The anti-
corrosion warranty does not cover corrosion
resulting from untreated defects.
Paintwork damage sustained in a crash is
usually extensive and can only be properly
restored by professionals.
However, you can repair small scratches
and stone chip damage yourself. The nec-
essary tools and materials, such as primer,
touch-up paint and brushes, are available
from your Saab dealer.
In the case of minor flaws in the paintwork,
where the metal has not been exposed and
an undamaged layer of paint remains,
touch-up paint can usually be applied
directly, after any dirt has been scraped
away using a pointed knife.
If corrosion has already set in, such as the
result of stone-chip damage, use a pointed
knife to scrape off all surface rust. If possi-
ble, the damaged area should be taken
back to the bare metal. The metal should
then be primed with two thin coats of primer
applied by brush.
After the primer has dried, apply several thin
layers of topcoat until the surface of the
repaired area is flush with the surrounding
paintwork.
Stir both primer and touch-up paint thor-
oughly before use and allow each coat to
dry before applying the next.
NOTICE Try your brakes on leaving a car wash.
Wet brake discs reduce the perfor-
mance of the brakes.
Fixed antennae, such as for a mobile
phone, must be removed if the car
goes through an automatic car wash.
Cars with Saab Parking Assistance:
Do not spray the sensors or closer
than 8 in. (20 cm) to the sensors with
a pressure washer, as this can
damage them.
ProCarManuals.com
Page 220 of 256
220 Car careTwo-coat enamelAs the name implies, two-coat enamel is
applied in two operations. The first coat, the
base color, contains the pigment, metal
flakes and binder. The second coat consists
of a clear enamel, which provides the final
gloss for the paintwork and protects the
base from moisture and environmental con-
taminants.
Touch-up stone-chip damage as follows:
1 Thoroughly clean the damaged area.
2 Then apply the primer, base colour and
finally, the clear enamel. To achieve the
best finish, apply two or three coats of
primer.
Anti-corrosion
treatmentThe entire car undergoes a series of anti-
corrosion processes during production.
These include electrophoretic priming,
polyester-based coating to protect against
stone chip damage and corrosion, and
treatment of body cavities and members
with thin, penetrating rustproofing oil.
In addition, most body panels, such as the
hood, doors and floor pan are galvanized.
The anti-corrosion treatment on some parts
of the car is constantly exposed to wear and
prone to damage. This applies particularly
to the underside of the car and inside the
wheel arches, where grit, road salt and the
like that are thrown up can give rise to cor-
rosion where the underseal has worn away.
The extent of this obviously depends on the
conditions in which the car is used.
Accordingly, make it a habit to hose the
underside of the car often and to inspect the
condition of the underseal. The anti-corro-
sion warranty does not relieve the car owner
of the need to carry out normal maintenance
to the rustproofing and to make good any
damage.
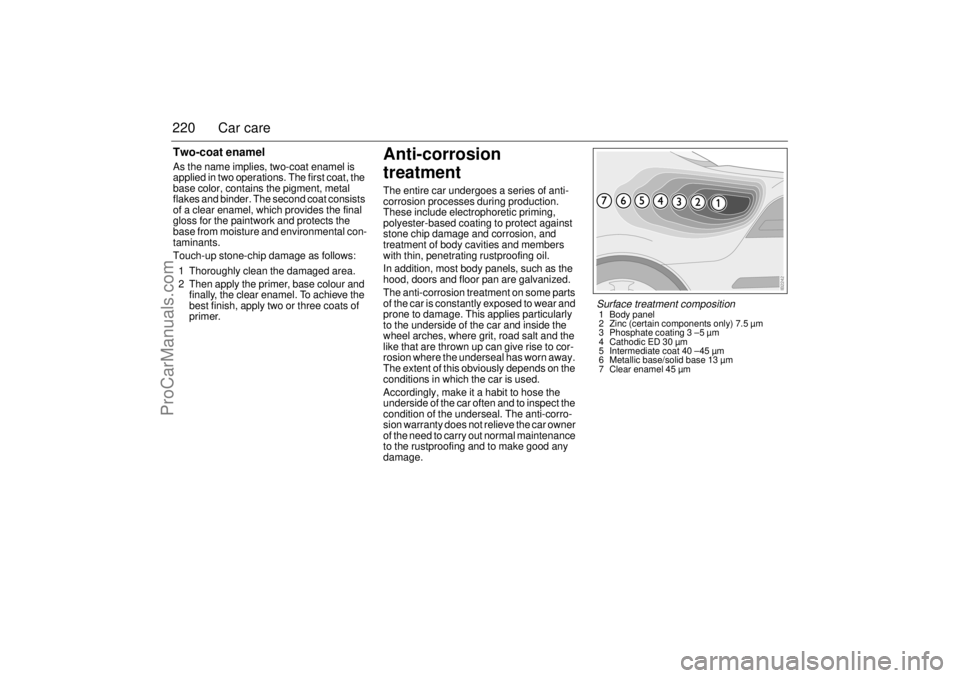
Surface treatment composition1 Body panel
2 Zinc (certain components only) 7.5 µm
3 Phosphate coating 3 –5 µm
4 Cathodic ED 30 µm
5 Intermediate coat 40 –45 µm
6 Metallic base/solid base 13 µm
7 Clear enamel 45 µm
ProCarManuals.com