ECO mode SAAB 9-3 2006 Owners Manual
[x] Cancel search | Manufacturer: SAAB, Model Year: 2006, Model line: 9-3, Model: SAAB 9-3 2006Pages: 318, PDF Size: 28.05 MB
Page 2 of 318

2IntroductionThis manual provides practical guidance on
driving and caring for your Saab.
Although this manual describes the most
important differences between model vari-
ants, it does not specify the equipment or
features included on individual models.
Importation and distribution of Saab auto-
mobiles, spare parts and accessories are
handled exclusively by Saab Cars USA, Inc.
in the United States and by General Motors
of Canada Limited in Canada.
We recommend that you read through the
manual before taking the car out for the first
time and keep it in the car for future refer-
ence.To find a specific item, use the overviews
given on page 3–6. A list of content is given
at the beginning of each section of the
manual, and there is also a comprehensive
index at the back of the book.
Supplied with the car is a Warranty and Ser-
vice Record booklet which contains impor-
tant warranty information and specifies the
regular maintenance to be carried out. Also
included is a Quick Reference Guide, an
Infotainment System manual, tire warran-
ties and (U.S. customers), a dealer directory
with Roadside Assistance Program infor-
mation.
Since the policy at Saab is one of continual
improvement, we retain the right to incorpo-
rate modifications and to alter specifications
during production without prior notice.3 Asterisk means: equipment not fitted in all
cars (can depend on model variant, engine
variant, market specification, options or
accessories).
If you have any questions concerning your
car, its equipment, the warranty conditions,
etc., your Saab dealer will be pleased to
help, or you may call the Saab Customer
Assistance Center in the U.S. at 1-800-955-
9007 or email them at saab-
[email protected]. In Canada, please
contact the Saab Customer Assistance
Center at 1-800-263-1999.
Enjoy the road ahead!
Saab Automobile AB
Saab Automobile AB does not accept liability for
any damage caused by the fitting of spare parts,
exchange parts or accessories that are not
approved by Saab Automobile AB.
WARNING
Failure to heed warnings may cause
personal injury.NOTICENOTICE texts warns of potential damage
to the car if the recommendations are not
followed.
93U S M 06.book Page 2 Friday, February 18, 2005 1:15 PM
ProCarManuals.com
Page 45 of 318
45 Safety
Scrapping or working on airbag
and belt pretensionersFrequently asked questions on
function of the airbag
Do you still need to wear a safety belt if air-
bags are fitted?Yes, always! The airbag system compo-
nents merely supplement the car’s normal
safety system. Moreover, the front airbags
will only be actuated in a moderate to severe
frontal, or near-frontal crash, which means,
of course, that they provide no protection in
minor frontal crashes, major rear- or side-
crashes or if the car rolls over.
The safety belts help to reduce the sideway
movement of the body in a crash.
But they also ensure that, if a crash occurs
in which the airbags are inflated, the airbag
will make the optimum contact with the
occupant, i.e. square on from the front. If the
occupant meets the airbag in an offset posi-
tion, the protection afforded will be reduced.In addition, airbags provide no protection
against a secondary impact occurring in the
same incident. So there is no doubt about
the benefit of wearing safety belts at all
times.
Do not sit too close to the airbag: it needs
room to inflate.
The airbag inflates very quickly and power-
fully in order to protect an adult, before they
are thrown forward, in a serious frontal
crash.
How do I position the seat to leave room for
the airbag to inflate?Don’t have your seat too far forward.
Recline the seat back to increase the dis-
tance between you and the airbag. For short
drivers, special accessory pedal extensions
are available through your Saab dealer.
Airbags inflate extremely rapidly and with
great force – to be fast enough to protect an
adult in the seat.
WARNING
Under no circumstances should any
modifications be made that affect the
steering wheel or the airbag’s electri-
cal circuitry.
During any welding, both battery
cables must be disconnected and
covered.
Before quick drying paint in the vicinity
of the electronic control module, the
module’s grounding points and wiring
must be covered.
Airbags and safety belt pretensioners
must be deployed under controlled
conditions before the car is scrapped
or any of the system’s components are
removed. Airbags or belt pretension-
ers that have been deployed as a
result of a crash must be replaced by
new ones.
Airbag-system components must
never be transferred for use in another
vehicle.
All work involving the scrapping or
replacement of airbags or belt preten-
sioners must be carried out by autho-
rized personnel only.93U S M 06.book Page 45 Friday, February 18, 2005 1:15 PM
ProCarManuals.com
Page 46 of 318

46 SafetyWhen do the airbags in the steering wheel
and passenger side of the dash board
inflate? The airbag will only be inflated under certain
predetermined conditions in a moderate to
severe frontal, or near-frontal crash,
depending on such factors as the force and
angle of the impact, the speed of the car on
impact, and the resistance to deformation of
the impacting object.
The airbag can only be activated once in the
same incident.
Do not attempt to drive the car after an
airbag has been inflated, even if it is possi-
ble.What won’t trigger the airbag? The airbag will not be activated in all frontal
crashes. For instance, if the car has hit
something relatively soft and yielding (e.g. a
snow drift or a hedge) or a solid object at a
low impact speed, the airbag will not neces-
sarily be triggered.
How loud is the inflation? The noise of the inflation is certainly loud,
but it is of an very short duration and will not
damage your hearing. For a short time after-
wards you could experience a buzzing
noise in your ears.
Most people who have experienced it
cannot remember the noise of the inflation
at all – all they remember is the noise of the
crash. Can you still use a child seat in the front if a
passenger airbag is installed? Definitely not!
Children 12 and under or shorter than
55 inches (140 cm) can be killed by the air-
bag.
The back seat is the safest place for chil-
dren.
Never put a rear-facing child seat in the
front.
Sit as far back as possible from the airbag.
Always use seat belts and child restraints.
What should I do if the AIR-BAG warning
light comes on? If the warning light is on, it means that a fault
has been detected in the system. The
airbag cannot be relied on to operate as
intended and it might even be activated
erroneously. You should therefore take the
car to a workshop. We recommend that you
contact a Saab dealer as soon as possible.
93U S M 06.book Page 46 Friday, February 18, 2005 1:15 PM
ProCarManuals.com
Page 78 of 318
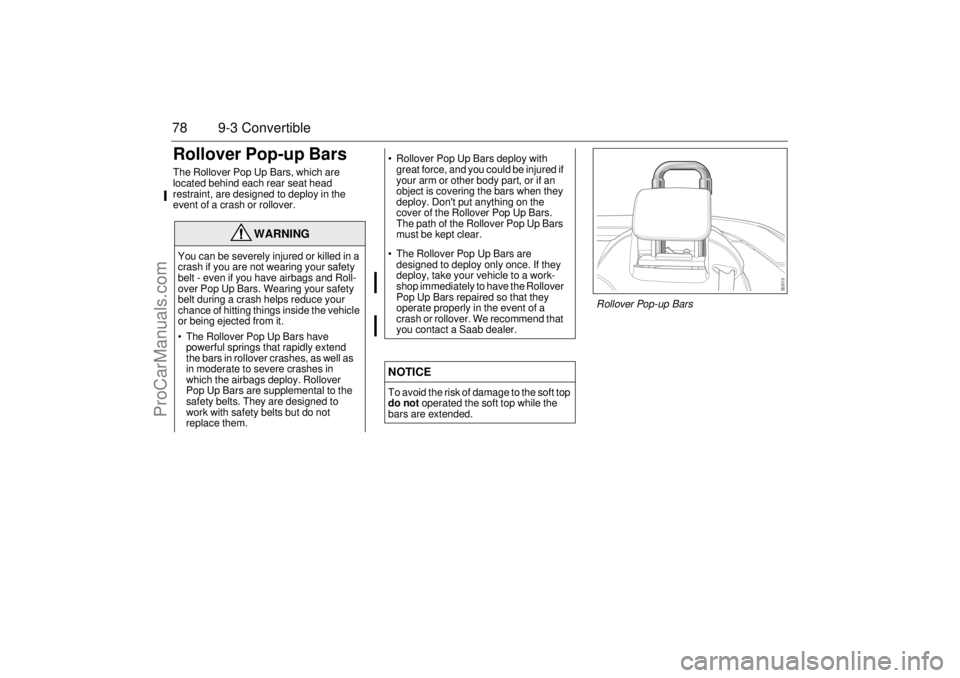
78 9-3 ConvertibleRollover Pop-up BarsThe Rollover Pop Up Bars, which are
located behind each rear seat head
restraint, are designed to deploy in the
event of a crash or rollover.
WARNING
You can be severely injured or killed in a
crash if you are not wearing your safety
belt - even if you have airbags and Roll-
over Pop Up Bars. Wearing your safety
belt during a crash helps reduce your
chance of hitting things inside the vehicle
or being ejected from it.
The Rollover Pop Up Bars have
powerful springs that rapidly extend
the bars in rollover crashes, as well as
in moderate to severe crashes in
which the airbags deploy. Rollover
Pop Up Bars are supplemental to the
safety belts. They are designed to
work with safety belts but do not
replace them.
Rollover Pop Up Bars deploy with
great force, and you could be injured if
your arm or other body part, or if an
object is covering the bars when they
deploy. Don't put anything on the
cover of the Rollover Pop Up Bars.
The path of the Rollover Pop Up Bars
must be kept clear.
The Rollover Pop Up Bars are
designed to deploy only once. If they
deploy, take your vehicle to a work-
shop immediately to have the Rollover
Pop Up Bars repaired so that they
operate properly in the event of a
crash or rollover. We recommend that
you contact a Saab dealer.NOTICETo avoid the risk of damage to the soft top
do not operated the soft top while the
bars are extended.
Rollover Pop-up Bars
93U S M 06.book Page 78 Friday, February 18, 2005 1:15 PM
ProCarManuals.com
Page 82 of 318
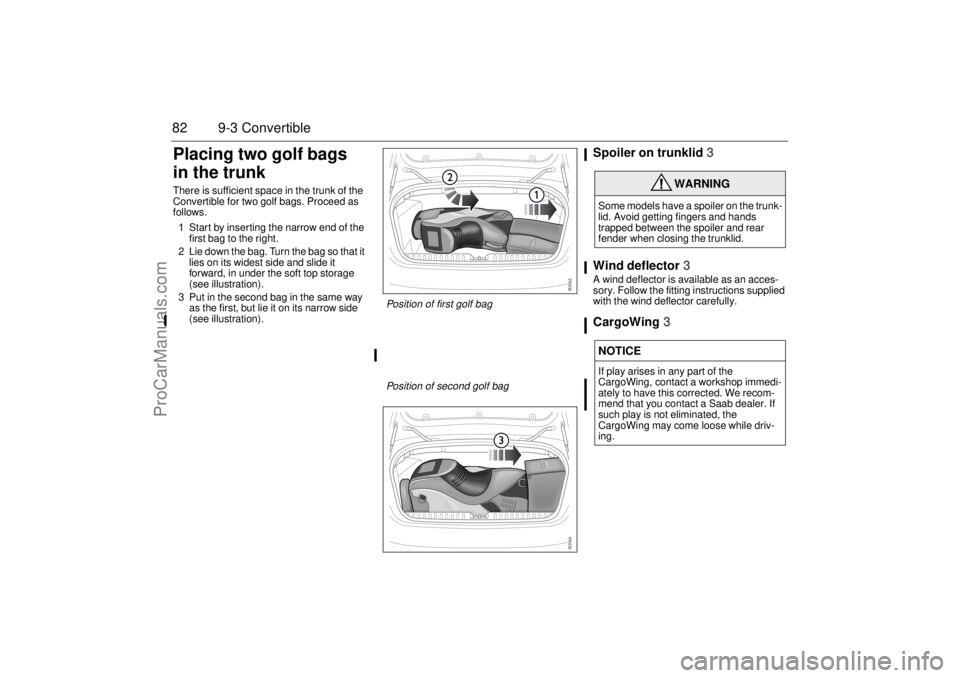
82 9-3 ConvertiblePlacing two golf bags
in the trunkThere is sufficient space in the trunk of the
Convertible for two golf bags. Proceed as
follows.
1 Start by inserting the narrow end of the
first bag to the right.
2 Lie down the bag. Turn the bag so that it
lies on its widest side and slide it
forward, in under the soft top storage
(see illustration).
3 Put in the second bag in the same way
as the first, but lie it on its narrow side
(see illustration).
Spoiler on trunklid3
Wind deflector3A wind deflector is available as an acces-
sory. Follow the fitting instructions supplied
with the wind deflector carefully.CargoWing3
WARNING
Some models have a spoiler on the trunk-
lid. Avoid getting fingers and hands
trapped between the spoiler and rear
fender when closing the trunklid.NOTICEIf play arises in any part of the
CargoWing, contact a workshop immedi-
ately to have this corrected. We recom-
mend that you contact a Saab dealer. If
such play is not eliminated, the
CargoWing may come loose while driv-
ing.
Position of first golf bag
Position of second golf bag
93U S M 06.book Page 82 Friday, February 18, 2005 1:15 PM
ProCarManuals.com
Page 94 of 318
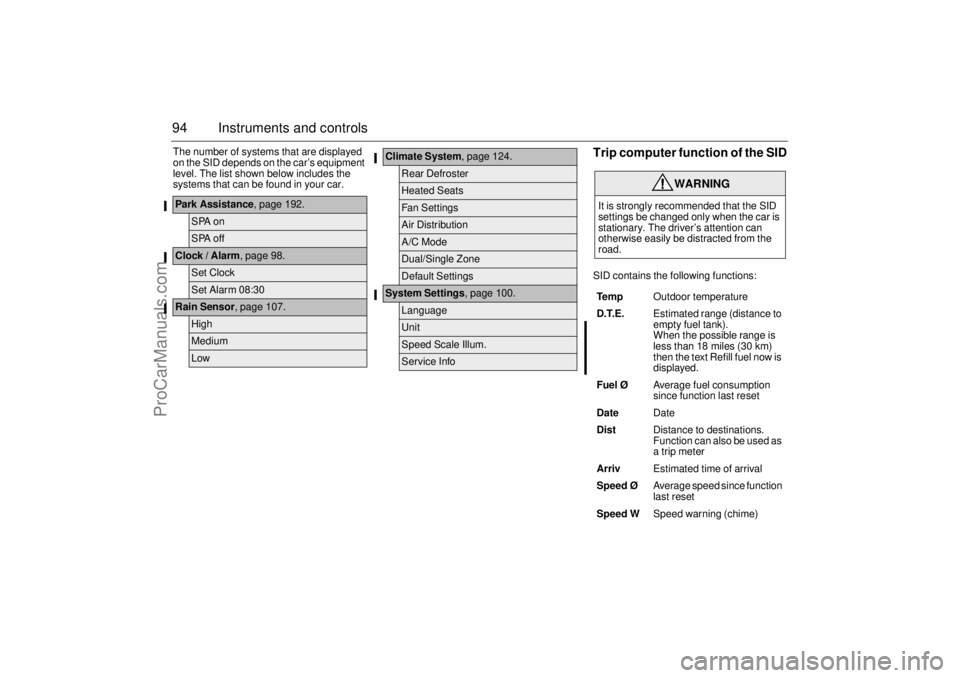
94 Instruments and controlsThe number of systems that are displayed
on the SID depends on the car’s equipment
level. The list shown below includes the
systems that can be found in your car.
Trip computer function of the SIDSID contains the following functions:
Park Assistance, page 192.
SPA onSPA off
Clock / Alarm, page 98.
Set ClockSet Alarm 08:30
Rain Sensor, page 107.
HighMediumLow
Climate System, page 124.
Rear DefrosterHeated SeatsFan SettingsAir DistributionA/C ModeDual/Single ZoneDefault Settings
System Settings, page 100.
LanguageUnitSpeed Scale Illum.Service Info
WARNING
It is strongly recommended that the SID
settings be changed only when the car is
stationary. The driver’s attention can
otherwise easily be distracted from the
road.
Te m pOutdoor temperature
D.T.E. Estimated range (distance to
empty fuel tank).
When the possible range is
less than 18 miles (30 km)
then the text Refill fuel now is
displayed.
Fuel ØAverage fuel consumption
since function last reset
DateDate
DistDistance to destinations.
Function can also be used as
a trip meter
ArrivEstimated time of arrival
Speed Ø Average speed since function
last reset
Speed WSpeed warning (chime)
93U S M 06.book Page 94 Friday, February 18, 2005 1:15 PM
ProCarManuals.com
Page 95 of 318
95 Instruments and controls
When the engine is started, the function that
was selected when the engine was
switched off is displayed, with the following
exceptions:
Te m p is displayed if the outside tempera-
ture is between 26 and 38°F (–3 and
+3°C).
D.T.E is displayed if less than or equal to
30 miles (50 km).
Outdoor temperature
The Temp function is always activated
(even in
NIGHTPANEL
mode) if the outdoor
temperature rises or falls to between 26 and
38°F (–3 and +3°C).
If the temperature sensor, located under the
front bumper, is covered by snow or ice,
temperature readings will be unreliable.
For how to set the year, month and day,
refer to Clock on page 98.Setting values
1 Select one of the functions using the
INFO dial.
Speed W (preset to 55 mph (90 km/h)
Dist (preset to 100 miles (100 km) if not
previously set)
Speed Ø
Arriv
2 Press and hold the INFO dial until given
audible confirmation.
3 Turn the INFO dial to change the value.
(Press CLEAR to reset the value.)
4 Press the INFO dial to finish setup.
Using DIST as a trip meter
1 Select Dist using the INFO dial.
2 Press and hold the CLEAR button for
approx. 1 second.
An arrow will now appear on the right-hand
side of the display, indicating that the trip
meter is running.Resetting a single function
1 Select the function you wish to reset with
the INFO dial.
Fuel Ø
SpeedØ
Tr i p (Dist used as trip meter)
2 Press and hold the CLEAR button for
approx. 1 second.
The selected function will now be reset.
Resetting the trip computer
1 Select one of the functions using the
INFO dial.
Fuel Ø
SpeedØ
D.T.E.
Arriv
Tr i p (Dist used as trip meter)
2 Press and hold the CLEAR button
(approx. 3 seconds) until audible confir-
mation is given.
WARNING
Remember that roads can be icy even at
temperatures of above 38°F (+3°C),
especially on bridges and stretches of
road that are sheltered from the sun.93U S M 06.book Page 95 Friday, February 18, 2005 1:15 PM
ProCarManuals.com
Page 97 of 318

97 Instruments and controls
Calculating the requisite average speed
(What average speed do I need to maintain
to get to my destination in time?)
This function should be used before starting
out a journey.
To calculate the requisite average speed,
the distance must first be given.
First, set the distance under Dist.
1 Then use the INFO dial to select the
Arriv function.
2 Press and hold the INFO dial until given
audible confirmation.
3 Turn the INFO dial to set the estimated
time of arrival.
4 Press the INFO dial to finish setup.
The average speed (Speed Ø) will be
shown for 10 seconds.
This average speed will be updated during
the journey.Setting the date
1 Select the Date function using the
INFO dial.
2 Press and hold the INFO dial until given
audible confirmation.
3 Turn the INFO dial to set the year.
4 Press the INFO dial.
5 Turn the INFO dial to set the month.
6 Press the INFO dial.
7 Turn the INFO dial to set the day.
8 Confirm the setting by pressing the
INFO dial.
NIGHTPANELTo improve night-driving conditions inside
the car, the Night Panel mode can be
selected. In this mode, the amount of infor-
mation displayed is reduced, and only the
most important instruments and displays
will be illuminated.
When the NIGHTPANEL button is pressed,
only the speedometer will be illuminated.
All other instrument lighting will be switched
off and the needles drop to zero.
Note: All indicator and warning lights and
messages will operate normally if required.
Temp (when the outside temperature falls
or rises to between 26 and 38°F (–3 and
+3°C)) and D.T.E. (when the remaining fuel
is only sufficient for approx. 80 miles
(50 km) of driving) are even shown in Night
Panel model.
93U S M 06.book Page 97 Friday, February 18, 2005 1:15 PM
ProCarManuals.com
Page 98 of 318
98 Instruments and controlsUnder Profiler you can choose whether the
entire speedometer scale (0–160 mph) or
only part of the scale (0–90 mph) should be
illuminated in
NIGHTPANEL
mode.
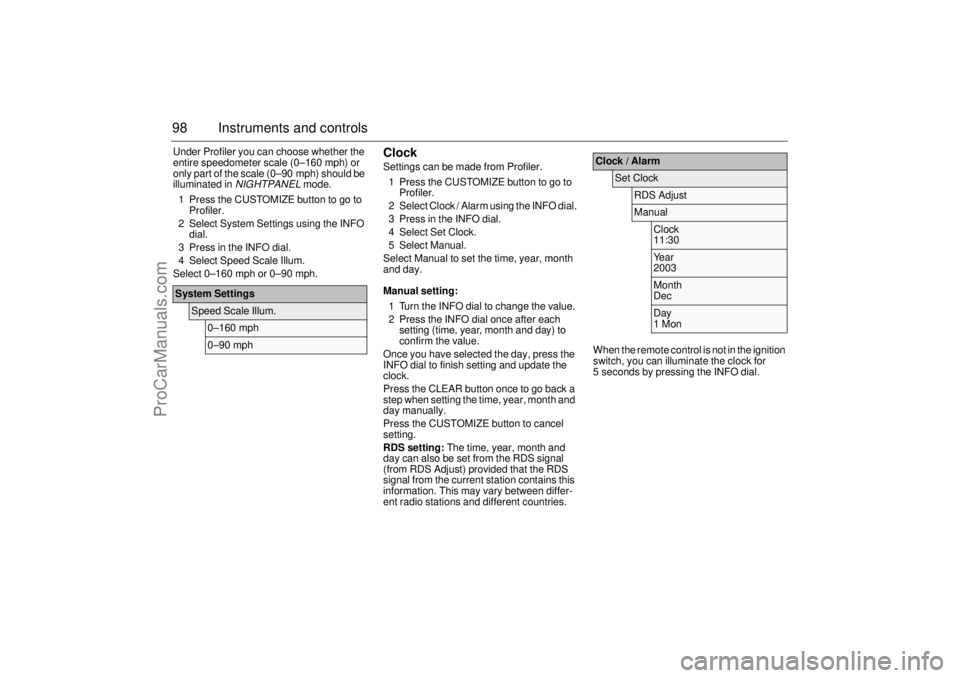
1 Press the CUSTOMIZE button to go to
Profiler.
2 Select System Settings using the INFO
dial.
3 Press in the INFO dial.
4 Select Speed Scale Illum.
Select 0–160 mph or 0–90 mph.
ClockSettings can be made from Profiler.
1 Press the CUSTOMIZE button to go to
Profiler.
2 Select Clock / Alarm using the INFO dial.
3 Press in the INFO dial.
4 Select Set Clock.
5 Select Manual.
Select Manual to set the time, year, month
and day.
Manual setting:
1 Turn the INFO dial to change the value.
2 Press the INFO dial once after each
setting (time, year, month and day) to
confirm the value.
Once you have selected the day, press the
INFO dial to finish setting and update the
clock.
Press the CLEAR button once to go back a
step when setting the time, year, month and
day manually.
Press the CUSTOMIZE button to cancel
setting.
RDS setting: The time, year, month and
day can also be set from the RDS signal
(from RDS Adjust) provided that the RDS
signal from the current station contains this
information. This may vary between differ-
ent radio stations and different countries.When the remote control is not in the ignition
switch, you can illuminate the clock for
5 seconds by pressing the INFO dial.
System Settings
Speed Scale Illum.
0–160 mph0–90 mph
Clock / Alarm
Set Clock
RDS AdjustManual
Clock
11:30Year
2003Month
DecDay
1 Mon
93U S M 06.book Page 98 Friday, February 18, 2005 1:15 PM
ProCarManuals.com
Page 107 of 318
107 Instruments and controls
to prioritize the windshield. The following
message is displayed on the SID:
To prevent the smell of washer fluid from
entering the car, recirculation can be acti-
vated automatically while the windshield is
washed. The recirculation symbol will how-
ever not light up. This function is optional;
contact a workshop. We recommend that
you contact a Saab dealer. This automatic
recirculation is the factory default setting as
long as the system is working in full "AUTO"
mode with no customized settings.
Headlight washers3The headlights are washed at the same time
as the windshield if the headlights are on.
The headlights are washed every fifth time
the windshield washers are used or if two
(2) minutes have elapsed since the wind-
shield was last washed.
The headlight washers are not activated at
speeds in excess of 125 mph (200 km/h).
Rain sensor3The rain sensor automatically controls the
windshield wipers. The sensor is located on
the windshield beside the rearview mirror.
The system varies the frequency of wiping
between single sweeps and continuous
wiping, depending on the amount of pre-
cipitation.
Activate the rain sensor by lifting the stalk
switch to the AUTO position. The wipers
make one sweep for reference to see how
much water is on the windshield. In the
future, the sensor compares the amount of
water on the windshield with this reference
value. Washer fluid level low.
Refill.
WARNING
Turn the rain sensor off if the ignition is
ON to avoid personal injury when clearing
snow and ice from the windshield.NOTICETurn the rain sensor off before washing
the car in an automatic carwash, to avoid
damaging the windshield wipers.
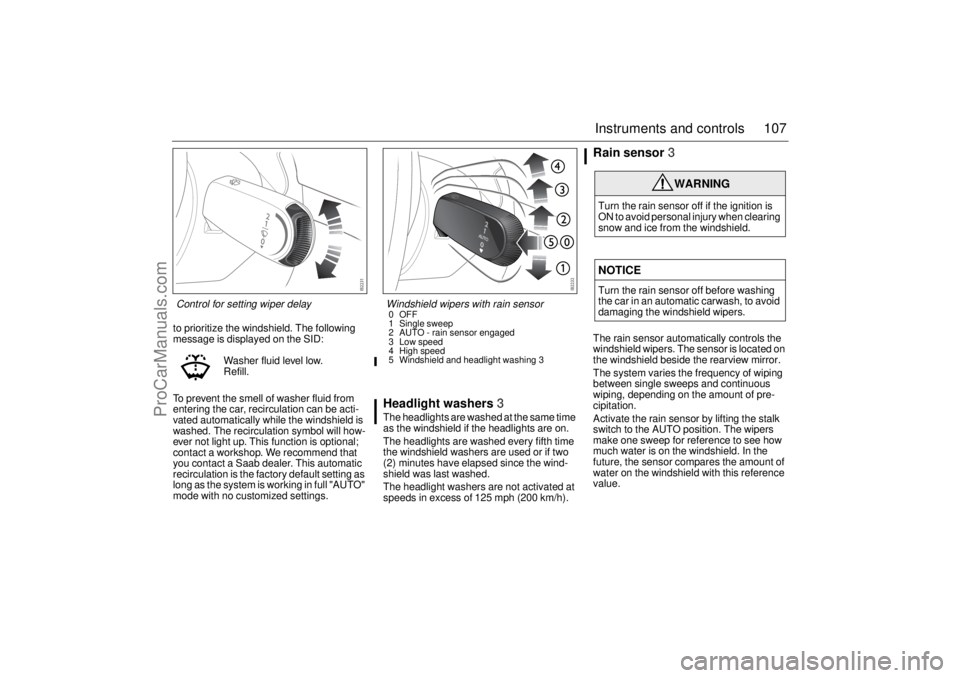
Control for setting wiper delay
Windshield wipers with rain sensor0OFF
1 Single sweep
2 AUTO - rain sensor engaged
3 Low speed
4 High speed
5 Windshield and headlight washing3
93U S M 06.book Page 107 Friday, February 18, 2005 1:15 PM
ProCarManuals.com