SAAB 9-3 2008 Owners Manual
Manufacturer: SAAB, Model Year: 2008, Model line: 9-3, Model: SAAB 9-3 2008Pages: 320, PDF Size: 56.39 MB
Page 261 of 320
261 Car care
The car must not be driven with more than
one compact spare tire at a time.
Avoid driving against the curb.
Do not use snow chains.
Do not fit the wheel cover - this would
conceal the warning text.NOTETo avoid damaging a alloy wheel of a
punctured tire, this can be temporarily
placed outside up in the spare wheel well
but only while driving to the closest work-
shop.
As a general rule, all heavy loads must be
well secured in the trunk (see page 141).
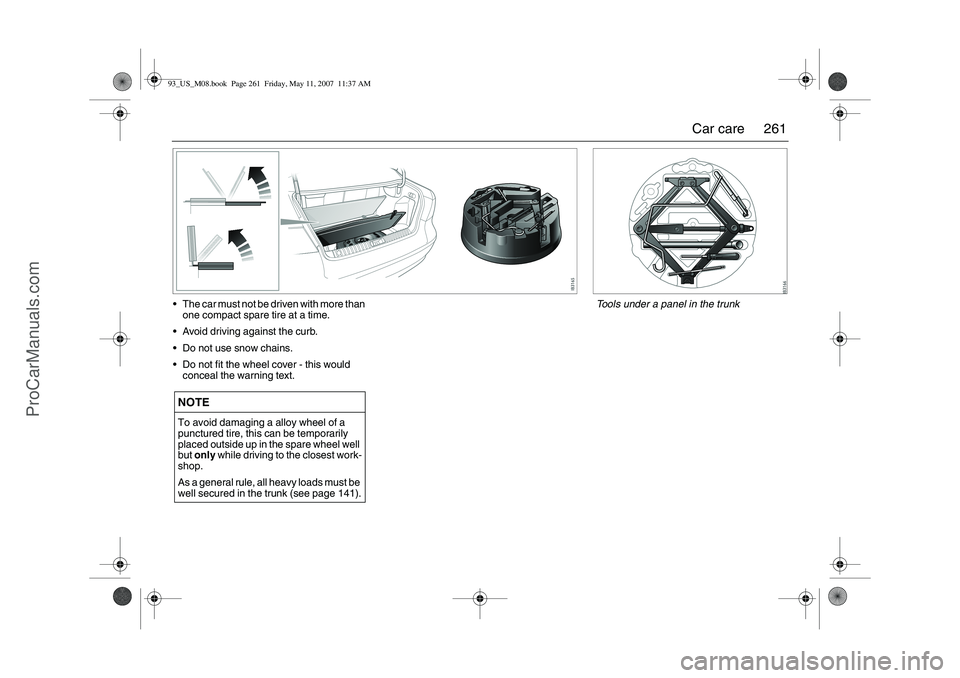
Tools under a panel in the trunk
93_US_M08.book Page 261 Friday, May 11, 2007 11:37 AM
ProCarManuals.com
Page 262 of 320
262 Car care
Changing a tire
WARNING
Lifting a vehicle and getting under it to do
maintenance or repairs is dangerous
without the appropriate safety equipment
and training. The jack provided with your
vehicle is designed only for changing a
flat tire. If it is used for anything else, you
or others could be badly injured or killed if
the vehicle slips off the jack. Use the jack
provided with your vehicle only for chang-
ing a flat tire.
Changing a tire can be dangerous. The
vehicle can slip off the jack and roll over
or fall on you or other people. You and
they could be badly injured or even killed.
Find a level place to change your tire. To
help prevent the vehicle from moving:
1 Set the parking brake firmly.
2 If you have an automatic transmis-
sion, put the shift lever in PARK (P).
For a manual transmission, leave the
car in gear (1st or REVERSE (R)).
3 Turn off the engine and do not restart
while the vehicle is raised.
4 Do not allow passengers to remain in
the vehicle.
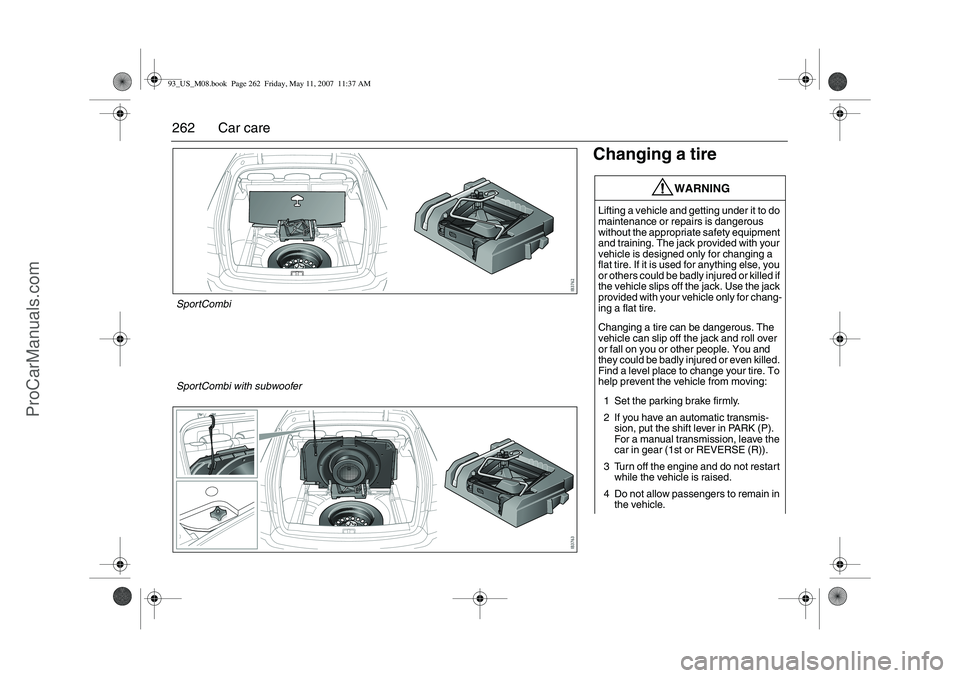
SportCombi
SportCombi with subwoofer93_US_M08.book Page 262 Friday, May 11, 2007 11:37 AM
ProCarManuals.com
Page 263 of 320
263 Car care
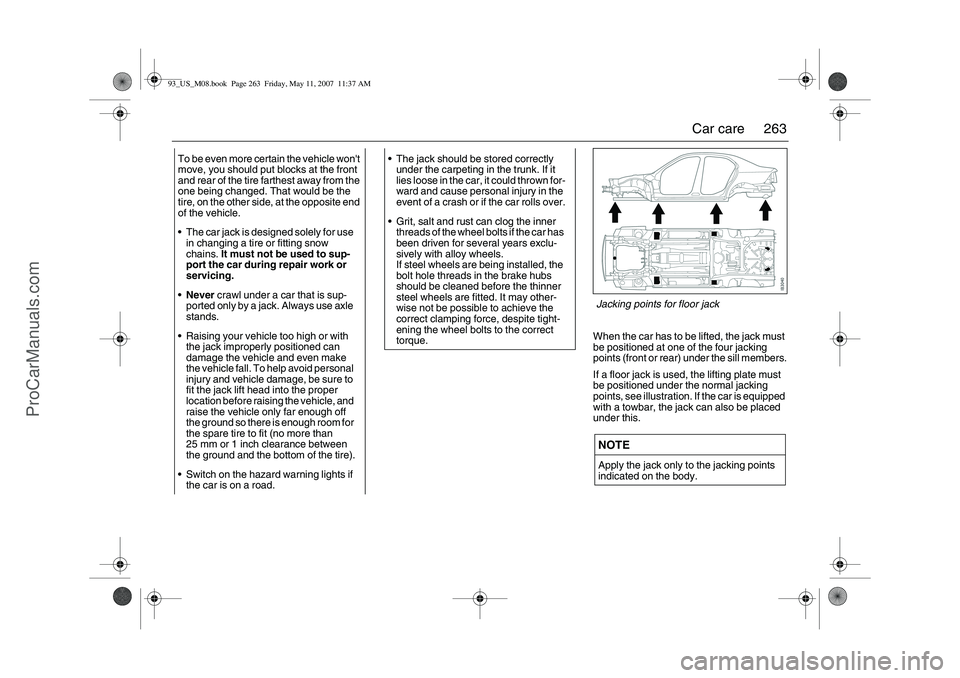
When the car has to be lifted, the jack must
be positioned at one of the four jacking
points (front or rear) under the sill members.
If a floor jack is used, the lifting plate must
be positioned under the normal jacking
points, see illustration. If the car is equipped
with a towbar, the jack can also be placed
under this. To be even more certain the vehicle won't
move, you should put blocks at the front
and rear of the tire farthest away from the
one being changed. That would be the
tire, on the other side, at the opposite end
of the vehicle.
The car jack is designed solely for use
in changing a tire or fitting snow
chains. It must not be used to sup-
port the car during repair work or
servicing.
Never crawl under a car that is sup-
ported only by a jack. Always use axle
stands.
Raising your vehicle too high or with
the jack improperly positioned can
damage the vehicle and even make
the vehicle fall. To help avoid personal
injury and vehicle damage, be sure to
fit the jack lift head into the proper
location before raising the vehicle, and
raise the vehicle only far enough off
the ground so there is enough room for
the spare tire to fit (no more than
25 mm or 1 inch clearance between
the ground and the bottom of the tire).
Switch on the hazard warning lights if
the car is on a road.
The jack should be stored correctly
under the carpeting in the trunk. If it
lies loose in the car, it could thrown for-
ward and cause personal injury in the
event of a crash or if the car rolls over.
Grit, salt and rust can clog the inner
threads of the wheel bolts if the car has
been driven for several years exclu-
sively with alloy wheels.
If steel wheels are being installed, the
bolt hole threads in the brake hubs
should be cleaned before the thinner
steel wheels are fitted. It may other-
wise not be possible to achieve the
correct clamping force, despite tight-
ening the wheel bolts to the correct
torque.
NOTEApply the jack only to the jacking points
indicated on the body.Jacking points for floor jack
93_US_M08.book Page 263 Friday, May 11, 2007 11:37 AM
ProCarManuals.com
Page 264 of 320
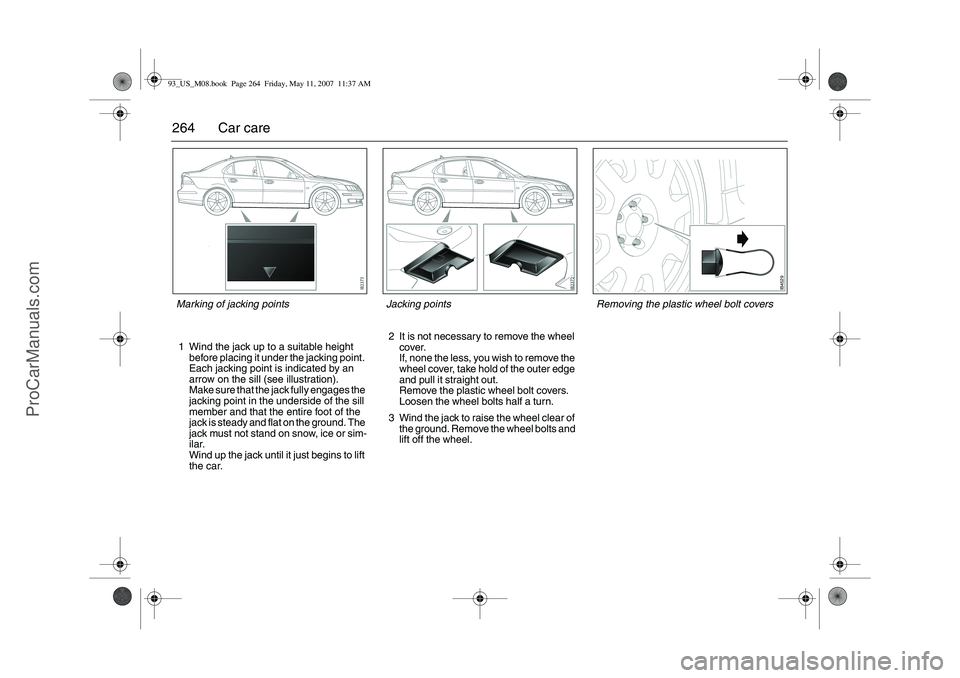
264 Car care1 Wind the jack up to a suitable height
before placing it under the jacking point.
Each jacking point is indicated by an
arrow on the sill (see illustration).
Make sure that the jack fully engages the
jacking point in the underside of the sill
member and that the entire foot of the
jack is steady and flat on the ground. The
jack must not stand on snow, ice or sim-
ilar.
Wind up the jack until it just begins to lift
the car.2 It is not necessary to remove the wheel
cover.
If, none the less, you wish to remove the
wheel cover, take hold of the outer edge
and pull it straight out.
Remove the plastic wheel bolt covers.
Loosen the wheel bolts half a turn.
3 Wind the jack to raise the wheel clear of
the ground. Remove the wheel bolts and
lift off the wheel.
Jacking points
Marking of jacking points
IB4529
Removing the plastic wheel bolt covers
93_US_M08.book Page 264 Friday, May 11, 2007 11:37 AM
ProCarManuals.com
Page 265 of 320
265 Car care
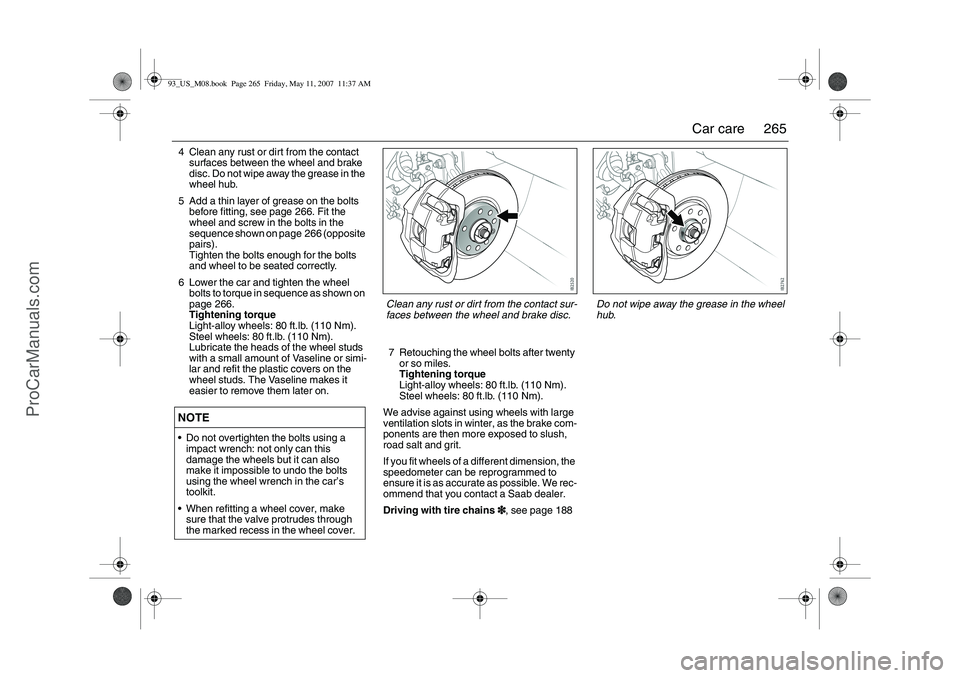
4 Clean any rust or dirt from the contact
surfaces between the wheel and brake
disc. Do not wipe away the grease in the
wheel hub.
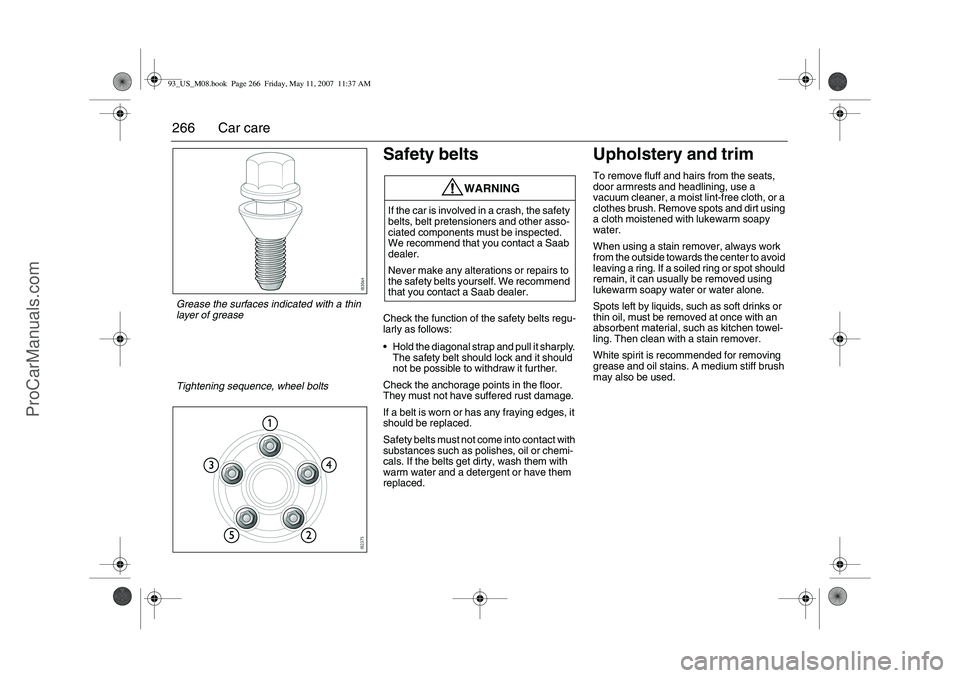
5 Add a thin layer of grease on the bolts
before fitting, see page 266. Fit the
wheel and screw in the bolts in the
sequence shown on page 266 (opposite
pairs).
Tighten the bolts enough for the bolts
and wheel to be seated correctly.
6 Lower the car and tighten the wheel
bolts to torque in sequence as shown on
page 266.
Tightening torque
Light-alloy wheels: 80 ft.lb. (110 Nm).
Steel wheels: 80 ft.lb. (110 Nm).
Lubricate the heads of the wheel studs
with a small amount of Vaseline or simi-
lar and refit the plastic covers on the
wheel studs. The Vaseline makes it
easier to remove them later on.7 Retouching the wheel bolts after twenty
or so miles.
Tightening torque
Light-alloy wheels: 80 ft.lb. (110 Nm).
Steel wheels: 80 ft.lb. (110 Nm).
We advise against using wheels with large
ventilation slots in winter, as the brake com-
ponents are then more exposed to slush,
road salt and grit.
If you fit wheels of a different dimension, the
speedometer can be reprogrammed to
ensure it is as accurate as possible. We rec-
ommend that you contact a Saab dealer.
Driving with tire chains3
33 3, see page 188NOTEDo not overtighten the bolts using a
impact wrench: not only can this
damage the wheels but it can also
make it impossible to undo the bolts
using the wheel wrench in the car’s
toolkit.
When refitting a wheel cover, make
sure that the valve protrudes through
the marked recess in the wheel cover.
Do not wipe away the grease in the wheel
hub.
Clean any rust or dirt from the contact sur-
faces between the wheel and brake disc.
93_US_M08.book Page 265 Friday, May 11, 2007 11:37 AM
ProCarManuals.com
Page 266 of 320
266 Car care
Safety beltsCheck the function of the safety belts regu-
larly as follows:
Hold the diagonal strap and pull it sharply.
The safety belt should lock and it should
not be possible to withdraw it further.
Check the anchorage points in the floor.
They must not have suffered rust damage.
If a belt is worn or has any fraying edges, it
should be replaced.
Safety belts must not come into contact with
substances such as polishes, oil or chemi-
cals. If the belts get dirty, wash them with
warm water and a detergent or have them
replaced.
Upholstery and trimTo remove fluff and hairs from the seats,
door armrests and headlining, use a
vacuum cleaner, a moist lint-free cloth, or a
clothes brush. Remove spots and dirt using
a cloth moistened with lukewarm soapy
water.
When using a stain remover, always work
from the outside towards the center to avoid
leaving a ring. If a soiled ring or spot should
remain, it can usually be removed using
lukewarm soapy water or water alone.
Spots left by liquids, such as soft drinks or
thin oil, must be removed at once with an
absorbent material, such as kitchen towel-
ling. Then clean with a stain remover.
White spirit is recommended for removing
grease and oil stains. A medium stiff brush
may also be used.
WARNING
If the car is involved in a crash, the safety
belts, belt pretensioners and other asso-
ciated components must be inspected.
We recommend that you contact a Saab
dealer.
Never make any alterations or repairs to
the safety belts yourself. We recommend
that you contact a Saab dealer.
Tightening sequence, wheel boltsGrease the surfaces indicated with a thin
layer of grease93_US_M08.book Page 266 Friday, May 11, 2007 11:37 AM
ProCarManuals.com
Page 267 of 320
267 Car care
Cleaning and caring for leather
upholsteryThe principal reason for treating leather
upholstery is to maintain its elegant appear-
ance and to provide it with a protective film.
Discolor at ion caused by dust and wear
mainly affects the lighter shades, although
this is not detrimental to the leather, indeed,
the patina resulting from use is often consid-
ered desirable in leather. But if the leather is
allowed to become too grubby, it can start to
look shabby. Vacuum the leather regularly
with a soft brush attachment to remove
loose dirt and dust.
The leather upholstery should be cleaned
and reconditioned twice a year in conjunc-
tion with spring and autumn inspections. In
very warm, dry climates the leather may
need more regular reconditioning. Use con-
ventional leather care products. Follow the
instructions on the packaging.
Do not use harsh polishing agents, cleaning
agents, sprays, coarse soap or hot water.
Semi-Anilin is a leather that is colored
throughout which only has a thin protective
finish and is accordingly more sensitive than
a surface colored leather and therefore
need more care to keep the protection and
ageing properties.
Textile carpetingTextile carpeting should be vacuum
cleaned regularly. Carpeting can also be
cleaned using a brush or sponge and carpet
shampoo.
For safety reasons, vacuum cleaners that
are not earthed (grounded) must not be
used out of doors.Engine bayThe engine bay should be cleaned with an
engine decreasing and rinsed with hot
water. The headlights must be covered
over. Do not use a pressure washer. Avoid
spraying electrical components and con-
nectors.
Do not use petrol as a cleaning agent or sol-
vent when carrying out repairs or mainte-
nance. Saab recommends the use of envi-
ronmentally-friendly cleaning solutions.
WashingThe bodywork must be washed frequently.
When the car is new, the body should be
washed by hand using plain cold water and
a clean, soft brush through which the water
flows. Automatic caresses should be
avoided when the car is new.
After 5–6 months the paintwork will have
hardened. To facilitate cleaning, a suitable
detergent can be added to the water, which
should be lukewarm.
Remove any bird droppings without delay,
as these can discolor the paintwork and
prove difficult to polish out. Lay a wad of wet
paper on the patch of dirt and leave it for a
minute or so. It will then be easy to wash off
the dirt.
Use a soft cloth moistened with white spirit
to remove splashes of tar or asphalt. Do not
use strong cleaners, as these can dry out
the paintwork.
93_US_M08.book Page 267 Friday, May 11, 2007 11:37 AM
ProCarManuals.com
Page 268 of 320
268 Car care
The underside of the car also needs wash-
ing regularly, and this should be done extra
thoroughly at the end of winter. Clean the
underside of the car by hand if the car is
usually washed in an automatic car wash
without special facilities for underbody
cleaning.
Never wash or leave the car to dry in the
sun, but wipe it dry with a chamois leather
immediately after washing to avoid smears
and streaks.
Clean the inside of window glass using a
proprietary window cleaner. This is particu-
larly important when the car is new, as
upholstery and trim have a tendency to
sweat a little at first.
Keep the glass well polished, as this helps
to prevent misting.
Clean the outside of the windows with Saab
washer fluid. This is especially important if
the car has been washed in an automatic
car wash, as sometimes a wax treatment is
used that can contaminate the windshield
and impair the performance of the wipers.
In the U.S., Saab offers a full complement of
car care products. See your dealer or visit
us at www.saabcatalog.com.Convertible
If a pressure washer is used be heedful of
the following recommendations:
on the lower part of the car (not higher
than the door handles): max pressure
of 100 bar and not closer than 8 in.
(20 cm).
on the upper part of the car: tax pres-
sure of 100 bar and not closer than
32 in. (80 cm).
Do not use any drying chemicals or water-
proofing agents.
Avoid automatic car washes.
NOTEDo not use alcohol-based cleaners on the
plastic lenses of the front or rear lights, as
these can cause a crackling effect on the
lenses.
The door mirrors should be folded in
before the car enters an automatic car
wash.
SportCombi: To avoid the wiper arm to
break tape it down to the window when
using a drive-through carwash.
Try your brakes on leaving a car wash.
Wet brake discs reduce the performance
of the brakes.
Fixed antennae, such as for a mobile
phone, must be removed if the car goes
through an automatic car wash.
Cars with Saab Parking Assistance: Do
not spray the sensors or closer than 8 in.
(20 cm) to the sensors with a pressure
washer, as this can damage them.
WARNING
Read and follow the instructions on
the packaging of the recommended
cleaning agents and waterproofing
agents. We recommend that you con-
tact an authorized Saab dealer
regarding recommended cleaning
agents and waterproofing agents.
Never treat the soft top with hot wax or
similar.
93_US_M08.book Page 268 Friday, May 11, 2007 11:37 AM
ProCarManuals.com
Page 269 of 320
269 Car care
When the soft top is only slightly soiled,
follow the directions on the cleaning agent
packaging. No brushing is necessary.
Check the soft top for water penetration
from time to time by spraying a small
amount of water on it. If water does not form
droplets but disappear into the material, it is
recommended to wash normally and then
waterproof.
If the soft top is heavily soiled and normal
recommended cleaning does not produce a
noticeable improvement, carry out the fol-
lowing.
The following cleaning method must be only
used if the soft top is heavily soiled and must
not be carried out more than twice a year.
1 Stop normal cleaning.
2 Rinse off the thick dirt thoroughly with
water.
3 Spray the newly rinsed soft top with the
recommended cleaning agent and allow
it to work in for 15-20 minutes.4 Move the washing brush backwards and
forwards, not diagonally, from side to
side or in circles. Use a soft brush, like a
clothes brush or a micro fibre cloth so
that the cleaning agent foams. Never
use a wire brush.
5 Then rinse the soft top with warm water
and brush using a soft brush in the direc-
tion of the vehicle until all foam has
disappeared. Brush carefully to prevent
damaging the material.
6 Dry the soft top using a clean chamois
leather or a cloth that does not leave lint
on the soft top.
7 Allow the soft top to dry fully. Touch with
a hand after a while, if the material feels
damp, allow it to dry for longer. Never use petrochemical based sol-
vents for cleaning. Only use water with
a recommended cleaning agent. Pet-
rochemical based solvents can cause
irreparable damage to the soft top.
Never use a pressure washer to clean
the soft top. Only use normal house-
hold water pressure.
NOTEOnly operate the soft top when it is
clean and dry.
Do not lower the soft top when it is
damp. This can cause folds and pres-
sure marks. If the soft top is heavily
soiled, the dirt may cause irreparable
visible chafe marks.
Only use water, recommended clean-
ing agents and a microfibre cloth if the
soft top is already damaged, other-
wise the damage can become worse.
At creases, seams and window edges
the cleaning motion should be away
from the crease, seam or window
edge in to the soft top.
WARNING
Water hotter than 37 °C can burn the skin,
cause skin irritation and/or cause injuries.
Use suitable protection.
93_US_M08.book Page 269 Friday, May 11, 2007 11:37 AM
ProCarManuals.com
Page 270 of 320
270 Car care8 If spots are still visible, repeat the treat-
ment on these spots as before. Press
lightly with the brush to prevent damag-
ing the material. Do not use the brush
excessively. This can irreparably
damage the material. Do not repeat the
treatment more than twice.
9 When the soft top has fully dried, it must
be waterproofed immediately. Only use
the recommended waterproofing agent.
Follow the instructions on the packag-
ing.
10 To obtain even and optimum waterproof-
ing, the car must be closed for 24 hours
after treatment. Do not touch the mate-
rial and do not place any objects on it.
Waxing and polishingDo not wax a new car during the first three
or four months. In fact, there is no need to
polish the car before the paintwork has
started to dull through oxidation. Other than
in exceptional cases, do not use abrasive
polishes containing a cutting agent on a new
car. Always wash the car thoroughly before
waxing or polishing.Touching up the paintDamaged paintwork should be treated as
soon as it is discovered: the longer it is left,
the greater the risk of corrosion. The
anti-corrosion warranty does not cover cor-
rosion resulting from untreated defects.
Paintwork damage sustained in a crash is
usually extensive and can only be properly
restored by professionals.
However, you can repair small scratches
and stone chip damage yourself. The nec-
essary tools and materials, such as primer,
touch-up paint and brushes, are available
from a workshop. We recommend that you
contact a Saab dealer.
In the case of minor flaws in the paintwork,
where the metal has not been exposed and
an undamaged layer of paint remains,
touch-up paint can usually be applied
directly, after any dirt has been scraped
away using a pointed knife.If corrosion has already set in, such as the
result of stone-chip damage, use a pointed
knife to scrape off all surface rust. If possi-
ble, the damaged area should be taken
back to the bare metal. The metal should
then be primed with two thin coats of primer
applied by brush.
After the primer has dried, apply several thin
layers of topcoat until the surface of the
repaired area is flush with the surrounding
paintwork.
Stir both primer and touch-up paint thor-
oughly before use and allow each coat to
dry before applying the next.
Two-coat enamelAs the name implies, two-coat enamel is
applied in two operations. The first coat, the
base color, contains the pigment, metal
flakes and binder. The second coat consists
of a clear enamel, which provides the final
gloss for the paintwork and protects the
base from moisture and environmental con-
taminants.
Touch-up stone-chip damage as follows:
1 Thoroughly clean the damaged area.
2 Then apply the primer, base color and
finally, the clear enamel. To achieve the
best finish, apply two or three coats of
primer.
93_US_M08.book Page 270 Friday, May 11, 2007 11:37 AM
ProCarManuals.com