ECU SAAB 9-3 2008 Service Manual
[x] Cancel search | Manufacturer: SAAB, Model Year: 2008, Model line: 9-3, Model: SAAB 9-3 2008Pages: 320, PDF Size: 56.39 MB
Page 194 of 320
194 Starting and drivingDriving with a roof rack
loadThe maximum permissible roof load is
220 lbs. (100 kg). Note that the roof load
must be included in the car’s maximum per-
missible payload and axle load.
Strong, sturdy roof carriers designed spe-
cially for your car are available from your
Saab dealer. Always secure roof loads
securely.
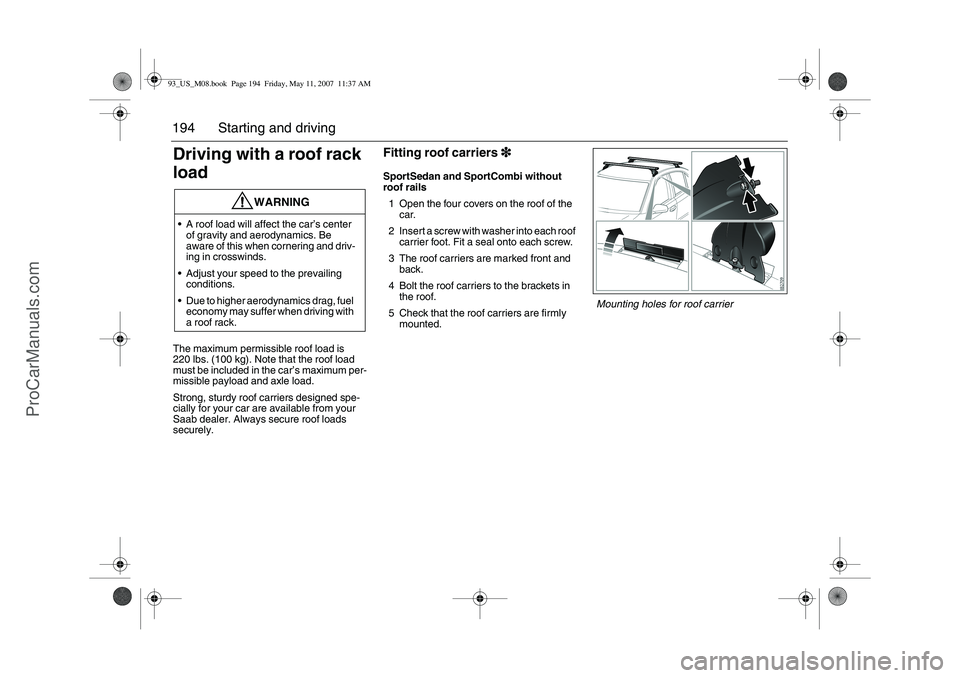
Fitting roof carriers3
33 3SportSedan and SportCombi without
roof rails
1 Open the four covers on the roof of the
car.
2 Insert a screw with washer into each roof
carrier foot. Fit a seal onto each screw.
3 The roof carriers are marked front and
back.
4 Bolt the roof carriers to the brackets in
the roof.
5 Check that the roof carriers are firmly
mounted.
WARNING
A roof load will affect the car’s center
of gravity and aerodynamics. Be
aware of this when cornering and driv-
ing in crosswinds.
Adjust your speed to the prevailing
conditions.
Due to higher aerodynamics drag, fuel
economy may suffer when driving with
a roof rack.
Mounting holes for roof carrier
93_US_M08.book Page 194 Friday, May 11, 2007 11:37 AM
ProCarManuals.com
Page 195 of 320
195 Starting and driving
Fitting roof carriers3
33 3SportCombi with roof rails
1 Clean the car’s roof rails.
2 Check the markings on the cross
members to see which is the front and
which is the rear roof carrier.
3 Place the cross members on the roof
rails, on their respective sides of the
centre supports. The cross members
must not be placed beyond the front or
rear joint on the rail. Ensure that the
distance between the cross members is
at least 700 mm (27.6 in.).
If a roof box is to be fitted, the cross
members must be positioned so that the
tailgate can be opened fully without
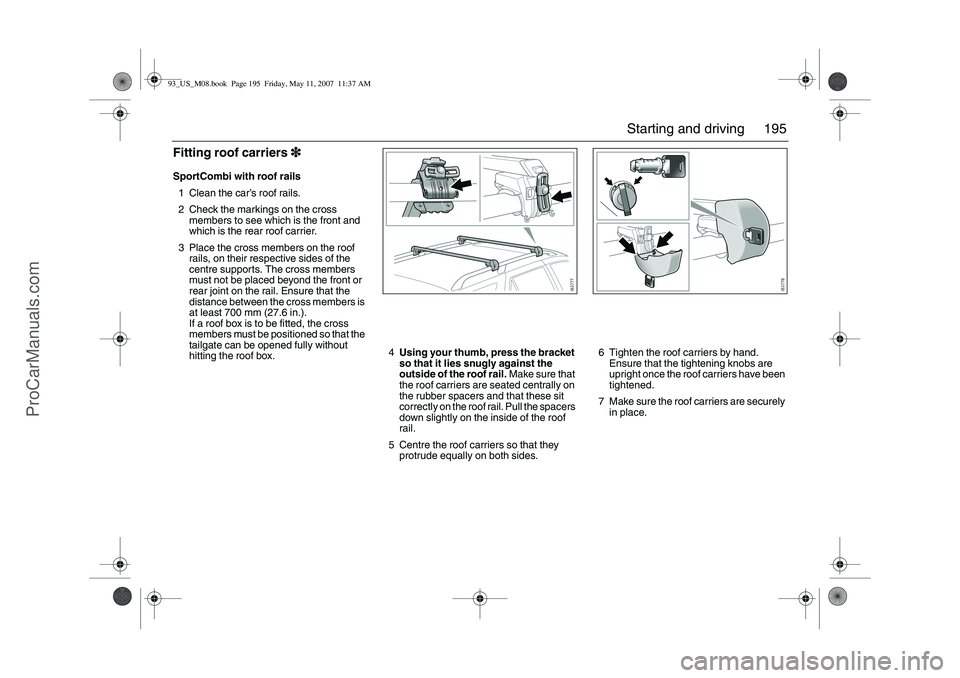
hitting the roof box.4Using your thumb, press the bracket
so that it lies snugly against the
outside of the roof rail. Make sure that
the roof carriers are seated centrally on
the rubber spacers and that these sit
correctly on the roof rail. Pull the spacers
down slightly on the inside of the roof
rail.
5 Centre the roof carriers so that they
protrude equally on both sides.6 Tighten the roof carriers by hand.
Ensure that the tightening knobs are
upright once the roof carriers have been
tightened.
7 Make sure the roof carriers are securely
in place.93_US_M08.book Page 195 Friday, May 11, 2007 11:37 AM
ProCarManuals.com
Page 196 of 320
196 Starting and drivingDriving with a loadThe handling characteristics are affected by
how the car is loaded.
Driving with the trunk lid
openIf you must drive with the trunk lid open,
close all windows and the moonroof (if
equipped) and set the cabin fan to its high-
est speed setting.
Driving in deep water
NOTEPlace the heaviest load as far forward
and as low as possible in the trunk.
Secure the load to the lashing eyes
(see page 141).
Heavy loads mean that the car’s
center of gravity is further back. As a
result, the car will sway more during
evasive steering.
Never exceed the permissible load of
the roof box, even if there is room for
more.
Ensure that the tire pressure is correct
– slight overinflation is preferable to
underinflation.
The braking distance of a loaded car is
always greater. Keep your distance
from the vehicle in front.
Do not exceed the car’s permissible
gross vehicle weight or axle load (see
page 286).
Roof loads can negatively affect tele-
communication.
For further information on tires see
page 244.
WARNING
Avoid driving with the trunk lid partly or
fully open, since exhaust fumes can be
drawn into the cabin.
NOTEDo not drive in puddles or water deeper
than 7 in. (20 cm) and do not drive faster
than 3–4 mph. Water can otherwise be
sucked into the engine. The engine will be
seriously damaged if water enters the
intake system.
93_US_M08.book Page 196 Friday, May 11, 2007 11:37 AM
ProCarManuals.com
Page 199 of 320
199 Starting and driving
Always try to keep the towrope taut by
gently applying the brake of the car on tow,
as necessary. This will avoid the towrope
being jerked violently.
Cars with automatic transmission
Always observe the speed limit for vehicles
on tow. Whatever the speed limit, the car
must not be towed at speeds exceeding
30 mph (50 km/h) nor for a distance of more
than 30 miles (50 km). If the car needs to be
transported over a longer distance, a tow
truck or flatbed truck must be called out.
The engine cannot be started by towing or
pushing the car. In an emergency, the
engine can be started as described under
"Jump starting" on page 200.
Cars with manual transmission
Always observe the speed limit for vehicles
on tow. There are no speed limit nor for dis-
tance.
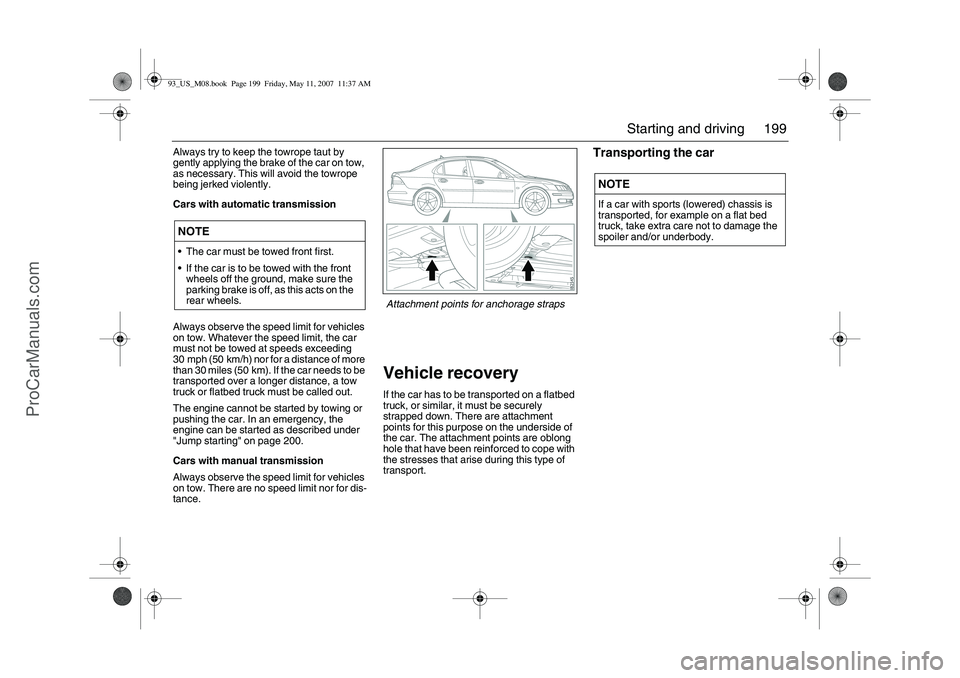
Vehicle recoveryIf the car has to be transported on a flatbed
truck, or similar, it must be securely
strapped down. There are attachment
points for this purpose on the underside of
the car. The attachment points are oblong
hole that have been reinforced to cope with
the stresses that arise during this type of
transport.
Transporting the car
NOTEThe car must be towed front first.
If the car is to be towed with the front
wheels off the ground, make sure the
parking brake is off, as this acts on the
rear wheels.
NOTEIf a car with sports (lowered) chassis is
transported, for example on a flat bed
truck, take extra care not to damage the
spoiler and/or underbody.
Attachment points for anchorage straps
93_US_M08.book Page 199 Friday, May 11, 2007 11:37 AM
ProCarManuals.com
Page 228 of 320
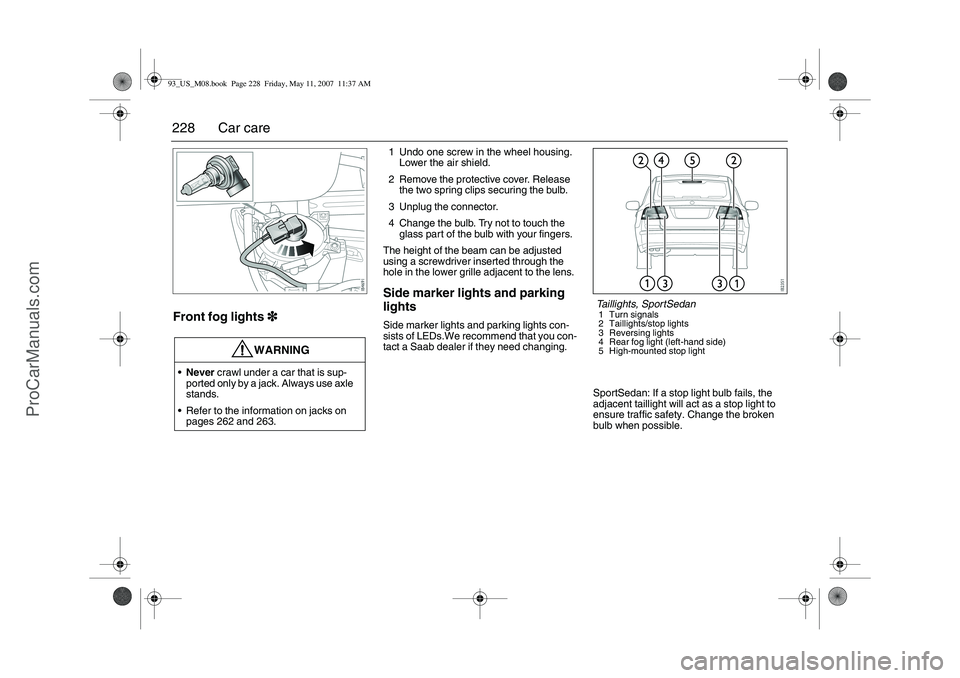
228 Car careFront fog lights3
33 3
1 Undo one screw in the wheel housing.
Lower the air shield.
2 Remove the protective cover. Release
the two spring clips securing the bulb.
3 Unplug the connector.
4 Change the bulb. Try not to touch the
glass part of the bulb with your fingers.
The height of the beam can be adjusted
using a screwdriver inserted through the
hole in the lower grille adjacent to the lens.Side marker lights and parking
lightsSide marker lights and parking lights con-
sists of LEDs.We recommend that you con-
tact a Saab dealer if they need changing.
SportSedan: If a stop light bulb fails, the
adjacent taillight will act as a stop light to
ensure traffic safety. Change the broken
bulb when possible.
WARNING
Never crawl under a car that is sup-
ported only by a jack. Always use axle
stands.
Refer to the information on jacks on
pages 262 and 263.
Taillights, SportSedan1 Turn signals
2 Taillights/stop lights
3 Reversing lights
4 Rear fog light (left-hand side)
5 High-mounted stop light
93_US_M08.book Page 228 Friday, May 11, 2007 11:37 AM
ProCarManuals.com
Page 229 of 320
229 Car care
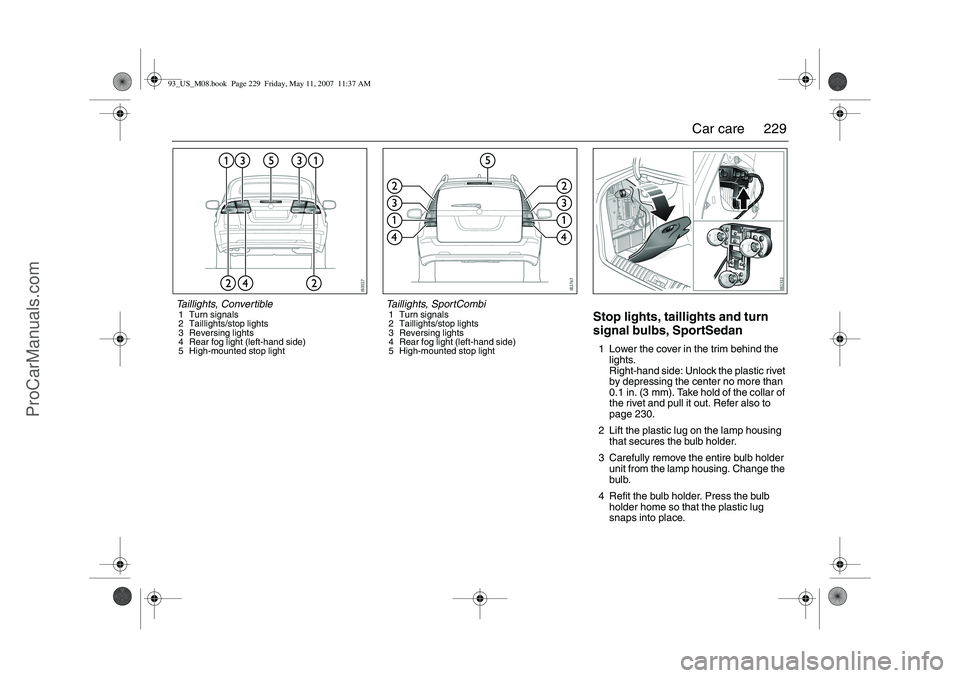
Stop lights, taillights and turn
signal bulbs, SportSedan1 Lower the cover in the trim behind the
lights.
Right-hand side: Unlock the plastic rivet
by depressing the center no more than
0.1 in. (3 mm). Take hold of the collar of
the rivet and pull it out. Refer also to
page 230.
2 Lift the plastic lug on the lamp housing
that secures the bulb holder.
3 Carefully remove the entire bulb holder
unit from the lamp housing. Change the
bulb.
4 Refit the bulb holder. Press the bulb
holder home so that the plastic lug
snaps into place.
Taillights, Convertible1 Turn signals
2 Taillights/stop lights
3 Reversing lights
4 Rear fog light (left-hand side)
5 High-mounted stop light
Taillights, SportCombi1 Turn signals
2 Taillights/stop lights
3 Reversing lights
4 Rear fog light (left-hand side)
5 High-mounted stop light
93_US_M08.book Page 229 Friday, May 11, 2007 11:37 AM
ProCarManuals.com
Page 230 of 320
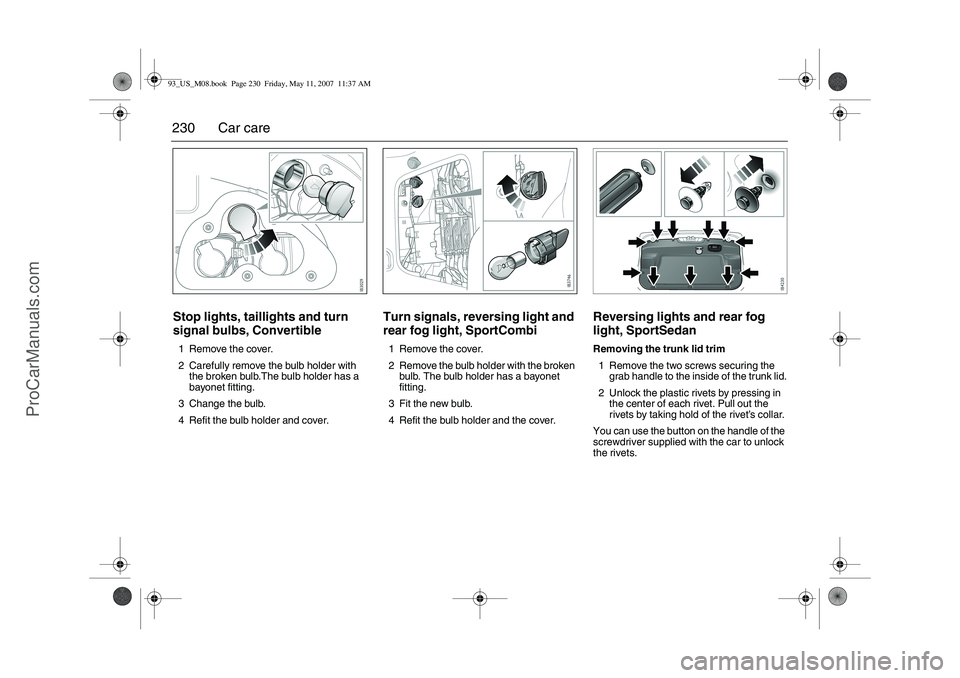
230 Car careStop lights, taillights and turn
signal bulbs, Convertible1 Remove the cover.
2 Carefully remove the bulb holder with
the broken bulb.The bulb holder has a
bayonet fitting.
3 Change the bulb.
4 Refit the bulb holder and cover.
Turn signals, reversing light and
rear fog light, SportCombi1 Remove the cover.
2 Remove the bulb holder with the broken
bulb. The bulb holder has a bayonet
fitting.
3 Fit the new bulb.
4 Refit the bulb holder and the cover.
Reversing lights and rear fog
light, SportSedanRemoving the trunk lid trim
1 Remove the two screws securing the
grab handle to the inside of the trunk lid.
2 Unlock the plastic rivets by pressing in
the center of each rivet. Pull out the
rivets by taking hold of the rivet’s collar.
You can use the button on the handle of the
screwdriver supplied with the car to unlock
the rivets.
93_US_M08.book Page 230 Friday, May 11, 2007 11:37 AM
ProCarManuals.com
Page 235 of 320

235 Car care
Trunk lighting, SportCombi1 Pull the lamp housing forward slightly
and lift it out at the rear. Use a thin and
wide tool.
2 Fit the new bulb. The bulb is secured in
the holder.
3 Start by inserting in the front edge of the
lamp housing and then pressing in the
rear edge.
Courtesy/floor lighting3
33 31 Release one edge of the lamp fitting
using a screwdriver.
2 Fit the new bulb.
3 Insert the connector side first when refit-
ting the lamp.
Other bulbsIf any other bulbs need changing, we rec-
ommend that you visit a Saab dealer.
93_US_M08.book Page 235 Friday, May 11, 2007 11:37 AM
ProCarManuals.com
Page 251 of 320

251 Car care
Tire Chains
Notice: If your vehicle does not have
235/45R17 size tires, use tire chains only
where legal and only when you must.
Contact your Saab dealer regarding suit-
able snow chains. Install them on the
front tires and tighten them as tightly as
possible with the ends securely
fastened. Drive slowly and follow the
chain manufacturer’s instructions. If you
can hear the chains contacting your
vehicle, stop and retighten them. If the
contact continues, slow down until it
stops. Driving too fast or spinning the
wheels with chains on will damage your
vehicle.
If a Tire Goes FlatIt’s unusual for a tire to “blowout” while
you’re driving, especially if you maintain
your tires properly. If air goes out of a tire,
it’s much more likely to leak out slowly. But
if you should ever have a “blowout”, here are
a few tips about what to expect and what to
do:
If a front tire fails, the flat tire will create a
drag that pulls the vehicle toward that side.
Take your foot off the accelerator pedal and
grip the steering wheel firmly. Steer to main-
tain lane position, and then gently brake to
a stop well out of the traffic lane.
A rear blowout, particularly on a curve, acts
much like a skid and may require the same
correction you’d use in a skid. In any rear
blowout, remove your foot from the acceler-
ator pedal. Get the vehicle under control by
steering the way you want the vehicle to go.
It may be very bumpy and noisy, but you can
still steer. Gently brake to a stop – well off
the road if possible.
If a tire goes flat, the next part shows how to
use your jacking equipment to change a flat
tire safely.
WARNING
If your vehicle has 235/45 R17 size tires,
don’t use tire chains, there’s not enough
clearance.
Tire chains used on a vehicle without the
proper amount of clearance can cause
damage to the brakes, suspension or
other vehicle parts. The area damaged by
the tire chains could cause you to lose
control of your vehicle and you or others
may be injured in a crash.
Use another type of traction device only if
its manufacturer recommends it for use
on your vehicle and tire size combination
and road conditions. Follow that manu-
facturer’s instructions. To help avoid
damage to your vehicle, drive slowly,
readjust or remove the device if it’s con-
tacting your vehicle, and don’t spin your
wheels.
If you do find traction devices that will fit,
install them on the front tires.93_US_M08.book Page 251 Friday, May 11, 2007 11:37 AM
ProCarManuals.com
Page 260 of 320

260 Car careCompact spareThe compact spare is light and easy to
handle when changing the tire. Its use is
only permitted when a standard tire has sus-
tained a puncture. The maximum life of the
tire is only just over 2,000 miles (3,500 km).
Do not exceed 50 mph (80 km/h) with the
compact spare fitted.
The tire pressure should be 60 psi
(420 kPa). Put the punctured tire in the
spare wheel well under the trunk floor.
Have the standard tire repaired and refitted
as soon as possible.The spare tire, the tools and the jack with its
crank are carried under a panel in the trunk.
Fold the carpeting forward to ease access to
the tools and spare tire.
The screwdriver handle has a “button” for
removing plastic rivets. This type of rivet
must be removed when changing the light
bulb in the trunk lid (see page 230).
Your Saab is equipped with a trip computer
and you can use its “Speed warning” func-
tion, to monitor driving speed since you
must not exceed 50 mph (80 km/h), see
page 92.
Driving with a compact wheel
fittedObserve the following when the compact
spare tire is fitted:
The compact spare is light and easy to
handle when changing a tire.
Do not drive further than necessary with
the compact spare fitted - the maximum
life of the tire is only just over 2,000 miles
(approx. 3,500 km).
Refit the standard tire as soon as possi-
ble.
Fitting a spare tire/wheel without pressure
sensor will trigger a malfunction
message, see page 259.
Important considerations when driving with
a compact spare tire:
The car’s ground clearance is reduced.
WARNING
The spare tire or punctured tire must be
stowed under the trunk floor, and secured
in place with the retaining nut.
WARNING
Do not exceed 50 mph (80 km/h). The
tire can overheat affecting the car’s
roadholding.
Tire pressure: refer to page 294.
The spare tire or punctured tire must
be stowed under the trunk floor, and
secured in place with the retaining nut.
93_US_M08.book Page 260 Friday, May 11, 2007 11:37 AM
ProCarManuals.com