ignition SAAB 9-5 2000 Owner's Manual
[x] Cancel search | Manufacturer: SAAB, Model Year: 2000, Model line: 9-5, Model: SAAB 9-5 2000Pages: 256, PDF Size: 14.24 MB
Page 73 of 256
73 Instruments and controls
Starting in cold weather
To start with, the system will automatically select the defroster set-
ting, maximum heat and low fan speed.
As the engine warms up, air will also be distributed through the floor
vents and the fan speed will be increased.
As the temperature inside the car nears the selected value, both the
fan speed and the heat will be decreased to a level determined by
the system.
Starting in hot weather
The system will automatically distribute air through the panel vents
at high fan speed and will switch on the A/C compressor (unless the
ECON switch has been pressed).
If the outdoor temperature is above 86
°F (30°C), the system might
select recirculation after approximately 45 seconds if this is required
in order to reach the desired temperature.
As the temperature inside the car nears the selected value, the fan
speed will be decreased to a value determined by the system.
Programming IManual selections can be programmed into the ACC system so that
these will take effect when the car is started. Note that the ignition
must be switched off for at least ten minutes after programming for
the selections to be saved in the system’s memory.
1 Make sure the ignition is ON.
2 Select the desired settings.
3 Press and , simultaneously
(the display will flash to confirm that the settings have been
recorded).
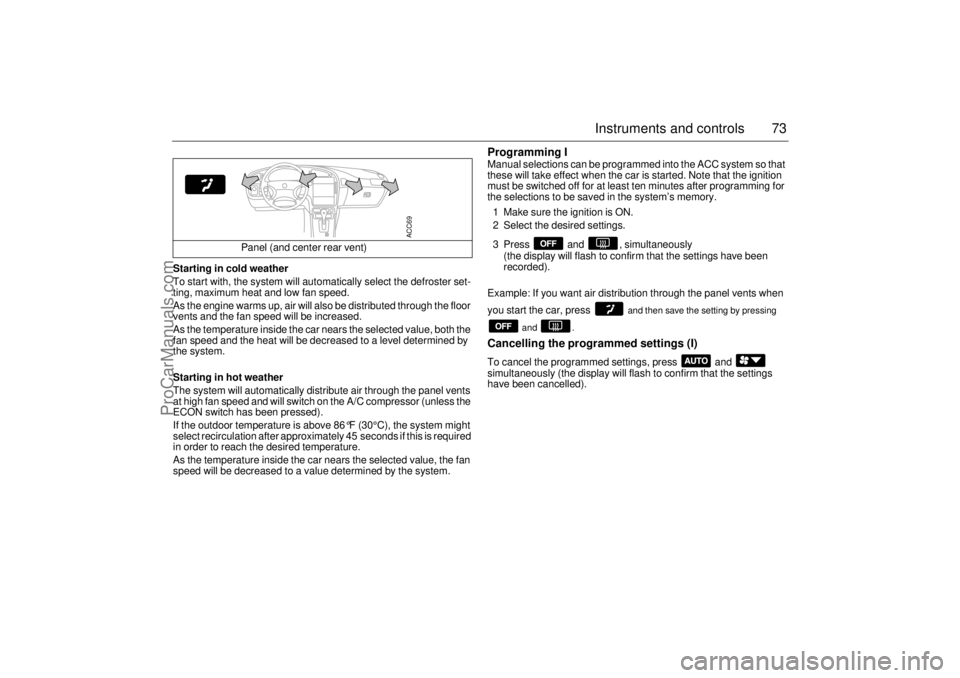
Example: If you want air distribution through the panel vents when
you start the car, press
and then save the setting by pressing
and .
Cancelling the programmed settings (I) To cancel the programmed settings, press and
simultaneously (the display will flash to confirm that the settings
have been cancelled). Panel (and center rear vent)
ACC69
ProCarManuals.com
Page 74 of 256
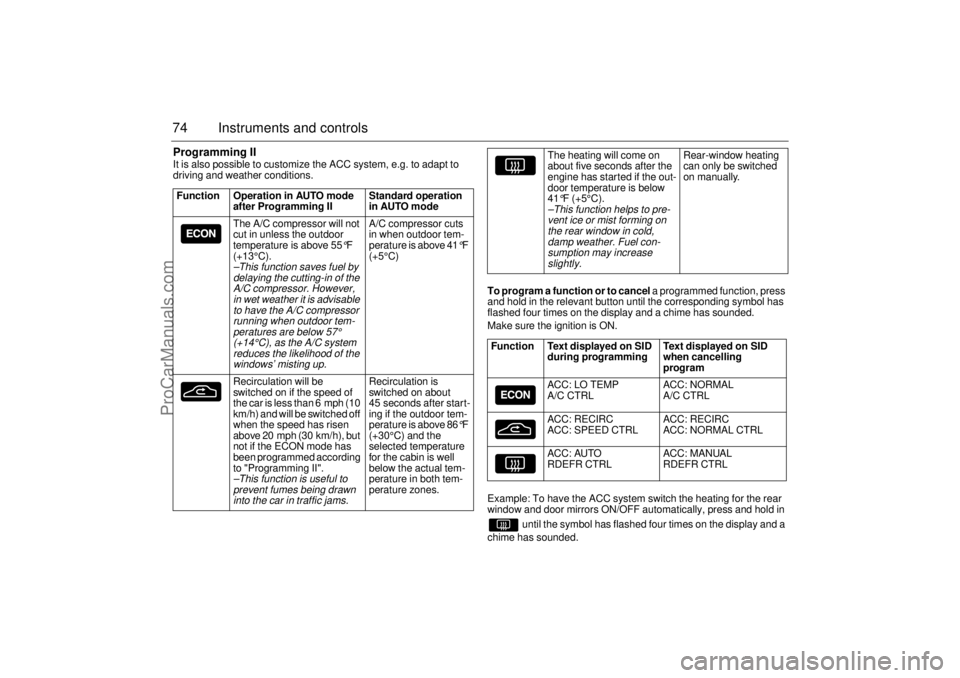
74 Instruments and controlsProgramming IIIt is also possible to customize the ACC system, e.g. to adapt to
driving and weather conditions.
To program a function or to cancel a programmed function, press
and hold in the relevant button until the corresponding symbol has
flashed four times on the display and a chime has sounded.
Make sure the ignition is ON.
Example: To have the ACC system switch the heating for the rear
window and door mirrors ON/OFF automatically, press and hold in
until the symbol has flashed four times on the display and a
chime has sounded. Function Operation in AUTO mode
after Programming II Standard operation
in AUTO mode
The A/C compressor will not
cut in unless the outdoor
temperature is above 55
°F
(+13°C).
–This function saves fuel by
delaying the cutting-in of the
A/C compressor. However,
in wet weather it is advisable
to have the A/C compressor
running when outdoor tem-
peratures are below
57°
(+14°C), as the A/C system
reduces the likelihood of the
windows’ misting up.
A/C compressor cuts
in when outdoor tem-
perature is above 41
°F
(+5°C)
Recirculation will be
switched on if the speed of
the car is less than 6 mph (10
km/h) and will be switched off
when the speed has risen
above 20 mph (30 km/h), but
not if the ECON mode has
been programmed according
to "Programming II".
–This function is useful to
prevent fumes being drawn
into the car in traffic jams.
Recirculation is
switched on about
45 seconds after start-
ing if the outdoor tem-
perature is above 86
°F
(+30°C) and the
selected temperature
for the cabin is well
below the actual tem-
perature in both tem-
perature zones.
The heating will come on
about five seconds after the
engine has started if the out-
door temperature is below
41°F (+5°C).
–This function helps to pre-
vent ice or mist forming on
the rear window in cold,
damp weather. Fuel con-
sumption may increase
slightly.
Rear-window heating
can only be switched
on manually.
Function Text displayed on SID
during programming Text displayed on SID
when cancelling
program
ACC: LO TEMP
A/C CTRL ACC: NORMAL
A/C CTRL
ACC: RECIRC
ACC: SPEED CTRL ACC: RECIRC
ACC: NORMAL CTRL
ACC: AUTO
RDEFR CTRL ACC: MANUAL
RDEFR CTRL
ProCarManuals.com
Page 79 of 256
79 Saab 9-5 Audio System
Quick guide to the
Saab 9-5 Audio System Radio (see page 82)
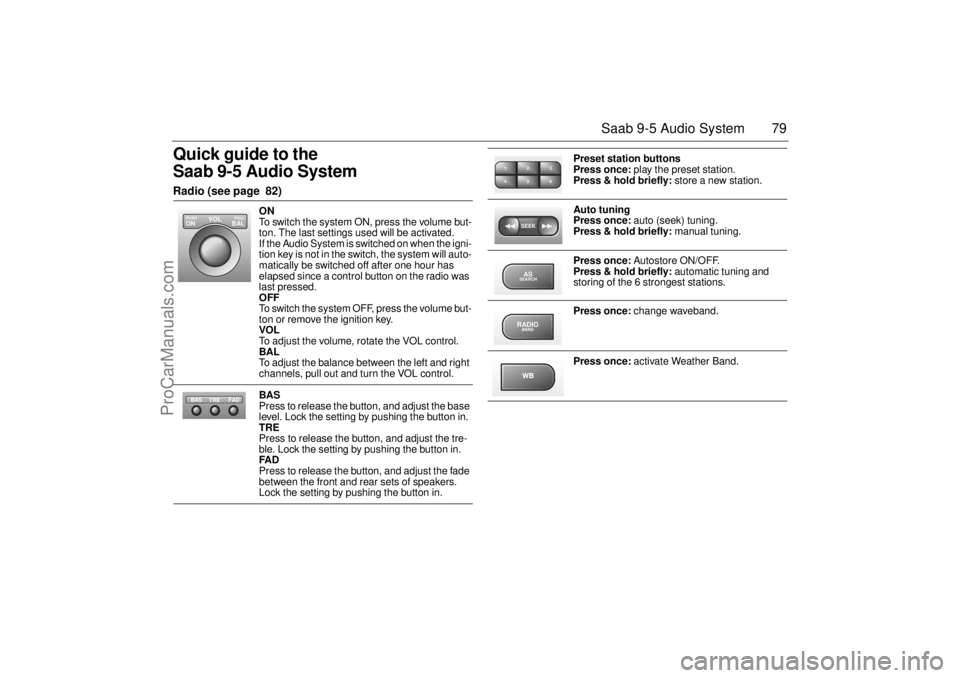
ON
To switch the system ON, press the volume but-
ton. The last settings used will be activated.
If the Audio System is switched on when the igni-
tion key is not in the switch, the system will auto-
matically be switched off after one hour has
elapsed since a control button on the radio was
last pressed.
OFF
To switch the system OFF, press the volume but-
ton or remove the ignition key.
VOL
To adjust the volume, rotate the VOL control.
BAL
To adjust the balance between the left and right
channels, pull out and turn the VOL control.
BAS
Press to release the button, and adjust the base
level. Lock the setting by pushing the button in.
TRE
Press to release the button, and adjust the tre-
ble. Lock the setting by pushing the button in.
FAD
Press to release the button, and adjust the fade
between the front and rear sets of speakers.
Lock the setting by pushing the button in.
VOL
BAL ON
PULL PUSH
TREFAD BAS
Preset station buttons
Press once: play the preset station.
Press & hold briefly: store a new station.
Auto tuning
Press once: auto (seek) tuning.
Press & hold briefly: manual tuning.
Press once: Autostore ON/OFF.
Press & hold briefly: automatic tuning and
storing of the 6 strongest stations.
Press once: change waveband.
Press once: activate Weather Band.
2 13
5 46SEEKASSEARCHRADIOBAND
ProCarManuals.com
Page 81 of 256
81 Saab 9-5 Audio System
Sound controlsON/OFF The Audio System will come on:
• When the volume control is pressed.
When the ignition is switched ON, if the
Audio System was on when the ignition
key was last removed.
The Audio System will be switched off:
When the volume control is pressed.
When the ignition key is removed.
One hour after the ignition was switched
OFF, if the ignition key has not been
removed.
When one hour has elapsed since a con-
trol button on the Audio System was last
pressed after the ignition key was
removed.
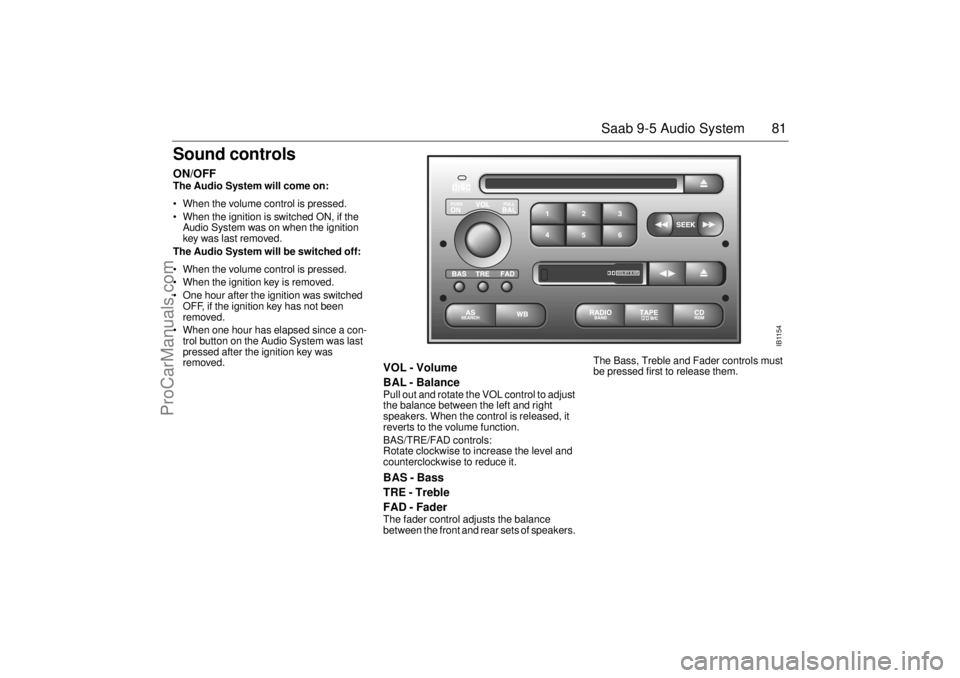
VOL - Volume
BAL - Balance Pull out and rotate the VOL control to adjust
the balance between the left and right
speakers. When the control is released, it
reverts to the volume function.
BAS/TRE/FAD controls:
Rotate clockwise to increase the level and
counterclockwise to reduce it. BAS - Bass
TRE - Treble
FAD - Fader The fader control adjusts the balance
between the front and rear sets of speakers. The Bass, Treble and Fader controls must
be pressed first to release them.
IB1154
DOLBY B NR
ProCarManuals.com
Page 102 of 256
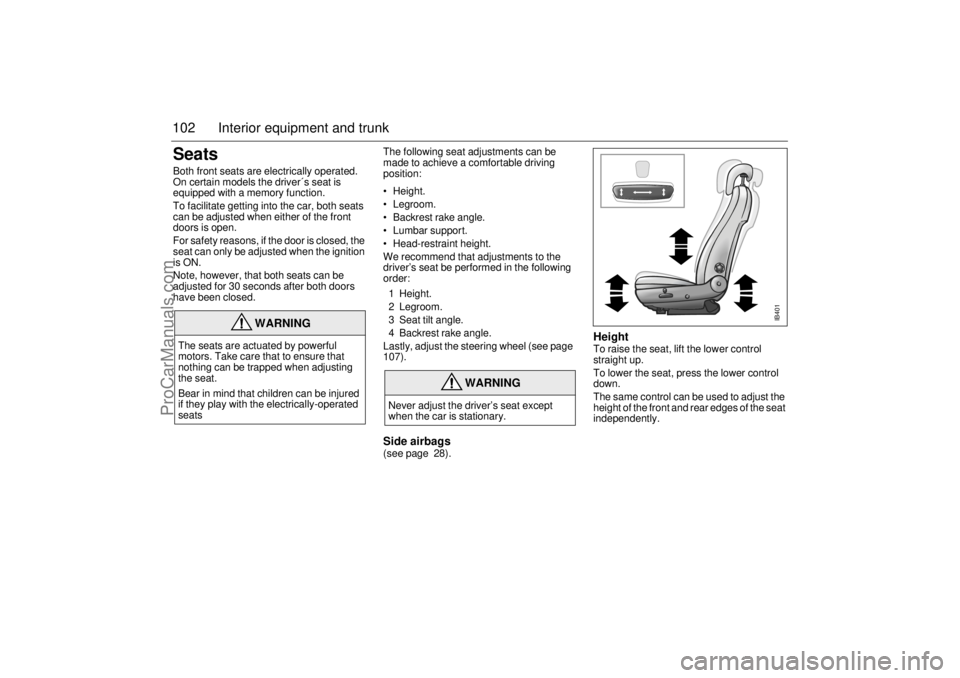
102 Interior equipment and trunkSeats Both front seats are electrically operated.
On certain models the driver´s seat is
equipped with a memory function.
To facilitate getting into the car, both seats
can be adjusted when either of the front
doors is open.
For safety reasons, if the door is closed, the
seat can only be adjusted when the ignition
is ON.
Note, however, that both seats can be
adjusted for 30 seconds after both doors
have been closed. The following seat adjustments can be
made to achieve a comfortable driving
position:
Height.
Legroom.
Backrest rake angle.
Lumbar support.
Head-restraint height.
We recommend that adjustments to the
driver’s seat be performed in the following
order:
1Height.
2 Legroom.
3 Seat tilt angle.
4 Backrest rake angle.
Lastly, adjust the steering wheel (see page
107).
Side airbags (see page 28).
Height To raise the seat, lift the lower control
straight up.
To lower the seat, press the lower control
down.
The same control can be used to adjust the
height of the front and rear edges of the seat
independently.
WARNING
The seats are actuated by powerful
motors. Take care that to ensure that
nothing can be trapped when adjusting
the seat.
Bear in mind that children can be injured
if they play with the electrically-operated
seats
WARNING
Never adjust the driver’s seat except
when the car is stationary.
IB401
ProCarManuals.com
Page 110 of 256
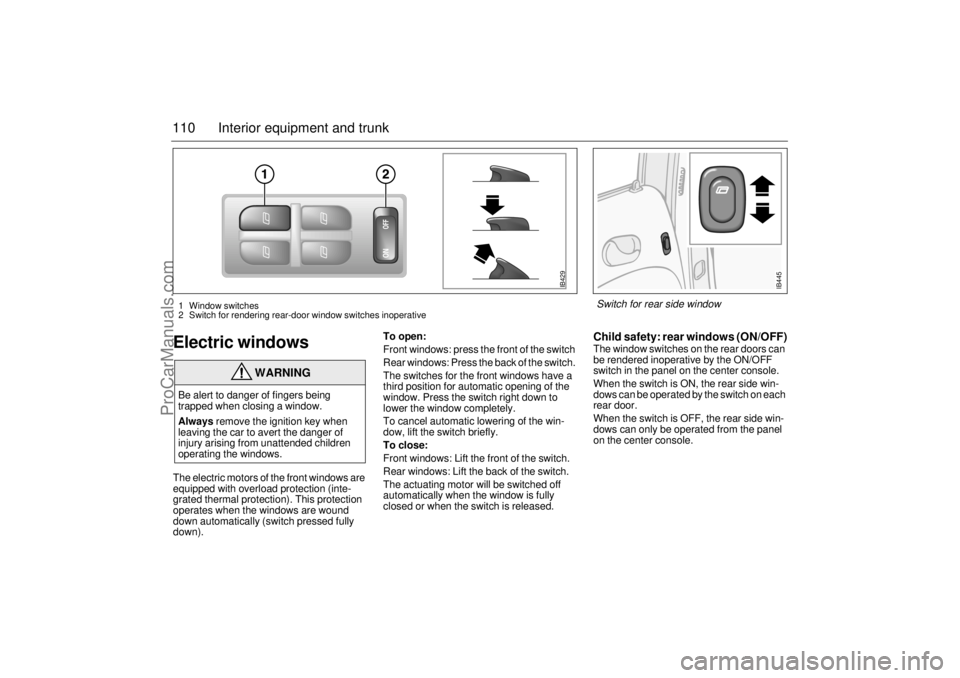
110 Interior equipment and trunkElectric windowsThe electric motors of the front windows are
equipped with overload protection (inte-
grated thermal protection). This protection
operates when the windows are wound
down automatically (switch pressed fully
down).To open:
Front windows: press the front of the switch
Rear windows: Press the back of the switch.
The switches for the front windows have a
third position for automatic opening of the
window. Press the switch right down to
lower the window completely.
To cancel automatic lowering of the win-
dow, lift the switch briefly.
To close:
Front windows: Lift the front of the switch.
Rear windows: Lift the back of the switch.
The actuating motor will be switched off
automatically when the window is fully
closed or when the switch is released.
Child safety: rear windows (ON/OFF)The window switches on the rear doors can
be rendered inoperative by the ON/OFF
switch in the panel on the center console.
When the switch is ON, the rear side win-
dows can be operated by the switch on each
rear door.
When the switch is OFF, the rear side win-
dows can only be operated from the panel
on the center console.
WARNING
Be alert to danger of fingers being
trapped when closing a window.
Always remove the ignition key when
leaving the car to avert the danger of
injury arising from unattended children
operating the windows.
IB429
1 Window switches
2 Switch for rendering rear-door window switches inoperative
IB445
Switch for rear side window
ProCarManuals.com
Page 111 of 256
111 Interior equipment and trunk
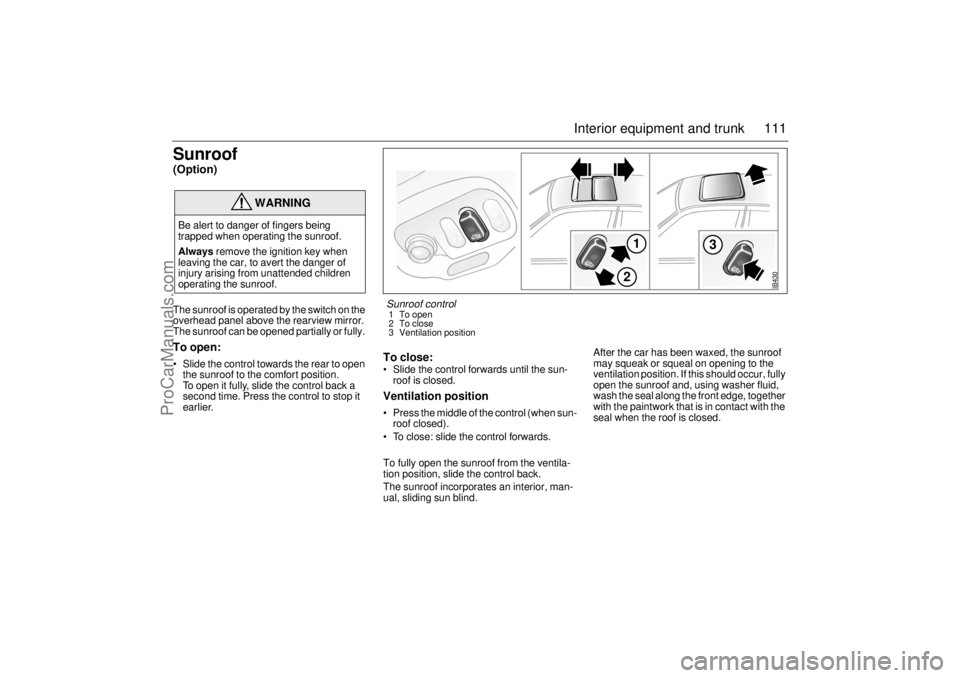
Sunroof (Option) The sunroof is operated by the switch on the
overhead panel above the rearview mirror.
The sunroof can be opened partially or fully. To open: Slide the control towards the rear to open
the sunroof to the comfort position.
To open it fully, slide the control back a
second time. Press the control to stop it
earlier.
To close: Slide the control forwards until the sun-
roof is closed. Ventilation position Press the middle of the control (when sun-
roof closed).
To close: slide the control forwards.
To fully open the sunroof from the ventila-
tion position, slide the control back.
The sunroof incorporates an interior, man-
ual, sliding sun blind. After the car has been waxed, the sunroof
may squeak or squeal on opening to the
ventilation position. If this should occur, fully
open the sunroof and, using washer fluid,
wash the seal along the front edge, together
with the paintwork that is in contact with the
seal when the roof is closed.
WARNING
Be alert to danger of fingers being
trapped when operating the sunroof.
Always remove the ignition key when
leaving the car, to avert the danger of
injury arising from unattended children
operating the sunroof.
IB430
1
3
2
Sunroof control 1 To open
2 To close
3 Ventilation position
ProCarManuals.com
Page 113 of 256
113 Interior equipment and trunk
To refit, line up the slots on either side and
slide it closed.
Rear ashtrays
Open the lid to use ashtray.
To remove the ashtray, fully open the lid and
lift the ashtray straight out.
To refit the ashtray, make sure it engages
the two square recesses in the door trim.
The cigarette lighter sockets can also be
used for accessories (e.g. to charge a
mobile phone) when the ignition is ON.
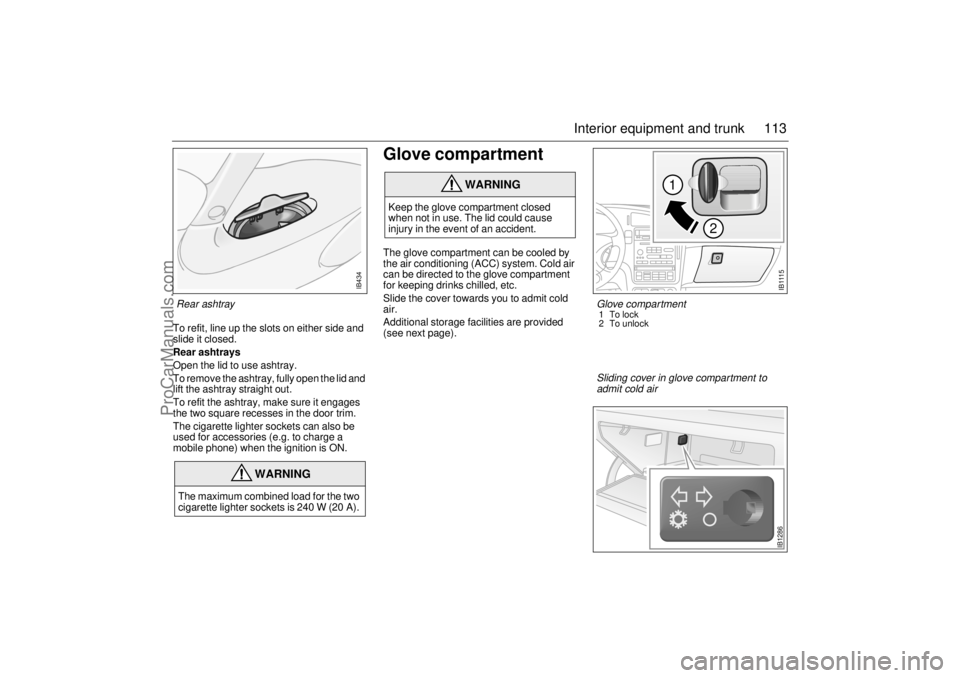
Glove compartment The glove compartment can be cooled by
the air conditioning (ACC) system. Cold air
can be directed to the glove compartment
for keeping drinks chilled, etc.
Slide the cover towards you to admit cold
air.
Additional storage facilities are provided
(see next page).
WARNING
The maximum combined load for the two
cigarette lighter sockets is 240 W (20 A).
WARNING
Keep the glove compartment closed
when not in use. The lid could cause
injury in the event of an accident.
I B 111 5
1
2
Glove compartment 1To lock
2 To unlock
IB434
Rear ashtray
IB1286
Sliding cover in glove compartment to
admit cold air
ProCarManuals.com
Page 129 of 256

129 Starting and driving
Starting and driving
IB597
Ignition switch ................. 130
Starting the engine .......... 131
Important considerations
for driving ....................... 132
Refueling .......................... 134
Engine Break-In Period ... 137
Gear changing ................. 137
Cruise control .................. 145
Braking ............................. 146
Traction Control System . 147
Economical motoring ...... 149
Driving in winter .............. 150 Driving in hot weather .... 151
Towing a trailer ................ 152
Driving considerations
with compact spare
wheel/tire fitted .............. 154
Driving with the trunk
lid/tailgate open ............. 154
Driving with a roof rack
load ................................. 155
Driving with a load .......... 157
Towing the car ................. 158
Jump starting .................. 160 Parking brake ................... 162
Parking .............................. 162
ProCarManuals.com
Page 130 of 256

130 Starting and drivingIgnition switchThe combined ignition switch and
gear-lever lock is located in the center con-
sole between the front seats. The ignition
key can only be removed when reverse is
engaged (automatic transmission: selector
in ”P” position).
The key fits all the locks on the car. The key
number is specified on the small plastic
strap that comes with the keys when the car
is delivered. Keep a note of the key number
in a safe place, as you will need to quote it if
ordering a replacement key.
See also page 32.
LOCK position Engage reverse and turn the key to LOCK.
Automatic transmission: select ”P”.
The gear lever is locked. This is the only position in which the key can be
removed.
The parking lights, hazard warning lights and interior lighting all work. OFF position Gear lever no longer locked.
Certain electrical circuits operationalON position All electrical circuits working. Do not leave the key in the ON position
when the engine is not running. Turn the key to OFF to switch off the
electrical circuits. In the ON position certain warning and indicator lights
come on as a check, and they normally are extinguished after about
3 seconds.ST (starter) position The starter operates when the key is turned to this position. When
released, the key will spring back to the ON position. If the engine fails to
start, the key must first be turned back to the position between OFF and
LOCK before the starter can be operated again.
When the starter motor is running, several electrical circuits are
disconnected to facilitate starting.
LOCK
OFFONST
LOCK
OFFONST
LOCK
OFFONST
LOCK
OFFONST
IB1120
ProCarManuals.com