weight SAAB 9-5 2004 Owners Manual
[x] Cancel search | Manufacturer: SAAB, Model Year: 2004, Model line: 9-5, Model: SAAB 9-5 2004Pages: 288, PDF Size: 16.91 MB
Page 16 of 288
16 SafetyHead restraintThe front seats in the Saab 9-5 are
equipped with Saab Active Head Restraints
(SAHRs). These reduce the risk of whiplash
injury if the car is hit from behind.
In the event of a rear-end crash, the body is
forced back against the backrest. This, in
turn, causes the mechanism to press the
head restraint forward and upward, thus
limiting the backward movement of the
head.
The SAHR is a mechanical system, actu-
ated by body weight. The mechanism is built
into the top of the backrest, where it is
connected to the head restraint.
Therefore, the SAHR does not need to be
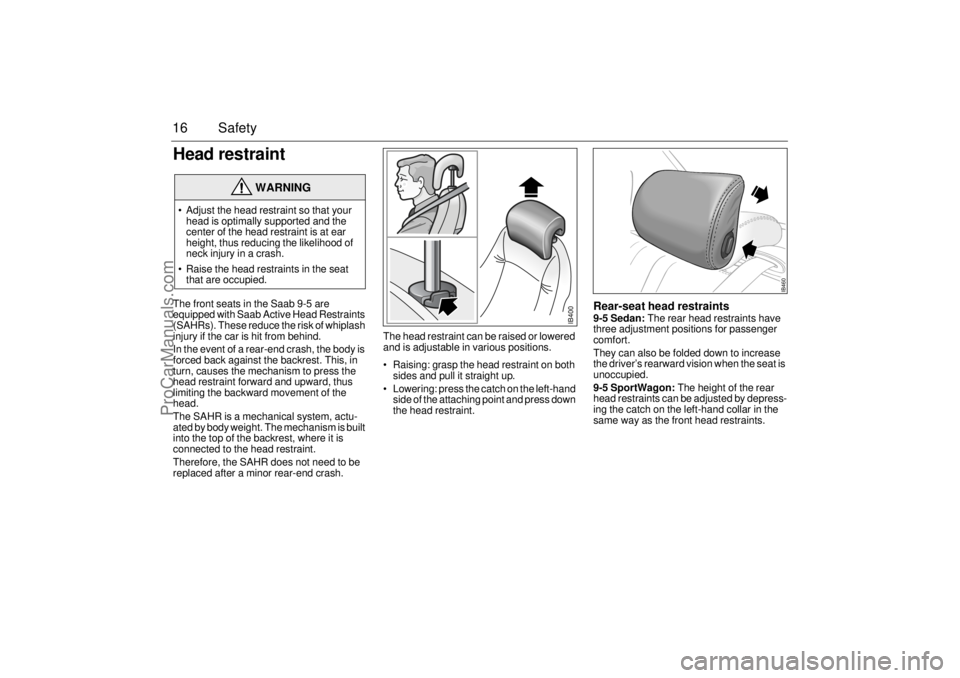
replaced after a minor rear-end crash.The head restraint can be raised or lowered
and is adjustable in various positions.
Raising: grasp the head restraint on both
sides and pull it straight up.
Lowering: press the catch on the left-hand
side of the attaching point and press down
the head restraint.
Rear-seat head restraints9-5 Sedan: The rear head restraints have
three adjustment positions for passenger
comfort.
They can also be folded down to increase
the driver’s rearward vision when the seat is
unoccupied.
9-5 SportWagon: The height of the rear
head restraints can be adjusted by depress-
ing the catch on the left-hand collar in the
same way as the front head restraints.
WARNING
Adjust the head restraint so that your
head is optimally supported and the
center of the head restraint is at ear
height, thus reducing the likelihood of
neck injury in a crash.
Raise the head restraints in the seat
that are occupied.
IB460
IB400
ProCarManuals.com
Page 140 of 288
140 Interior equipment and trunkLoad anchoring
Driving with the trunk lid/tailgate open, see
page 188.
WARNING
Put heavy loads as low down and as
far forward as possible in the luggage
compartment, i.e. against the back of
the rear seat.
Never overload the cargo net. If the
elastic breaks this may cause personal
injury. Do not use a cargo net that
shows signs of wear.
Never stack cargo so high that any part
of the cargo lies above the edge of the
backrest, if a cargo guard (accessory)
is not being used.
Always tie down the cargo so that it
cannot be thrown forward during
heavy braking or in the event of a
crash.
Unsecured and heavy cargo can
increase the risk of injury during hard
braking, sudden avoidance maneu-
vers and in the event of a crash.
For the best load anchoring, use the
special cargo bolts and load straps
(accessory).
Load the cargo bolts evenly. Never
attach more than one strap to each tie
down eye.
Provide protection on sharp edges to
prevent damage to the load straps.
Never use the elastic floor net and
elastic side net when the rear seat is
folded down. These nets are only
intended to keep light objects tidy, not
for the anchoring of loads.
If possible, avoid having the rear seat
folded down when driving with a heavy
load because the anchoring possibili-
ties are restricted when the rear seat is
in this position. That the rear seat is
in the upright position is a basic
requirement for protection against
cargo displacement in the event of
a crash.
Cargo can intrude into the passenger
compartment during a sudden stop or
front crash if the outer safety belts are
not fastened. Check that the two red
warning-indication flags are fully
down. This shows that the backrests
are locked.
WARNING
Match the speed and driving style
according to how the car is loaded.
The driving characteristics of the car
can be affected because the center of
gravity is altered when there is a cargo
in the luggage compartment.
An object weighing 55 lbs. (25 kg) cor-
responds to a weight of 2200 lbs.
(1000 kg) in a head on crash at
32 mph (50 km/h).
Adjust the car’s load (passengers and
luggage) so that the gross vehicle
weight or the axle weight is not
exceeded, see page 270.
ProCarManuals.com
Page 143 of 288
143 Interior equipment and trunk
Sliding floor (accessory)
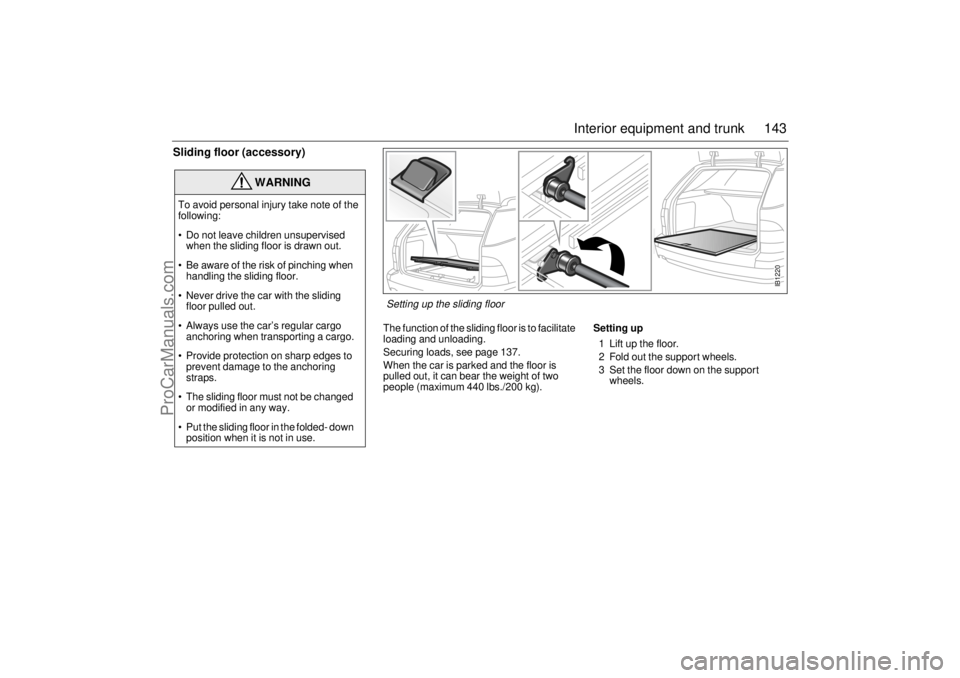
The function of the sliding floor is to facilitate
loading and unloading.
Securing loads, see page 137.
When the car is parked and the floor is
pulled out, it can bear the weight of two
people (maximum 440 lbs./200 kg).Setting up
1 Lift up the floor.
2 Fold out the support wheels.
3 Set the floor down on the support
wheels.
WARNING
To avoid personal injury take note of the
following:
Do not leave children unsupervised
when the sliding floor is drawn out.
Be aware of the risk of pinching when
handling the sliding floor.
Never drive the car with the sliding
floor pulled out.
Always use the car’s regular cargo
anchoring when transporting a cargo.
Provide protection on sharp edges to
prevent damage to the anchoring
straps.
The sliding floor must not be changed
or modified in any way.
Put the sliding floor in the folded- down
position when it is not in use.
IB1220
Setting up the sliding floor
ProCarManuals.com
Page 155 of 288

155 Starting and driving
Opening the fuel filler door in an emergency,
see page 146.
Recommended fuel:The engine in your Saab 9-5 is designed to
operate on unleaded gasoline that has an
octane rating of 87 or higher. Octane rating
is determined according to the formula:
where MON is the Motor Octane Number,
and RON is the Research Octane Number.
The average of these two values is the
octane rating of the gasoline as it appears
on the pump at a retail gas station. This
value is sometimes referred to as the
"Anti-Knock Index" (AKI) or the "Average
Octane Number" (AON).
To avoid deposit formation on the fuel injec-
tors which can cause poor driveability, use
only quality gasolines that contain deter-
gents and corrosion inhibitors. Because
gasolines sold at retail gas stations vary in
their composition and quality, you should
switch to a different brand if you begin expe-
riencing driveability and/or hard starting
problems shortly after refueling your car. In
recent years, a variety of fuel additives and
alcohols or oxygenates have been blended
with gasoline. These types of gasolines may
be found in all parts of the United States and
Canada, but particularly in geographic
areas and cities that have high carbon mon-
oxide levels. Saab approves the use of such
"reformulated" gasolines in its products,
which help in reducing pollution from all
motor vehicles, provided that the following blending percentages are met by such
fuels:
Up to 10 % ethanol by volume, with corro-
sion inhibitors.
Up to 15 % MTBE by volume (methyl ter-
tiary butyl ether).
Up to 5 % methanol by volume, with an
equal amount of a suitable co-solvent and
added corrosion inhibitors.
Other, less common, fuel additives used by
some gasoline dealers are also acceptable,
provided that the resultant gasoline is not
more than 2.7 % oxygen by weight.
Some Canadian and U.S. gasolines contain
an octane enhancing additive called meth-
lycyclopentadienyl manganese tricarbonyl
(MMT). If such fuel is used, your emission
control system performance may deterio-
rate and the malfunction indicator lamp on
your instrument panel may turn on. If this
occurs, return to your authorized Saab
dealer for service.
However, these blended gasolines are reg-
ulated and should never exceed these rec-
ommended blend percentages and service
station operators should know if their gaso-
lines contain detergents and oxygenates,
and have been reformulated to reduce vehi-
cle emissions. Nevertheless, if you begin to
notice a problem with the way your car starts
or runs shortly after it has been refueled, try
a different brand of gasoline.
NOTICE Fill to maximum filling capacity
Stop filling after the first time that the
nozzle trips to shut off the flow of fuel.
Filling capacity can differ between
different fuel stations and outside
temperature. Fuel tank volume when
nozzle trips to shut off, may vary by
0.5 gal. (2 liters).
Do not fill fuel all the way up the filler
pipe. The gasoline must be allowed
room for expansion especially during
hot weather.
MON + RON
2
ProCarManuals.com
Page 178 of 288
178 Starting and driving2 Wait until the needle has dropped back
to indicate normal temperature (roughly
midway, in the white zone) before stop-
ping the engine. If the coolant needs top-
ping up, unscrew the cap on expansion
tank carefully.
Top up, as necessary, ideally with a
50/50 mixture of Saab-approved coolant
and water. If only water is available, use
that, but remember to have the coolant
mixture checked as soon as possible. 3 As soon as possible, have the cooling
system checked by an authorized Saab
dealer.
Towing a trailer
Trailer hitch attachmentTrailer hitch attachments are available as
accessories. These are designed for a max-
imum trailer weight of 3500 lbs. (1588 kg),
see also page 271.
Use only the electrical trailer hitch socket
provided in the trailer hitch kit.
Saab recommends:
Use a Saab original hitch kit attachment
which is designed and tested by Saab.
Consult your Saab dealer regarding the
appropriate hitch kit for your car.
WARNING
Exercise care when opening the hood
if the engine is overheated. Never
remove the expansion tank cap com-
pletely when the engine is hot.
The cooling system is pressurized -
hot coolant and vapor can escape.
These can cause injury to your eyes
and burns. Open the cap slowly to
release the pressure before
removing it.
WARNING
When towing a trailer, do not attempt
to negotiate a hill having a gradient in
excess of 15 %. The weight distribu-
tion over the front wheels of the car will
be insufficient to prevent wheelspin,
making further progress impossible.
In addition, the parking brake may not
always be able to hold the car and
trailer securely, with the result that the
wheels can start to slide downhill.
Always apply the trailer’s handbrake
when unhitching it. There is otherwise
a risk of personal injury or damage to
the bumper should the trailer start to
roll.
NOTICEUse only a genuine Saab trailer hitch and
wiring, since other wiring methods can
cause expensive damage to the car’s
body and electrical system.
Consult an authorized Saab dealer for
guidance on how to connect the trailer
hitch electrical system.
ProCarManuals.com
Page 179 of 288
179 Starting and driving
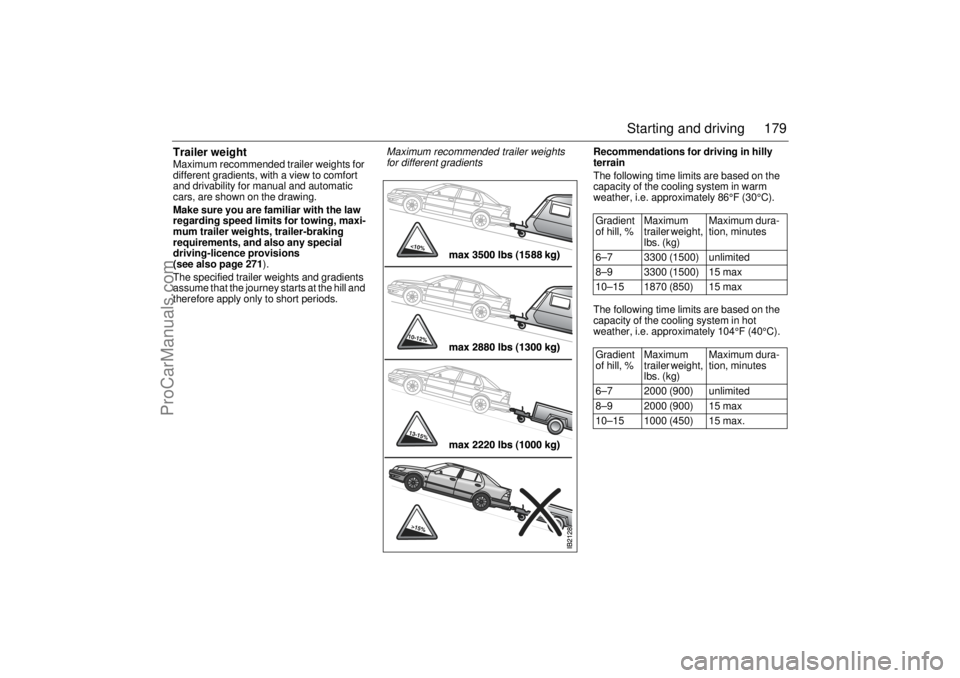
Trailer weightMaximum recommended trailer weights for
different gradients, with a view to comfort
and drivability for manual and automatic
cars, are shown on the drawing.
Make sure you are familiar with the law
regarding speed limits for towing, maxi-
mum trailer weights, trailer-braking
requirements, and also any special
driving-licence provisions
(see also page 271).
The specified trailer weights and gradients
assume that the journey starts at the hill and
therefore apply only to short periods. Recommendations for driving in hilly
terrain
The following time limits are based on the
capacity of the cooling system in warm
weather, i.e. approximately 86°F (30°C).
The following time limits are based on the
capacity of the cooling system in hot
weather, i.e. approximately 104°F (40°C).
Gradient
of hill, % Maximum
trailer weight,
lbs. (kg)Maximum dura-
tion, minutes
6–7 3300 (1500) unlimited
8–9 3300 (1500) 15 max
10–15 1870 (850) 15 max
Gradient
of hill, % Maximum
trailer weight,
lbs. (kg)Maximum dura-
tion, minutes
6–7 2000 (900) unlimited
8–9 2000 (900) 15 max
10–15 1000 (450) 15 max.
Maximum recommended trailer weights
for different gradients
ProCarManuals.com
Page 182 of 288
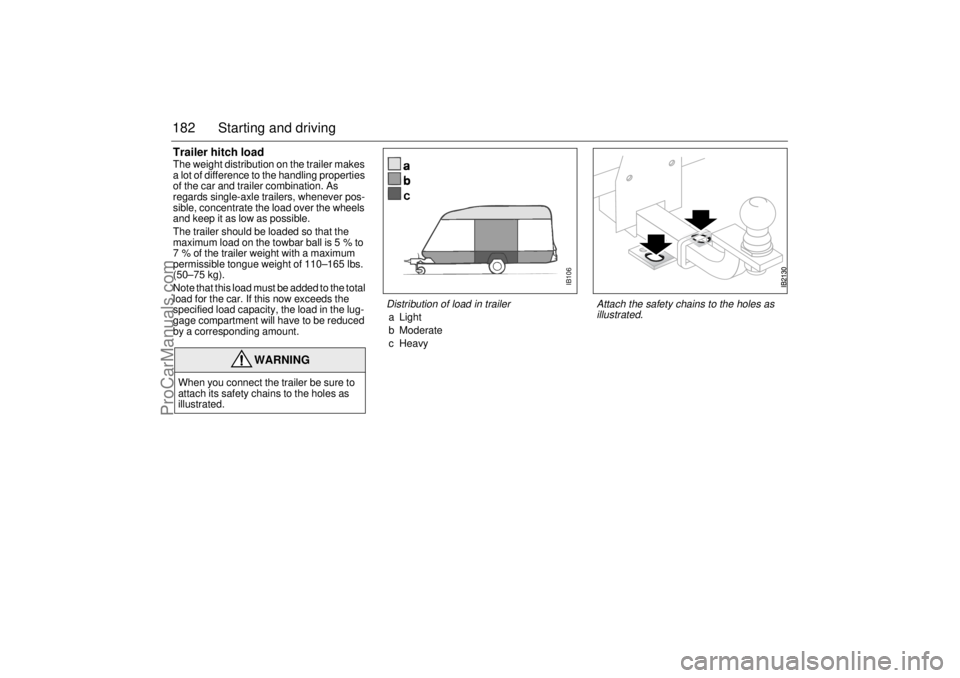
182 Starting and drivingTrailer hitch loadThe weight distribution on the trailer makes
a lot of difference to the handling properties
of the car and trailer combination. As
regards single-axle trailers, whenever pos-
sible, concentrate the load over the wheels
and keep it as low as possible.
The trailer should be loaded so that the
maximum load on the towbar ball is 5 % to
7 % of the trailer weight with a maximum
permissible tongue weight of 110–165 lbs.
(50–75 kg).
Note that this load must be added to the total
load for the car. If this now exceeds the
specified load capacity, the load in the lug-
gage compartment will have to be reduced
by a corresponding amount.
WARNING
When you connect the trailer be sure to
attach its safety chains to the holes as
illustrated.
IB106
Distribution of load in trailer aLight
b Moderate
cHeavy
Attach the safety chains to the holes as
illustrated.
ProCarManuals.com
Page 185 of 288
185 Starting and driving
Driving at nightBear in mind the following points when
driving at night:
Nighttime driving requires your full con-
centration.
Do not rush. Count on your journey taking
slightly longer.
The number of drivers under the influence
of drugs is likely to be greater at night than
during the day.
Do not stare at the headlights of oncom-
ing vehicles.
Avoid driving at night if you have poor eye-
sight. Night vision deteriorates with age.
Keep your car's headlights, windows and
mirrors clean. Also, if you wear glasses,
make sure they are clean.
Make sure you are well rested before
starting a long journey. Take a break every
other hour.
Only eat light meals. Heavy meals have a
tendency to induce tiredness.
Driving with a loadThe driving characteristics of the car are
affected by the way it is loaded.
Place heavy loads as far forward and as
low as possible in the trunk.
Secure the load to the tie downs, see
page 137.
The load should be such that the car´s
total weight or axle weight are not
exceeded, see page 270.
Heavy loads mean that the car’s center of
gravity is further back. As a result, the car
will sway more during evasive steering.
Never exceed the permissible load in the
roof box, even if there is room for more.
Ensure that the tire pressure is correct –
slight overinflation is preferable to under-
inflation.
The braking distance of a loaded car is
always greater. Keep your distance from
the vehicle in front.
Roof loads can negatively affect tele-
communication.
Tire pressure, see page 280 and back
cover.
IB1295
ProCarManuals.com
Page 242 of 288
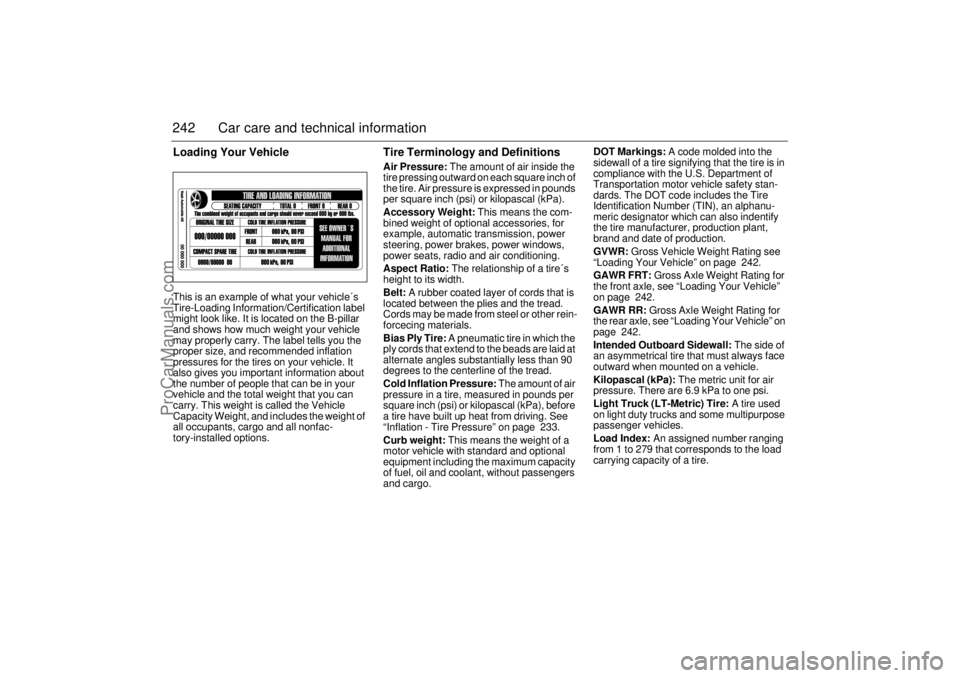
242 Car care and technical informationLoading Your VehicleThis is an example of what your vehicle´s
Tire-Loading Information/Certification label
might look like. It is located on the B-pillar
and shows how much weight your vehicle
may properly carry. The label tells you the
proper size, and recommended inflation
pressures for the tires on your vehicle. It
also gives you important information about
the number of people that can be in your
vehicle and the total weight that you can
carry. This weight is called the Vehicle
Capacity Weight, and includes the weight of
all occupants, cargo and all nonfac-
tory-installed options.
Tire Terminology and DefinitionsAir Pressure: The amount of air inside the
tire pressing outward on each square inch of
the tire. Air pressure is expressed in pounds
per square inch (psi) or kilopascal (kPa).
Accessory Weight: This means the com-
bined weight of optional accessories, for
example, automatic transmission, power
steering, power brakes, power windows,
power seats, radio and air conditioning.
Aspect Ratio: The relationship of a tire´s
height to its width.
Belt: A rubber coated layer of cords that is
located between the plies and the tread.
Cords may be made from steel or other rein-
forcecing materials.
Bias Ply Tire: A pneumatic tire in which the
ply cords that extend to the beads are laid at
alternate angles substantially less than 90
degrees to the centerline of the tread.
Cold Inflation Pressure: The amount of air
pressure in a tire, measured in pounds per
square inch (psi) or kilopascal (kPa), before
a tire have built up heat from driving. See
“Inflation - Tire Pressure” on page 233.
Curb weight: This means the weight of a
motor vehicle with standard and optional
equipment including the maximum capacity
of fuel, oil and coolant, without passengers
and cargo.DOT Markings: A code molded into the
sidewall of a tire signifying that the tire is in
compliance with the U.S. Department of
Transportation motor vehicle safety stan-
dards. The DOT code includes the Tire
Identification Number (TIN), an alphanu-
meric designator which can also indentify
the tire manufacturer, production plant,
brand and date of production.
GVWR: Gross Vehicle Weight Rating see
“Loading Your Vehicle” on page 242.
GAWR FRT: Gross Axle Weight Rating for
the front axle, see “Loading Your Vehicle”
on page 242.
GAWR RR: Gross Axle Weight Rating for
the rear axle, see “Loading Your Vehicle” on
page 242.
Intended Outboard Sidewall: The side of
an asymmetrical tire that must always face
outward when mounted on a vehicle.
Kilopascal (kPa): The metric unit for air
pressure. There are 6.9 kPa to one psi.
Light Truck (LT-Metric) Tire: A tire used
on light duty trucks and some multipurpose
passenger vehicles.
Load Index: An assigned number ranging
from 1 to 279 that corresponds to the load
carrying capacity of a tire.
ProCarManuals.com
Page 243 of 288

243 Car care and technical information
Maximum Load rating: The load rating for
a tire at the maximum permissible inflation
pressure for that tire.
Maximum Loaded Vehicle Weight: The
sum of curb weight; accessory weight; vehi-
cle capacity weight; and production options
weight.
Maximum Permissible Inflation Pres-
sure: The maximum cold inflation pressure
to which a tire may be inflated.
Normal occupant weight: The number of
occupants a vehicle is designed to seat mul-
tipled by 150 pounds (68 kg). See “Loading
Your Vehicle” on page 242.
Occupant Distribution: Designated seat-
ing positions.
Outward Facing Sidewall: The side of a
asymmetrical tire that has a particular side
that faces outward when mounted on a vehi-
cle. The side of the tire that contains a white-
wall bears white lettering or bears manufac-
turer, brand and or model name molding on
the other sidewall of the tire.
Passenger (P-Metric) Tire: A tire used on
passenger cars and some light duty trucks
and multipurpose vehicles.Recommended Inflation Pressure: Vehi-
cle manufacturer´s recommended tire infla-
tion pressure shown on the tire placard, see
“Inflation - Tire Pressure” on page 233 and
“Loading Your Vehicle” on page 242.
Radial Ply Tire: A pneumatic tire in which
the ply cords that extend to the beads are
laid at substantially 90 degrees to the cen-
terline of the tread.
Rim: A metal support for a tire or a tire and
tube assembly upon which the tire beads
are seated.
Sidewall: The portion of a tire between the
tread and the bead.
Speed rating: An alphanumeric code
assigned to a tire indicating the maximum
speed at which a tire can operate.
Traction: The friction between the tire and
the road surface. The amount of grip pro-
vided.
Treadwear Indicators: Narrow bands,
sometimes called “wear bars”, that show
across the tread of a tire when only
2/32 inch of tread remains. See “When It Is
Time for New Tires” on page 235.Tread Width: The width of the tire´s tread.
UTQGS: Uniform Tire Quality Grade Stan-
dards, a tire information system that pro-
vides consumers with ratings for a tire´s
traction, temperature and treadwear. Rat-
ings are determined by tire manufacturers
using government testing procedures. The
rating are molded into the sidewall of the
tire. See “Uniform Tire Quality Grading” on
page 237.
Vehicle Capacity Weight: Is the number of
designated seating positions multipled by
150 pounds (68 kg) plus the rated cargo
load. See “Loading Your Vehicle” on page
242.
Vehicle Maximum Load on the Tire: Load
on an individual tire due to curb weight,
accessory weight, occupant weight and
cargo weight.
Vehicle Placard: A label permanently
attached to a vehicle showing original
equipment tire size and the recommended
cold inflation pressure. See “Loading Your
Vehicle” on page 242.
ProCarManuals.com