heating SAAB 9-5 2007 Owners Manual
[x] Cancel search | Manufacturer: SAAB, Model Year: 2007, Model line: 9-5, Model: SAAB 9-5 2007Pages: 288, PDF Size: 18.14 MB
Page 9 of 288
9
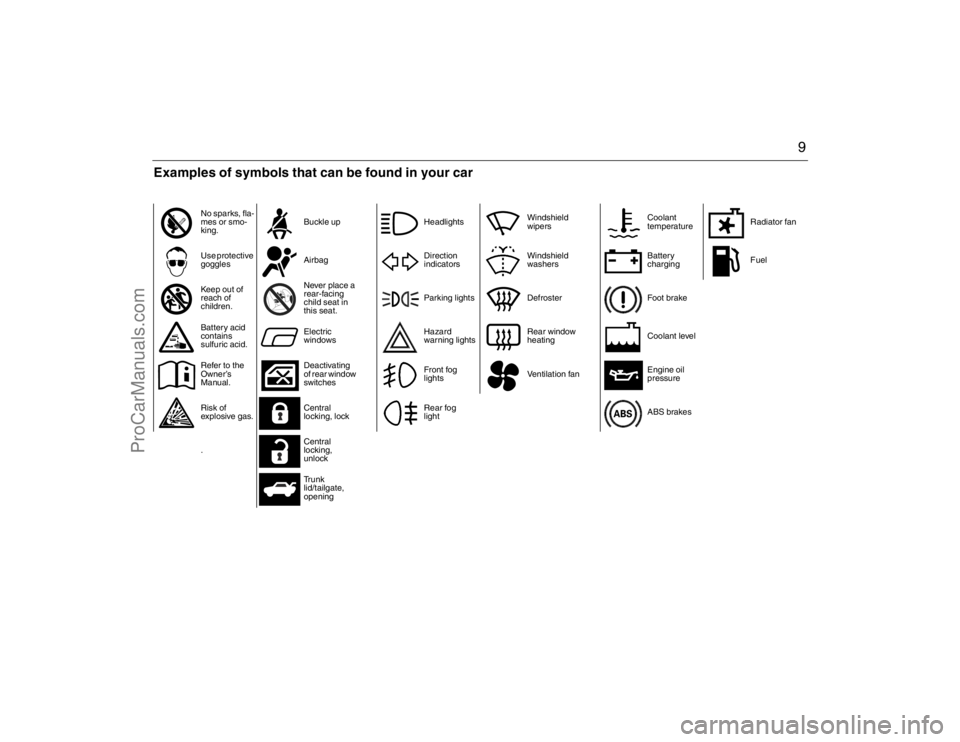
No sparks, fla-
mes or smo-
king.Buckle up
Use protective
gogglesAirbag
Keep out of
reach of
children.Never place a
rear-facing
child seat in
this seat.
Battery acid
contains
sulfuric acid.Electric
windows
Refer to the
Owner’s
Manual.Deactivating
of rear window
switches
Risk of
explosive gas.Central
locking, lock
.Central
locking,
unlock
Tr u n k
lid/tailgate,
opening
HeadlightsWindshield
wipers
Direction
indicatorsWindshield
washers
Parking lights Defroster
Hazard
warning lightsRear window
heating
Front fog
lightsVentilation fan
Rear fog
light
Coolant
temperatureRadiator fan
Battery
chargingFuel
Foot brake
Coolant level
Engine oil
pressure
ABS brakes
Examples of symbols that can be found in your car95_U S _M 07.book Page 9 Friday, June 9, 2006 8:58 AM
ProCarManuals.com
Page 61 of 288
61 Instruments and controls
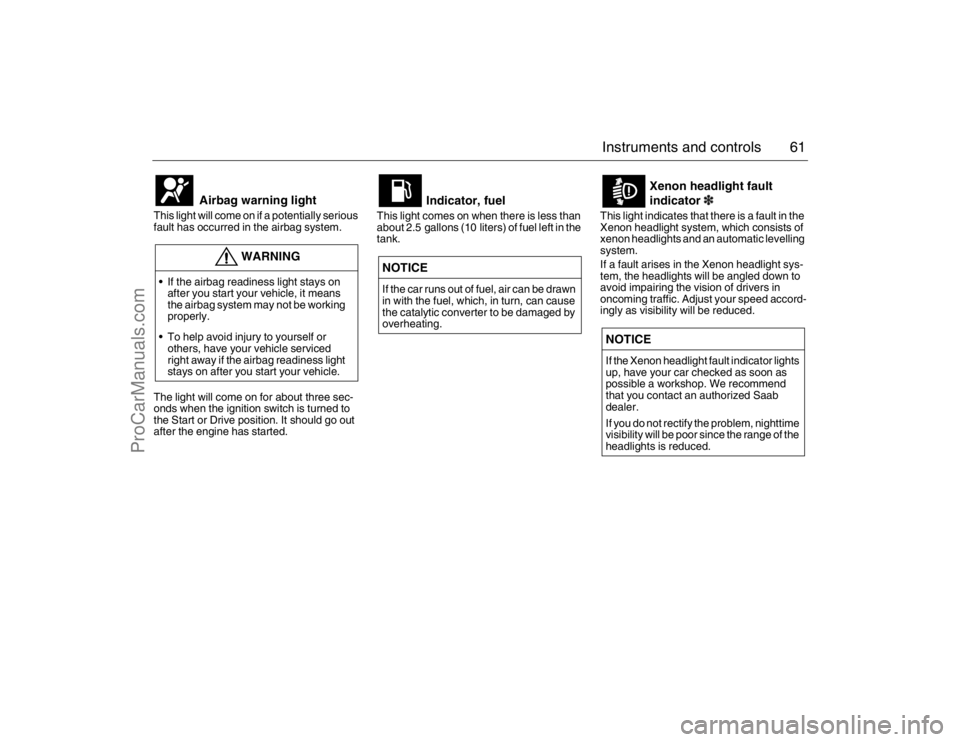
This light will come on if a potentially serious
fault has occurred in the airbag system. The light will come on for about three sec-
onds when the ignition switch is turned to
the Start or Drive position. It should go out
after the engine has started.This light comes on when there is less than
about 2.5 gallons (10 liters) of fuel left in the
tank. This light indicates that there is a fault in the
Xenon headlight system, which consists of
xenon headlights and an automatic levelling
system.
If a fault arises in the Xenon headlight sys-
tem, the headlights will be angled down to
avoid impairing the vision of drivers in
oncoming traffic. Adjust your speed accord-
ingly as visibility will be reduced.
Airbag warning light
WARNING
If the airbag readiness light stays on
after you start your vehicle, it means
the airbag system may not be working
properly.
To help avoid injury to yourself or
others, have your vehicle serviced
right away if the airbag readiness light
stays on after you start your vehicle.
Indicator, fuel
NOTICE
If the car runs out of fuel, air can be drawn
in with the fuel, which, in turn, can cause
the catalytic converter to be damaged by
overheating.
Xenon headlight fault
indicator3
NOTICE
If the Xenon headlight fault indicator lights
up, have your car checked as soon as
possible a workshop. We recommend
that you contact an authorized Saab
dealer.
If you do not rectify the problem, nighttime
visibility will be poor since the range of the
headlights is reduced.
95_U S _M 07.book Page 61 Friday, June 9, 2006 8:58 AM
ProCarManuals.com
Page 79 of 288
79 Instruments and controls
Automatic climate
control (ACC) The ACC system automatically works to
maintain the desired temperature inside the
car.
The system will achieve the desired temper-
ature in the quickest possible way. Note that
selecting a higher or lower temperature than
that desired will not speed up the process.
For the ACC system to be most effective, all
windows (and moonroof3) should be
closed.
Fresh air for the cabin is drawn in through an
inlet grille adjacent to the bottom edge of the
windshield. The air flows through a filter
upstream of the ACC system before deliv-
ery to the cabin. Cabin air is evacuated via
openings in the rear parcel shelf and then
through outlets on either side of the car
behind the rear bumper.
The incoming air is treated in three stages:
first it passes through a filter; it is then dehu-
midified and cooled and, finally, if required,
heated.
The filter is a combined particle and char-
coal filter. It is so efficient that levels of nox-
ious substances such as benzene and tolu-
ene are also reduced.To reduce the likelihood of misting on the
insides of the windows, the glass should be
cleaned with a quality window cleaner. How
often this will need to be done depends on
how clean the air is – if there are smokers in
the car, cleaning will need to be done more
frequently.
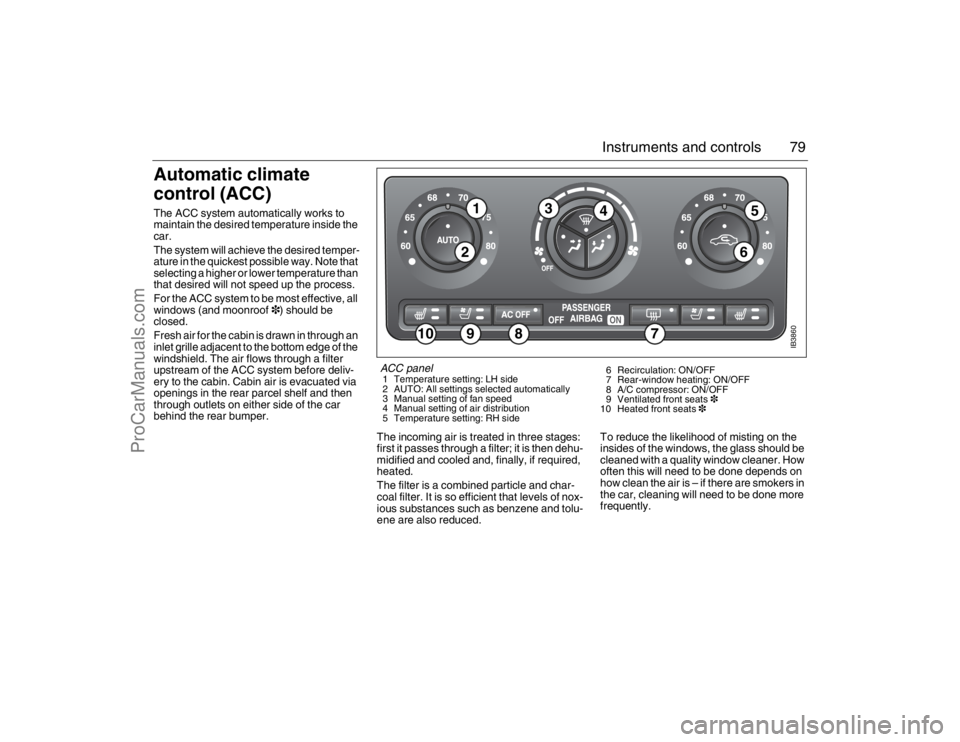
IB3860
9
10
1
5
4
2
3
6
8
7
ACC panel 1 Temperature setting: LH side
2 AUTO: All settings selected automatically
3 Manual setting of fan speed
4 Manual setting of air distribution
5 Temperature setting: RH side6 Recirculation: ON/OFF
7 Rear-window heating: ON/OFF
8 A/C compressor: ON/OFF
9 Ventilated front seats3
10 Heated front seats3
95_U S _M 07.book Page 79 Friday, June 9, 2006 8:58 AM
ProCarManuals.com
Page 82 of 288
82 Instruments and controlsFunctionsPressing AUTO will cancel all manual settings.
If a manual function is selected, it will be locked in but other functions
will be controlled automatically.
The selected temperature is always maintained automatically.
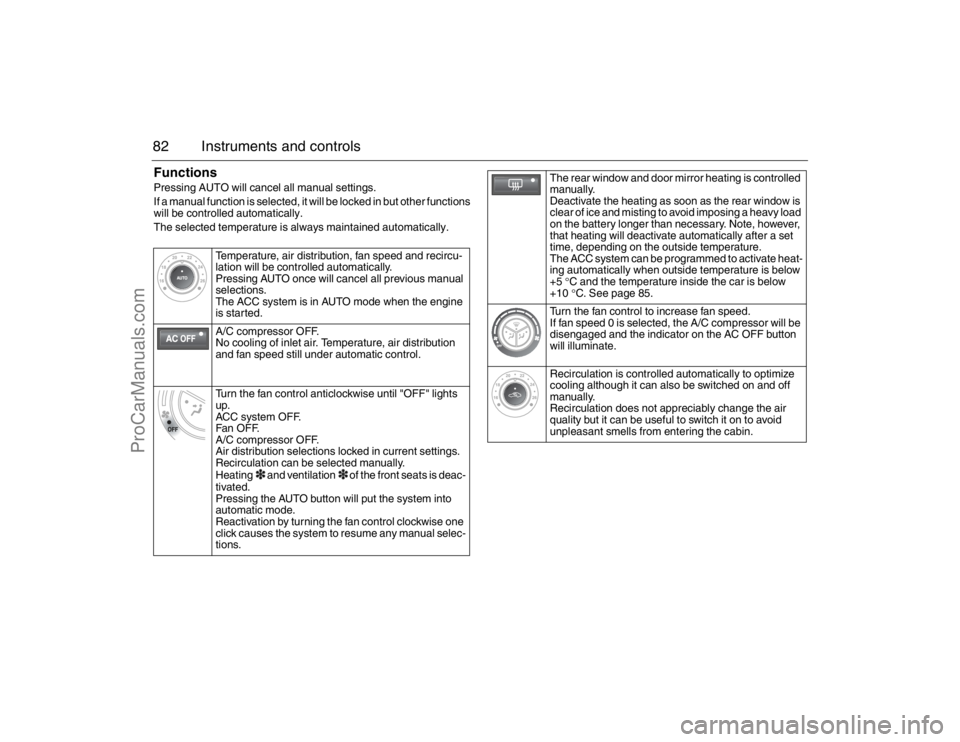
Temperature, air distribution, fan speed and recircu-
lation will be controlled automatically.
Pressing AUTO once will cancel all previous manual
selections.
The ACC system is in AUTO mode when the engine
is started.
A/C compressor OFF.
No cooling of inlet air. Temperature, air distribution
and fan speed still under automatic control.
Turn the fan control anticlockwise until "OFF" lights
up.
ACC system OFF.
Fan OF F.
A/C compressor OFF.
Air distribution selections locked in current settings.
Recirculation can be selected manually.
Heating
3 and ventilation
3 of the front seats is deac-
tivated.
Pressing the AUTO button will put the system into
automatic mode.
Reactivation by turning the fan control clockwise one
click causes the system to resume any manual selec-
tions.
The rear window and door mirror heating is controlled
manually.
Deactivate the heating as soon as the rear window is
clear of ice and misting to avoid imposing a heavy load
on the battery longer than necessary. Note, however,
that heating will deactivate automatically after a set
time, depending on the outside temperature.
The ACC system can be programmed to activate heat-
ing automatically when outside temperature is below
+5 °C and the temperature inside the car is below
+10°C. See page 85.
Turn the fan control to increase fan speed.
If fan speed 0 is selected, the A/C compressor will be
disengaged and the indicator on the AC OFF button
will illuminate.
Recirculation is controlled automatically to optimize
cooling although it can also be switched on and off
manually.
Recirculation does not appreciably change the air
quality but it can be useful to switch it on to avoid
unpleasant smells from entering the cabin.
95_U S _M 07.book Page 82 Friday, June 9, 2006 8:58 AM
ProCarManuals.com
Page 83 of 288
83 Instruments and controls
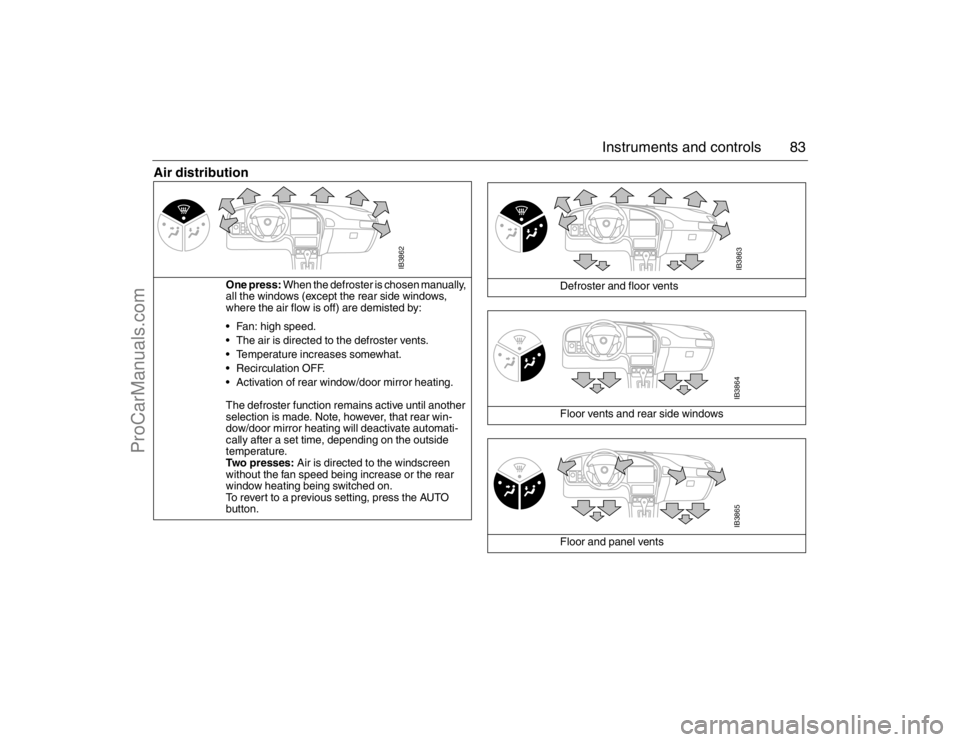
Air distribution
One press: When the defroster is chosen manually,
all the windows (except the rear side windows,
where the air flow is off) are demisted by:
Fan: high speed.
The air is directed to the defroster vents.
Temperature increases somewhat.
Recirculation OFF.
Activation of rear window/door mirror heating.
The defroster function remains active until another
selection is made. Note, however, that rear win-
dow/door mirror heating will deactivate automati-
cally after a set time, depending on the outside
temperature.
Two presses: Air is directed to the windscreen
without the fan speed being increase or the rear
window heating being switched on.
To revert to a previous setting, press the AUTO
button.
IB3862
Defroster and floor vents
Floor vents and rear side windows
Floor and panel vents
IB3863IB3864IB3865
95_U S _M 07.book Page 83 Friday, June 9, 2006 8:58 AM
ProCarManuals.com
Page 85 of 288

85 Instruments and controls
Adaptation of ACCIt is also possible to customize the ACC system, e.g. to adapt to
driving and weather conditions.
Adaptation and restoration of factory settings is done by holding
the respective button depressed approx. 2 seconds until a chime
sounds.
Make sure the ignition is ON.
Example: If you want the ACC system to handle activation and deac-
tivation of rear window/door mirror heating, hold the button
depressed approx. 2 seconds until a chime sounds.
The display shows:
ACC:AUTO
RDEFR CTRL
When “Adaptation of ACC“ is done, it will apply until factory settings
are restored. Function Operation in AUTO mode
after adaptationFactory setting
The rear window heating will
come on after the engine has
started if the outside temper-
ature is below +5 °C.
– This function helps to pre-
vent ice or mist forming on
the rear window in cold,
damp weather. Fuel con-
sumption may increase
slightly.
Heating is selected
manually.
Seat heating comes on if the
system determines that
heating is necessary based
on the temperature in the
seat and the outside temper-
ature
.
There are two settings
for heating. Repeat-
edly pressing the but-
ton switches between
low output, high output
and off.
Function Display text in SID
during adaptationDisplay text in SID when
factory settings are
restored
ACC:AUTO
RDEFR CTRLACC:MANUAL
RDEFR CTRL
ACC:AUTO
SEAT HEATINGACC:MANUAL
SEAT HEATING
95_U S _M 07.book Page 85 Friday, June 9, 2006 8:58 AM
ProCarManuals.com
Page 86 of 288

86 Instruments and controlsCalibrationCalibration is carried out automatically after
a certain number of starts if the ignition has
been switched off for more than 2 hours.
If the battery has been disconnected or has
run flat, the system will need to be recali-
brated.
Calibration is started manually as follows:
1 Start the engine.
2 Press and at the same
time.
When manual calibration starts,
” ACC:CALIBR.
STARTED”
appears in SID.
Calibration takes approx. 30 seconds.Useful tips(before taking the car to a workshop. We
recommend that you contact an authorized
Saab workshop.)
If the battery has been disconnected or
has run flat, the system will need to be
recalibrated. See "Calibration" above.
If front seat heating and/or rear window
heating do not function satisfactorily, see
"Adaptation of ACC" on page 85.
Condensation waterWhen the A/C system is running, the intake
air is dehumidified, and the resultant con-
densation is drained off through two outlets
underneath the floor of the car, in the vicinity
of the front doors.
It is therefore perfectly normal for water to
be seen dripping from these outlets when
the car is parked. The warmer the ambient
air and the higher the humidity, the more
condensation water will form.Formation of ice and mist in
extreme weather conditionsIt is only in the most extreme conditions that
icing and misting of window glass are likely
to be a problem, e.g. in torrential rain or
severe cold coupled with high relative
humidity, or when passengers are perspir-
ing heavily or wearing wet clothes.
The following measures are recommended
if such problems should occur:
1 Select AUTO and 21 °C for both temper-
ature zones.
2 Select Defroster.
If this is not enough...
3 Increase the fan speed.
If this is not enough...
4 Select a higher temperature.
The following measures are recommended
if the occupants feel that it is cold and
draughty in the car:1 Make sure that all the air vents are fully
open, including the center rear vent. If
this is not enough...
2 Direct the air flow away from the body. If
this is not enough...
3 Raise the temperature setting a degree
or two. If this is not enough...
4 Lower the fan speed.
Troubleshooting and care, see page 243.
95_U S _M 07.book Page 86 Friday, June 9, 2006 8:58 AM
ProCarManuals.com
Page 87 of 288
87 Instruments and controls
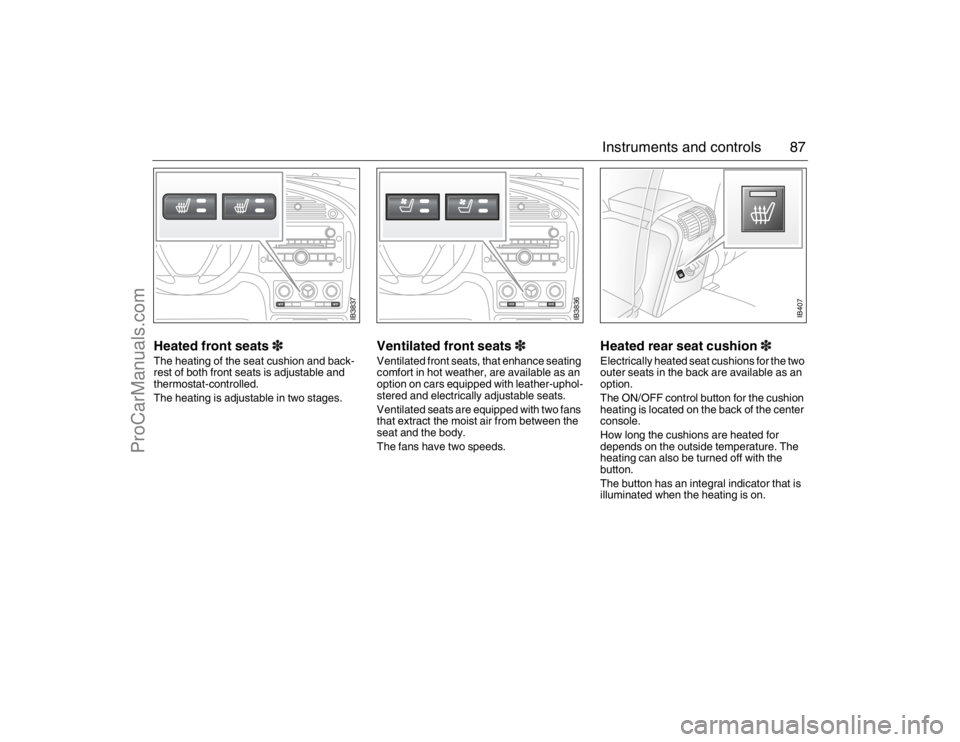
Heated front seats3The heating of the seat cushion and back-
rest of both front seats is adjustable and
thermostat-controlled.
The heating is adjustable in two stages.
Ventilated front seats3Ventilated front seats, that enhance seating
comfort in hot weather, are available as an
option on cars equipped with leather-uphol-
stered and electrically adjustable seats.
Ventilated seats are equipped with two fans
that extract the moist air from between the
seat and the body.
The fans have two speeds.
Heated rear seat cushion3Electrically heated seat cushions for the two
outer seats in the back are available as an
option.
The ON/OFF control button for the cushion
heating is located on the back of the center
console.
How long the cushions are heated for
depends on the outside temperature. The
heating can also be turned off with the
button.
The button has an integral indicator that is
illuminated when the heating is on.
IB3837
IB3836
IB407
95_U S _M 07.book Page 87 Friday, June 9, 2006 8:58 AM
ProCarManuals.com
Page 117 of 288

117 Interior equipment and trunk
The adjusting switch is on the driver’s door.
If the car is equipped with a programmable
driver’s seat, the settings of the door mirrors
can also be stored in the preset buttons for
the seat (see page 20). The door mirrors are designed to fold back
if knocked. They can also be fully retracted
for parking in tight spaces, such as on the
car deck of a ferry. Remember to fold them
out again before driving off.Cars equipped with a programmable
driver’s seat3 also have the ability to angle
the passenger’s mirror down when revers-
ing, e.g. for a better view of the curb.
1 Select reverse.
2 Press the tiny button adjacent to the
doormirror switch to tilt the mirror. The
mirror will be reset automatically when
reverse gear is deselected.
The mirror glass can also be adjusted man-
ually by gently pressing the glass in the
desired direction.
The mirrors are heated, and the heating
comes on and goes off with the rear-window
heater.
NOTICEThe door mirrors should be fully retracted
before the car enters an automatic car
wash.Door mirror folded in
IB568
Button for angling passenger’s mirror
down when reversing
Adjusting the door mirrors 1 Select mirror
2 Use touch pad to adjust mirror 95_U S _M 07.book Page 117 Friday, June 9, 2006 8:58 AM
ProCarManuals.com
Page 120 of 288

120 Interior equipment and trunkGate Operator / Canadian Programming
Canadian radio-frequency laws require
transmitter signals to "time-out" (or quit)
after several seconds of transmission -
which may not be long enough for the
garage opener to pick up the signal during
programming. Similar to this Canadian law,
some U.S. gate operators are designed to
"time-out" in the same manner.
If you live in Canada or you are having diffi-
culties programming a gate operator by
using the "Programming" procedures
(regardless of where you live), replace
"Programming " step 4 with the following:
Note: If programming a garage door opener
or gate operator, it is advised to unplug the
device during the "cycling" process to pre-
vent possible overheating.
Continue to press and hold the button while
you press and release - every two sec-
onds ("cycle") your hand-held transmitter
until the frequency signal has successfully
been accepted by the garage opener. (The
indicator light will flash slowly and then rap-
idly.)
Proceed with "Programming" step five to
complete.Reprogramming a single button
To program a device to the garage opener
using a button previously trained, follow
these steps:
1 Press and hold the desired button. DO
NOT release the button.
2 The indicator light will begin to flash after
20 seconds. Without releasing the but-
ton, proceed with "Programming" -
step 3.Erasing the three buttons
To erase programming from the three but-
tons (individual buttons cannot be erased
but can be "reprogrammed" as outlined
below), follow the step noted:
Press and hold the two outer buttons until
the indicator light begins to flash-after
20 seconds. Release both buttons. Do
not hold for longer that 30 seconds. The
garage opener is now in the train (or learn-
ing) mode and can be programmed at any
time beginning with "Programming" -
step 3.NOTICESwitch off the power supply to the garage
door or gate (or park the car beyond the
range of the remote control) while pro-
gramming using the "cycling" method to
prevent damaging the electrical motor.95_U S _M 07.book Page 120 Friday, June 9, 2006 8:58 AM
ProCarManuals.com