ECU SAAB 900 1986 Service Manual
[x] Cancel search | Manufacturer: SAAB, Model Year: 1986, Model line: 900, Model: SAAB 900 1986Pages: 133, PDF Size: 11.74 MB
Page 9 of 133
Downloaded from www.Manualslib.com manuals search engine Technicai descnprron 800-3
Headllnlng
The h6adlining ls secur€d to the und6rsides
or the rou. crossmembers. on fte no. 1 andno. 4 crossnembers it is h€td an ptace byboth double,sided adh€sive iape and sc.ews
and on $6 no. 2 and no. 3 crossmembers by
m6ans ol plaslic rglain€r slrips. Ih€ bdck ol
the headlining is secured by press studs .nd
Hydraulics
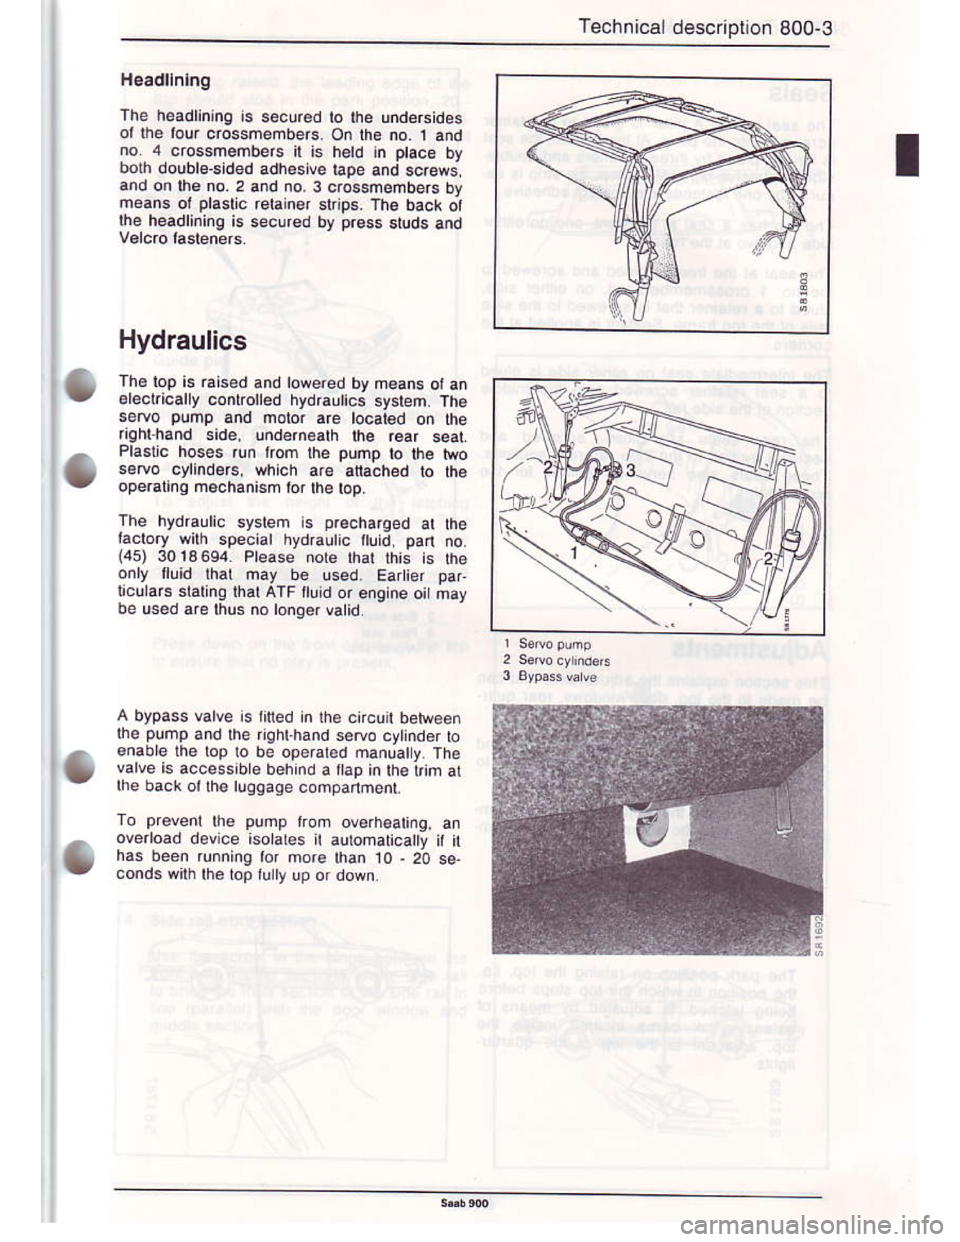
Th6lop is raised and lowered by h€an! ot a.
.lectrically controlred hydraulics system. The
setoo pump and moio. are tocai€d on the
ightnand side, undernoath th€ rear seatPlastic hoses run tlom lhe pump to the htro
setuo cylinders, which ar€ atached to lha
operatng mechanism lor lhe top.
The hydrautic systen is precha.ged al $eractory wilh special hydGutic fluid 9a.t no.(45) 3014604. Please nore lhar rhis is rh.
only ttuid lhal may be !sed. Eartier par
ricurars staring rharATF ud or eng'ne ortmay
be us€d are lhus no longer ,alrd
A bypass valve is titted in lhe ci.cuit bolw€en
rhe PUmp and lhe nghlhand s
enabre lhe lop Io be operatod manuaty The
vaNe is accessible behind a lap in lhelim ar
lhe back ollhe ruoqaqe companoenr
To prevent the pump ftoh overheating, an
overload devce isolales it aulomaticatty it ithas been runninq tor more than 10 - 20 seconds with lhe top lulry up or down
.A
Page 10 of 133
Downloaded from www.Manualslib.com manuals search engine 800-4 Technical descriplion
Seals
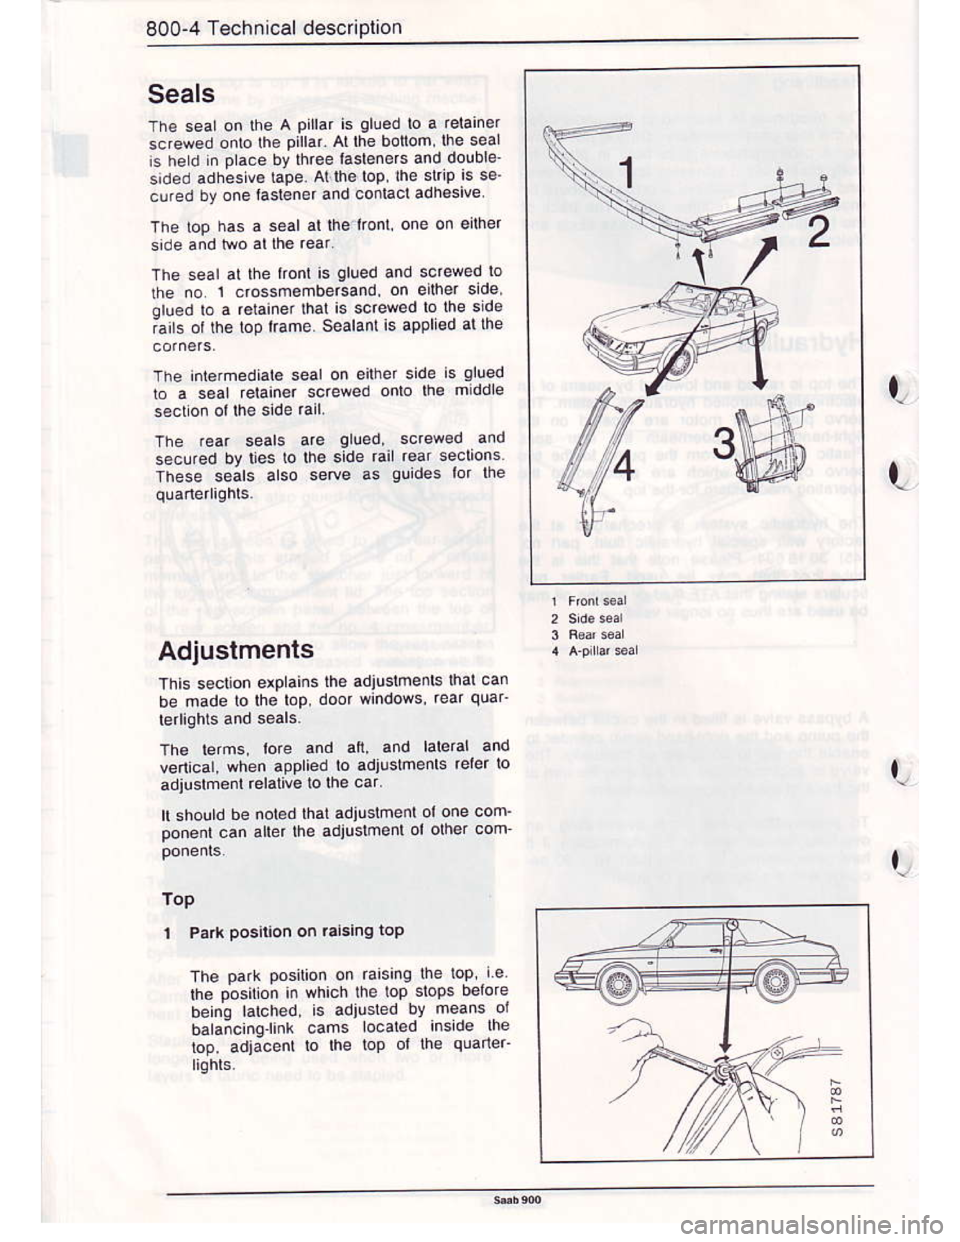
The seal on the A pillar is glued lo a retainer
scfew€d onlo lh€ p'llar Ai lhe bonom.lhe seai
'5 herd 'n prace by rhree lasle
sided adhesiv. tape. At$6top,lhe slrrp is se'
cured by one lastBner and co acladhesive
The lop has a seal al lhel.od one on eilh€r
side and lwo atlhs reat.
The seal at $e tont is glued and screw€d to
$e no 1 crossmombersand, on eith6r slde
orued b a retainer lhal ie screwad lo the side
;ails ot the top lrame. Sealdnl is appliBd atlhe
The iniemediata seal on eilher side is glued
ro a s€al retainer sc.ewed onlo lhe middle
The .ear seals 8re gl!6d, scr4€d and
secured by li€s lo lh€ side rail r€ar seclions
These seals also setoe as quid6 lor IneI
t
t,
L
Adiustments
This s€clion exDbins lhe adiusltneds mal can
be made lo lh€ top, door windows, rea. quaF
Th. tenE. lore a.d all, and lated and
ve,lical, when applied to adjustm€nE rerer io
adju ment relaliv€ to lhe car'
ll should be nol€d lhal adiustmenl ol one com_
ponont 6an afier lhe adiushenl ol oth€r com
i P.rr P@iton o. r.ising toP
The oark Dosilion on raising lhe top. i€
lh6 oosilion in qhich the top sloF bolore
belno larched, is adiusled bv means or
bala;c'n9.link cams locarad inside lhe
bp, adjacenl to lhe top ol $e quaner
Page 11 of 133
Downloaded from www.Manualslib.com manuals search engine Technrcal descnptron 800-5
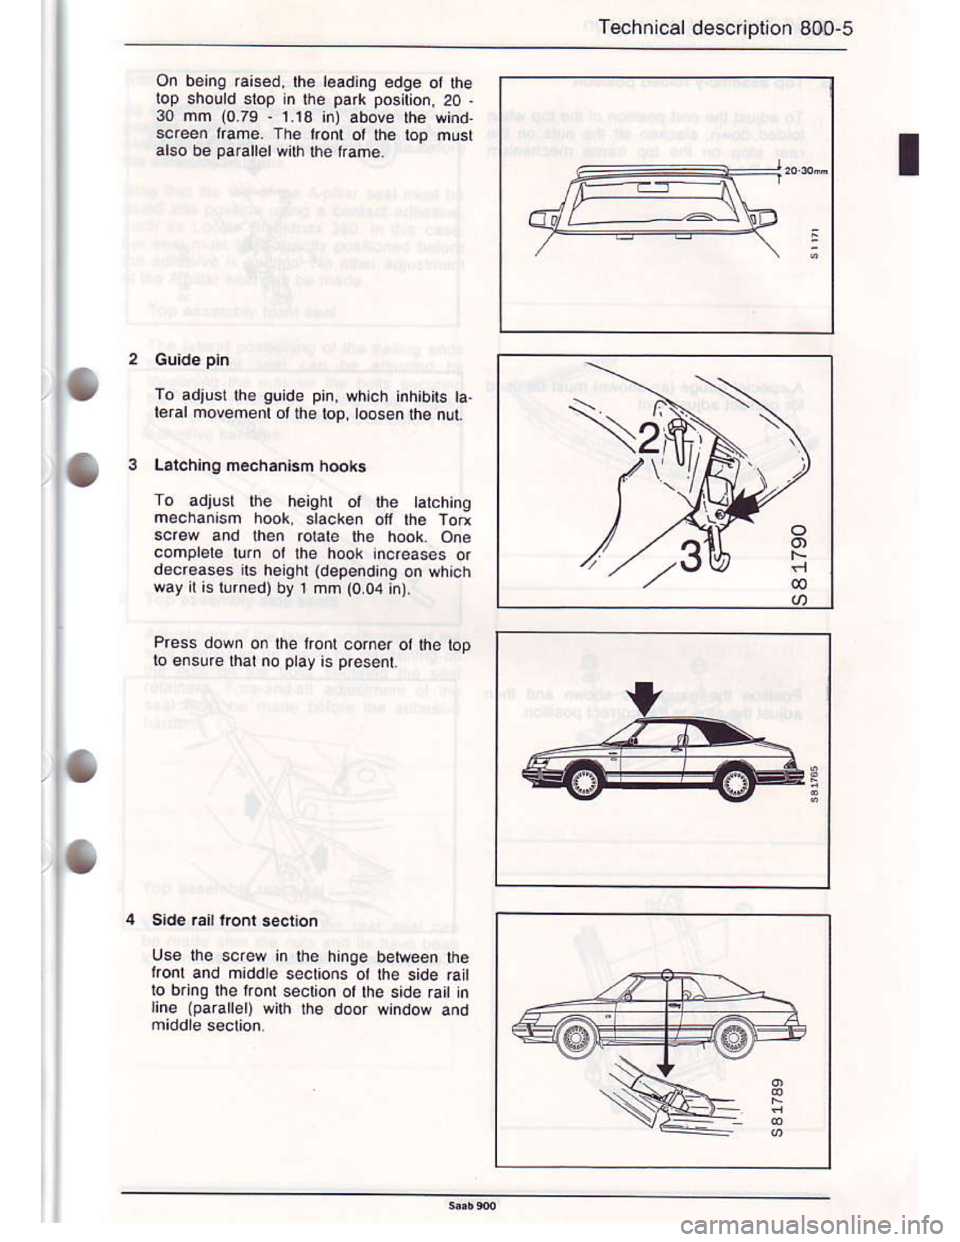
on belng raised, lh6 l€ading edqe ot he
lop sholld slop in lhe park poslion, 20 -
30 mm (0.79 . 1 13 in) above Ihe wind
screen rrame. The rronr ot rhe rop must
also be parallelwilh the lrame
To adjusr rhe guide pin, which inhrbits ta.
€rar movemenr olhe lop. toosen the nul
Lalchinq mechanlsm hoo*s
Io adjusl rhe heiohr ot rhe tar.hing
mechansm hook. slacken ott lhe Tod
rotale $e hook One
complele lurn or lhe hook increases ordecrerses rs heqhr ldependng on which
way rt rs turned) by 1 mm (0.04 in)
Press dow. on the tront corner ot lhe lop
lo ensure that no play is presenl
in rhe hinge beMeen the
Ironl and middle secuons ol rhe s'de ral
to bring lhe iionl se.lion or the side rait n
line (parallel) with lhe door windor and
Page 13 of 133
Downloaded from www.Manualslib.com manuals search engine T€chnical description 800-7
As a geno€l rule, atts6ats hust be gtu€d 'n|opos'rion u5in9 3M super weaher.ho Adh6.sjv€, wirh .ny adjustment b€inq nad; b€tore
NoLe lhat rhe rop or lhe Atilar s€at musl begfued nlo posi0on usino a contact ddhesNe,
such as Loctile glackhax 3a0. In tis case,$e s€ar musl be cor€c y positionad betora[lo adhesive is applied. No olher adtush€nl
ol lhe A'pillar sealcan b€ made.
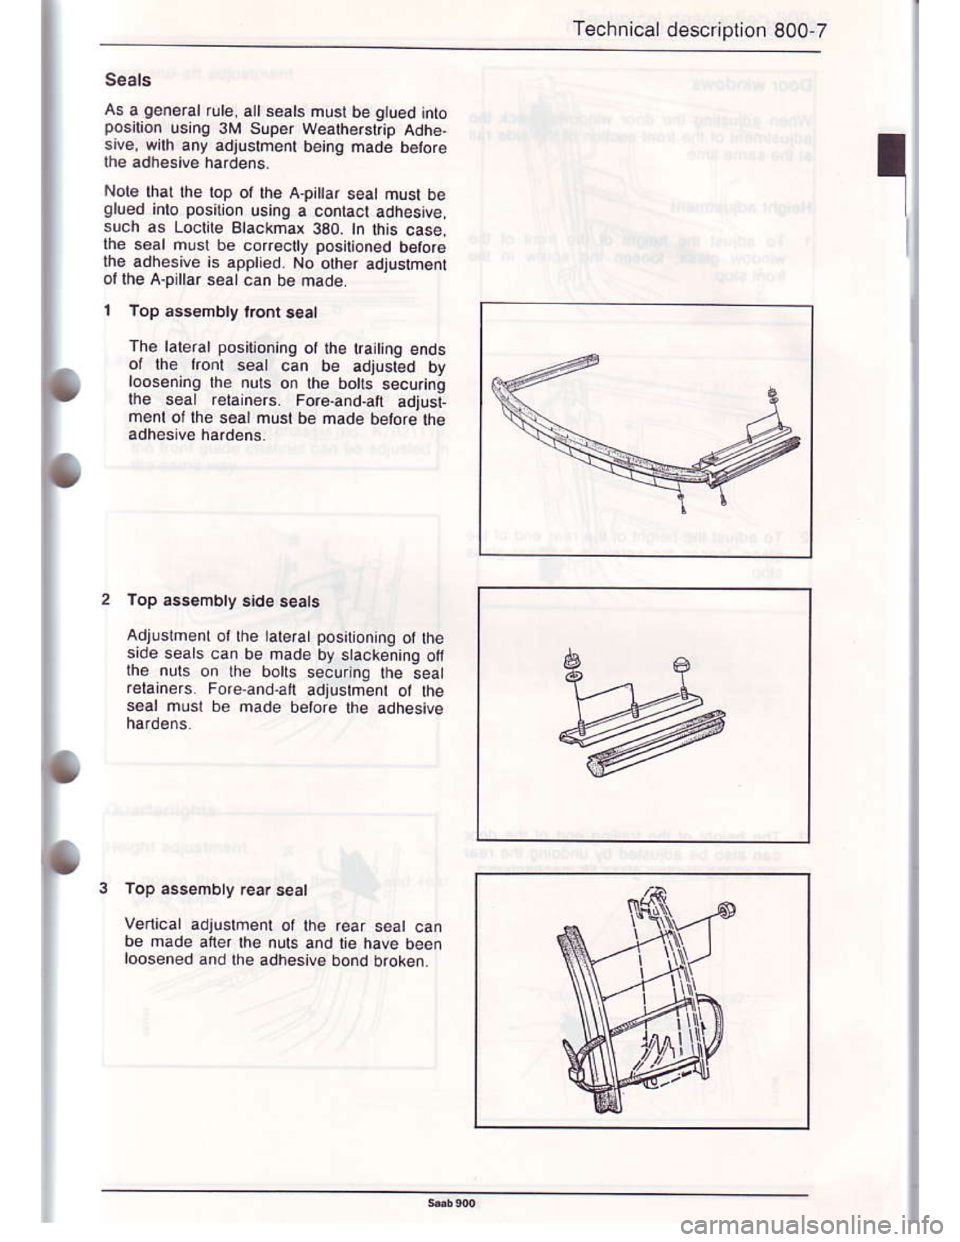
1 Top a3!.Ebty tronr .€61
rh€ lale/at positionrng ot tl€ tra't'ng ends
or |ne rronl se.l can be adusl€d bt
roosanhg lh6 nuts on th6 botd securina
lhe soal r€tainers. Foreand,aft adjusi-m€nl otlhe s€al mustbe nade betoro th€
lop as$mbly stde 3€ats
Adjusrmenr or rhe talerar posilroning or the
s'de seaE can be nad€ by slacleninq onlhe nuls on lh€ bolts securinq lhe seal
rerarners. Fore.and.aft adjuslmed ot rhe
s€ar mlsl bo made betore lhe adhesivo
lop assembly rear se.l
verlical adjuslment ot lhe rear seat canb6 made after lh€ nuts and o have beenr@sened and the adhesiv€ bond broken.
W
A*
Stl
Page 16 of 133
Downloaded from www.Manualslib.com manuals search engine 800-10 Technical description
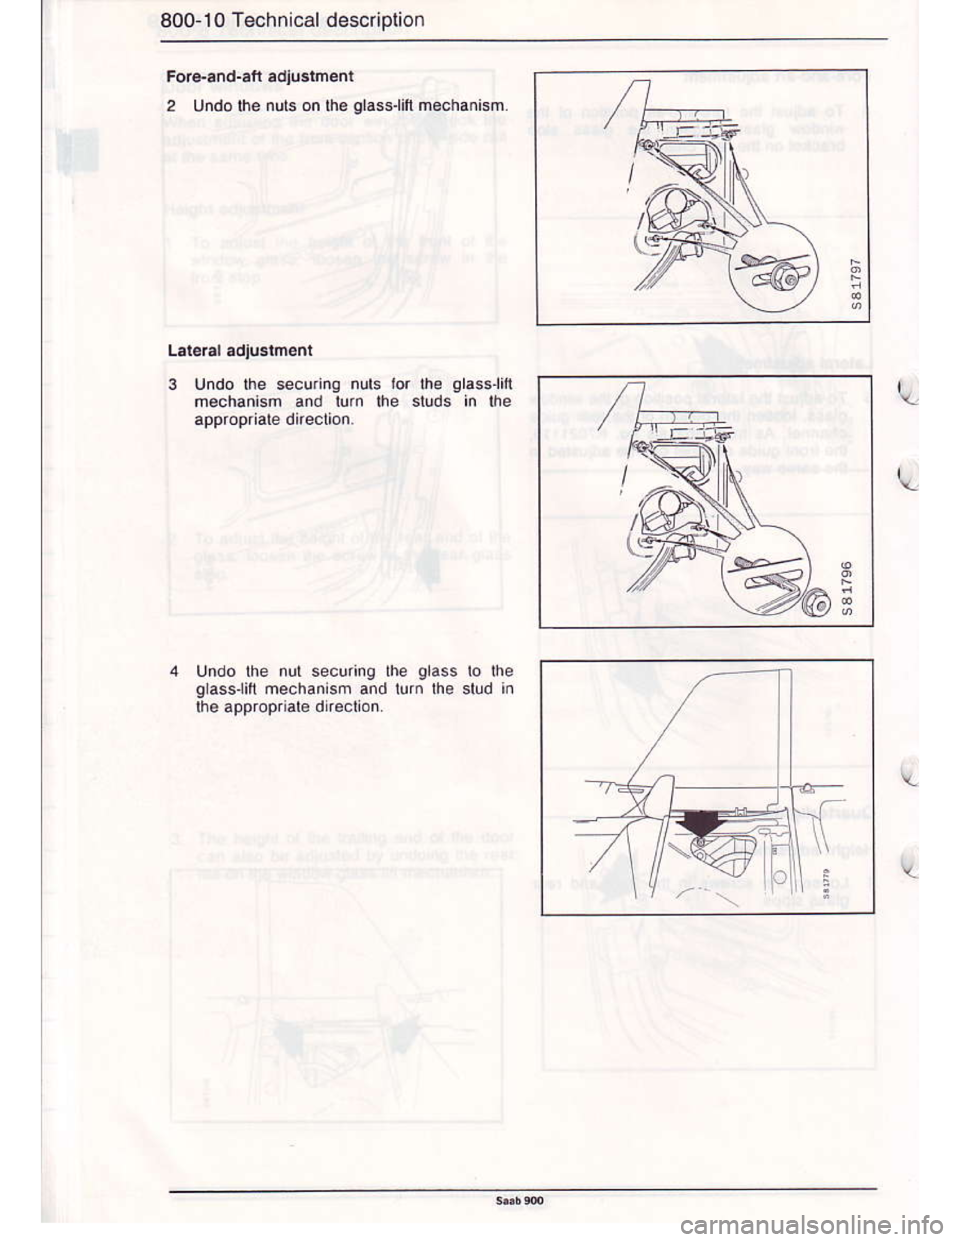
Fo.€-6nd-afi adiustm€nl
2 Undolhe nuts on lhe glass.lift mechanism.
3 Undo lhe secutng nuts lor l-\e glass.li,l
h€chanism and ium lhe sluds in lhe
appropriate dteclion.
4 Undo lhe nul securinq the glass lo lhe
glasslin mechanism and lum the slud in
lhe appropriare direclon
\
-4
Page 26 of 133
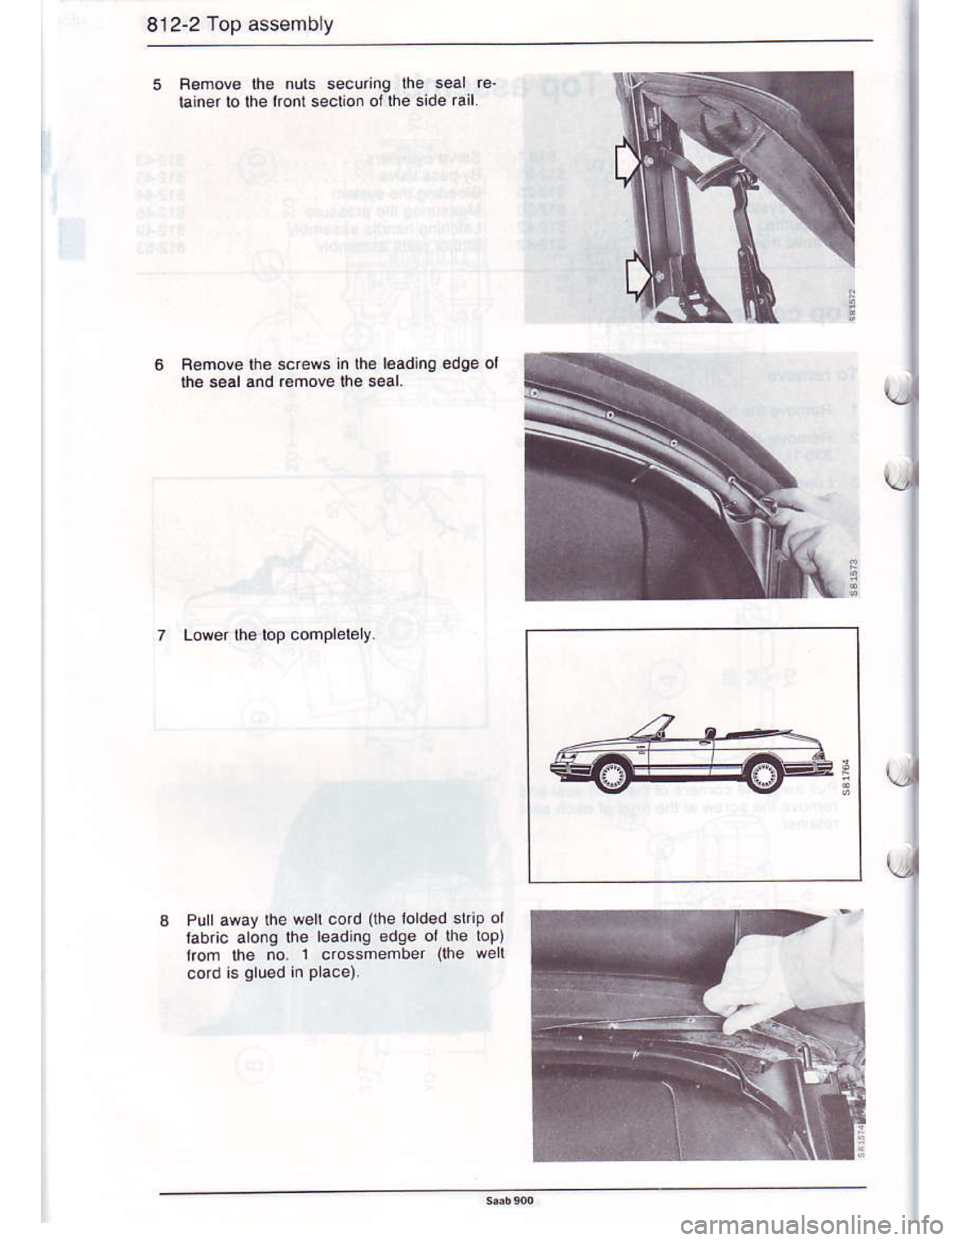
Downloaded from www.Manualslib.com manuals search engine 812-2 Top assembly
Aemov€ the fluls secuino lhe seal 16.
iainer lo lhe lronl seclion ol the side rail.
ReFov€ lhs sdews in lh6 l6adin0 edge ol
tie sealand remov€ lhe seal.
Lower lhe top comPlelery.
Pull away the welt cord (lhe lolded sl p ol
labric along the teading edge ol lhe top)
rrom $e no. 1 crossmembet ilh€ w€lt
i
Page 30 of 133
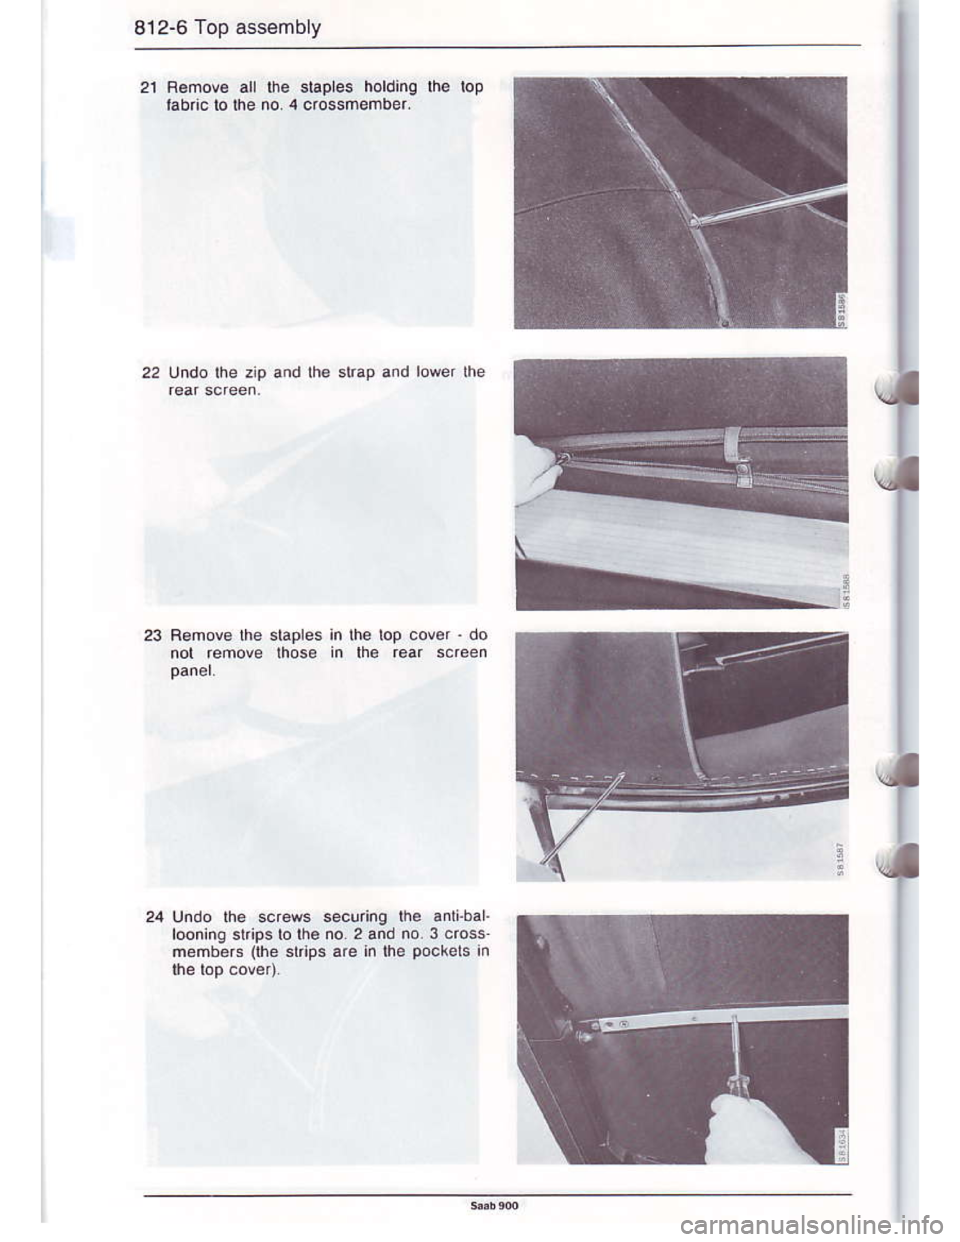
Downloaded from www.Manualslib.com manuals search engine 812-6 Top assembly
staples holding lhe lop
.i
24 Undo the scr6ws secu.ing lh. anlibar.
l@ning stripslo lhe no.2 and no. 3 cross
nohbers (he $ips are in lhe pockeE in
Page 38 of 133
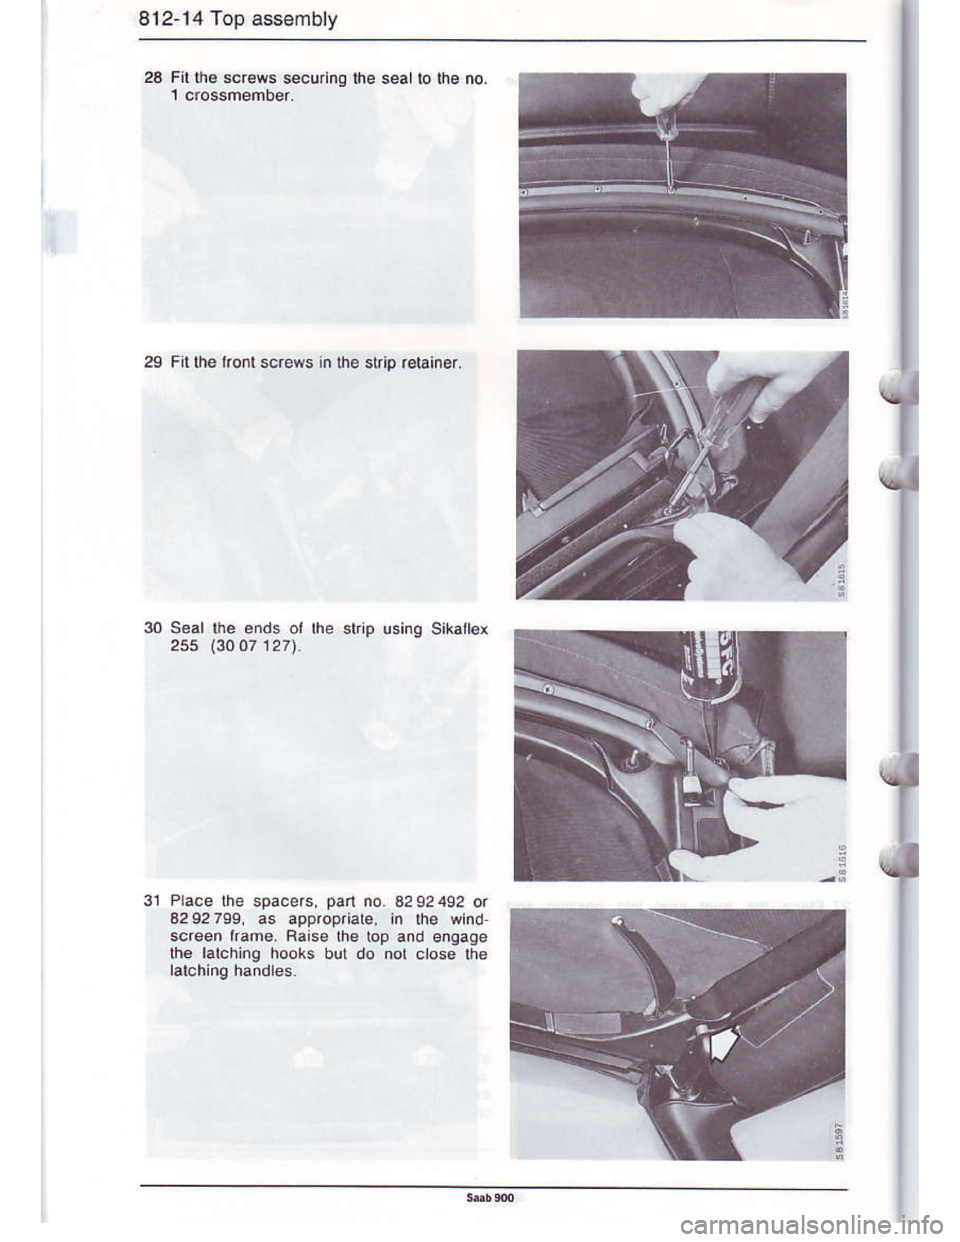
Downloaded from www.Manualslib.com manuals search engine 8t2-14 Top assembly
28 Fil ols scr€ws securlnO |ne sealto lhe no.
29 Flllhe ko scr€ws in the strip r€tainer.
30 S€al [h. ends ol the stip usinq Sikallq
255 (3OO712J).
31 Place lh€ space6, pan no. a292492 ol
429?7S9. as appropriale, an he wind-
screen lram€. Rais€ lhe top and enoage
lhe lalching hools bul do not close $i
Page 41 of 133
Downloaded from www.Manualslib.com manuals search engine Top assemb y 812-17
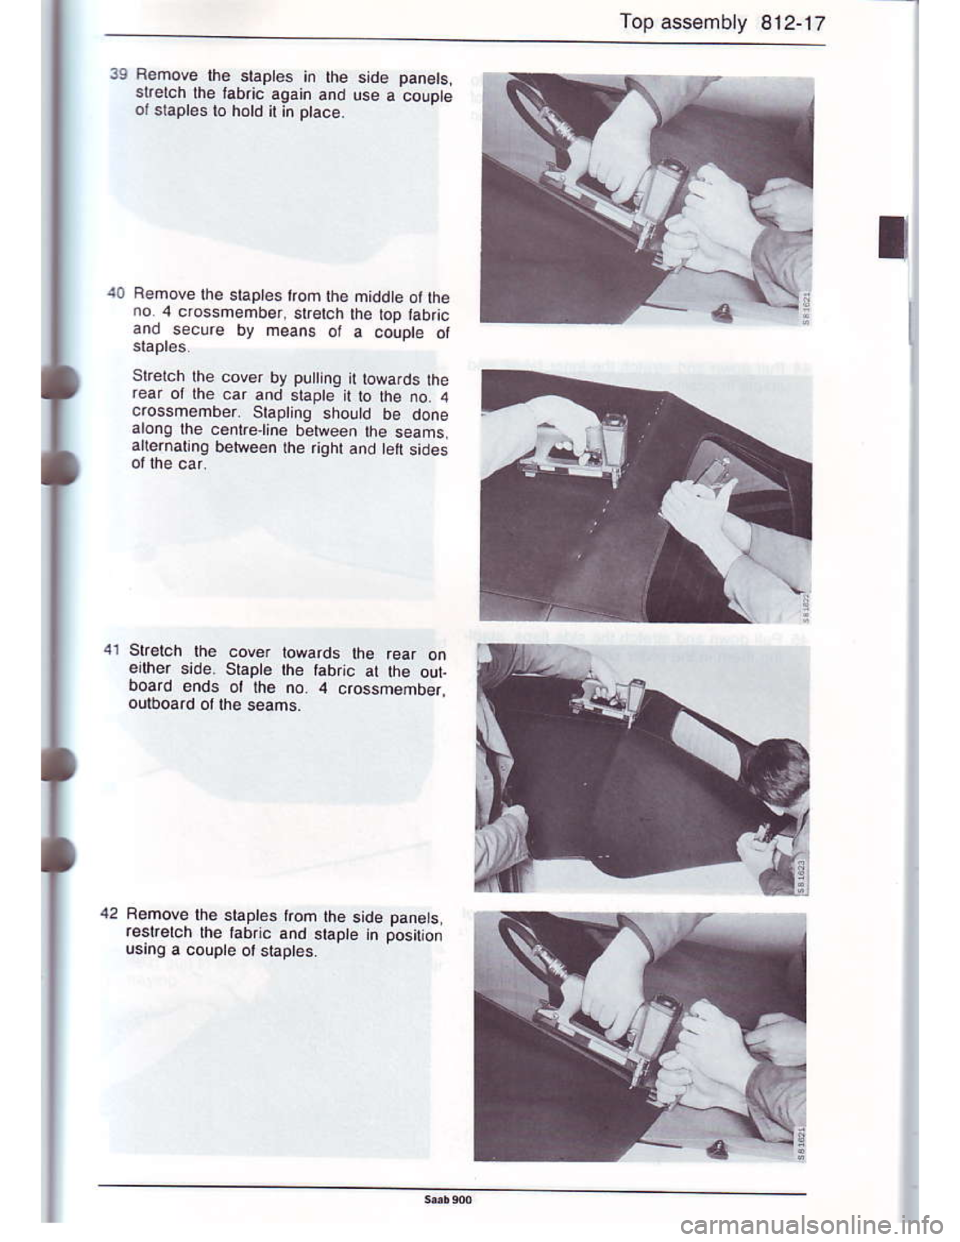
39 Remove lhe staptes in the side panels
srerch lhe tabric aqain and use a couDteoJ slaples to hotd it in ptace.
t0 Remove rhe sraples trom rhe middte ofiheno..4 cfossmember srelch the bp,abricano secure by means ot a coupte oi
srerch lhe cover by putinq it towards therear or the car and siaote il to lhe no. 4crossmember slapti.9 should be donearong lhe cenlrellno between the seamsa(ernarrno berween the righr and en sides
41 Slretch rhe cover lowards lhe rear onerlher side shpte the fabic ar rhe oul
lhe no 4 crossmember,ourboard ol rhe seams
42 Remove lhe staptes trom lhe side panels
,esrerch the tabrtc and sbpte n position
usrng a coupre or sraptes
Page 45 of 133
Downloaded from www.Manualslib.com manuals search engine Top assembly 812-2i
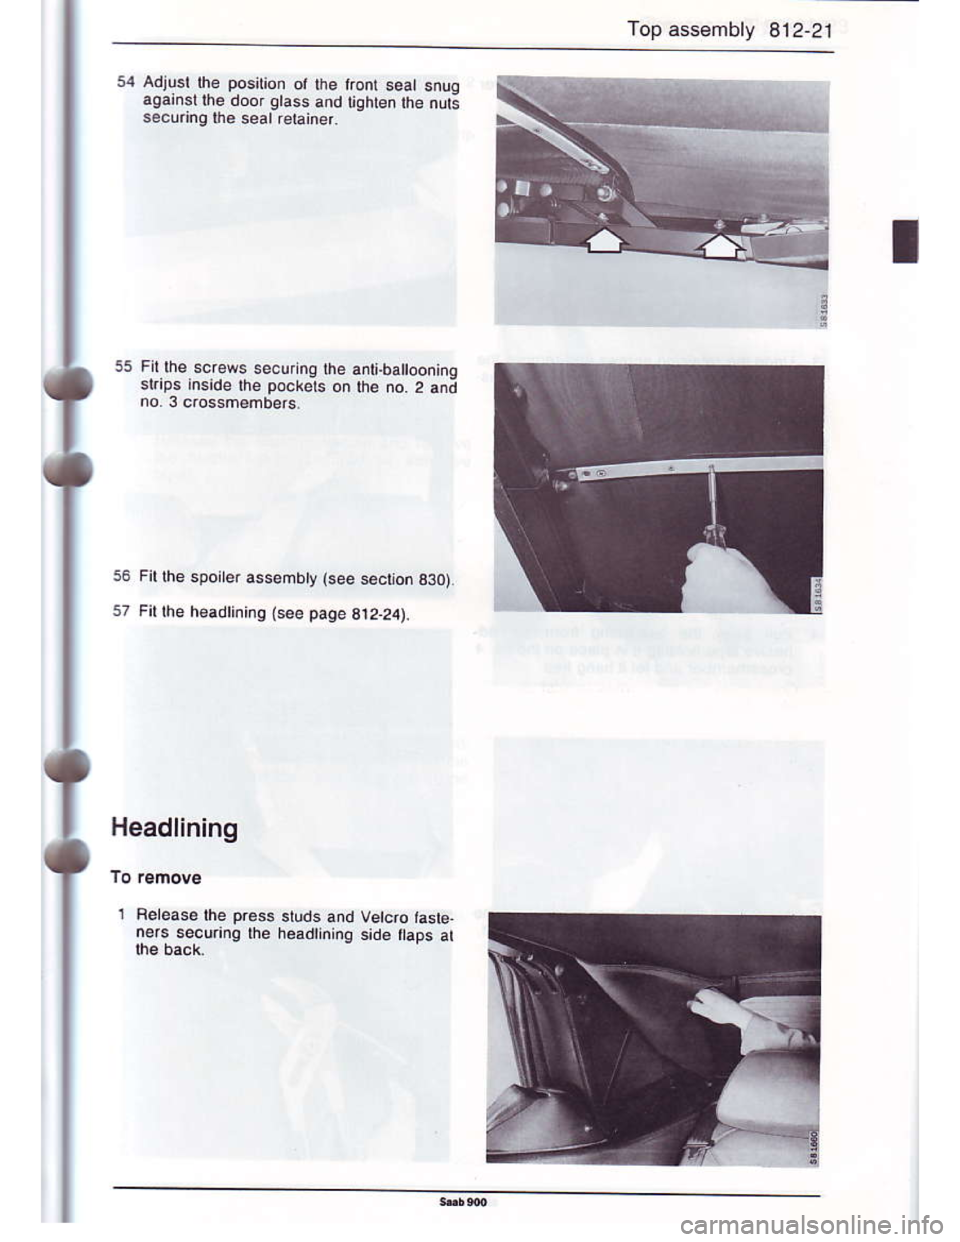
54 Adjusl the position ot lhe
agarnsl |ne door glass and
secunnq|nesealreIainer.
q
55 Fir lhe screws securnq lhe anx.ba oonrnaslrips inside the pocrets on lh€ no 2 an;no.3 c.ossm€mbe.s
56 Fil lhe spoiler assembty (see soction B3O)
s7 Fil ihe h€adlininq (see page B12.Aa).
Headlining
1 Feleaselhe prese studs and vetdo taslenss sekcu.ing lhe h6adtining sid6 flaps al