torque SATURN ASTRA 2008 Owners Manual
[x] Cancel search | Manufacturer: SATURN, Model Year: 2008, Model line: ASTRA, Model: SATURN ASTRA 2008Pages: 304, PDF Size: 1.92 MB
Page 164 of 304

Leaving Your Vehicle with the
Engine Running
{CAUTION
It can be dangerous to leave the
vehicle with the engine running.
The vehicle could move
suddenly if the shift lever is not
fully in P (Park) with the parking
brake �rmly set. And, if you
leave the vehicle with the engine
running, it could overheat and
even catch �re. You or others
could be injured. Do not leave
the vehicle with the engine
running.If you have to leave your vehicle
with the engine running, be sure your
vehicle is in PARK (P) and your
parking brake is �rmly set before you
leave it. After you have moved the
shift lever into PARK (P), hold the
regular brake pedal down. Then, see
if you can move the shift lever away
from PARK (P) without �rst pushing
the button.
If you can, it means that the shift
lever was not fully locked in
PARK (P).
Torque Lock
If you are parking on a hill and you
do not shift your transmission into
PARK (P) properly, the weight of the
vehicle may put too much force on
the parking pawl in the transmission.
You may �nd it difficult to pull the
shift lever out of PARK (P).This is called torque lock. To prevent
torque lock, set the parking brake
and then shift into PARK (P) properly
before you leave the driver’s seat.
To �nd out how, seeShifting Into
Park on page 8-11.
When you are ready to drive, move
the shift lever out of PARK (P)before
you release the parking brake.
If torque lock does occur, you may
need to have another vehicle
push your vehicle a little uphill to
take some of the pressure from the
parking pawl in the transmission,
so you can pull the shift lever out of
PARK (P).
8-12 Driving and Operating
ProCarManuals.com
Page 214 of 304

Rear disc brake pads do not have
built-in brake pad wear indicators.
Periodic visual inspection of the rear
brake pads is required to determine
when to replace the pads. Visually
inspect the rear brake pads
whenever the rear wheels are
removed such as during tire rotation.
1. Set the parking brake and make
sure that the brakes have been
given enough time to cool.
2. Remove the rear wheels.
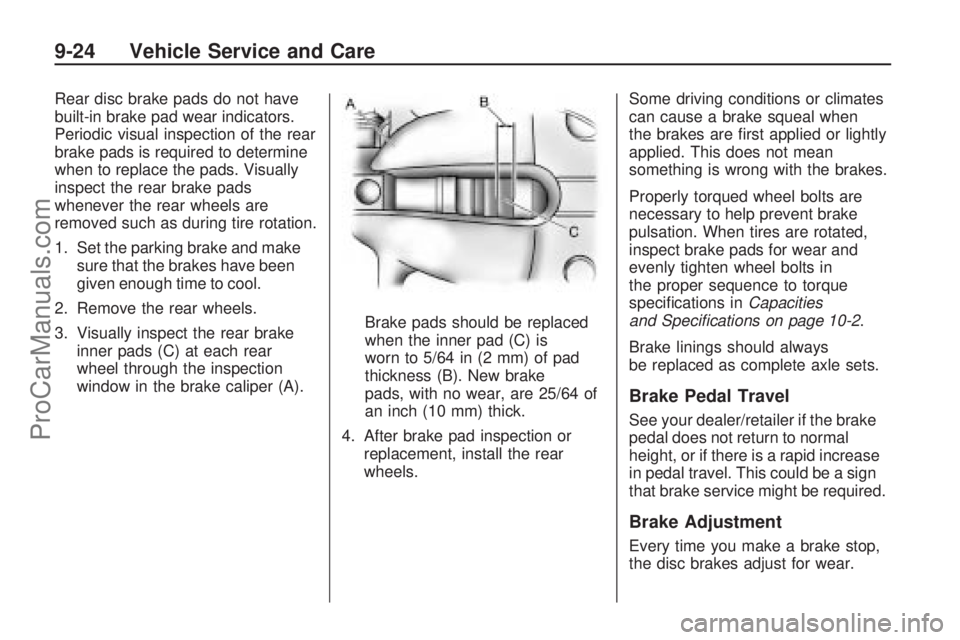
3. Visually inspect the rear brake
inner pads (C) at each rear
wheel through the inspection
window in the brake caliper (A).Brake pads should be replaced
when the inner pad (C) is
worn to 5/64 in (2 mm) of pad
thickness (B). New brake
pads, with no wear, are 25/64 of
an inch (10 mm) thick.
4. After brake pad inspection or
replacement, install the rear
wheels.Some driving conditions or climates
can cause a brake squeal when
the brakes are �rst applied or lightly
applied. This does not mean
something is wrong with the brakes.
Properly torqued wheel bolts are
necessary to help prevent brake
pulsation. When tires are rotated,
inspect brake pads for wear and
evenly tighten wheel bolts in
the proper sequence to torque
speci�cations inCapacities
and Specifications on page 10-2.
Brake linings should always
be replaced as complete axle sets.
Brake Pedal Travel
See your dealer/retailer if the brake
pedal does not return to normal
height, or if there is a rapid increase
in pedal travel. This could be a sign
that brake service might be required.
Brake Adjustment
Every time you make a brake stop,
the disc brakes adjust for wear.
9-24 Vehicle Service and Care
ProCarManuals.com
Page 242 of 304

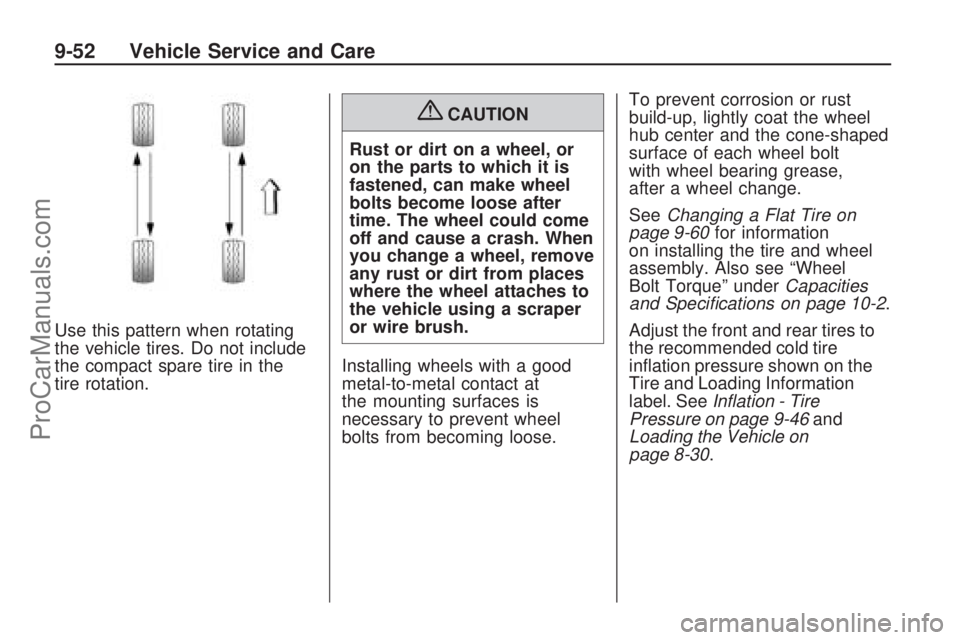
Use this pattern when rotating
the vehicle tires. Do not include
the compact spare tire in the
tire rotation.
{CAUTION
Rust or dirt on a wheel, or
on the parts to which it is
fastened, can make wheel
bolts become loose after
time. The wheel could come
off and cause a crash. When
you change a wheel, remove
any rust or dirt from places
where the wheel attaches to
the vehicle using a scraper
or wire brush.
Installing wheels with a good
metal-to-metal contact at
the mounting surfaces is
necessary to prevent wheel
bolts from becoming loose.To prevent corrosion or rust
build-up, lightly coat the wheel
hub center and the cone-shaped
surface of each wheel bolt
with wheel bearing grease,
after a wheel change.
SeeChanging a Flat Tire on
page 9-60for information
on installing the tire and wheel
assembly. Also see “Wheel
Bolt Torque” underCapacities
and Specifications on page 10-2.
Adjust the front and rear tires to
the recommended cold tire
in�ation pressure shown on the
Tire and Loading Information
label. SeeInflation - Tire
Pressure on page 9-46and
Loading the Vehicle on
page 8-30.
9-52 Vehicle Service and Care
ProCarManuals.com
Page 255 of 304

9. Place the compact spare tire on
the wheel-mounting surface.
10. Reinstall the wheel bolts with
the rounded end of the bolts
toward the wheel. Tighten each
bolt by hand until the wheel
is held against the hub.
11. Lower the vehicle by turning the
jack handle counterclockwise.
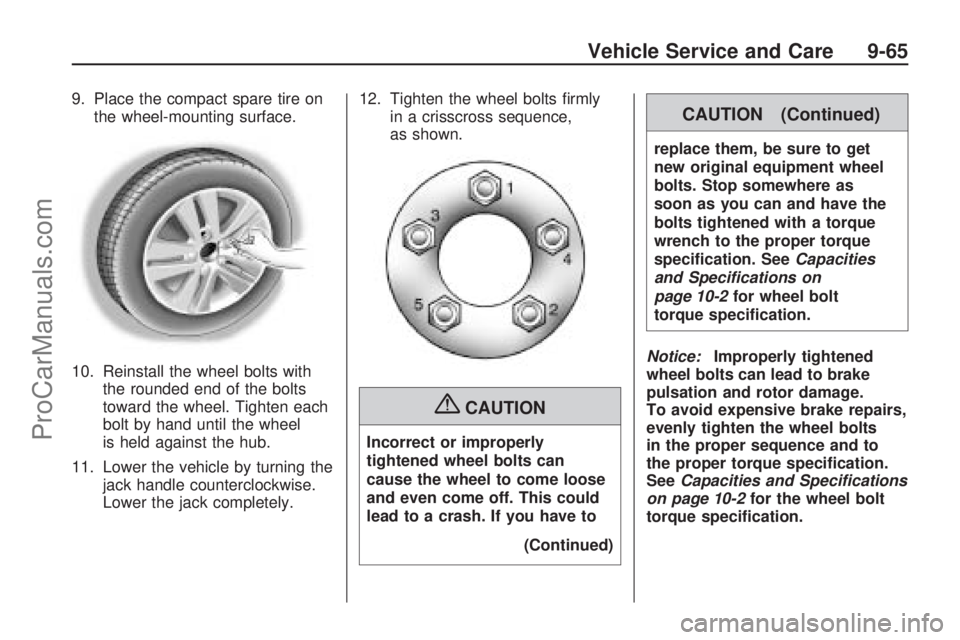
Lower the jack completely.12. Tighten the wheel bolts �rmly
in a crisscross sequence,
as shown.
{CAUTION
Incorrect or improperly
tightened wheel bolts can
cause the wheel to come loose
and even come off. This could
lead to a crash. If you have to
(Continued)
CAUTION (Continued)
replace them, be sure to get
new original equipment wheel
bolts. Stop somewhere as
soon as you can and have the
bolts tightened with a torque
wrench to the proper torque
speci�cation. SeeCapacities
and Specifications on
page 10-2for wheel bolt
torque speci�cation.
Notice:Improperly tightened
wheel bolts can lead to brake
pulsation and rotor damage.
To avoid expensive brake repairs,
evenly tighten the wheel bolts
in the proper sequence and to
the proper torque speci�cation.
SeeCapacities and Specifications
on page 10-2for the wheel bolt
torque speci�cation.
Vehicle Service and Care 9-65
ProCarManuals.com
Page 274 of 304

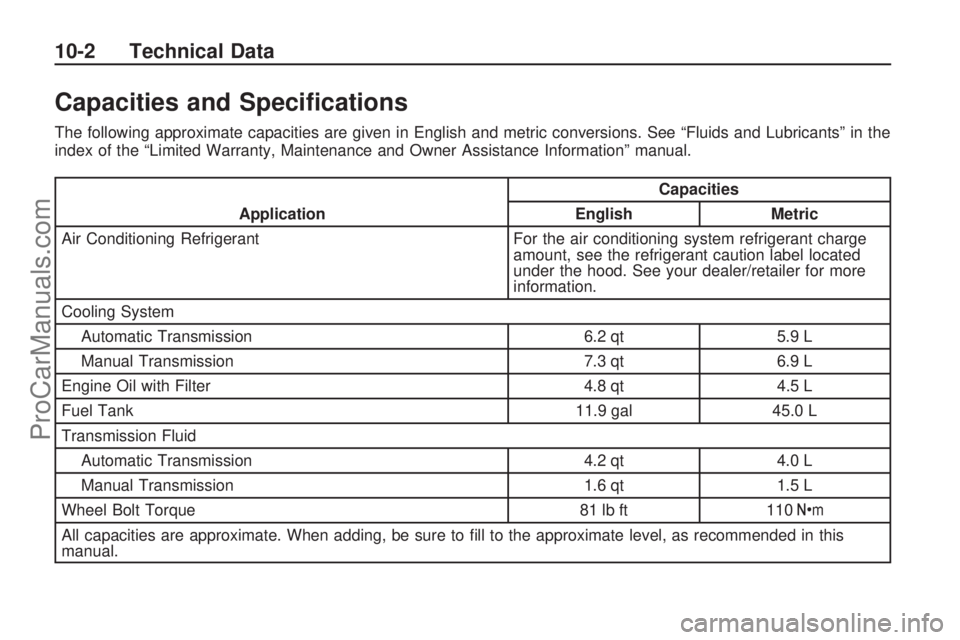
Capacities and Speci�cations
The following approximate capacities are given in English and metric conversions. See “Fluids and Lubricants” in the
index of the “Limited Warranty, Maintenance and Owner Assistance Information” manual.
ApplicationCapacities
English Metric
Air Conditioning Refrigerant For the air conditioning system refrigerant charge amount, see the refrigerant caution label located
under the hood. See your dealer/retailer for more
information.
Cooling System Automatic Transmission 6.2 qt 5.9 L
Manual Transmission 7.3 qt 6.9 L
Engine Oil with Filter 4.8 qt 4.5 L
Fuel Tank 11.9 gal 45.0 L
Transmission Fluid Automatic Transmission 4.2 qt 4.0 L
Manual Transmission 1.6 qt 1.5 L
Wheel Bolt Torque 81 lb ft 110 Y
All capacities are approximate. When adding, be sure to �ll to the approximate level, as recommended in this
manual.
10-2 Technical Data
ProCarManuals.com