buttons SATURN AURA 2010 Owners Manual
[x] Cancel search | Manufacturer: SATURN, Model Year: 2010, Model line: AURA, Model: SATURN AURA 2010Pages: 428, PDF Size: 2.78 MB
Page 24 of 428

bg:Press to silence the vehicle speakers only. Press
again to turn the sound on. Press and hold longer
than two seconds to interact with the OnStar
®or
Bluetooth systems.
c:Press to reject an incoming call, or to end a call.
For more information, seeAudio Steering Wheel
Controls on page 4-82.
Bluetooth®
For vehicles with an in-vehicle Bluetooth system, it
allows users with a Bluetooth enabled cell phone
to make and receive hands-free calls using the vehicle’s
audio system and controls.
The Bluetooth enabled cell phone must be paired with
the in-vehicle Bluetooth system before it can be used in
the vehicle. Not all phones will support all functions.
For more information visit www.gm.com/bluetooth.
For more information, seeBluetooth
®on page 4-68.
Driver Information Center (DIC)
The DIC display is located at the bottom of the
instrument panel cluster. It shows the status of
many vehicle systems and enables access to the
personalization menu.
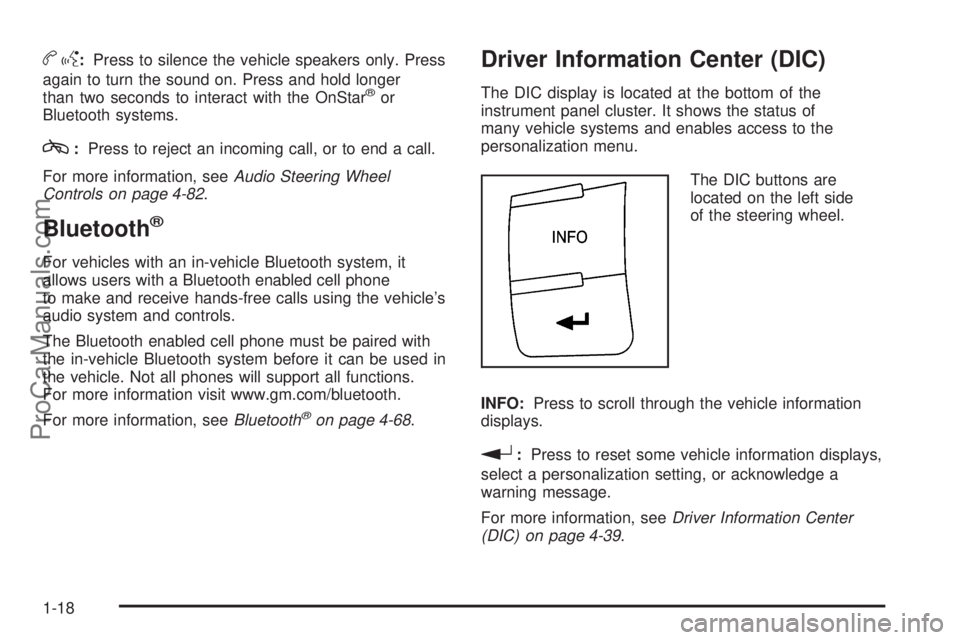
The DIC buttons are
located on the left side
of the steering wheel.
INFO:Press to scroll through the vehicle information
displays.
r:Press to reset some vehicle information displays,
select a personalization setting, or acknowledge a
warning message.
For more information, seeDriver Information Center
(DIC) on page 4-39.
1-18
ProCarManuals.com
Page 25 of 428

Vehicle Personalization
Some vehicle features can be programmed by using the
DIC buttons on the left side of the steering wheel.
These features include:
•Oil Life Reset
•Units
•RKE Lock and Unlock Feedback
•Door Lock and Unlock Settings
•Language
SeeDIC Vehicle Personalization on page 4-46.
Cruise Control
The cruise control buttons
are located on the left side
of the steering wheel.
J:On/Off.
RES+:Press to resume or accelerate speed.
SET−:Press to set or decrease speed.
For more information, seeCruise Control on page 4-7.
1-19
ProCarManuals.com
Page 28 of 428

You may notice during cooler conditions that the low tire
pressure warning light will appear when the vehicle is
first started and then turn off as you drive. This may be
an early indicator that your tire pressures are getting
low and the tires need to be inflated to the proper
pressure.
Note:The Tire Pressure Monitor can alert you about
low tire pressure, but it does not replace normal monthly
tire maintenance. It is the driver’s responsibility to
maintain correct tire pressures.
SeeTire Pressure Monitor System on page 6-53and
Tire Pressure Monitor Operation on page 6-54.
Tire Sealant and Compressor Kit
This vehicle may come with a jack and spare tire or a
tire sealant and compressor kit. The kit can be used
to seal small punctures in the tread area of the tire.
SeeTire Sealant and Compressor Kit on page 6-67for
complete operating information.
Engine Oil Life System
The engine oil life system calculates engine oil life
based on vehicle use and displays a DIC message
when it is necessary to change the engine oil and filter.
The oil life system should be reset to 100% only
following an oil change.
Resetting the Oil Life System
1. Turn the ignition key to ON/RUN with the
engine off.
2. With the CHANGE OIL SOON message displayed,
press either of the DIC buttons to clear the
message. SeeDIC Warnings and Messages
on page 4-42.
3. Display OIL LIFE RESET on the DIC.
4. Press and hold the INFO button for at least one
second. An ACKNOWLEDGED message displays
for three seconds or until the next button is pressed.
This tells you the system has been reset.
SeeDIC Vehicle Personalization on page 4-46.
5. Turn the key to LOCK/OFF.
SeeEngine Oil Life System on page 6-20.
Fuel E85 (85% Ethanol)
If the vehicle has the 2.4L L4 engine (VIN Code 0),
you can use either unleaded gasoline or ethanol
fuel containing up to 85% ethanol (E85). SeeFuel on
page 6-5. In all other engines, use only the unleaded
gasoline described underGasoline Octane on page 6-6.
Vehicles that have the 2.4L L4 engine (VIN Code 0)
have a yellow fuel cap and can use 85% ethanol
fuel (E85). SeeFuel E85 (85% Ethanol) on page 6-8.
1-22
ProCarManuals.com
Page 31 of 428
![SATURN AURA 2010 Owners Manual The OnStar system can record and transmit vehicle
information. This information is automatically sent to an
OnStar call center when
Qis pressed,]is pressed,
or if the airbags or ACR system deploy. Thi SATURN AURA 2010 Owners Manual The OnStar system can record and transmit vehicle
information. This information is automatically sent to an
OnStar call center when
Qis pressed,]is pressed,
or if the airbags or ACR system deploy. Thi](/img/68/58570/w960_58570-30.png)
The OnStar system can record and transmit vehicle
information. This information is automatically sent to an
OnStar call center when
Qis pressed,]is pressed,
or if the airbags or ACR system deploy. This information
usually includes the vehicle’s GPS location and, in
the event of a crash, additional information regarding
the crash that the vehicle was involved in (e.g. the
direction from which the vehicle was hit). When
the virtual advisor feature of OnStar hands-free calling
is used, the vehicle also sends OnStar the vehicle’s
GPS location so they can provide services where it is
located.
Location information about the vehicle is only available
if the GPS satellite signals are unobstructed and
available.
The vehicle must have a working electrical system,
including adequate battery power, for the OnStar
equipment to operate. There are other problems OnStar
cannot control that may prevent OnStar from providing
OnStar service at any particular time or place. Some
examples are damage to important parts of the vehicle
in a crash, hills, tall buildings, tunnels, weather or
wireless phone network congestion.
OnStar Steering Wheel Controls
This vehicle may have a Talk/Mute button that can be
used to interact with OnStar hands-free calling. See
Audio Steering Wheel Controls on page 4-82for more
information.
On some vehicles, the mute button can be used to dial
numbers into voice mail systems, or to dial phone
extensions. See the OnStar Owner’s Guide for more
information.
Your Responsibility
Increase the volume of the radio if the OnStar advisor
cannot be heard.
If the light next to the OnStar buttons is red, the system
may not be functioning properly. Press
Qand request
a vehicle diagnostic. If the light appears clear (no light is
appearing), your OnStar subscription has expired and
all services have been deactivated. Press
Qto confirm
that the OnStar equipment is active.
1-25
ProCarManuals.com
Page 59 of 428

Shoulder Belt Height Adjuster
Your vehicle has a shoulder belt height adjuster for the
driver and right front passenger position.
Adjust the height so that the shoulder portion of the belt
is centered on the shoulder. The belt should be away
from the face and neck, but not falling off of the
shoulder. Improper shoulder belt height adjustment
could reduce the effectiveness of the safety belt
in a crash.
Squeeze the buttons (A)
on the sides of the height
adjuster and move the
height adjuster to the
desired position.
After the adjuster is set to the desired position, try to
move it down without squeezing the buttons to
make sure it has locked into position.
Safety Belt Pretensioners
This vehicle has safety belt pretensioners for the front
outboard occupants. Although the safety belt
pretensioners cannot be seen, they are part of the
safety belt assembly. They can help tighten the safety
belts during the early stages of a moderate to severe
frontal and near frontal crash if the threshold conditions
for pretensioner activation are met. And, if the vehicle
has side impact airbags, safety belt pretensioners
can help tighten the safety belts in a side crash.
Pretensioners work only once. If they activate in a crash,
they will need to be replaced, and probably other new
parts for the vehicle’s safety belt system. SeeReplacing
Restraint System Parts After a Crash on page 2-76.
2-27
ProCarManuals.com
Page 140 of 428

Mirrors
Manual Rearview Mirror
Hold the inside rearview mirror in the center to move it
for a clearer view of behind your vehicle. Adjust the
mirror to reduce the glare of headlamps from behind
you. Push the tab forward for daytime use and pull it for
nighttime use.
There are also three additional OnStar
®control buttons
located at the bottom of the mirror. See your dealer/
retailer for more information on the system and how to
subscribe to OnStar
®. See the OnStar®owner’s
guide for more information about the services OnStar®
provides.
Cleaning the Mirror
Do not spray glass cleaner directly on the mirror. Use a
soft towel dampened with water.
Automatic Dimming Rearview Mirror
The vehicle may have an automatic dimming inside
rearview mirror with a compass display and OnStar®.
Vehicles with OnStar
®have three additional control
buttons located at the bottom of the mirror. See your
retailer/dealer for more information on the system
and how to subscribe to OnStar. See the OnStar
®
owner’s guide for more information about the services
OnStar provides.
O(On/Off):Press to turn the dimming feature on or
off. This button is located on the lower left side of
the mirror.
Automatic Dimming Mirror Operation
Automatic dimming reduces the glare of lights from
behind the vehicle. The dimming feature comes on and
the indicator light illuminates each time the vehicle is
started.
Cleaning the Mirror
Do not spray glass cleaner directly on the mirror. Use a
soft towel dampened with water.
3-32
ProCarManuals.com
Page 143 of 428

Universal Home Remote System
Operation (With Three Round LED)
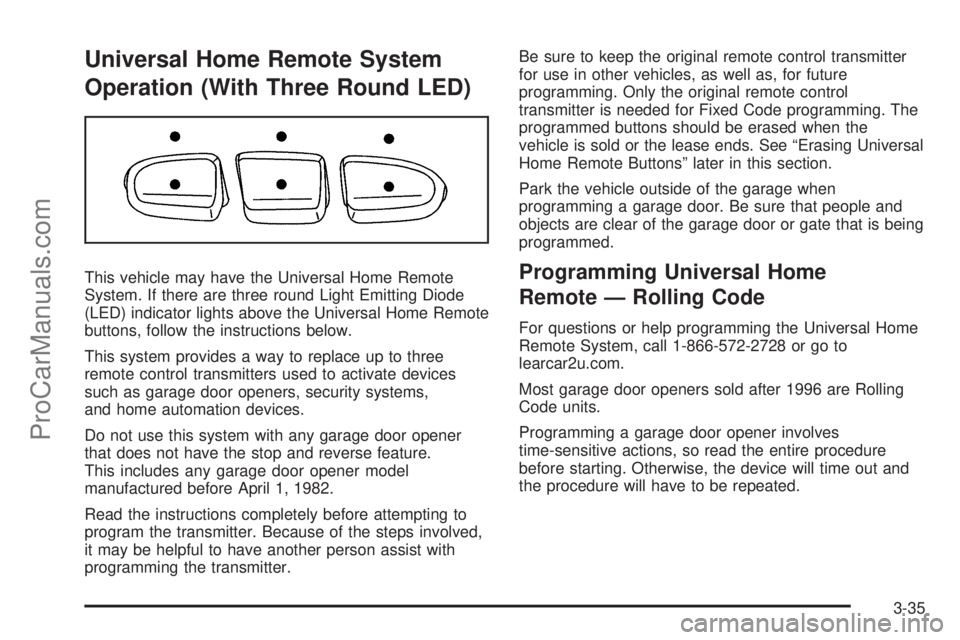
This vehicle may have the Universal Home Remote
System. If there are three round Light Emitting Diode
(LED) indicator lights above the Universal Home Remote
buttons, follow the instructions below.
This system provides a way to replace up to three
remote control transmitters used to activate devices
such as garage door openers, security systems,
and home automation devices.
Do not use this system with any garage door opener
that does not have the stop and reverse feature.
This includes any garage door opener model
manufactured before April 1, 1982.
Read the instructions completely before attempting to
program the transmitter. Because of the steps involved,
it may be helpful to have another person assist with
programming the transmitter.Be sure to keep the original remote control transmitter
for use in other vehicles, as well as, for future
programming. Only the original remote control
transmitter is needed for Fixed Code programming. The
programmed buttons should be erased when the
vehicle is sold or the lease ends. See “Erasing Universal
Home Remote Buttons” later in this section.
Park the vehicle outside of the garage when
programming a garage door. Be sure that people and
objects are clear of the garage door or gate that is being
programmed.Programming Universal Home
Remote — Rolling Code
For questions or help programming the Universal Home
Remote System, call 1-866-572-2728 or go to
learcar2u.com.
Most garage door openers sold after 1996 are Rolling
Code units.
Programming a garage door opener involves
time-sensitive actions, so read the entire procedure
before starting. Otherwise, the device will time out and
the procedure will have to be repeated.
3-35
ProCarManuals.com
Page 144 of 428

To program up to three devices:
1. From inside the vehicle, press the two outside
buttons at the same time for one to two seconds,
and immediately release them.2. Locate in the garage, the garage door opener
receiver (motor-head unit). Locate the “Learn”
or “Smart” button. It can usually be found where the
hanging antenna wire is attached to the motor-head
unit and may be a colored button. Press this
button. After pressing this button, complete the
following steps in less than 30 seconds.
3. Immediately return to the vehicle. Press and hold
the Universal Home Remote button that will be
used to control the garage door until the garage
door moves. The indicator light, above the selected
button, should slowly blink. This button may
need to be held for up to 20 seconds.
4. Immediately, within one second, release the button
when the garage door moves. The indicator light
will blink rapidly until programming is complete.
5. Press and release the same button again. The
garage door should move, confirming that
programming is successful and complete.
To program another Rolling Code device such as an
additional garage door opener, a security device,
or home automation device, repeat Steps 1 through 5,
choosing a different function button in Step 3 than
what was used for the garage door opener.
If these instructions do not work, the garage door
opener is probably a Fixed Code unit. Follow the
Programming instructions that follow for a Fixed Code
garage door opener.
3-36
ProCarManuals.com
Page 147 of 428

2. Write down the eight to 12 switch settings from left
to right as follows:
•When a switch is in the up position, write “Left.”
•When a switch is in the down position, write
“Right.”
•If a switch is set between the up and down
position, write “Middle.”
The switch settings written down in Step 2 now
become the button strokes to be entered into the
Universal Home Remote in Step 4. Be sure to
enter the switch settings written down in Step 2, in
order from left to right, into the Universal Home
Remote, when completing Step 4.
3. From inside your vehicle, first firmly press all three
buttons at the same time for about three seconds.
Release the buttons to put the Universal Home
Remote into programming mode.4. The indicator lights will blink slowly. Enter each
switch setting from Step 2 into your vehicle’s
Universal Home Remote. You will have two and
one-half minutes to complete Step 4. Now
press one button on the Universal Home Remote
for each switch setting as follows:
•If you wrote “Left,” press the left button in the
vehicle.
•If you wrote “Right,” press the right button in the
vehicle.
•If you wrote “Middle,” press the middle button in
the vehicle.
3-39
ProCarManuals.com
Page 148 of 428

5. After entering all of the switch positions, again,
firmly press and release all three buttons at the
same time. The indicator lights will turn on.
6. Press and hold the button that will be used to
control the garage door until the garage door
moves. The indicator light above the selected button
should slowly blink. This button may need to be
held for up to 55 seconds.
7. Immediately release the button when the garage
door moves. The indicator light will blink rapidly
until programming is complete.
8. Press and release the same button again. The
garage door should move, confirming that
programming is successful and complete.
To program another Fixed Code device such as an
additional garage door opener, a security device,
or home automation device, repeat Steps 1-8, choosing
a different button in Step 6 than what was used for
the garage door opener.
Using Universal Home Remote
Press and hold the appropriate button for at least half of
a second. The indicator light will come on while the
signal is being transmitted.
Reprogramming Universal Home
Remote Buttons
Any of the three buttons can be reprogrammed by
repeating the instructions.
Erasing Universal Home Remote
Buttons
The programmed buttons should be erased when the
vehicle is sold or the lease ends.
To erase either Rolling Code or Fixed Code on the
Universal Home Remote device:
1. Press and hold the two outside buttons at the same
time for approximately 20 seconds, until the
indicator lights, located directly above the buttons,
begin to blink rapidly.
2. Once the indicator lights begin to blink, release both
buttons. The codes from all buttons will be erased.
For help or information on the Universal Home Remote
System, call the customer assistance phone number
underCustomer Assistance Offices on page 8-5.
3-40
ProCarManuals.com