display SATURN AURA 2010 User Guide
[x] Cancel search | Manufacturer: SATURN, Model Year: 2010, Model line: AURA, Model: SATURN AURA 2010Pages: 428, PDF Size: 2.78 MB
Page 133 of 428

2. Press the + (plus) paddle located on top of the
steering wheel controls forward to upshift, or
push the backside of the shift paddle rearward to
downshift.The Driver Information Center (DIC) in the instrument
cluster will change from the currently displayed message
to the letter “M”, For Manual position, and a number
indicating the requested gear range when moving
the shift lever forward or rearward.
While using the DSC feature the transmission will have
firmer shifting and sportier performance. You can
use this for sport driving or when climbing hills to stay in
gear longer or to downshift for more power or engine
braking.
The transmission will only allow you to shift into gears
appropriate for the vehicle speed and engine revolutions
per minute (RPM):
•The transmission will not automatically shift to the
next higher gear if the vehicle speed or engine
RPM is too low.
•The transmission will not allow shifting to the next
lower gear if the vehicle speed or engine RPM is
too high.
3-25
ProCarManuals.com
Page 140 of 428

Mirrors
Manual Rearview Mirror
Hold the inside rearview mirror in the center to move it
for a clearer view of behind your vehicle. Adjust the
mirror to reduce the glare of headlamps from behind
you. Push the tab forward for daytime use and pull it for
nighttime use.
There are also three additional OnStar
®control buttons
located at the bottom of the mirror. See your dealer/
retailer for more information on the system and how to
subscribe to OnStar
®. See the OnStar®owner’s
guide for more information about the services OnStar®
provides.
Cleaning the Mirror
Do not spray glass cleaner directly on the mirror. Use a
soft towel dampened with water.
Automatic Dimming Rearview Mirror
The vehicle may have an automatic dimming inside
rearview mirror with a compass display and OnStar®.
Vehicles with OnStar
®have three additional control
buttons located at the bottom of the mirror. See your
retailer/dealer for more information on the system
and how to subscribe to OnStar. See the OnStar
®
owner’s guide for more information about the services
OnStar provides.
O(On/Off):Press to turn the dimming feature on or
off. This button is located on the lower left side of
the mirror.
Automatic Dimming Mirror Operation
Automatic dimming reduces the glare of lights from
behind the vehicle. The dimming feature comes on and
the indicator light illuminates each time the vehicle is
started.
Cleaning the Mirror
Do not spray glass cleaner directly on the mirror. Use a
soft towel dampened with water.
3-32
ProCarManuals.com
Page 141 of 428

Compass
Compass Operation
There is a compass display in the upper right corner of
the mirror.
Press
Oto turn the compass display on or off.
When the ignition and the compass feature are on, the
compass displays the current compass direction,
after a few seconds.
Compass Calibration
The compass can be calibrated by driving the vehicle in
circles at 5 mph (8 km) or less until the display reads
a direction.
If after a few seconds the display does not show a
compass direction, (N for North for example), there may
be a strong magnetic field interfering with the compass.
Interference can be caused by a magnetic antenna
mount, note pad holder, or similar object. If the letter C
appears in the compass window, the compass may
need to be reset or calibrated.
Compass Variance
The mirror is set to zone eight. If you do not live in zone
eight or drive out of the area, the compass variance
needs to be changed to the appropriate zone.To adjust for compass variance:
1. Find your current location and variance zone
number on the following zone map.
2. Press and hold
Ountil the zone number displays.
The number shown is the current zone number.
3. Scroll through the zone numbers that appear in the
window on the mirror by pressing the
Obutton.
Once you find your zone number, release the
button. After about four seconds, the mirror returns
3-33
ProCarManuals.com
Page 142 of 428

to the compass display, and the new zone number
is set. If C appears in the compass window, the
compass may need calibration. See “Compass
Calibration” listed previously.
Outside Power Mirrors
Controls for the outside
power mirrors are located
on the inside of the
vehicle near the driver side
mirror.
Use the selector switch located above the four-way
control panel to choose either the left or right outside
mirror. Then press the control pad to move the selected
mirror in the desired direction.
To maximize the viewing area, adjust each mirror to see
the side of your vehicle and the area beside and
behind your vehicle.
Outside Automatic Dimming Mirror
If the vehicle has this feature, the driver side mirror
adjusts for the glare of headlamps behind you.
Outside Heated Mirrors
For vehicles with heated mirrors:
<(Rear Window Defogger):Press to heat the
mirrors. See “Rear Window Defogger” underClimate
Control System on page 4-16.
Universal Home Remote
System
SeeRadio Frequency Statement on page 8-17for
information regarding Part 15 of the Federal
Communications Commission (FCC) Rules and
RSS-210/211 of Industry and Science Canada.
3-34
ProCarManuals.com
Page 154 of 428
Tire Pressure Light.......................................4-34
Malfunction Indicator Lamp.............................4-34
Oil Pressure Light.........................................4-37
Security Light...............................................4-37
Cruise Control Light......................................4-38
Highbeam On Light.......................................4-38
Fuel Gage...................................................4-38
Driver Information Center (DIC).......................4-39
DIC Operation and Displays...........................4-40
DIC Warnings and Messages.........................4-42
DIC Vehicle Personalization............................4-46Audio System(s).............................................4-50
Setting the Clock..........................................4-51
Radio(s)......................................................4-52
Using an MP3..............................................4-61
XM Radio Messages.....................................4-67
Bluetooth
®...................................................4-68
Rear Seat Audio (RSA).................................4-79
Theft-Deterrent Feature..................................4-81
Audio Steering Wheel Controls.......................4-82
Radio Reception...........................................4-83
Backglass Antenna.......................................4-84
XM™ Satellite Radio Antenna System.............4-84
Chime Level Adjustment................................4-84
Section 4 Instrument Panel
4-2
ProCarManuals.com
Page 160 of 428
RES+ (Resume):Press to resume a set speed and to
accelerate the speed.
SET−(Set):Press to set a speed and to decrease the
speed.
To set a speed do the following:
1. Press
Ito turn cruise control on. The indicator
light on the button comes on.
2. Get up to the desired speed.
3. Press the SET−and release it. The cruise symbol
displays in the instrument panel cluster to show the
system is engaged.
4. Take your foot off the accelerator pedal.
When the brakes are applied, the cruise control
shuts off.
If the vehicle is in cruise control and the Traction
Control System (TCS) begins to limit wheel spin, the
cruise control automatically disengages. SeeTraction
Control System (TCS) on page 5-7. When road
conditions allow, the cruise control can be used again.
Resuming a Set Speed
If the cruise control is set at a desired speed and then
the brakes are applied, the cruise control is disengaged.
But it does not need to be reset. The cruise symbol in
the instrument panel cluster also goes out indicating
cruise is no longer engaged. Once the vehicle speed is
40 km/h (25 mph) or more, briefly press the RES+.
The vehicle returns to the previously set speed
and stays there.
Increasing Speed While Using Cruise
Control
There are two ways to increase the vehicle speed while
using cruise control:
•If the cruise control system is already engaged,
press and hold the RES+ button until the desired
speed is reached, then release it.
•To increase the vehicle speed in small amounts,
briefly press the RES+ and then release it. Each
time this is done, the vehicle goes about 1.6 km/h
(1 mph) faster.
4-8
ProCarManuals.com
Page 165 of 428

Instrument Panel Brightness
The knob with this symbol
is located on the
instrument panel to the left
of the steering column.
Turn the knob clockwise or counterclockwise to brighten
or dim the lights.
Turn the knob completely clockwise to turn on the
interior lamps.
Dome Lamps
The dome lamps come on when any door is opened.
They turn off after all the doors are closed.
The dome lamps can also be turned on by turning the
instrument panel brightness knob, located on the
instrument panel to the left of the steering column,
clockwise to the farthest position. In this position, the
dome lamps remain on whether a door is opened
or closed.
Entry/Exit Lighting
The lamps inside the vehicle come on when any door is
opened. These lamps fade out about 20 seconds
after all of the doors have been closed or when the
ignition is turned to ON/RUN. They also come on when
the unlock symbol button or the horn symbol is
pressed on the Remote Keyless Entry (RKE) system
transmitter.
The lamps inside the vehicle stay on for about
20 seconds after the key is removed from the ignition to
provide light as you exit.
Parade Dimming
Parade dimming is a separate lighting mode that comes
on while the parking lamps are turned on during the
day. It prevents the display lights and indicator
lights from being dim, while the parking lamps are used
during the day.
Reading Lamps
For vehicles with front overhead console and rear
reading lamps, press the lens to turn the lamp on and
off, while the doors are closed. These lamps come
on automatically when any door is opened.
4-13
ProCarManuals.com
Page 166 of 428
Electric Power Management
The vehicle has Electric Power Management (EPM) that
estimates the battery’s temperature and state of
charge. It then adjusts the voltage for best performance
and extended life of the battery.
When the battery’s state of charge is low, the voltage is
raised slightly to quickly bring the charge back up.
When the state of charge is high, the voltage is lowered
slightly to prevent overcharging. If the vehicle has a
voltmeter gage or a voltage display on the Driver
Information Center (DIC), you may see the voltage move
up or down. This is normal. If there is a problem, an
alert will be displayed.
The battery can be discharged at idle if the electrical
loads are very high. This is true for all vehicles. This is
because the generator (alternator) may not be
spinning fast enough at idle to produce all the power
that is needed for very high electrical loads.
A high electrical load occurs when several of the
following are on, such as: headlamps, high beams, fog
lamps, rear window defogger, climate control fan at
high speed, heated seats, engine cooling fans, trailer
loads, and loads plugged into accessory power outlets.
EPM works to prevent excessive discharge of the
battery. It does this by balancing the generator’s output
and the vehicle’s electrical needs. It can increaseengine idle speed to generate more power, whenever
needed. It can temporarily reduce the power demands of
some accessories.
Normally, these actions occur in steps or levels, without
being noticeable. In rare cases at the highest levels
of corrective action, this action may be noticeable to the
driver. If so, a Driver Information Center (DIC)
message might be displayed, such as BATTERY
SAVER ACTIVE, BATTERY VOLTAGE LOW, or LOW
BATTERY. If this message is displayed, it is
recommended that the driver reduce the electrical loads
as much as possible. SeeDIC Warnings and Messages
on page 4-42.
Battery Run-Down Protection
The battery run-down feature is designed to protect the
vehicle’s battery.
When any interior lamp (trunk, reading lamps, or dome
lamp) is left on when the ignition is turned off, the
battery run-down protection system automatically shuts
the lamp off after 20 minutes. This prevents draining
of the battery.
To reactivate the interior lamps, do one of the following:
•Open any door.
•Press any Remote Keyless Entry (RKE) transmitter
button.
4-14
ProCarManuals.com
Page 171 of 428
Remote Start Climate Control Operation
For vehicles with the remote start feature, when it
is activated the climate control system heats or cools
the inside of the vehicle using the modes that were set
before the vehicle was turned off. The climate control
knobs will remain active during a remote start. However,
the climate control buttons will be inactive until the
ignition is turned on by the key. If the fan is off,
the climate control system will not operate during remote
start. SeeRemote Keyless Entry (RKE) System
Operation on page 3-3.
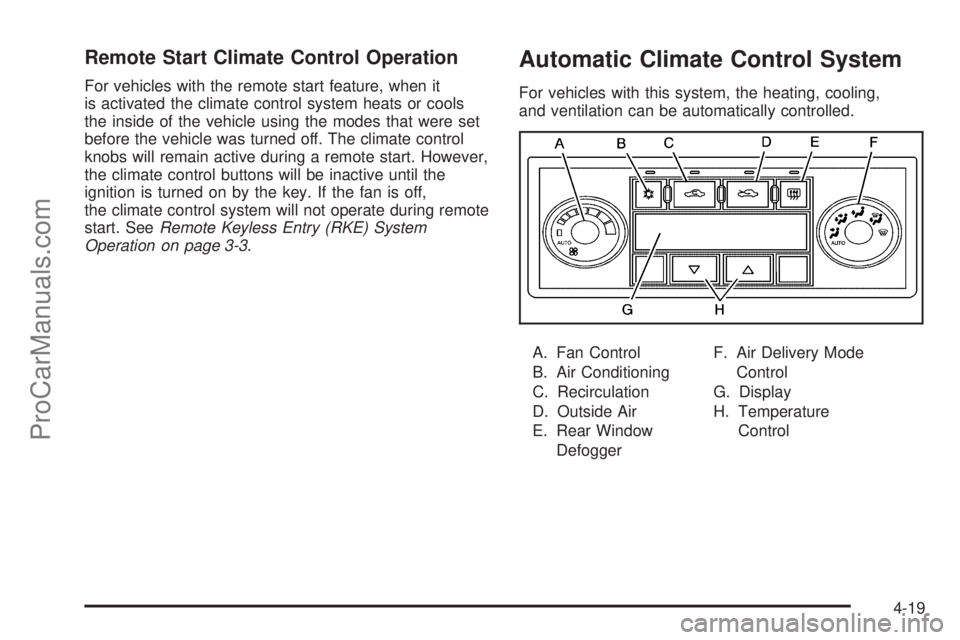
Automatic Climate Control System
For vehicles with this system, the heating, cooling,
and ventilation can be automatically controlled.
A. Fan Control
B. Air Conditioning
C. Recirculation
D. Outside Air
E. Rear Window
DefoggerF. Air Delivery Mode
Control
G. Display
H. Temperature
Control
4-19
ProCarManuals.com
Page 172 of 428
Automatic Operation
AUTO (Automatic):Select AUTO on both the fan
speed control and the air delivery mode control knobs to
activate the automatic system. When automatic
operation is active the system controls the inside
temperature and air delivery.
To place the system in automatic mode do the following:
1. Turn the fan knob and the mode knob to the
AUTO position.
The current set temperature displays. When AUTO
is selected, the air conditioning operation and air
inlet is automatically controlled. The air conditioning
compressor runs while the outside temperature is
over about 40°F (4°C). The air inlet will normally be
set to outside air. If it is hot outside, the air inlet
may automatically switch to recirculate inside air to
help quickly cool down the vehicle.
2. Set the temperature.
An initial setting of 73°F (23°C) is recommended.
Allow about 20 minutes for the system to regulate.
Press
worxto adjust the temperature setting
as necessary. If the temperature is set at 60°F
(15°C) the system remains at the maximum cooling
setting. If the temperature is set at 90°F (32°C)
the system remains at the maximum heat setting.
Choosing either maximum setting does not
cause the vehicle to heat or cool any faster.Do not to cover the sensor located on the top of the
instrument panel near the windshield. This sensor
regulates air temperature based on the intensity
of the sun.
Also do not cover the sensor grille on the lower
right side of the climate control faceplate, as
this regulates the inside temperature.
To avoid blowing cold air at engine start-up in cold
weather, the system delays turning on the fan
until warm air is available. The length of delay
depends on the engine coolant temperature. Turning
the fan knob overrides this delay and changes
the fan to the selected speed.
Manual Operation
9(Off):Select this position on the fan knob to turn off
the entire climate control system. Outside air still
enters the vehicle. The airflow direction and temperature
can be adjusted.
x/wTemperature Control:Press the arrows to
increase or decrease the temperature inside the vehicle.
9(Fan Control):Turn clockwise or counterclockwise
to increase or decrease the fan speed.
Air Delivery Mode Control:Turn clockwise or
counterclockwise to change the direction of the airflow
in the vehicle.
4-20
ProCarManuals.com