lock SATURN AURA HYBRID 2010 Owners Manual
[x] Cancel search | Manufacturer: SATURN, Model Year: 2010, Model line: AURA HYBRID, Model: SATURN AURA HYBRID 2010Pages: 400, PDF Size: 2.46 MB
Page 299 of 400

5. Remove the taillamp assembly.
6. Remove the wiring harness from the taillamp
assembly by lifting the release tab.
7. Turn the bulb socket counterclockwise to remove it.
8. Pull the bulb from the socket.
9. Install a new bulb.
10. Turn the bulb socket clockwise to reinstall.
11. Reinstall the wiring harness and press down on the
release tab.
12. Reinstall the taillamp assembly and turn the three
wing nuts clockwise.
13. Reinstall the trunk trim and wing nuts.License Plate Lamp
To replace the license plate lamp bulb:
1. Remove the license plate assembly by turning the
two screws counterclockwise.
2. Turn and pull the license plate lamp forward
through the fascia opening.
6-41
ProCarManuals.com
Page 300 of 400

3. Turn the bulb socket counterclockwise and pull the
bulb straight out of the socket.
4. Push the new bulb in and turn it clockwise to install.
5. Replace the license plate lamp by pushing it
through the fascia opening.
6. Turn the two screws that hold the license plate
lamp clockwise to reinstall.
Replacement Bulbs
Exterior Lamp Bulb Number
Back-up Lamp 921
License Plate Lamp and Rear
Sidemarker Lamp168
Turn Signal Lamp 3156
For replacement bulbs not listed here, contact your
dealer/retailer.
Windshield Wiper Blade
Replacement
Inspect the windshield wiper blades for wear or cracking.
SeeScheduled Maintenance on page 7-3.
To remove the wiper blade:
1. Pull the windshield wiper arm connector away from
the windshield.
2. Push the release button.
3. Slide the blade forward.
4. Turn the blade toward you and continue to slide
forward to remove.
5. Install the new blade onto the arm connector and
make sure the grooved areas are fully set in the
locked position.
For the proper type and size, seeMaintenance
Replacement Parts on page 7-11.
6-42
ProCarManuals.com
Page 312 of 400

If the TPMS is not functioning it cannot detect or signal a
low tire condition. See your dealer/retailer for service if
the TPMS malfunction light and DIC message comes on
and stays on.
TPMS Sensor Matching Process
Each TPMS sensor has a unique identification code.
Any time you replace one or more of the TPMS sensors
or rotate the vehicle’s tires, the identification codes need
to be matched to the new tire/wheel location. The sensors
are matched, to the tire/wheel locations, in the following
order: driver side front tire, passenger side front tire,
passenger side rear tire, and driver side rear tire using
a TPMS diagnostic tool. See your dealer/retailer for
service.
The TPMS sensors can also be matched to each
tire/wheel position by increasing or decreasing the tire’s
air pressure. When increasing the tire’s pressure, do
not exceed the maximum inflation pressure indicated on
the tire’s sidewall. To decrease the tire’s air-pressure
use the pointed end of the valve cap, a pencil-style
air pressure gage, or a key.
You have two minutes to match each tire and wheel
position. If it takes longer than two minutes to match
any tire and wheel position, the matching process
stops and you need to start over.The TPMS matching process is outlined below:
1. Set the parking brake.
2. Turn the ignition switch to ON/RUN with the
engine off.
3. Press and hold the Remote Keyless Entry (RKE)
transmitter’s LOCK and UNLOCK buttons, at the
same time, for about five seconds to start the TPMS
learn mode. The horn sounds twice indicating the
TPMS receiver is ready and in learn mode.
4. Start with the driver side front tire. The driver side
front turn signal also comes on to indicate that
corner’s sensor is ready to be learned.
5. Remove the valve cap from the tire’s valve stem.
Activate the TPMS sensor by increasing or
decreasing the tire’s air pressure for about
eight seconds. The horn chirp, can take up to
30 seconds to sound. It chirps one time and then
all the turn signals flash one time to confirm the
sensor identification code has been matched to
the tire/wheel position.
6. The passenger side front turn signal comes on to
indicate that corner sensor is ready to be learned.
Proceed to the passenger side front tire and
repeat the procedure in Step 5.
6-54
ProCarManuals.com
Page 313 of 400

7. The passenger side rear turn signal comes on to
indicate that corner sensor is ready to be learned.
Proceed to the passenger side rear tire and
repeat the procedure in Step 5.
8. The driver side rear turn signal comes on to
indicate that corner sensor is ready to be learned.
Proceed to the driver side rear tire, and repeat
the procedure in Step 5.
9. After hearing the single horn chirp for the driver
side rear tire, two additional horn chirps sound
to indicate the tire learning process is done.
Turn the ignition switch to LOCK/OFF.
If no tires are learned after entering the TPMS learn
mode, or if communication with the receiver stops, or
if the time limit has expired, turn the ignition switch to
LOCK/OFF and start over beginning with Step 2.
10. Set all four tires to the recommended air pressure
level as indicated on the Tire and Loading
Information label.
11. Put the valve caps back on the valve stems.Tire Inspection and Rotation
We recommend that you regularly inspect your
vehicle’s tires for signs of wear or damage.
SeeWhen It Is Time for New Tires on page 6-57
for more information.
Tires should be rotated every 5,000 to 8,000 miles
(8 000 to 13 000 km). SeeScheduled Maintenance
on page 7-3.
The purpose of a regular tire rotation is to achieve
a uniform wear for all tires on the vehicle. This will
ensure that your vehicle continues to perform most
like it did when the tires were new.
Any time you notice unusual wear, rotate your tires
as soon as possible and check wheel alignment.
Also check for damaged tires or wheels. SeeWhen
It Is Time for New Tires on page 6-57andWheel
Replacement on page 6-62for more information.
6-55
ProCarManuals.com
Page 317 of 400

{WARNING:
If you use bias-ply tires on the vehicle, the
wheel rim flanges could develop cracks after
many miles of driving. A tire and/or wheel
could fail suddenly, causing a crash. Use only
radial-ply tires with the wheels on the vehicle.
If you must replace your vehicle’s tires with those that do
not have a TPC Spec number, make sure they are the
same size, load range, speed rating, and construction
type (radial and bias-belted tires) as your vehicle’s
original tires.
Vehicles that have a tire pressure monitoring system
could give an inaccurate low-pressure warning if
non-TPC Spec rated tires are installed on your vehicle.
Non-TPC Spec rated tires may give a low-pressure
warning that is higher or lower than the proper warning
level you would get with TPC Spec rated tires. SeeTire
Pressure Monitor System on page 6-51.
Your vehicle’s original equipment tires are listed on the
Tire and Loading Information label. SeeLoading the
Vehicle on page 5-20, for more information about the
Tire and Loading Information label and its location on
your vehicle.
Different Size Tires and Wheels
If you add wheels or tires that are a different size than
your original equipment wheels and tires, this may affect
the way your vehicle performs, including its braking, ride
and handling characteristics, stability, and resistance
to rollover. Additionally, if your vehicle has electronic
systems such as, anti-lock brakes, traction control, and
stability control, the performance of these systems can
be affected.
{WARNING:
If you add different sized wheels, your vehicle may
not provide an acceptable level of performance
and safety if tires not recommended for those
wheels are selected. You may increase the
chance that you will crash and suffer serious
injury. Only use Saturn specific wheel and tire
systems developed for your vehicle, and have
them properly installed by a Saturn certified
technician.
SeeBuying New Tires on page 6-58andAccessories
and Modi�cations on page 6-3for additional information.
6-59
ProCarManuals.com
Page 326 of 400

Using the Tire Sealant and Compressor
Kit to Temporarily Seal and In�ate a
Punctured Tire
Follow the directions closely for correct sealant usage.
When using the tire sealant and compressor kit during
cold temperatures, warm the kit in a heated environment
for 5 minutes. This will help to inflate the tire faster.Always do a safety check first. SeeIf a Tire Goes Flat
on page 6-65. Do not remove any objects that have
penetrated the tire.
1. Remove the tire sealant and compressor kit from its
storage location. SeeTire Sealant and Compressor
Kit Storage on page 6-73.
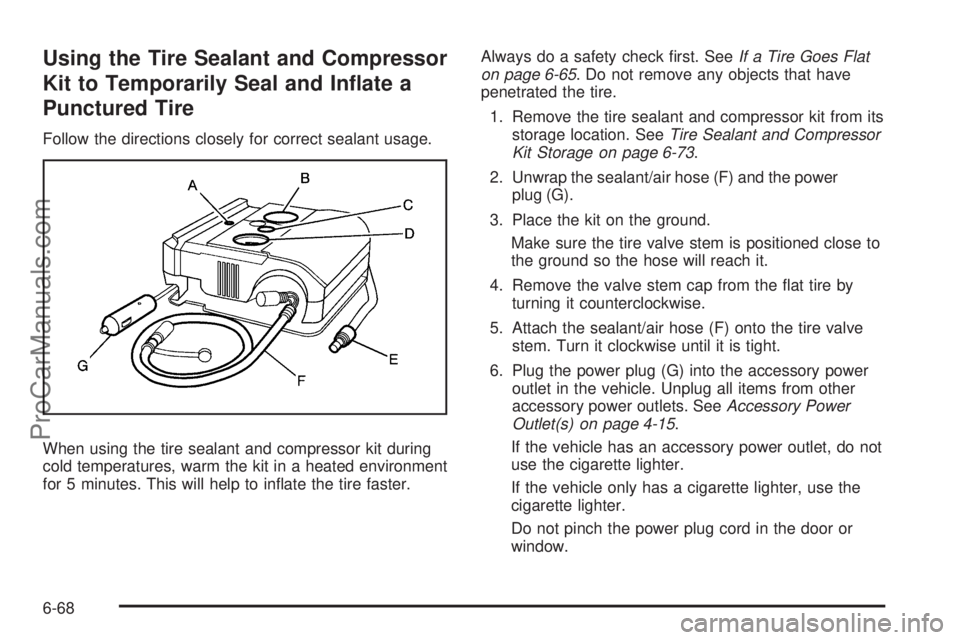
2. Unwrap the sealant/air hose (F) and the power
plug (G).
3. Place the kit on the ground.
Make sure the tire valve stem is positioned close to
the ground so the hose will reach it.
4. Remove the valve stem cap from the flat tire by
turning it counterclockwise.
5. Attach the sealant/air hose (F) onto the tire valve
stem. Turn it clockwise until it is tight.
6. Plug the power plug (G) into the accessory power
outlet in the vehicle. Unplug all items from other
accessory power outlets. SeeAccessory Power
Outlet(s) on page 4-15.
If the vehicle has an accessory power outlet, do not
use the cigarette lighter.
If the vehicle only has a cigarette lighter, use the
cigarette lighter.
Do not pinch the power plug cord in the door or
window.
6-68
ProCarManuals.com
Page 327 of 400

7. Start the vehicle. The vehicle must be running while
using the air compressor.
8. Turn the selector switch (B) clockwise to the
Sealant + Air position.
9. Press the on/off (A) button to turn the tire sealant
and compressor kit on.
The compressor will inject sealant and air into
the tire.
The pressure gage (D) will initially show a high
pressure while the compressor pushes the sealant
into the tire. Once the sealant is completely
dispersed into the tire, the pressure will quickly drop
and start to rise again as the tire inflates with air only.
10. Inflate the tire to the recommended inflation pressure
using the pressure gage (D). The recommended
inflation pressure can be found on the Tire and
Loading Information label. SeeIn�ation - Tire
Pressure on page 6-49.
The pressure gage (D) may read higher than the
actual tire pressure while the compressor is on.
Turn the compressor off to get an accurate pressure
reading. The compressor may be turned on/off
until the correct pressure is reached.Notice:If the recommended pressure cannot be
reached after approximately 25 minutes, the vehicle
should not be driven farther. The tire is too severely
damaged and the tire sealant and compressor kit
cannot in�ate the tire. Remove the power plug from
the accessory power outlet and unscrew the in�ating
hose from the tire valve. SeeRoadside Assistance
Program on page 8-7.
11. Press the on/off button (A) to turn the tire sealant
and compressor kit off.
The tire is not sealed and will continue to leak air until
the vehicle is driven and the sealant is distributed in
the tire, therefore, Steps 12 through 18 must be done
immediately after Step 11.
Be careful while handling the tire sealant and
compressor kit as it could be warm after usage.
12. Unplug the power plug (G) from the accessory
power outlet in the vehicle.
13. Turn the sealant/air hose (F) counterclockwise to
remove it from the tire valve stem.
14. Replace the tire valve stem cap.
15. Replace the sealant/air hose (F), and the power
plug (G) back in their original location.
6-69
ProCarManuals.com
Page 329 of 400

Using the Tire Sealant and Compressor
Kit without Sealant to In�ate a Tire
(Not Punctured)
To use the air compressor to inflate a tire with air only
and not sealant:
Always do a safety check first. SeeIf a Tire Goes Flat
on page 6-65.
1. Remove the tire sealant and compressor kit from its
storage location. SeeTire Sealant and Compressor
Kit Storage on page 6-73.
2. Unwrap the air only hose (E) and the power
plug (G).3. Place the kit on the ground.
Make sure the tire valve stem is positioned close to
the ground so the hose will reach it.
4. Remove the tire valve stem cap from the flat tire by
turning it counterclockwise.
5. Attach the air only hose (E) onto the tire valve stem
by turning it clockwise until it is tight.
6. Plug the power plug (G) into the accessory power
outlet in the vehicle. Unplug all items from other
accessory power outlets. SeeAccessory Power
Outlet(s) on page 4-15.
If the vehicle has an accessory power outlet, do not
use the cigarette lighter.
If the vehicle only has a cigarette lighter, use the
cigarette lighter.
Do not pinch the power plug cord in the door or
window.
7. Start the vehicle. The vehicle must be running while
using the air compressor.
8. Turn the selector switch (B) counterclockwise to the
Air Only position.
9. Press the on/off (A) button to turn the
compressor on.
The compressor will inflate the tire with air only.
6-71
ProCarManuals.com
Page 330 of 400

10. Inflate the tire to the recommended inflation pressure
using the pressure gage (D). The recommended
inflation pressure can be found on the Tire and
Loading Information label. SeeIn�ation - Tire
Pressure on page 6-49.
The pressure gage (D) may read higher than the
actual tire pressure while the compressor is on.
Turn the compressor off to get an accurate reading.
The compressor may be turned on/off until the
correct pressure is reached.
11. Press the on/off button (A) to turn the tire sealant
and compressor kit off.
Be careful while handling the tire sealant and
compressor kit as it could be warm after usage.
12. Unplug the power plug (G) from the accessory
power outlet in the vehicle.
13. Disconnect the air only hose (E) from the tire valve
stem, by turning it counterclockwise, and replace
the tire valve stem cap.
14. Replace the air only hose (E) and the power
plug (G) and cord back in its original location.
15. Place the equipment in the original storage location
in the vehicle.Removal and Installation of the Sealant
Canister
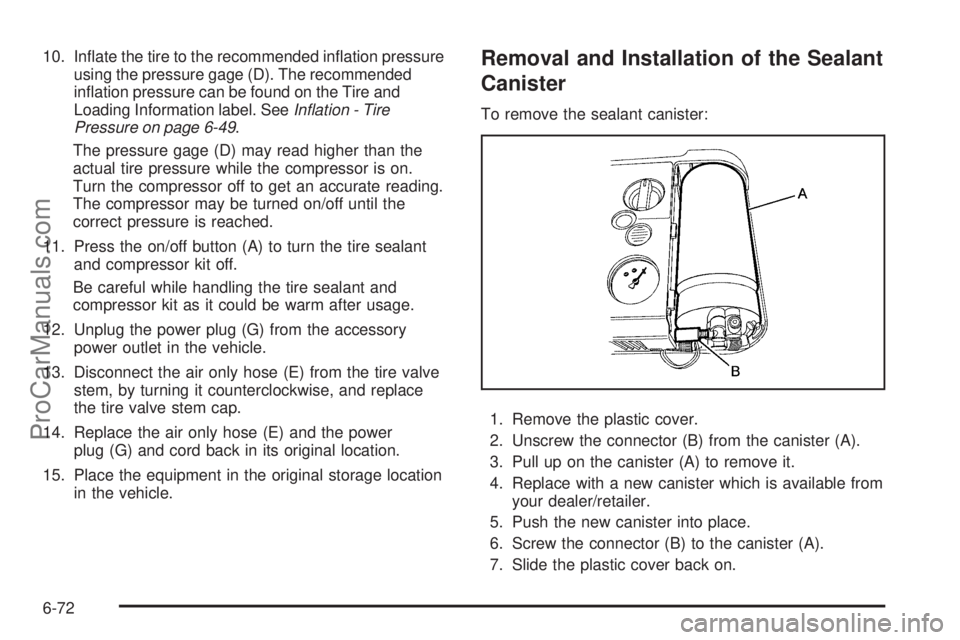
To remove the sealant canister:
1. Remove the plastic cover.
2. Unscrew the connector (B) from the canister (A).
3. Pull up on the canister (A) to remove it.
4. Replace with a new canister which is available from
your dealer/retailer.
5. Push the new canister into place.
6. Screw the connector (B) to the canister (A).
7. Slide the plastic cover back on.
6-72
ProCarManuals.com
Page 331 of 400

Tire Sealant and Compressor Kit
Storage
The tire sealant and compressor kit is located in the
trunk.
1. Open the trunk. SeeTrunk on page 3-12.
2. Lift the cover.
3. Turn the retainer clockwise and remove the tire
sealant and compressor kit.
To store the tire sealant and compressor kit, reverse the
steps.
Appearance Care
Interior Cleaning
The vehicle’s interior will continue to look its best if it is
cleaned often. Although not always visible, dust and dirt
can accumulate on the upholstery. Dirt can damage
carpet, fabric, leather, and plastic surfaces. Regular
vacuuming is recommended to remove particles from
the upholstery. It is important to keep the upholstery from
becoming and remaining heavily soiled. Soils should be
removed as quickly as possible. The vehicle’s interior
may experience extremes of heat that could cause
stains to set rapidly.
Lighter colored interiors may require more frequent
cleaning. Use care because newspapers and garments
that transfer color to home furnishings may also
transfer color to the vehicle’s interior.
When cleaning the vehicle’s interior, only use cleaners
specifically designed for the surfaces being cleaned.
Permanent damage may result from using cleaners
on surfaces for which they were not intended.
6-73
ProCarManuals.com