ECU SATURN RELAY 2007 Workshop Manual
[x] Cancel search | Manufacturer: SATURN, Model Year: 2007, Model line: RELAY, Model: SATURN RELAY 2007Pages: 570, PDF Size: 3.41 MB
Page 232 of 570

Oil Pressure Light
If you have low engine
oil pressure, this light
will stay on after
you start your engine, or
come on when you
are driving.
This indicates that your engine is not receiving
enough oil. The engine could be low on oil,
or could have some other oil problem. Have it
�xed immediately by your GM retailer.
The oil light could also come on in three other
situations:
When the ignition is on but the engine is not
running, the light will come on as a test to show
you it is working. The light will go out when you
turn the ignition on. If it does not come on with
the ignition on, you may have a problem with
the fuse or bulb. Have it �xed right away.
If you are idling at a stop sign, the light may
blink on and then off.
If you make a hard stop, the light may come on
for a moment. This is normal.
{CAUTION:
Do not keep driving if the oil pressure is
low. If you do, your engine can become so
hot that it catches �re. You or others could
be burned. Check your oil as soon as
possible and have your vehicle serviced.
Notice:Lack of proper engine oil maintenance
may damage the engine. The repairs would
not be covered by your warranty. Always follow
the maintenance schedule in this manual for
changing engine oil.
Security Light
For information
regarding this light, see
Theft-Deterrent
Systems on page 133.
232
ProCarManuals.com
Page 294 of 570

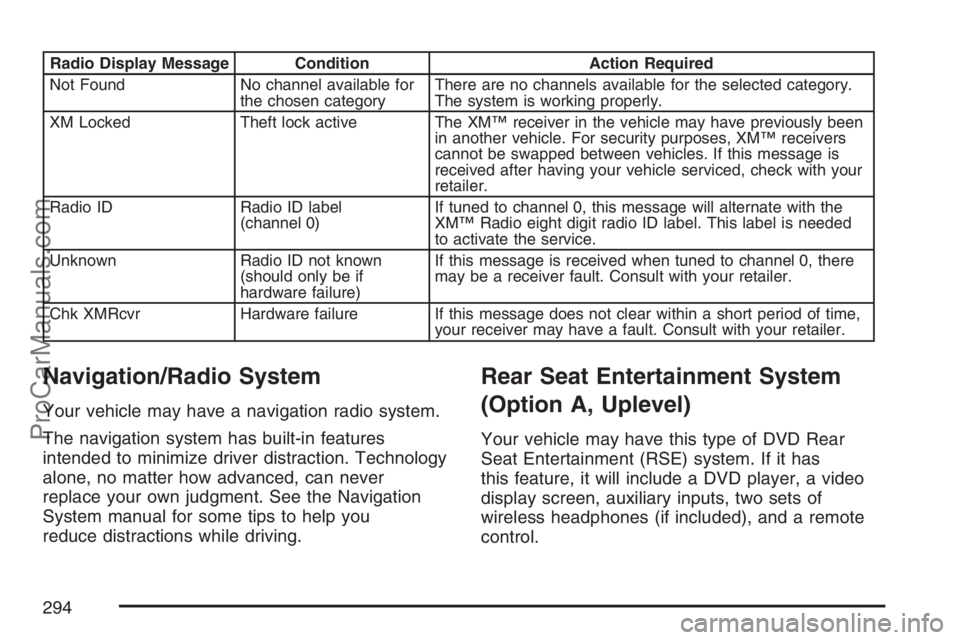
Radio Display Message Condition Action Required
Not Found No channel available for
the chosen categoryThere are no channels available for the selected category.
The system is working properly.
XM Locked Theft lock active The XM™ receiver in the vehicle may have previously been
in another vehicle. For security purposes, XM™ receivers
cannot be swapped between vehicles. If this message is
received after having your vehicle serviced, check with your
retailer.
Radio ID Radio ID label
(channel 0)If tuned to channel 0, this message will alternate with the
XM™ Radio eight digit radio ID label. This label is needed
to activate the service.
Unknown Radio ID not known
(should only be if
hardware failure)If this message is received when tuned to channel 0, there
may be a receiver fault. Consult with your retailer.
Chk XMRcvr Hardware failure If this message does not clear within a short period of time,
your receiver may have a fault. Consult with your retailer.
Navigation/Radio System
Your vehicle may have a navigation radio system.
The navigation system has built-in features
intended to minimize driver distraction. Technology
alone, no matter how advanced, can never
replace your own judgment. See the Navigation
System manual for some tips to help you
reduce distractions while driving.
Rear Seat Entertainment System
(Option A, Uplevel)
Your vehicle may have this type of DVD Rear
Seat Entertainment (RSE) system. If it has
this feature, it will include a DVD player, a video
display screen, auxiliary inputs, two sets of
wireless headphones (if included), and a remote
control.
294
ProCarManuals.com
Page 386 of 570

Winter Driving
Here are some tips for winter driving:
Have your vehicle in good shape for winter.
You may want to put winter emergency
supplies in your vehicle.
Also seeTires on page 462.Include an ice scraper, a small brush or broom,
a supply of windshield washer �uid, a rag,
some winter outer clothing, a small shovel, a
�ashlight, a red cloth, and a couple of re�ective
warning triangles. And, if you will be driving under
severe conditions, include a small bag of sand,
a piece of old carpet, or a couple of burlap bags
to help provide traction. Be sure you properly
secure these items in your vehicle.
Driving on Snow or Ice
Most of the time, those places where the tires
meet the road probably have good traction.
However, if there is snow or ice between the
tires and the road, you can have a very slippery
situation. You will have a lot less traction, or
grip, and will need to be very careful.
386
ProCarManuals.com
Page 396 of 570

If you put things inside your vehicle — like
suitcases, tools, packages, or anything else, they
will go as fast as the vehicle goes. If you have
to stop or turn quickly, or if there is a crash, they
will keep going.
{CAUTION:
Things you put inside your vehicle can
strike and injure people in a sudden stop
or turn, or in a crash.
Put things in the cargo area of your
vehicle. Try to spread the weight
evenly.
Never stack heavier things, like
suitcases, inside the vehicle so that
some of them are above the tops of
the seats.
Do not leave an unsecured child
restraint in your vehicle.
When you carry something inside the
vehicle, secure it whenever you can.
Do not leave a seat folded down
unless you need to.
Towing
Towing Your Vehicle
Consult your retailer or a professional towing
service if you need to have your disabled vehicle
towed. SeeRoadside Assistance Program on
page 543.
If you want to tow your vehicle behind another
vehicle for recreational purposes (such as behind
a motorhome), see “Recreational Vehicle
Towing” following.
Recreational Vehicle Towing
Recreational vehicle towing means towing your
vehicle behind another vehicle — such as behind
a motorhome. The two most common types
of recreational vehicle towing are known as
“dinghy towing” (towing your vehicle with all
four wheels on the ground) and “dolly towing”
(towing your vehicle with two wheels on the
ground and two wheels up on a device know
as a “dolly”).
396
ProCarManuals.com
Page 405 of 570

CAUTION: (Continued)
This will bring fresh, outside air into
your vehicle. Do not use the climate
control setting for maximum air
because it only recirculates the air
inside your vehicle. SeeClimate
Control System on page 205orDual
Climate Control System on page 209.
Towing a trailer requires a certain amount of
experience. Before setting out for the open road,
you will want to get to know your rig. Acquaint
yourself with the feel of handling and braking
with the added weight of the trailer. And always
keep in mind that the vehicle you are driving
is now a good deal longer and not nearly
as responsive as your vehicle is by itself.Before you start, check all trailer hitch parts and
attachments, safety chains, electrical connector,
lamps, tires, and mirror adjustment. If the trailer has
electric brakes, start your vehicle and trailer moving
and then apply the trailer brake controller by hand
to be sure the brakes are working. This lets you
check your electrical connection at the same time.
During your trip, check occasionally to be sure
that the load is secure, and that the lamps and
any trailer brakes are still working.
Following Distance
Stay at least twice as far behind the vehicle ahead
as you would when driving your vehicle without
a trailer. This can help you avoid situations
that require heavy braking and sudden turns.
Passing
You will need more passing distance up ahead
when you are towing a trailer. And, because
you are a good deal longer, you will need to
go much farther beyond the passed vehicle
before you can return to your lane.
405
ProCarManuals.com
Page 429 of 570

To inspect or replace the air cleaner/�lter, do the
following:
1. Remove the two clamps on the duct.
2. Remove the duct.
3. Unlatch the two hooks on top of the engine air
cleaner/�lter housing.
4. Inspect or replace the engine air cleaner/�lter.
5. Align the tabs located on the bottom of the
panel with the slots at the bottom of the
housing.
6. Latch the hooks to secure the panel in place.
If the panel moves easily, check that the tabs
are seated correctly in the slots.
7. Put the duct back on and reinstall the clamps.
{CAUTION:
Operating the engine with the air
cleaner/�lter off can cause you or others
to be burned. The air cleaner not only
cleans the air; it helps to stop �ames if
the engine back�res. If it is not there and
the engine back�res, you could be
burned. Do not drive with it off, and be
careful working on the engine with the
air cleaner/�lter off.
Notice:If the air cleaner/�lter is off, a back�re
can cause a damaging engine �re. And, dirt
can easily get into your engine, which will
damage it. Always have the air cleaner/�lter in
place when you are driving.
429
ProCarManuals.com
Page 457 of 570

3. Remove the screw (B) from the top of the
headlamp assembly.
4. Pull the assembly away from the vehicle.
5. Disconnect the socket wiring harness
connector from the headlamp assembly.
6. Turn the bulb socket counterclockwise to
remove from the assembly.
7. To replace a headlamp bulb, disconnect
the bulb socket wiring harness and connect
to the new bulb socket.
To replace a sidemarker bulb, pull the old
bulb out and push a new bulb in.
8. Reinstall the bulb socket by inserting into
the bulb assembly and turning it clockwise
to secure.
9. Reverse the steps to reinstall the headlamp
assembly.Front Turn Signal, Parking and
Daytime Running Lamps (DRL)
To replace one of these bulbs (A), do the following:
1. Follow the Steps 1 through 4 to remove the
headlamp assembly. SeeHeadlamps and
Sidemarker Lamps on page 456for more
information.
2. Turn the bulb socket counterclockwise to
remove from the assembly.
3. Pull the old bulb out from the bulb socket.
4. Replace with a new bulb
457
ProCarManuals.com
Page 458 of 570

5. Reinstall the bulb socket by inserting into
the bulb assembly and turning it clockwise
to secure.
6. Reverse the steps to reinstall the headlamp
assembly.
Taillamps, Turn Signal, Stoplamps
and Back-up Lamps
To change a stoplamp/taillamp, turn signal or
back-up lamp bulb, do the following:
1. Open the liftgate. SeeLiftgate on page 128
for more information.
2. Remove the two
screws from the
taillamp housing on
the inboard side.3. Pull out the taillamp housing.
4. Disconnect the wiring harness connector
from the taillamp assembly.
A. Stoplamp/Taillamp
B. Turn Signal Lamp
C. Back-up Lamp Bulb
458
ProCarManuals.com
Page 459 of 570

5. Turn the bulb socket counterclockwise
to remove.
6. Replace the bulb by pulling the old bulb
out of the socket and gently pushing in
a new bulb.
7. Replace the bulb socket by inserting and
turning clockwise to secure.
8. Reinstall the taillamp assembly by
inserting the outboard locating/retaining
pins until the lamp is seated.
9. Secure with the inboard screws.License Plate Lamp
To replace one of these bulbs, do the following:
1. Remove the two screws holding each of
the license plate lamps to the fascia.
2. Turn and pull the license plate lamp forward
through the fascia opening.
3. Turn the bulb socket counterclockwise and
pull the bulb straight out of the socket.
4. Install the new bulb.
5. Reverse Steps 1 through 3 to reinstall the
license plate lamp.
459
ProCarManuals.com
Page 461 of 570

To replace the windshield wiper blade assembly
do the following:
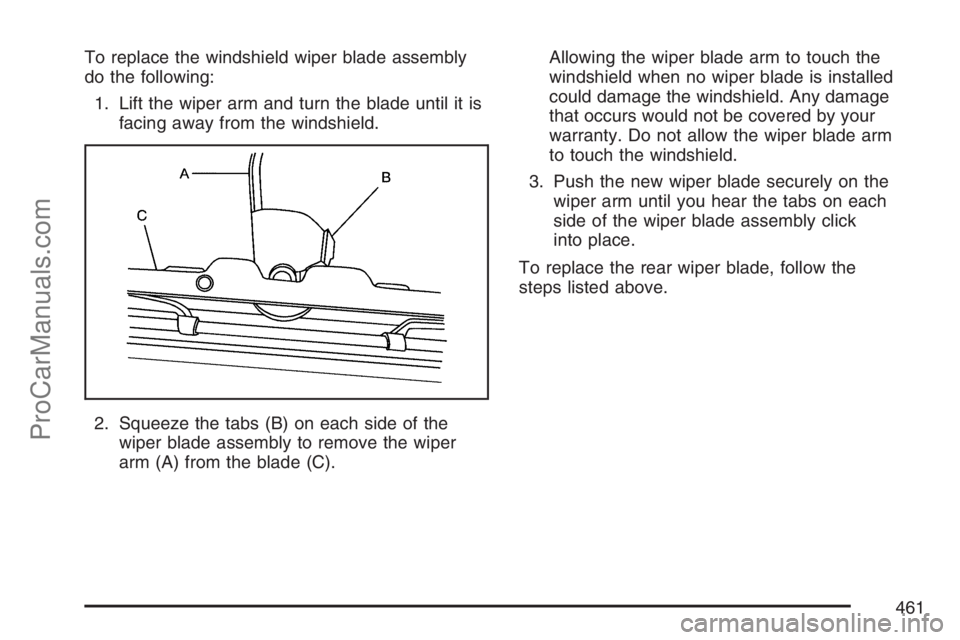
1. Lift the wiper arm and turn the blade until it is
facing away from the windshield.
2. Squeeze the tabs (B) on each side of the
wiper blade assembly to remove the wiper
arm (A) from the blade (C).Allowing the wiper blade arm to touch the
windshield when no wiper blade is installed
could damage the windshield. Any damage
that occurs would not be covered by your
warranty. Do not allow the wiper blade arm
to touch the windshield.
3. Push the new wiper blade securely on the
wiper arm until you hear the tabs on each
side of the wiper blade assembly click
into place.
To replace the rear wiper blade, follow the
steps listed above.
461
ProCarManuals.com