radio SATURN VUE 2008 Owners Manual
[x] Cancel search | Manufacturer: SATURN, Model Year: 2008, Model line: VUE, Model: SATURN VUE 2008Pages: 412, PDF Size: 2.78 MB
Page 82 of 412
The key code is stamped on the key number plate and
can be used to make new keys at any dealer/retailer.
Store this information in a safe place outside your
vehicle.
Notice:If you ever lock your keys in your vehicle,
you may have to damage the vehicle to get in.
Be sure you have spare keys.
If you are locked out of your vehicle, contact
Roadside Assistance. SeeRoadside Assistance
Program on page 7-7for more information.
Remote Keyless Entry (RKE) System
If this vehicle has the Remote Keyless Entry (RKE)
system, it operates on a radio frequency subject
to Federal Communications Commission (FCC)
Rules and with Industry Canada.
This device complies with Part 15 of the FCC Rules.
Operation is subject to the following two conditions:
1. This device may not cause interference.
2. This device must accept any interference received,
including interference that may cause undesired
operation of the device.This device complies with RSS-210 of Industry Canada.
Operation is subject to the following two conditions:
1. This device may not cause interference.
2. This device must accept any interference received,
including interference that may cause undesired
operation of the device.
Changes or modi�cations to this system by other than
an authorized service facility could void authorization
to use this equipment.
If there is a decrease in the RKE operating range,
try this:
Check the distance. The transmitter may be
too far from the vehicle. Stand closer during rainy
or snowy weather.
Check the location. Other vehicles or objects
may be blocking the signal. Take a few steps
to the left or right, hold the transmitter higher,
and try again.
Check the transmitter’s battery. See “Battery
Replacement” later in this section.
If the transmitter is still not working correctly,
see your dealer/retailer or a quali�ed technician
for service.
2-4
ProCarManuals.com
Page 94 of 412

PASS-Key®III+ Electronic
Immobilizer
The PASS-Key®III+ system operates on a radio
frequency subject to Federal Communications
Commission (FCC) Rules and with Industry Canada.
This device complies with Part 15 of the FCC Rules.
Operation is subject to the following two conditions:
1. This device may not cause harmful interference.
2. This device must accept any interference received,
including interference that may cause undesired
operation.
This device complies with RSS-210 of Industry Canada.
Operation is subject to the following two conditions:
1. This device may not cause interference.
2. This device must accept any interference received,
including interference that may cause undesired
operation of the device.
Changes or modi�cations to this system by other than
an authorized service facility could void authorization
to use this equipment.
PASS-Key
®III+ uses a radio frequency transponder
in the key that matches a decoder in the vehicle.
PASS-Key®III+ Electronic
Immobilizer Operation
Your vehicle has PASS-Key®III+ (Personalized
Automotive Security System) theft-deterrent system.
PASS-Key
®III+ is a passive theft-deterrent system.
The system is automatically armed when the key
is removed from the ignition.
You do not have to manually arm or disarm the system.
The security light will come on if there is a problem
with arming or disarming the theft-deterrent system.
When the PASS-Key
®III+ system senses that someone
is using the wrong key, it prevents the vehicle from
starting. Anyone using a trial-and-error method to
start the vehicle will be discouraged because of the
high number of electrical key codes.
When trying to start the vehicle if the engine does not
start and the security light on the instrument panel
cluster comes on, there may be a problem with your
theft-deterrent system. Turn the ignition off and try again.
2-16
ProCarManuals.com
Page 97 of 412
ACC (ACC/ACCESSORY):This position operates
some of the electrical accessories, such as the radio,
but not the climate control system.
Use ACC/ACCESSORY if you must have your vehicle
in motion while the engine is off, for example, if your
vehicle is being pushed or towed.
ON/RUN:This is the position the switch returns after
you start the engine and release the key. The switch
stays in ON/RUN when the engine is running. But even
when the engine is not running, you can use ON/RUN
to operate the electrical accessories, and to display
some instrument panel warning lights.
The battery could be drained if you leave the key in
the ACC/ACCESSORY or ON/RUN position with
the engine off. You may not be able to start your
vehicle if the battery is allowed to drain for an
extended period of time.
START:This position starts the engine. When the
engine starts, release the key. The switch returns to
ON/RUN for normal driving. Do not turn the key to
START if the engine is running.
Even if the engine is not running, ACC/ACCESSORY
and ON/RUN allow you to operate electrical accessories,
such as the radio.Key In the Ignition
Never leave your vehicle with the keys inside, as it is
an easy target for joy riders or thieves. If you leave
the key in the ignition and park your vehicle, a chime
will sound, when you open the driver’s door. Always
remember to remove your key from the ignition and take
it with you. This will lock your ignition and transmission.
Also, always remember to lock the doors.
The battery could be drained if you leave the key in the
ignition while your vehicle is parked. You may not be
able to start your vehicle after it has been parked for
an extended period of time.
Retained Accessory Power (RAP)
These vehicle accessories may be used for up to
10 minutes after the ignition key is turned off:
Outside Mirror
Power Windows
Radio
All these features work when the ignition key is in
the ON/RUN or ACC/ACCESSORY positions, until a
door is opened.
2-19
ProCarManuals.com
Page 116 of 412
Location information about your vehicle is only
available if the GPS satellite signals are unobstructed
and available.
Your vehicle must have a working electrical system
(including adequate battery power) for the OnStar
equipment to operate. There are other problems OnStar
cannot control that may prevent OnStar from providing
OnStar service to you at any particular time or place.
Some examples are damage to important parts of your
vehicle in an accident, hills, tall buildings, tunnels,
weather or wireless phone network congestion.
Your Responsibility
Increase the radio volume if you cannot hear the
OnStar advisor. If the light next to the OnStar buttons
is red, this means that your system is not functioning
properly and should be checked by your dealer/retailer.
If the light appears clear (no light is appearing),
your OnStar subscription has expired. You can
always press the OnStar button to con�rm that your
OnStar equipment is active.
Universal Home Remote
System
The Universal Home Remote System provides a way
to replace up to three hand-held Radio-Frequency (RF)
transmitters used to activate devices such as garage
door openers, security systems, and home lighting.
This device complies with Part 15 of the FCC Rules.
Operation is subject to the following two conditions:
1. This device may not cause harmful interference.
2. This device must accept any interference received,
including interference that may cause undesired
operation.
This device complies with RSS-210 of Industry Canada.
Operation is subject to the following two conditions:
1. This device may not cause interference.
2. This device must accept any interference received,
including interference that may cause undesired
operation of the device.
Changes or modi�cations to this system by other than
an authorized service facility could void authorization to
use this equipment.
2-38
ProCarManuals.com
Page 117 of 412

Universal Home Remote System
Operation (With One Triangular LED)
If there is one triangular Light Emitting Diode (LED)
indicator light above the Universal Home Remote
buttons, follow the instructions below.
This system provides a way to replace up to
three remote control transmitters used to activate
devices such as garage door openers, security
systems, and home automation devices.
Do not use the Universal Home Remote with any
garage door opener that does not have the stop
and reverse feature. This includes any garage door
opener model manufactured before April 1, 1982.Read the instructions completely before attempting to
program the Universal Home Remote. Because of
the steps involved, it may be helpful to have another
person available to assist you in the programming
the Universal Home Remote.
Keep the original hand-held transmitter for use in other
vehicles as well as for future Universal Home Remote
programming. It is also recommended that upon the
sale of the vehicle, the programmed Universal Home
Remote buttons should be erased for security purposes.
See “Erasing Universal Home Remote Buttons” later
in this section.
When programming a garage door, park outside of
the garage. Park directly in line with and facing
the garage door opener motor-head or gate motor-head.
Be sure that people and objects are clear of the
garage door or gate you are programming.
It is recommended that a new battery be installed in
your hand-held transmitter for quicker and more
accurate transmission of the radio-frequency signal.
2-39
ProCarManuals.com
Page 120 of 412

7. Firmly press and release the “Learn” or “Smart”
button. After you press this button, you will have
30 seconds to complete Step 8.
8. Immediately return to the vehicle. Firmly press
and hold the Universal Home Remote button,
chosen in Step 3 to control the garage door,
for two seconds, and then release it. If the garage
door does not move, press and hold the same
button a second time for two seconds, and then
release it. Again, if the door does not move,
press and hold the same button a third time
for two seconds, and then release.
The Universal Home Remote should now
activate the garage door.
To program the remaining two Universal Home
Remote buttons, begin with Step 2 of “Programming
the Universal Home Remote System.” Do not repeat
Step 1, as this will erase all previous programming
from the Universal Home Remote buttons.Gate Operator and Canadian
Programming
If you have questions or need help programming the
Universal Home Remote System, call 1-800-355-3515
or go to www.homelink.com.
Canadian radio-frequency laws require transmitter
signals to time out or quit after several seconds of
transmission. This may not be long enough for
Universal Home Remote to pick up the signal during
programming. Similarly, some U.S. gate operators
are manufactured to time out in the same manner.
If you live in Canada, or you are having difficulty
programming a gate operator or garage door opener
by using the “Programming Universal Home Remote”
procedures, regardless of where you live, replace Step 3
under “Programming Universal Home Remote” with
the following:
Continue to press and hold the Universal Home Remote
button while you press and release every two seconds
(cycle) the hand-held transmitter button until the
frequency signal has been successfully accepted by the
Universal Home Remote. The Universal Home Remote
indicator light will �ash slowly at �rst and then rapidly.
Proceed with Step 4 under “Programming Universal
Home Remote” to complete.
2-42
ProCarManuals.com
Page 130 of 412
Low Oil Level Light.......................................3-44
Change Engine Oil Light................................3-44
Security Light...............................................3-44
Fog Lamp Light............................................3-45
Cruise Control Light......................................3-45
Reduced Engine Power Light.........................3-45
Highbeam On Light.......................................3-46
Low Washer Fluid Warning Light.....................3-46
All-Wheel Drive Disabled Light........................3-46
Gate Ajar Light.............................................3-46
Door Ajar Light.............................................3-47
Service Vehicle Soon Light............................3-47
Fuel Gage...................................................3-47
Low Fuel Warning Light.................................3-48Driver Information Center (DIC).......................3-49
DIC Operation and Displays...........................3-49
DIC Compass..............................................3-50
Audio System(s).............................................3-52
Setting the Clock..........................................3-53
Radio(s)......................................................3-55
Using an MP3..............................................3-64
XM Radio Messages.....................................3-68
Navigation/Radio System...............................3-69
Audio Steering Wheel Controls.......................3-70
Radio Reception...........................................3-70
Fixed Mast Antenna......................................3-71
XM™ Satellite Radio Antenna System.............3-71
Section 3 Instrument Panel
3-2
ProCarManuals.com
Page 133 of 412
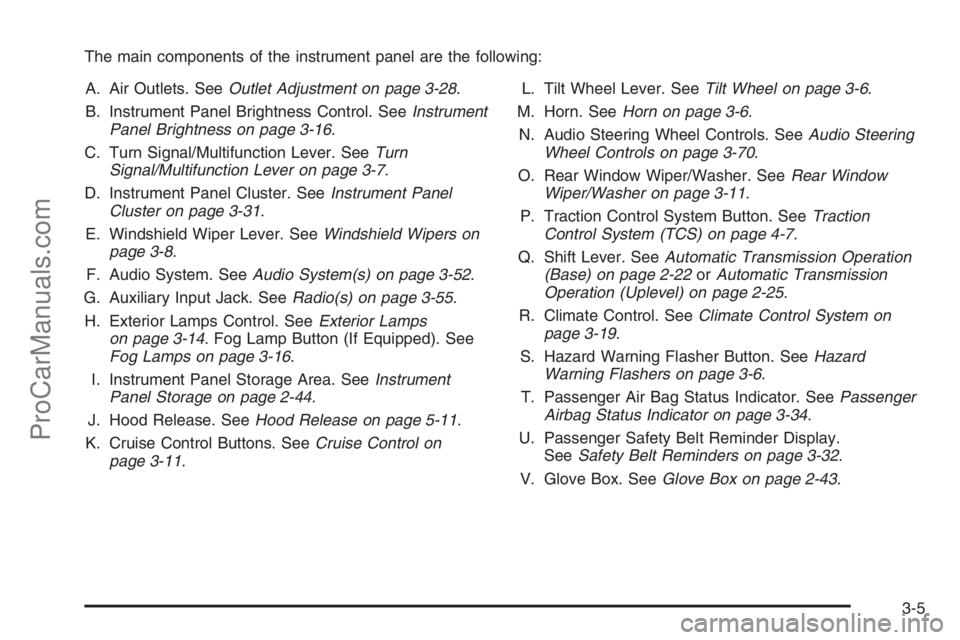
The main components of the instrument panel are the following:
A. Air Outlets. SeeOutlet Adjustment on page 3-28.
B. Instrument Panel Brightness Control. SeeInstrument
Panel Brightness on page 3-16.
C. Turn Signal/Multifunction Lever. SeeTurn
Signal/Multifunction Lever on page 3-7.
D. Instrument Panel Cluster. SeeInstrument Panel
Cluster on page 3-31.
E. Windshield Wiper Lever. SeeWindshield Wipers on
page 3-8.
F. Audio System. SeeAudio System(s) on page 3-52.
G. Auxiliary Input Jack. SeeRadio(s) on page 3-55.
H. Exterior Lamps Control. SeeExterior Lamps
on page 3-14. Fog Lamp Button (If Equipped). See
Fog Lamps on page 3-16.
I. Instrument Panel Storage Area. SeeInstrument
Panel Storage on page 2-44.
J. Hood Release. SeeHood Release on page 5-11.
K. Cruise Control Buttons. SeeCruise Control on
page 3-11.L. Tilt Wheel Lever. SeeTilt Wheel on page 3-6.
M. Horn. SeeHorn on page 3-6.
N. Audio Steering Wheel Controls. SeeAudio Steering
Wheel Controls on page 3-70.
O. Rear Window Wiper/Washer. SeeRear Window
Wiper/Washer on page 3-11.
P. Traction Control System Button. SeeTraction
Control System (TCS) on page 4-7.
Q. Shift Lever. SeeAutomatic Transmission Operation
(Base) on page 2-22orAutomatic Transmission
Operation (Uplevel) on page 2-25.
R. Climate Control. SeeClimate Control System on
page 3-19.
S. Hazard Warning Flasher Button. SeeHazard
Warning Flashers on page 3-6.
T. Passenger Air Bag Status Indicator. SeePassenger
Airbag Status Indicator on page 3-34.
U. Passenger Safety Belt Reminder Display.
SeeSafety Belt Reminders on page 3-32.
V. Glove Box. SeeGlove Box on page 2-43.
3-5
ProCarManuals.com
Page 146 of 412
Accessory Power Outlet(s)
The accessory power outlets can be used to connect
electrical equipment such as a cellular phone or
CB radio.
The accessory power outlets are located on the rear
of the center storage console and in the rear cargo
compartment. There may be a power outlet located
inside the instrument panel storage area below
the climate controls.
To use the outlets, remove the cover. When not in use,
always cover the outlet with the protective cap.
Notice:Leaving electrical equipment on for
extended periods will drain the battery. Always turn
off electrical equipment when not in use and do
not plug in equipment that exceeds the maximum
20 ampere rating.Certain electrical accessories may not be compatible
with the accessory power outlet and could result
in blown vehicle or adapter fuses. If you experience
a problem, see your dealer/retailer for additional
information on the accessory power outlet.
Notice:Adding any electrical equipment to your
vehicle may damage it or keep other components
from working as they should. The repairs would
not be covered by your warranty. Check with your
dealer/retailer before adding electrical equipment.
When adding electrical equipment, be sure to follow the
installation instructions included with the equipment.
Notice:Improper use of the power outlet can cause
damage not covered by your warranty. Do not
hang any type of accessory or accessory bracket
from the plug because the power outlets are
designed for accessory power plugs only.
3-18
ProCarManuals.com
Page 164 of 412

If, after several seconds, both status indicator lights
remain on, or if there are no lights at all, there may
be a problem with the lights or the passenger sensing
system. See your dealer/retailer for service.
{CAUTION:
If the airbag readiness light in the instrument
panel cluster ever comes on and stays on,
it means that something may be wrong with
the airbag system. If this ever happens, have
the vehicle serviced promptly, because an
adult-size person sitting in the right front
passenger’s seat may not have the protection
of the airbag(s). SeeAirbag Readiness Light
on page 3-33for more on this, including
important safety information.
Charging System Light
This light will come on
brie�y when the ignition is
turned on, and the engine
is not running, as a check
to show you it is working.
It should go out when the engine is started. If it stays
on, or comes on while you are driving, you may have a
problem with the electrical charging system. Have it
checked by your dealer/retailer. Driving while this light is
on could drain your battery. If you must drive a short
distance with the light on, be certain to turn off all your
accessories, such as the radio and air conditioner to
help reduce the drain on the battery.
3-36
ProCarManuals.com