lock SATURN VUE 2010 Owners Manual
[x] Cancel search | Manufacturer: SATURN, Model Year: 2010, Model line: VUE, Model: SATURN VUE 2010Pages: 398, PDF Size: 4.02 MB
Page 285 of 398

Vehicle Care 10-19
{WARNING
You can be burned if you spill
coolant on hot engine parts.
Coolant contains ethylene glycol
and it will burn if the engine parts
are hot enough. Do not spill
coolant on a hot engine.
1. You can remove the coolantsurge tank pressure cap when
the cooling system, including the
coolant surge tank pressure cap
and upper radiator hose, is no
longer hot.
Turn the pressure cap slowly
counterclockwise about
one-quarter of a turn. If you
hear a hiss, wait for that to stop. This will allow any pressure still
left to be vented out the
discharge hose.
2. Then keep turning the pressure cap slowly, and remove it.
3. Fill the coolant surge tank withthe proper DEX-COOL®coolant
mixture, to between the MIN and
MAX lines. 4. With the coolant surge tank
pressure cap off, start the
engine and let it run until you
can feel the upper radiator hose
getting hot. Watch out for the
engine cooling fan.
By this time, the coolant level
inside the coolant surge tank
may be lower. If the level is
lower, add more of the proper
DEX-COOL
®coolant mixture to
the coolant surge tank until the
level reaches between the MIN
and MAX lines.
5. Then replace the pressure cap. Be sure the pressure cap is
hand-tight.
Check the level in the surge tank
when the cooling system has
cooled down. If the coolant is not at
the proper level, repeat Steps 1
through 3 and reinstall the pressure
cap. If the coolant still is not at the
proper level when the system cools
down again, see your dealer/retailer.
ProCarManuals.com
Page 294 of 398

10-28 Vehicle Care
Automatic Transmission
Shift Lock Control
System Check
{WARNING
When you are doing this
inspection, the vehicle could
move suddenly. If the vehicle
moves, you or others could be
injured.
1. Before starting this check, be sure there is enough room
around the vehicle. It should be
parked on a level surface. 2. Firmly apply the parking brake.
See Parking Brake
on
page 9‑39.
Be ready to apply the regular
brake immediately if the vehicle
begins to move.
3. With the engine off, turn the ignition to ON/RUN, but do not
start the engine. Without
applying the regular brake, try to
move the shift lever out of
P (Park) with normal effort. If the
shift lever moves out of P (Park),
contact your dealer/retailer for
service.
Ignition Transmission
Lock Check
While parked, and with the parking
brake set, try to turn the ignition to
LOCK/OFF in each shift lever
position.
.For automatic transmission
vehicles, the ignition should turn
to LOCK/OFF only when the
shift lever is in P (Park). The
ignition key should come out
only in LOCK/OFF.
.For manual transmission
vehicles, the ignition key should
come out only in LOCK/OFF.
Contact your dealer/retailer if
service is required.
ProCarManuals.com
Page 298 of 398

10-32 Vehicle Care
Notice:Do not cover a headlamp
to improve beam cut-off when
aiming. Covering a headlamp may
cause excessive heat build-up
which may cause damage to the
headlamp.
6. Turn on the low-beam
headlamps and place a piece of
cardboard or equivalent in front
of the headlamp not being
adjusted. This allows only the
beam of light from the headlamp
being adjusted to be seen on the
flat surface.
7. Locate the vertical headlampaiming screws, which are under
the hood near each headlamp
assembly.
The adjustment screw can be
turned with a E8 Torx
®socket.
8. Turn the vertical aiming screw until the headlamp beam is
aimed to the horizontal tape line.
Turn it clockwise or
counterclockwise to raise or
lower the angle of the beam.
9. Make sure that the light from theheadlamp is positioned at the
bottom edge of the horizontal
tape line. The lamp on the
left (A) shows the correct
headlamp aim. The lamp on the
right (B) shows the incorrect
headlamp aim.
10. Repeat Steps 7 through 9 for the opposite headlamp.
ProCarManuals.com
Page 299 of 398

Vehicle Care 10-33
Bulb Replacement
For the proper type of replacement
bulbs, seeReplacement Bulbson
page 10‑36.
For any bulb changing procedure
not listed in this section, contact
your dealer/retailer.
Halogen Bulbs
{WARNING
Halogen bulbs have pressurized
gas inside and can burst if you
drop or scratch the bulb. You or
others could be injured. Be sure
to read and follow the instructions
on the bulb package.
Headlamps
To replace one of the headlamp
bulbs, use the following procedure.
To replace the parking/turn signal
lamp bulb, see Front Turn Signal
and Parking Lamps on page 10‑34.
1. Open the hood. See Hood
on
page 10‑5for more information.
2. Remove the two screws from the top of the front fascia and grille.
They are inboard of the
headlamp assembly.
3. Remove the three screws retaining the headlamp
assembly. 4. Insert a flat blade tool through
the opening in the top. Make
sure the tool fits through the
opening in the headlamp bracket
lower arm.
5. Push the locking tab toward the rear of the vehicle with the tool
to lift the headlamp bracket
lower arm.
6. Pull back on the front fascia and then pull the headlamp assembly
out from the vehicle. Another
person might be needed to
assist with this step.
ProCarManuals.com
Page 300 of 398

10-34 Vehicle Care
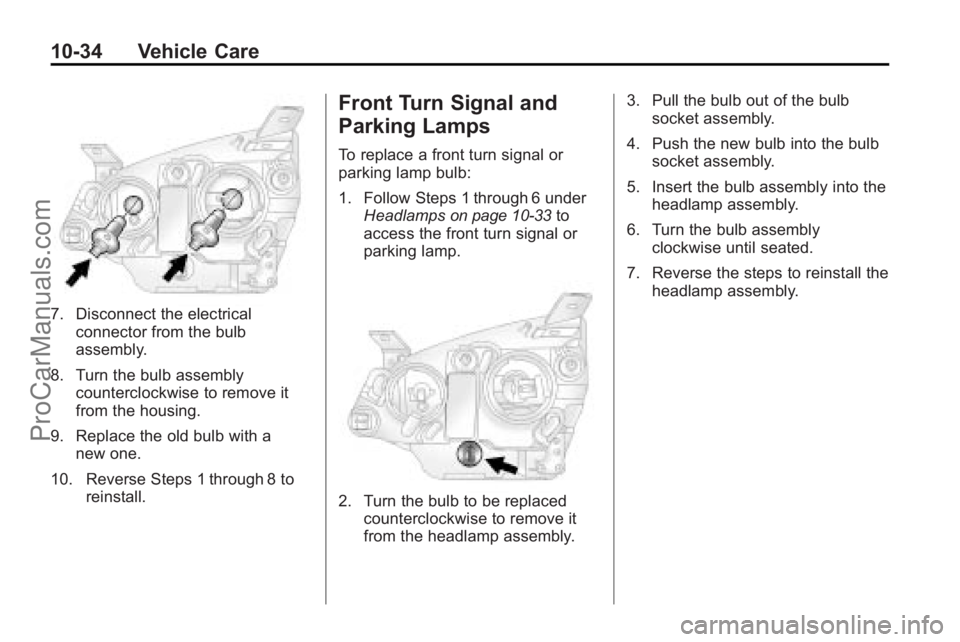
7. Disconnect the electricalconnector from the bulb
assembly.
8. Turn the bulb assembly counterclockwise to remove it
from the housing.
9. Replace the old bulb with a new one.
10. Reverse Steps 1 through 8 to reinstall.
Front Turn Signal and
Parking Lamps
To replace a front turn signal or
parking lamp bulb:
1. Follow Steps 1 through 6 under
Headlamps
on page 10‑33to
access the front turn signal or
parking lamp.
2. Turn the bulb to be replaced counterclockwise to remove it
from the headlamp assembly. 3. Pull the bulb out of the bulb
socket assembly.
4. Push the new bulb into the bulb socket assembly.
5. Insert the bulb assembly into the headlamp assembly.
6. Turn the bulb assembly clockwise until seated.
7. Reverse the steps to reinstall the headlamp assembly.
ProCarManuals.com
Page 301 of 398

Vehicle Care 10-35
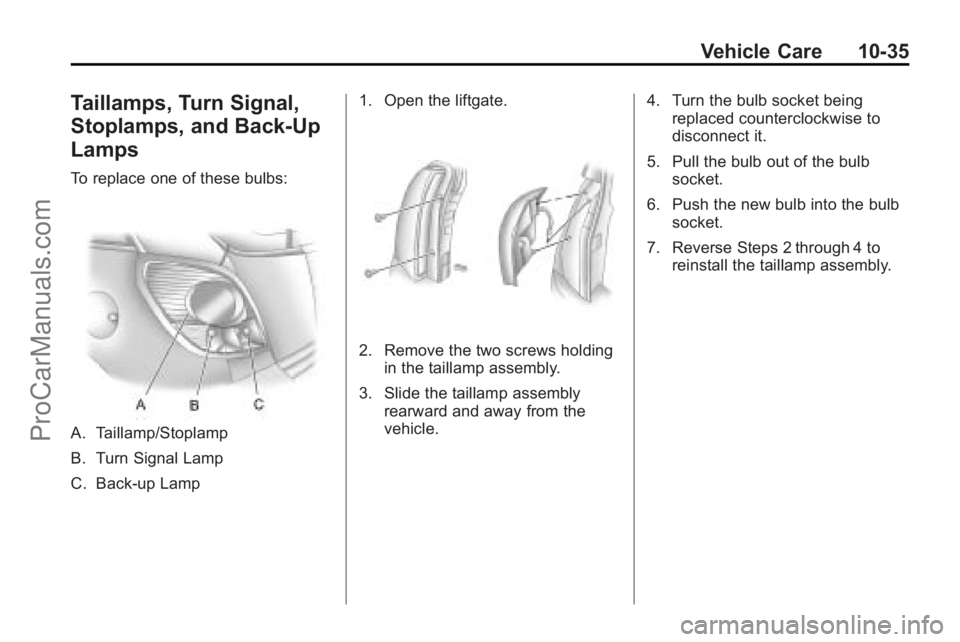
Taillamps, Turn Signal,
Stoplamps, and Back-Up
Lamps
To replace one of these bulbs:
A. Taillamp/Stoplamp
B. Turn Signal Lamp
C. Back-up Lamp1. Open the liftgate.
2. Remove the two screws holding
in the taillamp assembly.
3. Slide the taillamp assembly rearward and away from the
vehicle. 4. Turn the bulb socket being
replaced counterclockwise to
disconnect it.
5. Pull the bulb out of the bulb socket.
6. Push the new bulb into the bulb socket.
7. Reverse Steps 2 through 4 to reinstall the taillamp assembly.
ProCarManuals.com
Page 302 of 398

10-36 Vehicle Care
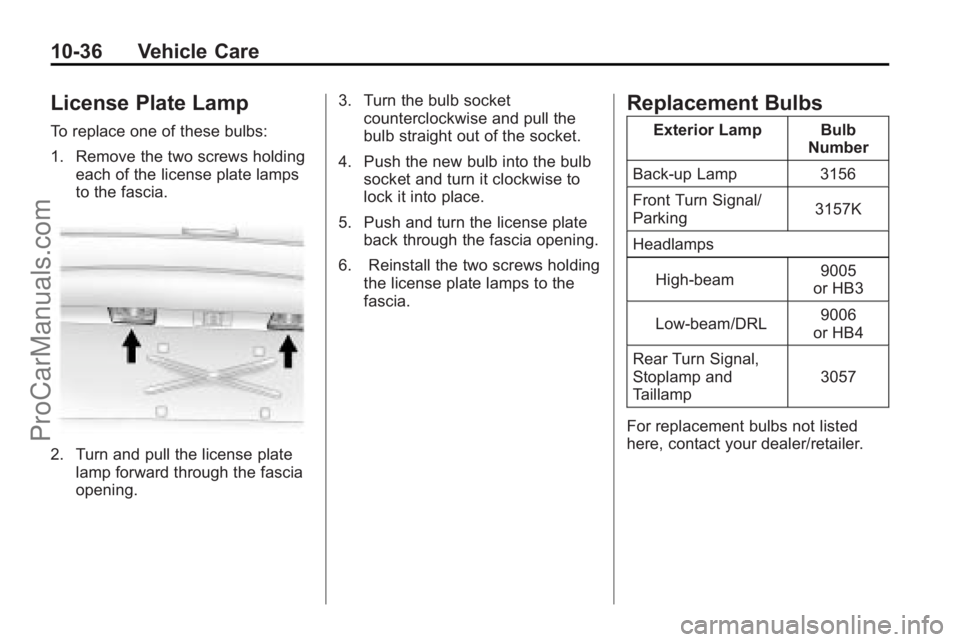
License Plate Lamp
To replace one of these bulbs:
1. Remove the two screws holdingeach of the license plate lamps
to the fascia.
2. Turn and pull the license plate
lamp forward through the fascia
opening. 3. Turn the bulb socket
counterclockwise and pull the
bulb straight out of the socket.
4. Push the new bulb into the bulb socket and turn it clockwise to
lock it into place.
5. Push and turn the license plate back through the fascia opening.
6. Reinstall the two screws holding the license plate lamps to the
fascia.
Replacement Bulbs
Exterior Lamp Bulb Number
Back-up Lamp 3156
Front Turn Signal/
Parking 3157K
Headlamps High-beam 9005
or HB3
Low-beam/DRL 9006
or HB4
Rear Turn Signal,
Stoplamp and
Taillamp 3057
For replacement bulbs not listed
here, contact your dealer/retailer.
ProCarManuals.com
Page 303 of 398

Vehicle Care 10-37
Electrical System
Electrical System
Overload
The vehicle has fuses and circuit
breakers to protect against an
electrical system overload.
When the current electrical load is
too heavy, the circuit breaker opens
and closes, protecting the circuit
until the current load returns to
normal or the problem is fixed.
This greatly reduces the chance of
circuit overload and fire caused by
electrical problems.
Fuses and circuit breakers protect
the following in the vehicle:
.Headlamp Wiring
.Windshield Wiper Motor
.Power Windows and other
Power Accessories
Headlamp Wiring
An electrical overload may cause
the lamps to go on and off, or in
some cases to remain off. Have the
headlamp wiring checked right
away if the lamps go on and off or
remain off.
Windshield Wipers
If the wiper motor overheats due to
heavy snow or ice, the windshield
wipers will stop until the motor cools
and will then restart.
Although the circuit is protected
from electrical overload, overload
due to heavy snow or ice, may
cause wiper linkage damage.
Always clear ice and heavy snow
from the windshield before using the
windshield wipers.
If the overload is caused by an
electrical problem and not snow or
ice, be sure to get it fixed.
Fuses and Circuit
Breakers
The wiring circuits in the vehicle are
protected from short circuits by
fuses. This greatly reduces the
chance of circuit overload and fire
caused by electrical problems.
There are two fuse blocks—the
engine compartment fuse block, and
the instrument panel fuse block.
To identify and check fuses and
relays, refer to the Fuse Usage
Chart on the inside surface of the
fuse panel door.
ProCarManuals.com
Page 304 of 398

10-38 Vehicle Care
Engine Compartment
Fuse Block
The engine compartment fuse block
is located on the driver side of the
engine compartment, near the
battery.
Notice:Spilling liquid on any
electrical components on the
vehicle may damage it. Always
keep the covers on any electrical
component.
Fuses Usage
FAN MAIN Cooling Fan Main
REAR/WPR Rear Wiper Motor
FAN AUX Cooling Fan
Auxiliary Fuses
Usage
ECM/
TCM/SGCM Engine Control
Module/
Transmission
Control Module/
Serial Data Gateway
Communication
Module
ProCarManuals.com
Page 305 of 398

Vehicle Care 10-39
FusesUsage
ECM Engine Control
Module
ENG-3 Engine 3
ENG-2 Engine 2
ENG-1 Engine 1
HYBRID BEC Not Used
RUN Run
S/ROOF Sunroof Module
HTD/SEAT Heated Seat Control
Module
BCM Body Control
Module
STRTR Starter Motor WPR Windshield Wiper
4WD/ESCM All-Wheel Drive
System
ABS Antilock Brake
System Module Fuses
Usage
A/C CLTCH Air Conditioning
Compressor
BLWR MTR Blower Motor AMP Amplifier
HORN Horn
ABS Antilock Brake
System Module
I/P BEC Instrument Panel
Bussed Electrical
Center
FRT FOG Front Fog Lamps
I/P BEC Instrument Panel
Bussed Electrical
Center
DRL Daytime Running
Light
T/LAMP RT Right Marker and
Parking Lamps
T/LAMP LT Left Marker and
Parking Lamps Fuses
Usage
TRLR
T/LAMP Trailer Parking
Lamps
HDLP HI LT Passenger Side
High-Beam
Headlamp
STOP LP Stoplamps DEFOG Defroster Fog
HDLP
LO RT Driver Side
Low-Beam
Headlamp
HDLP
LO LT Passenger Side
Low-Beam
Headlamp
HDLP HI RT Driver Side
High-Beam
Headlamp
OSRVM HTR Outside Rearview
Mirror Heating
ProCarManuals.com