window Seat Alhambra 2009 Owner's Guide
[x] Cancel search | Manufacturer: SEAT, Model Year: 2009, Model line: Alhambra, Model: Seat Alhambra 2009Pages: 285, PDF Size: 7.62 MB
Page 120 of 285
Lights and visibility
118
CautionIn icy conditions, always check that the wiper blades are not frozen to the
glass before using the wipers for the first time. If you switch on the wipers
when the wiper blades are frozen to the windscreen, you could damage both
the wiper blades and the wiper motor.Rear window wiper
The windscreen wiper lever controls the rear window wipers
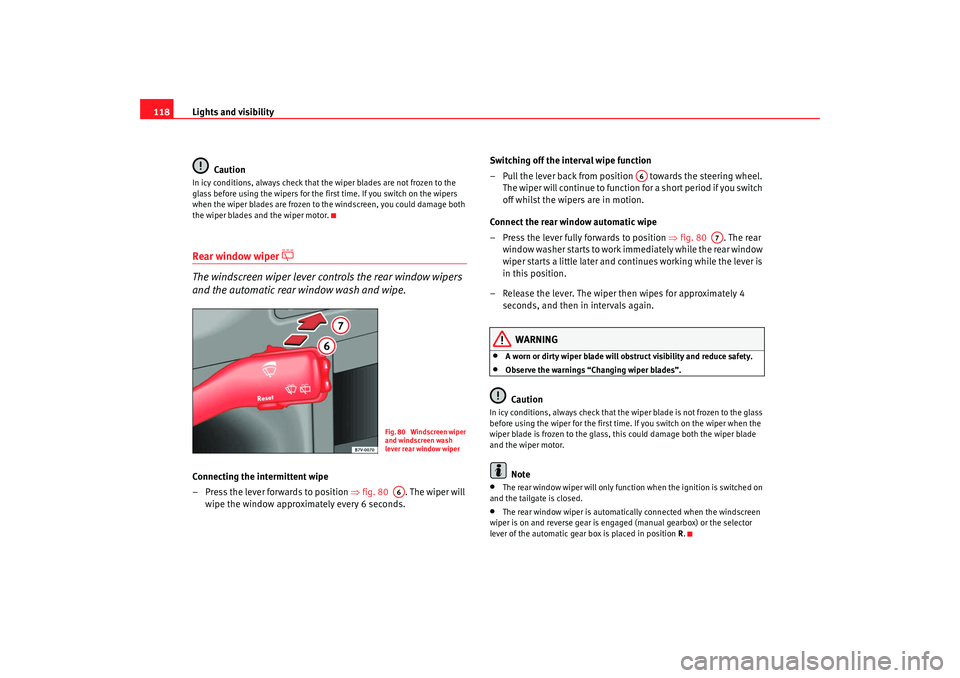
and the automatic rear window wash and wipe.Connecting the intermittent wipe
– Press the lever forwards to position ⇒ fig. 80 . The wiper will
wipe the window approximately every 6 seconds. Switching off the interval wipe function
– Pull the lever back from position towards the steering wheel.
The wiper will continue to function for a short period if you switch
off whilst the wipers are in motion.
Connect the rear window automatic wipe
– Press the lever fully forwards to position ⇒fig. 80 . The rear
window washer starts to work immediately while the rear window
wiper starts a little later and continues working while the lever is
in this position.
– Release the lever. The wiper then wipes for approximately 4 seconds, and then in intervals again.
WARNING
•
A worn or dirty wiper blade will obstruct visibility and reduce safety.
•
Observe the warnings “Changing wiper blades”.Caution
In icy conditions, always check that the wiper blade is not frozen to the glass
before using the wiper for the first time. If you switch on the wiper when the
wiper blade is frozen to the glass, this could damage both the wiper blade
and the wiper motor.
Note
•
The rear window wiper will only function when the ignition is switched on
and the tailgate is closed.
•
The rear window wiper is automatically connected when the windscreen
wiper is on and reverse gear is engaged (manual gearbox) or the selector
lever of the automatic gear box is placed in position R.
Fig. 80 Windscreen wiper
and windscreen wash
lever rear window wiperA6
A6
A7
alhambra_aleman.book Seite 118 Montag, 23. M‰ rz 2009 1:12 13
Page 121 of 285
Lights and visibility119
Safety First
Operating instructions
Tips and Maintenance
Te c h n i c a l D a t a
Headlamp washer*
The headlight washers clean the headlight lenses.The headlight washers are activated automatically when the windscreen
washer is used and the windscreen wiper lever is pulled towards the steering
wheel ⇒page 117, fig. 79 for at least 5 seconds – provided the dipped
headlights or main beams are switched on. Clean off stubborn dirt (insects,
etc.) from the headlights at regular intervals, for instance when filling the fuel
tank.
Note
To ensure that the headlight washers work properly in winter, keep the
nozzles in the bumper free of snow and remove any ice with a de-icer spray.
MirrorsInterior mirror
It is dangerous to drive if you cannot see clearly through the
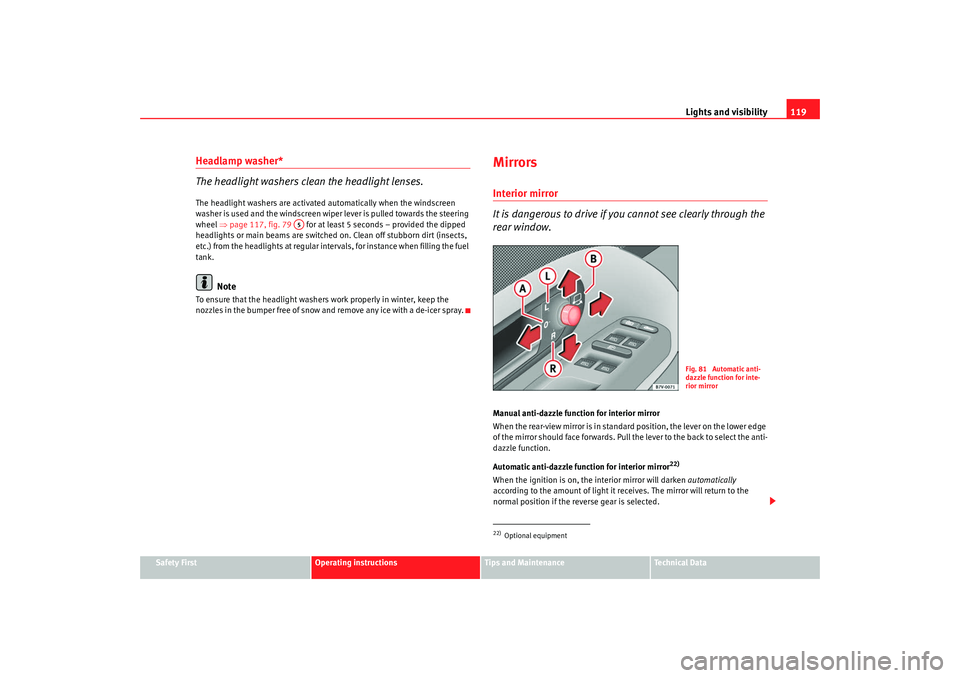
rear window.Manual anti-dazzle function for interior mirror
When the rear-view mirror is in standard position, the lever on the lower edge
of the mirror should face forwards. Pull the lever to the back to select the anti-
dazzle function.
Automatic anti-dazzle function for interior mirror
22)
When the ignition is on, the interior mirror will darken automatically
according to the amount of light it receives. The mirror will return to the
normal position if the reverse gear is selected.
A5
22)Optional equipment
Fig. 81 Automatic anti-
dazzle function for inte-
rior mirror
alhambra_aleman.book Seite 119 Montag, 23. M‰ rz 2009 1:12 13
Page 122 of 285
Lights and visibility
120This function can be activated and deactivated by pressing the rearview
mirror switch ⇒ page 119, fig. 81 . When it is activated, the warning lamp
lights up .Exterior mirrors
The exterior mirrors can be adjusted using the rotary knob in
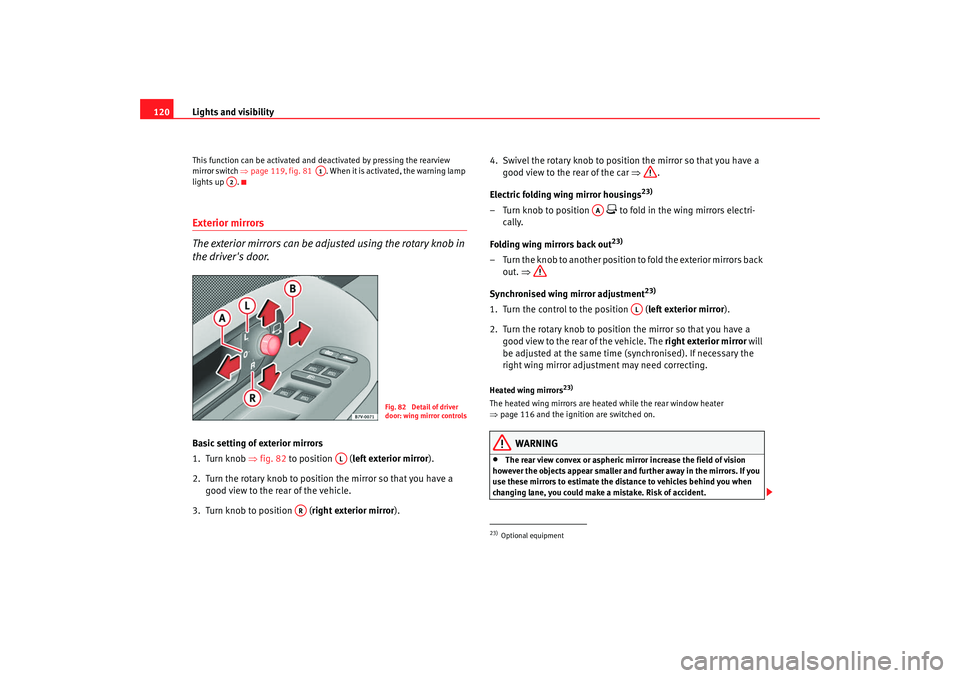
the driver's door.Basic setting of exterior mirrors
1. Turn knob ⇒fig. 82 to position ( left exterior mirror ).
2. Turn the rotary knob to position the mirror so that you have a good view to the rear of the vehicle.
3. Turn knob to position ( right exterior mirror). 4. Swivel the rotary knob to position the mirror so that you have a
good view to the rear of the car ⇒ .
Electric folding wing mirror housings
23)
– Turn knob to position
to fold in the wing mirrors electri-
cally.
Folding wing mirrors back out23)
– Turn the knob to another position to fold the exterior mirrors back out. ⇒
Synchronised wing mirror adjustment
23)
1. Turn the control to the position ( left exterior mirror).
2. Turn the rotary knob to position the mirror so that you have a good view to the rear of the vehicle. The right exterior mirror will
be adjusted at the same time (synchronised). If necessary the
right wing mirror adjustment may need correcting.Heated wing mirrors
23)
The heated wing mirrors are heated while the rear window heater
⇒ page 116 and the ignition are switched on.
WARNING
•
The rear view convex or aspheric mirror increase the field of vision
however the objects appear smaller and further away in the mirrors. If you
use these mirrors to estimate the distance to vehicles behind you when
changing lane, you could make a mistake. Risk of accident.
A1
A2
Fig. 82 Detail of driver
door: wing mirror controls
AL
AR
23)Optional equipment
AA
AL
alhambra_aleman.book Seite 120 Montag, 23. M‰ rz 2009 1:12 13
Page 124 of 285
Seats and stowage
122Seats and stowageThe importance of correct seat adjustmentProper seat adjustment optimises the level of protection
offered by seat belts and airbags.The driver seat, front passenger seat, and seats in the passenger compart-
ment, can be adjusted in many ways to suit the physical requirements of the
vehicle occupants. The correct seat position is very important for:•
fast and easy operation of all controls on the instrument panel,
•
relaxed posture that does not cause drowsiness,
•
safe driving,
•
optimum protection from the seat belts and airbag system ⇒page 7.
Ve hicle s ea ts
Yo u r ve h i cl e ha s a t o ta l o f five or seven
24) seats.
•
First row of seats: two seats
•
Second row of seats: three seats
•
Third row of seats
24): two seats
Each seat is equipped with a three-point seat belt.
WARNING
If the driver and passengers assume improper sitting positions, they may
sustain critical injuries.•
Never transport more people than there are seats available in the
vehicle.
•
Every occupant in the vehicle must properly fasten and wear the seat
belt belonging to his or her seat. Chil dren must be protected with an appro-
priate child restraint system. Section “Child Safety”
•
The seats and all head restraints must always be adjusted to body size
and the seat belt must always be properly adjusted to provide you and your
passengers with optimum protection.
•
Always keep your feet in the footwell when the vehicle is moving; never
rest them on the dash panel, out of the window or on the seat. This also
applies to passengers. An incorrect sitting position exposes you to an
increased risk of injury in the event of a braking manoeuvre or an accident.
If the airbag is triggered, you could sustain fatal injuries due to an improper
sitting position.
•
It is important for the driver and front passenger to maintain a distance
of at least 25 cm from the steering wheel or dash panel. Failure to respect
the minimum distance means that the airbag will not protect you. Risk of
fatal injury. The distance between the driver and the steering wheel or
between the front passenger and the dash panel should always be as great
as possible.
•
Adjust the driver or front passenger seat only when the vehicle is
stationary. Otherwise your seat could move unexpectedly while the vehicle
is moving. This could increase the risk of an accident and therefore injury.
In addition, while adjusting your seat, you will assume an incorrect sitting
position. Risk of fatal accidents.
•
Special guidelines apply to installing a child seat on the front
passenger seat. When installing a child seat, observe the warning note in
“Child safety”.
•
The seats in the third row of seats may, for safety reasons, only be used
if the luggage compartment cover has been removed.
24)Optional equipment
WARNING (continued)
alhambra_aleman.book Seite 122 Montag, 23. M‰ rz 2009 1:12 13
Page 147 of 285
Seats and stowage145
Safety First
Operating instructions
Tips and Maintenance
Te c h n i c a l D a t a
WARNING
Loose luggage and other objects in the luggage compartment can cause
serious injuries.•
Always stow objects in the luggage compartment and secure them on
the fastening rings.
•
Use suitable specialist straps to secure heavy objects.
•
During sudden manoeuvres or accidents, loose objects can be thrown
forward, injuring vehicle occupants or passers-by. This increased risk of
injury will be further increased if a lo ose object is struck by an inflating
airbag. If this happens, objects can be transformed into “missiles”. Risk of
fatal injury.
•
Remember that transporting heavy objects modifies the driving condi-
tions as the centre of gravity has been altered. There is a risk of accident.
Therefore, it is essential to adjust your speed and driving style accordingly,
to avoid accidents.
•
Never exceed the allowed axle loads or allowed maximum weight. If the
allowed axle load or the allowed total weight is exceeded, the driving char-
acteristics of the vehicle may change, leading to accidents, injuries and
damage to the vehicle.
•
Never leave the vehicle unattended, especially when the tailgate is
open. Children could climb into the luggage compartment closing the door
behind them; they will remain trapped without help and there is a mortal
risk.
•
Never allow children to play in or around the vehicle. Close and lock
both the tailgate and all the doors when you leave the vehicle. Before you
lock the vehicle, make sure that there are no adults or children in the
vehicle.
•
Never transport passengers in the luggage compartment. Every
passenger must be properly belted in.
Caution
•
Avoid overloading small areas by placing heavy objects on the vehicle
floor.
•
The wires of the heating element in the rear window and the window aerial
in the rear side windows could be damaged if objects on the luggage
compartment cover rub against them.
•
If you have removed the seats from the passenger compartment, you
should place a large, robust covering over the floor anchorings to prevent
damage.Note
•
Air circulation in the vehicle helps reduce fogging of the windows. Used
air escapes through ventilation slits in the side trim of the luggage compart-
ment. Ensure that the ventilation slits are never covered.
•
Straps for securing the load to the fastening rings are commercially
available.
Fastening rings
There are fastening rings in the luggage compartment which
can be used to secure luggage and other objects.– Always use suitable undamaged belts for fastening the luggage or any other object tot he anchorage rings ⇒ in “Loading the
luggage compartment” on page 144.The retainers for the detachable seat belts for the third row of seats and the
floor anchorings for the seats can be used as fastening rings for items of
luggage.
alhambra_aleman.book Seite 145 Montag, 23. M‰ rz 2009 1:12 13
Page 149 of 285
Seats and stowage147
Safety First
Operating instructions
Tips and Maintenance
Te c h n i c a l D a t a
•
Always stow objects safely in the vehicle and secure them on the
fastening rings if necessary.
•
Use suitable specialist straps to secure heavy objects.
•
Loose objects in the vehicle can move suddenly. As the centre of gravity
moves, safety is impaired and the vehicle becomes difficult to handle.
•
During sudden manoeuvres or accidents, loose objects can be thrown
forward, injuring vehicle occupants or passers-by. This increased risk of
injury will be further increased if a lo ose object is struck by an inflating
airbag. If this happens, objects can be transformed into “missiles”. Risk of
fatal injury.
•
Remember that transporting heavy objects modifies the driving condi-
tions as the centre of gravity has been altered. There is a risk of accident.
Therefore, it is essential to adjust your speed and driving style accordingly,
to avoid accidents.
•
Never exceed the allowed axle loads or allowed maximum weight. If the
allowed axle load or the allowed total weight is exceeded, the driving char-
acteristics of the vehicle may change, leading to accidents, injuries and
damage to the vehicle.
•
Never leave the vehicle unattended, especially when the tailgate is
open. Children could climb into the interior of the vehicle closing the door
behind them; they will remain trapped without help and there is a mortal
risk.
•
Never allow children to play in or around the vehicle. Close and lock all
windows, the tailgate and all doors when you leave the vehicle.
•
Never transport passengers in the luggage compartment. Every
passenger must be properly belted in.
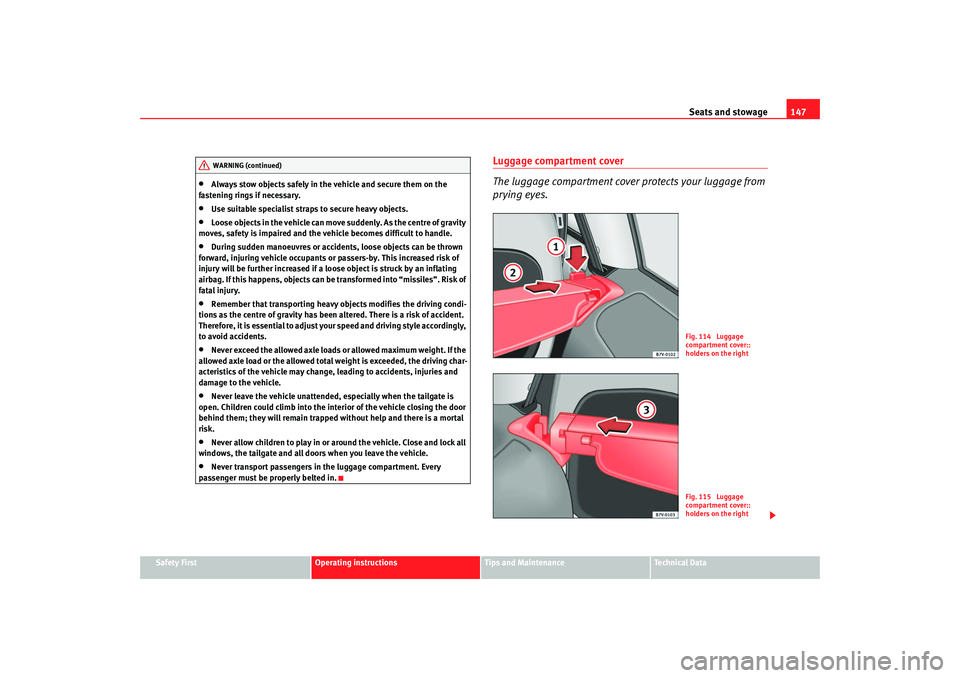
Luggage compartment cover
The luggage compartment cover protects your luggage from
prying eyes.
WARNING (continued)
Fig. 114 Luggage
compartment cover::
holders on the rightFig. 115 Luggage
compartment cover::
holders on the right
alhambra_aleman.book Seite 147 Montag, 23. M‰ rz 2009 1:12 13
Page 150 of 285
Seats and stowage
148
Opening the luggage compartment cover
– After fitting the luggage compartment cover, pull the handle on the cover back and hook in the cover on the side.
Removing the luggage compartment cover
– Press the unlock button (with the luggage compartment cover rolled up) ⇒page 147, fig. 114 in the direction of the arrow
and remove the cover from the right holder upwards.
– Remove the cover from the left holder in the direction of the arrow and remove from the vehicle.
Fitting the luggage compartment cover
– Push the luggage compartment cover to the stop in the direction of the arrow ⇒page 147, fig. 115 into the left-hand holder.
– Press the cover down into the right-hand holder until it engages in position.Light items of clothing or other objects on the luggage compartment cover
can restrict visibility through the rear window.
WARNING
•
Never leave hard, heavy or sharp objects on the shelf (unrolled) or in the
pockets of clothing on the luggage compartment cover. Animals must
never be allowed onto the luggage compartment cover. During a sudden
braking or driving manoeuvre or an accident, these objects and animals
endanger all vehicle occupants.Risk of injury.
Caution
The wires of the heating element in the rear window and the window aerial in
the rear side windows could be damaged if objects on the luggage compart-
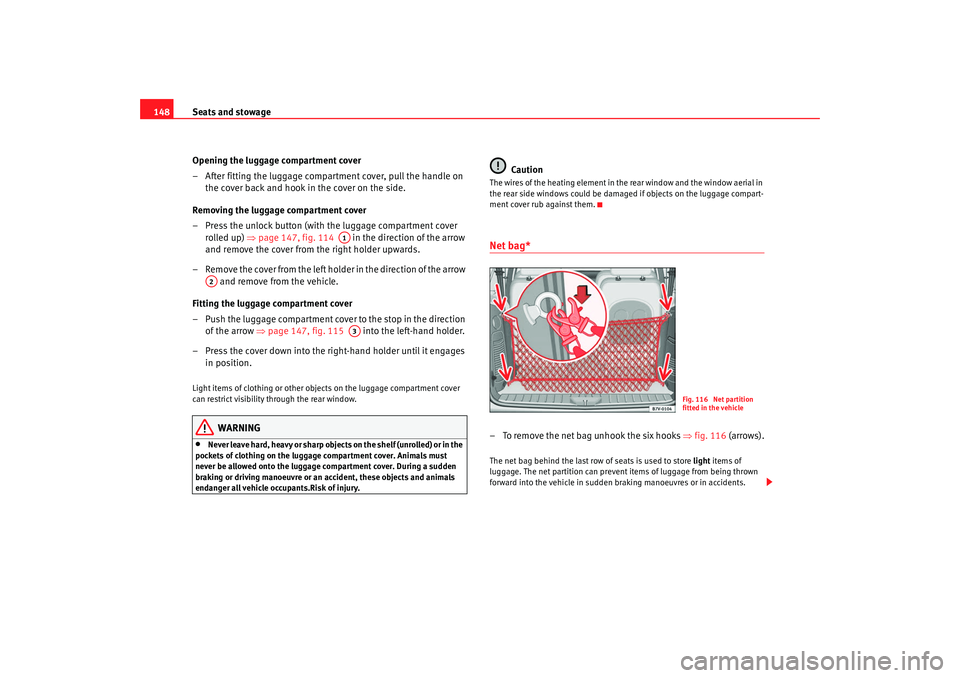
ment cover rub against them.Net bag*– To remove the net bag unhook the six hooks ⇒fig. 116 (arrows).The net bag behind the last row of seats is used to store light items of
luggage. The net partition can prevent items of luggage from being thrown
forward into the vehicle in sudden braking manoeuvres or in accidents.
A1
A2
A3
Fig. 116 Net partition
fitted in the vehicle
alhambra_aleman.book Seite 148 Montag, 23. M‰ rz 2009 1:12 13
Page 152 of 285
Seats and stowage
150•
Damage to the vehicle caused by incorrect installation of mounts or roof
carrier systems not approved by the factory are excluded from the vehicle
warranty.
Securing the load
Loads transported on the roof carrier must be securely
attached. The car's handling is affected when transporting
loads.The maximum permissible roof load for your vehicle is 75 kg. The load limit
applies to the combined weight of the carrier system and the load itself.
Distribute the load evenly. However, if you are using a roof carrier with a lower
weight rating, you will not be able to carry the maximum roof load. Do not
exceed the maximum weight limit for the roof carrier which is listed in the
fitting instructions.
WARNING
•
If damaged, fine or inadequate securing straps are used to fasten
objects carried on the roof, they could break in the event of sharp braking.
This could cause an accident and serious injury.
•
Always use appropriate securing straps to secure objects on the roof
carrier against sliding or flying off.,This could cause an accident. The load
must be correctly secured.
•
Always respect the maximum authorised weight for the roof, the
maximum authorised weight on the axles and the total maximum author-
ised weight of the vehicle. Otherwise there is danger of causing an acci-
dent.
•
The risk of an accident is increased by transporting heavy or bulky
loads on the roof, which affects the car's handling by shifting the centre of
gravity and increasing susceptibility to cross winds. Both circumstances increase the risk of accident. Therefore you must adapt your driving style
and speed to the prevailing conditions - avoid sudden braking or driving
manoeuvres when there is a load on the roof carrier.
Caution
Please take extra care not to let the tailgate or rear window strike the roof load
when open – there is a risk of damage to the vehicle.
For the sake of the environment
The roof carrier is often left on the roof for convenience even if it is not being
used. However, increased air resistance means that the vehicle uses more
fuel. For this reason you should always take off the roof carrier when it is not
in use.Cooling and heating box*Notes on usage
The cooling and heating box may on
ly be installed in the posi-
tion of rear left seat in the third row.Power can be supplied by any of the 12 Volt sockets in the vehicle. It
consumes approximately 33 watts and has a capacity of approximately 32
litres.
The battery will discharge if the cooling and heating box is used for a long
period while the engine is switched off.
WARNING (continued)
alhambra_aleman.book Seite 150 Montag, 23. M‰ rz 2009 1:12 13
Page 156 of 285
Heating, Ventilation and Air conditioning
154
− ECON (cooling system off) or
− OFF (entire system off)
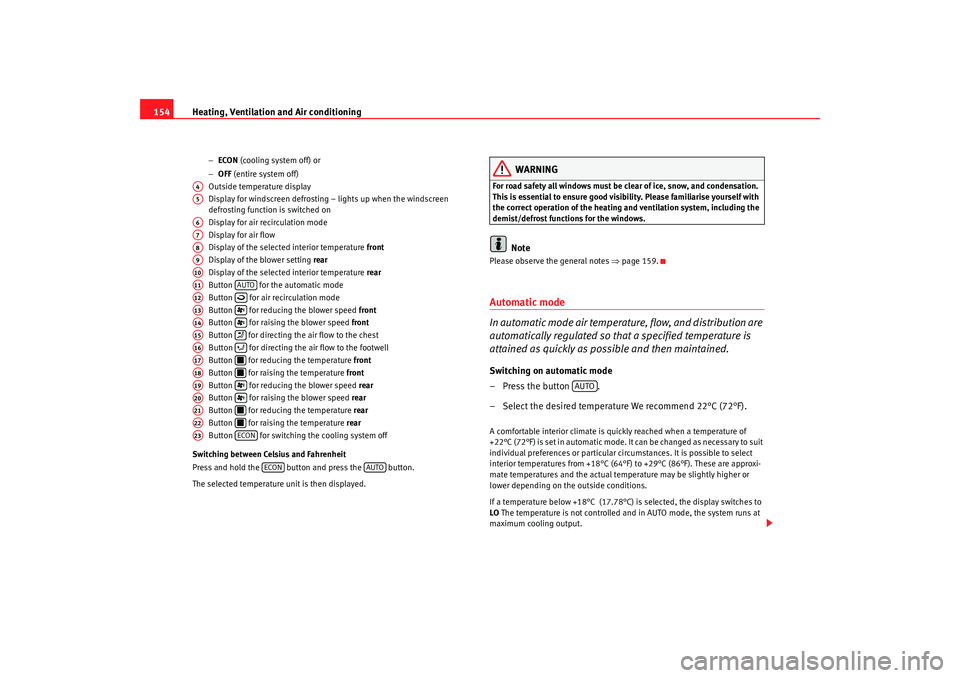
Outside temperature display
Display for windscreen defrosting – lights up when the windscreen
defrosting function is switched on
Display for air recirculation mode
Display for air flow
Display of the selected interior temperature front
Display of the blower setting rear
Display of the selected interior temperature rear
Button for the automatic mode
Button for air recirculation mode
Button for reducing the blower speed front
Button for raising the blower speed front
Button for directing the air flow to the chest
Button for directing the air flow to the footwell
Button for reducing the temperature front
Button for raising the temperature front
Button for reducing the blower speed rear
Button for raising the blower speed rear
Button for reducing the temperature rear
Button for raising the temperature rear
Button for switching the cooling system off
Switching between Celsius and Fahrenheit
Press and hold the button and press the button.
The selected temperature unit is then displayed.
WARNING
For road safety all windows must be clear of ice, snow, and condensation.
This is essential to ensure good visibility. Please familiarise yourself with
the correct operation of the heating and ventilation system, including the
demist/defrost functions for the windows.
Note
Please observe the general notes ⇒page 159.Automatic mode
In automatic mode air temperature, flow, and distribution are
automatically regulated so that a specified temperature is
attained as quickly as possible and then maintained.Switching on automatic mode
– Press the button .
– Select the desired temperature We recommend 22°C (72°F).A comfortable interior climate is quickly reached when a temperature of
+22°C (72°F) is set in automatic mode. It can be changed as necessary to suit
individual preferences or particular circumstances. It is possible to select
interior temperatures from +18°C (64°F) to +29°C (86°F). These are approxi-
mate temperatures and the actual temperature may be slightly higher or
lower depending on the outside conditions.
If a temperature below +18°C (17.78°C) is selected, the display switches to
LO The temperature is not controlled and in AUTO mode, the system runs at
maximum cooling output.
A4A5A6A7A8A9A10A11
AUTO
A12
A13
A14
A15
A16
A17
A18
A19
A20
A21
A22
A23
ECON
ECON
AUTO
AUTO
alhambra_aleman.book Seite 154 Montag, 23. M‰ rz 2009 1:12 13
Page 158 of 285
Heating, Ventilation and Air conditioning
156Te m p e r a t u r e
The selected temperature setting is shown on the display. It is possible to
select interior temperatures from +18°C (64°F) to +29°C (86°F). These are
approximate temperatures and the actual temperature may be slightly higher
or lower depending on the outside conditions.
If a temperature below +18°C (17.78°C) is selected, the display switches to
LO The temperature is not controlled and in AUTO mode, the system runs at
maximum cooling output.
If a temperature above +29°C (86°F) is selected, the display switches to HI In
this setting the system runs at maximum heating output and the temperature
is not controlled.
Blower
The blower can be adjusted gradually using the controls y . Always
have the blower running at a low setting to ensure a constant flow of fresh air
into the vehicle. If the blower is set to 0, the Climatronic is switched off.
Air distribution
The air distribution is adjusted using the buttons and . It is also
possible to open and close some of the air outlets separately.
Switching off the cooling system
Pressing the button switches off the air cooling system to save fuel.
The temperature continues to be controlled, but the air cannot be cooled. The
set temperature can then only be reached if it is higher than the outside
temperature.
Switching the Climatronic on/off
Press button until OFF is shown on display . The Climatronic is switched
off. This function should be used in certain situations only (e.g. if the system
develops a fault).
The Climatronic is switched back on by pressing button .
WARNING
When the Climatronic is off open a window to ensure an adequate supply of
fresh air in the vehicle. Otherwise, when the Climatronic is switched off, no
fresh air enters the vehicle. Stale or contaminated air inside the vehicle
may cause drowsiness, increasing the risk of accident.Air recirculation mode
Air recirculation mode prevents fumes or unpleasant smells
from entering the vehicle.– Press the button ⇒page 155, fig. 119 to switch air recircula-
tion mode on or off. This is ON if the symbol is displayed
on the screen.Air recirculation mode prevents strong odours in the ambient air from
entering the vehicle interior, for example when passing through a tunnel or in
queuing traffic.
When the outside temperature is low, using air recirculation mode provides
more effective heating by heating air from the vehicle interior instead of cold
air from outside.
When the outside temperature is high, using air recirculation mode provides
more effective cooling by cooling air from the vehicle interior instead of warm
air from outside.
ECON
A13
A3
AUTO
A12
A6
alhambra_aleman.book Seite 156 Montag, 23. M‰ rz 2009 1:12 13