child lock Seat Alhambra 2009 Owner's Manual
[x] Cancel search | Manufacturer: SEAT, Model Year: 2009, Model line: Alhambra, Model: Seat Alhambra 2009Pages: 285, PDF Size: 7.62 MB
Page 5 of 285
Contents3
ContentsThe structure of this manual
. . . . .
Content
. . . . . . . . . . . . . . . . . . . . . . . . . . . . . . . .
Safety First
. . . . . . . . . . . . . . . . . . . . . . . . . . .
Safe Driving
. . . . . . . . . . . . . . . . . . . . . . . . . . . . . .
Brief introduction . . . . . . . . . . . . . . . . . . . . . . . .
Proper sitting position for occupants . . . . . . . . .
Pedal area . . . . . . . . . . . . . . . . . . . . . . . . . . . . . .
Stowing luggage . . . . . . . . . . . . . . . . . . . . . . . . .
Seat belts
. . . . . . . . . . . . . . . . . . . . . . . . . . . . . . . .
Introduction . . . . . . . . . . . . . . . . . . . . . . . . . . . . .
Why wear seat belts? . . . . . . . . . . . . . . . . . . . . . .
Seat belts . . . . . . . . . . . . . . . . . . . . . . . . . . . . . . .
Belt tension devices . . . . . . . . . . . . . . . . . . . . . .
Airbag system
. . . . . . . . . . . . . . . . . . . . . . . . . . . .
Brief introduction . . . . . . . . . . . . . . . . . . . . . . . .
Front airbags . . . . . . . . . . . . . . . . . . . . . . . . . . . .
Side airbags . . . . . . . . . . . . . . . . . . . . . . . . . . . . .
Curtain airbags . . . . . . . . . . . . . . . . . . . . . . . . . .
Deactivating airbags* . . . . . . . . . . . . . . . . . . . . .
Child safety
. . . . . . . . . . . . . . . . . . . . . . . . . . . . . .
Brief introduction . . . . . . . . . . . . . . . . . . . . . . . .
Child seats . . . . . . . . . . . . . . . . . . . . . . . . . . . . . .
Installation of child seats in vehicle seats . . . . .
Integrated child seat . . . . . . . . . . . . . . . . . . . . . .
Operating instructions
. . . . . . . . . . . .
Overview
. . . . . . . . . . . . . . . . . . . . . . . . . . . . . . . . .
Overview of the instrument panel . . . . . . . . . . .
Instruments . . . . . . . . . . . . . . . . . . . . . . . . . . . . .
Display in the instrument panel . . . . . . . . . . . . .
Warning lamps . . . . . . . . . . . . . . . . . . . . . . . . . . .
On board computer with multifunction display .
Steering wheel controls . . . . . . . . . . . . . . . . . . .
Telephone* . . . . . . . . . . . . . . . . . . . . . . . . . . . . .
Unlocking and locking
. . . . . . . . . . . . . . . . . . . .
Keys . . . . . . . . . . . . . . . . . . . . . . . . . . . . . . . . . . .
Central locking . . . . . . . . . . . . . . . . . . . . . . . . . . .
Key with remote control . . . . . . . . . . . . . . . . . . .
Anti-theft alarm system . . . . . . . . . . . . . . . . . . . .
Tailgate . . . . . . . . . . . . . . . . . . . . . . . . . . . . . . . . .
Windows . . . . . . . . . . . . . . . . . . . . . . . . . . . . . . .
Sliding/tilting sun roof . . . . . . . . . . . . . . . . . . . .
Lights and visibility
. . . . . . . . . . . . . . . . . . . . . . .
Lights . . . . . . . . . . . . . . . . . . . . . . . . . . . . . . . . . .
Visibility . . . . . . . . . . . . . . . . . . . . . . . . . . . . . . . .
Windscreen washers . . . . . . . . . . . . . . . . . . . . . .
Mirrors . . . . . . . . . . . . . . . . . . . . . . . . . . . . . . . . .
Seats and stowage
. . . . . . . . . . . . . . . . . . . . . . .
The importance of correct seat adjustment . . . .
Head restraints . . . . . . . . . . . . . . . . . . . . . . . . . .
Front seats . . . . . . . . . . . . . . . . . . . . . . . . . . . . . .
Rear seats . . . . . . . . . . . . . . . . . . . . . . . . . . . . . .
Stowage compartments . . . . . . . . . . . . . . . . . . .
Ashtrays, cigarette lighter and electrical sockets
AUX-IN Input . . . . . . . . . . . . . . . . . . . . . . . . . . . . .
Hazard warning triangles and first aid kit . . . . .
Luggage compartment . . . . . . . . . . . . . . . . . . . . Roof carrier . . . . . . . . . . . . . . . . . . . . . . . . . . . . . .
Cooling and heating box* . . . . . . . . . . . . . . . . . .
Heating, Ventilation and Air conditioning
. .
Climatronic . . . . . . . . . . . . . . . . . . . . . . . . . . . . . .
Driving
. . . . . . . . . . . . . . . . . . . . . . . . . . . . . . . . . . .
Address . . . . . . . . . . . . . . . . . . . . . . . . . . . . . . . .
Safety . . . . . . . . . . . . . . . . . . . . . . . . . . . . . . . . . .
Ignition lock . . . . . . . . . . . . . . . . . . . . . . . . . . . . .
Starting and stopping the engine . . . . . . . . . . .
Manual gearbox . . . . . . . . . . . . . . . . . . . . . . . . . .
Automatic gearbox . . . . . . . . . . . . . . . . . . . . . . .
Handbrake . . . . . . . . . . . . . . . . . . . . . . . . . . . . . .
Parking distance warning system* . . . . . . . . . . .
Cruise control system (CCS) . . . . . . . . . . . . . . . .
Tips and Maintenance
. . . . . . . . . . . . .
Intelligent technology
. . . . . . . . . . . . . . . . . . . . .
Brakes . . . . . . . . . . . . . . . . . . . . . . . . . . . . . . . . .
Driving and the environment
. . . . . . . . . . . . . .
Running-in . . . . . . . . . . . . . . . . . . . . . . . . . . . . . .
Exhaust gas emission control system . . . . . . . .
Economical and environmentally friendly driving
Driving abroad . . . . . . . . . . . . . . . . . . . . . . . . . . .
Trailer towing . . . . . . . . . . . . . . . . . . . . . . . . . . . .
Cleaning and caring for your vehicle
. . . . . . .
General notes . . . . . . . . . . . . . . . . . . . . . . . . . . .
Care of the vehicle exterior . . . . . . . . . . . . . . . . .
Care of the vehicle interior . . . . . . . . . . . . . . . . .
5
6
7
7
7
10
15
16
18
18
20
23
31
33
33
37
40
42
44
46
46
48
51
54 63
63
63
64
69
72
81
86
87
88
88
89
95
97
99
102
105
109
109
115
117
119
122
122
123
125
127
134
140
143
144
144 149
150
153
153
161
161
162
163
165
167
168
174
175
177
181
181
181
187
187
188
189
191
192
195
195
196
201
alhambra_aleman.book Seite 3 Montag, 23. M‰
rz 2009 1:12 13
Page 19 of 285

Safe Driving17
Safety First
Operating instructions
Tips and Maintenance
Te c h n i c a l D a t a
behind them; they will remain trapped without help and there is a mortal
risk.
•
Never allow children to play in or around the vehicle. Close and lock
both the tailgate and all the doors when you leave the vehicle. Before you
lock the vehicle, make sure that there are no adults or children in the
vehicle.
•
Never transport passengers in the luggage compartment. Every
passenger must be properly belted in ⇒page 18.Note
•
Air circulation in the vehicle helps reduce fogging of the windows. Used
air escapes through ventilation slits in the side trim of the luggage compart-
ment. Ensure that the ventilation slits are never covered.
•
Straps for securing the load to the fastening rings are commercially
available.
Fastening rings
There are four fastening rings in the luggage compartment
which can be used to secure luggage and other objects.– Always use suitable and undamaged straps to secure luggage and other objects to the fastening rings ⇒ in “Loading the
luggage compartment” on page 16.
– Pull up the fastening rings to attach the straps.
The retainers for the detachable seat belts for the third row of seats and the
floor anchorings for the seats can be used as fastening rings for items of
luggage.
During a collision or an accident, even small and light objects can build up so
much energy that they can cause very severe injuries. The amount of “kinetic
energy” depends on the speed of the vehicle and the weight of the object.
The most significant factor, however, is the speed of the vehicle.
Example: An object weighing 4.5 kg is lying unsecured in the vehicle. During
a frontal collision at a speed of 50 km/h, this object generates a force corre-
sponding to 20 times its weight. That means that the effective weight of the
object increases to about 90 kg. You can imagine the severity of the injuries
which might be sustained if this “projectile” strikes an occupant as it flies
through the passenger compartment. This increased risk of injury will be
further increased if a loose object is struck by an inflating airbag.
WARNING
If pieces of baggage or other objects are secured to the fastening rings with
inappropriate or damaged retaining cords, injuries could result in the event
of braking manoeuvres or accidents.•
To prevent pieces of luggage or other objects from flying forward,
always use appropriate retaining cords which are secured to the fastening
rings.
•
Never secure a child seat on the fastening rings.
WARNING (continued)
alhambra_aleman.book Seite 17 Montag, 23. M‰ rz 2009 1:12 13
Page 25 of 285
Seat belts23
Safety First
Operating instructions
Tips and Maintenance
Te c h n i c a l D a t a
•
Faste n you r sea t be lt be fore ev e r y t rip - e ve n w hen d riv in g in tow n. Tha t
applies also to your front and rear passengers – danger of injury!
•
The seat belt cannot offer its full protection if the belt web is not posi-
tioned correctly.
•
Never allow two passengers (even children) to share the same seat belt.
•
Keep both feet in the foot-well in front of your seat as long as the
vehicle is in motion.
•
Never unbuckle a seat belt while the vehicle is in motion. Risk of fatal
injury.
•
The belt webbing must never be twisted while it is being worn.
•
The belt webbing should never lie on hard or fragile objects (such as
glasses or pens, etc.) because this can cause injuries.
•
Do not allow the seat belt to be damaged or jammed, or to rub on any
sharp edges.
•
Never wear the seat belt under the arm or in any other incorrect posi-
tion.
•
Loose, bulky clothing (such as an overcoat over a jacket) impairs the
proper fit and function of the belts, reducing their capacity to protect.
•
The slot in the seat belt buckle must not be blocked with paper or other
objects, as this can prevent the latch plate from engaging securely.
•
Never use seat belt clips, retaining rings or similar instruments to alter
the position of the belt webbing.
•
Frayed or torn seat belts or damage to the connections, belt retractors
or parts of the buckle could cause seve re injuries in the event of an acci-
dent. Therefore, you must check the condition of all seat belts at regular
intervals.
•
Seat belts which have been worn in an accident and stretched must be
replaced by a qualified workshop. Renewal may be necessary even if there
is no apparent damage. The belt anchorage should also be checked.
•
Do not attempt to repair a damaged seat belt yourself. The seat belts
must not be removed or modified in any way.
•
The belts must be kept clean, otherwise the retractors may not work
properly.
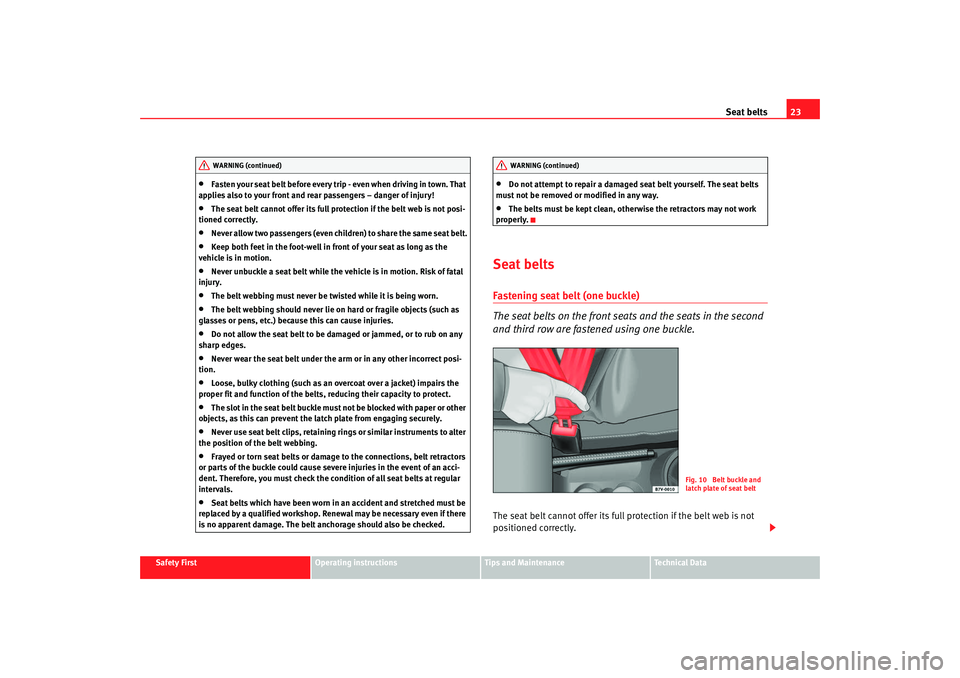
Seat beltsFastening seat belt (one buckle)
The seat belts on the front seats and the seats in the second
and third row are fastened using one buckle.The seat belt cannot offer its full protection if the belt web is not
positioned correctly.
WARNING (continued)
WARNING (continued)
Fig. 10 Belt buckle and
latch plate of seat belt
alhambra_aleman.book Seite 23 Montag, 23. M‰ rz 2009 1:12 13
Page 28 of 285
Seat belts
26The following features are available to adjust the seat belt in the shoulder
region:•
Belt height adjustment for the front seats and the outer seats in the
second row,
•
front seat height adjustment*.
WARNING
An incorrectly worn seat belt web can cause severe injuries in the event of
an accident.•
T h e s h o u l d e r p a r t o f t h e s e a t b e l t m u st l i e o n t h e ce n t r e o f t h e s h o u l d e r ,
never across the neck. The seat belt must lie flat and fit comfortably on the
torso
•
The lap part of the seat belt must lie across the pelvis, never across the
stomach. The seat belt must lie flat and fit comfortably on the pelvis Pull
the belt tight if necessary to take up any slack.
•
Read and observe the warnings ⇒page 23.
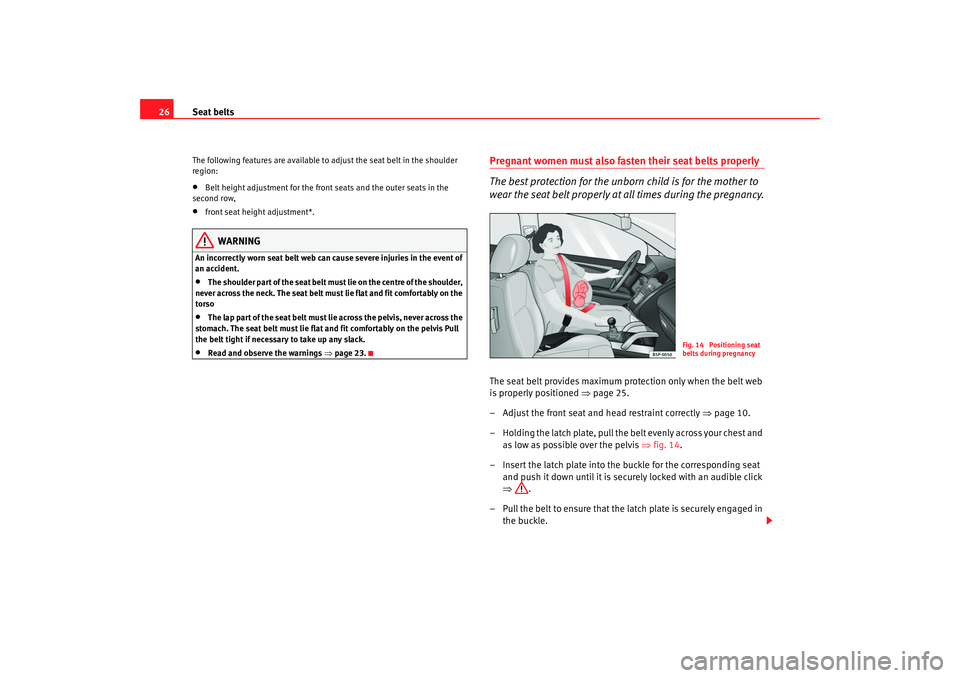
Pregnant women must also fasten their seat belts properly
The best protection for the unborn child is for the mother to
wear the seat belt properly at all times during the pregnancy.The seat belt provides maximum protection only when the belt web
is properly positioned ⇒page 25.
– Adjust the front seat and head restraint correctly ⇒page 10.
– Holding the latch plate, pull the belt evenly across your chest and as low as possible over the pelvis ⇒fig. 14 .
– Insert the latch plate into the buckle for the corresponding seat and push it down until it is securely locked with an audible click
⇒ .
– Pull the belt to ensure that the latch plate is securely engaged in the buckle.
Fig. 14 Positioning seat
belts during pregnancy
alhambra_aleman.book Seite 26 Montag, 23. M‰ rz 2009 1:12 13
Page 58 of 285
Child safety
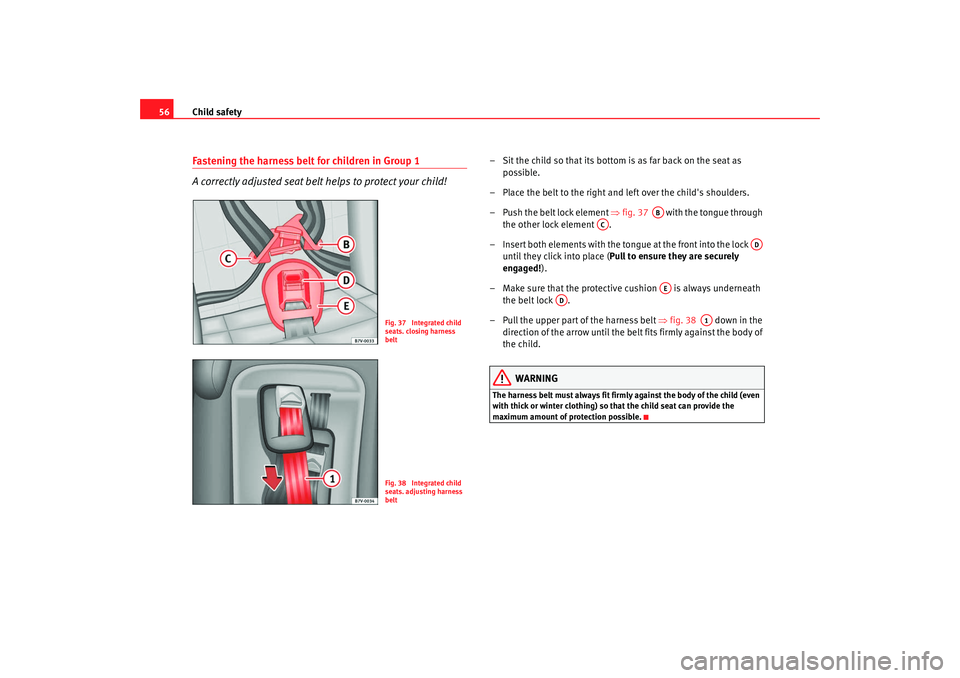
56Fastening the harness belt for children in Group 1
A correctly adjusted seat belt helps to protect your child!
– Sit the child so that its bottom is as far back on the seat as
possible.
– Place the belt to the right and left over the child's shoulders.
– Push the belt lock element ⇒ fig. 37 with the tongue through
the other lock element .
– Insert both elements with the tongue at the front into the lock until they click into place (Pull to ensure they are securely
engaged! ).
– Make sure that the protective cushion is always underneath the belt lock .
– Pull the upper part of the harness belt ⇒ fig. 38 down in the
direction of the arrow until the belt fits firmly against the body of
the child.
WARNING
The harness belt must always fit firmly against the body of the child (even
with thick or winter clothing) so that the child seat can provide the
maximum amount of protection possible.
Fig. 37 Integrated child
seats. closing harness
beltFig. 38 Integrated child
seats. adjusting harness
belt
AB
AC
AD
AE
AD
A1
alhambra_aleman.book Seite 56 Montag, 23. M‰ rz 2009 1:12 13
Page 60 of 285

Child safety
58
– To fasten the three-point belt, take hold of the tongue and pull it slowly across the chest and lap.
– Push the tongue of the belt into the lock for that seat so that it engages audibly (pull to check! ).
– Adjust the three-point belt to suit body size ⇒.
Restoring the normal seat
– Pull the loop in the direction of the arrow and push the seat cushion down until it engages.
Removing the slumber roll
– Remove the head restraint.
– Pull the slumber roll off the head restraint.
– Reinsert the head restraint and push down until it can be heard to engage.Use the following measures to guarantee the proper routing of the shoulder
belt:•
Seatbelt height setting
•
Adjustment of the seat forwards and backwards
•
Backrest angle adjustment
WARNING
•
For safety reasons, the seat for children in Group 2 may only be fitted in
the direction of travel and in one of the outer positions (not on the centre
seat).
•
The risk of injury is increased if the belt is not correctly routed.
•
The shoulder part of the belt should be positioned roughly over the
centre of the shoulder, never across the neck, and fit closely against the
upper part of the body.
•
The lap belt part must lie across the pelvis, not across the stomach, and
always fit closely. check the fitting of the belt.
Group 3 integrated child seat
A suitable child seat and a corre ctly adjusted seat belt can
help to protect your child.Setting up the child seat
– Pull the loop to the front in the direction of the arrow ⇒fig. 41
.
A1
WARNING (continued)
Fig. 41 Using the inte-
grated child seat
A1
alhambra_aleman.book Seite 58 Montag, 23. M‰ rz 2009 1:12 13
Page 61 of 285

Child safety59
Safety First
Operating instructions
Tips and Maintenance
Te c h n i c a l D a t a
– Push the seat cushion in direction of the arrow until it
engages in position.
Fastening the three-point belt
– To fasten the three-point belt, take hold of the tongue and pull it slowly across the chest and lap.
– Push the tongue of the belt into the lock for that seat so that it engages audibly ( pull to check!)
– Adjust the three-point belt to suit body size ⇒.
Restoring the normal seat
– Pull the loop in the direction of the arrow and push the seat cushion down until it engages.Use the following measures to guarantee the proper routing of the shoulder
belt:•
Seatbelt height setting
•
Adjustment of the seat forwards and backwards
•
Backrest angle adjustment
WARNING
•
For safety reasons, the seat for children in Group 3 may only be fitted in
the direction of travel and in one of the outer positions (not on the centre
seat).
•
The risk of injury is increased if the belt is not correctly routed.
•
The shoulder part of the belt should be positioned roughly over the
centre of the shoulder, never across the neck, and fit closely against the
upper part of the body.
•
The lap belt part must lie across the pelvis, not across the stomach, and
always fit closely. check the fitting of the belt.
Cleaning the child seat– Open the zip ⇒fig. 42 fully and undo it at the end.
– Pull the cover from the Velcro fastening in area .
– Guide the belt lock and the harness belts through the cover and remove the child seat cover.The child seat cover can be washed in a washing machine at a maximum
temperature of 30°C.
A2
A1
WARNING (continued)
Fig. 42 Section of inte-
grated child seat
AA
AB
alhambra_aleman.book Seite 59 Montag, 23. M‰ rz 2009 1:12 13
Page 90 of 285
Unlocking and locking
88Unlocking and lockingKeysKey set
The set of keys includes a remote control, a key without a
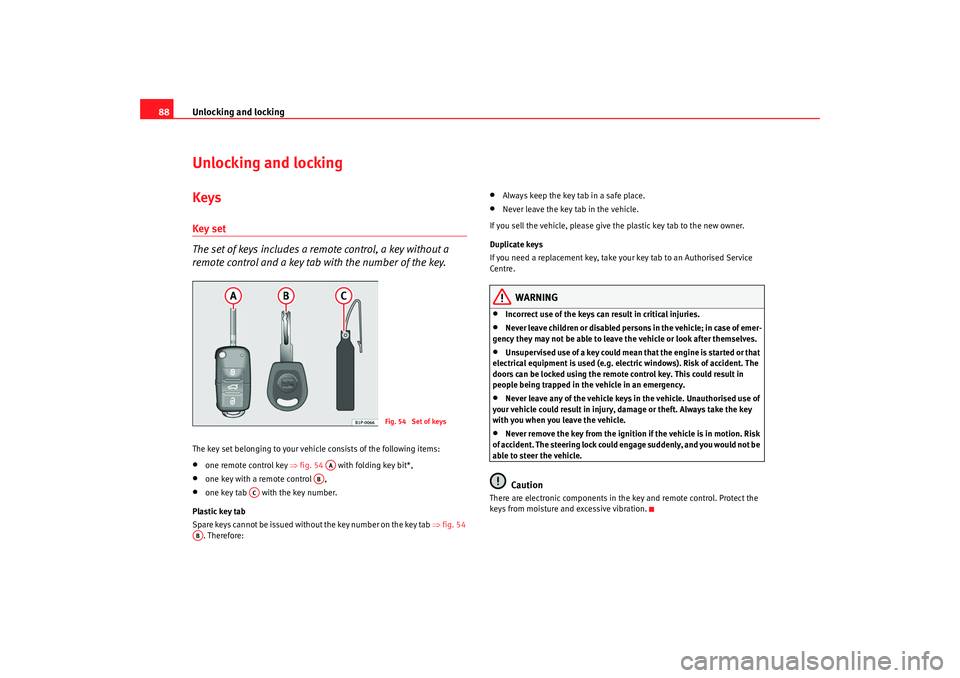
remote control and a key tab with the number of the key.The key set belonging to your vehicle consists of the following items:•
one remote control key ⇒fig. 54 with folding key bit*,
•
one key with a remote control ,
•
one key tab with the key number.
Plastic key tab
Spare keys cannot be issued without the key number on the key tab ⇒fig. 54
. Therefore:
•
Always keep the key tab in a safe place.
•
Never leave the key tab in the vehicle.
If you sell the vehicle, please give the plastic key tab to the new owner.
Duplicate keys
If you need a replacement key, take your key tab to an Authorised Service
Centre.
WARNING
•
Incorrect use of the keys can result in critical injuries.
•
Never leave children or disabled persons in the vehicle; in case of emer-
gency they may not be able to leave the vehicle or look after themselves.
•
Unsupervised use of a key could mean that the engine is started or that
electrical equipment is used (e.g. electric windows). Risk of accident. The
doors can be locked using the remote control key. This could result in
people being trapped in the vehicle in an emergency.
•
Never leave any of the vehicle keys in the vehicle. Unauthorised use of
your vehicle could result in injury, damage or theft. Always take the key
with you when you leave the vehicle.
•
Never remove the key from the ignition if the vehicle is in motion. Risk
of accident. The steering lock could engage suddenly, and you would not be
able to steer the vehicle.Caution
There are electronic components in the key and remote control. Protect the
keys from moisture and excessive vibration.
Fig. 54 Set of keys
AA
AB
AC
AB
alhambra_aleman.book Seite 88 Montag, 23. M‰ rz 2009 1:12 13
Page 93 of 285
Unlocking and locking91
Safety First
Operating instructions
Tips and Maintenance
Te c h n i c a l D a t a
•
The deadlock mechanism, the interior monitoring system
10) and the anti-
theft alarm
10) will be activated immediately if the key is turned once in the
lock. The activation is confirmed by the turn signals flashing briefly.
•
The deadlock mechanism, the interior monitoring system and the anti-
theft alarm will not be activated if the key is turned in the lock twice within
one second. All the doors and the tailgate will, however, be locked. The doors
can be unlocked from the inside if the deadlock mechanism has not been
activated. To do this, operate the door opening lever on the door in question.
The alarm will go off.
•
When locking the vehicle, the interior lights in the courtesy switch posi-
tion will be switched off.
•
A warning lamp in the driver door flashes to indicate the deadlock is
working. The warning lamp will switch off after 14 days. This is to prevent the
vehicle battery from discharging completely when the vehicle is not used for
a longer period. The system is still active.
•
Windows, or the sliding roof, which are still open can be closed automat-
ically on vehicles equipped with electric windows and electric vent windows
or with an electric sliding roof. To do this, the key must be kept held in the
locking position until all windows and the sliding roof are fully closed.
WARNING
If the vehicle is locked, children and disabled people may be trapped
inside.•
Never leave children or disabled persons in the vehicle; in case of emer-
gency they may not be able to leave the vehicle or look after themselves.
•
Always take you car keys with you when you leave the vehicle. Misuse
of the keys, for example, by children, may result in serious damage and
accident.
−The engine may accidentally be started and be out of control.
− If the ignition is switched on, the electric equipment could be acti-
vated with risk of injury, for example, in the electric windows. −
The doors can be locked using the remote control key. This could
result in people being trapped in the vehicle in an emergency.
− Always take the key with you when you leave the vehicle.
•
Never remove the key from the ignition if the vehicle is in motion. Risk
of accident. The steering lock could engage suddenly, and you would not be
able to steer the vehicle.Caution
Each key contains electronic components. Protect the keys from moisture and
excessive vibration.
Note
•
Any SEAT Service centre can programme the central locking system so that
only the driver's door is unlocked when the key is turned once to open.WARNING (continued)
alhambra_aleman.book Seite 91 Montag, 23. M‰ rz 2009 1:12 13
Page 94 of 285
Unlocking and locking
92Central locking buttons
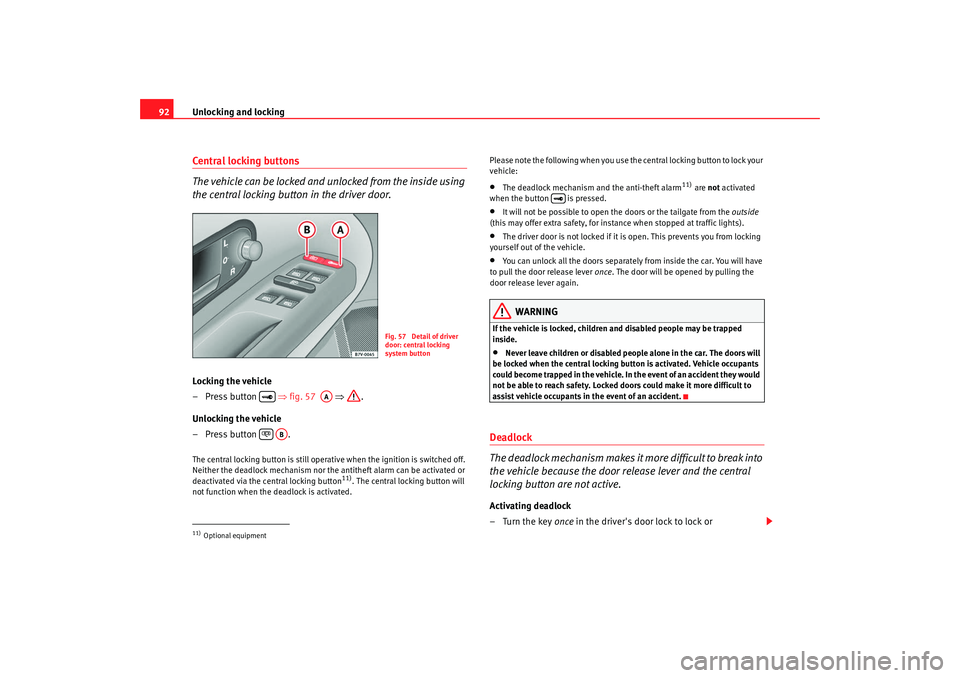
The vehicle can be locked and unlocked from the inside using
the central locking button in the driver door.Locking the vehicle
– Press button ⇒fig. 57 ⇒ .
Unlocking the vehicle
– Press button .The central locking button is still operative when the ignition is switched off.
Neither the deadlock mechanism nor the antitheft alarm can be activated or
deactivated via the central locking button
11). The central locking button will
not function when the deadlock is activated. Please note the following when you use the central locking button to lock your
vehicle:
•
The deadlock mechanism and the anti-theft alarm
11) are
not activated
when the button is pressed.
•
It will not be possible to open the doors or the tailgate from the outside
(this may offer extra safety, for instance when stopped at traffic lights).
•
The driver door is not locked if it is open. This prevents you from locking
yourself out of the vehicle.
•
You can unlock all the doors separately from inside the car. You will have
to pull the door release lever once. The door will be opened by pulling the
door release lever again.
WARNING
If the vehicle is locked, children and disabled people may be trapped
inside.•
Never leave children or disabled people alone in the car. The doors will
be locked when the central locking button is activated. Vehicle occupants
could become trapped in the vehicle. In the event of an accident they would
not be able to reach safety. Locked doors could make it more difficult to
assist vehicle occupants in the event of an accident.
Deadlock
The deadlock mechanism makes it more difficult to break into
the vehicle because the door release lever and the central
locking button are not active.Activating deadlock
–Turn the key once in the driver's door lock to lock or
11)Optional equipment
Fig. 57 Detail of driver
door: central locking
system button
AA
AB
alhambra_aleman.book Seite 92 Montag, 23. M‰ rz 2009 1:12 13