check engine Seat Alhambra 2011 User Guide
[x] Cancel search | Manufacturer: SEAT, Model Year: 2011, Model line: Alhambra, Model: Seat Alhambra 2011Pages: 385, PDF Size: 7.92 MB
Page 157 of 385
155
Heating, Ventilation and Air conditioning
Heating, Ventilation and Air conditioning Climate Control
Introduction Viewing Climatronic information
The fact
or
y-fitted radio or navigation system screen briefly displays informa-
tion relating to Climatronic.
The units of temperature measurement is displayed on the factory-installed
radio or navigation system and, depending on the vehicle equipment, can
be set using the Configuration menu on the instrument panel.
Additional information and warnings:
● SEAT information system ⇒ page 62
● W
indscreen wash system ⇒ page 105
● Aux
iliary heating ⇒ page 163
● C
aring for and cleaning the vehicle exterior ⇒ page 242WARNING
Reduced visibility through the windows increases the risk of serious acci-
dents.
● Ens
ure that all windows are free of ice and snow and that they are not
fogg
ed up preventing a clear view of everything outside.
● The maximum heat output required to defrost windows quickly is only
avail
able when the engine has reached its normal running temperature.
Only drive when you have good visibility. WARNING (Continued)
● Always ensure that you use the climate control and heated rear win-
do w t
o maintain good visibility.
● Never leave the air recirculation on for a long period of time. If the
coolin
g mode is switched off and air recirculation mode switched on, the
windows can mist over very quickly, considerably limiting visibility.
● Switch air recirculation mode off when it is not required. WARNING
Stuffy or used air will increase fatigue and reduce driver concentration
pos s
ibly resulting in a serious accident.
● Never leave the fresh air fan turned off or use the air recirculation for
long periods
of time; the air inside the passenger compartment will not
be refreshed. CAUTION
● Switch the climate control system off if you think it may be broken. This
w i
ll avoid additional damage. Have the climate control system checked by a
Technical Service.
● Repairs to the climate control system require specialist knowledge and
speci
al tools. SEAT recommends visiting a Technical Service.
● Do not smoke when air recirculation is switched on in vehicles with a cli-
mate c
ontrol system. The smoke taken in could lie on the cooling system va-
poriser and on the activated charcoal cartridge of the dust and pollen filter,
leading to a permanently unpleasant smell. Safety First Operating instructions Practical tips Technical Data
Page 162 of 385
160
Heating, Ventilation and Air conditioning
Keep the air vents in front of the windscreen free of snow, ice and leaves to
ens ur
e heating and cooling are not impaired and to prevent the windows
from misting over.
Adjustment for safer driving
When the air conditioning is switched on, the temperature and the air hu-
midity in the vehicle interior drop. Hence, when the outside air humidity is
high, the windows do not mist over and comfort for the vehicle occupants is
improved:
With Climatic
● Disable air recirculation mode ⇒ pag
e 161.
● Set the fan to setting 1 or 2.
● Turn the temperature control to the centre position.
● Open the air outlets in the dash panel ⇒ pag
e 161.
● Turn the air distribution control to the required position.
● Press the AC button to turn on cooling. The button will light up.
With C lim
atronic
● Press the AUTO button.
● Set the temperature to +22°C (+72°F).
● Open the air outlets in the dash panel ⇒ pag
e 161.
Switching the Climatronic temperature measuring unit
Press and hold the AC and
AUT
O buttons to switch the temperature display
between C el
sius and Fahrenheit.
Heat
The maximum heat output required to defrost windows quickly is only avail-
able when the engine has reached its normal running temperature.
The air conditioning system does not switch on
If the air conditioning system cannot be switched on, this may be caused by
the following: ●
The engine is not running.
● The fan i
s switched off.
● The climate control fuse has blown.
● The outside temperature is lower than approximately +3°C (+38°F).
● The climate control system compressor has been temporarily switched
off becau
se the engine coolant temperature is too high.
● Another fault in the vehicle. Have the climate control system checked by
a Tec
hnical Service.
Things to note
If the humidity and temperature outside the vehicle are high, condensation
can drip off the evaporator in the cooling system and form a pool under-
neath the vehicle. This is normal and does not indicate a leak!
Dust and pollen filter
The dust and pollen filter with its activated charcoal cartridge serves as a
barrier against impurities in the ambient air.
For the climate control system to work with maximum efficiency, the dust
and pollen filter must be replaced at the intervals specified in the Mainte-
nance Programme.
If the filter loses efficiency prematurely due to use in areas with very high
levels of air pollution, the filter must be changed more frequently than sta-
ted in the Service Schedule. Note
● The climate control system must left running for a few minutes to reach
the set t
emperature in the vehicle interior.
● After starting it, any residual humidity in the climate control system
coul
d mist over the windscreen.
● The air from the vents flows through the passenger compartment and
out through the outl
ets below the rear window. Do not cover these outlets
with items of clothing or other objects.
Page 168 of 385
166
Heating, Ventilation and Air conditioning
Checking programming
If the timer h
as been switched on after switching the ignition off, the instant
on button will remain lit for around ten seconds.
WARNING
Never program the independent heating system to be activated and oper-
ated in c lo
sed, unventilated areas. The auxiliary heater fumes contain
carbon dioxide, an odourless and colourless toxic gas. Carbon monoxide
can cause people to lose consciousness. It can also cause death.
Operating instructions The auxiliary heater exhaust system located below the vehicle must be kept
cl
e
ar of snow, mud and other objects. The exhaust fumes must not be ob-
structed in any way. The exhaust fumes generated by the auxiliary heater
are removed via an exhaust pipe fitted underneath the vehicle.
On heating the vehicle interior, depending on the outside temperature the
warm air is first directed at the windscreen and then to the rest of the pas-
senger compartment through the air vents. If the air vents are turned to-
wards the windows, for example, the form of air distribution may be affec-
ted.
Depending on the outside temperature, the temperature at which the auxili-
ary heater warms the vehicle interior may be somewhat higher if the heating
or climate control temperature control is set to maximum before switching
the heating on.
Depending on the engine, vehicles with auxiliary heater may be fitted with a
second battery in the luggage compartment that is responsible for powering
the auxiliary heater. Cases in which the auxiliary heater will not switch on
●
The auxiliary heater requires about as much power as the dipped head-
lights. If the batt
ery charge is low, the auxiliary heater will switch off auto-
matically or will not even switch on. This avoids problems when starting the
engine.
● The heater will switch just once each time. The timer will also have to be
switc
hed back on every time it is required. Note
● Noise will be heard while the auxiliary heater is running.
● When the air humidity i
s high and the outside temperature low, the
heating sy
stem may evaporate condensation from the auxiliary heater. In
this case, steam may be released from underneath the vehicle. This is com-
pletely normal and there is no need to suspect a fault!
● If the auxiliary heater runs several times over a prolonged period, the ve-
hicle b
attery may run flat. To re-charge the battery, drive the vehicle for a
long distance. In general: drive for as much time as the auxiliary heating
was working.
Page 170 of 385
168
Driving flashes Possible cause Solution
(red) Fault in the steering column
electr
onic
lock.
Do not drive on!
Seek pr
ofessional advice.
(yel-
lo w) Steering column deviation. Gently turn the steering wheel to
and fro
. Steering wheel not unlocked
or lock
ed. Remove the key from the igni-
tion and then swit
c
h the ignition
back on. Check the messages
displayed on the instrument
panel at the same time.
Do not drive on, if the steering
column remains locked after the
ignition has been switched on.
You should obtain professional
assistance. Several warning and control lamps should light up for a few seconds when
the ignition is
sw
itched. This signals that the lamp is working properly. They
will switch off after a few seconds. WARNING
If the warning lamps and messages are ignored, the vehicle may stall in
traffic, or m a
y cause accidents and severe injuries.
● Never ignore the warning lamps or text messages.
● Stop the vehicle safely as soon as possible. CAUTION
Failure to heed the warning lamps and text messages when they appear
ma y
result in faults in the vehicle. Information on the steering Steering column electronic lock
If the driv
er's
door is opened before the ignition is switched off, the steering
column electronic lock is activated via the ignition key or the sensor built
into the door handle.
Mechanical steering lock
To prevent theft, we recommend you lock the steering before leaving the ve-
hicle. Please engage steering lock Unlocking the steering
Parking the vehicle
⇒ page 183. Turn the steering wheel slightly to
rel
e
ase the steering lock. Remove the key from the ignition. Insert the key in the ignition lock.
Turn the steering wheel slightly until
you he
ar the s
teering lock. Hold the steering wheel in this posi-
tion and swit
c
h on the ignition. Electromechanical power steering
With the po
w
er steering system, the assisted steering function automatical-
ly adjusts according to the vehicle speed, the steering torque and the wheel
turning angle. The power steering only works when the engine is running.
You should remember that you will need considerably more power than nor-
mal to steer the vehicle if the power steering is not working correctly or not
at all.
Counter steering assistance system
The counter steering assistance system helps the driver in critical situa-
tions. Additional steering power helps the driver when counter steering.
Page 183 of 385
181
Driving
● You should reduce speed accordingly.
● Pre
ss the selector lever from position D to the right int
o the Tiptronic se-
lector gate ⇒ page 180.
● Gently pull the selector lever back to change down a gear.
● ALTERNATIVELY: Reduce u
sing the steering wheel paddles ⇒ page 180.
Emergency program
If all the selector lever positions on the instrument panel display are shown
with a light-coloured background, this means there is a fault in the system.
The automatic gearbox will operate in emergency programme mode. When
the emergency program is activated, it is possible to drive the vehicle how-
ever, at low speeds and within a selected range of gears.
For the DSG ®
dual clutch gearbox, in some cases, this may mean that re-
verse gear does not engage . The gearbox should be checked by a Technical
Service as soon as possible.
Overload protection for the 6-speed DSG gearbox ®
When the clutch is overloaded, the vehicle begins to jerk and the selector
lever position indicator begins to flash. To prevent damage to the clutch,
this interrupts the power transmission between the engine and the gearbox.
There is no more traction and it is not possible to accelerate. If the clutch is
opened automatically due to overloading, press the brake pedal. Wait a few
seconds before starting to move again.
Kick-down
The kick-down system provides maximum acceleration when the gear selec-
tor lever is in the positions D, S or in the Tiptronic position.
When the accelerator pedal is pressed right down, the automatic gearbox
will shift down to a lower gear, depending on road speed and engine speed.
This takes advantage of the maximum acceleration of the vehicle ⇒ .
When the acc el
erator is pressed to the floor, the automatic gearbox shifts to
the next gear only after the engine reaches the specified maximum engine
speed. Launch-Control Programme
The Launch-C
ontrol programme enables maximum acceleration while at a
standstill.
● Deactivate the ASR (TCS) ⇒ page 183.
● Pr
ess and hold the brake pedal with your left foot.
● Place the selector lever in position S or Tiptronic
.
● Press the accelerator with the right foot until the vehicle reaches an en-
gine speed of ap
proximately 3200 rpm.
● Lift the left foot off the brake ⇒ . The vehicle starts with maximum ac-
cel er
ation.
● Turn on the ASR (TCS) after accelerating! WARNING
Rapid acceleration can cause loss of traction and skidding, especially on
slip per
y ground. This could cause loss of control of the vehicle resulting
in an accident and considerable damage.
● Only use kick-down and rapid acceleration when weather conditions,
surf
ace conditions and traffic conditions permit; accelerate and drive in a
manner that does not endanger other road users.
● Please remember that the drive wheels can slip and the vehicle can
skid if the ASR (T
CS) is turned off, especially on slippery ground.
● Turn on the ASR (TCS) after accelerating. CAUTION
● If you stop on a hill with a gear ratio engaged, do not try to prevent the
v ehic
le from rolling back by pressing on the accelerator. This could cause
overheating and damage the automatic gearbox.
● Never allow the vehicle to move with the gear selector lever in N, espe-
c
ially with the engine turned off. The automatic gearbox will not be lubrica-
ted and could be damaged. Safety First Operating instructions Practical tips Technical Data
Page 185 of 385
183
Driving
Braking, stopping and parking
Introduction The assisted braking systems include the anti-lock braking system (ABS),
the br
ak
e assist system (BAS), the electronic differential system (EDS), the
ASR traction control system (TCS) and the ESC electronic stabilisation pro-
gram (ESP).
Additional information and warnings:
● Towing mode ⇒ page 233
● St
art assist systems ⇒ page 194
● Wheel
s and tyres ⇒ page 293
● A
ccessories, parts replacement, repairs and modifications ⇒ page 257WARNING
Driving with worn brake pads or a faulty brake system may lead to seri-
ous ac
cident.
● If lights, alone or accompanied by a warning message on the in-
strument
panel, please go immediately to a specialist workshop to check
the brake pads and to replace them if they are worn. WARNING
Careless parking can cause serious injury.
● Never remove the key from the ignition if the vehicle is in motion. The
st eerin
g lock may engage and locked the steering wheel making the vehi-
cle impossible to control. WARNING (Continued)
● Always park your vehicle so that no part of the exhaust system can
c ome in c
ontact with flammable materials (such as wood, leaves, spilled
fuel, dried grass, etc).
● Always apply the electronic parking brake when you leave your vehi-
cle and when
you park.
● Never leave children or disabled people alone in the vehicle. They
coul
d release the electronic parking brake, activate the selector lever or
gear stick and start the vehicle moving. This could result in serious acci-
dent.
● Always take all the keys with you whenever you leave the vehicle. The
engine cou
ld accidentally be started and electrical equipment such as
the windows could accidentally be operated resulting in serious injury.
● Never leave children or disabled people alone in the car. They could
be trapped in the c
ar in an emergency and will not be able to get them-
selves to safety. For example, depending on the time of the year, temper-
atures inside a locked and closed vehicle can be extremely high or ex-
tremely low resulting in serious injuries and illness or even death, partic-
ularly for young children. CAUTION
● Special care should be taken when parking in areas with high kerbs or
fi x
ed barriers. Objects protruding from the ground may damage the bumper
or other parts of the vehicle during manoeuvres. To avoid damage, stop be-
fore the wheels touched the barrier or kerb.
● Special attention is required when driving through entrances, over
ramps, k
erbs or other objects. The vehicle underbody, bumpers, mudguards
and running gear, and the engine and exhaust system could be damaged as
you drive over these objects. Safety First Operating instructions Practical tips Technical Data
Page 187 of 385
185
Driving WARNING
Driving with brakes in bad condition could result in a serious accident.
● If the brake warning lamp does not go out, or if it lights up when
driving, the brake fluid level in the reservoir is too low or there is a fault
in the brake system. Obtain professional assistance immediately
⇒ page 191, Brake fluid.
● If the brake warning lamp lights up t
ogether with the ABS warning
lamp , the regulation function of the ABS could be malfunctioning. As a
result, the rear wheels can lock relatively easily when braking. If the rear
wheels lock this could result in loss of vehicle control! If possible, reduce
your speed and drive carefully to a specialist workshop close by to check
the brake system. During the following journey, avoid sudden braking
and manoeuvres.
● If the ABS warning lamp does not
go out or if it lights while driv-
ing, the ABS is malfunctioning. The vehicle can only be stopped using
normal braking without ABS. The protection provided by the ABS is not
available. Visit a specialised workshop as soon as possible.
● If lights, alone or accompanied by a warning message on the in-
strument
panel screen, please go immediately to a specialist workshop
to check the brake pads and to replace them if they are worn. CAUTION
Failure to heed the warning lamps and text messages when they appear
ma y
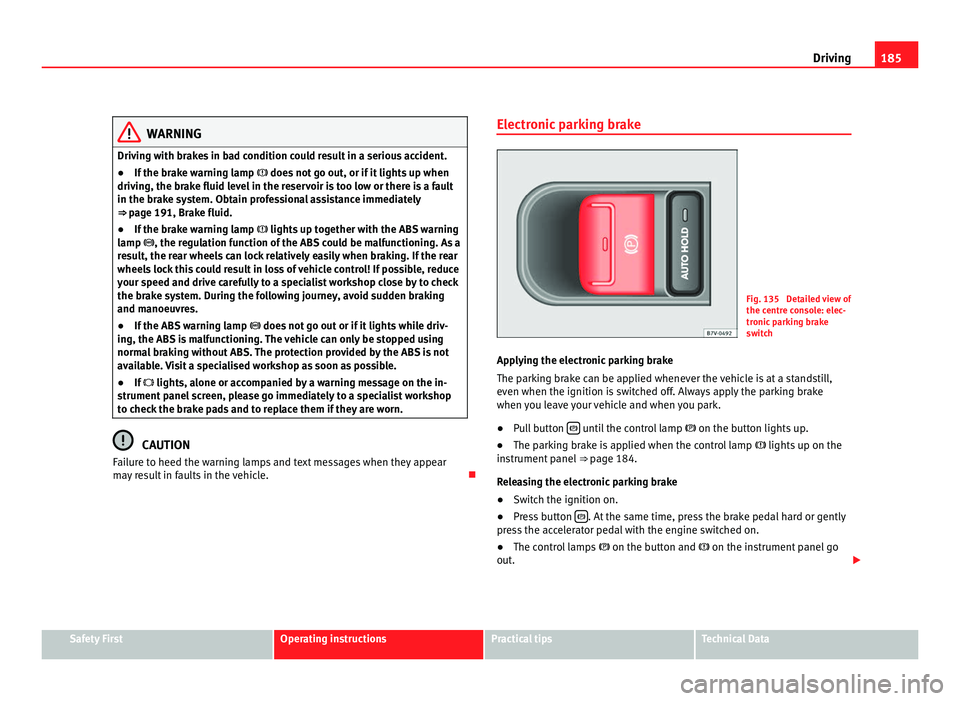
result in faults in the vehicle. Electronic parking brake Fig. 135 Detailed view of
the centr
e c
onsole: elec-
tronic parking brake
switch
Applying the electronic parking brake
The parkin
g brake can be applied whenever the vehicle is at a standstill,
even when the ignition is switched off. Always apply the parking brake
when you leave your vehicle and when you park.
● Pull button until the control lamp
on the button lights
up.
● The parking brake is applied when the control lamp lights up on the
ins
trument panel ⇒ page 184.
Releasing the electronic parking brake
● Switch the ignition on.
● Press button . At the same time, press the brake pedal hard or gently
pre s
s the accelerator pedal with the engine switched on.
● The control lamps on the button and
on the instrument panel go
out. Safety First Operating instructions Practical tips Technical Data
Page 188 of 385
186
Driving
Automatic release of the electronic parking brake on starting the engine
The electr onic
parking brake is automatically released when the vehicle
starts moving, if the driver's door is closed and the driver is wearing his/her
seat belt. In vehicles with a manual gearbox the clutch pedal should also be
pressed to the floor before starting the engine so that the system recogni-
ses that the parking brake should be released.
Emergency braking function
Only use the emergency braking function if the vehicle cannot be stopped
with the brake pedal ⇒ !
● Pull button hard to stop the vehicle. The warning display will be ac-
c omp
anied by the corresponding warning chime.
● To stop the braking process, release the button or press the accelerator. WARNING
The incorrect use of the electronic parking brake may result in serious ac-
cident .
● Nev
er use the electronic parking brake to brake the vehicle except in
an emergency
. The braking distance is considerably longer, because
braking is only applied to the rear wheels. Always use the foot brake.
● Never accelerate from the engine compartment with the engine run-
ning and a ge
ar or a gear range engaged. The vehicle could move, even if
the parking brake is applied. Note
● In vehicles with a manual gearbox: When the clutch pedal is released
and the ac c
elerator pressed at the same time, the electronic parking brake
is automatically released.
● If the vehicle battery is flat, it will not be possible to disconnect the elec-
tronic p
arking brake. Use the jump-start ⇒ page 337. ●
When the electronic
parking brake is applied or released, noises may be
heard.
● If the electronic parking brake has not been used for a long while, the
syst
em sometimes performs automatic and audible checks while the vehi-
cle is at a standstill.
Parking When parking your vehicle, all legal requirements should be observed.
To p
ark
the vehicle
Complete operations only in the sequence given.
● Park the vehicle on a suitable surface ⇒ .
● Press and hold the brake pedal until the vehicle comes to a standstill.
● Connect the electronic parking brake ⇒ page 185.
● F
or an automatic gearbox, move the selector lever to position P.
● Switch off the engine and release the brake pedal.
● Remove the key from the ignition.
● If necessary, turn the steering wheel slightly to lock the steering.
● With a manual gearbox, engage the 1st gear on flat ground and slopes,
or even the rev
erse gear on hills, and release the clutch pedal.
● Ensure that all passengers leave the vehicle, especially children.
● When leaving the vehicle, take all keys with you.
● Lock the vehicle.
Additiona
l information for steep slopes and hills
Before switching off the engine, rotate the steering wheel so that if the vehi-
cle should move then it will be held by the kerb.
Page 189 of 385
187
Driving
● On slopes, turn the front wheels so that they are against the edge of the
k erb
.
● Uphill, turn the wheels towards the centre of the road. WARNING
The components of the exhaust system reach very high temperatures.
This c
ould cause a fire and considerable damage.
● Always park your vehicle so that no part of the exhaust system can
come in cont
act with flammable materials (such as wood, leaves, spilled
fuel, dried grass, etc). CAUTION
● Special care should be taken when parking in areas with high kerbs or
fi x
ed barriers. Objects protruding from the ground may damage the bumper
or other parts of the vehicle during manoeuvres. To avoid damage, stop be-
fore the wheels touched the barrier or kerb.
● Special attention is required when driving through entrances, over
ramps, k
erbs or other objects. The vehicle underbody, bumpers, mudguards
and running gear, and the engine and exhaust system could be damaged as
you drive over these objects.
Information about the brakes For the first 200 to 300 km (100 to 200 miles),
new brake p
ads have not yet
reached their maximum braking capacity, and need to be “run in” first ⇒ .
The slightly r
educed braking effect can be compensated for by increasing
pressure on the brake pedal. While running in, the full braking distance or
emergency braking distance is larger then when the brake pads have been
run in. While running in, avoid full power braking or situations requiring
braking performance. For example, in heavy traffic. The rate of wear of the brake pads
depends
to a great extent on the condi-
tions in which the vehicle is used and the way the vehicle is driven. If the
vehicle is used frequently in city traffic or for short trips or driven sport style,
visit a specialist workshop regularly more frequently than advised in the
Maintenance Programme to have the bake pads checked.
If you drive with wet brakes, for example, after crossing areas of water, in
heavy rainfall or even after washing the car, the effect of the brakes is less-
ened as the brake discs are wet or even frozen (in winter). At higher speed,
dry the brakes as quickly as possible by braking gently several times. Only
do this without endangering vehicles behind you or any other road users
⇒ .
A la y
er of salt on the discs and brake pads will reduce brake efficiency and
increase braking distance. If you drive for a prolonged period on salted
roads without braking then brake carefully several times to eliminate the
layer of salt on the brakes ⇒ .
If the v
ehicle remains parked for considerable lengths of time, is used little,
or if the brakes are not used, there may be corrosion on the brake discs and
a buildup of dirt on the brake pads. If the brakes are not used frequently, or
if rust has formed on the discs, SEAT recommends cleaning the pads and
discs by braking firmly a few times at a moderately high speed. Only do this
without endangering vehicles behind you or any other road users ⇒ .
Fau lt
s in the brake system
During braking, if you notice that the vehicle does not react as usual (that
the braking distance has increased suddenly) it may be possible that there
is a fault in the braking system. The warning lamp lights up and a text
message displayed. Take the vehicle to a Technical Service immediately and
have the fault repaired. Drive at a moderate speed and be prepared to use
more pressure on the brake pedal, and allow for longer stopping distances.
Brake servo
The brake servo only operates when the engine is running and the pressure
applied by the driver on the brake pedal increases. Safety First Operating instructions Practical tips Technical Data
Page 191 of 385
189
Driving Note
When checking the front brake pads, take the time to also check the rear
brak e p
ads. The thickness of the brake pads should be checked visually and
regularly, by looking through the openings in the wheel rims or from under-
neath the vehicle. If necessary, remove the wheels to check them thorough-
ly. SEAT recommends visiting a Technical Service.
Assisted braking systems The assisted braking systems ESC (ESP), ABS, BAS, ASR (TCS) and EDS only
operat
e when the ignition i
s switched on. They contribute significantly to in-
creasing active safety.
Electronic stability programme ESC (ESP)
ESC (ESP) reduces the risk of skidding and increases the vehicle stability by
braking individual wheels under specific driving conditions. ESC (ESP) de-
tects critical handling situations, such as understeer, oversteer and wheel-
spin on the drive wheels. The system stabilises the vehicle by braking indi-
vidual wheels or by reducing the engine torque.
The ESC (ESP) has limits. It is important to realise that the ESC (ESP) is also
subject to the laws of physics. ESC (ESP) will not be able to deal with all sit-
uations with which drivers may be faced. For example, if the road surface
changes suddenly then ESC (ESP) will not be useful in all cases. If the vehi-
cle suddenly enters a section covered by water, mud or snow then ESC (ESP)
will not provide assistance in the same way as on dry ground. If the vehicle
loses its grip on the ground and moves on a film of water (“aquaplaning”),
the ESC (ESP) will not be able to assist the driver to control the vehicle due
to the loss of adherence with the road surface preventing braking and steer-
ing. If the vehicle is driven through series of bends at high speed, the ESC
(ESP) will not always be as effective: the vehicle reaction to aggressive driv-
ing is not the same as at reduced speeds. When driving with a trailer, ESC
(ESP) does not provide the same amount of vehicle control as without a
trailer. Adjust your speed and driving style to road, traffic and weather conditions.
ESC (E
SP) cannot push the limits of the laws of physics; improve the trans-
mission available or maintain the vehicle on the road if a lack of driver at-
tention creates an inevitable situation. Otherwise, ESC (ESP) assists in
maintaining vehicle control in extreme situations and uses the movements
of the steering made by the driver to maintain the vehicle moving in the de-
sired direction. If the vehicle is driven at such a speed that it will leave the
road before ESC (ESP) can intervene then the system cannot provide assis-
tance.
The ABS, BAS, ASR (TCS) and EDS systems are incorporated into the ESC
(ESP). The ESC (ESP) is always on. The ESC (ESP) should only be turned off
using the ASR (TCS) button ⇒ fig. 136 when traction is insufficient. Always remember to turn on the ASR (TCS) once more when the vehicle has traction
once again.
Anti-lock brake system (ABS)
ABS can prevent the wheels from locking during braking until just before
the vehicle stops thus helping the driver to steer the vehicle and maintain
control. This means that, even during full braking, the risk of skidding is re-
duced:
● Press and hold the brake pedal fully. Do not remove your foot from the
brake ped
al or reduce braking force!
● Do not “pump” the brake pedal, or reduce braking force!
● Maintain vehicle direction when braking fully.
● When the brake pedal is released or when the brake force is reduced,
ABS is
turned off.
ABS control can be observed by vibration of the brake pedal and noise. You
should never expect the ABS to reduce the braking distance under any cir-
cumstances. Braking distances will increase when driving on gravel, recent
snow or on icy and slippery ground.
When driving on loose ground, the all-terrain configuration of the ABS is au-
tomatically turned on. When ABS is activated, the front wheels may lock
briefly. This shortens the braking distance in off-road situations as the Safety First Operating instructions Practical tips Technical Data