window Seat Alhambra 2011 Owner's Guide
[x] Cancel search | Manufacturer: SEAT, Model Year: 2011, Model line: Alhambra, Model: Seat Alhambra 2011Pages: 385, PDF Size: 7.92 MB
Page 92 of 385
90
Unlocking and locking
After turning off the ignition, the windows can be opened and closed for a
short time u
sing the buttons on the door as long as the driver's door or pas-
senger side door is not open. When the key is removed from the ignition
and the driver's door is open, all of the electric windows can be opened or
closed using the corresponding button on the driver's door. After a few sec-
onds, the convenience opening or closing function will begin ⇒ page 90.
Electric windows: functions One-touch opening and closing
The one-touc
h aut
omatic opening and closing is used to open or close the
windows completely. It will not be necessary to hold the button of the corre-
sponding electric window.
For the one-touch closing function: pull up on the button for the window to
the second position.
For the one-touch opening function: Push down the button for the window
to the second position.
To stop the one touch function: Push or pull on the button of the corre-
sponding window.
Restoring one-touch opening and closing
The one-touch opening and closing function is not active after the vehicle
battery has been disconnected or is flat and will have to be reset.
● Close all windows and doors.
● Pull the button of the corresponding window and hold it for one second
in this po
sition.
● Release the button and pull upwards and hold again. The one-touch
function i
s now ready for operation.
The automatic one-touch electric windows can be reinitialised individually
or several at a time. Convenience opening and closing function
The electric w
indows can be opened or closed from outside using the vehi-
cle key:
● Hold in the unlocking for locking button for the vehicle. All windows
which fu
nction electrically will be either opened or closed.
● To interrupt the function, release the locking or unlocking button.
During c
onvenience closing, first the windows and then the sliding sunroof
will be closed.
In the Configuration - convenience menu, there are different settings for oper- ating the windows ⇒ page 62. WARNING
Careless use of the electric windows can cause serious injury.
● Only operate the electric windows when nobody is in the way.
● Never leave children or disabled people alone in the vehicle if the
doors ar
e to be locked. The windows cannot be opened in case of an
emergency.
● Always take all the keys with you whenever you leave the vehicle. Af-
ter turnin
g off the ignition, the windows can be opened and closed for a
short time using the buttons on the door as long as the driver's door or
passenger side door is not open.
● When transporting children in the rear seats, always deactivate the
rear el
ectric windows with the child safety lock so that they cannot be
opened and closed. Note
The one-touch function and roll-back function will not work if there is a mal-
fu nction in the el
ectric windows. Visit a specialist workshop.
Page 93 of 385
91
Unlocking and locking
Electric Windows anti-trap function The anti-trap function of the electric windows can reduce the risk of injury
when opening and c
lo
sing the electric windows ⇒ . If a window is not
abl e t
o close because it is stiff or because of an obstruction, it will automati-
cally open again.
● Check why the window does not close.
● Attempt to close the window again.
● If you try within the following 10 seconds and the window closes with
difficulty
or there is an obstruction once again, the one-touch closing will
stop working for 10 seconds.
● If the window is still obstructed, it will stop at the corresponding posi-
tion. When the butt
on is operated within 10 seconds, the window will close
without the anti-trap function ⇒ .
To c lo
se windows without the anti-trap function
● Attempt to close the corresponding electric window within 10 seconds
after b
y holding the button. The window is closed without the anti-trap
function, deactivated for a short time.
● After more than 10 seconds, the anti-trap function is reactivated. The
window w
ill stop once again if there is another difficulty or obstacle.
● If the window will still not close, visit a specialised workshop. WARNING
Closing the electric windows without the anti-trap function can cause se-
rious injur
y.
● Always close the electric windows carefully.
● Nobody should be in the way of the electric windows, especially when
the anti-trap fu
nction is deactivated.
● The anti-trap function does not prevent fingers or other parts of the
body gettin
g pinched against the window frame and causing injury. Note
The anti-trap function also operates if the windows are closed from the out-
side of the
vehicle using the ignition key for convenience closing
⇒ page 90. Safety First Operating instructions Practical tips Technical Data
Page 96 of 385
94
Unlocking and locking
Panorama sliding sunroof: operation Convenience open/close function
The panor
am
a sliding sunroof can be opened or closed from outside the ve-
hicle using the vehicle key:
● Hold in the unlocking for locking button for the vehicle. The panorama
sliding s
unroof is adjusted or closes.
● Release the unlock or lock button to stop the function.
During c
onvenience closing, first the windows and then the sliding sunroof
will be closed. Note
The sliding sunroof rotary button remains in the last position selected if the
roof i
s closed using convenience closing from outside the vehicle and will
have to be re-positioned the next time you drive.
Anti-trap function of the panorama sliding sunroof and the
sun
shade The anti-trap function reduces the risk of injury when opening and closing
the panor
am
a sliding sunroof and sunshade ⇒ . When the panorama
slidin g s
unroof or the sunshade encounter difficulty or an obstacle when
closing, they will stop and reopen.
● Check why the panorama sliding sunroof or the sunshade did not close.
● Attempt to close the panorama sliding sunroof or sunshade once again.
● If the panorama sliding sunroof or sunshade is still obstructed, it will
stop at
the corresponding position. Now close the panorama sliding sun-
roof or sunshade without the anti-trap function. Closing without the roll-back function
●
The ⇒ fig. 58 1 switch should be in the “closed” position
A .
● Panorama sliding sunroof: Within five sec
onds of triggering the anti-trap
function, pull the control all the way back ⇒ fig. 59 (arrow E) until the panor-
ama sliding sunroof closes fully.
● Sunshade: Within five sec
onds of triggering the anti-trap function, push
the ⇒ fig. 60 2 button until the sunshade closes completely.
● The panorama sliding sunroof or sunshade close without the anti-trap
fu nction.
● If
the panorama sliding sunroof still cannot be closed, visited a special-
ised work
shop. WARNING
Closing the panorama sliding sunroof or sunshade without the anti-trap
fu nction c
an cause serious injuries.
● Always close the panorama sliding sunroof carefully.
● Nobody should be in the way of the panorama sliding sunroof or sun-
shade, e
specially when they are closed without the anti-trap function.
● The anti-trap function does not prevent fingers or other parts of the
body gettin
g pinched against the window frame and causing injury. Note
The anti-trap function is activated if the windows and the panorama sliding
su nr
oof are closed from the outside of the vehicle using the ignition key for
convenience closing ⇒ page 90.
Page 106 of 385
104
Lights and visibility
Make-up mirror light
There m a
y be a make-up mirror, with a cover, on the rear of the sun visor.
When the cover is opened 2 a light comes on.
The lamp g oe
s out when the make-up mirror cover is closed or the sun visor
is pushed back up. Note
The light above the sun visor automatically switches off after a few minutes
in cer t
ain conditions. This prevents the battery from discharging.
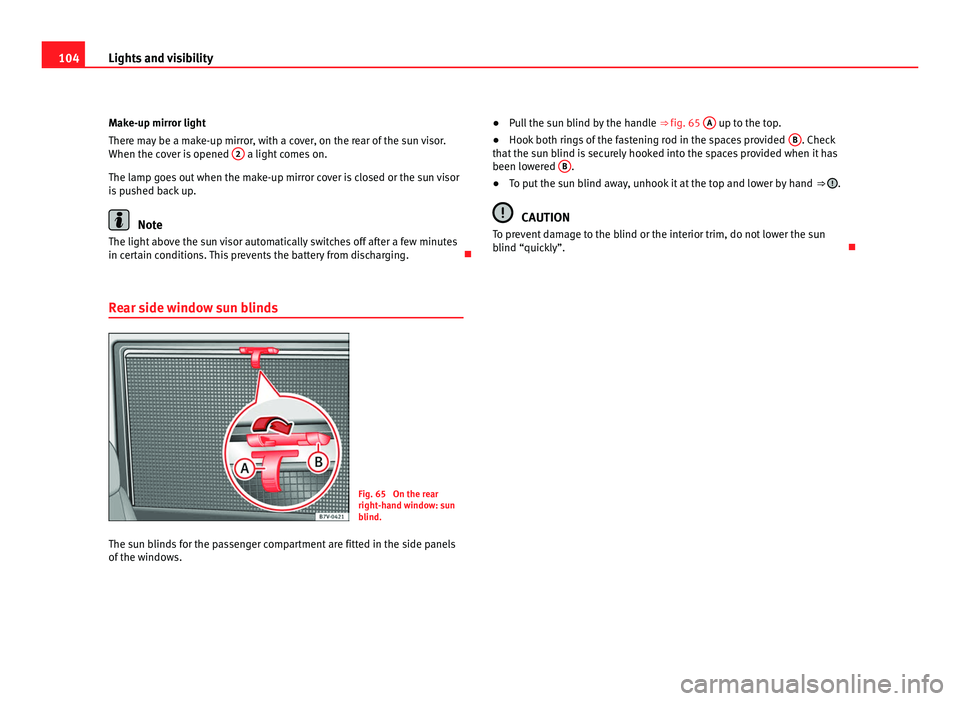
Rear side window sun blinds Fig. 65 On the rear
right-h
and w
indow: sun
blind.
The sun blinds for the passenger compartment are fitted in the side panels
of the windo
ws. ●
Pull the sun blind by the handle ⇒ fig. 65 A up to the top.
● Hook both rings of the fastening rod in the spaces provided B . Check
that the s
un blind is securely hooked into the spaces provided when it has
been lowered B .
● To put the sun blind away, unhook it at the top and lower by hand ⇒ .
CAUTION
To prevent damage to the blind or the interior trim, do not lower the sun
blind “quic k
ly”.
Page 108 of 385
106
Lights and visibility
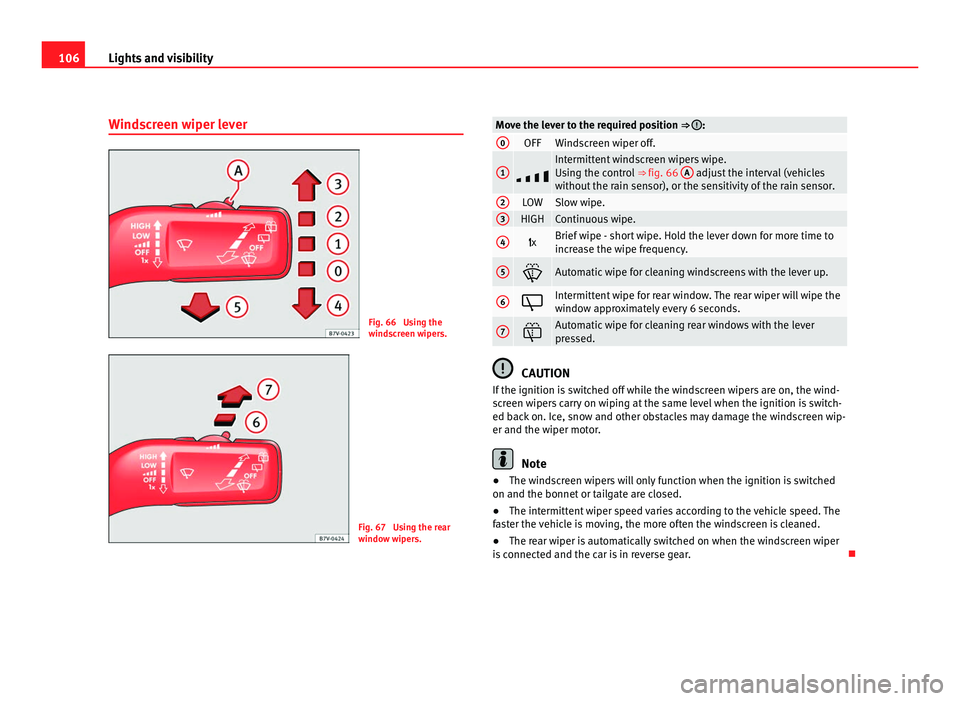
Windscreen wiper lever Fig. 66 Using the
wind
s
creen wipers. Fig. 67 Using the rear
windo
w w
ipers. Move the lever to the required position ⇒ :
0
OFF Windscreen wiper off.
1
Intermittent windscreen wipers wipe.
Us
in
g the control ⇒ fig. 66 A adjust the interval (vehicles
without the r
ain sensor), or the sensitivity of the rain sensor. 2
LOW Slow wipe.
3
HIGH Continuous wipe.
4
x Brief wipe - short wipe. Hold the lever down for more time to
incr
e
ase the wipe frequency. 5
Automatic wipe for cleaning windscreens with the lever up.
6
Intermittent wipe for rear window. The rear wiper will wipe the
windo
w ap
proximately every 6 seconds. 7
Automatic wipe for cleaning rear windows with the lever
pre
s
sed. CAUTION
If the ignition is switched off while the windscreen wipers are on, the wind-
sc r
een wipers carry on wiping at the same level when the ignition is switch-
ed back on. Ice, snow and other obstacles may damage the windscreen wip-
er and the wiper motor. Note
● The windscreen wipers will only function when the ignition is switched
on and the bonnet or t
ailgate are closed.
● The intermittent wiper speed varies according to the vehicle speed. The
fas
ter the vehicle is moving, the more often the windscreen is cleaned.
● The rear wiper is automatically switched on when the windscreen wiper
is c
onnected and the car is in reverse gear.
Page 111 of 385
109
Lights and visibility
● Damaged blades: A film of water on the damaged blades may lengthen
the activ ation time, r
educe the washing intervals or result in a fast and con-
tinuous wipe.
● Insects: insects on the sensor may trigger the windscreen wipers.
● Salt on roads: in winter, salt spread in the roads may cause an extra
long wipe when the w
indscreen is almost dry.
● Dirt: dry dust, wax, coating on glass (Lotus effect) or traces of detergent
(car wa
sh) may reduce the effectiveness of the rain sensor or make it react
more slowly, later or not at all.
● Cracked windscreen: the impact of a stone will trigger a single wipe cy-
cle w
ith the rain sensor on. Next the rain sensor detects the reduction in the
sensitive surface area and adapts accordingly. The behaviour of the sensor
will vary with the size of the damage caused by the stone. WARNING
The rain sensor may not detect enough rain to switch on the wipers.
● If necessary, switch on the wipers manually when water on the wind-
sc r
een obstructs visibility. Note
● Clean the sensitive surface of the rain sensor regularly and check the
b l
ades for damage ⇒ fig. 70 (arrow).
● To remove wax and coatings, we recommend a window cleaner contain-
ing alcoho
l. Checking and topping up the windscreen washer bottle
with wat
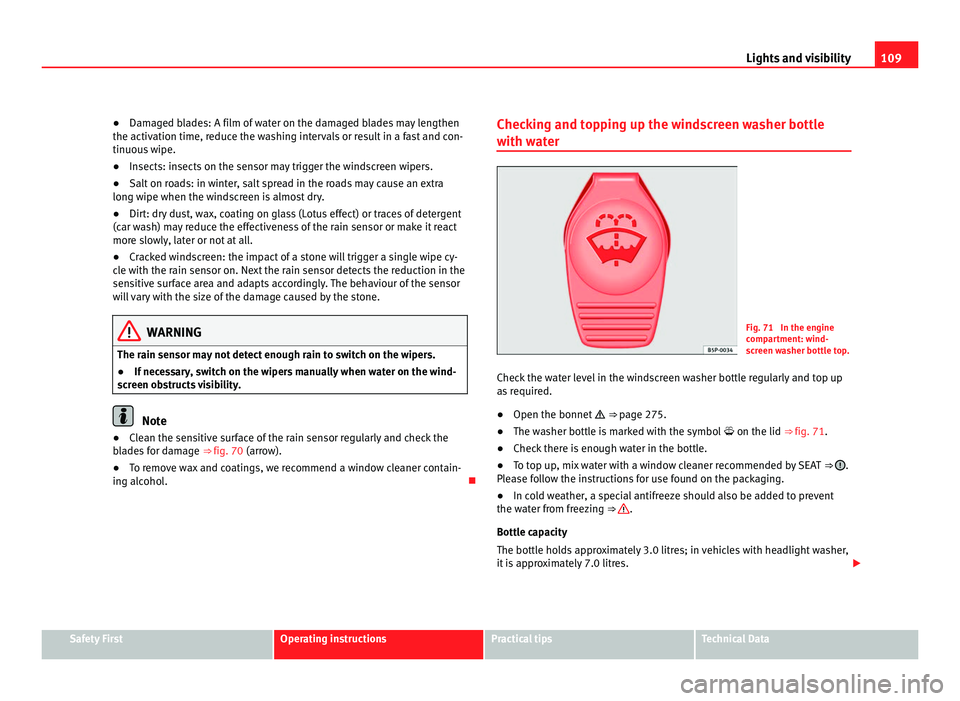
er Fig. 71 In the engine
comp
ar
tment: wind-
screen washer bottle top.
Check the water level in the windscreen washer bottle regularly and top up
as r
equired.
● Open the bonnet ⇒ pag
e 275.
● The washer bottle is marked with the symbol on the lid ⇒ fig. 71.
● Check there is enough water in the bottle.
● To top up, mix water with a window cleaner recommended by SEAT ⇒ .
Ple a
se follow the instructions for use found on the packaging.
● In cold weather, a special antifreeze should also be added to prevent
the water fr
om freezing ⇒ .
Bottle c ap
acity
The bottle holds approximately 3.0 litres; in vehicles with headlight washer,
it is approximately 7.0 litres. Safety First Operating instructions Practical tips Technical Data
Page 112 of 385
110
Lights and visibility WARNING
Never mix an unsuitable antifreeze or other similar products with the
wind s
creen washer water. A greasy layer may be formed on the wind-
screen which will impair visibility.
● Use clean water with a window cleaner recommended by SEAT.
● If necessary, add a suitable antifreeze to the water bottle. CAUTION
● Do not mix cleaning products recommended by SEAT with other prod-
ucts. Thi
s could lead to flocculation and may block the windscreen washer
jets.
● When topping up service fluids, make absolutely certain that you fill the
fluids int
o the correct reservoirs. Failure to observe this point will result in
serious malfunctions and engine damage!
Rear vision mirror
Intr oduction Additional information and warnings:
●
Personal convenience settings in the SEAT information system
⇒ pag
e 62
● Se
at memory ⇒ page 117
● Ch
anging gear ⇒ page 174
● Br
aking, stopping and parking ⇒ page 183 WARNING
The automatic anti-dazzle rear vision mirror contains an electrolytic fluid
which m a
y leak if the mirror is broken. This fluid can cause irritation to
the skin, eyes and respiratory organs.
● The electrolytic fluid may cause irritation to the skin, eyes and respi-
rator
y organs, particularly in individuals suffering from asthma or other
illnesses. Make sure that adequate quantities of fresh air enter and leave
the vehicle if it is not possible to open all the doors and windows.
● If the electrolytic fluid comes into contact with eyes or skin, wash the
area f
or at least 15 minutes with plenty of water, and seek medical ad-
vice.
● If the electrolytic fluid comes into contact with shoes or clothing,
wash the ar
ea for at least 15 minutes with plenty of water. Wash shoes
and clothing before wearing them again.
● If the electrolytic fluid is swallowed, wash the mouth with plenty of
water f
or at least 15 minutes. Do not try to provoke vomiting unless rec-
ommended by a Doctor. Seek medical advice immediately. CAUTION
If an automatic anti-dazzle rear vision mirror is broken, the electrolytic fluid
ma y
leak out. This fluid attacks plastic surfaces. Therefore, it should be
cleaned as fast as possible with a damp sponge or similar.
Page 113 of 385
111
Lights and visibility
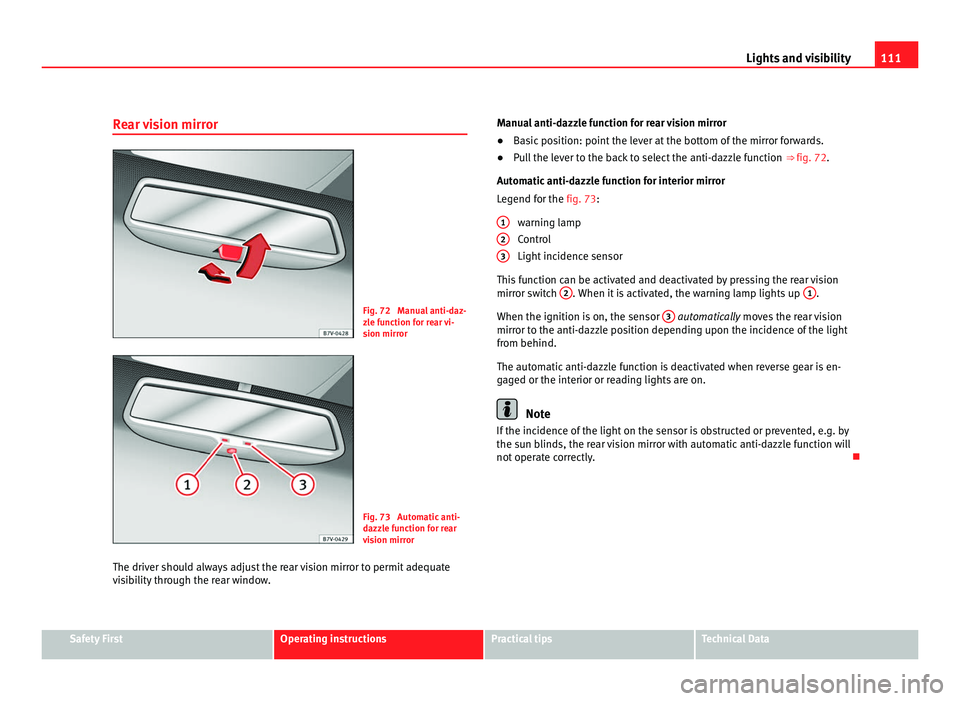
Rear vision mirror Fig. 72 Manual anti-daz-
zl
e f
unction for rear vi-
sion mirror Fig. 73 Automatic anti-
dazz
l
e function for rear
vision mirror
The driver should always adjust the rear vision mirror to permit adequate
vis
ibility through the rear window. Manual anti-dazzle function for rear vision mirror
●
Basic position: point the lever at the bottom of the mirror forwards.
● Pull the lever to the back to select the anti-dazzle function ⇒ fig. 72.
Automatic
anti-dazzle function for interior mirror
Legend for the fig. 73:
warning lamp
Control
Light incidence sensor
This function can be activated and deactivated by pressing the rear vision
mirror switch 2 . When it is activated, the warning lamp lights up
1 .
When the ignition is on, the sen
sor 3 automatically moves the rear vision
mirr or t
o the anti-dazzle position depending upon the incidence of the light
from behind.
The automatic anti-dazzle function is deactivated when reverse gear is en-
gaged or the interior or reading lights are on. Note
If the incidence of the light on the sensor is obstructed or prevented, e.g. by
the su n b
linds, the rear vision mirror with automatic anti-dazzle function will
not operate correctly.
1 2
3
Safety First Operating instructions Practical tips Technical Data
Page 128 of 385
126
Seats and storage compartments WARNING
When the vehicle is not in use or being watched, always lock the doors
and the tai l
gate to reduce the risk of serious injury or death.
● Do not leave children unwatched, especially when the tailgate is
open. Childr
en could climb into the luggage compartment, close the tail-
gate from inside and be unable to escape themselves. This could lead to
serious injury or death.
● Never allow children to play in or around the vehicle.
● Never transport people in the luggage compartment. WARNING
Unsecured or incorrectly secured objects can cause serious injury in case
of a s ud
den manoeuvring or breaking or in case of an accident. This is es-
pecially true when objects are struck by a detonating airbag and fired
through the vehicle interior. To reduce the risks, please note the follow-
ing:
● Secure all objects in the vehicle. Always keep equipment and heavy
obj
ects in the luggage compartment.
● Always secure objects with suitable rope or straps so that they can-
not enter the ar
eas around the frontal or side airbags in case of sudden
braking or an accident.
● While driving, always keep object compartments closed. WARNING (Continued)
● Do not place hard, heavy or sharp objects inside the passenger com-
p ar
tment, in open storage compartments, the rear shelf or on the dash-
board.
● Remove hard, heavy and sharp objects from clothes and pockets in-
side the v
ehicle and store securely. WARNING
The transport of heavy object changes vehicle handling and increases
brak in
g distance. Heavy loads that have not been stored or secured cor-
rectly could cause loss of control and result in serious injury.
● The vehicle handling changes when transporting heavy objects due
to a ch
ange in the centre of gravity.
● Distribute the load as uniformly and as low down on the vehicle as
poss
ible.
● Store heavy objects in the luggage compartment as far from the rear
axle a
s possible. CAUTION
● Hard objects on the shelf could chafe the wires of the heating element
and ant enn
a of the rear window and cause damage.
● The side window antenna could be damaged due to chafing from ob-
jects. Note
The ventilating slits between the heated rear window and the shelf must not
be co v
ered so that used air can escape from the vehicle.
Page 143 of 385
141
Seats and storage compartments
Storage compartments
Introduction Storage compartments must only be used to store light or small objects.
The front
c
entral armrest compartment houses the factory-fitted AUX-IN or
multimedia (MEDIA-IN) connection sockets.
The factory-fitted CD changer is located in the left-hand storage compart-
ment of the luggage compartment.
Additional information and warnings:
● Child seats (accessories) ⇒ page 39
● L
uggage compartment ⇒ page 125
● C
are and cleaning of the vehicle interior ⇒ page 249
● ⇒
Bookl et Radio or ⇒ Booklet navigation system WARNING
In the event of sudden braking movements or turns, loose objects may be
thro wn ar
ound the vehicle interior. This could cause serious injuries to
passengers and cause the driver to lose control of the vehicle.
● Do not transport animals or place hard, heavy or sharp objects inside
the vehic
le in: open storage compartments, instrument panel, storage
tray, items of clothing or bags.
● While driving, always keep object compartments closed. WARNING
Objects falling into the driver's footwell could prevent use of the pedals.
This c
ould lead the driver to lose control of the vehicle, increasing the
risk of a serious accident.
● Make sure the pedals can be used at all times, with no objects rolling
underneath them.
● The floor m
at should always be secured to the floor.
● Never place other mats or rugs on top of the original mat supplied by
the factor
y.
● Make sure that no objects can fall into the driver's footwell while the
vehicl
e is in motion. CAUTION
● Objects on the shelf could chafe against the wires of the heating ele-
ment in the r
ear window and cause damage.
● Do not keep heat-sensitive objects, food or medicines inside the vehi-
cle. He
at and cold could damage them or render them useless.
● Light-transparent objects placed inside the vehicle, such as lenses,
magnify
ing glasses or transparent suction caps on the windows, could con-
centrate the sun's rays and cause damage to the vehicle. Note
The ventilating slits between the heated rear window and the shelf must not
be co v
ered so that used air can escape from the vehicle. Safety First Operating instructions Practical tips Technical Data