ad blue Seat Alhambra 2011 Owner's Manual
[x] Cancel search | Manufacturer: SEAT, Model Year: 2011, Model line: Alhambra, Model: Seat Alhambra 2011Pages: 385, PDF Size: 7.92 MB
Page 5 of 385
Table of Contents
Manual structure
. . . . . . . . . . . . . . . . . . . . 5
Content . . . . . . . . . . . . . . . . . . . . . . . . . . . . . . . . 6
Safety First . . . . . . . . . . . . . . . . . . . . . . . . . . . . 7
Safe driving . . . . . . . . . . . . . . . . . . . . . . . . . . . . . . . 7
Dear SEAT Driver . . . . . . . . . . . . . . . . . . . . . . . . . . 7
Tips for driving . . . . . . . . . . . . . . . . . . . . . . . . . . . 7
Adjusting the seat position . . . . . . . . . . . . . . . . . 10
Transporting objects . . . . . . . . . . . . . . . . . . . . . . . 13
Seat belts . . . . . . . . . . . . . . . . . . . . . . . . . . . . . . . . . 16
Brief introduction . . . . . . . . . . . . . . . . . . . . . . . . . 16
Why wear seat belts? . . . . . . . . . . . . . . . . . . . . . . 19
Seat belts . . . . . . . . . . . . . . . . . . . . . . . . . . . . . . . 21
Seat belt tensioners . . . . . . . . . . . . . . . . . . . . . . . 26
Airbag system . . . . . . . . . . . . . . . . . . . . . . . . . . . . . 28
Brief introduction . . . . . . . . . . . . . . . . . . . . . . . . . 28
Airbag system . . . . . . . . . . . . . . . . . . . . . . . . . . . . 31
Child safety . . . . . . . . . . . . . . . . . . . . . . . . . . . . . . . 39
Child seats (accessories) . . . . . . . . . . . . . . . . . . . 39
Integrated child seat . . . . . . . . . . . . . . . . . . . . . . . 46
Operating instructions . . . . . . . . . . . . . 53
Cockpit . . . . . . . . . . . . . . . . . . . . . . . . . . . . . . . . . . . 53
Overview . . . . . . . . . . . . . . . . . . . . . . . . . . . . . . . . 53
Instrument panel . . . . . . . . . . . . . . . . . . . . . . . . . . 54
Instruments . . . . . . . . . . . . . . . . . . . . . . . . . . . . . . 57
SEAT information system . . . . . . . . . . . . . . . . . . . 62 Unlocking and locking
. . . . . . . . . . . . . . . . . . . . . 71
Vehicle key set . . . . . . . . . . . . . . . . . . . . . . . . . . . 71
Central locking and locking system . . . . . . . . . . . 74
Doors . . . . . . . . . . . . . . . . . . . . . . . . . . . . . . . . . . . 80
Sliding doors . . . . . . . . . . . . . . . . . . . . . . . . . . . . . 81
Tailgate . . . . . . . . . . . . . . . . . . . . . . . . . . . . . . . . . 84
Electric windows . . . . . . . . . . . . . . . . . . . . . . . . . . 89
Panorama sliding sunroof* . . . . . . . . . . . . . . . . . 92
Lights and visibility . . . . . . . . . . . . . . . . . . . . . . . . 95
Lights . . . . . . . . . . . . . . . . . . . . . . . . . . . . . . . . . . . 95
Sun blind . . . . . . . . . . . . . . . . . . . . . . . . . . . . . . . . 103
Windscreen wiper and washer . . . . . . . . . . . . . . . 105
Rear vision mirror . . . . . . . . . . . . . . . . . . . . . . . . . 110
Seats and storage compartments . . . . . . . . . . 114
Seat adjustment . . . . . . . . . . . . . . . . . . . . . . . . . . 114
Seat functions . . . . . . . . . . . . . . . . . . . . . . . . . . . . 117
Head restraints . . . . . . . . . . . . . . . . . . . . . . . . . . . 123
Centre armrest . . . . . . . . . . . . . . . . . . . . . . . . . . . . 125
Loading luggage compartment . . . . . . . . . . . . . . 125
Roof carrier system* . . . . . . . . . . . . . . . . . . . . . . . 138
Storage compartments . . . . . . . . . . . . . . . . . . . . . 141
Cup holders . . . . . . . . . . . . . . . . . . . . . . . . . . . . . . 148
Ashtray and cigarette lighter* . . . . . . . . . . . . . . . 150
Sockets . . . . . . . . . . . . . . . . . . . . . . . . . . . . . . . . . 151
Heating, Ventilation and Air conditioning . . . 155
Climate Control . . . . . . . . . . . . . . . . . . . . . . . . . . . 155
Auxiliary heater* (additional heater) . . . . . . . . . . 163
Driving . . . . . . . . . . . . . . . . . . . . . . . . . . . . . . . . . . . . 167
Steering . . . . . . . . . . . . . . . . . . . . . . . . . . . . . . . . . 167
Stopping and starting the engine . . . . . . . . . . . . 170
Changing gear . . . . . . . . . . . . . . . . . . . . . . . . . . . . 174
Braking, stopping and parking . . . . . . . . . . . . . . 183
Start assist systems . . . . . . . . . . . . . . . . . . . . . . . 194
Parking sensor system* . . . . . . . . . . . . . . . . . . . . 198 Park Assist system* . . . . . . . . . . . . . . . . . . . . . . . 202
Rear Assist system* . . . . . . . . . . . . . . . . . . . . . . . 207
Cruise control system* . . . . . . . . . . . . . . . . . . . . . 212
Lane Assist system* . . . . . . . . . . . . . . . . . . . . . . . 215
Sign Assist* . . . . . . . . . . . . . . . . . . . . . . . . . . . . . . 218
Tyre monitoring systems . . . . . . . . . . . . . . . . . . . . 221
Practical tips . . . . . . . . . . . . . . . . . . . . . . . . . . 225
Driving and the environment . . . . . . . . . . . . . . . 225
Running-in . . . . . . . . . . . . . . . . . . . . . . . . . . . . . . . 225
Ecological driving . . . . . . . . . . . . . . . . . . . . . . . . . 225
Engine management and exhaust gas
purific ation sy
stem . . . . . . . . . . . . . . . . . . . . . . . . 228
Trailer towing . . . . . . . . . . . . . . . . . . . . . . . . . . . . . . 231
Introduction . . . . . . . . . . . . . . . . . . . . . . . . . . . . . . 231
Driving with a trailer . . . . . . . . . . . . . . . . . . . . . . . 233
Vehicle maintenance and cleaning . . . . . . . . . 242
Care and cleaning the vehicle exterior . . . . . . . . 242
Caring for and cleaning the vehicle interior . . . . 249
Notes for the user . . . . . . . . . . . . . . . . . . . . . . . . . 255
Accessories, parts replacement and
modifications . . . . . . . . . . . . . . . . . . . . . . . . . . . . .
257
Accessories, replacement of parts and
modifications
. . . . . . . . . . . . . . . . . . . . . . . . . . . . 257
Checking and refilling levels . . . . . . . . . . . . . . . 264
Filling the tank . . . . . . . . . . . . . . . . . . . . . . . . . . . . 264
Fuel . . . . . . . . . . . . . . . . . . . . . . . . . . . . . . . . . . . . 267
Selective Catalytic Reduction* (AdBlue) . . . . . . . 271
Working in the engine compartment . . . . . . . . . . 275
Engine oil . . . . . . . . . . . . . . . . . . . . . . . . . . . . . . . . 279
Engine coolant . . . . . . . . . . . . . . . . . . . . . . . . . . . 283
Vehicle battery . . . . . . . . . . . . . . . . . . . . . . . . . . . 288 3
Table of Contents
Page 57 of 385
55
Cockpit
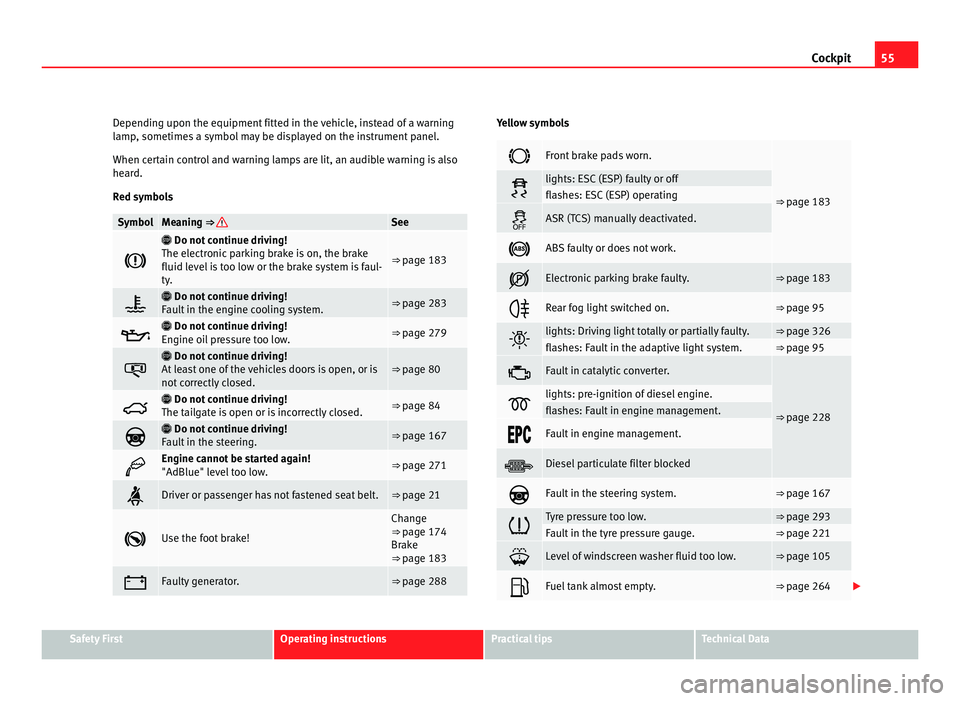
Depending upon the equipment fitted in the vehicle, instead of a warning
lamp , sometime
s a symbol may be displayed on the instrument panel.
When certain control and warning lamps are lit, an audible warning is also
heard.
Red symbols Symbol Meaning ⇒ See
Do not continue driving!
The el ectr
onic parking brake is on, the brake
fluid level is too low or the brake system is faul-
ty. ⇒ page 183
Do not continue driving!
F au
lt in the engine cooling system. ⇒ page 283
Do not continue driving!
En gine oi
l pressure too low. ⇒ page 279
Do not continue driving!
At l
east one of the vehicles doors is open, or is
not correctly closed. ⇒ page 80
Do not continue driving!
The t ai
lgate is open or is incorrectly closed. ⇒ page 84
Do not continue driving!
F au
lt in the steering. ⇒ page 167
Engine cannot be started again!
"AdBlue" lev
el
too low. ⇒ page 271
Driver or passenger has not fastened seat belt. ⇒ page 21
Use the foot brake! Change
⇒ pag
e 174
Br
ake
⇒ page 183 Faulty generator. ⇒ page 288 Yellow symbols
Front brake pads worn.
⇒ page 183 lights: ESC (ESP) faulty or off
flashes: ESC (ESP) operating
ASR (TCS) manually deactivated.
ABS faulty or does not work.
Electronic parking brake faulty. ⇒ page 183
Rear fog light switched on. ⇒ page 95
lights: Driving light totally or partially faulty. ⇒ page 326
flashes: Fault in the adaptive light system. ⇒ page 95
Fault in catalytic converter.
⇒ page 228 lights: pre-ignition of diesel engine.
flashes: Fault in engine management.
Fault in engine management.
Diesel particulate filter blocked
Fault in the steering system. ⇒ page 167
Tyre pressure too low. ⇒ page 293
Fault in the tyre pressure gauge. ⇒ page 221
Level of windscreen washer fluid too low. ⇒ page 105
Fuel tank almost empty. ⇒ page 264
Safety First Operating instructions Practical tips Technical Data
Page 58 of 385
56
Cockpit flashes: Engine oil sensor faulty.
⇒ page 279
lights: Insufficient engine oil.
Fault in airbag system and seat belt tensioners. ⇒ page 31
Passenger front airbag is off (
PASSENGER AIR-
BAG ). ⇒ page 31
Top up "AdBlue", or there is a fault in the "AdBl-
ue" system.
⇒ page 271
Fuel tank not closed correctly. ⇒ page 264
Lane Assist is connected, but not active. ⇒ page 216
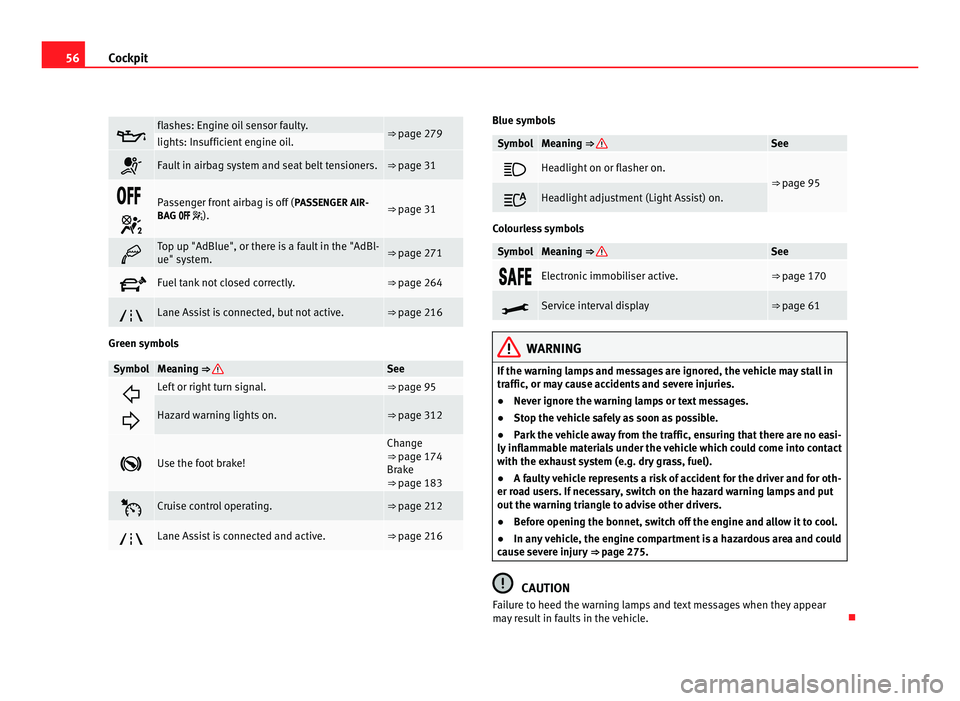
Green symbols
Symbol Meaning ⇒ See
Left or right turn signal. ⇒ page 95
Hazard warning lights on. ⇒ page 312
Use the foot brake! Change
⇒ page 174
Br ak
e
⇒ page 183 Cruise control operating. ⇒ page 212
Lane Assist is connected and active. ⇒ page 216 Blue symbols
Symbol Meaning
⇒ See
Headlight on or flasher on.
⇒
page 95 Headlight adjustment (Light Assist) on.
Colourless symbols
Symbol Meaning ⇒ See
Electronic immobiliser active. ⇒ page 170
Service interval display ⇒ page 61
WARNING
If the warning lamps and messages are ignored, the vehicle may stall in
traffic, or may cause accidents and severe injuries.
● Never ignore the warning lamps or text messages.
● Stop the vehicle safely as soon as possible.
● Park the vehicle away from the traffic, ensuring that there are no easi-
ly inflammable materials under the vehicle which could come into contact
with the exhaust system (e.g. dry grass, fuel).
● A faulty vehicle represents a risk of accident for the driver and for oth-
er road users. If necessary, switch on the hazard warning lamps and put
out the warning triangle to advise other drivers.
● Before opening the bonnet, switch off the engine and allow it to cool.
● In any vehicle, the engine compartment is a hazardous area and could
cause severe injury ⇒ page 275. CAUTION
Failure to heed the warning lamps and text messages when they appear
may result in faults in the vehicle.
Page 263 of 385
261
Accessories, parts replacement and modifications
In vehicles equipped with an emergency call function via the mobile phone
or other app li
ances connected in the vehicle, it is possible to send the vehi-
cle position. If the control unit records an accident with airbag activation,
the system may automatically send a signal. This will depend on the net-
work operator. Normally, transmission is only possible in areas with good
coverage.
Event Data Recorder
The vehicle is not fitted with an event data recorder.
An event data recorder temporarily stores the vehicle information. There-
fore, in the event of accident, it is possible to obtain detailed information
about how the accident occurred. For example, in vehicles with airbag sys-
tems, data relating to speed of impact, seat belt status, seat positions and
airbag activation times may be stored. The volume of data depends on the
manufacturer.
Event data recorders can only be mounted with authorisation from the vehi-
cle owner and, in some countries, they are governed by local legislation.
Reprogramming control units
On the whole, all the data required for the component management is stor-
ed in the control units. The programming of certain convenience functions,
such as the convenience indicators, individual door opening and instruc-
tions on the display can be modified using special equipment at the work-
shop. If this is the case, the information and descriptions given in the in-
structions manual will not match the original functions. Therefore, SEAT rec-
ommends that any modifications are recorded in the section “Other work-
shop notes” in the Maintenance Programme.
The Technical Service must have a record of any modification to the pro-
gramming.
Reading the vehicle fault memory
There is a diagnostics connector in the vehicle interior for reading the vehi-
cle fault memory. The fault memory documents errors and deviations from
the theoretical values of the electronic control units. The diagnostics connector is in the driver's side footwell area, next to the
lever f
or opening the bonnet, below a cover.
The fault memory should only be read and reset by a Technical Service.
Using a mobile telephone in a vehicle without connection
to an ext
erior aerial Mobile telephones transmit and receive radio waves, both when in use and
when on st
and-b
y. Scientific studies state that radio waves exceeding cer-
tain values may be harmful to the human body. International committees
and authorities have established limits and directives in order to ensure
electromagnetic radiation from mobile phones remains within certain limits
that do not endanger human health. However, there is no available conclu-
sive scientific evidence that cordless phones are completely safe.
Therefore, some experts recommend that use of mobile phone be kept to a
minimum until the results of current research are published.
When a mobile phone not connected to an exterior aerial is used inside the
vehicle, the electromagnetic radiation may be greater than if the mobile
phone were connected to a built-in aerial or to another exterior aerial.
If the vehicle is fitted with a suitable hands-free device, it will comply with
the legislation in many countries which only permits the use of mobile
phones inside vehicles using a hands-free device.
The hands-free system mounted at the factory has been designed for use
with conventional mobile phones and phones with Bluetooth technology.
Mobile phones should be placed on a suitable phone cradle. In addition,
the cradle should always be correctly fitted into the base plate. This ensures
that the mobile phone is securely fastened to the instrument panel and con-
nected to the exterior aerial of the vehicle.
If the mobile phone is connected to an aerial incorporated into the vehicle
or an exterior aerial connected to the vehicle, this will help to reduce the Safety First Operating instructions Practical tips Technical Data
Page 266 of 385
264
Checking and refilling levels
Checking and refilling levels
Filling the tank
Introduction The fuel tank flap is on the rear right of the vehicle.
Addition
a
l information and warnings:
● Fuel ⇒ page 267
● Selectiv
e Catalytic Reduction (AdBlue) ⇒ page 271
● W
orking in the engine compartment ⇒ page 275WARNING
Refuelling or handling fuel carelessly can cause an explosion or fire re-
su ltin
g in serious burns and injuries.
● Always make sure that you correctly close the fuel cap to avoid evap-
oration and fuel
spillage.
● Fuels are highly explosive and inflammable substances that can
cause seriou
s burns and injuries.
● Fuel could leak out or be spilt if the engine is not switched off or if the
fill
er fuel nozzle is not fully inserted into the tank filler neck when refuel-
ling. This could lead to a fire, explosion and severe injuries.
● When refuelling, turn off the engine, the auxiliary heating
(⇒ page 163) and t
urn off the ignition for safety reasons.
● Always turn off mobile telephones, radio apparatus and other radio
wave emittin
g equipment before refuelling. Electromagnetic waves could
cause sparks and lead to a fire. WARNING (Continued)
● Nev er enter the vehicle while refuelling. If it is absolutely necessary
t o ent
er the vehicle, close the door and touch a metal surface before
touching the filler nozzle again. This will prevent the generation of static
electricity. Sparks could cause a fire when refuelling.
● Never handle fuel close to open flames, sparks or objects with slow
combu
stion (e.g. cigarettes).
● Avoid static electricity and electro-magnetic radiation when refuel-
ling.
● Ob
serve the safety regulations of the service station.
● Never spill fuel on the vehicle or in the luggage compartment. WARNING
For safety reasons, SEAT does not recommend carrying a spare fuel canis-
ter in the v
ehicle. Fuel could be spilled and catch fire, above all in case of
an accident and this applies to a full container as well as empty contain-
ers. This could lead to explosions, fires and injuries.
● Observe the following if you exceptionally have to carry fuel in a can-
ist
er:
– Never place a fuel container to fill it inside the vehicle or on the ve-
hicle, f
or example, in the luggage compartment or on the tailgate.
Filling in these circumstances could create an electrostatic charge
and spark that could ignite fuel fumes.
– Always place the canister on the ground to fill it.
– Insert the fuel nozzle into the mouth of the canister as far as possi-
ble.
Page 273 of 385
271
Checking and refilling levels
Selective Catalytic Reduction* (AdBlue)
Introduction The AdBlue fill level must be checked when the vehicle is being serviced
⇒ Bookl
et
Maintenance Programme.
Additional information and warnings:
● Luggage compartment ⇒ p
age 125
● Fuel ⇒ page 267
● Wheels
and tyres ⇒ pag
e 293
● Accessories, parts replacement, repairs and modifications ⇒ page 257WARNING
If the AdBlue fill level is too low, the vehicle may not restart after switch-
ing the ignition off .
The emergency start or jump start will not be possi-
ble either!
● Top up with AdBlue at the latest 1000 km or 600 miles before it runs
out.
● Do not a
llow the AdBlue to run too low. WARNING
AdBlue is an irritant, corrosive liquid that can cause injuries if it touches
the skin, ey e
s or respiratory organs.
● If AdBlue get in contact with eyes and skin, rinse for at least 15 mi-
nutes
with plenty of water and seek medical help.
● If the AdBlue is swallowed, wash the mouth with plenty of water for at
lea
st 15 minutes. Do not try to provoke vomiting unless recommended by
a Doctor. Seek medical advice immediately. CAUTION
AdBlue damages surfaces such as painted vehicle parts, plastic, items of
clothin g and c
arpets. Spilt AdBlue should be removed as quickly as possi-
ble using a damp cloth and plenty of cold water.
● If the AdBlue has crystallised, remove with warm water and a sponge.
Control and warning lamps lights up Possible cause ⇒ Solution
(red) The engine cannot be restar-
ted!
The l
evel of AdBlue is too
low. Stop the vehicle in a suitable,
saf
e and fl
at area then top up
with the minimum quantity of
AdBlue required ⇒ page 273. (red)
with
The engine cannot be restar-
ted!
AdBlue sy
stem malfunc-
tion. Contact a specialist workshop.
Have the sy
s
tem checked there.
(yel-
lo w) The AdBlue reserve is low. Refill AdBlue over the next kilo-
metre
s
or miles as indicated
⇒ page 273. SEAT recommends
contacting a specialist work-
shop. (red)
with
There is a fault in the AdBlue
sys
t
em or unsuitable AdBlue
fluid has been used. Contact a specialist workshop.
Have the sy
s
tem checked there. Several warning and control lamps should light up for a few seconds when
the ignition is
sw
itched. This signals that the lamp is working properly. They
will switch off after a few seconds. Safety First Operating instructions Practical tips Technical Data
Page 274 of 385
272
Checking and refilling levels WARNING
If the warning lamps and messages are ignored, the vehicle may stall in
traffic, or m a
y cause accidents and severe injuries.
● Never ignore the warning lamps or text messages.
● Stop the vehicle safely as soon as possible. CAUTION
Failure to heed the warning lamps and text messages when they appear
ma y
result in faults in the vehicle.
Information on AdBlue In vehicles with Selective Catalytic Reduction, a special urea solution (AdBl-
ue) is
inj
ected into the exhaust gas system in front of the catalytic converter
to reduce nitrogen oxide emissions.
The consumption of AdBlue depends on individual driving style, the tem-
perature at which the system operates and the outside temperature where
the vehicle is driven. AdBlue is kept in an independent tank in the vehicle and should be refilled
at an offici
al supplier. The AdBlue tank holds about 17 litres.
A message will be displayed on the instrument panel around 2400 km be-
fore the next service to indicate that AdBlue must be refilled ⇒ page 273. If
you ignore this message and do not refill, you will be unable to start the en-
gine afterwards ⇒ page 271.
SEAT recommends contacting a specialist workshop. If you are unable to
visit a qualified specialist workshop, you should temporarily refill with a
minimum of 10.0 litres of AdBlue. Only refill using AdBlue expressly ap-
proved by SEAT.
When the indicators and light simultaneously, there is a fault. SEAT
recommends visiting the closest qualified workshop.
AdBlue ®
is a registered trademark in the US, Germany, the European Union
and other countries belonging to the German automobile industry ("Ver-
band der Automobilindustrie e. V.", VDA).
Page 275 of 385
273
Checking and refilling levels
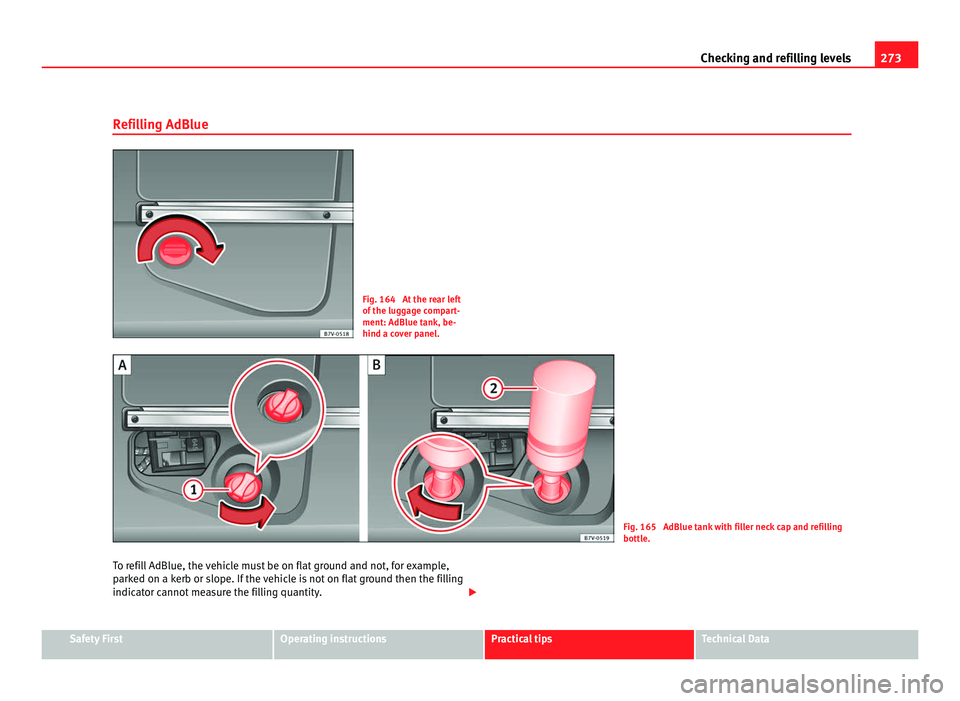
Refilling AdBlue Fig. 164 At the rear left
of the lug
g
age compart-
ment: AdBlue tank, be-
hind a cover panel. Fig. 165 AdBlue tank with filler neck cap and refilling
bottle.
T o r
efill AdBlue, the vehicle must be on flat ground and not, for example,
parked on a k
erb or slope. If the vehicle is not on flat ground then the filling
indicator cannot measure the filling quantity. Safety First Operating instructions Practical tips Technical Data
Page 276 of 385
274
Checking and refilling levels
Opening the tank filling neck
● Open the tailgate.
● Rotate the shut off on the cover clockwise ⇒ fig. 164 and open the cov er
forwards.
● Unscrew the tank filler neck cap ⇒ fig. 165 1 anticlockwise.
Refi l
ling AdBlue
Only use AdBlue that is approved by SEAT and that complies with the
ISO 22241-1 Standard. Only use genuine bottles.
● Observe the instructions and information provided by the refill bottle
manufact
urer.
● Observe the expiry date.
● Unscrew the cap on the refill bottle.
● Place the refill bottle 2 upside down inside the tank filler neck.
● Press the refill bottle against the filler neck and keep in this position.
● Add at least 10 litres of AdBlue (6 bottles). A lower quantity
would be
insufficient.
● Wait until the contents of the refill bottle have been poured into the
AdBlue tank. Do not c
rush or damage the bottle!
● Unscrew the liquid bottle anticlockwise and remove it carefully ⇒ .
● You can tell when the AdBlue tank is full because the bottle will be emp-
ty.
C lo
sing the tank filling neck
● Screw on the tank filler neck cap 1 clockwise until it is fully inserted.
● Place the cover and turn the shut off anticlockwise to close it.
Operation s
before driving
● Only switch the ignition on after refilling.
● Keep the ignition sw
itch on for at least 30 seconds so that the system
detects t
ank refilling.
● Wait 30 seconds before starting the engine! WARNING
Only keep AdBlue in its original container, tightly shut and in a safe
pl ac
e.
● Never keep AdBlue in empty food cans, bottles or other containers to
avoid other peopl
e mistaking it for something else.
● Keep the AdBlue out of the reach of small children. CAUTION
● Only refill using AdBlue expressly approved by SEAT. The use of any oth-
er type of AdBlue c
ould cause engine damage!
● AdBlue should never be mixed with water or any other additives. Any
type of dam
age caused by a mixture will not be covered by the warranty.
● Do not add AdBlue to the diesel fuel tank! Otherwise you may damage
the engine.
● Never l
eave the refill bottle in the vehicle. It could become permeable
due to temper
ature changes and bottle damage and the AdBlue could dam-
age the vehicle interior. For the sake of the environment
Dispose of the refill bottle in an environment-friendly manner. Note
Suitable AdBlue refill bottles can be purchased from a Technical Service.
Page 325 of 385
323
If and when
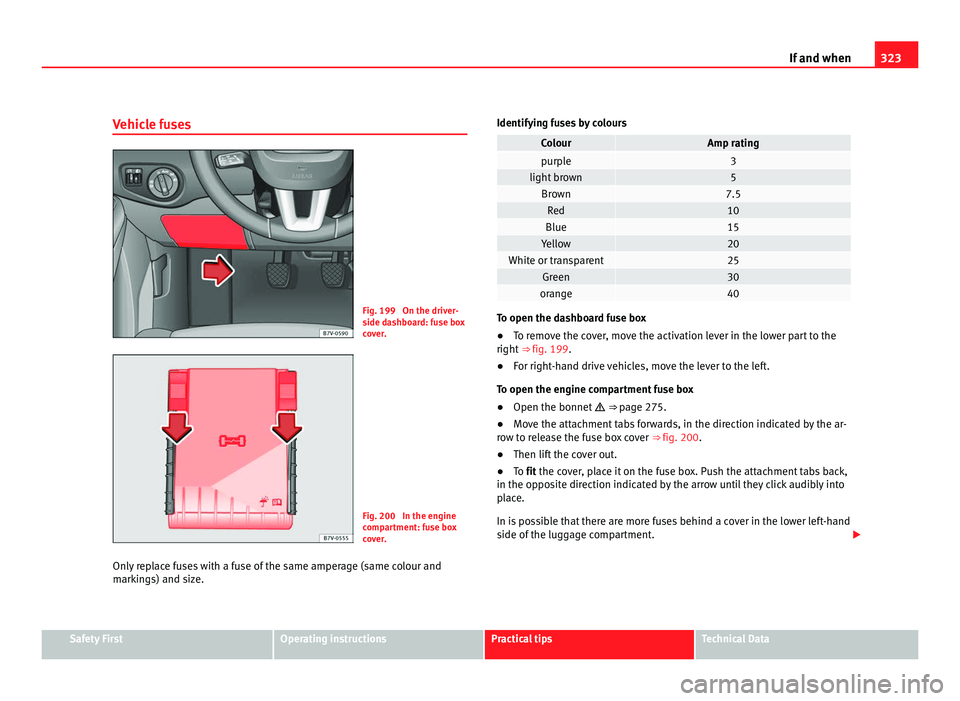
Vehicle fuses Fig. 199 On the driver-
side d
a
shboard: fuse box
cover. Fig. 200 In the engine
comp
ar
tment: fuse box
cover.
Only replace fuses with a fuse of the same amperage (same colour and
markin
gs) and size. Identifying fuses by colours Colour Amp rating
purple 3
light brown 5
Brown 7.5
Red 10
Blue 15
Yellow 20
White or transparent 25
Green 30
orange 40
To open the dashboard fuse box
●
To remove the cover, move the activation lever in the lower part to the
right ⇒ fig. 199 .
● F
or right-hand drive vehicles, move the lever to the left.
To open the engine c
ompartment fuse box
● Open the bonnet ⇒ pag
e 275.
● Move the attachment tabs forwards, in the direction indicated by the ar-
row t
o release the fuse box cover ⇒ fig. 200.
● Then lift the cover out.
● To fit the cover, place it on the fuse box. Push the attachment tabs back,
in the oppo
site direction indicated by the arrow until they click audibly into
place.
In is possible that there are more fuses behind a cover in the lower left-hand
side of the luggage compartment. Safety First Operating instructions Practical tips Technical Data