headlights Seat Alhambra 2011 Owner's Manual
[x] Cancel search | Manufacturer: SEAT, Model Year: 2011, Model line: Alhambra, Model: Seat Alhambra 2011Pages: 385, PDF Size: 7.92 MB
Page 55 of 385
53
Cockpit
Operating instructions Coc kpit
Ov
erview
Overv
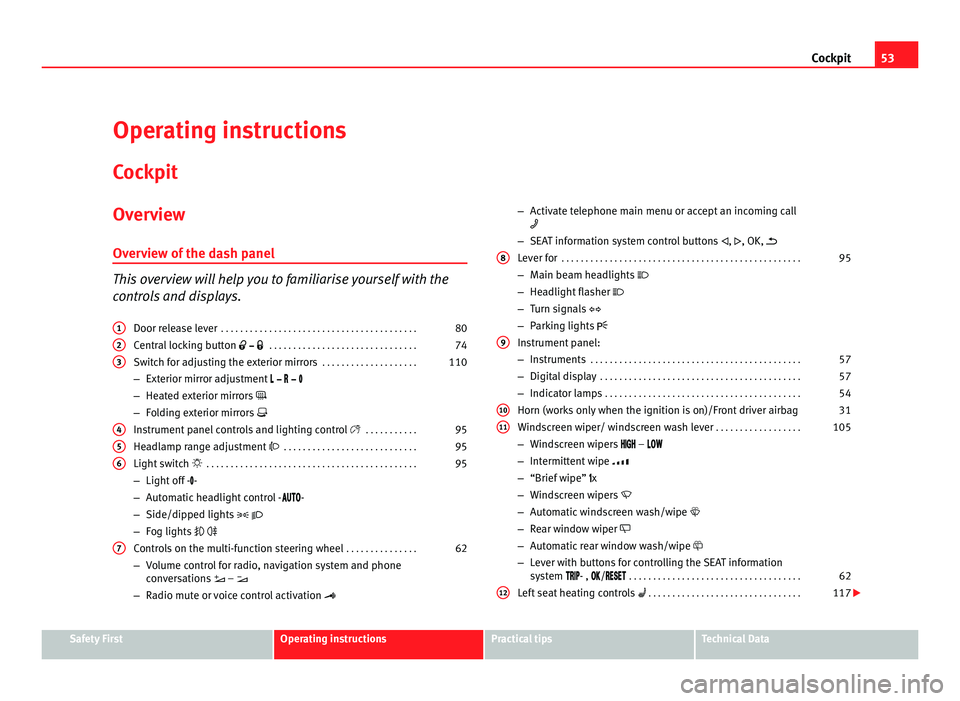
iew of the dash panel This overview will help you to familiarise yourself with the
con
tr
ols and displays.
Door release lever . . . . . . . . . . . . . . . . . . . . . . . . . . . . . . . . . . . . . . . . . 80
Central locking button . . . . . . . . . . . . . . . . . . . . . . . . . . . . . . . 74
Switch for adjusting the exterior mirrors . . . . . . . . . . . . . . . . . . . .110
– Exterior mirror adjustment
– Heat
ed exterior mirrors
– Folding exterior mirrors
Instrument panel controls and lighting control . . . . . . . . . . . 95
Headlamp range adjustment . . . . . . . . . . . . . . . . . . . . . . . . . . . . 95
Light switch . . . . . . . . . . . . . . . . . . . . . . . . . . . . . . . . . . . . . . . . . . . . 95
– Light off - -
– Autom
atic headlight control - -
– Side/dipped lights
– Fog lights
Controls on the multi-function steering wheel . . . . . . . . . . . . . . .62
– Volume control for radio, navigation system and phone
con
versations –
– Radio mute or voice control activation
1 2
3
4
5
6
7 –
Activate telephone main menu or accept an incoming call
– SEA
T information system control buttons , , OK,
Lever for . . . . . . . . . . . . . . . . . . . . . . . . . . . . . . . . . . . . . . . . . . . . . . . . . . 95
– Main beam headlights
– Hea
dlight flasher
– Turn signals
– Parking lights
Instrument panel:
– Instruments . . . . . . . . . . . . . . . . . . . . . . . . . . . . . . . . . . . . . . . . . . . . 57
– Digital display . . . . . . . . . . . . . . . . . . . . . . . . . . . . . . . . . . . . . . . . . . 57
– Indicator lamps . . . . . . . . . . . . . . . . . . . . . . . . . . . . . . . . . . . . . . . . . 54
Horn (work
s only when the ignition is on)/Front driver airbag 31
Windscreen wiper/ windscreen wash lever . . . . . . . . . . . . . . . . . .105
– Windscreen wipers –
– Int
ermittent wipe
– “Brief wipe” x
– Windscreen wipers
– Automatic windscreen wash/wipe
– Rear window wiper
– Automatic rear window wash/wipe
– Lever with buttons for controlling the SEAT information
system - , / . . . . . . . . . . . . . . . . . . . . . . . . . . . . . . . . . . . . 62
Left seat heating controls . . . . . . . . . . . . . . . . . . . . . . . . . . . . . . . . 117
8
9
10
11
12
Safety First Operating instructions Practical tips Technical Data
Page 97 of 385
95
Lights and visibility
Lights and visibility
Lights Introduction The legal requirements regarding the use of vehicle lights in each country
mus
t
be observed.
The driver is personally responsible for the correct use and adjustment of
the lights in all situations.
Additional information and warnings:
● SEAT information system ⇒ page 62
● Ch
anging bulbs ⇒ page 326 WARNING
If the headlights are set too high and the main beam is not used correct-
ly, ther e i
s a risk of dazzling or distracting other road users. This could
result in serious accident.
● Always make sure that the headlamps are correctly adjusted.
● Never use the main beam or flashed headlamps as this could dazzle
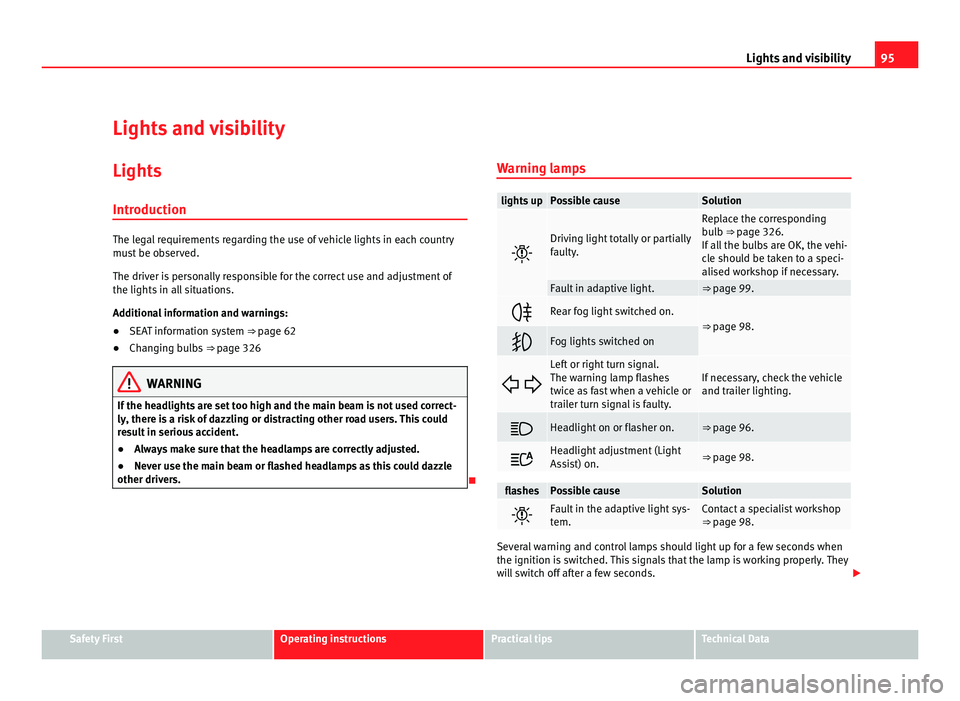
other drivers. Warning lamps lights up Possible cause Solution
Driving light totally or partially
fau
lty
. Replace the corresponding
bu
l
b ⇒ page 326.
If all the bulbs are OK, the vehi-
cle should be taken to a speci-
alised workshop if necessary. Fault in adaptive light. ⇒ page 99.
Rear fog light switched on.
⇒ page 98.
Fog lights switched on
Left or right turn signal.
The warnin
g l
amp flashes
twice as fast when a vehicle or
trailer turn signal is faulty. If necessary, check the vehicle
and trai
l
er lighting. Headlight on or flasher on. ⇒ page 96.
Headlight adjustment (Light
Ass
i
st) on. ⇒ page 98.
flashes Possible cause Solution
Fault in the adaptive light sys-
tem. Contact a specialist workshop
⇒ pag
e 98. Several warning and control lamps should light up for a few seconds when
the ignition is
sw
itched. This signals that the lamp is working properly. They
will switch off after a few seconds. Safety First Operating instructions Practical tips Technical Data
Page 99 of 385
97
Lights and visibility
The control turn signals are switched on and off from the menu Lights & Visi-
bility on the instrument panel display ⇒ page 62. This function can be dis-
connected at a specialised workshop for those vehicles which do not have
the menu Lights & Visibility .WARNING
Incorrect use of the headlamps may cause accidents and serious injury,
as the m
ain beam may distract or dazzle other drivers. Note
● The turn signal only works when the ignition is switched on. The hazard
w arnin
g lights also work when the ignition is switched off ⇒ page 312.
● If a turn signal on the vehicle or trailer is faulty, the warning lamp flash-
es tw
ice as fast as usual.
● The main beam headligh
ts can only be switched on if the dipped beam
headlights are already on.
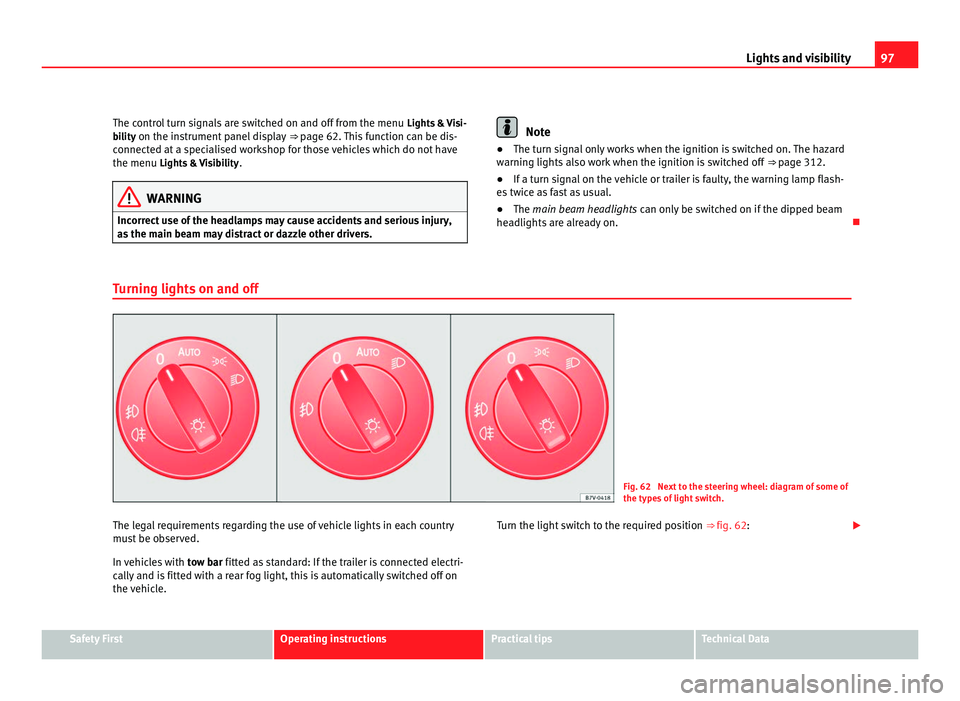
Turning lights on and off Fig. 62 Next to the steering wheel: diagram of some of
the type
s
of light switch.
The legal requirements regarding the use of vehicle lights in each country
mus t
be observed.
In vehicles with tow bar fitted as standard: If the trailer is connected electri-
cally and is fitted with a rear fog light, this is automatically switched off on
the vehicle. Turn the light switch to the required position
⇒ fig. 62:Safety First Operating instructions Practical tips Technical Data
Page 101 of 385
99
Lights and visibility
Automatic dipped beam control
The autom atic
dipped beam control is merely intended as an aid and is not
able to recognise all driving situations.
When the light switch is in position , the vehicle lights and the instru-
ment panel and switch lighting switch on and off automatically in the fol-
lowing situations ⇒ :
Automatic switching on: Automatic switching off or switch to
da
ytime lightin
g: The photo sensor detects
darknes
s,
for example, when driving through a
tunnel. When adequate lighting is detected.
When driving at more than 140 km/
h for a f
ew sec
onds. When driving at less than 65 km/h
for a f
ew minut
es. The rain sensor detects rain and ac-
tivat
e
s the windscreen wipers. When the windscreen wiper has
been inactiv
e f
or a few minutes. Adaptive headlights (AFS)
The ad
aptiv
e headlights only operate when the dipped beam is on and at
speeds of over 10 km/h. When taking a bend, the adaptive headlights auto-
matically light up the road better.
The adaptive headlights can be switched on and off from the infotainment
system.
Static turning lights
When turning slowly to change direction or going round a tight bend, the
static cornering lights automatically come on. The static cornering lights on-
ly work at speeds of less than 40 km/h.
The static cornering lights may be incorporated into the fog lights or the
front headlights, depending upon the equipment. WARNING
If the road is not well lit and other road users cannot see the vehicle well
enough or at a l
l, accidents may occur.
● The automatic dipped beam control ( ) only sw
itches on the dip-
ped beam when there are no changes in brightness, and not, for example
when it is foggy.
● Never drive with daytime lights if the road is not well lit due to weath-
er or lighting condition
s. Daytime lights do not provide enough light to
illuminate the road properly or be seen by other road users.
Headlight adjustment Headlight adjustment (Light Assist)
The hea
dlight
adjustment automatically connects and disconnects the main
beam headlights depending on the environmental and traffic conditions
and on the speed, within the limitations of the system ⇒ . This is moni-
tor ed b
y a sensor located on the inside of the windscreen, above the interior
rear vision mirror.
Automatic headlight adjustment (Dynamic Light Assist)
The automatic headlight adjustment (Dynamic Light Assist) can reduce or
avoid dazzle for other road users within the limitations of the system ⇒ .
The sys t
em detects other road users and their distance with respect to the
vehicle and covers a certain area of the headlamps. If dazzling other road
users cannot be avoided, the lights are set automatically to dipped beam.
They are regulated with a camera positioned in the support of the interior
rear vision mirror. Safety First Operating instructions Practical tips Technical Data
Page 102 of 385
100
Lights and visibility
The automatic headlight adjustment automatically switches on the main
beam dependin g on the
vehicles travelling in front and in the opposite di-
rection, and of other environmental and traffic conditions from an approxi-
mate speed of 60 km/h (37 mph) and turns them off again at speeds below
approximately 30 km/h (18 mph).
When the dynamic adaptive light system is deactivated ⇒ page 99 or the
headlight adjustment is activated, only the main beam is turned on and off
automatically. This happens depending on the vehicles travelling in front
and in the opposite direction, and on the road lighting.
Switching on and off How it works
Switching
on: – With the ignition on, turn the lights control to the position
and p
ut the turn signal and main beam lever in the
main beam position ⇒ page 96. When the headlight adjust-
ment (automatic also) is activated, the warning lamp lights
up in the instrument panel display .Switching
off: – Switch the ignition off.
– ALTERNA
TIVEL
Y: Turn the light switch to a position other
than ⇒ page 97.
– ALTERNATIVELY: place the turn signal and main beam lev-
er in the headlight flasher or main beam position
⇒ page 96. The following conditions can cause the headlight adjustment to fail to turn
off the m
ain be
am or fail to do so in time:
● On roads with insufficient lighting with very reflective signs
● If road users are insufficiently lit up, e.g. pedestrians or cyclists
● On closed curves, when the traffic in the opposite direction is partially
hidden, on pronou
nced slopes
● On roads with traffic in the opposite direction and with a central reserva-
tion barrier when the driver c
an see through gaps or over it e.g. lorry drivers
● If the camera is damaged or if the power supply has been cut off
● In the event of fog, snow or heavy rain ●
In the event of
dust or sand storms
● If the windscreen is damaged by the impact from a stone in the camera's
field of
vision
● If the camera's field of vision is misted up, dirty or covered by a sticker,
snow or ic
e. WARNING
The greater comfort that the headlight adjustment provides (automatic
al so) mu
st not cause you to take risks. The system is not a replacement
for driver awareness.
● Always monitor the lights yourself and adjust them depending on the
light, vi
sibility and traffic conditions.
● The headlight adjustment (automatic also) may not correctly detect
all
situations and in certain situations may only provide limited function.
● If the windscreen is damaged or modifications are made to the vehi-
cle lightin
g, this may harm the functioning of the headlight adjustment
(automatic also), for example, if additional headlight are fitted. Note
Main beam and flashed headlights can be turned on and off manually at
any time w
ith the turn signal and main beam lever ⇒ page 96.
Adhesive strips for headlights or adjusting headlights In those countries where vehicles drive on the other side of the road to the
home cou
ntr
y, the asymmetric dipped beam may dazzle drivers of oncom-
ing vehicles. Therefore, when driving abroad, adhesive strips should be at-
tached to the headlights or the headlights should be adjusted accordingly.
The direction of the headlights can be adjusted from the instrument panel,
in the Tourist light submenu of the Settings menu
⇒ page 67.
Page 103 of 385
101
Lights and visibility
For those vehicles in which it is not possible to adjust the headlights from
the menu, adhe s
ive strips are used to cover certain parts of the headlamp
cover or the headlights may be adjusted at a specialised workshop. For fur-
ther information, please refer to a specialised workshop. SEAT recommends
visiting a Technical Service. Note
Use of the Touris
t light option and the adhesives on the headlights is only
allowed if they are to be used for a short period of time. To modify the direc-
tion of the headlights permanently, please take the vehicle to a specialised
workshop. SEAT recommends visiting a Technical Service.
“Coming home” and “Leaving home” function (guidance
lights)C omin
g HomeThe “Coming home” function should be switched on manually. However the
“Le
av
ing home” function is automatically controlled by a photo sensor. “Coming Home” Necessary operations
To switch sys-
tem on: – Switch off the ignition.
– Briefly fl
a
sh the headlights for approximately one sec-
ond ⇒ page 96.
The “Coming home” lighting comes on when the driver's
door is opened. The delay in switching off the headlights
is counted from when the last door or tailgate is closed. The system
swit
c
hes off: – Automatically at the end of the delay period.
– Autom
atic
ally, if 30 seconds after coming on, a vehicle
door or tailgate remains open.
– If the light switch is turned to position .
– If the ignition is switched on. “Leaving home” Necessary operations
To switch sys-
tem on: – Unlock the vehicle when the light switch is in position
and the phot
o sensor detects darkness. The system
swit
c
hes off: – Automatically, at the end of the delay period.
– When the
v
ehicle is locked.
– When the light switch is turned to position .
– When the ignition is switched on. Lighting around the exterior mirrors
The lighting ar
ou
nd the exterior mirrors illuminates the door area on enter-
ing and leaving the vehicles. It comes on when the vehicle is unlocked,
when the vehicle door is opened and when the “Coming home” or “Leaving
home” function is switched on. If the equipment includes the light sensor,
the lighting around the exterior mirrors only comes when it is dark. Note
● The time tak en f
or the headlights to go off can be changed in the Lights
& Visibility menu and the function can be switched on or off ⇒ page 62.
● When the “Coming home” function is on, if the vehicle door is opened
there is
no audible warning signal to advise that the light is still on. Safety First Operating instructions Practical tips Technical Data
Page 104 of 385
102
Lights and visibility
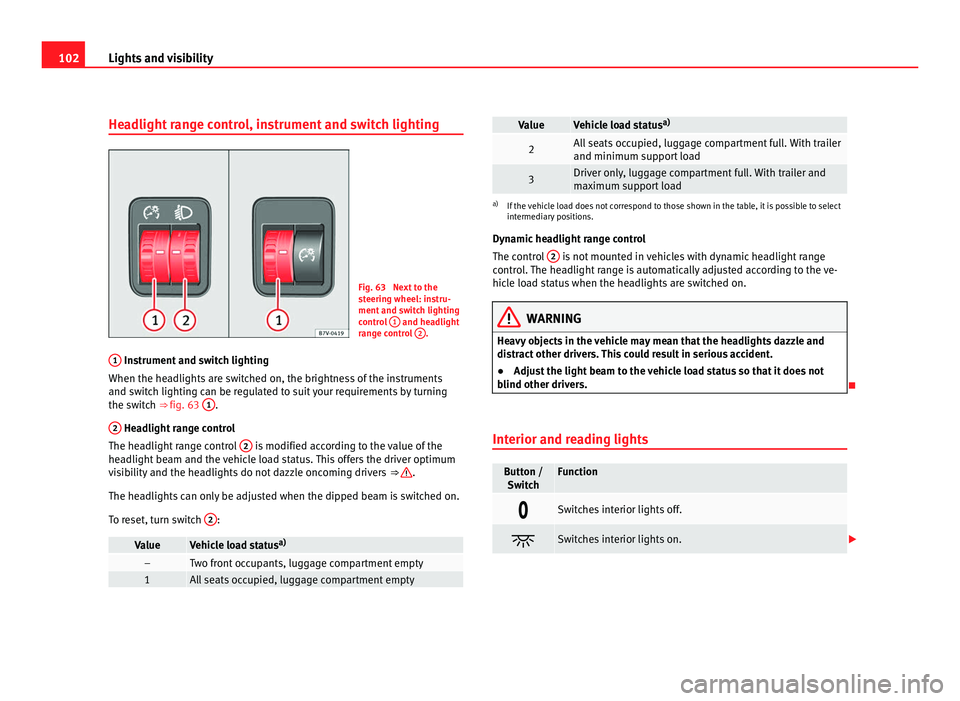
Headlight range control, instrument and switch lighting Fig. 63 Next to the
st
eerin
g wheel: instru-
ment and switch lighting
control 1 and headlight
ran g
e control 2 .
1 Instrument and switch lighting
When the hea dlights
are switched on, the brightness of the instruments
and switch lighting can be regulated to suit your requirements by turning
the switch ⇒ fig. 63 1 .
2 Headlight range control
The hea dlight
range control 2 is modified according to the value of the
hea dlight
beam and the vehicle load status. This offers the driver optimum
visibility and the headlights do not dazzle oncoming drivers ⇒ .
The hea dlights
can only be adjusted when the dipped beam is switched on.
To reset, turn switch 2 :
Value Vehicle load status
a) – Two front occupants, luggage compartment empty
1 All seats occupied, luggage compartment empty Value Vehicle load status
a) 2 All seats occupied, luggage compartment full. With trailer
and minimum sup
por
t load 3 Driver only, luggage compartment full. With trailer and
max
imum s
upport load a)
If the vehicle load does not correspond to those shown in the table, it is possible to select
intermedi ar
y positions.
Dynamic headlight range control
The control 2 is not mounted in vehicles with dynamic headlight range
contr o
l. The headlight range is automatically adjusted according to the ve-
hicle load status when the headlights are switched on. WARNING
Heavy objects in the vehicle may mean that the headlights dazzle and
dis tr
act other drivers. This could result in serious accident.
● Adjust the light beam to the vehicle load status so that it does not
blind other driver
s.
Interior and reading lights Button /
Swit c
h Function
Switches interior lights off.
Switches interior lights on.
Page 109 of 385
107
Lights and visibility
Windscreen wiper functions Windscreen wiper performance in different situations:
If the vehicle is at a stand-
sti
l
l: The activated position provisionally changes
to the pr
ev
ious position. During the automatic wipe: The air conditioning comes on for approxi-
mat
ely
30 seconds in air recirculation mode
to prevent the smell of the windscreen wash-
er fluid entering the inside of the vehicle. For the intermittent wipe: The intervals between wipes vary according
to the s
peed of
the vehicle. The higher the
vehicle speed the shorter the intervals. Heated windscreen washer jets
The heatin
g on
ly thaws the frozen jets, it does not thaw the water in the
washer hoses. The heated windscreen washer jets automatically adjust the
heat depending on the ambient temperature, when the ignition is switched
on.
Headlight wash /wipe system
The headlight washers/wipers clean the headlight lenses.
After the ignition is switched on, the first and every fifth time the wind-
screen washer is switched on, the headlights are also washed. Therefore,
the windscreen wiper lever should be pulled towards the steering wheel
when the dipped beam or main beam are on. Any incrusted dirt (such as in-
sects) should be cleaned regularly (e.g. when refuelling).
To ensure the headlight washers work correctly in winter, any snow which
has got into the bumper jet supports should be cleaned away. If necessary,
remove snow with an anti-icing spray. Note
The wiper will try to wipe away any obstacles that are on the windscreen.
The wiper w i
ll stop moving if the obstacle blocks its path. Remove the ob-
stacle and switch the wiper back on again.
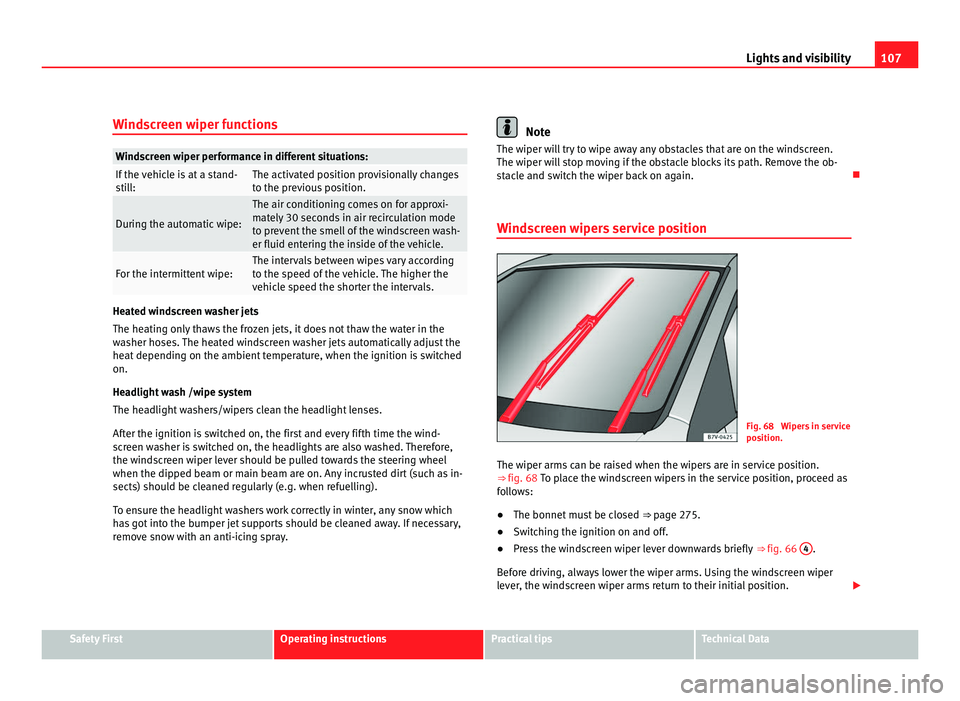
Windscreen wipers service position Fig. 68 Wipers in service
pos
ition.
The w
iper arms can be raised when the wipers are in service position.
⇒ fig. 68 To p l
ace the windscreen wipers in the service position, proceed as
follows:
● The bonnet must be closed ⇒ page 275.
● Sw
itching the ignition on and off.
● Press the windscreen wiper lever downwards briefly ⇒ fig. 66 4 .
Bef or
e driving, always lower the wiper arms. Using the windscreen wiper
lever, the windscreen wiper arms return to their initial position. Safety First Operating instructions Practical tips Technical Data
Page 239 of 385
237
Trailer towing
For the sake of road safety, SEAT recommends using the maximum allowed
dra wb
ar load. The handling of the combined vehicle and trailer will be poor
if the drawbar load is too low.
The drawbar load increases the weight on the rear axle, reducing the vehicle
carrying capacity.
Gross combination weight
This figure refers to the combined weight of the loaded vehicle and loaded
trailer.
Loading the trailer
The combined vehicle and trailer must be balanced. Use the maximum
drawbar load authorised and do not overload the front or the rear of the
trailer:
● Distribute loads in the trailer so that heavy objects are as near to the
axle a
s possible or even above it.
● Correctly secure the trailer load.
Tyr
e pressure
Inflate the trailer tyres according to the manufacturer's instructions.
Inflate the towing vehicles tyres to the maximum ⇒ page 293.WARNING
Exceeding the maximum authorised axle load, drawbar load or the gross
comb in
ation weight of the towing vehicle and trailer could cause a seri-
ous accident with severe consequences.
● Never exceed the specifications.
● With the actual load on the front and rear axles, the maximum axle
load shou
ld never be exceeded. The weight on the front and rear should
never exceed the gross vehicle weight. WARNING
If the load moves, the stability and safety of the vehicle and trailer com-
bin ation w
ill be seriously affected and this could result in a serious acci-
dent.
● Always correctly load the trailer.
● Always secure loads correctly with suitable and undamaged attach-
ment rope or s
traps.
Driving with a trailer Adjusting the headlights
When to
w
ing a trailer, the front of the vehicle may rise and so the dipped
beam headlights may blind other drivers. Use the headlight range control to
lower the cone of light. If you do not have headlight range control, have the
headlights adjusted by a qualified dealership. Vehicles with high-intensity
discharge lamps adapt automatically and do not require adjustment.
Details of driving with a trailer
● If the trailer has an overru
n brake, apply the brakes gently at first and
then, firmly. This will prevent the jerking that can be caused by the trailer
wheels locking.
● As of the combined vehicle and trailer mass, braking distances will be
great
er.
● Select a low gear before driving down a steep hill to use the engine
brakin
g effect to slow down the vehicle. Otherwise, the braking system
could overheat and fail. Safety First Operating instructions Practical tips Technical Data
Page 245 of 385
243
Vehicle maintenance and cleaning
Washing the vehicle The longer substances such as insects, bird droppings, resinous tree sap,
ro
a
d dirt, industrial deposits, tar, soot or road salt and other aggressive ma-
terials remain on the vehicle, the more damage they do to the paintwork.
High temperatures (for instance due to strong sunlight) further intensify the
corrosive effect. The vehicle undercarriage should also be thoroughly wash-
ed at regular intervals.
Automatic car washes
Always observe the instructions provided at the automatic car wash. The
standard precautionary measures prior to entering the car wash should be
taken to avoid damage to the vehicle (close all windows, fold in exterior mir-
rors). If the vehicle is fitted with additional components (spoiler, roof-rack,
aerial...), check with the car wash supervisor whether these can enter the
car wash ⇒ .
The v ehic
le paintwork is so durable that the car can normally be washed
without problems in an automatic car washing tunnel. However, wear and
damage to the paintwork will depend on the type of car wash used. SEAT
recommends the use of car washed without brushes.
To remove traces of wax on windows and to prevent wiper blades from
scratching, please observe the following ⇒ page 245, Cleaning windows
and exterior mirrors.
Washing the car by hand
When washing the car by hand, use plenty of water to soften the dirt first,
and rinse off as well as possible.
Then clean the vehicle with a soft sponge, glove or brush using only slight
pressure. Start at the roof and work downwards. Special car shampoo
should only be used for very persistent dirt.
Rinse the sponge or glove thoroughly and often.
Wheels, sills and similar should be cleaned last. Use a second sponge for
this. WARNING
Sharp components on the vehicle may cause injury.
● Protect arms and hands from sharp edges when cleaning the vehicle
under c
arriage or the interior of the wheel hubs. WARNING
After the vehicle has been washed, the braking effect will be reduced
(and the brakin
g distance increased) due to moisture (and ice in winter)
on the brakes.
● Dry the brakes and remove ice by braking carefully. Ensure that you
are not end
angering other road-users or breaking traffic regulations in
the process. CAUTION
● The temperature of the water must not exceed +60°C (+140°F).
● To av
oid damage to the paintwork, do not wash the vehicle in full sun.
● Do not use rough sponges or similar which could damage the surface to
cle
an away the traces of insects.
● Never wipe the headlights with a dry cloth or sponge, always moisten
first
. It is best to use soapy water.
● Washing the vehicle in low temperatures: When washing the vehicle
with a hose, do not
direct water into the lock cylinders or the gaps around
the doors, tailgate, or sunroof. Locks and seals could freeze! CAUTION
To prevent damage to the vehicle, please observe the following before en-
terin g
an automatic car wash :
● Compare the distance between the vehicle wheels and the distance be-
tween the guide-rai
ls of the car wash to prevent damage to the wheels and
tyres! Safety First Operating instructions Practical tips Technical Data