technical specifications Seat Alhambra 2012 Owner's Manual
[x] Cancel search | Manufacturer: SEAT, Model Year: 2012, Model line: Alhambra, Model: Seat Alhambra 2012Pages: 388, PDF Size: 6.72 MB
Page 315 of 388

313
Wheels and tyres
Raising the vehicle with the jack
Fig. 185 Jack position
points
Fig. 186 A: jack mounted on the left front part of the
vehicle B: jack mounted on the left rear part of the ve-
hicle.
The jack may be applied only at the jacking points shown (marks on chas-
sis) ⇒ fig. 185. The mark indicates the jacking points below the vehicle. The
jacking points are on the ribs behind the front edges ⇒ fig. 186. Always the
relevant jacking point for the wheel to be changed ⇒
.Raise the vehicle using only the designated jacking points.
Safety FirstOperating instructionsPractical tipsTechnical Specifications
Page 317 of 388

315
Wheels and tyres
Changing a wheel
Fig. 187 Changing the
wheel: loosen wheel
bolts with the socket at
the end of the wheel
brace.
Removing the wheel
● Please observe the check list ⇒ page 310.
● Loosen the wheel bolts ⇒ page 311.
● Jacking up the vehicle ⇒ page 313.
● Using the hexagonal socket in the wheel brace ⇒ fig. 187, unscrew the
slackened wheel bolts and place them on a clean surface.
● Take off the wheel.
Putting on the spare wheel
Check the direction of rotation of the tyre ⇒ page 299.
● Fit the wheel.
● Screw on the anti-theft locking bolt with the adapter in position
⇒ fig. 184 2
or 3 clockwise and tighten gently.
● Replace the other wheel bolts and tighten slightly using the hexagonal
socket on the end of the wheel brace.
● Lower the car with the jack. ●
Tighten all of the wheel bolts clockwise ⇒
. Tighten the bolts in diago-
nal pairs (not in a circle).
● Put the caps, trim or full hubcap back on ⇒ page 308.
WARNING
If the wheel bolts are not treated suitably or not tightened to the correct
torque then this could lead to loss of vehicle control and to a serious ac-
cident.
● All the wheel bolts and hub threads should be clean and free of oil
and grease. The wheel bolts should be easily tightened to the correct tor-
que.
● The hexagonal socket in the wheel brace should be used for turning
wheel bolts only. Do not use it to loosen or tighten the wheel bolts.
After changing the wheel
● Clean the wheel brace, if necessary and put it away in the luggage com-
partment ⇒ page 324.
● Have the tightening torque of the wheel bolts checked as soon as possi-
ble with a torque wrench ⇒ page 311.
Note
If the vehicle is fitted with a tyre monitoring system, this should be “reprog-
rammed” if necessary whenever a tyre is changed ⇒ page 227.
Safety FirstOperating instructionsPractical tipsTechnical Specifications
Page 319 of 388

317
If and when
Move the selector lever to its intermediate position or to P ⇒ page 176.
Stop the engine and remove the key from the ignition ⇒ page 172.
Have all occupants leave the vehicle and move to safety, for example
behind a guard rail.
When leaving the vehicle, take all keys with you.
Place an emergency warning triangle to indicate the position of your ve-
hicle to other road users.
Allow the engine to cool and check if a specialist is required.
Examples of when to use the hazard warning lights:
● If the vehicles ahead suddenly slow down or reach the end of a traffic
jam, to warn the vehicles behind.
● In case of an emergency.
● If the vehicle breaks down.
● When being towed.
Always comply with the applicable laws regarding the use of hazard warn-
ing lights.
If the hazard warning lights are not working, you must use an alternative
method of drawing attention to your vehicle. This method must comply with
traffic legislation.
WARNING
Failure to follow the checklist prepared for your own safety could lead to
accidents and severe injuries.
● Always complete the operations given in the checklist and observe
the general rules of safety.
4.
5.
6.
7.
8.
9.WARNING
The components of the exhaust system reach very high temperatures.
This could cause a fire and considerable damage.
● Always park your vehicle so that no part of the exhaust system can
come in contact with flammable materials (such as dried grass or fuel).
Note
● The vehicle battery will discharge and run down if the hazard warning
lights remain on for too much time (even with the ignition turned off).
● For some vehicles, the brake lights will blink when braking suddenly at
speeds of approximately 80 km/h to warn vehicles behind. If braking con-
tinues, then the hazard warning lights will automatically be turned on at the
speed of less than approximately 10 km an hour. The brake lights remain lit.
Upon accelerating, the hazard warning lights will be automatically turned
off.
Safety FirstOperating instructionsPractical tipsTechnical Specifications
Page 321 of 388

319
If and when
WARNING
Opening and closing doors carelessly can cause serious injury.
● If the vehicle is locked from outside, the doors and windows cannot
be opened from the inside.
● Never leave children or disabled people alone in the car. They could
be trapped in the car in an emergency and will not be able to get them-
selves to safety.
● Depending on the time of the year, temperatures inside a locked and
closed vehicle can be extremely high or extremely low resulting in seri-
ous injuries and illness or even death, particularly for young children.
WARNING
Getting in the way of the doors and the panoramic sliding roof is danger-
ous and can lead to serious injury.
● Open and close the doors and the panoramic sliding roof only when
nobody is in the way.
CAUTION
When opening and closing in an emergency, carefully disassemble compo-
nents and then reassemble them carefully to avoid damage to the vehicle. Manually locking and unlocking the driver's door
Fig. 190 Driver's door
handle: Hidden lock cyl-
inder.
In general, when the driver's door is locked all other doors are locked. Un-
locking manually only opens the driver's door. Please note the instructions
for the anti-theft alarm ⇒ page 74.
● Unfold the key shaft ⇒ page 71.
● Insert the key shaft into the opening in the cover on the driver's door
handle from below ⇒ fig. 190 (arrow) then remove the cover upwards.
● Insert the key shaft into the lock cylinder to unlock or lock the vehicle.
Unlocking notes:
● The anti-theft alarm will remain active when vehicles are unlocked. How-
ever, the alarm will not yet be triggered ⇒ page 74.
● If the driver's door is opened, the alarm will be triggered.
● Switch the ignition on. When the ignition is switched on, the electronic
immobiliser recognises a valid vehicle key and deactivates the anti-theft
alarm system.
Safety FirstOperating instructionsPractical tipsTechnical Specifications
Page 323 of 388

321
If and when
Emergency unlocking the tailgate
Fig. 193 From the lug-
gage compartment: Re-
move the tailgate cover.
Fig. 194 From the lug-
gage compartment: Man-
ually unlocking the tail-
gate.
● Remove equipment to access the inside of the tailgate.
● Remove the square cover in the inner trim of the tailgate ⇒ fig. 193.●
Push the release lever ⇒ fig. 194 A
in the direction of the arrow to un-
lock the tailgate.
● Manually open the tailgate.
Safety FirstOperating instructionsPractical tipsTechnical Specifications
Page 325 of 388

323
If and when
Manually unlocking the gear selection lever
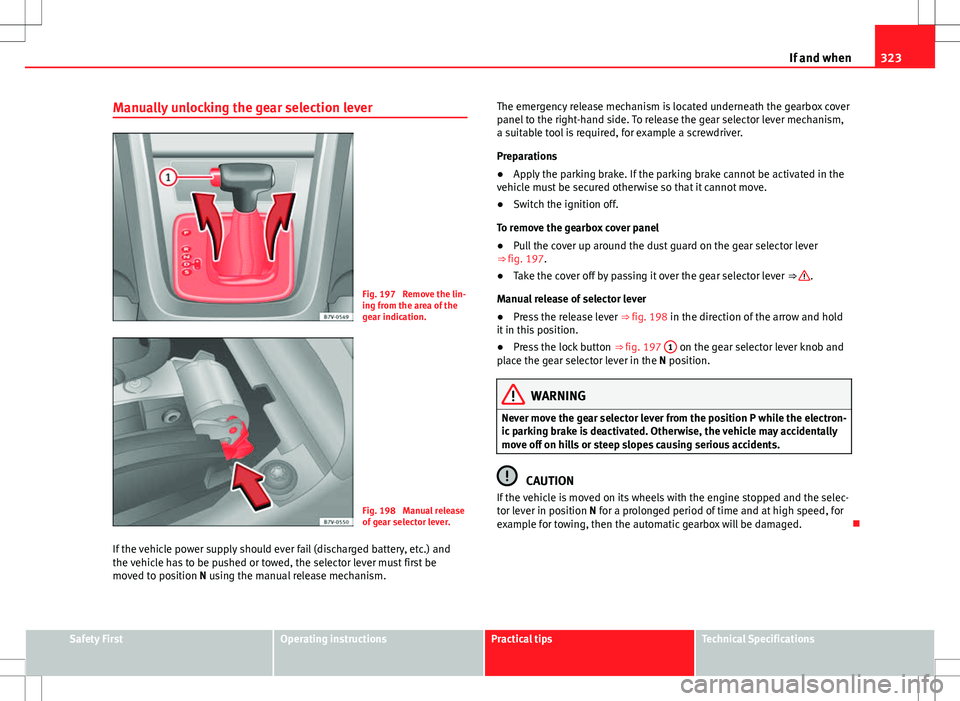
Fig. 197 Remove the lin-
ing from the area of the
gear indication.
Fig. 198 Manual release
of gear selector lever.
If the vehicle power supply should ever fail (discharged battery, etc.) and
the vehicle has to be pushed or towed, the selector lever must first be
moved to position N using the manual release mechanism. The emergency release mechanism is located underneath the gearbox cover
panel to the right-hand side. To release the gear selector lever mechanism,
a suitable tool is required, for example a screwdriver.
Preparations
●
Apply the parking brake. If the parking brake cannot be activated in the
vehicle must be secured otherwise so that it cannot move.
● Switch the ignition off.
To remove the gearbox cover panel
● Pull the cover up around the dust guard on the gear selector lever
⇒ fig. 197.
● Take the cover off by passing it over the gear selector lever ⇒
.
Manual release of selector lever
● Press the release lever ⇒ fig. 198 in the direction of the arrow and hold
it in this position.
● Press the lock button ⇒ fig. 197 1
on the gear selector lever knob and
place the gear selector lever in the N position.
WARNING
Never move the gear selector lever from the position P while the electron-
ic parking brake is deactivated. Otherwise, the vehicle may accidentally
move off on hills or steep slopes causing serious accidents.
CAUTION
If the vehicle is moved on its wheels with the engine stopped and the selec-
tor lever in position N for a prolonged period of time and at high speed, for
example for towing, then the automatic gearbox will be damaged.
Safety FirstOperating instructionsPractical tipsTechnical Specifications
Page 327 of 388

325
If and when
Components
Fig. 200 Components of
the onboard tool kit.
The set of on-board tools depends on the vehicle equipment. The following
is a description for a vehicle with all options.
The individual elements of the on-board toolkit ⇒ fig. 200
Adapter for anti-theft bolt. SEAT recommend you carry the wheel bolt
adapter in the vehicle tool kit at all times. The code number of the anti-
theft wheel bolt is stamped on the front of the adapter. In case it is lost,
another adapter can be ordered using this number. Note the anti-theft
bolt code for the wheels and keep it in a place other than the vehicle.
Towing eye, removable.
Wheel spanner.
Jack. Fold the jack before returning it to the toolkit.
Jack. Before storing the jack in the toolkit, fold its hook.
Screwdriver with hexagon socket in the handle for screwing and un-
screwing the wheel bolts once loosened. The screwdriver bit is inter-
1
23456
changeable. The screwdriver may be found underneath the wheel span-
ner.
Wire hook for pulling off the wheel cover, integral hubcaps and the
wheel bolt caps.
7
Safety FirstOperating instructionsPractical tipsTechnical Specifications
Page 329 of 388

327
If and when
Vehicle fuses
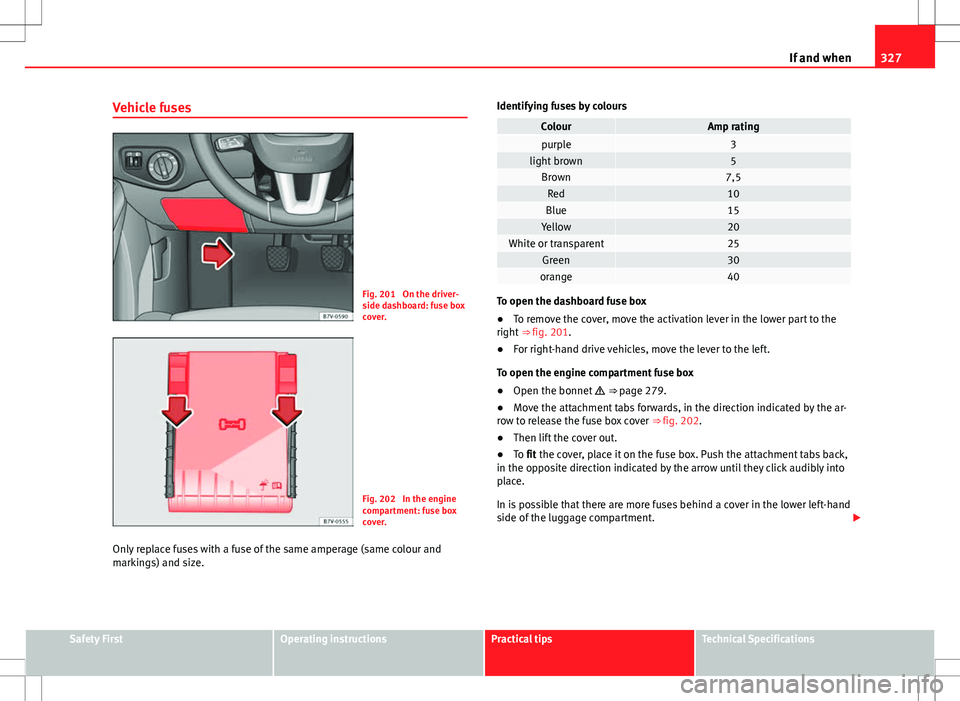
Fig. 201 On the driver-
side dashboard: fuse box
cover.
Fig. 202 In the engine
compartment: fuse box
cover.
Only replace fuses with a fuse of the same amperage (same colour and
markings) and size. Identifying fuses by colours
ColourAmp ratingpurple3light brown5Brown7,5Red10Blue15Yellow20White or transparent25Green30orange40
To open the dashboard fuse box
●
To remove the cover, move the activation lever in the lower part to the
right ⇒ fig. 201.
● For right-hand drive vehicles, move the lever to the left.
To open the engine compartment fuse box
● Open the bonnet ⇒ page 279.
● Move the attachment tabs forwards, in the direction indicated by the ar-
row to release the fuse box cover ⇒ fig. 202.
● Then lift the cover out.
● To fit the cover, place it on the fuse box. Push the attachment tabs back,
in the opposite direction indicated by the arrow until they click audibly into
place.
In is possible that there are more fuses behind a cover in the lower left-hand
side of the luggage compartment.
Safety FirstOperating instructionsPractical tipsTechnical Specifications
Page 331 of 388

329
If and when
CAUTION
If you replace a fuse with higher-rating fuse, you could cause damage to an-
other part of the electrical system.
Safety FirstOperating instructionsPractical tipsTechnical Specifications
Page 332 of 388

330If and when
Changing bulbs
Introduction
Changing bulbs requires a certain amount of manual skill. If you are unsure,
SEAT recommends that you consult an Technical Service or request assis-
tance from a specialist. In general, a specialist is required if other vehicle
components must be removed or if the discharge lamps must be replaced.
You should store spare light bulbs in the vehicle for safety-relevant lights.
Spare bulbs may be obtained from the Technical Services. In some coun-
tries, it is a legal requirement to carry spare bulbs in the vehicle.
Driving with faults and blown bulbs on the vehicle exterior lighting is
against the law.
Additional bulb specifications
The specifications of some headlamp bulbs and bulbs for the tail lamps fit-
ted at the factory may be different to those of conventional bulbs. Bulb in-
formation is displayed on the bulb socket or on the bulb itself.
Additional information and warnings:
● Lights and visibility ⇒ page 95
● Working in the engine compartment ⇒ page 279
● Vehicle tools ⇒ page 324
● Fuses ⇒ page 326
WARNING
If the road is not well-lit and the vehicle is not clearly visible to other
drivers, there is a risk of accident.
WARNING
Failure to replace bulbs correctly may cause serious accidents.
● Before carrying out any work in the engine compartment please read
and observe the warnings ⇒ page 279. In any vehicle, the engine com-
partment is a hazardous area and could cause severe injury.
● Discharge lamps work with high-voltage and can cause serious or fa-
tal injury if handled incorrectly.
● H7 and discharge lamps are highly pressurised and could explode
when being changed.
● Only replace the bulbs concerned when they have cooled.
● Never replace bulbs alone if you are not familiar with the operations
necessary. If you are not sure about procedures then visit a Technical
Service to carry out the necessary work.
● Never touch the bulb glass directly. Fingerprints will be evaporated by
the heat of the operating bulb thus “fogging” up the reflector.
● The headlamp frameworks in the engine compartment and the tail
lamps contain sharp elements. Always protect your hands when chang-
ing bulbs.
CAUTION
After changing a bulb, if the rubber covers and plastic caps are not replaced
correctly on the headlamp framework, the electrical installation may be
damaged, especially if water is allowed to enter.
Indicator
lights upPossible causeSolution
A vehicle exterior lighting
bulb is not working.Replace the faulty bulb.