technical specifications Seat Alhambra 2012 User Guide
[x] Cancel search | Manufacturer: SEAT, Model Year: 2012, Model line: Alhambra, Model: Seat Alhambra 2012Pages: 388, PDF Size: 6.72 MB
Page 25 of 388

23
Seat belts
Fastening the seat belt
Fasten your seat belt before each trip.
● Adjust the front seat and head restraint correctly ⇒ page 10.
● Engage the backrest of the rear seat in an upright position ⇒
.
● Pull the latch plate and place the belt webbing evenly across your chest
and lap. Do not twist the seat belt when doing so ⇒
.
● Engage the latch plate in the buckle of the corresponding seat ⇒ fig. 10.
● Pull the belt to ensure that the latch plate is securely engaged in the
buckle.
Unfastening the seat belt
The seat belt must not be unfastened until the vehicle has come to a stand-
still ⇒
.
● Press the red button on the buckle ⇒ fig. 11. The latch plate is released
from the buckle.
● Guide the belt back by hand so that it rolls up easily and the trim will not
be damaged.
WARNING
An incorrectly worn seat belt web can cause severe or fatal injuries in the
event of an accident.
● The seat belt cannot offer its full protection unless the backrests are
in an upright position and the seat belt is worn correctly, according to
your size.
● Unbuckling your seat belt while the vehicle is in motion can cause se-
vere or fatal injuries in the event of an accident or sudden braking.
Fastening or unfastening the seat belt with two buckles
Fig. 12 Fasten the seat
belt on the centre seat in
the second row of seats.
Properly worn seat belts hold the vehicle occupants in the position that
most protects them in the event of an accident or sudden braking ⇒
.
The seat belts for the centre seat in the second row of seats and for the
seats in the third row of seats are fastened using two buckles.
Fastening the seat belt
Fasten your seat belt before each trip.
● Adjust the rear seat and head restraint correctly ⇒ page 10.
● Engage the backrest of the rear seat in an upright position ⇒
.
● Use latch plate of the belt ⇒ fig. 12 1 to pull the seat belt down. Do
not
twist the seat belt when doing so ⇒ .
● Engage the latch plate 1 in the buckle of the corresponding seat A.
● Use the latch plate 2 to pull the seat belt across your lap.
● Engage the latch plate 2 in the buckle of the corresponding seat B.
● Pull the belt to ensure that both latch plates are securely engaged in the
buckles.
Safety FirstOperating instructionsPractical tipsTechnical Specifications
Page 27 of 388

25
Seat belts
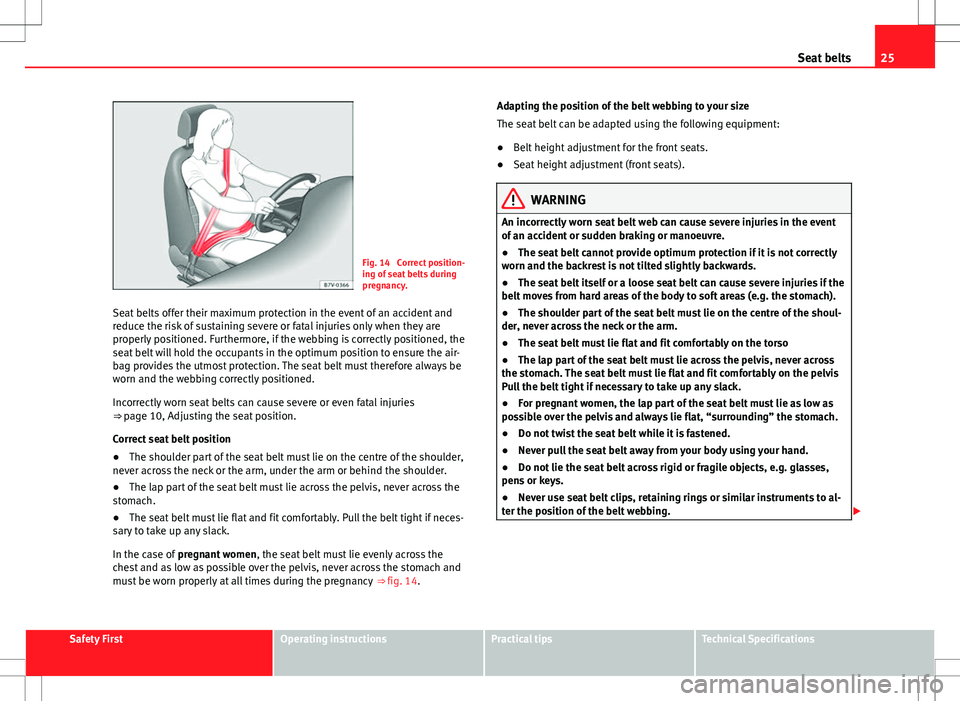
Fig. 14 Correct position-
ing of seat belts during
pregnancy.
Seat belts offer their maximum protection in the event of an accident and
reduce the risk of sustaining severe or fatal injuries only when they are
properly positioned. Furthermore, if the webbing is correctly positioned, the
seat belt will hold the occupants in the optimum position to ensure the air-
bag provides the utmost protection. The seat belt must therefore always be
worn and the webbing correctly positioned.
Incorrectly worn seat belts can cause severe or even fatal injuries
⇒ page 10, Adjusting the seat position.
Correct seat belt position
● The shoulder part of the seat belt must lie on the centre of the shoulder,
never across the neck or the arm, under the arm or behind the shoulder.
● The lap part of the seat belt must lie across the pelvis, never across the
stomach.
● The seat belt must lie flat and fit comfortably. Pull the belt tight if neces-
sary to take up any slack.
In the case of pregnant women , the seat belt must lie evenly across the
chest and as low as possible over the pelvis, never across the stomach and
must be worn properly at all times during the pregnancy ⇒ fig. 14.Adapting the position of the belt webbing to your size
The seat belt can be adapted using the following equipment:
●
Belt height adjustment for the front seats.
● Seat height adjustment (front seats).
WARNING
An incorrectly worn seat belt web can cause severe injuries in the event
of an accident or sudden braking or manoeuvre.
● The seat belt cannot provide optimum protection if it is not correctly
worn and the backrest is not tilted slightly backwards.
● The seat belt itself or a loose seat belt can cause severe injuries if the
belt moves from hard areas of the body to soft areas (e.g. the stomach).
● The shoulder part of the seat belt must lie on the centre of the shoul-
der, never across the neck or the arm.
● The seat belt must lie flat and fit comfortably on the torso
● The lap part of the seat belt must lie across the pelvis, never across
the stomach. The seat belt must lie flat and fit comfortably on the pelvis
Pull the belt tight if necessary to take up any slack.
● For pregnant women, the lap part of the seat belt must lie as low as
possible over the pelvis and always lie flat, “surrounding” the stomach.
● Do not twist the seat belt while it is fastened.
● Never pull the seat belt away from your body using your hand.
● Do not lie the seat belt across rigid or fragile objects, e.g. glasses,
pens or keys.
● Never use seat belt clips, retaining rings or similar instruments to al-
ter the position of the belt webbing.
Safety FirstOperating instructionsPractical tipsTechnical Specifications
Page 29 of 388

27
Seat belts
Belt tension limiter
The belt tension limiter reduces the force of the seat belt on the body in the
event of an accident.
Note
The relevant safety requirements must be observed when the vehicle or
components of the system are scrapped. These requirements are known to
specialised workshops ⇒ page 27.
Service and disposal of belt tension devices
If you work on the belt tension devices or remove and install other parts of
the vehicle when performing other repair work, the seat belt may be dam-
aged. The consequence may be that, in the event of an accident, the belt
tension devices function incorrectly or not at all.
So that the effectiveness of the belt tension device is not reduced and that
removed parts do not cause any injuries or environmental pollution, regula-
tions must be observed. These requirements are known to qualified dealer-
ships.
WARNING
Improper handling and homemade repairs of seat belts, automatic belt
retainers and tension devices increase the risk of sustaining severe or fa-
tal injuries. The belt tension device may fail to trigger or may trigger in
the wrong circumstances.
● Never attempt to repair, adjust or remove or install parts of the belt
tension devices or seat belts. Any work must be performed by a Technical
Service only ⇒ page 261.
● Belt tension devices and automatic belt retainers cannot be repaired
and must be replaced.
For the sake of the environment
Airbag modules and belt tension devices may contain perchlorate. Observe
the legal requirements for their disposal.
Safety FirstOperating instructionsPractical tipsTechnical Specifications
Page 31 of 388

29
Airbag system
WARNING
The airbag system provides protection for one accident only. If they have
been deployed, they must be replaced.
● Ensure deployed airbags and the system components involved are im-
mediately replaced with new, SEAT-approved components for the vehicle.
● Have any repairs or modifications carried out at a Technical Service.
Qualified workshops have the necessary tools, diagnostics equipment,
repair information and qualified personnel.
● Never fit recycled or reused airbag components in your vehicle.
● Never modify the airbag system components.
WARNING
If the airbags are triggered, a fine dust is produced. This is normal and it
is not an indication of fire in the vehicle.
● This fine dust may irritate the skin and eyes and cause breathing dif-
ficulties, particularly in people suffering from or who have suffered from
asthma or other illnesses of the respiratory tract. To reduce breathing dif-
ficulties, get out of the vehicle and open and doors and windows to
breath in fresh air.
● Should you touch the dust, wash your hands and face using a mild
soap and water before you eat.
● Prevent the dust from affecting the eyes or open wounds.
● Rinse your eyes with water if you have dust in them.
WARNING
Solvents cause the surfaces of the airbag modules to become porous. If
an airbag is accidentally triggered, the detachment of plastic parts could
cause serious injury.
● Never clean the instrument panel and the surfaces of the airbag mod-
ules with cleaners containing solvents.
Safety FirstOperating instructionsPractical tipsTechnical Specifications
Page 33 of 388

31
Airbag system
CAUTION
Always pay attention to any lit lamps and to the corresponding descriptions
and instructions to avoid damage to the vehicle.
Airbag system Description and function of the airbag
The airbag can protect vehicle occupants in the event of an accidents, cush-
ioning the movement of the occupants in the direction of the collision in
frontal and side accidents.
Deployed airbags fill with a propellant gas. This causes the airbag covers to
break and the airbags to deploy extremely quickly in their entire deploy-
ment space within fractions of a second. When an occupant with the seat
belt properly fastened puts pressure on the inflated airbag, the propellant
gas escapes to absorb the force of the impact and slow the movement. This
reduces the risk of severe or fatal injuries. Airbag deployment does not
mean that other types of injury such as swelling, bruising, burns and skin
injuries can be ruled out.
Airbags do not protect the arms or the lower part of the body.
The most important factors for triggering the airbag are the type of accident,
the angle of impact, the vehicle speed and the characteristics of the object
the vehicle hits. Therefore, airbags are not triggered every time the vehicle
is visibly damaged.
The airbag system is designed to be triggered in collisions with a severe im-
pact. The front, curtain, side and knee airbags may be triggered under spe-
cial circumstances. The scope of any visible damage to the vehicle is not an
indication of airbag deployment. Airbags act in conjunction with three-point seat belts in the event of certain
accidents, when the vehicle deceleration rate is severe enough to trigger
the airbags. Airbags only deploy once and only under certain circumstan-
ces. Seat belts remain present to offer protection in situations where air-
bags are not triggered or where they have already deployed. For example,
when a vehicle hits another after an initial collision or is hit by another vehi-
cle.
The airbag system is an integral part of the car's passive safety system. The
airbag system can only work effectively when the occupants are wearing
their seat belts correctly and have adjusted the head restraints properly
⇒ page 10.
Vehicle safety components
The following safety equipment makes up the vehicle safety design to re-
duce the risk of severe and fatal injuries. Depending on the vehicle equip-
ment, some equipment may not be fitted in the vehicle or may not be avail-
able in some markets.
● Optimised seat belts for all seats.
● Belt tension devices for the driver and front passenger and, where appli-
cable, on the outer seats of the second row of seats in combination with the
side airbags.
● Furthermore, belt tension limiters for the driver's and front passenger's
seat belt.
● Belt height adjustment for the front seats and, where applicable, the
outer seats of the second row of seats.
● Seat belt warning lamp
● Frontal airbags for driver and passenger.
● Side airbags for the driver, front passenger and, where applicable, the
outer seats of the second row of seats.
● Left and right curtain airbags.
● One airbag for the driver's knees.
● Airbag control lamp .
● PASSENGER AIR BAG control lamp.
Safety FirstOperating instructionsPractical tipsTechnical Specifications
Page 35 of 388

33
Airbag system
Front airbags
Fig. 17 Location and deployment area of the front air-
bag for the driver.
Fig. 18 Location and deployment area of the front air-
bag for the front passenger.
In conjunction with the seat belts, the front airbag system gives the front
occupants additional protection for the head and chest in the event of a se-
vere frontal collision. Always remains as far away as possible from the front airbag. This way, the front airbags can completely deploy when triggered,
providing their maximum protection.
Safety FirstOperating instructionsPractical tipsTechnical Specifications
Page 37 of 388

35
Airbag system
Deactivating and activating the front passenger airbag
using the key switch
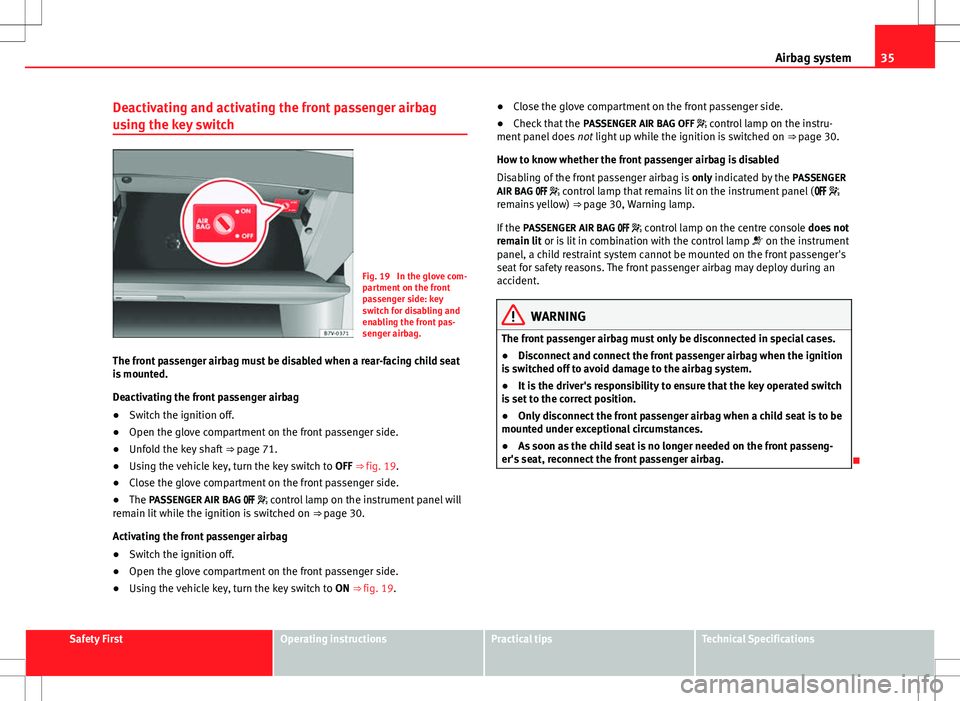
Fig. 19 In the glove com-
partment on the front
passenger side: key
switch for disabling and
enabling the front pas-
senger airbag.
The front passenger airbag must be disabled when a rear-facing child seat
is mounted.
Deactivating the front passenger airbag
● Switch the ignition off.
● Open the glove compartment on the front passenger side.
● Unfold the key shaft ⇒ page 71.
● Using the vehicle key, turn the key switch to OFF ⇒ fig. 19.
● Close the glove compartment on the front passenger side.
● The PASSENGER AIR BAG control lamp on the instrument panel will
remain lit while the ignition is switched on ⇒ page 30.
Activating the front passenger airbag
● Switch the ignition off.
● Open the glove compartment on the front passenger side.
● Using the vehicle key, turn the key switch to ON ⇒ fig. 19. ●
Close the glove compartment on the front passenger side.
● Check that the PASSENGER AIR BAG OFF control lamp on the instru-
ment panel does not light up while the ignition is switched on ⇒ page 30.
How to know whether the front passenger airbag is disabled
Disabling of the front passenger airbag is only indicated by the PASSENGER
AIR BAG control lamp that remains lit on the instrument panel (
remains yellow) ⇒ page 30, Warning lamp.
If the PASSENGER AIR BAG control lamp on the centre console does not
remain lit or is lit in combination with the control lamp on the instrument
panel, a child restraint system cannot be mounted on the front passenger's
seat for safety reasons. The front passenger airbag may deploy during an
accident.
WARNING
The front passenger airbag must only be disconnected in special cases.
● Disconnect and connect the front passenger airbag when the ignition
is switched off to avoid damage to the airbag system.
● It is the driver's responsibility to ensure that the key operated switch
is set to the correct position.
● Only disconnect the front passenger airbag when a child seat is to be
mounted under exceptional circumstances.
● As soon as the child seat is no longer needed on the front passeng-
er's seat, reconnect the front passenger airbag.
Safety FirstOperating instructionsPractical tipsTechnical Specifications
Page 39 of 388

37
Airbag system
Curtain airbags
Fig. 22 On the left side of the vehicle: location and de-
ployment area of the curtain airbag.
Fig. 23 Deployed curtain
airbags
The curtain airbags are located on the driver and front passenger side
above the doors ⇒ fig. 22. Airbags are identified by the word “AIRBAG”. The area framed red ⇒ fig. 22 is covered by the curtain airbag when it is de-
ployed (deployment area). Therefore, objects should never be placed or
mounted in these areas.
In a side collision, the curtain airbag on the side affected will be deployed.
The airbag covers the windows and pillars.
In a side collision, the curtain airbags for the front and outer rear seats re-
duce the risk of injury to the areas of the body facing the impact.
WARNING
The airbag is deployed at high speed in fractions of a second.
● Always keep the deployment areas of the curtain airbags free.
● Do not fix objects to the cover or in the deployment area of the cur-
tain airbag.
Safety FirstOperating instructionsPractical tipsTechnical Specifications
Page 41 of 388

39
Child safety
Child safety
Child seats (accessories) Introduction
Please read the information regarding the airbag system fully before trans-
porting babies and children in a child seat or other child restraint system
installed on the front passenger seat.
This information is extremely important for driver and passenger safety, par-
ticularly that of babies and children.
SEAT recommends the use of child seats from the SEAT accessory pro-
gramme. These child seats have been designed and tested for use in SEAT
vehicles. You can purchase child seats with different mountings from a
Technical Service.
Using child restraint systems with a base or foot
Some child retention systems are secured to the seat using a base or foot.
For certain equipment the use of an additional accessory will be necessary
(for example, the accessory for the floor compartment) to fit the child reten-
tion system correctly and securely.
Additional information and warnings:
● Airbag system ⇒ page 31
● Integrated child seats ⇒ page 45
WARNING
Make sure children are properly belted in and correctly secured to avoid
severe or fatal injuries while the vehicle is in motion.
● Never use a rear-facing child seat in the front passenger seat if the
front passenger airbag is enabled.
● Children up to 12 years old should always travel on the rear seat.
● Children must always be protected with an approved child restraint
system suited to their height and weight.
● Children must assume the proper sitting position and be properly bel-
ted in while travelling.
● Ensure the backrest of a seat is upright when a child seat is being
used on it.
● Do not allow the child's head or other part of his or her body to fall
into the deployment area of the side airbags.
● Make sure the belt webbing is correctly positioned.
● Never hold children or babies on your lap or in your arms.
● Only one child may occupy a child seat.
● If you are using a child seat with a base or foot, always install this
base or foot correctly and safely.
● If the vehicle has a storage compartment in the foot well in front of
the last row of seats, this compartment cannot be used as designed; on
the contrary: It must be filled using the specially designed accessory so
that the base or foot is correctly supported by the closed compartment
and the child seat is secured properly. If this compartment is not suitably
secured when using a child seat with a base or foot then the compart-
ment cover could rupture in an accident and the child will be ejected and
suffer serious injury.
● Please read and observe the child seat manufacturer's handling in-
structions.
Safety FirstOperating instructionsPractical tipsTechnical Specifications
Page 43 of 388

41
Child safety
Categorisation of child seats according to ECE-R 44
Weight cate- goryWeight of the childInstallation of the child seat
Group 0children up to 10 kgRear-facing. On rear seats, optionallyusing the ISOFIX system.
Group 0+children up to 13 kg
Group 19 to 18 kgForward-facing. On rear seats, optional-ly using the ISOFIX system.
Group 215 to 25 kg
Forward-facing. On the outer rear seatsor in the centre seat of the second row of seats and on all seats in the thirdrow. Optionally with ISOFIX system.
Group 322 to 36 kgForward-facing.
Not all children fit in the seat of their weight group. Nor do all seats adapt to
the vehicle. Therefore, always check whether the child fits properly in the
child seat and whether the seat can be installed safely in the vehicle.
The rear seats are suitable for child seats with the ISOFIX system specially
designed for this type of vehicle in accordance with regulation ECE-R 44.
Child seats approved under the ECE-R 44 regulation are fitted with the corre-
sponding approval symbol. The sign is an upper-case E in a circle with the
identification number below it.
WARNING
Not following the checklist prepared for your own safety could lead to ac-
cidents and severe injuries.
● Always follow the check list and perform the necessary operations.
WARNING
In general, the rear seat is always the safest place for correctly belted in
children in the event of an accident.
● A suitable child seat that is correctly installed and used on one of the
rear seats offer the most protection possible for babies and small chil-
dren in most accidents.
Note
Other accessories may be required to fit the child retention system with a
base or foot security and safely. Contact a Technical Service or specialised
workshop.
Different mounting systems
Fig. 26 On the rear seats: figure A shows the basic child restraint system mounting
using lower retaining rings and the upper retaining strap. Figure B shows the child
restraint system mounting using the vehicle's seat belt.
Safety FirstOperating instructionsPractical tipsTechnical Specifications