bonnet Seat Alhambra 2012 Owner's Manual
[x] Cancel search | Manufacturer: SEAT, Model Year: 2012, Model line: Alhambra, Model: Seat Alhambra 2012Pages: 388, PDF Size: 6.72 MB
Page 56 of 388
54Cockpit
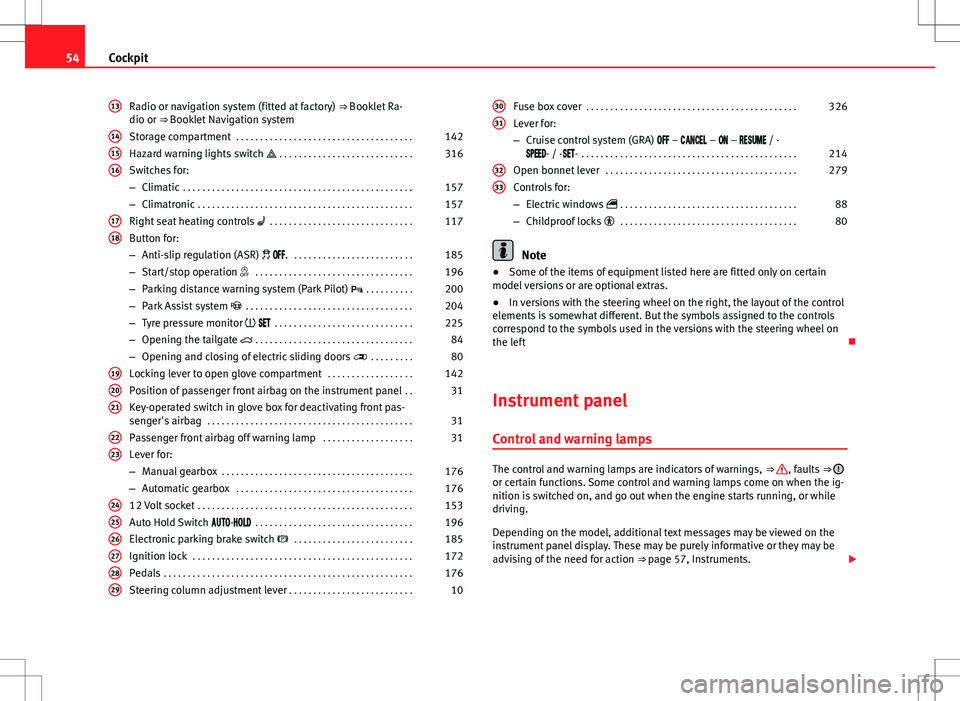
Radio or navigation system (fitted at factory) ⇒ Booklet Ra-
dio or ⇒ Booklet Navigation system
Storage compartment . . . . . . . . . . . . . . . . . . . . . . . . . . . . . . . . . . . . . 142
Hazard warning lights switch . . . . . . . . . . . . . . . . . . . . . . . . . . . . 316
Switches for:
– Climatic . . . . . . . . . . . . . . . . . . . . . . . . . . . . . . . . . . . . . . . . . . . . . . . . 157
– Climatronic . . . . . . . . . . . . . . . . . . . . . . . . . . . . . . . . . . . . . . . . . . . . . 157
Right seat heating controls . . . . . . . . . . . . . . . . . . . . . . . . . . . . . . 117
Button for:
– Anti-slip regulation (ASR) . . . . . . . . . . . . . . . . . . . . . . . . . . 185
– Start/stop operation . . . . . . . . . . . . . . . . . . . . . . . . . . . . . . . . . 196
– Parking distance warning system (Park Pilot) . . . . . . . . . . 200
– Park Assist system . . . . . . . . . . . . . . . . . . . . . . . . . . . . . . . . . . . 204
– Tyre pressure monitor . . . . . . . . . . . . . . . . . . . . . . . . . . . . . 225
– Opening the tailgate . . . . . . . . . . . . . . . . . . . . . . . . . . . . . . . . . 84
– Opening and closing of electric sliding doors . . . . . . . . . 80
Locking lever to open glove compartment . . . . . . . . . . . . . . . . . .142
Position of passenger front airbag on the instrument panel . .31
Key-operated switch in glove box for deactivating front pas-
senger's airbag . . . . . . . . . . . . . . . . . . . . . . . . . . . . . . . . . . . . . . . . . . . 31
Passenger front airbag off warning lamp . . . . . . . . . . . . . . . . . . .31
Lever for:
– Manual gearbox . . . . . . . . . . . . . . . . . . . . . . . . . . . . . . . . . . . . . . . . 176
– Automatic gearbox . . . . . . . . . . . . . . . . . . . . . . . . . . . . . . . . . . . . . 176
12 Volt socket . . . . . . . . . . . . . . . . . . . . . . . . . . . . . . . . . . . . . . . . . . . . . 153
Auto Hold Switch - . . . . . . . . . . . . . . . . . . . . . . . . . . . . . . . . . 196
Electronic parking brake switch . . . . . . . . . . . . . . . . . . . . . . . . . 185
Ignition lock . . . . . . . . . . . . . . . . . . . . . . . . . . . . . . . . . . . . . . . . . . . . . . 172
Pedals . . . . . . . . . . . . . . . . . . . . . . . . . . . . . . . . . . . . . . . . . . . . . . . . . . . . 176
Steering column adjustment lever . . . . . . . . . . . . . . . . . . . . . . . . . . 10
13
141516
1718
192021
2223
242526272829
Fuse box cover
. . . . . . . . . . . . . . . . . . . . . . . . . . . . . . . . . . . . . . . . . . . . 326
Lever for:
– Cruise control system (GRA) – – – / -
- / -- . . . . . . . . . . . . . . . . . . . . . . . . . . . . . . . . . . . . . . . . . . . . . 214
Open bonnet lever . . . . . . . . . . . . . . . . . . . . . . . . . . . . . . . . . . . . . . . . 279
Controls for:
– Electric windows . . . . . . . . . . . . . . . . . . . . . . . . . . . . . . . . . . . . . 88
– Childproof locks . . . . . . . . . . . . . . . . . . . . . . . . . . . . . . . . . . . . . 80
Note
● Some of the items of equipment listed here are fitted only on certain
model versions or are optional extras.
● In versions with the steering wheel on the right, the layout of the control
elements is somewhat different. But the symbols assigned to the controls
correspond to the symbols used in the versions with the steering wheel on
the left
Instrument panel Control and warning lamps
The control and warning lamps are indicators of warnings, ⇒ , faults ⇒ or certain functions. Some control and warning lamps come on when the ig-
nition is switched on, and go out when the engine starts running, or while
driving.
Depending on the model, additional text messages may be viewed on the
instrument panel display. These may be purely informative or they may be
advising of the need for action ⇒ page 57, Instruments.
30
31
3233
Page 59 of 388
57
Cockpit
WARNING (Continued)
● A faulty vehicle represents a risk of accident for the driver and for oth-
er road users. If necessary, switch on the hazard warning lamps and put
out the warning triangle to advise other drivers.
● Before opening the bonnet, switch off the engine and allow it to cool.
● In any vehicle, the engine compartment is a hazardous area and could
cause severe injury ⇒ page 279.
CAUTION
Failure to heed the warning lamps and text messages when they appear
may result in faults in the vehicle. Instruments
Introduction
Additional information and warnings:
● Indicator lamps ⇒ page 54
● Gear engaged display (automatic gearbox) ⇒ page 176.
● Instructions for inspection intervals ⇒ Booklet Maintenance Programme
WARNING
Any distraction may lead to an accident, with the risk of injury.
● Do not handle the instrument panel controls when driving.
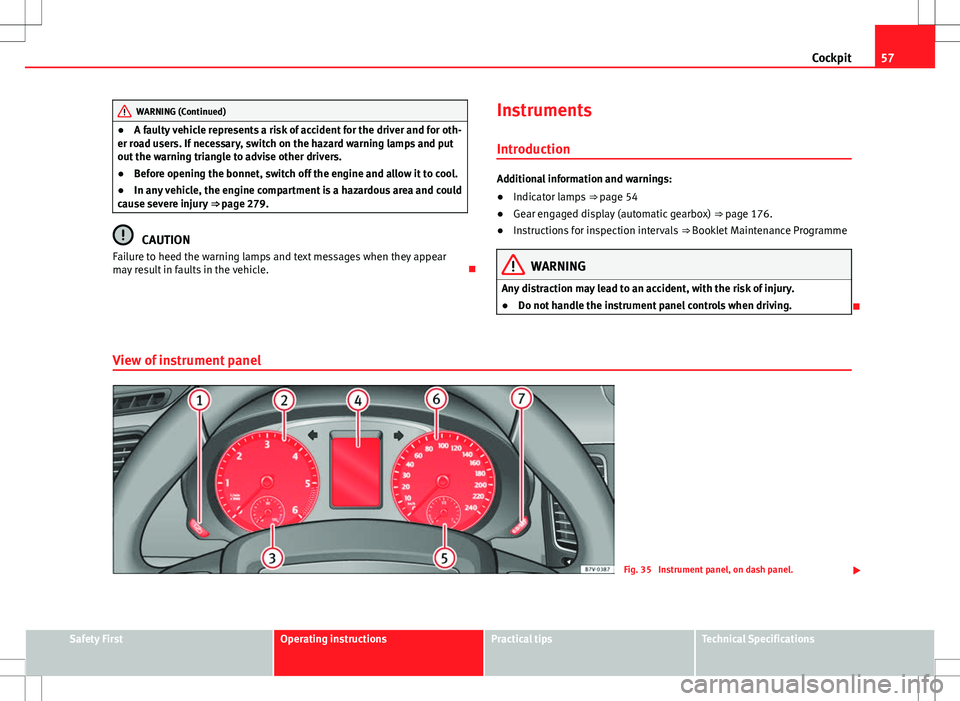
View of instrument panel
Fig. 35 Instrument panel, on dash panel.
Safety FirstOperating instructionsPractical tipsTechnical Specifications
Page 80 of 388
78Unlocking and locking
Driver's door indicator light.
When the vehicle is locked:MeaningThe red LED flashes for approximately 2
seconds at short intervals and then more
slowly.The "Safe" security system is
switched on.
The red LED flashes for about two sec-
onds then turns off. After 30 seconds, the
LED flashes again.The "Safe" security system is
switched off.
The red LED remains lit for about 30 sec-
onds.There is a fault in the locking
system. Contact a specialised
workshop.
WARNING
Careless use of the "Safe" security system can cause serious injury.
● Never leave anybody inside the vehicle if this is locked using the key.
When the "Safe" security system is activated, doors cannot be opened
from the inside.
● When the doors are locked, it is difficult to get to passengers in the
passenger compartment in case of an emergency. Passengers could re-
main trapped inside in case of emergency.
Antitheft alarm
The anti-theft alarm makes it more difficult to break into the vehicle or steal
it.
The anti-theft alarm is automatically turned on when the vehicle is locked
with the key. When does the system trigger an alarm?
The anti-theft alarm siren will be triggered for about 30 seconds accompa-
nied by optical warning signals for about five minutes when the vehicle is
locked and the following unauthorised actions are taken:
●
When the door is mechanically unlocked using the vehicle key without
turning the ignition within the following 15 seconds.
● A door is opened.
● The bonnet is opened.
● The tailgate is opened.
● When the ignition is switched on with a non-authorised key.
● When the vehicle battery is disconnected.
● When there is movement inside the vehicle (vehicles with interior moni-
toring).
● When the vehicle is towed (vehicles with anti-tow system)
● When the vehicle is lifted (vehicles with anti-tow system).
● Transporting the vehicle on a ferry or by railroad (vehicles with an anti-
tow system or interior monitoring).
● Unhitch a trailer connected to the anti-theft alarm ⇒ page 237.
How to turn OFF the alarm
Unlock the vehicle with the unlocking button on the key or turn on the igni-
tion with a valid key.Note
● The alarm will be triggered once more when anybody enters the same
zone of surveillance or any other zone. If, for example, after opening a door,
the tailgate is also opened.
● The anti-theft alarm is not activated when the vehicle is locked from
within using the central locking button
.
Page 108 of 388
106Lights and visibility
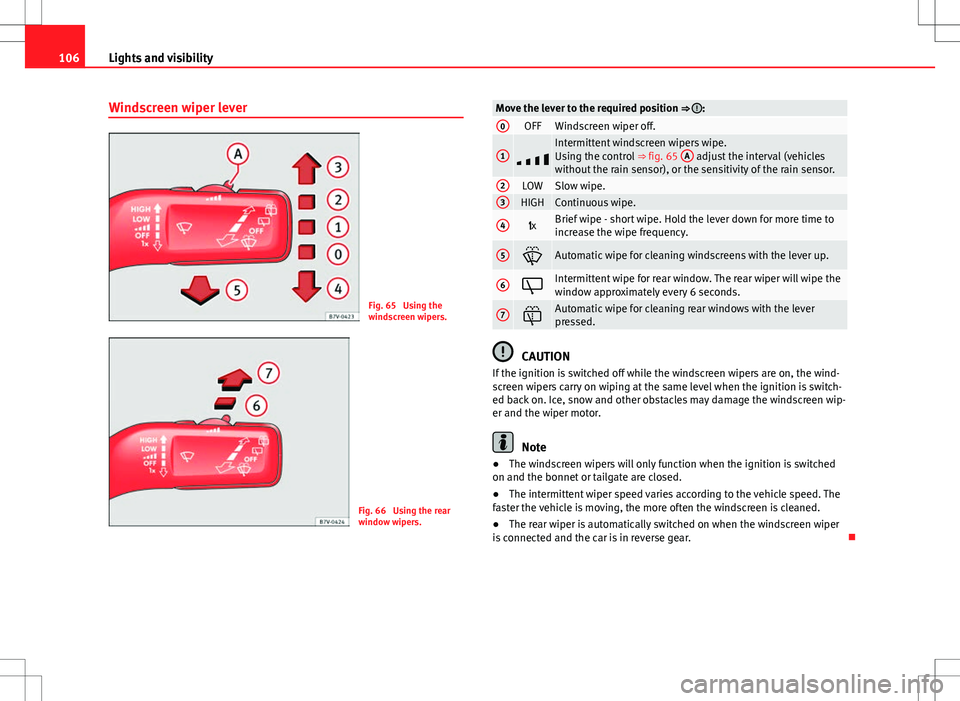
Windscreen wiper lever
Fig. 65 Using the
windscreen wipers.
Fig. 66 Using the rear
window wipers.
Move the lever to the required position ⇒ :0OFFWindscreen wiper off.
1
Intermittent windscreen wipers wipe.
Using the control ⇒ fig. 65 A adjust the interval (vehicles
without the rain sensor), or the sensitivity of the rain sensor.
2LOWSlow wipe.3HIGHContinuous wipe.
4 xBrief wipe - short wipe. Hold the lever down for more time to
increase the wipe frequency.
5Automatic wipe for cleaning windscreens with the lever up.
6Intermittent wipe for rear window. The rear wiper will wipe the
window approximately every 6 seconds.
7Automatic wipe for cleaning rear windows with the lever
pressed.
CAUTION
If the ignition is switched off while the windscreen wipers are on, the wind-
screen wipers carry on wiping at the same level when the ignition is switch-
ed back on. Ice, snow and other obstacles may damage the windscreen wip-
er and the wiper motor.
Note
● The windscreen wipers will only function when the ignition is switched
on and the bonnet or tailgate are closed.
● The intermittent wiper speed varies according to the vehicle speed. The
faster the vehicle is moving, the more often the windscreen is cleaned.
● The rear wiper is automatically switched on when the windscreen wiper
is connected and the car is in reverse gear.
Page 109 of 388

107
Lights and visibility
Windscreen wiper functions
Windscreen wiper performance in different situations:If the vehicle is at a stand-
still:The activated position provisionally changes
to the previous position.
During the automatic wipe:
The air conditioning comes on for approxi-
mately 30 seconds in air recirculation mode
to prevent the smell of the windscreen wash-
er fluid entering the inside of the vehicle.
For the intermittent wipe:The intervals between wipes vary according
to the speed of the vehicle. The higher the
vehicle speed the shorter the intervals.
Heated windscreen washer jets
The heating only thaws the frozen jets, it does not thaw the water in the
washer hoses. The heated windscreen washer jets automatically adjust the
heat depending on the ambient temperature, when the ignition is switched
on.
Headlight wash /wipe system
The headlight washers/wipers clean the headlight lenses.
After the ignition is switched on, the first and every fifth time the wind-
screen washer is switched on, the headlights are also washed. Therefore,
the windscreen wiper lever should be pulled towards the steering wheel
when the dipped beam or main beam are on. Any incrusted dirt (such as in-
sects) should be cleaned regularly (e.g. when refuelling).
To ensure the headlight washers work correctly in winter, any snow which
has got into the bumper jet supports should be cleaned away. If necessary,
remove snow with an anti-icing spray.
Note
The wiper will try to wipe away any obstacles that are on the windscreen.
The wiper will stop moving if the obstacle blocks its path. Remove the ob-
stacle and switch the wiper back on again.
Windscreen wipers service position
Fig. 67 Wipers in service
position.
The wiper arms can be raised when the wipers are in service position
⇒ fig. 67. To place the windscreen wipers in the service position, proceed as follows:
● The bonnet must be closed ⇒ page 279.
● Switching the ignition on and off.
● Press the windscreen wiper lever downwards briefly ⇒ fig. 65 4
.
Before driving, always lower the wiper arms. Using the windscreen wiper
lever, the windscreen wiper arms return to their initial position.
Safety FirstOperating instructionsPractical tipsTechnical Specifications
Page 110 of 388
108Lights and visibility
Lifting and returning windscreen wiper arms
● Place the wiper arms in the service position ⇒
.
● Only hold the wiper arms at the point where the blade is fixed.
CAUTION
● To prevent damage to the bonnet and the wiper arms, only leave them in
the service position.
● Before driving, always lower the wiper arms.
Rain sensor*
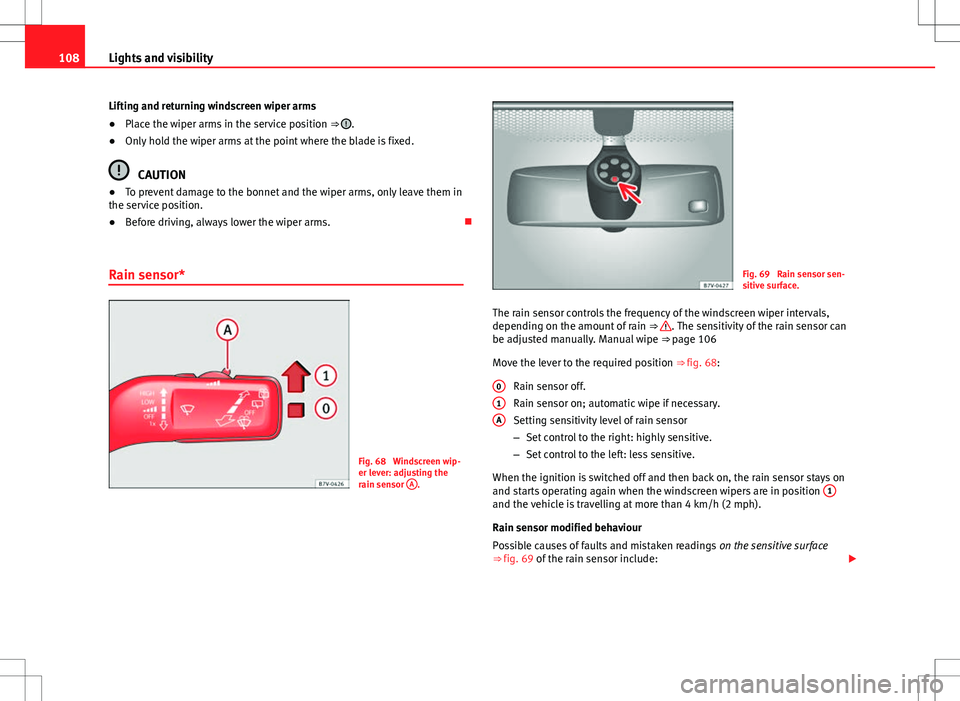
Fig. 68 Windscreen wip-
er lever: adjusting the
rain sensor A
.
Fig. 69 Rain sensor sen-
sitive surface.
The rain sensor controls the frequency of the windscreen wiper intervals,
depending on the amount of rain ⇒
. The sensitivity of the rain sensor can
be adjusted manually. Manual wipe ⇒ page 106
Move the lever to the required position ⇒ fig. 68: Rain sensor off.
Rain sensor on; automatic wipe if necessary.
Setting sensitivity level of rain sensor
–Set control to the right: highly sensitive.
– Set control to the left: less sensitive.
When the ignition is switched off and then back on, the rain sensor stays on
and starts operating again when the windscreen wipers are in position 1
and the vehicle is travelling at more than 4 km/h (2 mph).
Rain sensor modified behaviour
Possible causes of faults and mistaken readings
on the sensitive surface
⇒ fig. 69 of the rain sensor include:
0
1A
Page 111 of 388

109
Lights and visibility
● Damaged blades: A film of water on the damaged blades may lengthen
the activation time, reduce the washing intervals or result in a fast and con-
tinuous wipe.
● Insects: insects on the sensor may trigger the windscreen wipers.
● Salt on roads: in winter, salt spread in the roads may cause an extra
long wipe when the windscreen is almost dry.
● Dirt: dry dust, wax, coating on glass (Lotus effect) or traces of detergent
(car wash) may reduce the effectiveness of the rain sensor or make it react
more slowly, later or not at all.
● Cracked windscreen: the impact of a stone will trigger a single wipe cy-
cle with the rain sensor on. Next the rain sensor detects the reduction in the
sensitive surface area and adapts accordingly. The behaviour of the sensor
will vary with the size of the damage caused by the stone.
WARNING
The rain sensor may not detect enough rain to switch on the wipers.
● If necessary, switch on the wipers manually when water on the wind-
screen obstructs visibility.
Note
● Clean the sensitive surface of the rain sensor regularly and check the
blades for damage ⇒ fig. 69 (arrow).
● To remove wax and coatings, we recommend a window cleaner contain-
ing alcohol. Checking and topping up the windscreen washer bottle
with water
Fig. 70 In the engine
compartment: wind-
screen washer bottle top.
Check the water level in the windscreen washer bottle regularly and top up
as required.
● Open the bonnet ⇒ page 279.
● The washer bottle is marked with the symbol on the lid ⇒ fig. 70.
● Check there is enough water in the bottle.
● To top up, mix water with a window cleaner recommended by SEAT ⇒
.
Please follow the instructions for use found on the packaging.
● In cold weather, a special antifreeze should also be added to prevent
the water from freezing ⇒
.
Bottle capacity
The bottle holds approximately 3.0 litres; in vehicles with headlight washer,
it is approximately 7.0 litres.
Safety FirstOperating instructionsPractical tipsTechnical Specifications
Page 200 of 388
198Driving
Start-Stop Function*
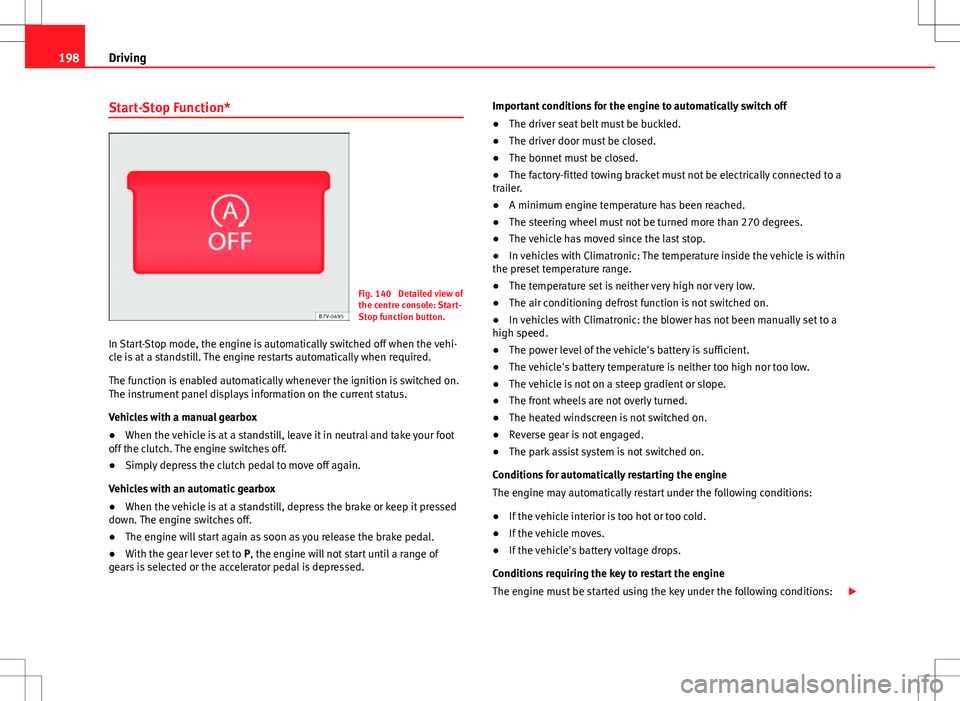
Fig. 140 Detailed view of
the centre console: Start-
Stop function button.
In Start-Stop mode, the engine is automatically switched off when the vehi-
cle is at a standstill. The engine restarts automatically when required.
The function is enabled automatically whenever the ignition is switched on.
The instrument panel displays information on the current status.
Vehicles with a manual gearbox
● When the vehicle is at a standstill, leave it in neutral and take your foot
off the clutch. The engine switches off.
● Simply depress the clutch pedal to move off again.
Vehicles with an automatic gearbox
● When the vehicle is at a standstill, depress the brake or keep it pressed
down. The engine switches off.
● The engine will start again as soon as you release the brake pedal.
● With the gear lever set to P, the engine will not start until a range of
gears is selected or the accelerator pedal is depressed. Important conditions for the engine to automatically switch off
●
The driver seat belt must be buckled.
● The driver door must be closed.
● The bonnet must be closed.
● The factory-fitted towing bracket must not be electrically connected to a
trailer.
● A minimum engine temperature has been reached.
● The steering wheel must not be turned more than 270 degrees.
● The vehicle has moved since the last stop.
● In vehicles with Climatronic: The temperature inside the vehicle is within
the preset temperature range.
● The temperature set is neither very high nor very low.
● The air conditioning defrost function is not switched on.
● In vehicles with Climatronic: the blower has not been manually set to a
high speed.
● The power level of the vehicle's battery is sufficient.
● The vehicle's battery temperature is neither too high nor too low.
● The vehicle is not on a steep gradient or slope.
● The front wheels are not overly turned.
● The heated windscreen is not switched on.
● Reverse gear is not engaged.
● The park assist system is not switched on.
Conditions for automatically restarting the engine
The engine may automatically restart under the following conditions:
● If the vehicle interior is too hot or too cold.
● If the vehicle moves.
● If the vehicle's battery voltage drops.
Conditions requiring the key to restart the engine
The engine must be started using the key under the following conditions:
Page 201 of 388
199
Driving
● If the driver unbuckles his/her seat belt.
● If the driver's door is opened.
● If the bonnet is opened.
● In vehicles with a manual gearbox: If a gear has been selected.
Switching Start-Stop mode on and off manually
● Press the
button on the centre console ⇒
fig. 140.
● The button will light up when the Start-Stop function is switched off.
The engine will start immediately if the vehicle is in Stop mode when it is
switched off manually.
WARNING
The brake servo and the power steering do not work when the engine is
switched off.
● Never allow the vehicle to move when the engine is switched off.
CAUTION
Using the Start-Stop function for a long period at very high outdoor temper-
atures could damage the vehicle's battery.
Note
● In some cases, you may have to restart the vehicle using the key. Ob-
serve the corresponding message on the instrument panel display.
● If the steering wheel is turned more than 270°, Stop will not function;
however, the angle of steering wheel turn does not affect starting the vehi-
cle.
Safety FirstOperating instructionsPractical tipsTechnical Specifications
Page 250 of 388
248Vehicle maintenance and cleaning
● Switch off the rain sensor and the Auto Hold function before entering a
car wash.
● Compare the height and width of your vehicle with the available height
and width when entering and driving through the car wash.
● Fold in exterior mirrors Electrically retractable exterior mirrors must NOT
be folded in or out by hand. Always use the electrical power control.
● To avoid damaging the bonnet paintwork, rest the wipers on the wind-
screen after drying them. Do not let them fall!
● Lock the tailgate to prevent it from opening unexpectedly while inside
the car wash.
Washing the vehicle with high pressure cleaning
equipment
When cleaning the vehicle with a high-pressure cleaner, always follow the
operating instructions for the equipment. Pay special attention to the re-
quired pressure of the jet and the distance between the jet and the vehicle
⇒
.
Keep a suitable distance from soft materials, such as rubber hoses or insu-
lating material, and from the parking distance warning system sensors. The
parking distance sensors are fitted in the rear bumpers and, where applica-
ble, in the front bumpers ⇒
.
Do not use a nozzle that sprays the water out in a direct stream or one that
has a rotating jet for forcing off dirt ⇒
.
WARNING
The incorrect use of high pressure cleaning equipment could result in
permanent damage, visible or invisible, to the tyres or other materials.
This could result in serious accident.
● Ensure there is a suitable distance between the nozzle and the tyres.
● Never wash tyres with a concentrated jet or so-called “dirt blasters”.
Even at large spraying distances and short cleaning times, you may dam-
age the tyres.
WARNING
After the vehicle has been washed, the braking effect will be reduced
(and the braking distance increased) due to moisture (and ice in winter)
on the brakes.
● Dry the brakes and remove ice by braking carefully. Ensure that you
are not endangering other road-users or breaking traffic regulations in
the process.
CAUTION
● The temperature of the water must not be above +60 °C (+140 °F).
● To avoid damage to the paintwork, do not wash the vehicle in full sun.
● The sensors on the bumpers should be kept clean and free of ice at all
times to ensure the parking distance warning system and the parking aid
system operate correctly. When cleaning with pressure hoses and steam
cleaners, the sensors should be sprayed only briefly. A distance of 10 cm
between the sensors and the steam / hose nozzle must be observed.
● Do not use a high pressure cleaner to remove ice or snow from windows
● Washing the vehicle in low temperatures: When washing the vehicle
with a hose, do not direct water into the lock cylinders or the gaps around
the doors, tailgate, or sunroof. Locks and seals could freeze!