door lock Seat Alhambra 2013 Owner's Manual
[x] Cancel search | Manufacturer: SEAT, Model Year: 2013, Model line: Alhambra, Model: Seat Alhambra 2013Pages: 387, PDF Size: 6.13 MB
Page 5 of 387
Table of Contents
Manual structure . . . . . . . . . . . . . . . . . . . . 5
Content . . . . . . . . . . . . . . . . . . . . . . . . . . . . . . . . 6
Safety First . . . . . . . . . . . . . . . . . . . . . . . . . . . . 7
Safe driving . . . . . . . . . . . . . . . . . . . . . . . . . . . . . . . 7
Dear SEAT Driver . . . . . . . . . . . . . . . . . . . . . . . . . . 7
Tips for driving . . . . . . . . . . . . . . . . . . . . . . . . . . . 7
Adjusting the seat position . . . . . . . . . . . . . . . . . 10
Transporting objects . . . . . . . . . . . . . . . . . . . . . . . 13
Seat belts . . . . . . . . . . . . . . . . . . . . . . . . . . . . . . . . . 16
Brief introduction . . . . . . . . . . . . . . . . . . . . . . . . . 16
Why wear seat belts? . . . . . . . . . . . . . . . . . . . . . . 19
Seat belts . . . . . . . . . . . . . . . . . . . . . . . . . . . . . . . 21
Seat belt tensioners . . . . . . . . . . . . . . . . . . . . . . . 27
Airbag system . . . . . . . . . . . . . . . . . . . . . . . . . . . . . 29
Brief introduction . . . . . . . . . . . . . . . . . . . . . . . . . 29
Airbag system . . . . . . . . . . . . . . . . . . . . . . . . . . . . 32
Child safety . . . . . . . . . . . . . . . . . . . . . . . . . . . . . . . 40
Child seats (accessories) . . . . . . . . . . . . . . . . . . . 40
Integrated child seat . . . . . . . . . . . . . . . . . . . . . . . 46
Operating instructions . . . . . . . . . . . . . 53
Cockpit . . . . . . . . . . . . . . . . . . . . . . . . . . . . . . . . . . . 53
Overview . . . . . . . . . . . . . . . . . . . . . . . . . . . . . . . . 53
Instrument panel . . . . . . . . . . . . . . . . . . . . . . . . . . 54
Instruments . . . . . . . . . . . . . . . . . . . . . . . . . . . . . . 57
SEAT information system . . . . . . . . . . . . . . . . . . . 62 Opening and closing
. . . . . . . . . . . . . . . . . . . . . . 71
Vehicle key set . . . . . . . . . . . . . . . . . . . . . . . . . . . 71
Central locking and locking system . . . . . . . . . . . 74
Doors . . . . . . . . . . . . . . . . . . . . . . . . . . . . . . . . . . . 80
Sliding doors . . . . . . . . . . . . . . . . . . . . . . . . . . . . . 80
Rear lid . . . . . . . . . . . . . . . . . . . . . . . . . . . . . . . . . . 83
Electric windows . . . . . . . . . . . . . . . . . . . . . . . . . . 88
Panoramic sliding sunroof* . . . . . . . . . . . . . . . . . 92
Lights and visibility . . . . . . . . . . . . . . . . . . . . . . . . 95
Lights . . . . . . . . . . . . . . . . . . . . . . . . . . . . . . . . . . . 95
Sun blind . . . . . . . . . . . . . . . . . . . . . . . . . . . . . . . . 103
Windscreen wiper and washer . . . . . . . . . . . . . . . 105
Rear vision mirror . . . . . . . . . . . . . . . . . . . . . . . . . 110
Seats and storage . . . . . . . . . . . . . . . . . . . . . . . . . 114
Seat adjustment . . . . . . . . . . . . . . . . . . . . . . . . . . 114
Seat functions . . . . . . . . . . . . . . . . . . . . . . . . . . . . 117
Head restraints . . . . . . . . . . . . . . . . . . . . . . . . . . . 123
Centre armrest . . . . . . . . . . . . . . . . . . . . . . . . . . . . 126
Loading luggage compartment . . . . . . . . . . . . . . 126
Roof carrier system* . . . . . . . . . . . . . . . . . . . . . . . 139
Storage compartments . . . . . . . . . . . . . . . . . . . . . 141
Drink holders . . . . . . . . . . . . . . . . . . . . . . . . . . . . . 149
Ashtray and cigarette lighter* . . . . . . . . . . . . . . . 151
Power sockets . . . . . . . . . . . . . . . . . . . . . . . . . . . . 152
Air conditioning . . . . . . . . . . . . . . . . . . . . . . . . . . . 156
Air conditioner . . . . . . . . . . . . . . . . . . . . . . . . . . . . 156
Auxiliary heater* (additional heater) . . . . . . . . . . 164
Driving . . . . . . . . . . . . . . . . . . . . . . . . . . . . . . . . . . . . 168
Steering . . . . . . . . . . . . . . . . . . . . . . . . . . . . . . . . . 168
Stopping and starting the engine . . . . . . . . . . . . 171
Changing gear . . . . . . . . . . . . . . . . . . . . . . . . . . . . 175
Braking, stopping and parking . . . . . . . . . . . . . . 184
Start assist systems . . . . . . . . . . . . . . . . . . . . . . . 195
Parking sensor system* . . . . . . . . . . . . . . . . . . . . 199 Park Assist system* . . . . . . . . . . . . . . . . . . . . . . . 203
Rear Assist system* . . . . . . . . . . . . . . . . . . . . . . . 208
Cruise control system* . . . . . . . . . . . . . . . . . . . . . 213
Lane Assist system* . . . . . . . . . . . . . . . . . . . . . . . 216
Sign Assist* . . . . . . . . . . . . . . . . . . . . . . . . . . . . . . 219
Tiredness detection (recommendation to take a
break) . . . . . . . . . . . . . . . . . . . . . . . . . . . . . . . . . . . 222
Tyre monitoring systems . . . . . . . . . . . . . . . . . . . . 224
Practical tips . . . . . . . . . . . . . . . . . . . . . . . . . . 228
Driving and the environment . . . . . . . . . . . . . . . 228
Running-in . . . . . . . . . . . . . . . . . . . . . . . . . . . . . . . 228
Ecological driving . . . . . . . . . . . . . . . . . . . . . . . . . 228
Engine management and exhaust gas
purification system . . . . . . . . . . . . . . . . . . . . . . . . 231
Trailer towing . . . . . . . . . . . . . . . . . . . . . . . . . . . . . . 234
Introduction . . . . . . . . . . . . . . . . . . . . . . . . . . . . . . 234
Driving with a trailer . . . . . . . . . . . . . . . . . . . . . . . 236
Vehicle maintenance and cleaning . . . . . . . . . 245
Care and cleaning the vehicle exterior . . . . . . . . 245
Caring for and cleaning the vehicle interior . . . . 252
Notes for the user . . . . . . . . . . . . . . . . . . . . . . . . . 258
Accessories, replacement of parts and
modifications . . . . . . . . . . . . . . . . . . . . . . . . . . . . . 260
Accessories, replacement of parts and
modifications . . . . . . . . . . . . . . . . . . . . . . . . . . . . 260
Checking and refilling levels . . . . . . . . . . . . . . . 267
Filling the tank . . . . . . . . . . . . . . . . . . . . . . . . . . . . 267
Fuel . . . . . . . . . . . . . . . . . . . . . . . . . . . . . . . . . . . . 270
Selective Catalytic Reduction* (AdBlue) . . . . . . . 274
Working in the engine compartment . . . . . . . . . . 278
Engine oil . . . . . . . . . . . . . . . . . . . . . . . . . . . . . . . . 282
3
Table of Contents
Page 55 of 387
53
Cockpit
Operating instructions Cockpit
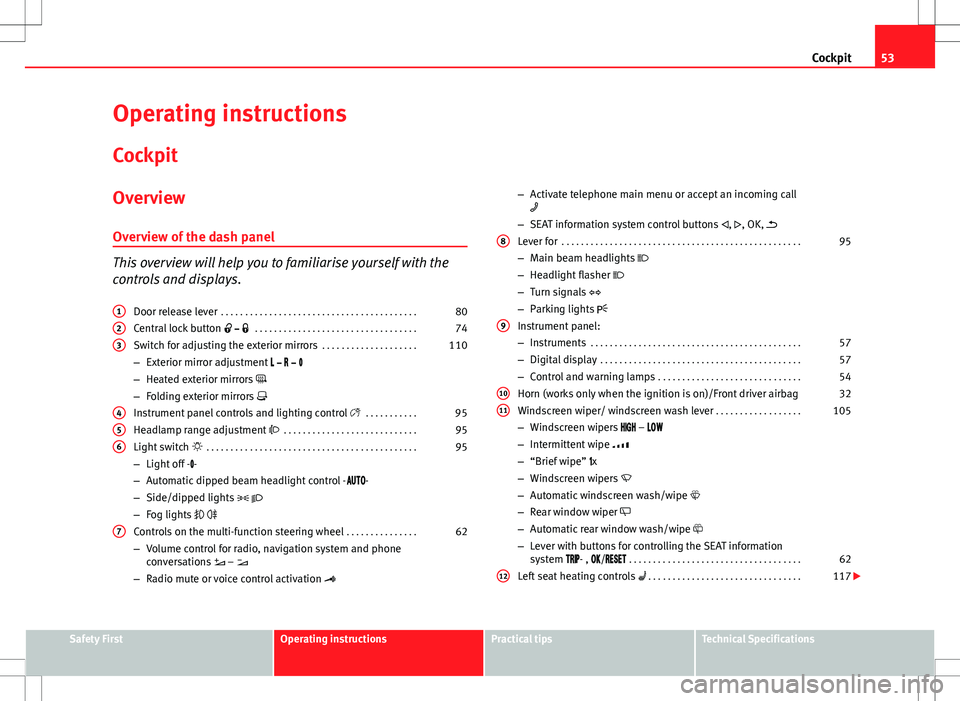
Overview Overview of the dash panel
This overview will help you to familiarise yourself with the
controls and displays. Door release lever . . . . . . . . . . . . . . . . . . . . . . . . . . . . . . . . . . . . . . . . . 80
Central lock button . . . . . . . . . . . . . . . . . . . . . . . . . . . . . . . . . . 74
Switch for adjusting the exterior mirrors . . . . . . . . . . . . . . . . . . . .110
– Exterior mirror adjustment
– Heated exterior mirrors
– Folding exterior mirrors
Instrument panel controls and lighting control . . . . . . . . . . .95
Headlamp range adjustment . . . . . . . . . . . . . . . . . . . . . . . . . . . . 95
Light switch . . . . . . . . . . . . . . . . . . . . . . . . . . . . . . . . . . . . . . . . . . . . 95
– Light off - -
– Automatic dipped beam headlight control - -
– Side/dipped lights
– Fog lights
Controls on the multi-function steering wheel . . . . . . . . . . . . . . .62
– Volume control for radio, navigation system and phone
conversations –
– Radio mute or voice control activation
1
23
456
7
–
Activate telephone main menu or accept an incoming call
– SEAT information system control buttons , , OK,
Lever for . . . . . . . . . . . . . . . . . . . . . . . . . . . . . . . . . . . . . . . . . . . . . . . . . . 95
– Main beam headlights
– Headlight flasher
– Turn signals
– Parking lights
Instrument panel:
– Instruments . . . . . . . . . . . . . . . . . . . . . . . . . . . . . . . . . . . . . . . . . . . . 57
– Digital display . . . . . . . . . . . . . . . . . . . . . . . . . . . . . . . . . . . . . . . . . . 57
– Control and warning lamps . . . . . . . . . . . . . . . . . . . . . . . . . . . . . . 54
Horn (works only when the ignition is on)/Front driver airbag 32
Windscreen wiper/ windscreen wash lever . . . . . . . . . . . . . . . . . .105
– Windscreen wipers –
– Intermittent wipe
– “Brief wipe” x
– Windscreen wipers
– Automatic windscreen wash/wipe
– Rear window wiper
– Automatic rear window wash/wipe
– Lever with buttons for controlling the SEAT information
system - , / . . . . . . . . . . . . . . . . . . . . . . . . . . . . . . . . . . . . 62
Left seat heating controls . . . . . . . . . . . . . . . . . . . . . . . . . . . . . . . . 117
8
9
1011
12
Safety FirstOperating instructionsPractical tipsTechnical Specifications
Page 56 of 387
54Cockpit
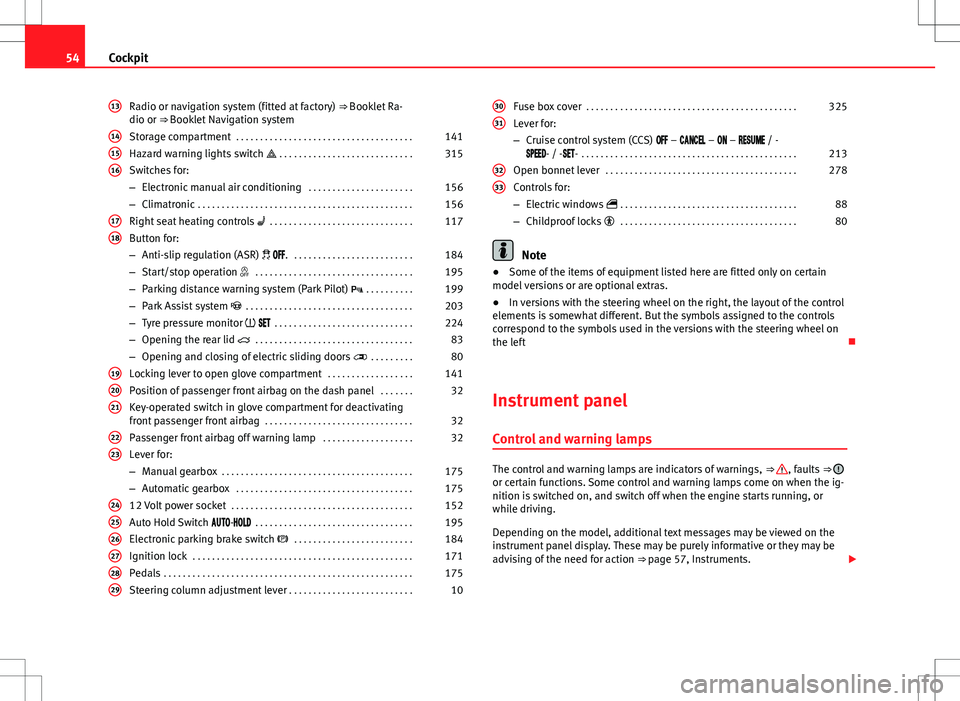
Radio or navigation system (fitted at factory) ⇒ Booklet Ra-
dio or ⇒ Booklet Navigation system
Storage compartment . . . . . . . . . . . . . . . . . . . . . . . . . . . . . . . . . . . . . 141
Hazard warning lights switch . . . . . . . . . . . . . . . . . . . . . . . . . . . . 315
Switches for:
– Electronic manual air conditioning . . . . . . . . . . . . . . . . . . . . . .156
– Climatronic . . . . . . . . . . . . . . . . . . . . . . . . . . . . . . . . . . . . . . . . . . . . . 156
Right seat heating controls . . . . . . . . . . . . . . . . . . . . . . . . . . . . . . 117
Button for:
– Anti-slip regulation (ASR) . . . . . . . . . . . . . . . . . . . . . . . . . . 184
– Start/stop operation . . . . . . . . . . . . . . . . . . . . . . . . . . . . . . . . . 195
– Parking distance warning system (Park Pilot) . . . . . . . . . . 199
– Park Assist system . . . . . . . . . . . . . . . . . . . . . . . . . . . . . . . . . . . 203
– Tyre pressure monitor . . . . . . . . . . . . . . . . . . . . . . . . . . . . . 224
– Opening the rear lid . . . . . . . . . . . . . . . . . . . . . . . . . . . . . . . . . 83
– Opening and closing of electric sliding doors . . . . . . . . . 80
Locking lever to open glove compartment . . . . . . . . . . . . . . . . . .141
Position of passenger front airbag on the dash panel . . . . . . .32
Key-operated switch in glove compartment for deactivating
front passenger front airbag . . . . . . . . . . . . . . . . . . . . . . . . . . . . . . . 32
Passenger front airbag off warning lamp . . . . . . . . . . . . . . . . . . .32
Lever for:
– Manual gearbox . . . . . . . . . . . . . . . . . . . . . . . . . . . . . . . . . . . . . . . . 175
– Automatic gearbox . . . . . . . . . . . . . . . . . . . . . . . . . . . . . . . . . . . . . 175
12 Volt power socket . . . . . . . . . . . . . . . . . . . . . . . . . . . . . . . . . . . . . . 152
Auto Hold Switch - . . . . . . . . . . . . . . . . . . . . . . . . . . . . . . . . . 195
Electronic parking brake switch . . . . . . . . . . . . . . . . . . . . . . . . . 184
Ignition lock . . . . . . . . . . . . . . . . . . . . . . . . . . . . . . . . . . . . . . . . . . . . . . 171
Pedals . . . . . . . . . . . . . . . . . . . . . . . . . . . . . . . . . . . . . . . . . . . . . . . . . . . . 175
Steering column adjustment lever . . . . . . . . . . . . . . . . . . . . . . . . . . 10
13
141516
1718
192021
2223
242526272829
Fuse box cover
. . . . . . . . . . . . . . . . . . . . . . . . . . . . . . . . . . . . . . . . . . . . 325
Lever for:
– Cruise control system (CCS) – – – / -
- / -- . . . . . . . . . . . . . . . . . . . . . . . . . . . . . . . . . . . . . . . . . . . . . 213
Open bonnet lever . . . . . . . . . . . . . . . . . . . . . . . . . . . . . . . . . . . . . . . . 278
Controls for:
– Electric windows . . . . . . . . . . . . . . . . . . . . . . . . . . . . . . . . . . . . . 88
– Childproof locks . . . . . . . . . . . . . . . . . . . . . . . . . . . . . . . . . . . . . 80
Note
● Some of the items of equipment listed here are fitted only on certain
model versions or are optional extras.
● In versions with the steering wheel on the right, the layout of the control
elements is somewhat different. But the symbols assigned to the controls
correspond to the symbols used in the versions with the steering wheel on
the left
Instrument panel Control and warning lamps
The control and warning lamps are indicators of warnings, ⇒ , faults ⇒ or certain functions. Some control and warning lamps come on when the ig-
nition is switched on, and switch off when the engine starts running, or
while driving.
Depending on the model, additional text messages may be viewed on the
instrument panel display. These may be purely informative or they may be
advising of the need for action ⇒ page 57, Instruments.
30
31
3233
Page 57 of 387
55
Cockpit
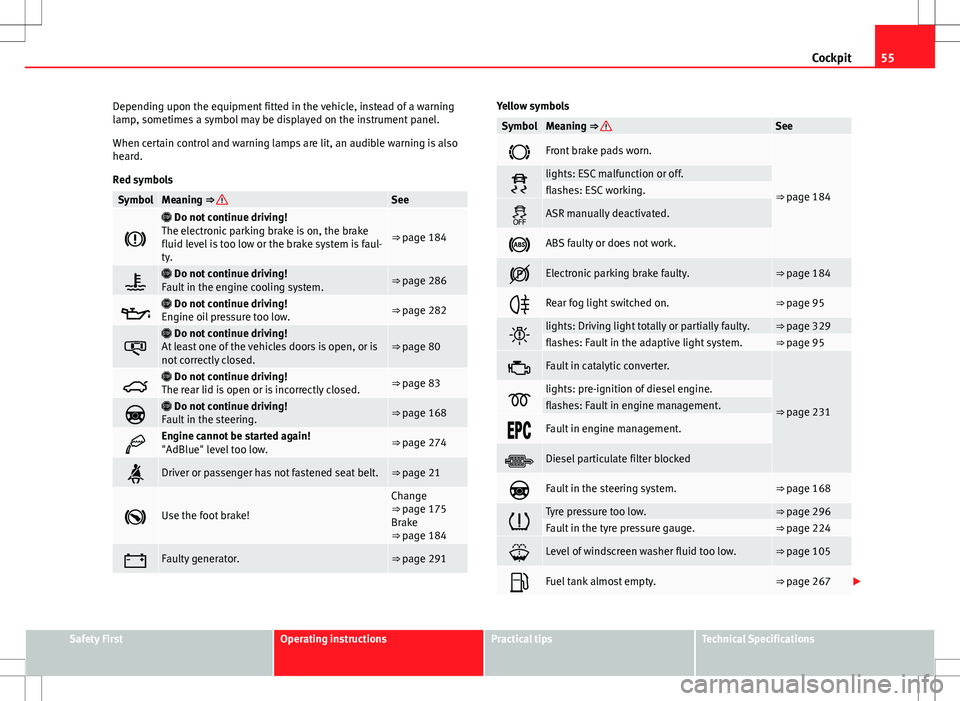
Depending upon the equipment fitted in the vehicle, instead of a warning
lamp, sometimes a symbol may be displayed on the instrument panel.
When certain control and warning lamps are lit, an audible warning is also
heard.
Red symbols
SymbolMeaning ⇒ See
Do not continue driving!
The electronic parking brake is on, the brake
fluid level is too low or the brake system is faul-
ty.
⇒ page 184
Do not continue driving!
Fault in the engine cooling system.⇒ page 286
Do not continue driving!
Engine oil pressure too low.⇒ page 282
Do not continue driving!
At least one of the vehicles doors is open, or is
not correctly closed.⇒ page 80
Do not continue driving!
The rear lid is open or is incorrectly closed.⇒ page 83
Do not continue driving!
Fault in the steering.⇒ page 168
Engine cannot be started again!
"AdBlue" level too low.⇒ page 274
Driver or passenger has not fastened seat belt.⇒ page 21
Use the foot brake!
Change
⇒ page 175
Brake
⇒ page 184
Faulty generator.⇒ page 291
Yellow symbols
SymbolMeaning ⇒ See
Front brake pads worn.
⇒ page 184lights: ESC malfunction or off.flashes: ESC working.
ASR manually deactivated.
ABS faulty or does not work.
Electronic parking brake faulty.⇒ page 184
Rear fog light switched on.⇒ page 95
lights: Driving light totally or partially faulty.⇒ page 329flashes: Fault in the adaptive light system.⇒ page 95
Fault in catalytic converter.
⇒ page 231lights: pre-ignition of diesel engine.flashes: Fault in engine management.
Fault in engine management.
Diesel particulate filter blocked
Fault in the steering system.⇒ page 168
Tyre pressure too low.⇒ page 296Fault in the tyre pressure gauge.⇒ page 224
Level of windscreen washer fluid too low.⇒ page 105
Fuel tank almost empty.⇒ page 267
Safety FirstOperating instructionsPractical tipsTechnical Specifications
Page 63 of 387
61
Cockpit
Calibrating compass
To calibrate the compass you must be in one of the valid magnetic zones
with sufficient space to be able to trace a circumference with the vehicle.
● Switch the ignition on.
● Select the Settings menu followed by the option Compass and Calibrate.
● Confirm the message Describe a complete circumference to calibrate the
compass with OK
and then trace a complete circumference driving at ap-
proximately 10 km/h (6 mph).
When the corresponding cardinal point is displayed, the calibration is com-
plete.
Service interval display
The service indication is shown on the instrument panel display
⇒ Fig. 35 4.
SEAT makes a difference between services with engine oil change (Interval
Service) and services without engine oil change (Inspection Service). The
service interval display only gives information for service dates which in-
volve an engine oil change. The dates of the remaining services (for exam-
ple, the next Inspection Service or change of brake fluid) are listed on the
label attached to the door strut, or even in the Maintenance Programme.
In vehicles with Services established by time or mileage , the service inter-
vals are already pre-defined.
In vehicles with LongLife Service , the intervals are determined individually.
Technical progress has made it possible to considerably reduce servicing re-
quirements. The technology used by SEAT ensures that your vehicle only
has an Interval Service when it is necessary. To establish when the Interval
Service is due (max. 2 years), the vehicle's conditions of use and individual
driving styles are considered. The service pre-warning first appears 20 days
before the date established for the corresponding service. The kilometres remaining until the next service are always rounded up to the nearest
100 km (miles) and the remaining time is given in complete days. The cur-
rent service message cannot be viewed until 500 km (miles) after the last
service. Prior to this only lines are visible on the display.
Inspection reminder
When the Service date is approaching, when the ignition is switched on a
Service reminder is displayed.
In vehicles without text messages
, a spanner is displayed on the instrument
panel with a figure given in km. The number of kilometres shown is the
maximum number that may be driven until the next service. After a few sec-
onds, the display mode changes. A clock symbol appears and the number
of days until the next service appointment is due.
In vehicles with text messages , Service in --- km (miles) or --- days is dis-
played on the instrument panel.
Service due
After the service date, an audible warning is given when the ignition is
switched on and the spanner displayed on the screen flashes for a few sec-
onds . In vehicles with text messages , Service in --- km (miles) or --- days is
displayed on the instrument panel.
Reading a service notification
With the ignition switched on, the engine off and the vehicle at a standstill,
the current service notification can be read:
● Press the button
on the instrument panel several times until the
spanner symbol is displayed .
● OR: select the Settings menu.
● From the Service submenu, select the option Info.
When the service date has past , a minus sign is displayed in front of the
number of kilometres or days. In vehicles with text messages the following
is displayed: Service --- km (miles) or --- days ago .
Safety FirstOperating instructionsPractical tipsTechnical Specifications
Page 70 of 387
68Cockpit
Configuration
MenuFunction
Winter tyresChanging the visual and audible speed warnings. This
function should only be used when the vehicle is fitted
with winter tyres, which are not designed for travel at high
speeds.
LanguageChanging the language of the display texts and the navi-
gation system.
UnitsChanging the units of measurement for the temperature,
consumption and distance.
Second speedSwitching second speed display on and off
Configuration
MenuFunction
AutoholdSelecting whether the Auto-Hold function should remain
on permanently.
ServiceCheck the service notifications or reset the service inter-
vals to zero
Factory set-
tingsSome functions of the Configuration menu will be reset to
the factory value.
BackThe main menu is displayed again.
Submenu Convenience
Convenience menuFunction
Open door
⇒ page 74
Manual
When the vehicle is unlocked with the key, the following doors (depending upon the configuration)
are unlocked:
all doors : All of the doors will be unlocked.
one door: see above Method 1.
Side of vehicle : The driver side doors will unlock.
Individually: Only the driver door is unlocked.
automatic mode
Automatic locking function (Auto Lock) All doors are automatically locked at speeds above approxi-
mately 15 km/h (10 mph). To unlock when the vehicle is stopped, push the central locking button
or remove the key from the ignition lock.
Automatic unlock : When the key is removed from the ignition lock, all doors and the rear lid are
unlocked.
Electronic childproof locksSwitching the childproof locks on or off ⇒ page 83.Confirm anti-theft alarmSwitching on or off the audible confirmation that the anti-theft alarm is activated ⇒ page 74.Handling windowsAdjusting the electric windows: This permits the windows to be opened or closed when the vehicle is unlocked or locked
respectively. The open function can only be activated from the driver door ⇒ page 88.
Page 71 of 387
69
Cockpit
Convenience menuFunctionRear vision mirror adjustmentTilts passenger mirror downwards when reverse gear is engaged. This enables the driver to see the edge of the pavement,
for example ⇒ page 110.
Exterior mirror adjust.If synchronised adjustment is selected, when the driver side exterior mirror is adjusted, the passenger exterior mirror is also
moved.
Factory settingsSome functions of the Convenience submenu will be reset to the factory value.BackThe Configuration menu is displayed again.
Lights & visibility submenu
Lights & visi-
bility menuFunction
Coming HomeThis permits the adjustment of the time the headlamps
stay on after locking or unlocking the vehicle, the function
can also be connected or disconnected here ⇒ page 100.Leaving Home
Footwell lightThis permits the adjustment of the brightness of the foot-
well lighting when the doors are open, the function can al-
so be connected or disconnected here
Convenience
turn signalsSwitching convenience turn signals on and off When the
convenience turn signals are connected, when the turn
signal is switched on, these flash at least three times
⇒ page 95.
Factory set-
tingsAll the configurations in the submenu Lights & visibility are
reset to the predefined factory values.
Tourist lightHeadlamp adjustment for countries in which vehicles are
driven on the other side of the road. When the mark is acti-
vated, the headlamps of a left-hand drive vehicle are ad-
justed for driving on the left. This function must only be
used for a short period.
BackThe Configuration menu is displayed again. Personal convenience settings
When two people use a vehicle, SEAT recommends that each person always
uses “their” own remote control key. When the ignition is switched off, or
the vehicle is locked, the personal convenience settings are stored and au-
tomatically allocated to the vehicle key
⇒ page 62.
The values of the personalised convenience settings of the following menu
options are allocated to the vehicle key: ■ Parking heating menu
■ Configuration Menu
■ Time
■ Language
■ Units
■ Convenience settings menu
■ Door unlock (individual opening, Auto Lock)
■ Convenience handling of windows
■ Rear vision mirror adjustment
■ Lights & visibility settings menu
■ Coming home and Leaving home
■ Footwell light
■ Convenience turn signals
Safety FirstOperating instructionsPractical tipsTechnical Specifications
Page 73 of 387
71
Opening and closing
Opening and closing Vehicle key set
Introduction
Additional information and warnings:
● Adjustments to the SEAT information system ⇒ page 62
● Central locking and locking system ⇒ page 74
● Start and stop the engine ⇒ page 171
● Notes for the user ⇒ page 258
● Emergency locking and unlocking ⇒ page 317
WARNING
Careless or incorrect use of vehicle keys may result in severe injury and
accident.
● Always take all the keys with you whenever you leave the vehicle.
Children and unauthorised individuals could lock the doors or the rear
lid, start the engine or turn the ignition on activating electrical systems,
for example: the electric windows.
● Never leave children or disabled people alone in the car. They could
be trapped in the car in an emergency and will not be able to get them-
selves to safety. For example, depending on the time of the year, temper-
atures inside a locked and closed vehicle can be extremely high or ex-
tremely low resulting in serious injuries and illness or even death, partic-
ularly for young children.
● Never remove the key from the ignition if the vehicle is in motion. The
steering may lock and it will not be possible to turn the steering wheel.
Vehicle key
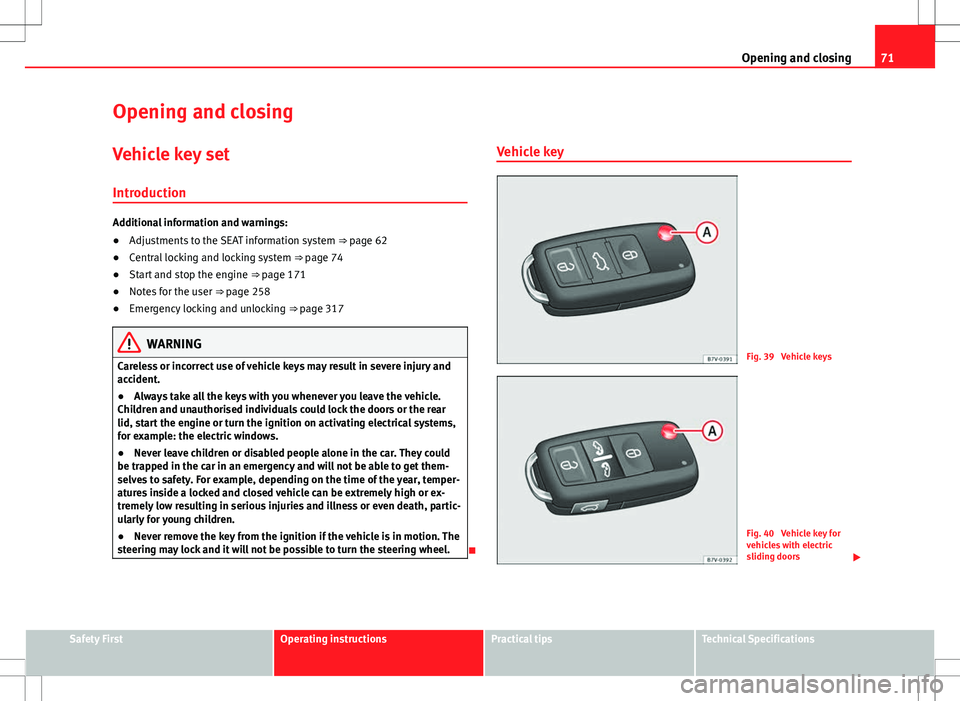
Fig. 39 Vehicle keys
Fig. 40 Vehicle key for
vehicles with electric
sliding doors
Safety FirstOperating instructionsPractical tipsTechnical Specifications
Page 76 of 387
74Opening and closing
SEAT recommend having the batteries changed in a specialised workshop.
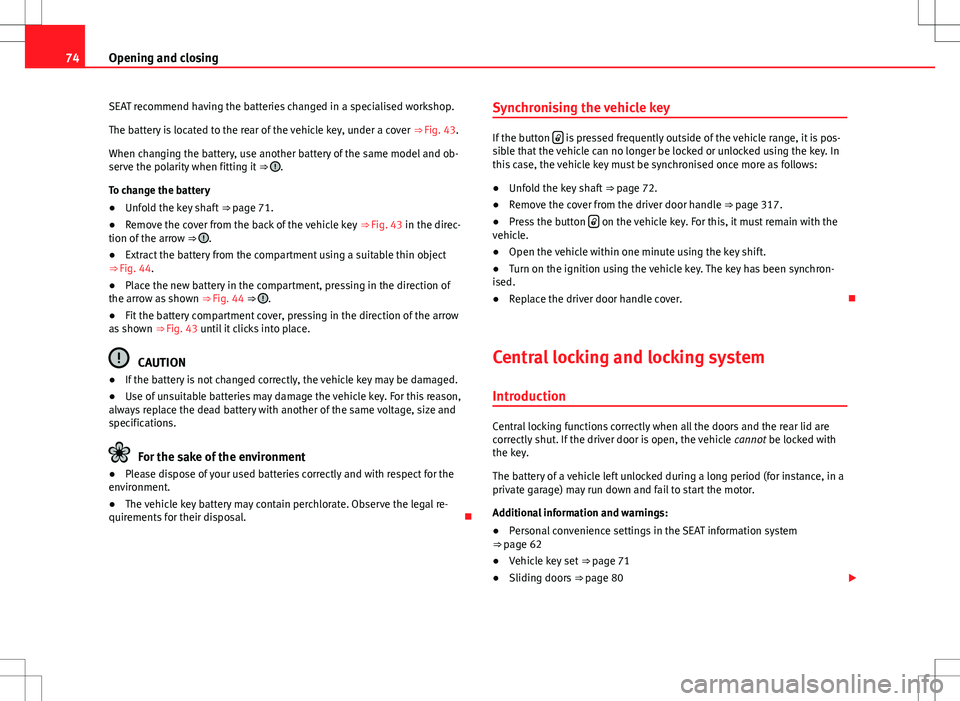
The battery is located to the rear of the vehicle key, under a cover ⇒ Fig. 43.
When changing the battery, use another battery of the same model and ob-
serve the polarity when fitting it ⇒
.
To change the battery
● Unfold the key shaft ⇒ page 71.
● Remove the cover from the back of the vehicle key ⇒ Fig. 43 in the direc-
tion of the arrow ⇒
.
● Extract the battery from the compartment using a suitable thin object
⇒ Fig. 44.
● Place the new battery in the compartment, pressing in the direction of
the arrow as shown ⇒ Fig. 44 ⇒
.
● Fit the battery compartment cover, pressing in the direction of the arrow
as shown ⇒ Fig. 43 until it clicks into place.
CAUTION
● If the battery is not changed correctly, the vehicle key may be damaged.
● Use of unsuitable batteries may damage the vehicle key. For this reason,
always replace the dead battery with another of the same voltage, size and
specifications.
For the sake of the environment
● Please dispose of your used batteries correctly and with respect for the
environment.
● The vehicle key battery may contain perchlorate. Observe the legal re-
quirements for their disposal. Synchronising the vehicle key
If the button
is pressed frequently outside of the vehicle range, it is pos-
sible that the vehicle can no longer be locked or unlocked using the key. In
this case, the vehicle key must be synchronised once more as follows:
● Unfold the key shaft ⇒ page 72.
● Remove the cover from the driver door handle ⇒ page 317.
● Press the button
on the vehicle key. For this, it must remain with the
vehicle.
● Open the vehicle within one minute using the key shift.
● Turn on the ignition using the vehicle key. The key has been synchron-
ised.
● Replace the driver door handle cover.
Central locking and locking system
Introduction
Central locking functions correctly when all the doors and the rear lid are
correctly shut. If the driver door is open, the vehicle cannot be locked with
the key.
The battery of a vehicle left unlocked during a long period (for instance, in a
private garage) may run down and fail to start the motor.
Additional information and warnings:
● Personal convenience settings in the SEAT information system
⇒ page 62
● Vehicle key set ⇒ page 71
● Sliding doors ⇒ page 80
Page 77 of 387
75
Opening and closing
● Electric windows ⇒ page 88
● Panoramic sliding sunroof ⇒ page 92
● Towing mode ⇒ page 236
● Emergency locking and unlocking ⇒ page 317
WARNING
The incorrect use of the central locking system may cause serious inju-
ries.
● The central locking system will lock all doors. A vehicle locked from
the inside can prevent any non-authorised individual from opening the
doors and accessing the vehicle. Nevertheless, in case of emergency or
accident, locked doors will complicate access to the vehicle interior to
help the passengers.
● Never leave children or disabled people alone in the vehicle. The cen-
tral locking button can be used to lock all the doors from within. There-
fore, passengers will be locked inside the vehicle. Individuals locked in
the vehicle can be exposed to very high or very low temperatures.
● Depending on the time of the year, temperatures inside a locked and
closed vehicle can be extremely high or extremely low resulting in seri-
ous injuries and illness or even death, particularly for young children.
● Never leave individuals locked in a closed and locked vehicle. In case
of emergency, they may not be able to exit the vehicle by themselves or
get help.
Description of the central locking system
The central locking system allows all doors and the rear lid to be locked and
unlocked centrally.
● From outside, using the vehicle key.
● From inside, by pushing the central locking button ⇒ page 77. In the submenu Convenience in the Configuration menu, or by visiting a spe-
cialised workshop, special functions of the central locking system can be
switched on or off ⇒ page 62.
In case of a vehicle key fault or central locking system fault, all doors can be
locked or unlocked manually.
Locking the vehicle after the airbags have been deployed
If the airbags are deployed due to an accident, the vehicle will be automati-
cally and completely unlocked. Depending on the amount of damage, the
vehicle can be locked following an accident in the following ways:
FunctionNecessary operationsLocking the vehicle
from within:– Turn off the ignition and turn it on again.
– Push the central locking button .Locking the vehicle
from the outside:– Turn off the ignition and turn it on again.
OR: – Remove the key from the ignition.
– Open any door just once.
– Lock the vehicle with the key.
Safety FirstOperating instructionsPractical tipsTechnical Specifications