check engine light Seat Alhambra 2014 Owner's Guide
[x] Cancel search | Manufacturer: SEAT, Model Year: 2014, Model line: Alhambra, Model: Seat Alhambra 2014Pages: 381, PDF Size: 5.75 MB
Page 275 of 381
273
Checking and refilling levels
CAUTION
● Do not refuel if the filler indicates that the fuel contains metal. LRP (lead
replacement petrol) fuels contain high concentrations of metal additives.
Using them may damage the engine!
● Only use fuel with an octane rating that is in line with the norm EN 228,
otherwise significant damage could be caused to the engine and fuel sys-
tem. Furthermore, it could lead to a loss of performance with the conse-
quent engine fault.
● The use of unsuitable petrol additives could damage the engine.
● If, in exceptional circumstances, petrol with a lower octane rating to that
recommended is used, only use moderate engine speeds and a light throt-
tle. Avoid using full throttle and overloading the engine. Otherwise you may
damage the engine. Fill up with fuel of a suitable octane rating as soon as
possible.
● Just one full tank of leaded fuel would seriously impair the efficiency of
the catalytic converter and could damage it.
Diesel
Diesel fuel
Diesel fuel must correspond to European standard EN 590 (in Germany,
EN 590 or DIN 51628).
The use of diesel fuel with a high sulphur percentage requires shorter serv-
ice intervals ⇒ Booklet Maintenance Programme ⇒
. Your Technical Serv-
ice will be able to tell you which countries have diesel with a high sulphur
content.
Do not mix fuel additives (thinners, or similar additives) with diesel fuel.
Winter-grade diesel
When using “summer-grade diesel fuel”, difficulties may be experienced at
temperatures below 0 °C (+32 °F) because the fuel thickens due to wax sep- aration. For this reason, “winter-grade diesel fuel” is available in Germany,
for example, during the cold months. It can be used at temperatures as low
as -20 °C (-4 °F).
In countries with different climatic conditions, other types of diesel fuel are
available that are suitable to local temperatures. Technical Services and fill-
ing stations in the country concerned will inform you on the type of diesel
fuels available.
A cold diesel engine makes more noise during winter temperatures than
summer temperatures. Furthermore, the exhaust gases may turn slightly
bluish while the engine is heating. The quantity of exhaust gases will de-
pend on the outside temperature.
Filter pre-heater
Vehicles with a diesel engine are fitted with a fuel filter pre-heating system.
This ensures that the fuel system remains operational to approx. -24 °C
(-11.2 °F), provided you use winter-grade diesel which is safe to -15 °C
(+5,0 °F).
However, if the fuel has waxed to such an extent that the engine will not
start at temperatures of under -24 °C (-11.2 °F), simply place the vehicle in a
warm garage or workshop for a while to heat up.
Auxiliary heater
Vehicles with a diesel engine may be fitted with an auxiliary heater. The
heater runs off the fuel from the fuel tank. On doing so, smells and steam
may be noticed outside the vehicle for a short period. This is normal and it
is not an indication of a fault in the vehicle.
Whenever there is little fuel in the tank (reserve), the auxiliary heater auto-
matically switches off.
Safety FirstOperating instructionsPractical TipsTechnical Specifications
Page 276 of 381
274Checking and refilling levels
WARNING
Never use start boosters. An aerosol start booster could explode or cause
a sudden rise in engine speed leading to engine damage and serious in-
jury.
CAUTION
● The vehicle is not prepared for the use of biodiesel. Never, under any
circumstances refuel with biodiesel. It could damage the fuel system and
subsequently lead to engine faults!
● The addition of biodiesel to diesel by the diesel producer according to
Standard EN 590 or other equivalent (DIN 51628 in Germany, for example)
is authorised and causes no type of damage to the engine or the fuel sys-
tem.
● The diesel engine has been designed for to use diesel fuel exclusively.
Therefore, never use petrol, fuel oil or other unsuitable fuels. The composi-
tion of these fuels may significantly damage the fuel system and the en-
gine.
● The use of diesel fuels with a high sulphur percentage could considera-
bly reduce the service life of the diesel particulate filter. Your Technical Serv-
ice will be able to tell you which countries have diesel with a high sulphur
content.
Information on fuel consumption
The consumption and emission values indicated do not refer to one specific
vehicle. They are only to be used to compare the values of the different ve-
hicle versions. The fuel consumption and CO 2 emissions of a vehicle not on-
ly depend on the effective use of fuel. They also depend on your driving
style and other non-technical factors. Calculation of fuel consumption
Fuel consumption and emission values are determined according to the cur-
rent version of the 715/2007/EC or 80/1268/EEC regulation and are valid
for the vehicle kerb weight. The specifications do
not refer to an individual
vehicle. Two measuring cycles are carried out on a rolling road test bed to
calculate fuel consumption. The test criteria are as follows:
Urban cycleMeasurement of the urban cycle starts with an engine cold
start. City driving is then simulated at between 0 and 50 km/
h (31 mph).
Road cycle
In the road cycle simulation, the car undergoes frequent ac-
celeration and braking in all gears, as in normal everyday
driving. The road speed ranges from 0 to 120 km/h
(75 mph).
CombinedThe average combined consumption is calculated with a
weighting of around 37 % for the urban cycle and 63 % for
the road cycle.
CO 2 emis-
sions of the
combinationThe exhaust gases are collected during both driving cycles
to calculate carbon dioxide emissions (urban and road). The
gas composition is then analysed to evaluate the CO 2 con-
tent and other emissions.
Note
● The kerb weight may vary according to the vehicle equipment. This
could raise consumption and the CO 2 emissions slightly.
● In practice, consumption values could be different to the values calcula-
ted based on the 715/2007/EC or 80/1268/EEC regulations.
Page 277 of 381
275
Checking and refilling levels
Selective Catalytic Reduction* (AdBlue)
Introduction
The AdBlue fill level must be checked when the vehicle is being serviced.
Additional information and warnings:
● Luggage compartment ⇒ page 127
● Fuel ⇒ page 271
● Wheels and tyres ⇒ page 297
● Accessories, parts replacement, repairs and modifications ⇒ page 261
WARNING
If the AdBlue fill level is too low, the vehicle may not restart after switch-
ing the ignition off. The emergency start or jump start will not be possi-
ble either!
● Top up with AdBlue at the latest 1000 km (600 miles) before it runs
out.
● Do not allow the AdBlue to run too low.
WARNING
AdBlue is an irritant, corrosive liquid that can cause injuries if it touches
the skin, eyes or respiratory organs.
● If AdBlue get in contact with eyes and skin, rinse for at least 15 mi-
nutes with plenty of water and seek medical help.
● If the AdBlue is swallowed, wash your mouth with plenty of water for
at least 15 minutes. Do not try to provoke vomiting unless recommended
by a Doctor. Seek medical advice immediately.
CAUTION
AdBlue damages surfaces such as painted vehicle parts, plastic, items of
clothing and carpets. Spilt AdBlue should be removed as quickly as possi-
ble using a damp cloth and plenty of cold water.
● If the AdBlue has crystallised, remove with warm water and a sponge.
Control and warning lamps
lights upPossible cause ⇒ Solution
(red)The engine cannot be re-
started! The level of AdBlue
is too low.Stop the vehicle in a suitable,
safe and flat area then top up
with the minimum quantity of
AdBlue required ⇒ page 277.
(red)
with
The engine cannot be re-
started! AdBlue system
malfunction.Contact a specialised work-
shop. Have the system
checked there.
(yellow)The AdBlue reserve is low.
Refill AdBlue over the next kil-
ometres or miles as indicated
⇒ page 277. SEAT recom-
mends contacting a special-
ised workshop.
(yellow)
together with
There is a fault in the AdBl-
ue system or unsuitable
AdBlue fluid has been
used.Contact a specialised work-
shop. Have the system
checked there.
Safety FirstOperating instructionsPractical TipsTechnical Specifications
Page 278 of 381

276Checking and refilling levels
Several warning and control lamps should light up for a few seconds when
the ignition is switched on, signalling that the function is being verified.
They will switch off after a few seconds.
WARNING
If the warning lamps and messages are ignored, the vehicle may stall in
traffic, or may cause accidents and severe injuries.
● Never ignore the warning lamps or text messages.
● Stop the vehicle safely as soon as possible.
CAUTION
Failure to heed the control lamps and text messages when they appear may
result in faults in the vehicle.
Information on AdBlue
In vehicles with Selective Catalytic Reduction, a special urea solution (AdBl-
ue) is injected into the exhaust gas system in front of the catalytic converter
to reduce nitrogen oxide emissions. The consumption of AdBlue depends on individual driving style, the tem-
perature at which the system operates and the outside temperature where
the vehicle is driven.
AdBlue is kept in an independent tank in the vehicle and should be refilled
at an official supplier. The AdBlue tank holds about 17 litres.
A message will be displayed on the dash panel around 2400 km
(1500 miles) before the next service to indicate that AdBlue must be refilled
⇒ page 277. If you ignore this message and do not refill, you will be unable
to start the engine afterwards
⇒ page 275.
SEAT recommends contacting a specialised workshop. If you are unable to
visit a qualified specialised workshop, you should temporarily refill with a
minimum of 10.0 litres of AdBlue. Only refill using AdBlue expressly ap-
proved by SEAT.
When the indicators and light simultaneously, there is a fault. SEAT
recommends visiting the closest specialised workshop.
AdBlue ®
is a registered trademark in the US, Germany, the European Union
and other countries belonging to the German automobile industry ("Ver-
band der Automobilindustrie e. V.", VDA).
Page 285 of 381
283
Checking and refilling levels
CAUTION
● To avoid damage to the bonnet and to the windscreen wiper arms, only
open the bonnet when the windscreen wipers are in place against the wind-
screen.
● Before driving, always lower the wiper arms.
Engine oil Introduction
Additional information and warnings:
● ⇒ Booklet Maintenance Programme
● Working in the engine compartment ⇒ page 279
● Accessories, parts replacement, repairs and modifications ⇒ page 261
WARNING
Incorrectly handling engine oil can cause injury and serious burns.
● Always protect your eyes when handling engine oil.
● Oil is toxic and must be kept out of the reach of children.
● Engine oil must only be kept closed in its original container. The same
applies to use oil until it has been disposed of.
● Never store engine oil in empty food containers or bottles as other
people may accidentally drink it.
● Regular contact with engine oil can be bad for the skin. If you come
into contact with engine oil, wash your skin with soap and water.
● With the engine running, the engine oil gets extremely hot and can
cause severe skin burns. Always wait until the engine has fully cooled.
For the sake of the environment
Similar to the other service liquids, spilled engine oil can be bad for the en-
vironment. Collect any spilt fluids in suitable containers and dispose of in
accordance with legislation and with the utmost respect for the environ-
ment.
Warning and control lamps
lights upPossible causeSolution
Insufficient engine oil.Switch the ignition off. Check
the engine oil level
⇒ page 285.
flashesPossible causeSolution
Engine oil pressure too low.
Stop the vehicle!
Switch off the engine. Check the
engine oil level.
- If the warning lamp flashes al-
though the oil level is correct,
do not continue driving or leave
the engine running. Otherwise,
the engine could be damaged.
Seek specialist assistance.
Engine oil sensor faulty.Contact a specialised workshop.
Have the engine oil sensor
checked.
Safety FirstOperating instructionsPractical TipsTechnical Specifications
Page 290 of 381
288Checking and refilling levels
For the sake of the environment
Coolants and additives can contaminate the environment. Collect any spilt
fluids in suitable containers and dispose of in accordance with legislation
and with the utmost respect for the environment.
Coolant temperature warning lamp and gauge
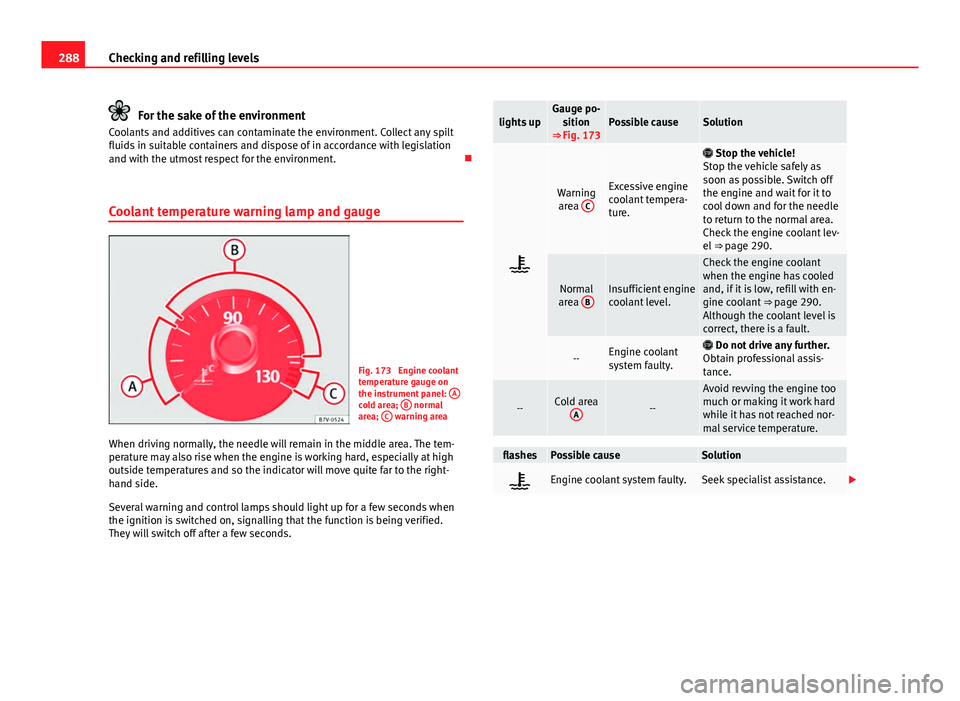
Fig. 173 Engine coolant
temperature gauge on
the instrument panel: A
cold area; B normal
area; C warning area
When driving normally, the needle will remain in the middle area. The tem-
perature may also rise when the engine is working hard, especially at high
outside temperatures and so the indicator will move quite far to the right-
hand side.
Several warning and control lamps should light up for a few seconds when
the ignition is switched on, signalling that the function is being verified.
They will switch off after a few seconds.
lights upGauge po- sition
⇒ Fig. 173Possible causeSolution
Warning area CExcessive engine
coolant tempera-
ture.
Stop the vehicle!
Stop the vehicle safely as
soon as possible. Switch off
the engine and wait for it to
cool down and for the needle
to return to the normal area.
Check the engine coolant lev-
el ⇒ page 290.
Normal
area BInsufficient engine
coolant level.
Check the engine coolant
when the engine has cooled
and, if it is low, refill with en-
gine coolant
⇒ page 290.
Although the coolant level is
correct, there is a fault.
--Engine coolant
system faulty. Do not drive any further.
Obtain professional assis-
tance.
--Cold area A--
Avoid revving the engine too
much or making it work hard
while it has not reached nor-
mal service temperature.
flashesPossible causeSolution
Engine coolant system faulty.Seek specialist assistance.
Page 291 of 381

289
Checking and refilling levels
WARNING
If the warning lamps and messages are ignored, the vehicle may stall in
traffic, or may cause accidents and severe injuries.
● Always observe any lit warning lamps and text messages.
● Never ignore the warning lamps or text messages.
● Stop the vehicle safely as soon as possible.
CAUTION
Failure to heed the control lamps and text messages when they appear may
result in faults in the vehicle.
Engine coolant specifications
The engine cooling system is supplied from the factory with a specially trea-
ted mixture of water and, at least, 40 % of the additive G 13 (TLVW 774 J).
The engine coolant additive is recognisable by its purple colour. This mix-
ture of water and additive gives the necessary frost protection down to
-25°C (-13°F) and protects the light alloy parts of the cooling system against
corrosion. It also prevents scaling and considerably raises the boiling point
of the coolant.
To protect the engine cooling system, the percentage of additive must al-
ways be at least 40 %, even in warm climates where anti-freeze protection is
not required.
If greater frost protection is required in very cold climates, the proportion of
additive can be increased. However, the percentage of additive should not
exceed 60 %, as this would reduce the frost protection and, in turn, de-
crease the cooling capacity.
When the coolant is topped up, use a mixture of distilled water and, at
least, 40 % of the G 13 or G 12 plus-plus (TL-VW 774 G) additive (both are purple) to obtain an optimum anticorrosion protection ⇒
. The mixture of
G 13 with G 12 plus (TL-VW 774 F), G 12 (red) or G 11 (green-blue) engine
coolants will significantly reduce the anticorrosion protection and should,
therefore be avoided ⇒
.
WARNING
If there is not enough anti-freeze in the coolant system, the engine may
fail leading to serious damage.
● Please make sure that the percentage of additive is correct with re-
spect to the lowest expected ambient temperature in the zone in which
the vehicle is to be used.
● When the outside temperature is very low, the coolant could freeze
and the vehicle would be immobilised. In this case, the heating would
not work either and inadequately dressed passengers could die of cold.
CAUTION
The original additives should never be mixed with coolants which are not
approved by SEAT. Otherwise, you run the risk of causing severe damage to
the engine and the engine cooling system.
● If the fluid in the expansion tank is not purple but is, for example,
brown, this indicates that the G 13 additive has been mixed with an inade-
quate coolant. The coolant must be changed as soon as possible if this is
the case! This could result in serious faults and engine damage.
For the sake of the environment
Coolants and additives can contaminate the environment. If any fluids are
spilled, they should be collected and correctly disposed of, with respect to
the environment.
Safety FirstOperating instructionsPractical TipsTechnical Specifications
Page 292 of 381
290Checking and refilling levels
Checking the engine coolant level and refilling
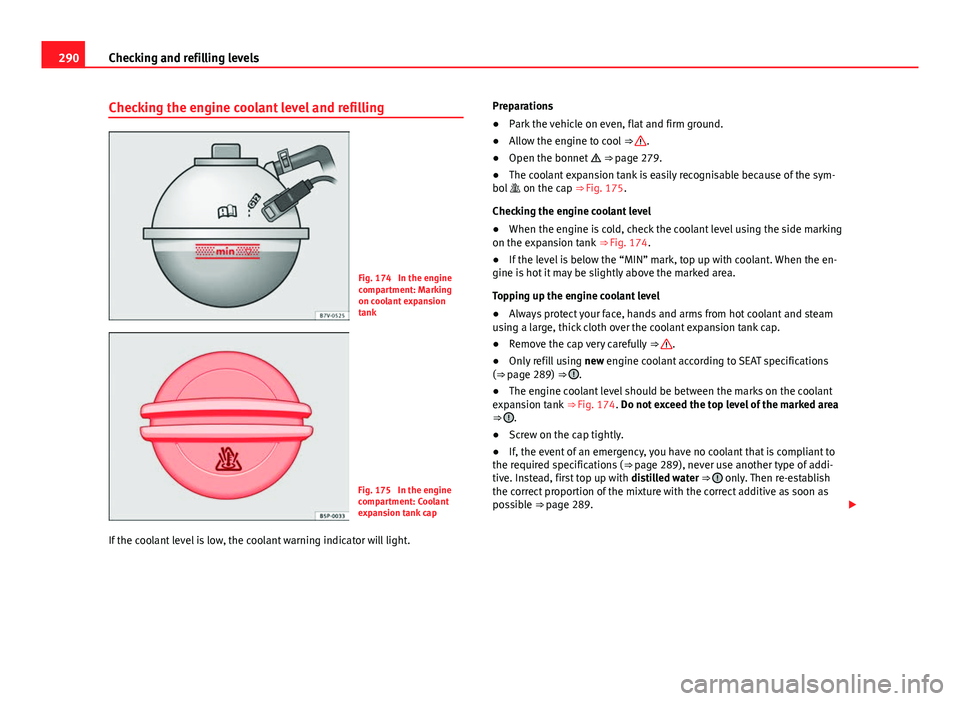
Fig. 174 In the engine
compartment: Marking
on coolant expansion
tank
Fig. 175 In the engine
compartment: Coolant
expansion tank cap
If the coolant level is low, the coolant warning indicator will light. Preparations
●
Park the vehicle on even, flat and firm ground.
● Allow the engine to cool ⇒
.
● Open the bonnet ⇒ page 279.
● The coolant expansion tank is easily recognisable because of the sym-
bol on the cap ⇒ Fig. 175.
Checking the engine coolant level
● When the engine is cold, check the coolant level using the side marking
on the expansion tank ⇒ Fig. 174.
● If the level is below the “MIN” mark, top up with coolant. When the en-
gine is hot it may be slightly above the marked area.
Topping up the engine coolant level
● Always protect your face, hands and arms from hot coolant and steam
using a large, thick cloth over the coolant expansion tank cap.
● Remove the cap very carefully ⇒
.
● Only refill using new engine coolant according to SEAT specifications
(⇒ page 289) ⇒
.
● The engine coolant level should be between the marks on the coolant
expansion tank ⇒ Fig. 174. Do not exceed the top level of the marked area
⇒
.
● Screw on the cap tightly.
● If, the event of an emergency, you have no coolant that is compliant to
the required specifications ( ⇒ page 289), never use another type of addi-
tive. Instead, first top up with distilled water ⇒
only. Then re-establish
the correct proportion of the mixture with the correct additive as soon as
possible ⇒ page 289.
Page 296 of 381
294Checking and refilling levels
Checking the electrolyte level of the vehicle battery
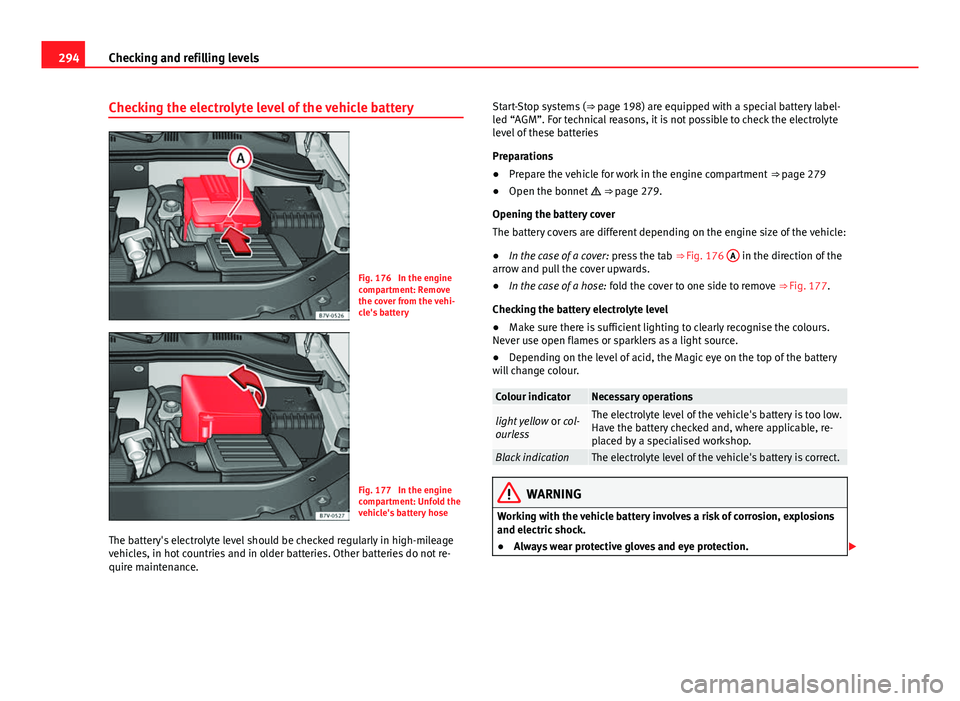
Fig. 176 In the engine
compartment: Remove
the cover from the vehi-
cle's battery
Fig. 177 In the engine
compartment: Unfold the
vehicle's battery hose
The battery's electrolyte level should be checked regularly in high-mileage
vehicles, in hot countries and in older batteries. Other batteries do not re-
quire maintenance. Start-Stop systems (
⇒ page 198) are equipped with a special battery label-
led “AGM”. For technical reasons, it is not possible to check the electrolyte
level of these batteries
Preparations
● Prepare the vehicle for work in the engine compartment ⇒ page 279
● Open the bonnet ⇒ page 279.
Opening the battery cover
The battery covers are different depending on the engine size of the vehicle:
● In the case of a cover: press the tab ⇒ Fig. 176 A
in the direction of the
arrow and pull the cover upwards.
● In the case of a hose: fold the cover to one side to remove ⇒ Fig. 177.
Checking the battery electrolyte level
● Make sure there is sufficient lighting to clearly recognise the colours.
Never use open flames or sparklers as a light source.
● Depending on the level of acid, the Magic eye on the top of the battery
will change colour.
Colour indicatorNecessary operations
light yellow or col-
ourlessThe electrolyte level of the vehicle's battery is too low.
Have the battery checked and, where applicable, re-
placed by a specialised workshop.
Black indicationThe electrolyte level of the vehicle's battery is correct.
WARNING
Working with the vehicle battery involves a risk of corrosion, explosions
and electric shock.
● Always wear protective gloves and eye protection.
Page 297 of 381
295
Checking and refilling levels
WARNING (Continued)
● Battery acid is very corrosive and caustic. It can burn skin and cause
blindness. When handling the battery, protect yourself from splashes of
acids, above all your hands, arms and face.
● Never tilt the vehicle battery. Battery acid could spill out of the open-
ings to release gases and cause corrosion damage.
● Never open the vehicle battery.
● If battery acid splashes on you, immediately rinse your eyes and skin
abundantly with water for several minutes. Then seek medical care imme-
diately.
● If acid is swallowed by mistake, consult a doctor immediately.
Charging, replacing and connecting or disconnecting the
battery
Charging the battery
The vehicle battery should be charged by a specialised workshop only, as
batteries using special technology have been installed and they must be
charged in a controlled environment ⇒
. SEAT recommends visiting a
Technical Service.
Replacing a vehicle battery
The battery has been developed to suit the conditions of its location and
has special safety features. If the battery must be replaced, consult a Tech-
nical Service for information on electromagnetic compatibility, the size and
maintenance, performance and safety requirements of the new battery in
your vehicle before you purchase one. SEAT recommends you have the bat-
tery replaced by a Technical Service.
Use only maintenance-free genuine batteries conforming to TL 825 06 and
VW 7 50 73 Standards. These standards must be dated April 2008 or later. Start-Stop systems (
⇒ page 198) are equipped with a special battery. There-
fore, it must only be replaced with a battery of the same specifications.
Disconnecting the vehicle's battery
If you must disconnect the battery from the electrical system, please note
the following:
● Switch off the ignition and all electrical equipment.
● The vehicle must be unlocked before disconnecting the battery, other-
wise the alarm will be triggered.
● First disconnect the negative cable and then the positive ⇒
.
Connecting the vehicle's battery
● Before reconnecting the battery, switch off the engine, the ignition and
electric devices.
● First reconnect the positive cable and then the negative ⇒
.
Different control lamps may light up after connecting the battery and switch-
ing the ignition on. They will be turned off after a short trip at a speed of
between 15-20 km/h (10-12 mph). If the warning indicators remain lit,
please visit a specialised workshop to have the vehicle checked.
If the battery has been disconnected for a long time, it is possible that the
next service date is not displayed or calculated correctly ⇒ page 57. Respect
the maximum service intervals permitted ⇒ Booklet Maintenance Pro-
gramme.
Automatic consumer disconnection
The intelligent vehicle electrical system automatically implements a range
of measures to prevent the battery from discharging when high demands
are made on it:
Safety FirstOperating instructionsPractical TipsTechnical Specifications