air conditioning Seat Alhambra 2015 Owner's Manual
[x] Cancel search | Manufacturer: SEAT, Model Year: 2015, Model line: Alhambra, Model: Seat Alhambra 2015Pages: 305, PDF Size: 5.46 MB
Page 5 of 305
Table of Contents
Table of Contents
Safety . . . . . . . . . . . . . . . . . . . . . . . . . . . . . . . . 5
Safe driving . . . . . . . . . . . . . . . . . . . . . . . . . . . . 5
Safety first! . . . . . . . . . . . . . . . . . . . . . . . . . . . . . 5
Tips for driving . . . . . . . . . . . . . . . . . . . . . . . . . . 5
Sitting position for occupants . . . . . . . . . . . . . . 6
Pedal area . . . . . . . . . . . . . . . . . . . . . . . . . . . . . . 9
Seat belts . . . . . . . . . . . . . . . . . . . . . . . . . . . . . . 10
The whys and wherefores of seat belts . . . . . . . 10
How to properly adjust your seatbelt . . . . . . . . 14
Seat belt tensioners . . . . . . . . . . . . . . . . . . . . . . 17
Airbag system . . . . . . . . . . . . . . . . . . . . . . . . . . 18
Brief introduction . . . . . . . . . . . . . . . . . . . . . . . . 18
General overview of the airbag . . . . . . . . . . . . . 20
Deactivating airbags . . . . . . . . . . . . . . . . . . . . . 25
Transporting children safely . . . . . . . . . . . . . . . 26
Child safety . . . . . . . . . . . . . . . . . . . . . . . . . . . . . 26
Integrated child seat . . . . . . . . . . . . . . . . . . . . . 33
Operation . . . . . . . . . . . . . . . . . . . . . . . . . . . . . 39
Cockpit . . . . . . . . . . . . . . . . . . . . . . . . . . . . . . . . 39
Overview . . . . . . . . . . . . . . . . . . . . . . . . . . . . . . . 38
Instruments . . . . . . . . . . . . . . . . . . . . . . . . . . . . 40
Control lamps . . . . . . . . . . . . . . . . . . . . . . . . . . . 45
SEAT information system . . . . . . . . . . . . . . . . . . 47
Three button unit in headliner . . . . . . . . . . . . . . 53
Opening and closing . . . . . . . . . . . . . . . . . . . . . 54
Vehicle key set . . . . . . . . . . . . . . . . . . . . . . . . . . 54
Central locking and locking system . . . . . . . . . 57
Doors . . . . . . . . . . . . . . . . . . . . . . . . . . . . . . . . . . 63
Sliding doors . . . . . . . . . . . . . . . . . . . . . . . . . . . 64
Rear lid . . . . . . . . . . . . . . . . . . . . . . . . . . . . . . . . 66
Electric windows . . . . . . . . . . . . . . . . . . . . . . . . . 70
Panoramic sliding sunroof* . . . . . . . . . . . . . . . . 72 Lights and visibility
. . . . . . . . . . . . . . . . . . . . . . 74
Lights . . . . . . . . . . . . . . . . . . . . . . . . . . . . . . . . . 74
Visibility . . . . . . . . . . . . . . . . . . . . . . . . . . . . . . . 80
Windscreen wiper and window wiper systems . 81
Rear vision mirror . . . . . . . . . . . . . . . . . . . . . . . . 85
Seats and head restraints . . . . . . . . . . . . . . . . . 88
Adjusting the seats and head restraints . . . . . . 88
Seat functions . . . . . . . . . . . . . . . . . . . . . . . . . . 93
Transport and practical equipment . . . . . . . . . 98
Transporting objects . . . . . . . . . . . . . . . . . . . . . 98
Loading luggage compartment . . . . . . . . . . . . . 100
Roof carrier system* . . . . . . . . . . . . . . . . . . . . . . 110
Storage compartments . . . . . . . . . . . . . . . . . . . 112
Drink holders . . . . . . . . . . . . . . . . . . . . . . . . . . . 117
Ashtray and cigarette lighter* . . . . . . . . . . . . . . 118
Power sockets . . . . . . . . . . . . . . . . . . . . . . . . . . . 119
Air conditioning . . . . . . . . . . . . . . . . . . . . . . . . . 122
Air conditioner . . . . . . . . . . . . . . . . . . . . . . . . . . 122
Auxiliary heater* (additional heater) . . . . . . . . 128
Driving . . . . . . . . . . . . . . . . . . . . . . . . . . . . . . . . 131
Address . . . . . . . . . . . . . . . . . . . . . . . . . . . . . . . . 131
Stopping and starting the engine . . . . . . . . . . . 133
Braking and parking . . . . . . . . . . . . . . . . . . . . . 137
Changing gear . . . . . . . . . . . . . . . . . . . . . . . . . . 143
Run-in and economical driving . . . . . . . . . . . . . 148
Engine management and exhaust gas
purification system . . . . . . . . . . . . . . . . . . . . . . 151
Driving abroad . . . . . . . . . . . . . . . . . . . . . . . . . . 153
Driving along flooded roadways . . . . . . . . . . . . 153
Driver assistance systems . . . . . . . . . . . . . . . . . 154
Braking and stability systems . . . . . . . . . . . . . . 154
Start assist systems . . . . . . . . . . . . . . . . . . . . . . 156
Parking sensor system* . . . . . . . . . . . . . . . . . . . 159
Park Assist system* . . . . . . . . . . . . . . . . . . . . . . 162
Rear Assist system* . . . . . . . . . . . . . . . . . . . . . . 166
Cruise control* (Cruise control system - CCS) . . 169
Lane Assist system* . . . . . . . . . . . . . . . . . . . . . . 172
Sign Assist* . . . . . . . . . . . . . . . . . . . . . . . . . . . . 174 Tiredness detection (recommendation to take
a break) . . . . . . . . . . . . . . . . . . . . . . . . . . . . . . . . 176
Tyre monitoring systems . . . . . . . . . . . . . . . . . . 177
Towing bracket device
. . . . . . . . . . . . . . . . . . . . 179
Driving with a trailer . . . . . . . . . . . . . . . . . . . . . . 179
Advice . . . . . . . . . . . . . . . . . . . . . . . . . . . . . . . . 189
Care and maintenance . . . . . . . . . . . . . . . . . . . . 189
Accessories, replacement of parts and
modifications . . . . . . . . . . . . . . . . . . . . . . . . . . . 189
Care and cleaning the vehicle exterior . . . . . . . 195
Caring for and cleaning the vehicle interior . . . 200
Notes for the user . . . . . . . . . . . . . . . . . . . . . . . . 205
Checking and refilling levels . . . . . . . . . . . . . . . 206
Filling the tank . . . . . . . . . . . . . . . . . . . . . . . . . . 206
Fuel . . . . . . . . . . . . . . . . . . . . . . . . . . . . . . . . . . . 209
Selective catalytic reduction* (AdBlue) . . . . . . 212
Working in the engine compartment . . . . . . . . 214
Engine oil . . . . . . . . . . . . . . . . . . . . . . . . . . . . . . 218
Engine coolant . . . . . . . . . . . . . . . . . . . . . . . . . . 221
Brake fluid . . . . . . . . . . . . . . . . . . . . . . . . . . . . . 225
Checking and topping up the windscreen
washer reservoir with water . . . . . . . . . . . . . . . . 226
Vehicle battery . . . . . . . . . . . . . . . . . . . . . . . . . . 227
Wheels and tyres . . . . . . . . . . . . . . . . . . . . . . . . 231
Wheels . . . . . . . . . . . . . . . . . . . . . . . . . . . . . . . . 231
Winter service . . . . . . . . . . . . . . . . . . . . . . . . . . . 241
Emergencies . . . . . . . . . . . . . . . . . . . . . . . . . . . . 242
In case of emergency . . . . . . . . . . . . . . . . . . . . . 242
Vehicle tool kit* . . . . . . . . . . . . . . . . . . . . . . . . . 244
Changing a wheel* . . . . . . . . . . . . . . . . . . . . . . . 246
Tyre repair . . . . . . . . . . . . . . . . . . . . . . . . . . . . . . 250
Starting assistance . . . . . . . . . . . . . . . . . . . . . . 253
Towing and tow starting . . . . . . . . . . . . . . . . . . . 255
3
Page 124 of 305
Operation
Air conditioning
Air conditioner Introduction Viewing Climatronic information
The factory-fitted radio or navigation system
screen briefly displays information relating to
Climatronic.
The units of temperature measurement is dis-
played on the factory-installed radio or navi-
gation system and, depending on the vehicle
equipment, can be set using the
Configura-
tion menu on the instrument panel. WARNING
Reduced visibility through the windows in-
creases the risk of serious accidents.
● Ensure that all windows are free of ice and
snow and that they are not fogged up pre-
venting a clear view of everything outside.
● The maximum heat output required to de-
frost windows quickly is only available when
the engine has reached its normal running
temperature. Only drive when you have good
visibility. ●
Always ensure that you use the air condi-
tioner and heated rear window to maintain
good visibility.
● Never leave the air recirculation on for a
long period of time. If the cooling system is
switched off and air recirculation mode
switched on, the windows can mist over very
quickly, considerably limiting visibility.
● Switch air recirculation mode off when it is
not required. WARNING
Stuffy or used air will increase fatigue and re-
duce driver concentration possibly resulting
in a serious accident.
● Never leave the fresh air fan turned off or
use the air recirculation for long periods of
time; the air in the vehicle interior will not be
refreshed. CAUTION
● Switch the air conditioner off if you think it
may be broken. This will avoid additional
damage. Have the air conditioner checked by
a specialised workshop.
● Repairs to the air conditioner require spe-
cialist knowledge and special tools. SEAT rec-
ommends taking your car in for technical
service. ●
Do not smoke when air recirculation is
switched on in vehicles with an air condition-
er. The smoke taken in could lie on the cool-
ing system vaporiser and on the activated
charcoal cartridge of the dust and pollen fil-
ter, leading to a permanently unpleasant
smell. Note
● When the cooling system is turned off, air
coming from the outside will not be dried. To
avoid fogging up the windows, SEAT recom-
mends leaving the cooler (compressor) on. To
do this, press the A/C button. The button
lamp should light up.
● If the humidity and temperature outside the
vehicle are high, condensation can drip off
the evaporator in the cooling system and
form a pool underneath the vehicle, this is
completely normal and there is no need to
suspect a leak.
● Keep the air intake slots in front of the
windscreen free of snow, ice and leaves to en-
sure heating and cooling are not impaired,
and to prevent the windows from misting
over. 122
Page 125 of 305
Air conditioning
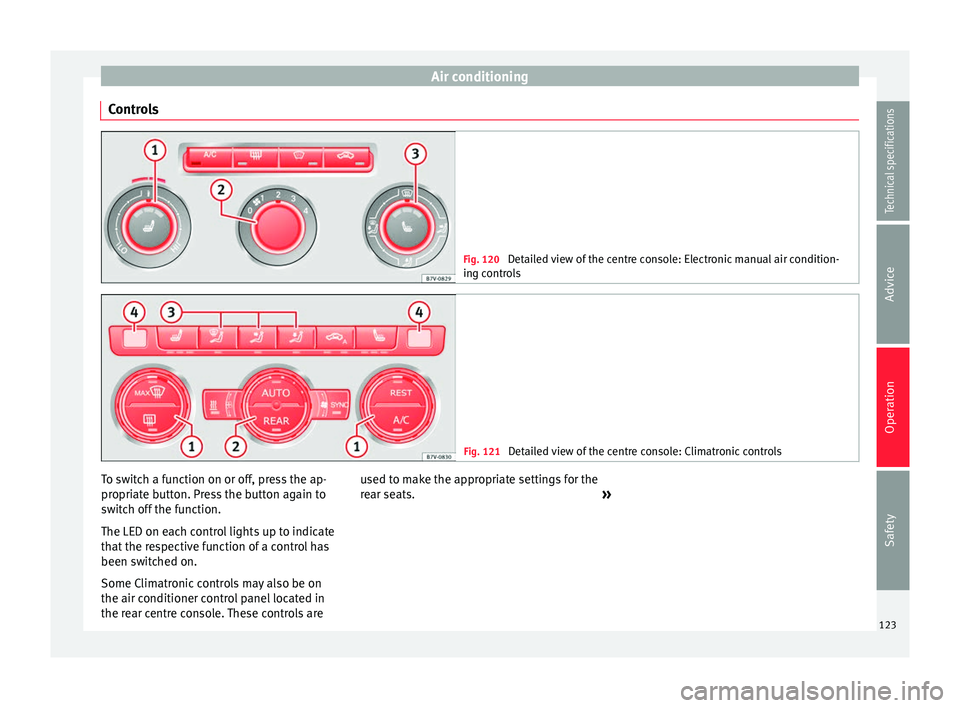
Controls Fig. 120
Detailed view of the centre console: Electronic manual air condition-
ing controls Fig. 121
Detailed view of the centre console: Climatronic controls To switch a function on or off, press the ap-
propriate button. Press the button again to
switch off the function.
The LED on each control lights up to indicate
that the respective function of a control has
been switched on.
Some Climatronic controls may also be on
the air conditioner control panel located in
the rear centre console. These controls are
used to make the appropriate settings for the
rear seats.
»
123Technical specifications
Advice
Operation
Safety
Page 126 of 305
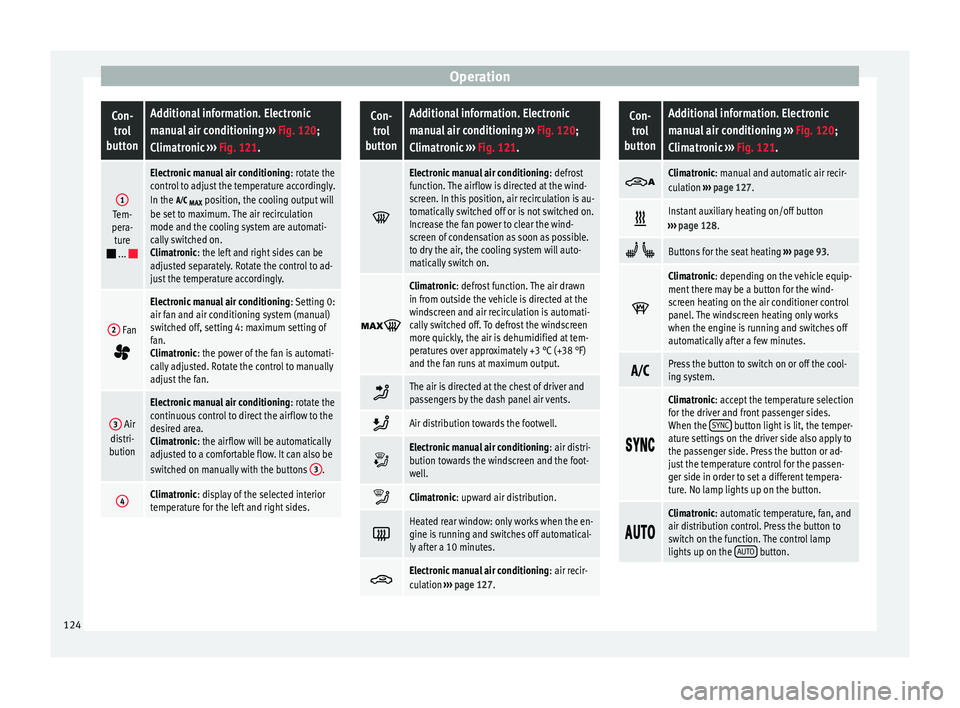
OperationCon-
trol
buttonAdditional information. Electronic
manual air conditioning ››› Fig. 120;
Climatronic ››› Fig. 121.
1Tem-
pera- ture
...
Electronic manual air conditioning : rotate the
control to adjust the temperature accordingly.
In the
MAX position, the cooling output will
be set to maximum. The air recirculation
mode and the cooling system are automati-
cally switched on.
Climatronic: the left and right sides can be
adjusted separately. Rotate the control to ad-
just the temperature accordingly.
2 Fan
Electronic manual air conditioning : Setting 0:
air fan and air conditioning system (manual)
switched off, setting 4: maximum setting of
fan.
Climatronic: the power of the fan is automati-
cally adjusted. Rotate the control to manually
adjust the fan.
3 Air
distri-
bution
Electronic manual air conditioning : rotate the
continuous control to direct the airflow to the
desired area.
Climatronic: the airflow will be automatically
adjusted to a comfortable flow. It can also be
switched on manually with the buttons 3
.
4Climatronic: display of the selected interior
temperature for the left and right sides.
Con-
trol
buttonAdditional information. Electronic
manual air conditioning ››› Fig. 120;
Climatronic ››› Fig. 121.
Electronic manual air conditioning
: defrost
function. The airflow is directed at the wind-
screen. In this position, air recirculation is au-
tomatically switched off or is not switched on.
Increase the fan power to clear the wind-
screen of condensation as soon as possible.
to dry the air, the cooling system will auto-
matically switch on.
Climatronic: defrost function. The air drawn
in from outside the vehicle is directed at the
windscreen and air recirculation is automati-
cally switched off. To defrost the windscreen
more quickly, the air is dehumidified at tem-
peratures over approximately +3 °C (+38 °F)
and the fan runs at maximum output.
The air is directed at the chest of driver and
passengers by the dash panel air vents.
Air distribution towards the footwell.
Electronic manual air conditioning
: air distri-
bution towards the windscreen and the foot-
well.
Climatronic: upward air distribution.
Heated rear window: only works when the en-
gine is running and switches off automatical-
ly after a 10 minutes.
Electronic manual air conditioning
: air recir-
culation ››› page 127.
Con-
trol
buttonAdditional information. Electronic
manual air conditioning ››› Fig. 120;
Climatronic ››› Fig. 121.
Climatronic: manual and automatic air recir-
culation
››› page 127.
Instant auxiliary heating on/off button
››› page 128.
Buttons for the seat heating ››› page 93.
Climatronic: depending on the vehicle equip-
ment there may be a button for the wind-
screen heating on the air conditioner control
panel. The windscreen heating only works
when the engine is running and switches off
automatically after a few minutes.
Press the button to switch on or off the cool-
ing system.
Climatronic: accept the temperature selection
for the driver and front passenger sides.
When the
SYNC
button light is lit, the temper-
ature settings on the driver side also apply to
the passenger side. Press the button or ad-
just the temperature control for the passen-
ger side in order to set a different tempera-
ture. No lamp lights up on the button.
Climatronic: automatic temperature, fan, and
air distribution control. Press the button to
switch on the function. The control lamp
lights up on the
AUTO
button.124
Page 127 of 305
Air conditioningCon-
trol
buttonAdditional information. Electronic
manual air conditioning ››› Fig. 120;
Climatronic ››› Fig. 121.
Climatronic: press the
REAR button to adjust
the air conditioner for the rear seats from the
front seats. A lamp is lit on the REAR
button if
the feature is activated. The settings for the
rear seats will be displayed. Press the button
again to switch the function off or do not
touch any other button for around 10 sec-
onds.
Climatronic: Press the
REST button to use the
heat that the engine produces. When the en-
gine is still warm but the ignition switched
off, the heat given off by the engine can be
used to keep the vehicle interior warm. The REST
button will light up when the function is
switched on. The function will switch off after
around 30 minutes and if the battery level is
low.
a)
Switch off.
Electronic manual air conditioning
: turn the
fan switch to setting 0.
Climatronic: press the OFF
button or manual-
ly set the fan to 0. When the device is switch-
ed off the OFF
button will light up.
a)
Depending on the version of the model. Note
● Not all Climatronic buttons are operational
in REAR mode.
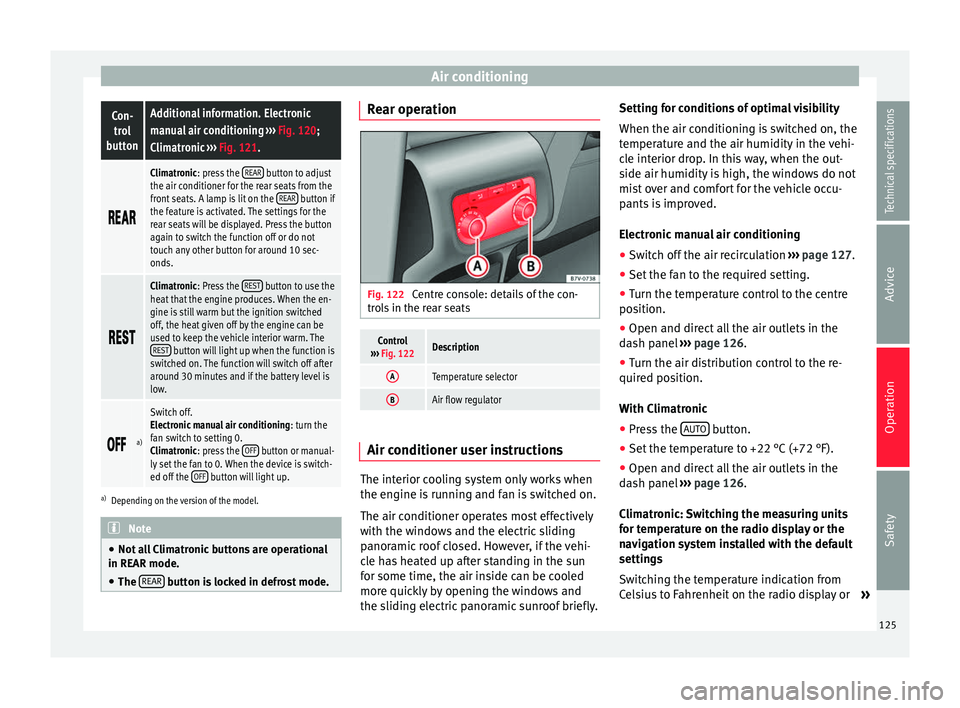
● The REAR button is locked in defrost mode. Rear operation
Fig. 122
Centre console: details of the con-
trols in the rear seats
Control
››› Fig. 122Description
ATemperature selector
BAir flow regulator Air conditioner user instructions
The interior cooling system only works when
the engine is running and fan is switched on.
The air conditioner operates most effectively
with the windows and the electric sliding
panoramic roof closed. However, if the vehi-
cle has heated up after standing in the sun
for some time, the air inside can be cooled
more quickly by opening the windows and
the sliding electric panoramic sunroof briefly.Setting for conditions of optimal visibility
When the air conditioning is switched on, the
temperature and the air humidity in the vehi-
cle interior drop. In this way, when the out-
side air humidity is high, the windows do not
mist over and comfort for the vehicle occu-
pants is improved.
Electronic manual air conditioning
● Switch off the air recirculation ››› page 127.
● Set the fan to the required setting.
● Turn the temperature control to the centre
position.
● Open and direct all the air outlets in the
dash panel ››› page 126 .
● Turn the air di
stribution control to the re-
quired position.
With Climatronic
● Press the AUTO button.
● Set the temperature to +22 °C (+72 °F).
● Open and direct all the air outlets in the
dash panel ››› page 126 .
C lim
atronic: Switching the measuring units
for temperature on the radio display or the
navigation system installed with the default
settings
Switching the temperature indication from
Celsius to Fahrenheit on the radio display or »
125
Technical specifications
Advice
Operation
Safety
Page 128 of 305
Operation
the navigation system is carried out in the
menu on the instrument panel ››› page 51.
The cooling system does not switch on
If the air conditioning system cannot be
switched on, this may be caused by the fol-
lowing:
● The engine is not running.
● The fan is switched off.
● The air conditioning fuse is blown. ●
The outside temperature is lower than ap-
proximately +3 °C (+38 °F).
● The air conditioner compressor has been
temporarily switched off because the engine
coolant temperature is too high.
● Another fault in the vehicle. Have the air
conditioner checked by a specialised work-
shop.
Things to note
If the humidity and temperature outside the
vehicle are high, condensation
can drip off the vaporiser in the cooling system and form
a pool underneath the vehicle. This is normal
and does not indicate a leak! Note
After starting the engine, any residual humid-
ity in the air conditioner could mist over the
windscreen. Switch on the defrost function as
soon as possible to clear the windscreen of
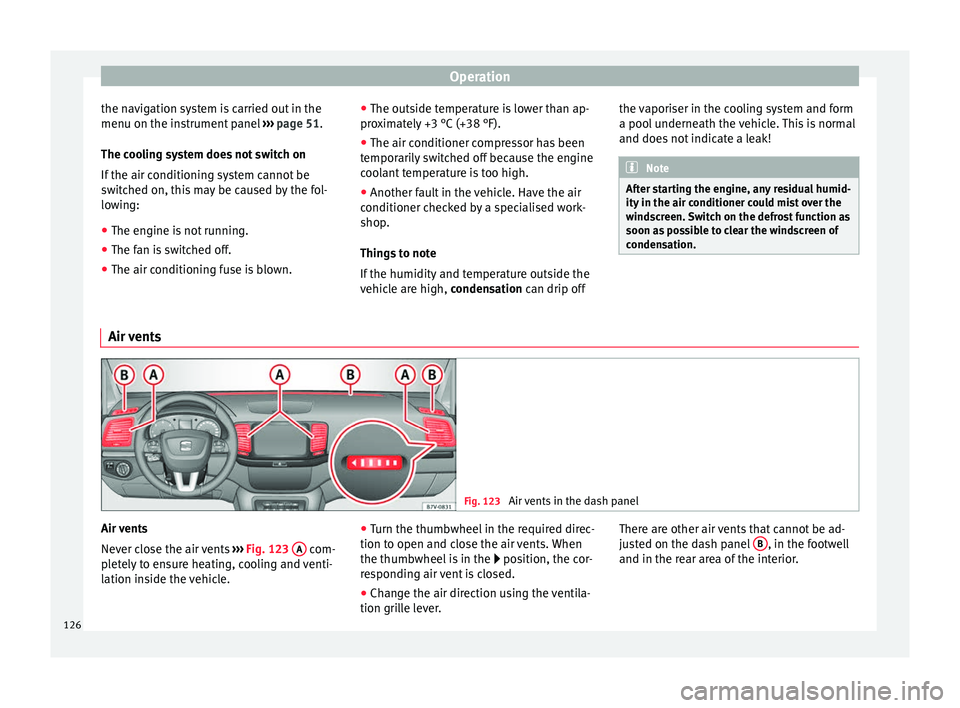
condensation. Air vents
Fig. 123
Air vents in the dash panel Air vents
Never close the air vents
››› Fig. 123 A com-
pletely to ensure heating, cooling and venti-
lation inside the vehicle. ●
Turn the thumbwheel in the required direc-
tion to open and close the air vents. When
the thumbwheel is in the position, the cor-
r e
sponding air vent is closed.
● Change the air direction using the ventila-
tion grille lever. There are other air vents that cannot be ad-
justed on the dash panel
B , in the footwell
and in the rear area of the interior.
126
Page 129 of 305
Air conditioning
CAUTION
Never place food, medicines or other heat-
sensitive objects close to the air vents. Being
heat-sensitive, they may be damaged or
made unsuitable for use by the air coming
from the air vents. Note
The air from the vents flows through the vehi-
cle interior and out through the outlets below
the rear window. The slots must not be cov-
ered with items of clothing or other objects. Air recirculation mode
Air recirculation mode prevents the ambient
air from entering the interior.
When the outside temperature is very high,
selecting manual air recirculation mode for a
short period refreshes the vehicle interior
more quickly.
For safety reasons, air recirculation mode is
switched off when the
button is press-
ed or the air distributor turned to ››› .
Switching the recirculation mode on and off
manually on the air conditioning (Electronic
manual air conditioning)
Switching on : press the button
u
nti l the
lamp on the button lights up. Switching off: press the button
until the
lamp on the button switches off.
Switching the recirculation mode on and off
manually on the Climatronic
Switching on: press the button until the
l
amp on the button lights up.
Switching off
: press the button until the
lamp on the button switches off.
Automatic air recirculation mode
Fresh air enters the vehicle interior in posi-
tion . If the system detects a high con-
centration of hazardous substances in the
ambient air, air recirculation mode is switch-
ed on automatically. When the level of impur-
ities drops to within a normal range, recircu-
lation mode is switched off.
The system is unable to detect unpleasant
smells.
With the following outside temperatures and
conditions the air recirculation does not
switch on automatically:
● The cooling system is switched on (the A/C button is lit up) and the outside temperature
is below +3 °C (+38 °F).
● The cooling system and the windscreen
wipers are switched off and the outside tem-
perature is below +10 °C (+50 °F).
● The cooling system is switched off and the
outside temperature is below +15 °C (+59 °F). The windscreen wiper is switched
on.
Switching the automatic air recirculation
mode on and off
Switching on
: press the button
until the
right
lamp on the button lights up.
Switching off
: press the button until all
the lamps on the button are switched off.
Switching the automatic air recirculation
mode off temporarily
● Press the button once to temporarily
switch to manual air recirculation mode in
the event of unpleasant smells from outside.
The left indicator lamp turns on.
● After more than two seconds, press the
button again to restart automatic air recircu-
lation. The right indicator lamp turns on. WARNING
Observe the safety warnings ››› in Intro-
duction on page 122.
● If the c
ooling system is switched off and air
recirculation mode switched on, the windows
can mist over very quickly, considerably limit-
ing visibility.
● Switch air recirculation mode off when it is
not required. » 127
Technical specifications
Advice
Operation
Safety
Page 131 of 305
Air conditioning
burn any fuel remaining in the auxiliary heat-
er. The exhaust gases are also extracted from
the system.
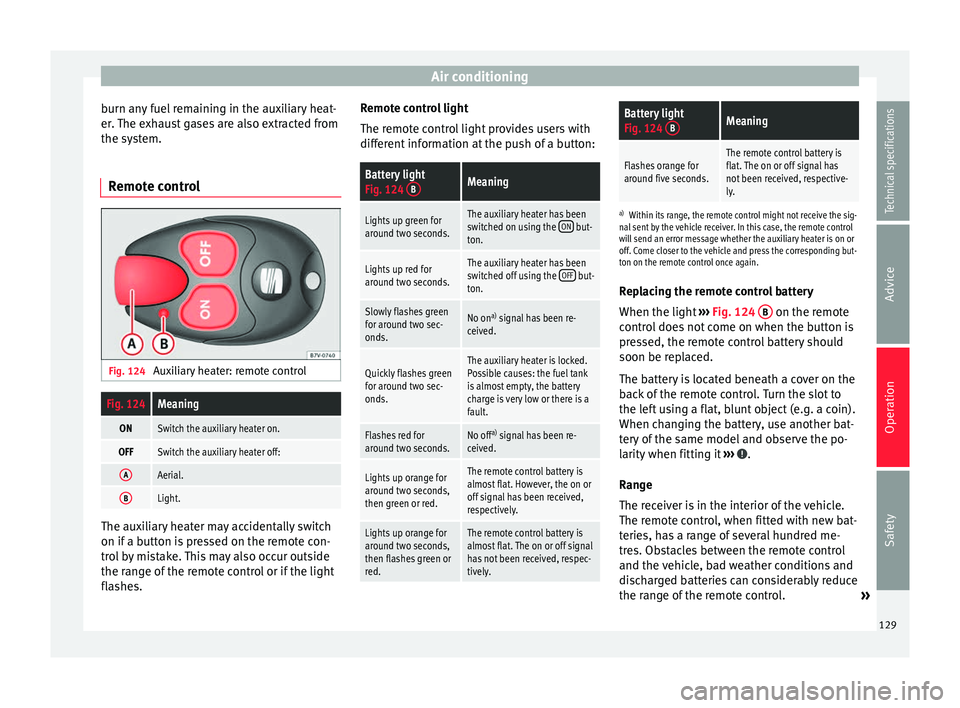
Remote control Fig. 124
Auxiliary heater: remote controlFig. 124Meaning
ONSwitch the auxiliary heater on.
OFFSwitch the auxiliary heater off:
AAerial.
BLight. The auxiliary heater may accidentally switch
on if a button is pressed on the remote con-
trol by mistake. This may also occur outside
the range of the remote control or if the light
flashes. Remote control light
The remote control light provides users with
different information at the push of a button:
Battery light
Fig. 124
BMeaning
Lights up green for
around two seconds.The auxiliary heater has been
switched on using the ON but-
ton.
Lights up red for
around two seconds.The auxiliary heater has been
switched off using the OFF but-
ton.
Slowly flashes green
for around two sec-
onds.No on a)
signal has been re-
ceived.
Quickly flashes green
for around two sec-
onds.The auxiliary heater is locked.
Possible causes: the fuel tank
is almost empty, the battery
charge is very low or there is a
fault.
Flashes red for
around two seconds.No off a)
signal has been re-
ceived.
Lights up orange for
around two seconds,
then green or red.The remote control battery is
almost flat. However, the on or
off signal has been received,
respectively.
Lights up orange for
around two seconds,
then flashes green or
red.The remote control battery is
almost flat. The on or off signal
has not been received, respec-
tively.
Battery light
Fig. 124 BMeaning
Flashes orange for
around five seconds.The remote control battery is
flat. The on or off signal has
not been received, respective-
ly.
a)
Within its range, the remote control might not receive the sig-
nal sent by the vehicle receiver. In this case, the remote control
will send an error message whether the auxiliary heater is on or
off. Come closer to the vehicle and press the corresponding but-
ton on the remote control once again.
Replacing the remote control battery
When the light ›››
Fig. 124 B on the remote
control does not come on when the button is
pressed, the remote control battery should
soon be replaced.
The battery is located beneath a cover on the
back of the remote control. Turn the slot to
the left using a flat, blunt object (e.g. a coin).
When changing the battery, use another bat-
tery of the same model and observe the po-
larity when fitting it ››› .
Range
The receiver is in the interior of the vehicle.
The remote control, when fitted with new bat-
teries, has a range of several hundred me-
tres. Obstacles between the remote control
and the vehicle, bad weather conditions and
discharged batteries can considerably reduce
the range of the remote control. »
129
Technical specifications
Advice
Operation
Safety
Page 152 of 305
Operation
Think ahead and “flow” with the traffic
Frequent acceleration and braking considera-
bly increase fuel consumption. If you think
ahead as you drive and keep a safe distance
from the vehicle in front, it is possible to slow
down by simply lifting your foot off the accel-
erator. This eliminates the need for constant
braking and acceleration.
Calm and steady driving
Constancy is more important than speed: The
more you drive at a constant speed, the lower
the fuel consumption.
When driving on the motorway, it is more effi-
cient to drive at a constant and more moder-
ate speed than to be continuously accelerat-
ing and braking. As a general rule, you will
reach your destination just as quickly when
you drive at a constant speed.
The cruise control function helps you to ach-
ieve a constant style of driving.
Moderate use of additional devices
It is important to travel in comfort, but con-
venience systems should be used ecological-
ly.
Some equipment, when connected, increase
fuel consumption considerably, for example:
● Air conditioning cooling system: If the air
conditioning system is required to cool to
significantly lower temperatures than the true outside temperature, it will require a large
amount of energy from the engine. Therefore,
we recommend that the selected temperature
for the vehicle is not too different to the out-
side temperature. It is a good idea to air the
vehicle before starting your journey and to
drive a short distance with all the windows
open. Only then should you close all the win-
dows and switch on the air conditioning.
Keep windows closed when travelling at high
speeds. Driving with the windows open in-
creases fuel consumption.
●
Switch off the seat heating when the seats
have warmed up.
● Switch off the heated rear window and the
windscreen heating when the windows have
demisted and are free of ice.
● Do not leave the auxiliary heater switched
on when the vehicle is moving ››› page 128.
Avoid short journeys
Fuel consumption is much higher when the
engine is cold, immediately after it has been
started. It takes a few kilometres of driving
for the engine to warm up and to normalise
consumption.
The engine and catalytic converter need to
reach their proper working temperature in or-
der t o minimi
se fuel consumption and emis-
sions. The ambient temperature has a deci-
sive influence. Fig. 133 shows the difference in consump-
tion for the same journey at +20 °C (+68 °F)
and at -10 °C (+14 °F).
Therefore, unnecessary short journeys
should be avoided. Try to combine trips.
The vehicle uses more fuel in winter than in
summer, even when other conditions are the
same.
“Warming” the engine is not only forbidden
in some countries, but in practice it is techni-
cally superfluous as it is a waste of fuel.
Adjusting type pressures.
Having the correct pressure in your tyres
helps to reduce rolling resistance and, as a
result reduces fuel consumption. Increasing
the tyre pressure slightly (+0.2 bar
[2.9 psi/20 kPa]) can help to save fuel.
If you are prepared to accept a slight reduc-
tion in comfort, the tyres may be filled to the
pressures recommended for a fully-loaded
vehicle. This is also valid when driving alone
without luggage.
When you buy new tyres, make sure they are
optimised for minimum rolling resistance.
Use low friction engine oil
The use of low viscosity totally synthetic oils,
known as low friction engine oil, helps to re-
duce fuel consumption. These oils reduce the
resistance caused by friction in the engine,
150
Page 160 of 305
Operation
CAUTION
Before entering an automatic car wash, al-
ways switch the Auto Hold function off, as it
could be damaged when the electronic park-
ing brake automatically engages. Start-Stop Function*
Fig. 136
Detailed view of the centre console:
Start-Stop function button With the Start-Stop system enabled, the en-
gine is automatically stopped when the vehi-
cle is at a standstill. The engine restarts auto-
matically when required.
The function is enabled automatically when-
ever the ignition is switched on. The instru-
ment panel displays information on the cur-
rent status. Vehicles with a manual gearbox
● When the vehicle is at a standstill, leave it
in neutral and take your foot off the clutch.
The engine switches off.
● Simply depress the clutch pedal to move
off again.
Vehicles with an automatic gearbox
● When the vehicle is at a standstill, depress
the brake or keep it pressed down. The en-
gine switches off.
● The engine will start again as soon as you
release the brake pedal.
● With the selector lever set to position P, the
en gine w
ill not start until a range of gears is
selected or the accelerator pedal is de-
pressed.
Important conditions for the engine to
automatically switch off
● The driver seat belt must be buckled.
● The driver door must be closed.
● The bonnet must be closed.
● The factory-fitted towing bracket must not
be electrically connected to a trailer.
● A minimum engine temperature has been
reached.
● The steering wheel must not be turned
more than 270 degrees.
● The vehicle has moved since the last stop. ●
In vehicles with Climatronic: the tempera-
ture inside the vehicle is within the pre-set
temperature range.
● The temperature set is neither very high nor
very low.
● The air conditioning defrost function is not
switched on.
● In vehicles with Climatronic: the blower has
not been manually set to a high speed.
● The power level of the vehicle's battery is
sufficient.
● The vehicle's battery temperature is neither
too high nor too low.
● The vehicle is not on a steep gradient or
slope.
● The front wheels are not overly turned.
● The heated windscreen is not switched on.
● Reverse gear is not engaged.
● The park assist system is not switched on.
Conditions for automatically restarting the
engine
The engine may automatically restart under
the following conditions:
● If the vehicle interior is too hot or too cold.
● If the vehicle moves.
● If the vehicle's battery voltage drops.
158