brake Seat Alhambra 2015 Owner's Manual
[x] Cancel search | Manufacturer: SEAT, Model Year: 2015, Model line: Alhambra, Model: Seat Alhambra 2015Pages: 305, PDF Size: 5.46 MB
Page 5 of 305
Table of Contents
Table of Contents
Safety . . . . . . . . . . . . . . . . . . . . . . . . . . . . . . . . 5
Safe driving . . . . . . . . . . . . . . . . . . . . . . . . . . . . 5
Safety first! . . . . . . . . . . . . . . . . . . . . . . . . . . . . . 5
Tips for driving . . . . . . . . . . . . . . . . . . . . . . . . . . 5
Sitting position for occupants . . . . . . . . . . . . . . 6
Pedal area . . . . . . . . . . . . . . . . . . . . . . . . . . . . . . 9
Seat belts . . . . . . . . . . . . . . . . . . . . . . . . . . . . . . 10
The whys and wherefores of seat belts . . . . . . . 10
How to properly adjust your seatbelt . . . . . . . . 14
Seat belt tensioners . . . . . . . . . . . . . . . . . . . . . . 17
Airbag system . . . . . . . . . . . . . . . . . . . . . . . . . . 18
Brief introduction . . . . . . . . . . . . . . . . . . . . . . . . 18
General overview of the airbag . . . . . . . . . . . . . 20
Deactivating airbags . . . . . . . . . . . . . . . . . . . . . 25
Transporting children safely . . . . . . . . . . . . . . . 26
Child safety . . . . . . . . . . . . . . . . . . . . . . . . . . . . . 26
Integrated child seat . . . . . . . . . . . . . . . . . . . . . 33
Operation . . . . . . . . . . . . . . . . . . . . . . . . . . . . . 39
Cockpit . . . . . . . . . . . . . . . . . . . . . . . . . . . . . . . . 39
Overview . . . . . . . . . . . . . . . . . . . . . . . . . . . . . . . 38
Instruments . . . . . . . . . . . . . . . . . . . . . . . . . . . . 40
Control lamps . . . . . . . . . . . . . . . . . . . . . . . . . . . 45
SEAT information system . . . . . . . . . . . . . . . . . . 47
Three button unit in headliner . . . . . . . . . . . . . . 53
Opening and closing . . . . . . . . . . . . . . . . . . . . . 54
Vehicle key set . . . . . . . . . . . . . . . . . . . . . . . . . . 54
Central locking and locking system . . . . . . . . . 57
Doors . . . . . . . . . . . . . . . . . . . . . . . . . . . . . . . . . . 63
Sliding doors . . . . . . . . . . . . . . . . . . . . . . . . . . . 64
Rear lid . . . . . . . . . . . . . . . . . . . . . . . . . . . . . . . . 66
Electric windows . . . . . . . . . . . . . . . . . . . . . . . . . 70
Panoramic sliding sunroof* . . . . . . . . . . . . . . . . 72 Lights and visibility
. . . . . . . . . . . . . . . . . . . . . . 74
Lights . . . . . . . . . . . . . . . . . . . . . . . . . . . . . . . . . 74
Visibility . . . . . . . . . . . . . . . . . . . . . . . . . . . . . . . 80
Windscreen wiper and window wiper systems . 81
Rear vision mirror . . . . . . . . . . . . . . . . . . . . . . . . 85
Seats and head restraints . . . . . . . . . . . . . . . . . 88
Adjusting the seats and head restraints . . . . . . 88
Seat functions . . . . . . . . . . . . . . . . . . . . . . . . . . 93
Transport and practical equipment . . . . . . . . . 98
Transporting objects . . . . . . . . . . . . . . . . . . . . . 98
Loading luggage compartment . . . . . . . . . . . . . 100
Roof carrier system* . . . . . . . . . . . . . . . . . . . . . . 110
Storage compartments . . . . . . . . . . . . . . . . . . . 112
Drink holders . . . . . . . . . . . . . . . . . . . . . . . . . . . 117
Ashtray and cigarette lighter* . . . . . . . . . . . . . . 118
Power sockets . . . . . . . . . . . . . . . . . . . . . . . . . . . 119
Air conditioning . . . . . . . . . . . . . . . . . . . . . . . . . 122
Air conditioner . . . . . . . . . . . . . . . . . . . . . . . . . . 122
Auxiliary heater* (additional heater) . . . . . . . . 128
Driving . . . . . . . . . . . . . . . . . . . . . . . . . . . . . . . . 131
Address . . . . . . . . . . . . . . . . . . . . . . . . . . . . . . . . 131
Stopping and starting the engine . . . . . . . . . . . 133
Braking and parking . . . . . . . . . . . . . . . . . . . . . 137
Changing gear . . . . . . . . . . . . . . . . . . . . . . . . . . 143
Run-in and economical driving . . . . . . . . . . . . . 148
Engine management and exhaust gas
purification system . . . . . . . . . . . . . . . . . . . . . . 151
Driving abroad . . . . . . . . . . . . . . . . . . . . . . . . . . 153
Driving along flooded roadways . . . . . . . . . . . . 153
Driver assistance systems . . . . . . . . . . . . . . . . . 154
Braking and stability systems . . . . . . . . . . . . . . 154
Start assist systems . . . . . . . . . . . . . . . . . . . . . . 156
Parking sensor system* . . . . . . . . . . . . . . . . . . . 159
Park Assist system* . . . . . . . . . . . . . . . . . . . . . . 162
Rear Assist system* . . . . . . . . . . . . . . . . . . . . . . 166
Cruise control* (Cruise control system - CCS) . . 169
Lane Assist system* . . . . . . . . . . . . . . . . . . . . . . 172
Sign Assist* . . . . . . . . . . . . . . . . . . . . . . . . . . . . 174 Tiredness detection (recommendation to take
a break) . . . . . . . . . . . . . . . . . . . . . . . . . . . . . . . . 176
Tyre monitoring systems . . . . . . . . . . . . . . . . . . 177
Towing bracket device
. . . . . . . . . . . . . . . . . . . . 179
Driving with a trailer . . . . . . . . . . . . . . . . . . . . . . 179
Advice . . . . . . . . . . . . . . . . . . . . . . . . . . . . . . . . 189
Care and maintenance . . . . . . . . . . . . . . . . . . . . 189
Accessories, replacement of parts and
modifications . . . . . . . . . . . . . . . . . . . . . . . . . . . 189
Care and cleaning the vehicle exterior . . . . . . . 195
Caring for and cleaning the vehicle interior . . . 200
Notes for the user . . . . . . . . . . . . . . . . . . . . . . . . 205
Checking and refilling levels . . . . . . . . . . . . . . . 206
Filling the tank . . . . . . . . . . . . . . . . . . . . . . . . . . 206
Fuel . . . . . . . . . . . . . . . . . . . . . . . . . . . . . . . . . . . 209
Selective catalytic reduction* (AdBlue) . . . . . . 212
Working in the engine compartment . . . . . . . . 214
Engine oil . . . . . . . . . . . . . . . . . . . . . . . . . . . . . . 218
Engine coolant . . . . . . . . . . . . . . . . . . . . . . . . . . 221
Brake fluid . . . . . . . . . . . . . . . . . . . . . . . . . . . . . 225
Checking and topping up the windscreen
washer reservoir with water . . . . . . . . . . . . . . . . 226
Vehicle battery . . . . . . . . . . . . . . . . . . . . . . . . . . 227
Wheels and tyres . . . . . . . . . . . . . . . . . . . . . . . . 231
Wheels . . . . . . . . . . . . . . . . . . . . . . . . . . . . . . . . 231
Winter service . . . . . . . . . . . . . . . . . . . . . . . . . . . 241
Emergencies . . . . . . . . . . . . . . . . . . . . . . . . . . . . 242
In case of emergency . . . . . . . . . . . . . . . . . . . . . 242
Vehicle tool kit* . . . . . . . . . . . . . . . . . . . . . . . . . 244
Changing a wheel* . . . . . . . . . . . . . . . . . . . . . . . 246
Tyre repair . . . . . . . . . . . . . . . . . . . . . . . . . . . . . . 250
Starting assistance . . . . . . . . . . . . . . . . . . . . . . 253
Towing and tow starting . . . . . . . . . . . . . . . . . . . 255
3
Page 9 of 305
Safe driving
If your physical constitution prevents you
from maintaining the correct sitting position,
contact a specialised workshop for help with
any special devices. The seat belt and airbag
can only provide optimum protection if a cor-
rect sitting position is adopted. SEAT recom-
mends taking your car in for technical serv-
ice.
For your own safety and to reduce the risk of
injury in the event of an accident or sudden
braking or manoeuvre, SEAT recommend the
following positions:
Valid for all vehicle occupants:
● Adjust the head restraint so that its upper
edge is at the same level as the top of your
head, or as close as possible to the same lev-
el as the top of your head and under no cir-
cumstances below eye level. Keep the back
of your neck as close as possible to the head
restraint ››› Fig. 1 and
›
›› Fig. 2.
● Short people must lower the head restraint
completely, even if your head is below its up-
per edge.
● Tall people must raise the head restraint
completely.
● Adjust the seat backrest to an upright posi-
tion so that your back rests completely
against it.
● Always keep your feet in the footwell while
the vehicle is in motion. ●
Adjust and fasten your seat belt correctly
››› page 14.
Al
so valid for the driver:
● Adjust the steering wheel so that there is a
distance of at least 25 cm (10 inches) be-
tween it and your chest ››› Fig. 1 and so that
you c
an hold the steering wheel with both
hands on the outside of the ring at the 9
o'clock and 3 o'clock positions with your
arms slightly bent.
● The adjusted steering wheel must face your
chest and not your face.
● Adjust the driver seat forwards or back-
wards so that you are able to press the accel-
erator, brake and clutch pedals to the floor
with your knees slightly angled and the dis-
tance between your knees and the dash pan-
el is at least 10 cm (4 inches) ››› Fig. 1
.
● Adjust the height of the driver seat so that
you can easily reach the top of the steering
wheel.
● Keep both feet in the footwell so that you
have the vehicle under control at all times.
Also valid for the front passenger:
● Move the front passenger seat back as far
as possible for optimum protection should
the airbag deploy. Adjusting the steering wheel position
Fig. 3
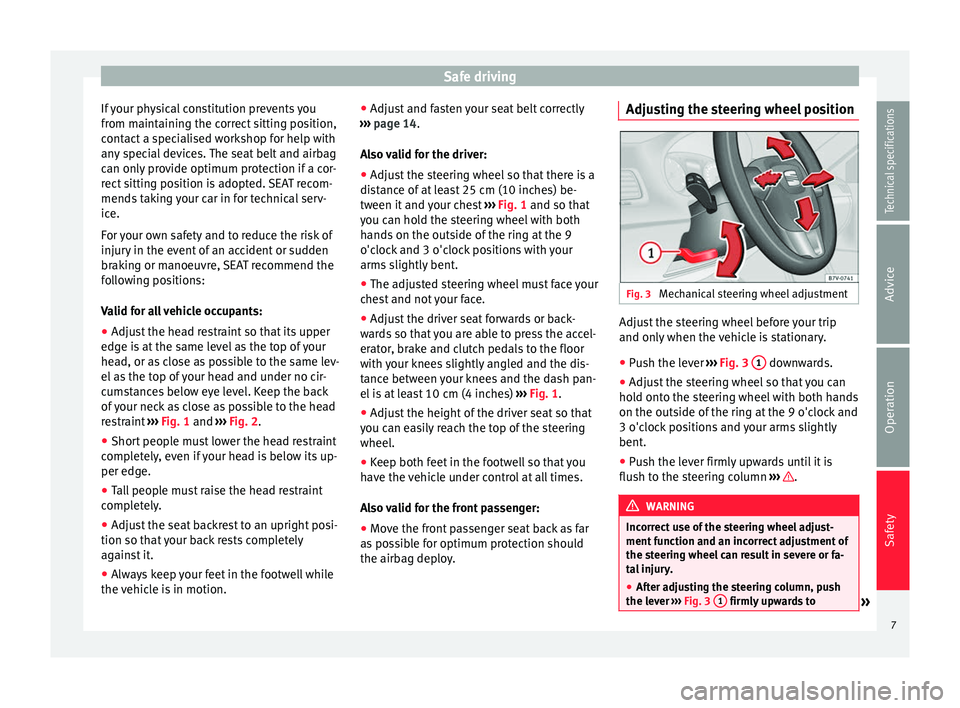
Mechanical steering wheel adjustment Adjust the steering wheel before your trip
and only when the vehicle is stationary.
●
Push the lever ››› Fig. 3 1 downwards.
● Adjust the steering wheel so that you can
hold onto the steering wheel with both hands
on the outside of the ring at the 9 o'clock and
3 o'clock positions and your arms slightly
bent.
● Push the lever firmly upwards until it is
flush to the steering column ››› .
WARNING
Incorrect use of the steering wheel adjust-
ment function and an incorrect adjustment of
the steering wheel can result in severe or fa-
tal injury.
● After adjusting the steering column, push
the lever ››› Fig. 3 1 firmly upwards to
» 7
Technical specifications
Advice
Operation
Safety
Page 11 of 305
Safe driving
●
Always keep your feet in the footwell while
the vehicle is in motion. Never, for example,
put your feet on the surface of a seat or on
the dash panel and never put them out of a
window. Otherwise the airbag and seat belt
offer insufficient protection and the risk of in-
jury in the event of an accident is increased. WARNING
Before every trip, adjust the seat, the seat
belt and the head restraints and instruct your
passengers to fasten their seat belts proper-
ly.
● Move the front passenger seat back as far
as possible.
● Adjust the driver seat so that there is a dis-
tance of at least 25 cm (10 inches) between
the centre of your chest and the hub of the
steering wheel. Adjust the driver seat so that
you are able to press the accelerator, brake
and clutch pedals to the floor with your knees
slightly angled and that the distance be-
tween your knees and the dash panel is at
least 10 cm (4 inches). If your physical consti-
tution prevents you from meeting these re-
quirements, contact a specialised workshop
to make any modifications required.
● Never drive with the seat backrest tilted far
back. The further the seat backrests are tilted
to the rear, the greater the risk of injury due
to incorrect positioning of the belt web or to
the incorrect sitting position!
● Never drive with the seat backrest tilted
forwards. Should a front airbag deploy, it could throw the seat backrest backwards and
injure the passengers of the rear seats.
●
Sit as far away as possible from the steer-
ing wheel and the dash panel.
● Keep your back straight and resting com-
pletely against the seat backrest and the
front seats correctly adjusted. Never place
any part of your body in the area of the airbag
or very close to it.
● If passengers on the rear seats are not sit-
ting in an upright position, the risk of severe
injury due to incorrect positioning of the belt
web increases. WARNING
Incorrect seat adjustment may lead to acci-
dents and severe injuries.
● Only adjust the seats when the vehicle is
stationary, as the seats could move unex-
pectedly while the vehicle is in motion and
you could lose control of the vehicle. Further-
more, an incorrect position is adopted when
adjusting the seat.
● Only adjust the height, seat backrest and
forwards or backwards position of the seat
when there is nobody in the seat adjustment
area.
● There must be no objects blocking the seat
adjustment area.
● Only adjust the height, angle and longitu-
dinal position of the rear seats when nobody
is in the way. ●
The seat adjustment and lock areas must
be kept clean. Pedal area
Pedals Do not allow floor mats or other objects to
obstruct the free passage of the pedals.
Floor mats should leave the pedal area free
and unobstructed and be correctly secured in
the footwell zone.
In the event of failure of a brake circuit, the
brake pedal must be pressed harder than
normal to brake the vehicle.
WARNING
Objects falling into the driver's footwell could
prevent use of the pedals. This could lead the
driver to lose control of the vehicle, increas-
ing the risk of a serious accident.
● Make sure the pedals can be used at all
times, with no objects rolling underneath
them.
● Always secure the mat in the footwell.
● Never place other mats or rugs on top of
the original mat supplied by the factory.
● Ensure that no objects can fall into the driv-
er's footwell while the vehicle is in motion. » 9Technical specifications
Advice
Operation
Safety
Page 12 of 305
Safety
CAUTION
The pedals must always have free and unob-
structed passage to the floor. For example, in
case of a fault in the brake circuit, the brake
pedal will need to be pressed further to stop
the vehicle. To press the brake pedal down
further will require more force than usual. Seat belts
The whys and wherefores of
seat belts Introduction Check the condition of all the seat belts at
regular intervals. If you notice that the belt
webbing, fittings, retractor mechanism or
buckle of any of the belts is damaged, the
belt must be replaced immediately by a spe-
cialised workshop
››› . The specialised
workshop must use the appropriate spare
parts corresponding to the vehicle, the
equipment and the model year. SEAT recom-
mends taking your car in for technical serv-
ice. WARNING
Unbuckled or badly buckled seat belts in-
crease the risk of severe or even fatal inju-
ries. The seat belt cannot offer its full protec-
tion if it is not fastened and used correctly.
● Seat belts are the most effective way of re-
ducing the risk of sustaining severe or fatal
injuries in the event of an accident. Seat belts
must be correctly fastened when the vehicle
is in motion to protect the driver and all vehi-
cle occupants.
● Before each trip, every occupant in the ve-
hicle occupants must sit properly, correctly fasten the seat belt belonging to his or her
seat and keep it fastened throughout the trip.
This also applies to other vehicle occupants
when driving in town.
●
When travelling, children must be secured
in the vehicle with a child restraint system
suitable for their weight and height and with
the seat belts correctly fastened
››› page 26.
● Ins
truct your passengers to fasten their
seat belts properly before driving off.
● Insert the latch plate into the buckle for the
appropriate seat and ensure it is engaged.
Using the latch plate in the buckle of another
seat will not protect you properly and may
cause severe injuries.
● Do not allow liquids or foreign bodies to en-
ter the buckle fastenings. This could damage
the buckles and seat belts.
● Never unbuckle your seat belt when the ve-
hicle is moving.
● Never allow more than one passenger to
share the same seat belt.
● Never hold children or babies on your lap
sharing the same seat belt.
● Loose, bulky clothing (such as a jacket) im-
pairs the proper fit and function of the seat
belt. 10
Page 42 of 305
Operation
Key-operated switch in glove com-
partment for deactivating front pas-
senger front airbag . . . . . . . . . . . . . . .20
Passenger front airbag off warning
lamp . . . . . . . . . . . . . . . . . . . . . . . . . . . . . 20
Lever for:
– Manual gearbox . . . . . . . . . . . . . . . . 143
– Automatic gearbox . . . . . . . . . . . . .143
12 Volt power socket . . . . . . . . . . . . .119
Auto Hold Switch
- . . . . . . . . 156
Electronic parking brake switch 137
Start-up push button (Keyless Ac-
cess closing and start-up system)
21 22
23
24
25
26
27 Ignition lock
. . . . . . . . . . . . . . . . . . . . . . 133
Pedals . . . . . . . . . . . . . . . . . . . . . . . . . . . 143
Steering column adjustment lever .6
Fuse box cover . . . . . . . . . . . . . . . . . . . 264
Lever for:
– Cruise control system (CCS) –
– – /--/-- . . 169
Open bonnet lever . . . . . . . . . . . . . . . . 214
Controls for:
– Electric windows . . . . . . . . . . . . . 70
– Childproof locks . . . . . . . . . . . . . 63
28 29
30
31
32
33
34 Note
● Some of the items of equipment listed here
are fitted only on certain model versions or
are optional extras.
● In versions with the steering wheel on the
right, the layout of the control elements is
somewhat different. But the symbols as-
signed to the controls correspond to the sym-
bols used in the versions with the steering
wheel on the left Instruments
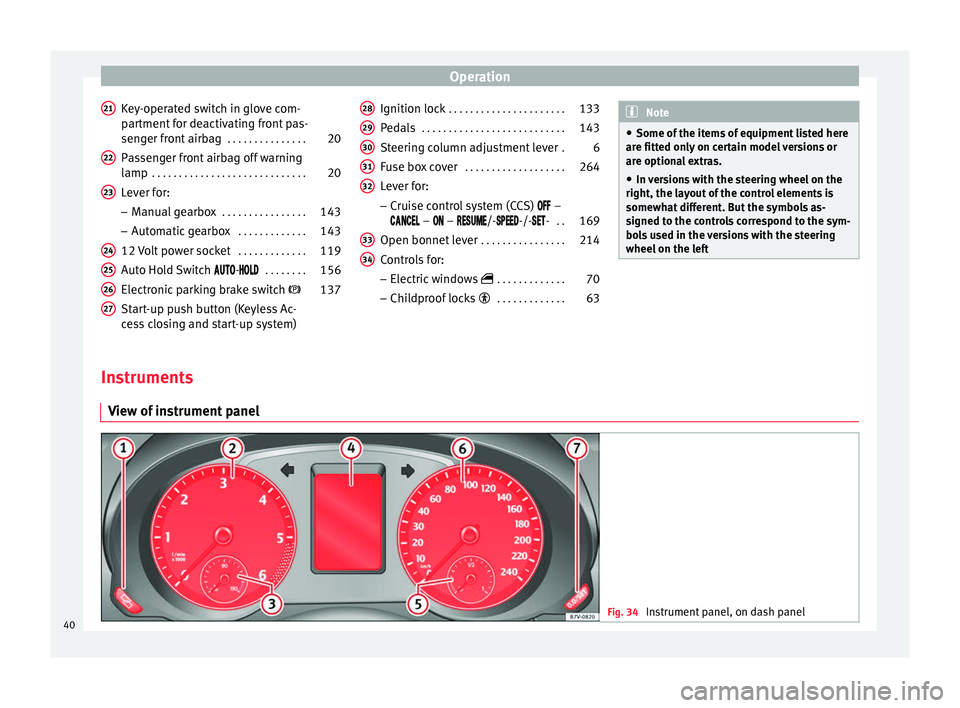
View of instrument panel Fig. 34
Instrument panel, on dash panel40
Page 46 of 305
Operation
Service interval display The service indication is shown on the dash
panel display
››› Fig. 34 4 .
SEAT distinguishes between services with en-
gine oi l
change (Interval Service) and serv-
ices without
engine oil change (Inspection
Service). The service interval display only
gives information for service dates which in-
volve an engine oil change. The dates for the
other services (e.g. the next Inspection Serv-
ice or change of brake fluid) are listed on the
label attached to the door strut, or in the
Maintenance Programme.
In vehicles with Services established by time
or mileage, the service intervals are already
pr e-defined.
In
vehicles with LongLife Service , the inter-
vals are determined individually. Technical
progress has made it possible to considera-
bly reduce servicing requirements. The tech-
nology used by SEAT ensures that your vehi-
cle only has an Interval Service when it is
necessary. To establish when the Interval
Service is due (max. 2 years), the vehicle's
conditions of use and individual driving
styles are considered. The service pre-warn-
ing first appears 20 days before the date es-
tablished for the corresponding service. The
kilometres (miles) remaining until the next
service are always rounded up to the nearest
100 km (miles) and the time is given in com-
plete days. The current service message can- not be viewed until 500 km after the last
service. Prior to this only lines are visible on
the display.
Inspection reminder
When the Service date is approaching, when
the ignition is switched on a
Service remind-
er
is displayed.
In
vehicles without text messages , a spanner
is displayed on the instrument panel with
a figure given in km. The number of kilome- tre
s shown is the maximum number that may
be driven until the next service. After a few
seconds, the display mode changes. A clock
symbol appears and the number of days until
the next service appointment is due.
In vehicles with text messages , Serv
ice in ---
km (miles) or --- days is displayed on the in- strument panel.
Service due
After the service date, an audible warning is
giv
en when the ignition is switched on and
the spanner displayed on the screen flashes
for a few seconds . In
vehicles with text
messages, Service in --- km or --- days is dis-
played on the instrument panel.
Reading a service notification
With the ignition switched on, the engine off
and the vehicle at a standstill, the current
service notification
can be read: ●
Press the button on the instrument pan-
el several times until the spanner symbol is
displayed
.
● OR:
select the Setting
s menu.
● From the
Service submenu, select the op-
tion Info.
When the service date has past , a minus
sign
is displayed in front of the number of kilome-
tres or days. In vehicles with text messages
the following is displayed: Service --- km
(miles) or --- days ago .
Resetting service interval display
If the service was not carried out by a techni-
cal service centre, the display can be reset as
follows:
In vehicles with text messages:
Select the Settings menu.
In the submenu Service, select the option Reset.
Confirm with OK when requested to do so by the sys-
tem.
In vehicles without text messages:
Switch the ignition off.
Press and hold the 0.0 / SET button.
Switch the ignition back on.44
Page 47 of 305
CockpitIn vehicles without text messages:
Release the
0.0 / SET button and, press for the next
20 seconds. Do not
reset the indicator to zero between
tw
o intervals, otherwise the display will be
incorrect.
If, while the LongLife service is valid, the
service interval display is reset to zero, the
“service will be activated by time or mile-
age”. The service interval is no longer calcu-
lated individually ›››
Booklet Maintenance
Programme. Note
● The service message disappears after a few
seconds, when the engine is started or when OK is pressed.
● In vehicles with the LongLife system in
which the battery has been disconnected for
a long period of time, it is not possible to cal-
culate the date of the next service. Therefore
the service interval display may not be cor-
rect. In this case, bear in mind the maximum
service intervals permitted in the ››› Book-
let Maintenance Programme. Control lamps
Control and warning lamps The control and warning lamps are indicators
of warnings,
››› , faults
››› or certain func-
tions. Some control and warning lamps come
on when the ignition is switched on, and
switch off when the engine starts running, or
while driving.
Depending on the model, additional text
messages may be viewed on the instrument
panel display. These may be purely informa-
tive or they may be advising of the need for
action ›››
page 40, Instruments .
D ependin
g upon the equipment fitted in the
vehicle, instead of a warning lamp, some-
times a symbol may be displayed on the in-
strument panel.
When certain control and warning lamps are
lit, an audible warning is also heard.
Red symbols
Sym- bolMeaning ››› See
Do not continue driving!
The electronic parking brake is on,
the brake fluid level is too low or
the brake system is faulty.››› page
137
Sym-
bolMeaning ››› See
Do not continue driving!
Fault in the engine cooling sys-
tem.››› page
221
Do not continue driving!
Engine oil pressure too low.››› page
218
Do not continue driving!
At least one of the vehicles doors
is open, or is not correctly closed.››› page
63
Do not continue driving!
The rear lid is open or is incorrect-
ly closed.››› page
66
Do not continue driving!
Fault in the steering.››› page
131
Engine cannot be started again!
"AdBlue" level too low.›››
page
212
Driver or passenger has not fas-
tened seat belt.›››
page
14
Use the foot brake!
Change
››› page
143
Brake
››› page
137
Faulty generator.›››
page
227» 45
Technical specifications
Advice
Operation
Safety
Page 48 of 305
Operation
Yellow symbolsSym- bolMeaning ››› See
Front brake pads worn.
›››
page
137
it lights up: ESC malfunction or
off.
flashes: ESC working.
ASR manually deactivated.
ABS faulty or does not work.
Electronic parking brake faulty.›››
page
137
Rear fog light switched on.›››
page
74
it lights up: Driving light totally or
partially faulty.›››
page
266
flashes: Fault in the adaptive light
system.››› page
74
Fault in catalytic converter.
›››
page
151
it lights up: pre-ignition of diesel
engine.
flashes: Fault in engine manage-
ment.
Fault in engine management.
Diesel particulate filter blocked
Sym-
bolMeaning ››› See
Fault in the steering system.›››
page
131
Tyre pressure too low.›››
page
231
Fault in the tyre pressure gauge.››› page
177
Level of windscreen washer fluid
too low.›››
page
81
Fuel tank almost empty.›››
page
206
flashes: engine oil sensor faulty.›››
page
218
it lights up: insufficient engine oil.
Fault in airbag system and seat
belt tensioners.›››
page
20
Front passenger front airbag is
disabled ( ).››› page
20
Top up "AdBlue", or there is a fault
in the "AdBlue" system.›››
page
212
Fuel tank not closed correctly.›››
page
206
Lane Assist is switched on, but not
active.›››
page
172 Green symbols
Sym-
bolMeaning ››› See
Left or right turn signal.›››
page
74
Hazard warning lights on.››› page
242
Use the foot brake!
Change
››› page
143
Brake
››› page
137
Cruise control operating.›››
page
169
Lane Assist is switched on and ac-
tive.›››
page
172 Blue symbols
Sym-
bolMeaning ››› See
Main beam on or flasher on.›››
page
74 Headlight adjustment (Light As-
sist) on.
46
Page 66 of 305
Operation
Warning lampIt
lights upPossible causeSolution
At least one vehicle
door is open or not
correctly shut. Stop driving imme-
diately!
Open the correspond-
ing door and close it
immediately. Several warning and control lamps light up
for a few seconds when the ignition is switch-
ed on, signalling that the function is being
verified. They will switch off after a few sec-
onds.
If a door is open or incorrectly closed, the
warning lamp
or on the instrument pan-
el will light up.
Depending on the vehicle equipment, a sym-
bol may be displayed on the dash panel
screen instead of the warning lamp. The indi-
cation is also visible when the ignition is
switched off. The indication disappears
around 15 seconds after the vehicle has
been locked. Sliding doors
Introduction WARNING
If a sliding door is not correctly closed, it
could open unexpectedly when driving and
cause serious injuries.
● Stop immediately and close it.
● When closing, ensure that the sliding door
has closed correctly. A closed sliding door
should be flush with the corresponding parts
of the bodywork.
● Only open and close sliding doors when no
body is in the way of the door. WARNING
If a sliding door is not fully open, it could
close unexpectedly and cause serious inju-
ries.
● Always open the sliding door fully. WARNING
Opening sliding doors while driving is dan-
gerous. These doors may be pushed open or
closed when the vehicle accelerates or brakes
and cause serious injuries.
● Never open the sliding doors when the ve-
hicle is in movement. Manually opening and closing the
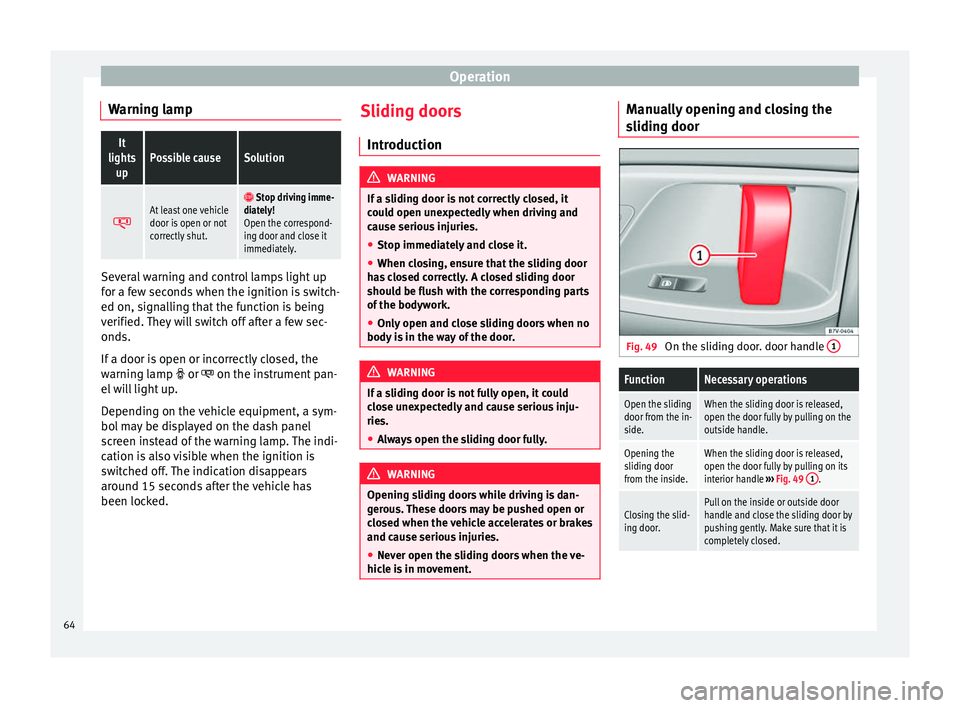
sliding door
Fig. 49
On the sliding door. door handle 1
FunctionNecessary operations
Open the sliding
door from the in-
side.When the sliding door is released,
open the door fully by pulling on the
outside handle.
Opening the
sliding door
from the inside.When the sliding door is released,
open the door fully by pulling on its
interior handle
››› Fig. 49 1
.
Closing the slid-
ing door.Pull on the inside or outside door
handle and close the sliding door by
pushing gently. Make sure that it is
completely closed.64
Page 88 of 305
Operation
This function can be activated and deactiva-
ted by pressing the rear-view mirror switch
››› Fig. 70 2 . When it is activated, the warn-
ing lamp lights up 1 .
When the ignition is on, the sensor 3
auto-
matic a
lly moves the rear vision mirror to the
anti-dazzle position depending upon the in-
cidence of the light from behind.
The automatic anti-dazzle function is deacti-
vated when reverse gear is engaged or the in-
terior or reading lights are on. Note
If the light is obstructed or prevented from
reaching the sensor, e.g. by the sun blinds,
the rear vision mirror with automatic anti-
dazzle function will not operate correctly. Exterior mirrors
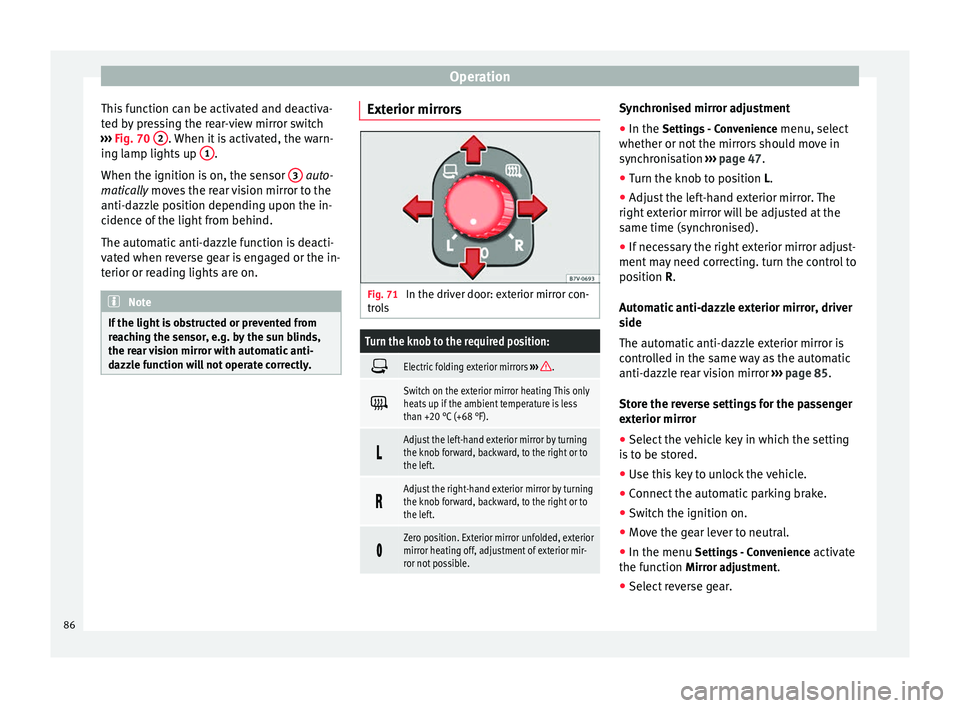
Fig. 71
In the driver door: exterior mirror con-
trols
Turn the knob to the required position:
Electric folding exterior mirrors
››› .
Switch on the exterior mirror heating This only
heats up if the ambient temperature is less
than +20 °C (+68 °F).
Adjust the left-hand exterior mirror by turning
the knob forward, backward, to the right or to
the left.
Adjust the right-hand exterior mirror by turning
the knob forward, backward, to the right or to
the left.
Zero position. Exterior mirror unfolded, exterior
mirror heating off, adjustment of exterior mir-
ror not possible. Synchronised mirror adjustment
●
In the Settings - Convenience
menu, sel
ect
whether or not
the mirrors should move in
synchronisation ››› page 47
.
● Turn the knob to position L.
● Adjust the left-hand exterior mirror. The
right exterior mirror will be adjusted at the
same time (synchronised).
● If necessary the right exterior mirror adjust-
ment may need correcting. turn the control to
position
R.
Automatic anti-dazzle exterior mirror, driver
side
The automatic anti-dazzle exterior mirror is
controlled in the same way as the automatic
anti-dazzle rear vision mirror ››› page 85.
Store the reverse settings for the passenger
exterior mirror ● Select the vehicle key in which the setting
is to be stored.
● Use this key to unlock the vehicle.
● Connect the automatic parking brake.
● Switch the ignition on.
● Move the gear lever to neutral.
● In the menu Settings - Convenience activate
the function Mirror adjustment.
● Select reverse gear.
86