lock Seat Alhambra 2015 Owner's Manual
[x] Cancel search | Manufacturer: SEAT, Model Year: 2015, Model line: Alhambra, Model: Seat Alhambra 2015Pages: 305, PDF Size: 5.46 MB
Page 5 of 305
Table of Contents
Table of Contents
Safety . . . . . . . . . . . . . . . . . . . . . . . . . . . . . . . . 5
Safe driving . . . . . . . . . . . . . . . . . . . . . . . . . . . . 5
Safety first! . . . . . . . . . . . . . . . . . . . . . . . . . . . . . 5
Tips for driving . . . . . . . . . . . . . . . . . . . . . . . . . . 5
Sitting position for occupants . . . . . . . . . . . . . . 6
Pedal area . . . . . . . . . . . . . . . . . . . . . . . . . . . . . . 9
Seat belts . . . . . . . . . . . . . . . . . . . . . . . . . . . . . . 10
The whys and wherefores of seat belts . . . . . . . 10
How to properly adjust your seatbelt . . . . . . . . 14
Seat belt tensioners . . . . . . . . . . . . . . . . . . . . . . 17
Airbag system . . . . . . . . . . . . . . . . . . . . . . . . . . 18
Brief introduction . . . . . . . . . . . . . . . . . . . . . . . . 18
General overview of the airbag . . . . . . . . . . . . . 20
Deactivating airbags . . . . . . . . . . . . . . . . . . . . . 25
Transporting children safely . . . . . . . . . . . . . . . 26
Child safety . . . . . . . . . . . . . . . . . . . . . . . . . . . . . 26
Integrated child seat . . . . . . . . . . . . . . . . . . . . . 33
Operation . . . . . . . . . . . . . . . . . . . . . . . . . . . . . 39
Cockpit . . . . . . . . . . . . . . . . . . . . . . . . . . . . . . . . 39
Overview . . . . . . . . . . . . . . . . . . . . . . . . . . . . . . . 38
Instruments . . . . . . . . . . . . . . . . . . . . . . . . . . . . 40
Control lamps . . . . . . . . . . . . . . . . . . . . . . . . . . . 45
SEAT information system . . . . . . . . . . . . . . . . . . 47
Three button unit in headliner . . . . . . . . . . . . . . 53
Opening and closing . . . . . . . . . . . . . . . . . . . . . 54
Vehicle key set . . . . . . . . . . . . . . . . . . . . . . . . . . 54
Central locking and locking system . . . . . . . . . 57
Doors . . . . . . . . . . . . . . . . . . . . . . . . . . . . . . . . . . 63
Sliding doors . . . . . . . . . . . . . . . . . . . . . . . . . . . 64
Rear lid . . . . . . . . . . . . . . . . . . . . . . . . . . . . . . . . 66
Electric windows . . . . . . . . . . . . . . . . . . . . . . . . . 70
Panoramic sliding sunroof* . . . . . . . . . . . . . . . . 72 Lights and visibility
. . . . . . . . . . . . . . . . . . . . . . 74
Lights . . . . . . . . . . . . . . . . . . . . . . . . . . . . . . . . . 74
Visibility . . . . . . . . . . . . . . . . . . . . . . . . . . . . . . . 80
Windscreen wiper and window wiper systems . 81
Rear vision mirror . . . . . . . . . . . . . . . . . . . . . . . . 85
Seats and head restraints . . . . . . . . . . . . . . . . . 88
Adjusting the seats and head restraints . . . . . . 88
Seat functions . . . . . . . . . . . . . . . . . . . . . . . . . . 93
Transport and practical equipment . . . . . . . . . 98
Transporting objects . . . . . . . . . . . . . . . . . . . . . 98
Loading luggage compartment . . . . . . . . . . . . . 100
Roof carrier system* . . . . . . . . . . . . . . . . . . . . . . 110
Storage compartments . . . . . . . . . . . . . . . . . . . 112
Drink holders . . . . . . . . . . . . . . . . . . . . . . . . . . . 117
Ashtray and cigarette lighter* . . . . . . . . . . . . . . 118
Power sockets . . . . . . . . . . . . . . . . . . . . . . . . . . . 119
Air conditioning . . . . . . . . . . . . . . . . . . . . . . . . . 122
Air conditioner . . . . . . . . . . . . . . . . . . . . . . . . . . 122
Auxiliary heater* (additional heater) . . . . . . . . 128
Driving . . . . . . . . . . . . . . . . . . . . . . . . . . . . . . . . 131
Address . . . . . . . . . . . . . . . . . . . . . . . . . . . . . . . . 131
Stopping and starting the engine . . . . . . . . . . . 133
Braking and parking . . . . . . . . . . . . . . . . . . . . . 137
Changing gear . . . . . . . . . . . . . . . . . . . . . . . . . . 143
Run-in and economical driving . . . . . . . . . . . . . 148
Engine management and exhaust gas
purification system . . . . . . . . . . . . . . . . . . . . . . 151
Driving abroad . . . . . . . . . . . . . . . . . . . . . . . . . . 153
Driving along flooded roadways . . . . . . . . . . . . 153
Driver assistance systems . . . . . . . . . . . . . . . . . 154
Braking and stability systems . . . . . . . . . . . . . . 154
Start assist systems . . . . . . . . . . . . . . . . . . . . . . 156
Parking sensor system* . . . . . . . . . . . . . . . . . . . 159
Park Assist system* . . . . . . . . . . . . . . . . . . . . . . 162
Rear Assist system* . . . . . . . . . . . . . . . . . . . . . . 166
Cruise control* (Cruise control system - CCS) . . 169
Lane Assist system* . . . . . . . . . . . . . . . . . . . . . . 172
Sign Assist* . . . . . . . . . . . . . . . . . . . . . . . . . . . . 174 Tiredness detection (recommendation to take
a break) . . . . . . . . . . . . . . . . . . . . . . . . . . . . . . . . 176
Tyre monitoring systems . . . . . . . . . . . . . . . . . . 177
Towing bracket device
. . . . . . . . . . . . . . . . . . . . 179
Driving with a trailer . . . . . . . . . . . . . . . . . . . . . . 179
Advice . . . . . . . . . . . . . . . . . . . . . . . . . . . . . . . . 189
Care and maintenance . . . . . . . . . . . . . . . . . . . . 189
Accessories, replacement of parts and
modifications . . . . . . . . . . . . . . . . . . . . . . . . . . . 189
Care and cleaning the vehicle exterior . . . . . . . 195
Caring for and cleaning the vehicle interior . . . 200
Notes for the user . . . . . . . . . . . . . . . . . . . . . . . . 205
Checking and refilling levels . . . . . . . . . . . . . . . 206
Filling the tank . . . . . . . . . . . . . . . . . . . . . . . . . . 206
Fuel . . . . . . . . . . . . . . . . . . . . . . . . . . . . . . . . . . . 209
Selective catalytic reduction* (AdBlue) . . . . . . 212
Working in the engine compartment . . . . . . . . 214
Engine oil . . . . . . . . . . . . . . . . . . . . . . . . . . . . . . 218
Engine coolant . . . . . . . . . . . . . . . . . . . . . . . . . . 221
Brake fluid . . . . . . . . . . . . . . . . . . . . . . . . . . . . . 225
Checking and topping up the windscreen
washer reservoir with water . . . . . . . . . . . . . . . . 226
Vehicle battery . . . . . . . . . . . . . . . . . . . . . . . . . . 227
Wheels and tyres . . . . . . . . . . . . . . . . . . . . . . . . 231
Wheels . . . . . . . . . . . . . . . . . . . . . . . . . . . . . . . . 231
Winter service . . . . . . . . . . . . . . . . . . . . . . . . . . . 241
Emergencies . . . . . . . . . . . . . . . . . . . . . . . . . . . . 242
In case of emergency . . . . . . . . . . . . . . . . . . . . . 242
Vehicle tool kit* . . . . . . . . . . . . . . . . . . . . . . . . . 244
Changing a wheel* . . . . . . . . . . . . . . . . . . . . . . . 246
Tyre repair . . . . . . . . . . . . . . . . . . . . . . . . . . . . . . 250
Starting assistance . . . . . . . . . . . . . . . . . . . . . . 253
Towing and tow starting . . . . . . . . . . . . . . . . . . . 255
3
Page 6 of 305
Table of Contents
Emergency locking and unlocking . . . . . . . . . . 259
Changing the wiper blades . . . . . . . . . . . . . . . . 263
Fuses and bulbs . . . . . . . . . . . . . . . . . . . . . . . . . 264
Fuses . . . . . . . . . . . . . . . . . . . . . . . . . . . . . . . . . . 264
Changing bulbs . . . . . . . . . . . . . . . . . . . . . . . . . 266
Technical specifications . . . . . . . . . . . . . . . 274
Technical specifications . . . . . . . . . . . . . . . . . . 274
Important information . . . . . . . . . . . . . . . . . . . . 274
Towing a trailer . . . . . . . . . . . . . . . . . . . . . . . . . . 276
Wheels . . . . . . . . . . . . . . . . . . . . . . . . . . . . . . . . 276
Engine specifications . . . . . . . . . . . . . . . . . . . . . 277
Dimensions . . . . . . . . . . . . . . . . . . . . . . . . . . . . . 285
Capacities . . . . . . . . . . . . . . . . . . . . . . . . . . . . . . 285
Index . . . . . . . . . . . . . . . . . . . . . . . . . . . . . . . . . 287
4
Page 9 of 305
Safe driving
If your physical constitution prevents you
from maintaining the correct sitting position,
contact a specialised workshop for help with
any special devices. The seat belt and airbag
can only provide optimum protection if a cor-
rect sitting position is adopted. SEAT recom-
mends taking your car in for technical serv-
ice.
For your own safety and to reduce the risk of
injury in the event of an accident or sudden
braking or manoeuvre, SEAT recommend the
following positions:
Valid for all vehicle occupants:
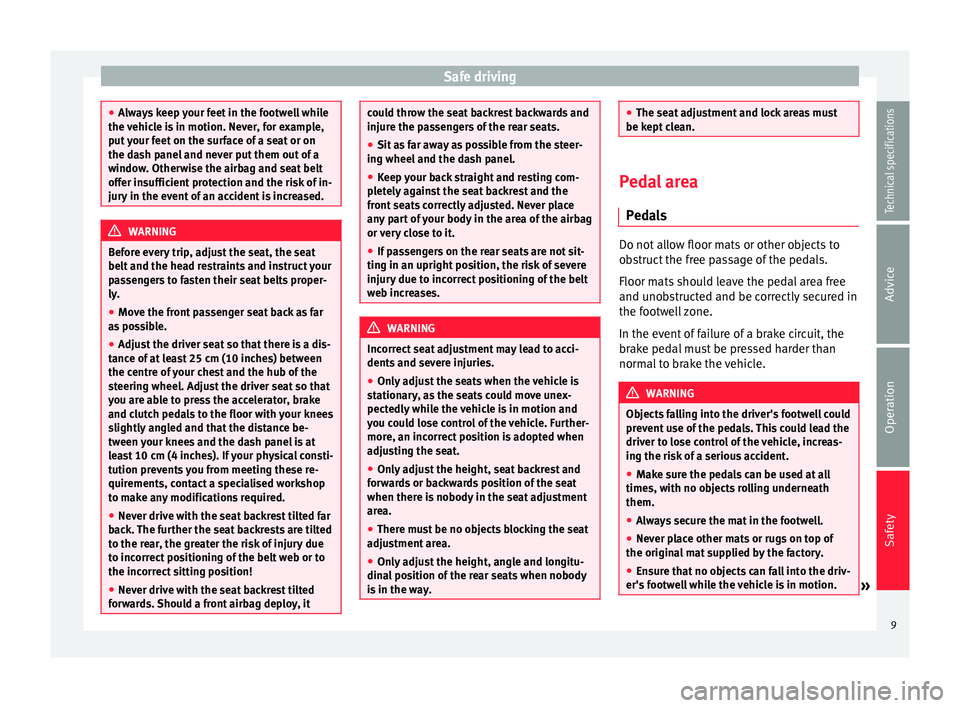
● Adjust the head restraint so that its upper
edge is at the same level as the top of your
head, or as close as possible to the same lev-
el as the top of your head and under no cir-
cumstances below eye level. Keep the back
of your neck as close as possible to the head
restraint ››› Fig. 1 and
›
›› Fig. 2.
● Short people must lower the head restraint
completely, even if your head is below its up-
per edge.
● Tall people must raise the head restraint
completely.
● Adjust the seat backrest to an upright posi-
tion so that your back rests completely
against it.
● Always keep your feet in the footwell while
the vehicle is in motion. ●
Adjust and fasten your seat belt correctly
››› page 14.
Al
so valid for the driver:
● Adjust the steering wheel so that there is a
distance of at least 25 cm (10 inches) be-
tween it and your chest ››› Fig. 1 and so that
you c
an hold the steering wheel with both
hands on the outside of the ring at the 9
o'clock and 3 o'clock positions with your
arms slightly bent.
● The adjusted steering wheel must face your
chest and not your face.
● Adjust the driver seat forwards or back-
wards so that you are able to press the accel-
erator, brake and clutch pedals to the floor
with your knees slightly angled and the dis-
tance between your knees and the dash pan-
el is at least 10 cm (4 inches) ››› Fig. 1
.
● Adjust the height of the driver seat so that
you can easily reach the top of the steering
wheel.
● Keep both feet in the footwell so that you
have the vehicle under control at all times.
Also valid for the front passenger:
● Move the front passenger seat back as far
as possible for optimum protection should
the airbag deploy. Adjusting the steering wheel position
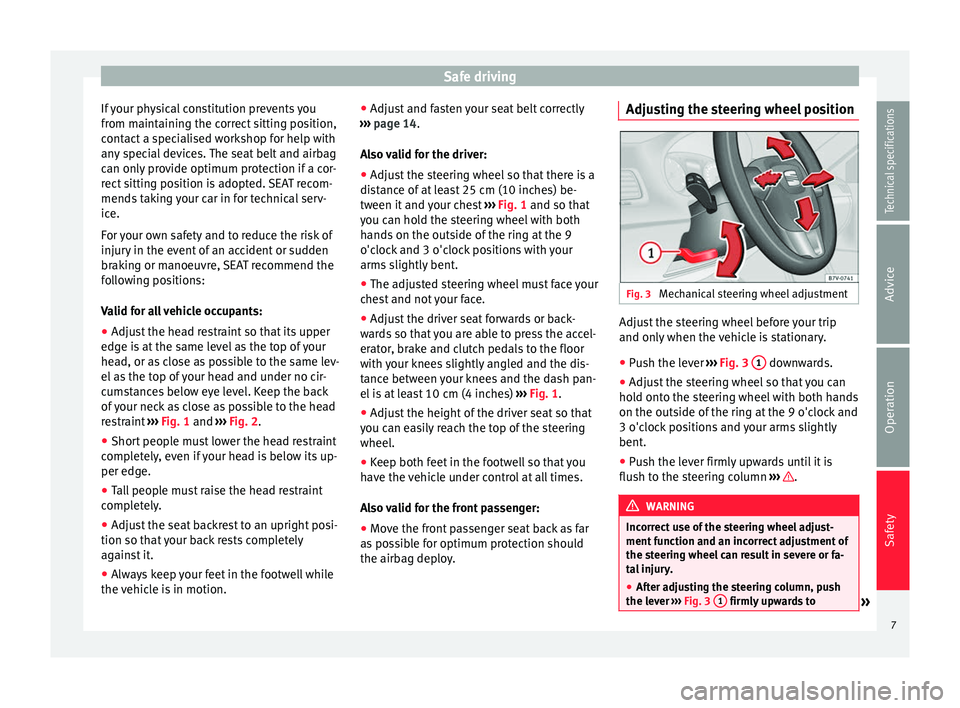
Fig. 3
Mechanical steering wheel adjustment Adjust the steering wheel before your trip
and only when the vehicle is stationary.
●
Push the lever ››› Fig. 3 1 downwards.
● Adjust the steering wheel so that you can
hold onto the steering wheel with both hands
on the outside of the ring at the 9 o'clock and
3 o'clock positions and your arms slightly
bent.
● Push the lever firmly upwards until it is
flush to the steering column ››› .
WARNING
Incorrect use of the steering wheel adjust-
ment function and an incorrect adjustment of
the steering wheel can result in severe or fa-
tal injury.
● After adjusting the steering column, push
the lever ››› Fig. 3 1 firmly upwards to
» 7
Technical specifications
Advice
Operation
Safety
Page 10 of 305
Safety
ensure the steering wheel does not acciden-
tally change position while driving.
●
Never adjust the steering wheel while the
vehicle is in motion. If you need to adjust the
steering wheel while the vehicle is in motion,
stop safely and make the proper adjustment.
● The adjusted steering wheel should be fac-
ing your chest and not your face so as not to
hinder the driver's front airbag protection in
the event of an accident.
● When driving, always hold the steering
wheel with both hands on the outside of the
ring at the 9 o'clock and 3 o'clock positions
to reduce injuries when the driver's front air-
bag deploys.
● Never hold the steering wheel at the 12
o'clock position or in any other manner (e.g.
in the centre of the steering wheel). In such
cases, if the driver's airbag deploys, you may
sustain injuries to your arms, hands and
head. Danger of injuries due to an incorrect
sitting position
Number of seats
Depending on the equipment, your vehicle
has a total of
five or
seven seats. Each seat is
equipped with a seat belt.
EquipmentSeats in
the frontSeats in the sec-
ond rowSeats in
the third row
5 seats23–
7 seats232 If the seat belts are worn incorrectly or not at
all, the risk of severe injuries increases. Seat
belts can provide optimal protection only if
the belt web is properly worn. Being seated
in an incorrect position means the seat belt
cannot offer its full protection. This could re-
sult in severe and even fatal injuries. The risk
of severe or fatal injuries is especially height-
ened when a deploying airbag strikes a vehi-
cle occupant who has assumed an incorrect
sitting position. The driver is responsible for
all passengers in the vehicle, particularly
children.
The following list shows just some examples
of incorrect sitting positions which can be
dangerous to all vehicle occupants.
Whenever the vehicle is in motion:
●
Never stand in the vehicle.
● Never stand on the seats.
● Never kneel on the seats.
● Never tilt your seat backrest too far to the
rear.
● Never lean against the dash panel. ●
Never lie on the rear bench.
● Never sit on the front edge of a seat.
● Never sit sideways.
● Never lean out of a window.
● Never put your feet out of a window.
● Never put your feet on the dash panel.
● Never put your feet on the surface of a seat
or seat backrest.
● Never travel in a footwell.
● Never sit on the armrests.
● Never travel on a seat without wearing the
seat belt.
● Never carry any person in the luggage com-
partment. WARNING
An incorrect sitting position in the vehicle
can lead to severe injuries or death in the
event of sudden braking or manoeuvres, colli-
sion or accidents or if the airbag deploys.
● Before the vehicle moves, assume the prop-
er sitting position and maintain it throughout
the trip. This also includes fastening the seat
belt.
● Never transport more people than there are
seats with a seat belt available in the vehicle.
● Children must always be protected with an
approved child restraint system suited to
their height and weight ››› page 26,
››› page 20.8
Page 11 of 305
Safe driving
●
Always keep your feet in the footwell while
the vehicle is in motion. Never, for example,
put your feet on the surface of a seat or on
the dash panel and never put them out of a
window. Otherwise the airbag and seat belt
offer insufficient protection and the risk of in-
jury in the event of an accident is increased. WARNING
Before every trip, adjust the seat, the seat
belt and the head restraints and instruct your
passengers to fasten their seat belts proper-
ly.
● Move the front passenger seat back as far
as possible.
● Adjust the driver seat so that there is a dis-
tance of at least 25 cm (10 inches) between
the centre of your chest and the hub of the
steering wheel. Adjust the driver seat so that
you are able to press the accelerator, brake
and clutch pedals to the floor with your knees
slightly angled and that the distance be-
tween your knees and the dash panel is at
least 10 cm (4 inches). If your physical consti-
tution prevents you from meeting these re-
quirements, contact a specialised workshop
to make any modifications required.
● Never drive with the seat backrest tilted far
back. The further the seat backrests are tilted
to the rear, the greater the risk of injury due
to incorrect positioning of the belt web or to
the incorrect sitting position!
● Never drive with the seat backrest tilted
forwards. Should a front airbag deploy, it could throw the seat backrest backwards and
injure the passengers of the rear seats.
●
Sit as far away as possible from the steer-
ing wheel and the dash panel.
● Keep your back straight and resting com-
pletely against the seat backrest and the
front seats correctly adjusted. Never place
any part of your body in the area of the airbag
or very close to it.
● If passengers on the rear seats are not sit-
ting in an upright position, the risk of severe
injury due to incorrect positioning of the belt
web increases. WARNING
Incorrect seat adjustment may lead to acci-
dents and severe injuries.
● Only adjust the seats when the vehicle is
stationary, as the seats could move unex-
pectedly while the vehicle is in motion and
you could lose control of the vehicle. Further-
more, an incorrect position is adopted when
adjusting the seat.
● Only adjust the height, seat backrest and
forwards or backwards position of the seat
when there is nobody in the seat adjustment
area.
● There must be no objects blocking the seat
adjustment area.
● Only adjust the height, angle and longitu-
dinal position of the rear seats when nobody
is in the way. ●
The seat adjustment and lock areas must
be kept clean. Pedal area
Pedals Do not allow floor mats or other objects to
obstruct the free passage of the pedals.
Floor mats should leave the pedal area free
and unobstructed and be correctly secured in
the footwell zone.
In the event of failure of a brake circuit, the
brake pedal must be pressed harder than
normal to brake the vehicle.
WARNING
Objects falling into the driver's footwell could
prevent use of the pedals. This could lead the
driver to lose control of the vehicle, increas-
ing the risk of a serious accident.
● Make sure the pedals can be used at all
times, with no objects rolling underneath
them.
● Always secure the mat in the footwell.
● Never place other mats or rugs on top of
the original mat supplied by the factory.
● Ensure that no objects can fall into the driv-
er's footwell while the vehicle is in motion. » 9Technical specifications
Advice
Operation
Safety
Page 19 of 305
Seat belts
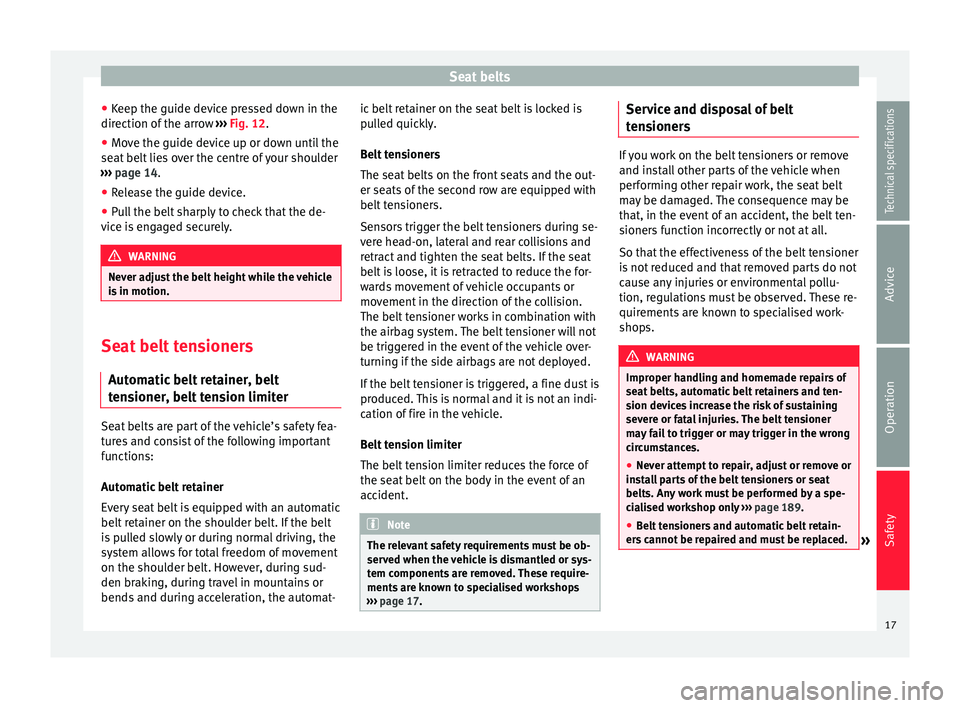
● Keep the guide device pressed down in the
direction of the arrow ››› Fig. 12 .
● Mo v
e the guide device up or down until the
seat belt lies over the centre of your shoulder
››› page 14.
● Rel
ease the guide device.
● Pull the belt sharply to check that the de-
vice is engaged securely. WARNING
Never adjust the belt height while the vehicle
is in motion. Seat belt tensioners
Automatic belt retainer, belt
tensioner, belt tension limiter Seat belts are part of the vehicle’s safety fea-
tures and consist of the following important
functions:
Automatic belt retainer
Every seat belt is equipped with an automatic
belt retainer on the shoulder belt. If the belt
is pulled slowly or during normal driving, the
system allows for total freedom of movement
on the shoulder belt. However, during sud-
den braking, during travel in mountains or
bends and during acceleration, the automat- ic belt retainer on the seat belt is locked is
pulled quickly.
Belt tensioners
The seat belts on the front seats and the out-
er seats of the second row are equipped with
belt tensioners.
Sensors trigger the belt tensioners during se-
vere head-on, lateral and rear collisions and
retract and tighten the seat belts. If the seat
belt is loose, it is retracted to reduce the for-
wards movement of vehicle occupants or
movement in the direction of the collision.
The belt tensioner works in combination with
the airbag system. The belt tensioner will not
be triggered in the event of the vehicle over-
turning if the side airbags are not deployed.
If the belt tensioner is triggered, a fine dust is
produced. This is normal and it is not an indi-
cation of fire in the vehicle.
Belt tension limiter
The belt tension limiter reduces the force of
the seat belt on the body in the event of an
accident.
Note
The relevant safety requirements must be ob-
served when the vehicle is dismantled or sys-
tem components are removed. These require-
ments are known to specialised workshops
››› page 17. Service and disposal of belt
tensioners
If you work on the belt tensioners or remove
and install other parts of the vehicle when
performing other repair work, the seat belt
may be damaged. The consequence may be
that, in the event of an accident, the belt ten-
sioners function incorrectly or not at all.
So that the effectiveness of the belt tensioner
is not reduced and that removed parts do not
cause any injuries or environmental pollu-
tion, regulations must be observed. These re-
quirements are known to specialised work-
shops.
WARNING
Improper handling and homemade repairs of
seat belts, automatic belt retainers and ten-
sion devices increase the risk of sustaining
severe or fatal injuries. The belt tensioner
may fail to trigger or may trigger in the wrong
circumstances.
● Never attempt to repair, adjust or remove or
install parts of the belt tensioners or seat
belts. Any work must be performed by a spe-
cialised workshop only ››› page 189.
● Belt tensioners and automatic belt retain-
ers cannot be repaired and must be replaced. » 17
Technical specifications
Advice
Operation
Safety
Page 22 of 305
Safety
Airbag activation The airbags deploy extremely rapidly, within
thousandths of a second, to provide addi-
tional protection in the event of an accident.
A fine dust may develop when the airbag de-
ploys. This is normal and it is not an indica-
tion of fire in the vehicle.
The airbag system is only ready to function
when the ignition is on.
In special accidents instances, several air-
bags may activate at the same time.
In the event of minor head-on and side colli-
sions, rear-end collisions, overturning or roll-
over of the vehicle, airbags
do not activate.
Activation factors
The conditions that lead to the airbag system
activating in each situation cannot be gener-
alised. Some factors play an important role,
such as the properties of the object the vehi-
cle hits (hard/soft), angle of impact, vehicle
speed, etc.
Deceleration trajectory is key for airbag acti-
vation.
The control unit analyses the collision trajec-
tory and activates the respective restraint
system.
If the deceleration rate is below the prede-
fined reference value in the control unit the
airbags will not be triggered, even though the accident may cause extensive damage to
the car.
The following airbags are triggered in
serious head-on collisions
● Driver airbag.
● Front passenger front airbag
● Knee airbag for the driver.
The following airbags are triggered in
serious side-on collisions
● Front side airbag on the side of the acci-
dent.
● Rear side airbag on the side of the acci-
dent.
● Curtain (head) airbag on the side of the ac-
cident.
In an accident with airbag activation:
● the interior lights switch on (if the interior
light switch is in the courtesy light position);
● the hazard warning lights switch on;
● all doors are unlocked;
● the fuel supply to the engine is cut. General overview of the airbag
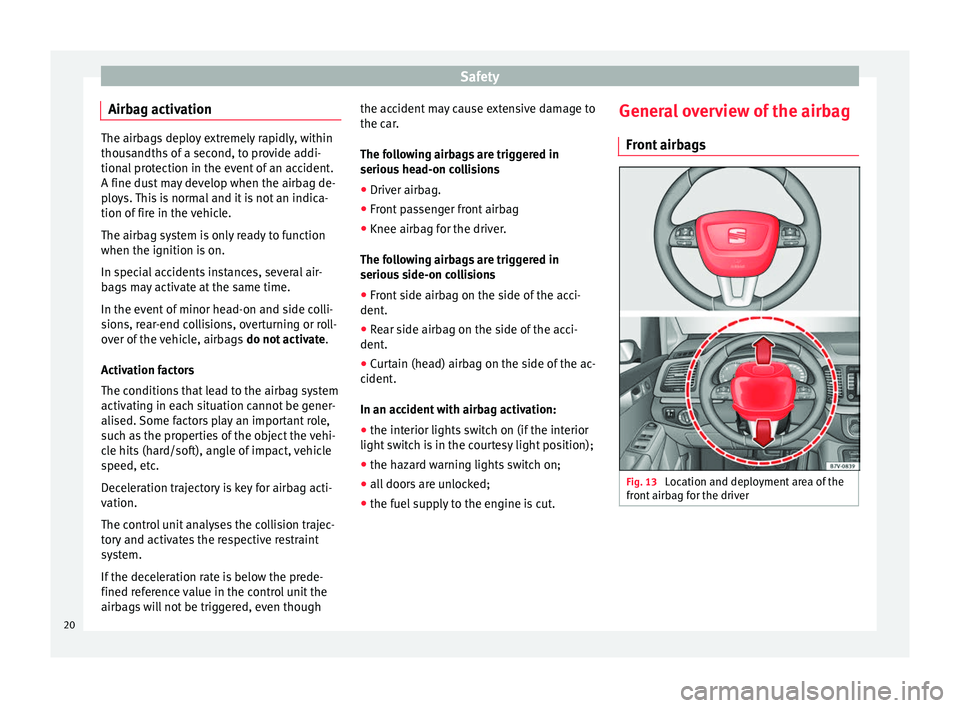
Front airbags Fig. 13
Location and deployment area of the
front airbag for the driver 20
Page 23 of 305
Airbag system
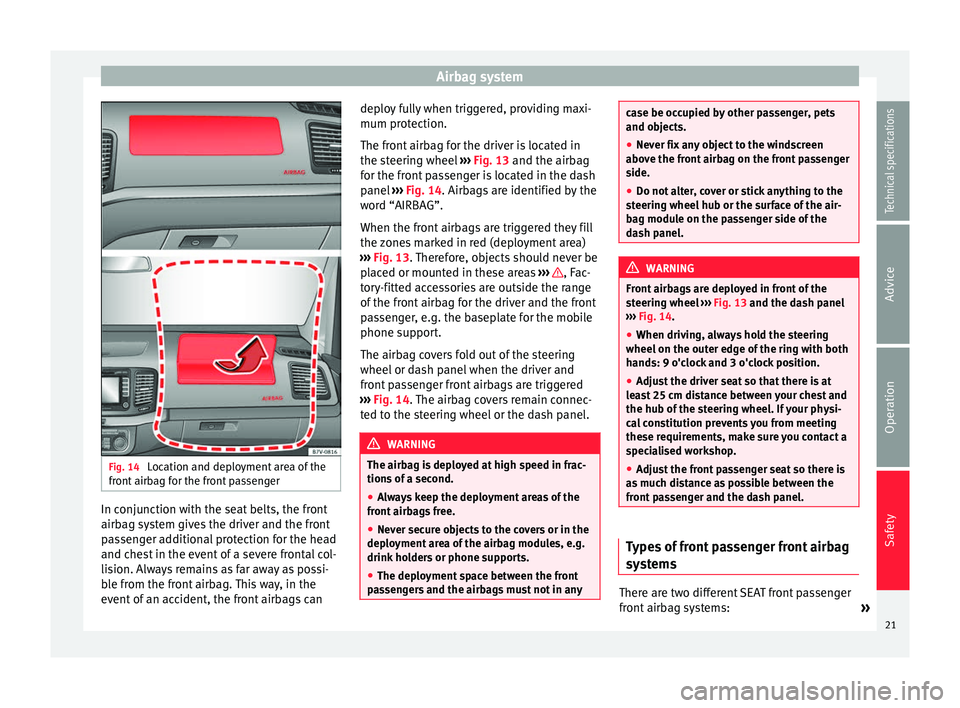
Fig. 14
Location and deployment area of the
front airbag for the front passenger In conjunction with the seat belts, the front
airbag system gives the driver and the front
passenger additional protection for the head
and chest in the event of a severe frontal col-
lision. Always remains as far away as possi-
ble from the front airbag. This way, in the
event of an accident, the front airbags can deploy fully when triggered, providing maxi-
mum protection.
The front airbag for the driver is located in
the steering wheel
››› Fig. 13 and the airbag
f or the fr
ont passenger is located in the dash
panel ››› Fig. 14. Airbags are identified by the
wor
d “AIRBAG”.
When the front airbags are triggered they fill
the zones marked in red (deployment area)
››› Fig. 13. Therefore, objects should never be
pl
aced or mounted in these areas ››› , Fac-
tory-fitted accessories are outside the range
of the front airbag for the driver and the front
passenger, e.g. the baseplate for the mobile
phone support.
The airbag covers fold out of the steering
wheel or dash panel when the driver and
front passenger front airbags are triggered
››› Fig. 14 . The airbag covers remain connec-
t ed t
o the steering wheel or the dash panel. WARNING
The airbag is deployed at high speed in frac-
tions of a second.
● Always keep the deployment areas of the
front airbags free.
● Never secure objects to the covers or in the
deployment area of the airbag modules, e.g.
drink holders or phone supports.
● The deployment space between the front
passengers and the airbags must not in any case be occupied by other passenger, pets
and objects.
●
Never fix any object to the windscreen
above the front airbag on the front passenger
side.
● Do not alter, cover or stick anything to the
steering wheel hub or the surface of the air-
bag module on the passenger side of the
dash panel. WARNING
Front airbags are deployed in front of the
steering wheel ››› Fig. 13
and the dash panel
› ›
› Fig. 14.
● When drivin
g, always hold the steering
wheel on the outer edge of the ring with both
hands: 9 o'clock and 3 o'clock position.
● Adjust the driver seat so that there is at
least 25 cm distance between your chest and
the hub of the steering wheel. If your physi-
cal constitution prevents you from meeting
these requirements, make sure you contact a
specialised workshop.
● Adjust the front passenger seat so there is
as much distance as possible between the
front passenger and the dash panel. Types of front passenger front airbag
systems
There are two different SEAT front passenger
front airbag systems:
»
21
Technical specifications
Advice
Operation
Safety
Page 33 of 305
Transporting children safely
seat so that the child has enough space.
Therefore, adapt the front passenger seat to
the size of the child seat and the height of
the child. Ensure the passenger is in the cor-
rect position
›
›› page 6.
Move the second and third rows of seats fully
back and lock them. Place the seat backs in a
vertical position and fold the head restraints
down.
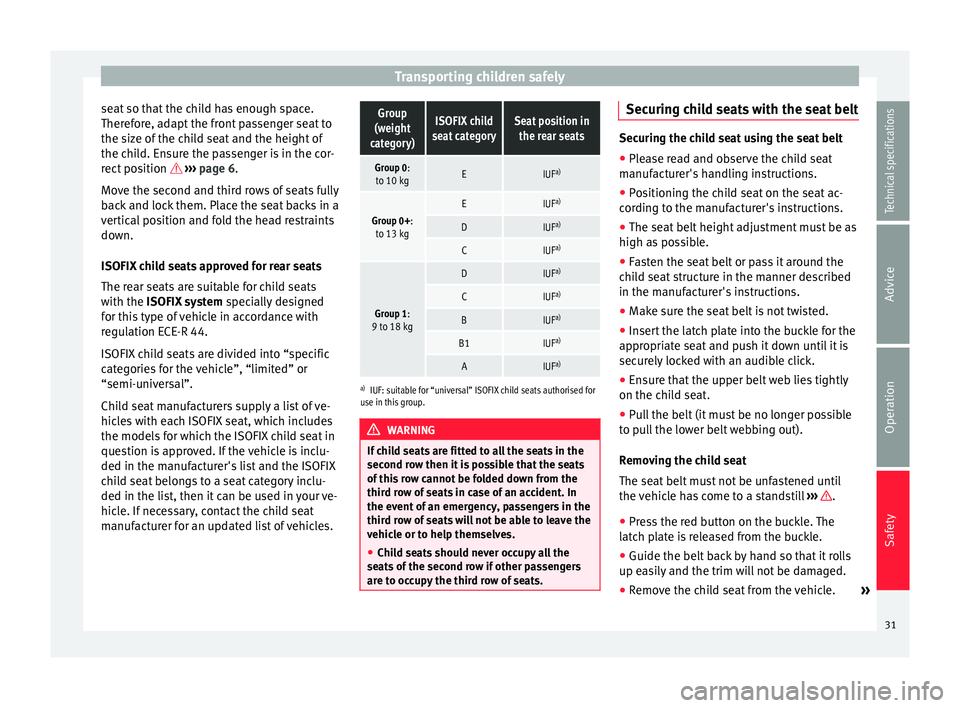
ISOFIX child seats approved for rear seats
The rear seats are suitable for child seats
with the ISOFIX system spec
ially designed
for this type of vehicle in accordance with
regulation ECE-R 44.
ISOFIX child seats are divided into “specific
categories for the vehicle”, “limited” or
“semi-universal”.
Child seat manufacturers supply a list of ve-
hicles with each ISOFIX seat, which includes
the models for which the ISOFIX child seat in
question is approved. If the vehicle is inclu-
ded in the manufacturer's list and the ISOFIX
child seat belongs to a seat category inclu-
ded in the list, then it can be used in your ve-
hicle. If necessary, contact the child seat
manufacturer for an updated list of vehicles.
Group
(weight
category)ISOFIX child
seat categorySeat position in the rear seats
Group 0:to 10 kgEIUF a)
Group 0+:
to 13 kgEIUF a)
DIUFa)
CIUFa)
Group 1:
9 to 18 kg
DIUF a)
CIUFa)
BIUFa)
B1IUFa)
AIUFa)
a)
IUF: suitable for “universal” ISOFIX child seats authorised for
use in this group. WARNING
If child seats are fitted to all the seats in the
second row then it is possible that the seats
of this row cannot be folded down from the
third row of seats in case of an accident. In
the event of an emergency, passengers in the
third row of seats will not be able to leave the
vehicle or to help themselves.
● Child seats should never occupy all the
seats of the second row if other passengers
are to occupy the third row of seats. Securing child seats with the seat belt
Securing the child seat using the seat belt
● Please read and observe the child seat
manufacturer's handling instructions.
● Positioning the child seat on the seat ac-
cording to the manufacturer's instructions.
● The seat belt height adjustment must be as
high as possible.
● Fasten the seat belt or pass it around the
child seat structure in the manner described
in the manufacturer's instructions.
● Make sure the seat belt is not twisted.
● Insert the latch plate into the buckle for the
appropriate seat and push it down until it is
securely locked with an audible click.
● Ensure that the upper belt web lies tightly
on the child seat.
● Pull the belt (it must be no longer possible
to pull the lower belt webbing out).
Removing the child seat
The seat belt must not be unfastened until
the vehicle has come to a standstill ››› .
● Press the red button on the buckle. The
latch plate is released from the buckle.
● Guide the belt back by hand so that it rolls
up easily and the trim will not be damaged.
● Remove the child seat from the vehicle. »
31
Technical specifications
Advice
Operation
Safety
Page 36 of 305
Safety
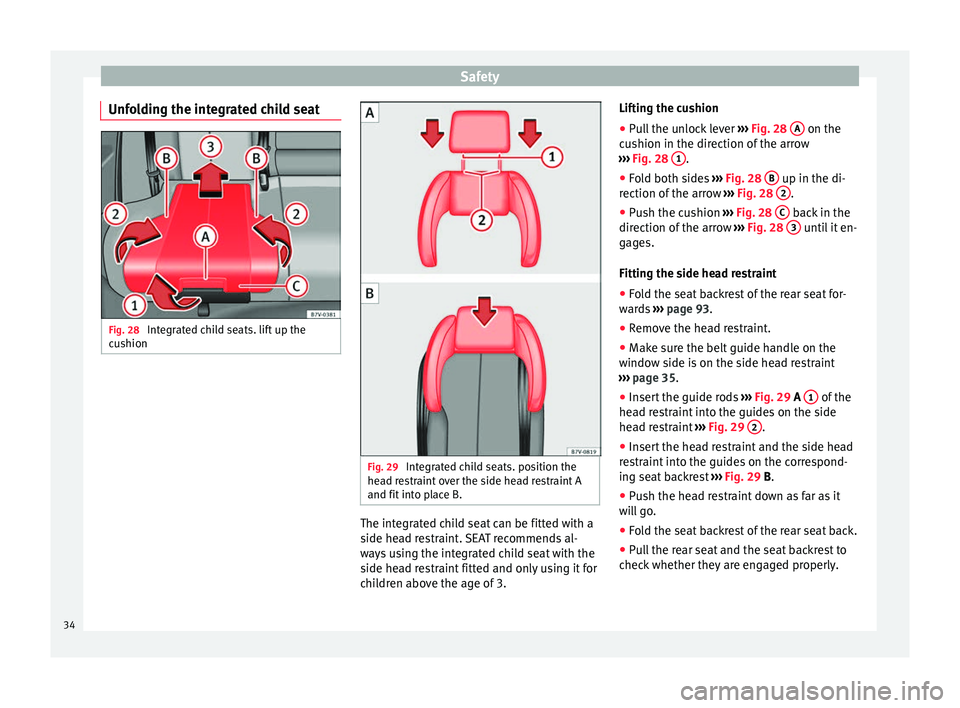
Unfolding the integrated child seat Fig. 28
Integrated child seats. lift up the
cushion Fig. 29
Integrated child seats. position the
head restraint over the side head restraint A
and fit into place B. The integrated child seat can be fitted with a
side head restraint. SEAT recommends al-
ways using the integrated child seat with the
side head restraint fitted and only using it for
children above the age of 3.Lifting the cushion
● Pull the unlock lever ››› Fig. 28 A on the
cushion in the direction of the arrow
››› Fig. 28 1 .
● Fold both sides ››› Fig. 28 B up in the di-
rection of the arrow ››› Fig. 28 2 .
● Push the cushion ››› Fig. 28 C back in the
direction of the arrow ››› Fig. 28 3 until it en-
gages.
Fitting the side head restraint
● Fold the seat backrest of the rear seat for-
wards ››› page 93 .
● Remo
ve the head restraint.
● Make sure the belt guide handle on the
window side is on the side head restraint
››› page 35.
● Inser
t the guide rods ››› Fig. 29 A 1 of the
head restraint into the guides on the side
head restraint ››› Fig. 29 2 .
● Insert the head restraint and the side head
restraint into the guides on the correspond-
ing seat backrest ››› Fig. 29
B
.
● Push the head restraint down as far as it
will go.
● Fold the seat backrest of the rear seat back.
● Pull the rear seat and the seat backrest to
check whether they are engaged properly.
34