low oil pressure Seat Alhambra 2015 Owner's Manual
[x] Cancel search | Manufacturer: SEAT, Model Year: 2015, Model line: Alhambra, Model: Seat Alhambra 2015Pages: 305, PDF Size: 5.46 MB
Page 7 of 305
Safe driving
Safety
Safe driving Safety first! This chapter contains important information,
tips, suggestions and warnings that you
should read and consider for both your own
safety and for your passengers' safety.
WARNING
● This manual contains important informa-
tion about the operation of the vehicle, both
for the driver and the passengers. The other
sections of the on-board documentation also
contain further information that you should
be aware of for your own safety and for the
safety of your passengers.
● Ensure that the on-board documentation is
kept in the vehicle at all times. This is espe-
cially important when lending or selling the
vehicle to another person. Tips for driving
Introduction Depending upon how you expect to use your
vehicle, it may a good idea to protect the en-
gine from below. An undercarriage may help to reduce the risk of damage to the lower part
of the vehicle and the oil sump when driving
over kerbs, or along dirt tracks or unsurfaced
roads, etc. SEAT recommends you have the
guard fitted by a technical service centre.
WARNING
Driving under the influence of alcohol, drugs,
medication or narcotics may result in severe
accidents and even loss of life.
● Alcohol, drugs, medication and narcotics
may significantly alter perception, affect re-
action times and safety while driving, which
could result in the loss of control of the vehi-
cle. Before starting every trip
For your own safety and the safety of your
passengers, always note the following points
before every trip:
– Make sure that the vehicle's lights and turn
signals are working properly.
– Check tyre pressure.
– Ensure that all windows provide a clear and
good view of the surroundings.
– Make sure all luggage is secured
››› page 98.
– Make sure that no objects can interfere
with the pedals. –
Adjust front seat, head restraint and rear vi-
sion mirrors properly according to your
size.
– Ensure that the passengers in the rear
seats always have the head restraints in
the in-use position ››› page 90.
– Instruct passengers to adjust the head re-
straints according to their height.
– Protect children with appropriate child
seats and properly applied seat belts
››› page 26 .
– As s
ume the correct sitting position. Instruct
your passengers also to assume a proper
sitting position. ››› page 6.
– Fasten your seat belt securely. Instruct your
passengers also to fasten their seat belts
properly. ››› page 14.
What
affects driving safety? As a driver, you are responsible for yourself
and your passengers. When your concentra-
tion or driving safety is affected by any cir-
cumstance, you endanger yourself as well as
others on the road
››› , for this reason:
– Always pay attention to traffic and do not
get distracted by passengers or telephone calls.
– Never drive when your driving ability is im-
paired (e.g. by medication, alcohol, drugs).
»
5
Technical specifications
Advice
Operation
Safety
Page 47 of 305
CockpitIn vehicles without text messages:
Release the
0.0 / SET button and, press for the next
20 seconds. Do not
reset the indicator to zero between
tw
o intervals, otherwise the display will be
incorrect.
If, while the LongLife service is valid, the
service interval display is reset to zero, the
“service will be activated by time or mile-
age”. The service interval is no longer calcu-
lated individually ›››
Booklet Maintenance
Programme. Note
● The service message disappears after a few
seconds, when the engine is started or when OK is pressed.
● In vehicles with the LongLife system in
which the battery has been disconnected for
a long period of time, it is not possible to cal-
culate the date of the next service. Therefore
the service interval display may not be cor-
rect. In this case, bear in mind the maximum
service intervals permitted in the ››› Book-
let Maintenance Programme. Control lamps
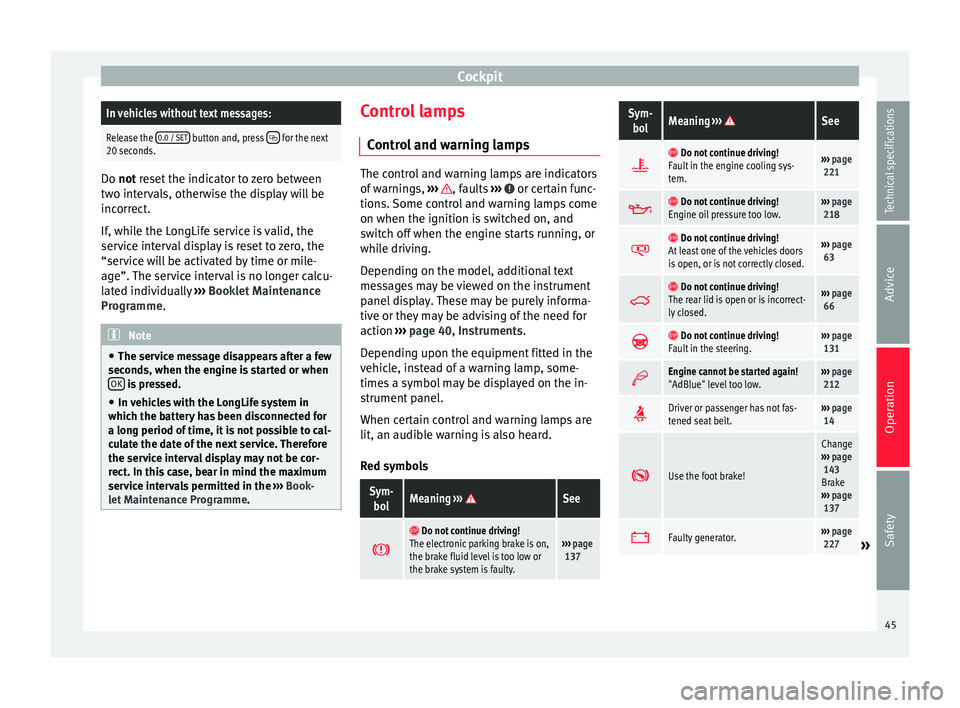
Control and warning lamps The control and warning lamps are indicators
of warnings,
››› , faults
››› or certain func-
tions. Some control and warning lamps come
on when the ignition is switched on, and
switch off when the engine starts running, or
while driving.
Depending on the model, additional text
messages may be viewed on the instrument
panel display. These may be purely informa-
tive or they may be advising of the need for
action ›››
page 40, Instruments .
D ependin
g upon the equipment fitted in the
vehicle, instead of a warning lamp, some-
times a symbol may be displayed on the in-
strument panel.
When certain control and warning lamps are
lit, an audible warning is also heard.
Red symbols
Sym- bolMeaning ››› See
Do not continue driving!
The electronic parking brake is on,
the brake fluid level is too low or
the brake system is faulty.››› page
137
Sym-
bolMeaning ››› See
Do not continue driving!
Fault in the engine cooling sys-
tem.››› page
221
Do not continue driving!
Engine oil pressure too low.››› page
218
Do not continue driving!
At least one of the vehicles doors
is open, or is not correctly closed.››› page
63
Do not continue driving!
The rear lid is open or is incorrect-
ly closed.››› page
66
Do not continue driving!
Fault in the steering.››› page
131
Engine cannot be started again!
"AdBlue" level too low.›››
page
212
Driver or passenger has not fas-
tened seat belt.›››
page
14
Use the foot brake!
Change
››› page
143
Brake
››› page
137
Faulty generator.›››
page
227» 45
Technical specifications
Advice
Operation
Safety
Page 48 of 305
Operation
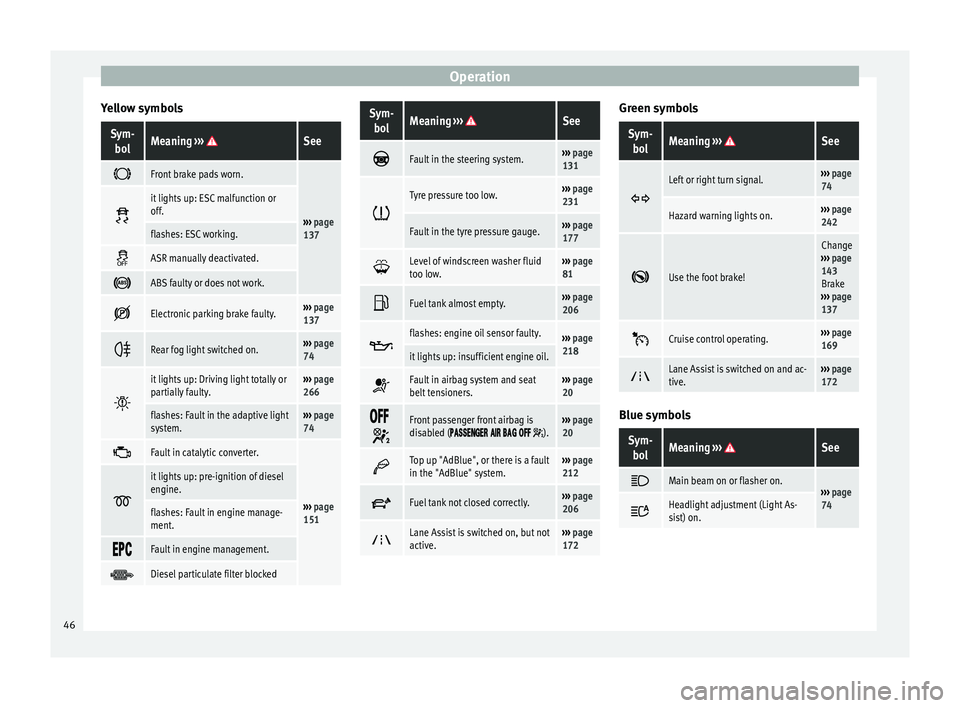
Yellow symbolsSym- bolMeaning ››› See
Front brake pads worn.
›››
page
137
it lights up: ESC malfunction or
off.
flashes: ESC working.
ASR manually deactivated.
ABS faulty or does not work.
Electronic parking brake faulty.›››
page
137
Rear fog light switched on.›››
page
74
it lights up: Driving light totally or
partially faulty.›››
page
266
flashes: Fault in the adaptive light
system.››› page
74
Fault in catalytic converter.
›››
page
151
it lights up: pre-ignition of diesel
engine.
flashes: Fault in engine manage-
ment.
Fault in engine management.
Diesel particulate filter blocked
Sym-
bolMeaning ››› See
Fault in the steering system.›››
page
131
Tyre pressure too low.›››
page
231
Fault in the tyre pressure gauge.››› page
177
Level of windscreen washer fluid
too low.›››
page
81
Fuel tank almost empty.›››
page
206
flashes: engine oil sensor faulty.›››
page
218
it lights up: insufficient engine oil.
Fault in airbag system and seat
belt tensioners.›››
page
20
Front passenger front airbag is
disabled ( ).››› page
20
Top up "AdBlue", or there is a fault
in the "AdBlue" system.›››
page
212
Fuel tank not closed correctly.›››
page
206
Lane Assist is switched on, but not
active.›››
page
172 Green symbols
Sym-
bolMeaning ››› See
Left or right turn signal.›››
page
74
Hazard warning lights on.››› page
242
Use the foot brake!
Change
››› page
143
Brake
››› page
137
Cruise control operating.›››
page
169
Lane Assist is switched on and ac-
tive.›››
page
172 Blue symbols
Sym-
bolMeaning ››› See
Main beam on or flasher on.›››
page
74 Headlight adjustment (Light As-
sist) on.
46
Page 133 of 305
Driving
Operating instructions The auxiliary heater exhaust system located
below the vehicle must be kept clear of snow,
mud and other objects. The exhaust gases
must not be obstructed in any way. The ex-
haust gases generated by the auxiliary heater
are removed via an exhaust pipe fitted under-
neath the vehicle.
On heating the vehicle interior, depending on
the outside temperature the warm air is first
directed at the windscreen and then to the
rest of the vehicle interior through the air
vents. If the air vents are turned towards the
windows, for example, the form of air distri-
bution may be affected.
Depending on the outside temperature, the
temperature at which the auxiliary heater
warms the vehicle interior may be somewhat
higher if the heating or air conditioner tem-
perature control is set to maximum before
switching the heating on.
Depending on the engine, vehicles with aux-
iliary heater may be fitted with a second bat-
tery in the luggage compartment that is re-
sponsible for powering the auxiliary heater.
Cases in which the auxiliary heater will not
switch on
● The auxiliary heater requires about as
much power as the dipped beam headlights.
If the battery charge is low, the auxiliary heat- er will switch off automatically or will not
even switch on. This avoids problems when
starting the engine.
●
The heater will switch on just once each
time. The timer will also have to be switched
back on every time it is required. Note
● Noise will be heard while the auxiliary
heater is running.
● When the air humidity is high and the out-
side temperature low, the heating system
may evaporate condensation from the auxili-
ary heater. In this case, steam may be re-
leased from underneath the vehicle. This is
completely normal and there is no need to
suspect a fault!
● If the auxiliary heater runs several times
over a prolonged period, the vehicle battery
may run flat. To re-charge the battery, drive
the vehicle for a long distance. As a general
rule, drive for as much time as the auxiliary
heating was working. Driving
Address Introduction The power steering is not hydraulic but elec-
tromechanical. The advantage of this steer-
ing system is that it disposes of hydraulic
tubes, hydraulic oil, the pump, filter and oth-
er components. The electromechanical sys-
tem saves fuel. While a hydraulic system re-
quires oil pressure to be maintained, electro-
mechanical steering only requires energy
when the steering wheel is turned.
With the power steering system, the assisted
steering function automatically adjusts ac-
cording to the vehicle speed, the steering tor-
que and the wheel turning angle. The power
steering only works when the engine is run-
ning.
WARNING
If the power steering is not working then the
steering wheel is much more difficult to turn
and the vehicle more difficult to control.
● The power steering only works when the
engine is running.
● Never allow the vehicle to move when the
engine is switched off.
● Never remove the key from the ignition if
the vehicle is in motion. The steering may » 131Technical specifications
Advice
Operation
Safety
Page 144 of 305
Operation
frequently, or if rust has formed on the discs,
SEAT recommends cleaning the pads and
discs by braking firmly a few times at a mod-
erately high speed. Only do this without en-
dangering vehicles behind you or any other
road users ››› .
Faults in the brake system
During braking, if you notice that the vehicle
does not react as usual (that the braking dis-
tance has increased suddenly) it may be pos-
sible that there is a fault in the braking sys-
tem. The warning lamp lights up and a
text message displayed. Take the vehicle to a
specialised workshop immediately and have
the fault repaired. Drive at a moderate speed
and be prepared to use more pressure on the
brake pedal, and allow for longer stopping
distances.
Brake servo
The brake servo only operates when the en-
gine is running and the pressure applied by
the driver on the brake pedal increases.
If the brake servo does not operate or the ve-
hicle must be towed, then the brake pedal
will have to be pressed with more force given
that the braking distance will be increased
when the brake servo does not operate ››› . WARNING
New brake pads do not brake to full efficien-
cy.
● For the first 320 km, new brake pads have
not yet reached their maximum braking ca-
pacity, and need to be “run in” first. For this,
to compensate for reduced braking efficiency
the brake pedal will have to be pressed with
more force.
● To avoid losing control of the vehicle and
causing serious accidents, always take great
care when driving with new brake pads.
● When running in new brake pads, always
respect the safety distances between you and
other vehicles and do not cause situations re-
quiring extreme braking performance. WARNING
When brakes overheat, braking is less effi-
cient and braking distances increase.
● When driving on slopes, brakes can be
overloaded and overheat quickly.
● Reduce speed or change down a gear when
faced with steep and long slopes. This allows
you to use the engine braking effect and to
reduce the strain on the brake system.
● Non-standard or damaged front spoilers
could restrict the airflow to the brakes and
cause them to overheat. WARNING
Wet, frozen or salt-covered brakes take lon-
ger to engage and this increases braking dis-
tances.
● Test the brakes carefully.
● Dry the brakes, free them of ice and salt by
braking gently several times, when weather,
road and traffic conditions permit. WARNING
Driving without the brake servo may signifi-
cantly increase the braking distance and re-
sult in a severe accident.
● Never allow the vehicle to move forwards
when the engine is switched off.
● If the brake servo does not operate or the
vehicle must be towed, then the brake pedal
will have to be pressed with more force given
that the braking distance will be increased
when the brake servo does not operate. CAUTION
● Never make the brakes “slip” by pressing
the pedal gently, if it is not really necessary
to brake. Continuously pressing on the brake
pedal will heat the brakes. This could signifi-
cantly reduce braking power, increase brak-
ing distance or even result in the total failure
of the brake system.
● Reduce speed or change down a gear when
faced with steep and long slopes. This allows
you to use the engine braking effect and to 142
Page 152 of 305
Operation
Think ahead and “flow” with the traffic
Frequent acceleration and braking considera-
bly increase fuel consumption. If you think
ahead as you drive and keep a safe distance
from the vehicle in front, it is possible to slow
down by simply lifting your foot off the accel-
erator. This eliminates the need for constant
braking and acceleration.
Calm and steady driving
Constancy is more important than speed: The
more you drive at a constant speed, the lower
the fuel consumption.
When driving on the motorway, it is more effi-
cient to drive at a constant and more moder-
ate speed than to be continuously accelerat-
ing and braking. As a general rule, you will
reach your destination just as quickly when
you drive at a constant speed.
The cruise control function helps you to ach-
ieve a constant style of driving.
Moderate use of additional devices
It is important to travel in comfort, but con-
venience systems should be used ecological-
ly.
Some equipment, when connected, increase
fuel consumption considerably, for example:
● Air conditioning cooling system: If the air
conditioning system is required to cool to
significantly lower temperatures than the true outside temperature, it will require a large
amount of energy from the engine. Therefore,
we recommend that the selected temperature
for the vehicle is not too different to the out-
side temperature. It is a good idea to air the
vehicle before starting your journey and to
drive a short distance with all the windows
open. Only then should you close all the win-
dows and switch on the air conditioning.
Keep windows closed when travelling at high
speeds. Driving with the windows open in-
creases fuel consumption.
●
Switch off the seat heating when the seats
have warmed up.
● Switch off the heated rear window and the
windscreen heating when the windows have
demisted and are free of ice.
● Do not leave the auxiliary heater switched
on when the vehicle is moving ››› page 128.
Avoid short journeys
Fuel consumption is much higher when the
engine is cold, immediately after it has been
started. It takes a few kilometres of driving
for the engine to warm up and to normalise
consumption.
The engine and catalytic converter need to
reach their proper working temperature in or-
der t o minimi
se fuel consumption and emis-
sions. The ambient temperature has a deci-
sive influence. Fig. 133 shows the difference in consump-
tion for the same journey at +20 °C (+68 °F)
and at -10 °C (+14 °F).
Therefore, unnecessary short journeys
should be avoided. Try to combine trips.
The vehicle uses more fuel in winter than in
summer, even when other conditions are the
same.
“Warming” the engine is not only forbidden
in some countries, but in practice it is techni-
cally superfluous as it is a waste of fuel.
Adjusting type pressures.
Having the correct pressure in your tyres
helps to reduce rolling resistance and, as a
result reduces fuel consumption. Increasing
the tyre pressure slightly (+0.2 bar
[2.9 psi/20 kPa]) can help to save fuel.
If you are prepared to accept a slight reduc-
tion in comfort, the tyres may be filled to the
pressures recommended for a fully-loaded
vehicle. This is also valid when driving alone
without luggage.
When you buy new tyres, make sure they are
optimised for minimum rolling resistance.
Use low friction engine oil
The use of low viscosity totally synthetic oils,
known as low friction engine oil, helps to re-
duce fuel consumption. These oils reduce the
resistance caused by friction in the engine,
150
Page 198 of 305
Advice
Automatic car washes
Always observe the instructions provided at
the automatic car wash. The standard pre-
cautionary measures prior to entering the car
wash should be taken to avoid damage to
the vehicle (close all windows, fold in exterior
mirrors). If the vehicle is fitted with additional
components (spoiler, roof-rack, aerial, etc.),
check with the car wash supervisor whether
these can enter the car wash ››› .
The vehicle paintwork is so durable that the
vehicle can normally be washed without
problems in an automatic car wash tunnel.
However, wear and damage to the paintwork
will depend on the type of car wash used.
SEAT recommends the use of car washes
without brushes.
To remove traces of wax on windows and to
prevent wiper blades from scratching, please
observe the following ››› page 197, Cleaning
windows and exterior mirrors .
Washing the car by hand
When washing the car by hand, use plenty of
water to soften the dirt first, and rinse off as
well as possible.
Then clean the vehicle with a soft sponge,
glove or brush using only slight pressure.
St ar
t at the roof and work downwards. Spe-
cial car shampoo should only be used for
ver
y persistent dirt. Rinse the sponge or glove thoroughly and of-
ten.
Wheels, sills and similar should be cleaned
last. Use a second sponge for this.
WARNING
Sharp components on the vehicle may cause
injury.
● Protect arms and hands from sharp edges
when cleaning the vehicle undercarriage or
the interior of the wheel hubs. WARNING
After the vehicle has been washed, the brak-
ing effect will be reduced (and the braking
distance increased) due to moisture (and ice
in winter) on the brakes.
● “Dry the brakes and remove ice” by braking
carefully. Ensure that you are not endanger-
ing other road-users or breaking traffic regu-
lations in the process. CAUTION
● The temperature of the water must not ex-
ceed +60 °C (+140 °F).
● To avoid damage to the paintwork, do not
wash the vehicle in full sun.
● Do not use rough sponges or similar which
could damage the surface to clean away the
traces of insects. ●
Never wipe the headlights with a dry cloth
or sponge, always moisten first. It is best to
use soapy water.
● Washing the vehicle in low temperatures:
When washing the vehicle with a hose, do
not direct water into the lock cylinders or the
gaps around the doors or roof. Locks and
seals could freeze! CAUTION
To prevent damage to the vehicle, please ob-
serve the following before entering an auto-
matic car wash: ● Compare the distance between the vehicle
wheels and the distance between the guide-
rails of the car wash to prevent damage to the
wheels and tyres!
● Switch off the rain sensor and the Au-
to Hold function before entering a car wash.
● Compare the height and width of your vehi-
cle with the available height and width when
entering and driving through the car wash.
● Fold in exterior mirrors Electrically retracta-
ble exterior mirrors must not be folded in or
out by hand. Always use the electrical power
control.
● To avoid damaging the bonnet paintwork,
rest the wipers on the windscreen after dry-
ing them. Do not let them fall!
● Lock the rear lid to prevent it from opening
unexpectedly while inside the car wash. 196
Page 199 of 305
Care and maintenance
Washing the vehicle with high
pressure cleaning equipment When cleaning the vehicle with a high-pres-
sure cleaner, always follow the operating in-
structions for the equipment. Pay special at-
tention to the required pressure of the jet
and the distance
between the jet and the ve-
hic
le ››› .
Keep a suitable distance from soft materials,
such as rubber hoses or insulating material,
and from the parking distance warning sys-
tem sensors. The parking distance sensors
are fitted in the rear bumpers and, where ap-
plicable, in the front bumpers ››› .
Do not use a nozzle that sprays the water out
in a direct stream
or one th
at
has a rotating
jet for forcing off dirt ››› .
WARNING
The incorrect use of high pressure cleaning
equipment could result in permanent dam-
age, visible or invisible, to the tyres or other
materials. This could result in a serious acci-
dent.
● Ensure there is a suitable distance between
the nozzle and the tyres.
● Never wash tyres with a concentrated jet or
so-called “dirt blasters”. Even at large spray-
ing distances and short cleaning times, you
may damage the tyres. WARNING
After the vehicle has been washed, the brak-
ing effect will be reduced (and the braking
distance increased) due to moisture (and ice
in winter) on the brakes.
● “Dry the brakes and remove ice” by braking
carefully. Ensure that you are not endanger-
ing other road-users or breaking traffic regu-
lations in the process. CAUTION
● The temperature of the water must not be
above +60 °C (+140 °F).
● To avoid damage to the paintwork, do not
wash the vehicle in full sun.
● The sensors on the bumpers should be kept
clean and free of ice at all times to ensure the parking distance warning system and the
parking aid system operate correctly. When
cleaning with pressure hoses and steam
cleaners, the sensors should be sprayed only
briefly. A distance of 10 cm between the sen-
sors and the steam / hose nozzle must be ob-
served.
● Do not use a high pressure cleaner to re-
move ice or snow from windows
● Washing the vehicle in low temperatures:
When washing the vehicle with a hose, do
not direct water into the lock cylinders or the
gaps around the doors or roof. Locks and
seals could freeze! Cleaning windows and exterior
mirrors
Cleaning windows and exterior mirrors
Spray windows and exterior windows with a
standard window cleaner containing alcohol.
Dry the windows with a clean chamois leath-
er or a lint-free cloth. The chamois leathers
used on painted surfaces are not suitable for
cleaning windows because they are soiled
with wax deposits which could smear the
windows.
Use window cleaner or a silicone remover to
clean rubber, oil, grease and silicone depos-
its off
››› .
Removing wax deposits
Automatic car washes and certain car care
products may leave wax deposits on the win-
dows. These deposits can only be removed
with a special product or cleaning cloths.
Wax deposits on the windscreen could cause
the wiper blades to judder. SEAT recom-
mends you wipe the wax deposits off the
windscreen with a soft cloth each time after
you have washed the vehicle.
A window cleaning detergent which helps to
dissolve the wax may be added to the wind-
screen washer fluid to prevent the wiper
blades from scratching the windscreen.
Please ensure you add the cleaning product
in the correct proportions. Products for »
197
Technical specifications
Advice
Operation
Safety
Page 219 of 305
Checking and refilling levels
● Before opening the bonnet, make sure that
the windscreen wiper arms are in place
against the windscreen ››› .
● Open the driver door.
● Pull the release lever ››› Fig. 162 in the di-
r ection of
the arrow. The bonnet is released
from the lock carrier by a spring mechanism
››› .
● Lift the bonnet using the release lever
››› Fig. 163 (arrow) and open the bonnet fully.
The bonnet i
s held open thanks to the gas
strut.
Closing the bonnet
● To close the bonnet, pull it down to over-
come the gas strut pressure ››› .
● Allow the bonnet to fall into the lock carrier.
Do not press down.
If the bonnet is not correctly closed, open it
once again and close it correctly.
The bonnet is correctly closed when it is flush
with the corresponding parts on the body-
work. WARNING
If the bonnet is not correctly closed, it could
suddenly open while driving leaving the driv-
er without visibility. This could result in a se-
rious accident.
● After closing the bonnet, always check that
it is properly secured by the locking mecha- nism in the lock carrier. The bonnet must be
flush with the surrounding body panels.
●
While driving, if you notice that the bonnet
is not correctly closed then stop immediately
and close it correctly.
● Only open and close the bonnet when there
is nobody within its range. CAUTION
● To avoid damage to the bonnet and to the
windscreen wiper arms, only open it when
the windscreen wipers are in place against
the windscreen.
● Before driving, always lower the wiper
arms. Checking fluid levels
Fig. 164
Diagram for the location of the vari-
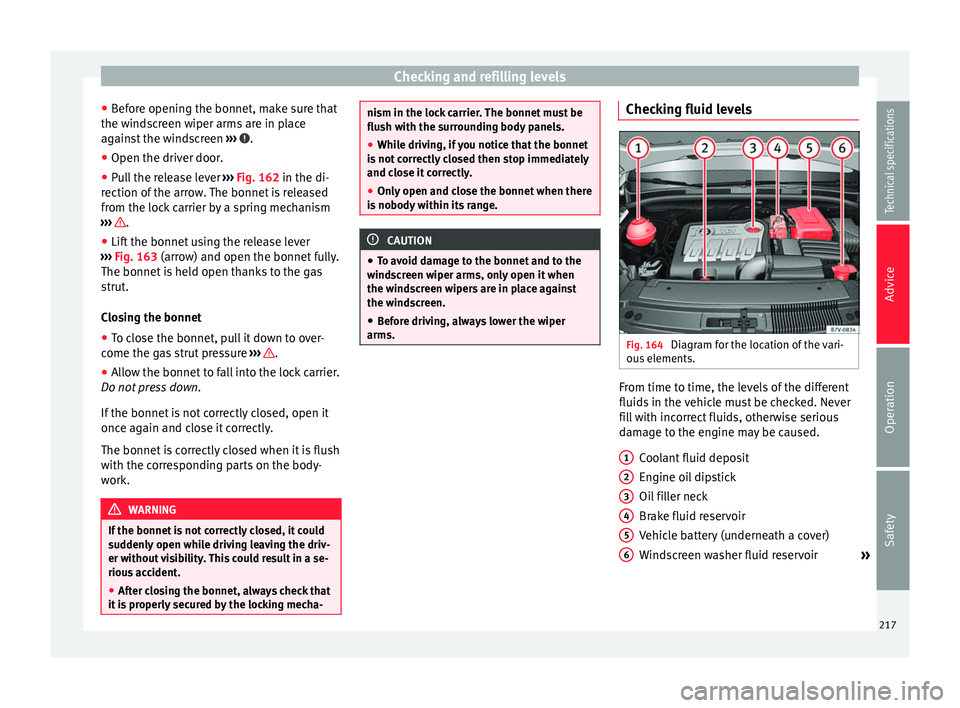
ous elements. From time to time, the levels of the different
fluids in the vehicle must be checked. Never
fill with incorrect fluids, otherwise serious
damage to the engine may be caused.
Coolant fluid deposit
Engine oil dipstick
Oil filler neck
Brake fluid reservoir
Vehicle battery (underneath a cover)
Windscreen washer fluid reservoir »
1 2
3
4
5
6
217
Technical specifications
Advice
Operation
Safety
Page 234 of 305
Advice
●
Never mount used tyres or wheels if you are
not sure of their previous history. They may
be damaged, although the damage is not im-
mediately visible.
● Old tyres, even if they have never been
used, may lose air or burst unexpectedly
while driving, resulting in serious accident or
damage. If tyres are over six years old, they
should only be used in an emergency and
with extreme caution. Note
● For technical reasons, it is not generally
possible to use the wheels from other vehi-
cles. In some cases, this may also be true for
the same model of wheel. Please refer to the
vehicle documentation or ask at a technical
service. About your tyres and wheels
Fig. 174
Diagram for changing wheels The tyres of a vehicle are the components
which are subjected to most stress and are
the most underestimated. Tyres are very im-
portant, as the support offered by their nar-
row surface is the only point of contact be-
tween the vehicle and the road.
The service life of tyres is dependent on tyre
pressure, driving style, the care they receive
and the correct fitting.
The tyres and wheel rims are an essential
part of the vehicle's design. The tyres and
rims approved by SEAT are specially matched
to the characteristics of the vehicle and our
critical to good road holding and safe han-
dling.
Avoiding damage to tyres and wheels
● If you have to drive over a kerb or similar
obstacle, drive very slowly and as near as
possible at a right angle to the kerb.
● Inspect the tyres regularly for damage
(punctures, cuts, cracks, dents).
● Remove any foreign bodies found on the
outside of the tyre tread and ensure that they
have not passed through the wall of the tyre
››› page 237 .
● In a d
dition, the instructions for tyre control
systems should always be observed.
● Replace damaged or worn tyres as soon as
possible ››› page 237. ●
Re
gularly check tyres for non-visible dam-
age ››› page 237.
● Never e
xceed the maximum permitted
speed or loads specified for the type of tyre
fitted on your vehicle ››› page 238.
● Do not allow tyres to come into contact with
aggressive substances, grease, oil, fuel or
brake fluid ››› .
● Lost valve caps should be replaced imme-
diately.
Tyres with directional tread pattern
Tyres with directional tread pattern have
been designed to operate best when rotating
in only one direction. An arrow on the tyre
sidewall indicates the direction of rotation on
tyres with directional tread ››› page 238. Al-
ways observe the direction of rotation indica-
ted when mounting the wheel. This guaran-
tees optimum grip and helps to avoid aqua-
planing, excessive noise and wear.
If the tyre is mounted in the opposite direc-
tion of rotation, drive with extreme caution,
as the tyre is no longer being used correctly.
This is of particular importance when the
road surface is wet. Change the tyre as soon
as possible or remount it with the correct di-
rection of rotation.
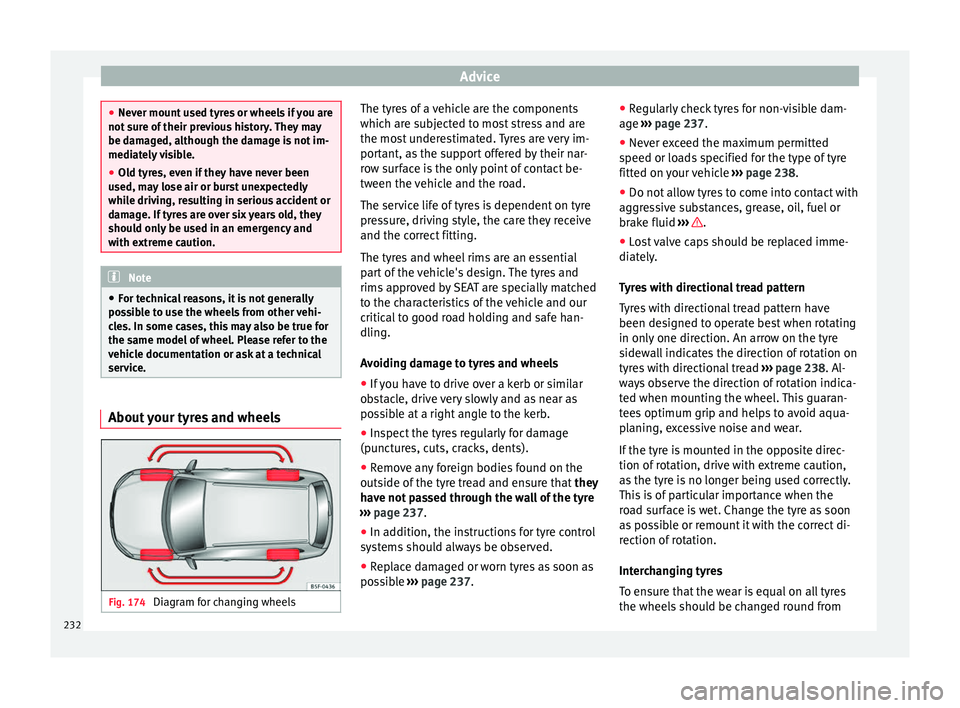
Interchanging tyres
To ensure that the wear is equal on all tyres
the wheels should be changed round from
232