open bonnet Seat Alhambra 2015 Owner's Manual
[x] Cancel search | Manufacturer: SEAT, Model Year: 2015, Model line: Alhambra, Model: Seat Alhambra 2015Pages: 305, PDF Size: 5.46 MB
Page 42 of 305
Operation
Key-operated switch in glove com-
partment for deactivating front pas-
senger front airbag . . . . . . . . . . . . . . .20
Passenger front airbag off warning
lamp . . . . . . . . . . . . . . . . . . . . . . . . . . . . . 20
Lever for:
– Manual gearbox . . . . . . . . . . . . . . . . 143
– Automatic gearbox . . . . . . . . . . . . .143
12 Volt power socket . . . . . . . . . . . . .119
Auto Hold Switch
- . . . . . . . . 156
Electronic parking brake switch 137
Start-up push button (Keyless Ac-
cess closing and start-up system)
21 22
23
24
25
26
27 Ignition lock
. . . . . . . . . . . . . . . . . . . . . . 133
Pedals . . . . . . . . . . . . . . . . . . . . . . . . . . . 143
Steering column adjustment lever .6
Fuse box cover . . . . . . . . . . . . . . . . . . . 264
Lever for:
– Cruise control system (CCS) –
– – /--/-- . . 169
Open bonnet lever . . . . . . . . . . . . . . . . 214
Controls for:
– Electric windows . . . . . . . . . . . . . 70
– Childproof locks . . . . . . . . . . . . . 63
28 29
30
31
32
33
34 Note
● Some of the items of equipment listed here
are fitted only on certain model versions or
are optional extras.
● In versions with the steering wheel on the
right, the layout of the control elements is
somewhat different. But the symbols as-
signed to the controls correspond to the sym-
bols used in the versions with the steering
wheel on the left Instruments
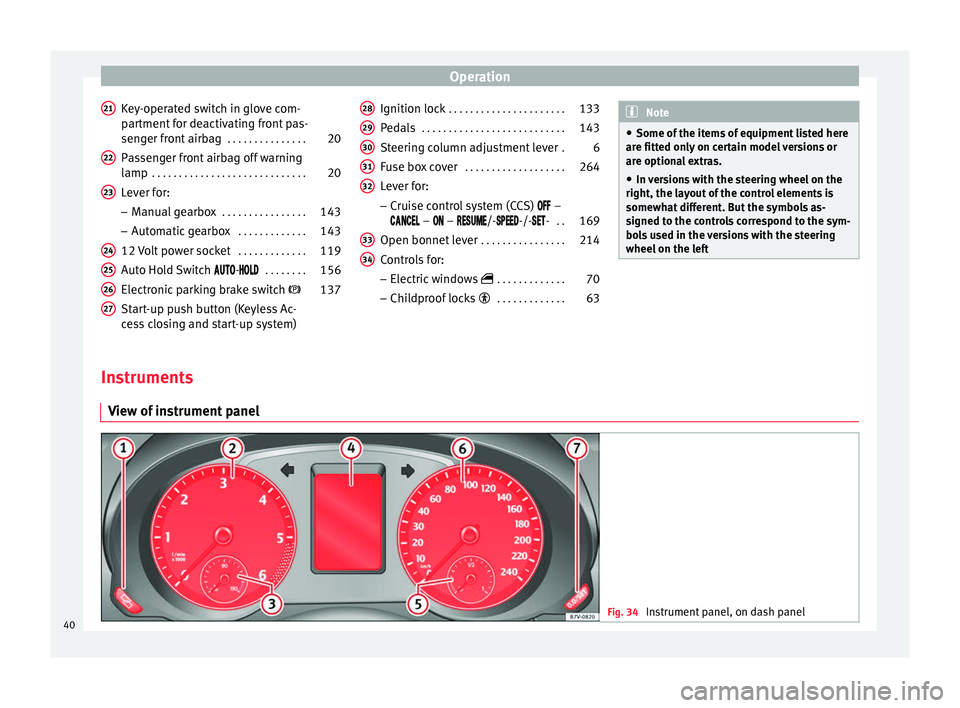
View of instrument panel Fig. 34
Instrument panel, on dash panel40
Page 49 of 305
Cockpit
Other control lampsSym- bolMeaning ››› See
Electronic immobiliser active.›››
page
133
Service interval display›››
page 44
Mobile telephone is connected
via Bluetooth to the original tel-
ephone device.›››
Book-
let Radio
or
››› Book-
let Navi-
gation
system
Mobile telephone battery
charge meter. Available only for
pre-installed factory-fitted devi-
ces.
Freezing warning. The outside
temperature is lower than +4 °C
(+39 °F).›››
page 42 WARNING
If the warning lamps and messages are ignor-
ed, the vehicle may stall in traffic, or may
cause accidents and severe injuries.
● Never ignore the warning lamps or text
messages.
● Stop the vehicle safely as soon as possible.
● Park the vehicle away from traffic and en-
sure that there are no highly flammable ma-
terials under the vehicle that could come into
contact with the exhaust system (e.g. dry
grass, fuel). ●
A faulty vehicle represents a risk of acci-
dent for the driver and for other road users. If
necessary, switch on the hazard warning
lamps and put out the warning triangle to ad-
vise other drivers.
● Before opening the bonnet, switch off the
engine and allow it to cool.
● In any vehicle, the engine compartment is a
hazardous area and could cause severe inju-
ries ››› page 214. CAUTION
Failure to heed the control lamps and text
messages when they appear may result in
faults in the vehicle. SEAT information system
Introduction With the ignition switched on, it is possible
to read the different functions of the display
by scrolling through the menus.
In vehicles with a multifunction steering
wheel, there are no buttons on the wind-
screen wiper lever. The multifunction display
can only be controlled from the buttons on
the steering wheel.
The number of menus displayed on the in-
strument panel will vary according to the ve-
hicle electronics and equipment.A specialised workshop will be able to pro-
gramme or modify additional functions, ac-
cording to the vehicle equipment. SEAT rec-
ommends taking your car in for technical
service.
Some menu options can only be read when
the vehicle is at a standstill.
As long as a priority 1 warning is displayed, it
will not be possible to read the menus. To
display the menus, confirm the warning by
pressing
OK .
Summary of the menu structure ■
Multifunction display (MFI) ››› page 50
■ Journey duration
■ Current fuel consumption
■ Average fuel consumption
■ Operating range
■ Distance covered
■ Average speed
■ Digital display of speed
■ Oil temperature digital display
■ Speed warning
■ Audio ›
›
›
Booklet Radio or ›››
Booklet Navi-
gation system
■ Navigation ››
›
Booklet Navigation system
■ Telephone ›››
Booklet Radio or ›››
Book-
let Navigation system
■ Auxiliary heating ››› page 128
»
47
Technical specifications
Advice
Operation
Safety
Page 64 of 305
Operation
●
When the doors are locked, it is difficult to
get to passengers in the vehicle interior in
case of an emergency. Passengers could re-
main trapped inside and unable to unlock the
doors in case of an emergency. Anti-theft alarm
The anti-theft alarm makes it more difficult to
break into the vehicle or steal it.
The anti-theft alarm is automatically turned
on when the vehicle is locked with the key.
When does the system trigger an alarm?
The anti-theft alarm siren will be triggered for
about 30 seconds accompanied by optical
warning signals for about five minutes when
the vehicle is locked and the following unau-
thorised actions are taken:
● When the door is mechanically unlocked
using the vehicle key without turning the ig-
nition within the following 15 seconds.
● A door is opened.
● The bonnet is opened.
● The rear lid is opened.
● When the ignition is switched on with a
non-authorised key.
● When the vehicle battery is disconnected.
● When there is movement inside the vehicle
(vehicles with interior monitoring). ●
When the vehicle is towed (vehicles with
anti-tow system)
● When the vehicle is lifted (vehicles with an-
ti-tow system).
● Transporting the vehicle on a ferry or by
railroad (vehicles with an anti-tow system or
interior monitoring).
● Unhitch a trailer connected to the anti-theft
alarm ››› page 179 .
Ho w t
o turn OFF the alarm
Unlock the vehicle with the unlocking button
on the key or turn on the ignition with a valid
key. On vehicles with the Keyless Access sys-
tem, the alarm can also be disabled by grasp-
ing the door handle ››› page 59. Note
● The alarm will be triggered once more when
anybody enters the same zone of surveillance
or any other zone. If, for example, after open-
ing a door, the rear lid is also opened.
● The anti-theft alarm is not activated when
the vehicle is locked from within using the
central locking button .
● If the driver door is unlocked mechanically
with the key, only the driver door is unlocked,
the rest of the doors remain locked. Only
when the ignition has been turned on will the
other doors be available - but not unlocked -
and the central lock button will be activated. ●
If the vehicle battery is run down or flat
then the anti-theft alarm will not operate cor-
rectly. Interior monitoring system and anti-
tow system*
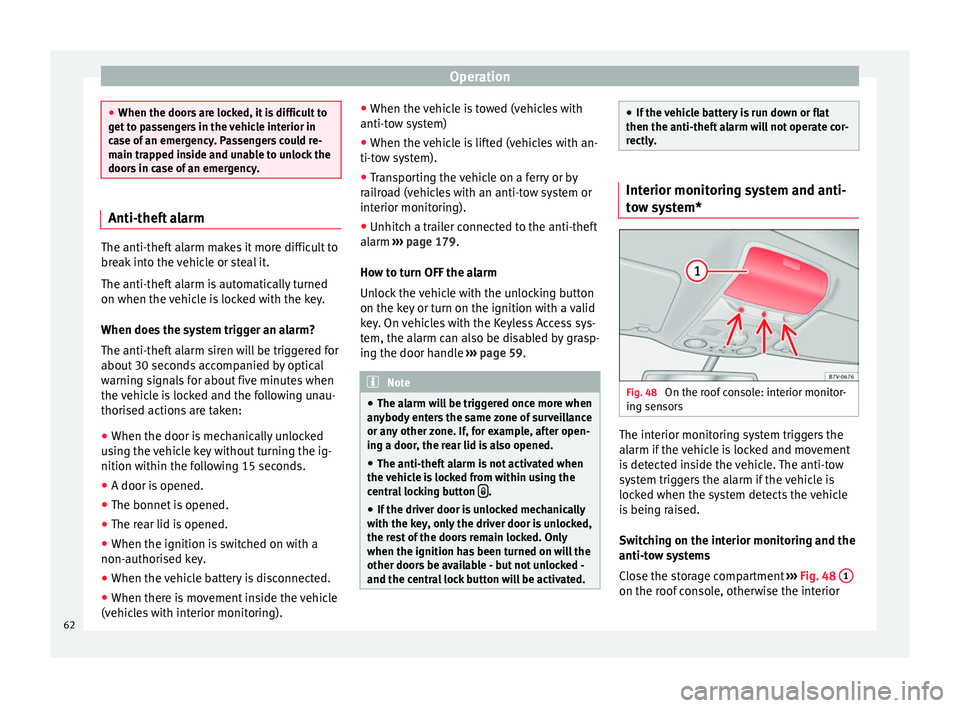
Fig. 48
On the roof console: interior monitor-
ing sensors The interior monitoring system triggers the
alarm if the vehicle is locked and movement
is detected inside the vehicle. The anti-tow
system triggers the alarm if the vehicle is
locked when the system detects the vehicle
is being raised.
Switching on the interior monitoring and the
anti-tow systems
Close the storage compartment
››› Fig. 48 1 on the roof console, otherwise the interior
62
Page 161 of 305
Driver assistance systems
Conditions requiring the key to restart the
engine
The engine must be started manually under
the following conditions:
● If the driver unbuckles his/her seat belt.
● If the driver door is opened.
● If the bonnet is opened.
● In vehicles with a manual gearbox: if a gear
has been selected.
Switching Start-Stop mode on and off
manually
● Press the button on the centre console
››› Fig. 136 .
● The b utt
on will light up when the Start-Stop
function is switched off.
The engine will start immediately if the vehi-
cle is in Stop mode when it is switched off
manually. WARNING
The brake servo and the power steering do
not work when the engine is switched off.
● Never allow the vehicle to move when the
engine is switched off. CAUTION
Using the Start-Stop function for a long peri-
od at very high outside temperatures could
damage the vehicle's battery. Note
● In some cases, you may have to restart the
vehicle using the key. Observe the corre-
sponding message on the instrument panel
display.
● If the steering wheel is turned more than
270°, Stop will not function; however, the an-
gle of steering wheel turn does not affect
starting the vehicle. Parking sensor system*
Introduction The parking sensor system assists the driver
when parking. When the vehicle approaches
an obstacle, forwards or backwards, an inter-
mittent audible warning will be heard, higher
or lower depending on the distance. The
shorter the distance, the shorter the intervals
between tones. If the vehicle is too close to
the obstacle, the audible warning becomes
constant.
If you continue to approach an obstacle when
the sound is continuous, this means the sys-
tem can no longer measure the distance.
The sensor system on the bumpers transmit
and receive ultrasound. Using the ultrasound
signal (transmission, reflection from the ob-
stacle and reception), this system continu-ously calculates the distance between the
bumper and the obstacle. WARNING
The parking sensor system and the optical
parking system cannot replace driver aware-
ness.
● The sensors have blind spots in which ob-
stacles and people are not registered.
● Always observe the area around the vehi-
cle, as the sensors do not always detect
small children, animals or objects.
● The surface of certain objects and some
clothing do not reflect the ultrasound signals
from the parking distance system. The sys-
tem cannot detect or incorrectly detects
these objects and people wearing these
types of clothes.
● External sound sources can affect the park-
ing distance aid signals. In this case, under
certain circumstances, people and objects
will not be detected. CAUTION
● The sensors may not always be able to de-
tect objects such as trailer draw bars, thin
rails, fences, posts, trees and open boots,
etc. This could result in damage to your car.
● Although the parking sensor system de-
tects and warns of the presence of an obsta-
cle, the obstacle could disappear from the an-
gle of measurement of the sensors if it is too
high or low and the system would no longer » 159
Technical specifications
Advice
Operation
Safety
Page 195 of 305
Care and maintenance
equipment at the workshop. If this is the
case, the information and descriptions given
in the Instruction Manual will not match the
original functions. Therefore, SEAT recom-
mends that any modifications be recorded in
the section “Other workshop notes” in the
Maintenance Programme.
The technical service centre must have a re-
cord of any modification to the programming.
Reading the vehicle fault memory
There is a diagnostics connector in the vehi-
cle interior for reading the vehicle fault mem-
ory. The fault memory documents errors and
deviations from the theoretical values of the
electronic control units.
The diagnostics connector is in the driver
side footwell area, next to the lever for open-
ing the bonnet, below a cover.
The fault memory should only be read and re-
set by a specialised workshop.
Using a mobile telephone in a vehicle
without connection to an exterior
aerial Mobile telephones transmit and receive radio
waves, both when in use and when on stand-
by. Scientific studies state that radio waves
exceeding certain values may be harmful to
the human body. International committees and authorities have established limits and
directives in order to ensure electromagnetic
radiation from mobile phones remains within
certain limits that do not endanger health.
Nevertheless, there is no conclusive scientif-
ic evidence that wireless telephones are to-
tally safe.
Therefore, some experts recommend that use
of mobile phone be kept to a minimum until
the results of current research are published.
When a mobile phone not connected to an
exterior aerial is used inside the vehicle, the
electromagnetic radiation may be greater
than if the mobile phone were connected to a
built-in aerial or to another exterior aerial.
If the vehicle is fitted with a suitable hands-
free device, it will comply with the legislation
in many countries which only permits the use
of mobile phones inside vehicles using a
hands-free device.
The hands-free system mounted at the facto-
ry has been designed for use with conven-
tional mobile phones and phones with Blue-
tooth technology. Mobile phones should be
placed on a suitable phone cradle. In addi-
tion, the cradle should always be correctly fit-
ted into the base plate. This ensures that the
mobile phone is securely attached to the
dash panel, it is always within reach of the
driver and is connected to the vehicle exterior
aerial.
If the mobile phone is connected to an aerial
incorporated into the vehicle or an exterior
aerial connected to the vehicle, it will help re-
duce the electromagnetic radiation transmit-
ted and the risk to human health. It will also
improve the quality of the connection.
If the phone is used inside the vehicle with-
out the hands-free system, it will not be se-
curely fastened and will not be connected to
the exterior aerial of the vehicle telephone.
Nor will the telephone charge if it is not on
the support. In addition, some calls may
break off and the quality of the connection
will be affected.
Mobile phones should only be used inside
the vehicle if they are connected to a hands-
free system with an exterior aerial.
WARNING
If the mobile phone is not securely fastened
in position, it could be sent flying around the
vehicle in the event of sharp braking, sudden
manoeuvres or accident, causing injury.
● While driving, mobile phones must be se-
curely fastened in position, outside the radi-
us of action of the airbags, or safely stowed
away. WARNING
When using a mobile phone without a con-
nection to an exterior aerial, the maximum
permitted levels of electromagnetic radiation » 193Technical specifications
Advice
Operation
Safety
Page 198 of 305
Advice
Automatic car washes
Always observe the instructions provided at
the automatic car wash. The standard pre-
cautionary measures prior to entering the car
wash should be taken to avoid damage to
the vehicle (close all windows, fold in exterior
mirrors). If the vehicle is fitted with additional
components (spoiler, roof-rack, aerial, etc.),
check with the car wash supervisor whether
these can enter the car wash ››› .
The vehicle paintwork is so durable that the
vehicle can normally be washed without
problems in an automatic car wash tunnel.
However, wear and damage to the paintwork
will depend on the type of car wash used.
SEAT recommends the use of car washes
without brushes.
To remove traces of wax on windows and to
prevent wiper blades from scratching, please
observe the following ››› page 197, Cleaning
windows and exterior mirrors .
Washing the car by hand
When washing the car by hand, use plenty of
water to soften the dirt first, and rinse off as
well as possible.
Then clean the vehicle with a soft sponge,
glove or brush using only slight pressure.
St ar
t at the roof and work downwards. Spe-
cial car shampoo should only be used for
ver
y persistent dirt. Rinse the sponge or glove thoroughly and of-
ten.
Wheels, sills and similar should be cleaned
last. Use a second sponge for this.
WARNING
Sharp components on the vehicle may cause
injury.
● Protect arms and hands from sharp edges
when cleaning the vehicle undercarriage or
the interior of the wheel hubs. WARNING
After the vehicle has been washed, the brak-
ing effect will be reduced (and the braking
distance increased) due to moisture (and ice
in winter) on the brakes.
● “Dry the brakes and remove ice” by braking
carefully. Ensure that you are not endanger-
ing other road-users or breaking traffic regu-
lations in the process. CAUTION
● The temperature of the water must not ex-
ceed +60 °C (+140 °F).
● To avoid damage to the paintwork, do not
wash the vehicle in full sun.
● Do not use rough sponges or similar which
could damage the surface to clean away the
traces of insects. ●
Never wipe the headlights with a dry cloth
or sponge, always moisten first. It is best to
use soapy water.
● Washing the vehicle in low temperatures:
When washing the vehicle with a hose, do
not direct water into the lock cylinders or the
gaps around the doors or roof. Locks and
seals could freeze! CAUTION
To prevent damage to the vehicle, please ob-
serve the following before entering an auto-
matic car wash: ● Compare the distance between the vehicle
wheels and the distance between the guide-
rails of the car wash to prevent damage to the
wheels and tyres!
● Switch off the rain sensor and the Au-
to Hold function before entering a car wash.
● Compare the height and width of your vehi-
cle with the available height and width when
entering and driving through the car wash.
● Fold in exterior mirrors Electrically retracta-
ble exterior mirrors must not be folded in or
out by hand. Always use the electrical power
control.
● To avoid damaging the bonnet paintwork,
rest the wipers on the windscreen after dry-
ing them. Do not let them fall!
● Lock the rear lid to prevent it from opening
unexpectedly while inside the car wash. 196
Page 217 of 305
Checking and refilling levels
carried out by a specialised workshop if you
are uncertain. Negligent work can cause seri-
ous injury. WARNING
If the vehicle moves unexpectedly, this could
cause serious injury.
● Never work under the vehicle if it has not
been immobilized. If you must work under-
neath the vehicle with the wheels in contact
with the ground then it should be parked on
flat ground, the wheels should be prevented
from moving and the key should be removed
from the ignition.
● If you have to work underneath the vehicle,
you must use suitable stands additionally to
support the vehicle, there is a risk of acci-
dent!. The jack is not intended for this kind of
work and its failure could lead to severe inju-
ries. WARNING
The engine compartment is a dangerous area
capable of causing serious injury.
● For all type of work, always take the utmost
precautions, work carefully and note the gen-
eral safety standards in force. Never take per-
sonal risks.
● Never work on the engine or in the engine
compartment if you are not familiar with the
necessary operations. If you are not sure
about procedures then visit a specialised
workshop to carry out the necessary work. Working incorrectly can cause serious inju-
ries.
●
Never open the bonnet if you see steam or
coolant escaping from the engine compart-
ment. This may cause serious burns. Always
wait until you cannot see or hear the sound of
steam or coolant coming from the engine
compartment.
● Always allow the engine to cool down be-
fore opening the bonnet.
● Contact with hot elements of the engine
and the exhaust system can cause burns.
● Once the engine has cooled, follow the in-
structions below before opening the bonnet:
– Turn on the electronic parking brake and
place the gear selector lever in P or the
gearbox lever in neutral.
– Remove the key from the ignition.
– Keep children away from the engine com-
partment and never leave them unsuper-
vised.
● When the engine is warm or hot, the cool-
ing system is pressurised. Do not unscrew
the cap on the expansion tank when the en-
gine is hot. Otherwise, coolant may spray out
under pressure causing burns and serious in-
jury.
– Carefully and slowly unscrew the cap an-
ticlockwise, gently pressing down on it.
– Always protect your face, hands and arms
from hot coolant and steam using a large,
thick cloth. ●
When refilling liquids, avoid spilling them
on parts of the engine and the exhaust sys-
tem. Spilled liquids could cause a fire. WARNING
The high voltages of the electrical system can
give electric shocks as well as causing burns
and serious injury and possibly even death!
● Never cause short circuits in the electrical
system. The battery could explode.
● To minimise the risk of electric shock and
serious consequences while the engine is
running or starting the engine, note the fol-
lowing:
– Never touch the electrical wiring of the
ignition system.
– Never touch electric cables or the gas dis-
charge lamps. WARNING
In the engine compartment, there are rotat-
ing parts that could cause serious injury.
● Never place your hands on or near the radi-
ator fan. Touching the rotor blades could seri-
ously harm you. The ventilator works accord-
ing to the engine temperature and could start
suddenly even when the ignition is turned off
and the key is removed.
● If any work has to be performed when the
engine is started or with the engine running,
there is an additional, potentially fatal, safety » 215Technical specifications
Advice
Operation
Safety
Page 218 of 305
Advice
risk from rotating parts, such as the drive
belts, alternator, radiator fan, etc., as well as
from the high-voltage ignition system. Al-
ways work with the utmost caution.
– Always make sure that no parts of your
body, jewellery, ties, loose clothing and
long hair can be trapped by the rotating
parts of the engine. Before any work, re-
move ties and jewellery (necklaces, etc),
tie long hair back and tie all items of
loose clothing to your body to make sure
that they cannot be trapped by engine
components.
– Take extreme caution when operating the
accelerator and remain attentive. The ve-
hicle could move, even with the electron-
ic parking brake activated.
● Always make sure you have not left any ob-
jects, such as cleaning cloths and tools, in
the engine compartment. If any object is left
in the engine compartment, this could cause
malfunctions, engine faults and even a fire. WARNING
Refill liquids and certain materials can catch
fire easily in the engine compartment, caus-
ing a fire and serious injury!
● Never smoke.
● Never work close to places exposed to
flames or sparks.
● Never pour service fluids over the engine.
These fluid may ignite hot engine parts and
cause injuries. ●
If it is necessary to work on the fuel system
or the electrical system, please follow the in-
structions below:
–Always disconnect the vehicle battery.
When disconnecting the battery, ensure
that the vehicle is unlocked otherwise
the anti-theft alarm will be triggered.
– Never work close to heaters, heat sources
or places exposed to flames or sparks.
● Always keep a recently serviced and per-
fectly working fire extinguisher close by.
● Never cover the engine with additional in-
sulating materials such as a blanket. Risk of
fire! CAUTION
When refilling or changing service liquids,
ensure that you put the liquids into the right
tank. Making a mistake when refilling could
cause serious malfunctions and damage the
engine! For the sake of the environment
Service fluids leaks are harmful to the envi-
ronment. For this reason you should make
regular checks on the ground underneath
your vehicle. Take the vehicle to a specialised
workshop to be checked if you see stains, oil
or other fluids on the ground. Collect any
spilt service fluids and allow a professional to
dispose of them. Opening and closing the bonnet
Fig. 162
In the footwell on the driver side:
Lever for unlocking the bonnet Fig. 163
Release lever to open the bonnet in
the radiator grille Opening the bonnet
The lever to open the bonnet can only be
used if the driver door is open.
216
Page 219 of 305
Checking and refilling levels
● Before opening the bonnet, make sure that
the windscreen wiper arms are in place
against the windscreen ››› .
● Open the driver door.
● Pull the release lever ››› Fig. 162 in the di-
r ection of
the arrow. The bonnet is released
from the lock carrier by a spring mechanism
››› .
● Lift the bonnet using the release lever
››› Fig. 163 (arrow) and open the bonnet fully.
The bonnet i
s held open thanks to the gas
strut.
Closing the bonnet
● To close the bonnet, pull it down to over-
come the gas strut pressure ››› .
● Allow the bonnet to fall into the lock carrier.
Do not press down.
If the bonnet is not correctly closed, open it
once again and close it correctly.
The bonnet is correctly closed when it is flush
with the corresponding parts on the body-
work. WARNING
If the bonnet is not correctly closed, it could
suddenly open while driving leaving the driv-
er without visibility. This could result in a se-
rious accident.
● After closing the bonnet, always check that
it is properly secured by the locking mecha- nism in the lock carrier. The bonnet must be
flush with the surrounding body panels.
●
While driving, if you notice that the bonnet
is not correctly closed then stop immediately
and close it correctly.
● Only open and close the bonnet when there
is nobody within its range. CAUTION
● To avoid damage to the bonnet and to the
windscreen wiper arms, only open it when
the windscreen wipers are in place against
the windscreen.
● Before driving, always lower the wiper
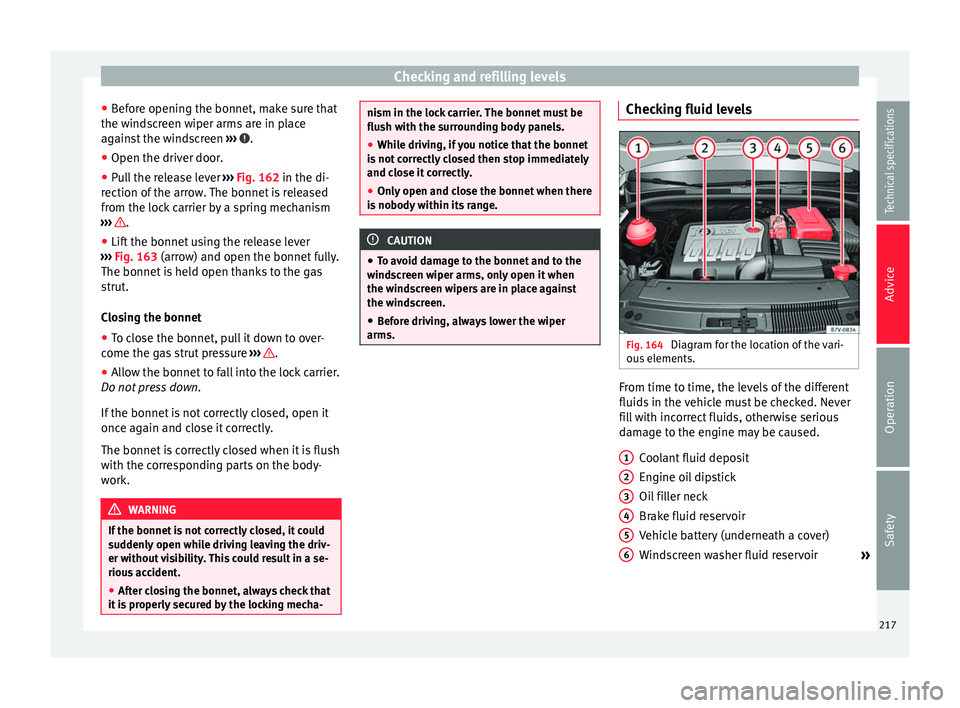
arms. Checking fluid levels
Fig. 164
Diagram for the location of the vari-
ous elements. From time to time, the levels of the different
fluids in the vehicle must be checked. Never
fill with incorrect fluids, otherwise serious
damage to the engine may be caused.
Coolant fluid deposit
Engine oil dipstick
Oil filler neck
Brake fluid reservoir
Vehicle battery (underneath a cover)
Windscreen washer fluid reservoir »
1 2
3
4
5
6
217
Technical specifications
Advice
Operation
Safety
Page 221 of 305
Checking and refilling levels
Only use an engine oil that complies to SEAT
standards whenever possible ››› . If you
wish to maintain the long-life service dura-
tion, only engine oils approved for this serv-
ice according to the corresponding VW stand-
ard ( ››› table on page 219 ) may be used. All
oi l
s indicated are synthetic multigrade oils .
Engine oils are being continuously further
developed. Technical services are constantly
updated with any modifications. SEAT there-
fore recommends that you have the engine
oil changed by a technical service.
Engines
Engine oil specifications
with LongLife servicewithout Long-Life service
Petrol enginesVW 504 00,VW 503 00VW 504 00, VW 502 00
Diesel enginesVW 507 00VW 507 00 CAUTION
● Only use engine oils whose specifications
are expressly approved by SEAT. The use of
any other type of oil could cause engine dam-
age!
● No additives should be used with engine
oil. Any damage caused by the use of such
additives would not be covered by the factory
warranty. Checking the engine oil level and
topping up
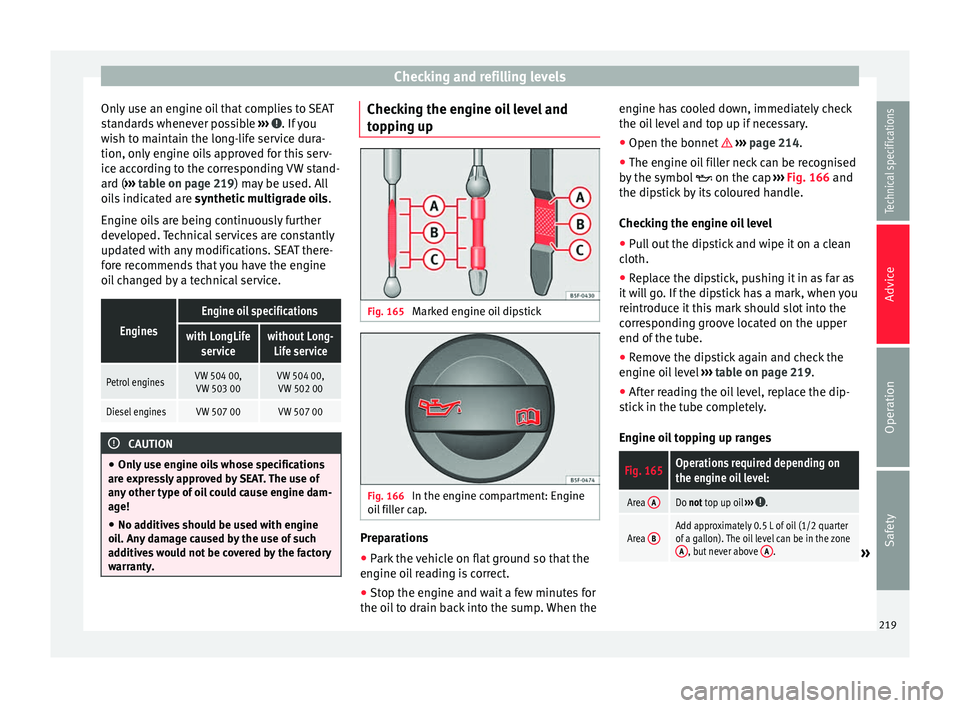
Fig. 165
Marked engine oil dipstick Fig. 166
In the engine compartment: Engine
oil filler cap. Preparations
● Park the vehicle on flat ground so that the
engine oil reading is correct.
● Stop the engine and wait a few minutes for
the oil to drain back into the sump. When the engine has cooled down, immediately check
the oil level and top up if necessary.
●
Open the bonnet ››› page 214.
● The engine oil filler neck can be recognised
by the symbol on the cap
›
›› Fig. 166
and
the dipstick by its coloured handle.
Checking the engine oil level
● Pull out the dipstick and wipe it on a clean
cloth.
● Replace the dipstick, pushing it in as far as
it will go. If the dipstick has a mark, when you
reintroduce it this mark should slot into the
corresponding groove located on the upper
end of the tube.
● Remove the dipstick again and check the
engine oil level ››› table on page 219.
● After reading the oil level, replace the dip-
stick in the tube completely.
Engine oil topping up ranges
Fig. 165Operations required depending on
the engine oil level:
Area ADo not top up oil
››› .
Area BAdd approximately 0.5 L of oil (1/2 quarter
of a gallon). The oil level can be in the zone
A
, but never above A.» 219
Technical specifications
Advice
Operation
Safety