winter tyres Seat Alhambra 2015 Owner's Manual
[x] Cancel search | Manufacturer: SEAT, Model Year: 2015, Model line: Alhambra, Model: Seat Alhambra 2015Pages: 305, PDF Size: 5.46 MB
Page 5 of 305
Table of Contents
Table of Contents
Safety . . . . . . . . . . . . . . . . . . . . . . . . . . . . . . . . 5
Safe driving . . . . . . . . . . . . . . . . . . . . . . . . . . . . 5
Safety first! . . . . . . . . . . . . . . . . . . . . . . . . . . . . . 5
Tips for driving . . . . . . . . . . . . . . . . . . . . . . . . . . 5
Sitting position for occupants . . . . . . . . . . . . . . 6
Pedal area . . . . . . . . . . . . . . . . . . . . . . . . . . . . . . 9
Seat belts . . . . . . . . . . . . . . . . . . . . . . . . . . . . . . 10
The whys and wherefores of seat belts . . . . . . . 10
How to properly adjust your seatbelt . . . . . . . . 14
Seat belt tensioners . . . . . . . . . . . . . . . . . . . . . . 17
Airbag system . . . . . . . . . . . . . . . . . . . . . . . . . . 18
Brief introduction . . . . . . . . . . . . . . . . . . . . . . . . 18
General overview of the airbag . . . . . . . . . . . . . 20
Deactivating airbags . . . . . . . . . . . . . . . . . . . . . 25
Transporting children safely . . . . . . . . . . . . . . . 26
Child safety . . . . . . . . . . . . . . . . . . . . . . . . . . . . . 26
Integrated child seat . . . . . . . . . . . . . . . . . . . . . 33
Operation . . . . . . . . . . . . . . . . . . . . . . . . . . . . . 39
Cockpit . . . . . . . . . . . . . . . . . . . . . . . . . . . . . . . . 39
Overview . . . . . . . . . . . . . . . . . . . . . . . . . . . . . . . 38
Instruments . . . . . . . . . . . . . . . . . . . . . . . . . . . . 40
Control lamps . . . . . . . . . . . . . . . . . . . . . . . . . . . 45
SEAT information system . . . . . . . . . . . . . . . . . . 47
Three button unit in headliner . . . . . . . . . . . . . . 53
Opening and closing . . . . . . . . . . . . . . . . . . . . . 54
Vehicle key set . . . . . . . . . . . . . . . . . . . . . . . . . . 54
Central locking and locking system . . . . . . . . . 57
Doors . . . . . . . . . . . . . . . . . . . . . . . . . . . . . . . . . . 63
Sliding doors . . . . . . . . . . . . . . . . . . . . . . . . . . . 64
Rear lid . . . . . . . . . . . . . . . . . . . . . . . . . . . . . . . . 66
Electric windows . . . . . . . . . . . . . . . . . . . . . . . . . 70
Panoramic sliding sunroof* . . . . . . . . . . . . . . . . 72 Lights and visibility
. . . . . . . . . . . . . . . . . . . . . . 74
Lights . . . . . . . . . . . . . . . . . . . . . . . . . . . . . . . . . 74
Visibility . . . . . . . . . . . . . . . . . . . . . . . . . . . . . . . 80
Windscreen wiper and window wiper systems . 81
Rear vision mirror . . . . . . . . . . . . . . . . . . . . . . . . 85
Seats and head restraints . . . . . . . . . . . . . . . . . 88
Adjusting the seats and head restraints . . . . . . 88
Seat functions . . . . . . . . . . . . . . . . . . . . . . . . . . 93
Transport and practical equipment . . . . . . . . . 98
Transporting objects . . . . . . . . . . . . . . . . . . . . . 98
Loading luggage compartment . . . . . . . . . . . . . 100
Roof carrier system* . . . . . . . . . . . . . . . . . . . . . . 110
Storage compartments . . . . . . . . . . . . . . . . . . . 112
Drink holders . . . . . . . . . . . . . . . . . . . . . . . . . . . 117
Ashtray and cigarette lighter* . . . . . . . . . . . . . . 118
Power sockets . . . . . . . . . . . . . . . . . . . . . . . . . . . 119
Air conditioning . . . . . . . . . . . . . . . . . . . . . . . . . 122
Air conditioner . . . . . . . . . . . . . . . . . . . . . . . . . . 122
Auxiliary heater* (additional heater) . . . . . . . . 128
Driving . . . . . . . . . . . . . . . . . . . . . . . . . . . . . . . . 131
Address . . . . . . . . . . . . . . . . . . . . . . . . . . . . . . . . 131
Stopping and starting the engine . . . . . . . . . . . 133
Braking and parking . . . . . . . . . . . . . . . . . . . . . 137
Changing gear . . . . . . . . . . . . . . . . . . . . . . . . . . 143
Run-in and economical driving . . . . . . . . . . . . . 148
Engine management and exhaust gas
purification system . . . . . . . . . . . . . . . . . . . . . . 151
Driving abroad . . . . . . . . . . . . . . . . . . . . . . . . . . 153
Driving along flooded roadways . . . . . . . . . . . . 153
Driver assistance systems . . . . . . . . . . . . . . . . . 154
Braking and stability systems . . . . . . . . . . . . . . 154
Start assist systems . . . . . . . . . . . . . . . . . . . . . . 156
Parking sensor system* . . . . . . . . . . . . . . . . . . . 159
Park Assist system* . . . . . . . . . . . . . . . . . . . . . . 162
Rear Assist system* . . . . . . . . . . . . . . . . . . . . . . 166
Cruise control* (Cruise control system - CCS) . . 169
Lane Assist system* . . . . . . . . . . . . . . . . . . . . . . 172
Sign Assist* . . . . . . . . . . . . . . . . . . . . . . . . . . . . 174 Tiredness detection (recommendation to take
a break) . . . . . . . . . . . . . . . . . . . . . . . . . . . . . . . . 176
Tyre monitoring systems . . . . . . . . . . . . . . . . . . 177
Towing bracket device
. . . . . . . . . . . . . . . . . . . . 179
Driving with a trailer . . . . . . . . . . . . . . . . . . . . . . 179
Advice . . . . . . . . . . . . . . . . . . . . . . . . . . . . . . . . 189
Care and maintenance . . . . . . . . . . . . . . . . . . . . 189
Accessories, replacement of parts and
modifications . . . . . . . . . . . . . . . . . . . . . . . . . . . 189
Care and cleaning the vehicle exterior . . . . . . . 195
Caring for and cleaning the vehicle interior . . . 200
Notes for the user . . . . . . . . . . . . . . . . . . . . . . . . 205
Checking and refilling levels . . . . . . . . . . . . . . . 206
Filling the tank . . . . . . . . . . . . . . . . . . . . . . . . . . 206
Fuel . . . . . . . . . . . . . . . . . . . . . . . . . . . . . . . . . . . 209
Selective catalytic reduction* (AdBlue) . . . . . . 212
Working in the engine compartment . . . . . . . . 214
Engine oil . . . . . . . . . . . . . . . . . . . . . . . . . . . . . . 218
Engine coolant . . . . . . . . . . . . . . . . . . . . . . . . . . 221
Brake fluid . . . . . . . . . . . . . . . . . . . . . . . . . . . . . 225
Checking and topping up the windscreen
washer reservoir with water . . . . . . . . . . . . . . . . 226
Vehicle battery . . . . . . . . . . . . . . . . . . . . . . . . . . 227
Wheels and tyres . . . . . . . . . . . . . . . . . . . . . . . . 231
Wheels . . . . . . . . . . . . . . . . . . . . . . . . . . . . . . . . 231
Winter service . . . . . . . . . . . . . . . . . . . . . . . . . . . 241
Emergencies . . . . . . . . . . . . . . . . . . . . . . . . . . . . 242
In case of emergency . . . . . . . . . . . . . . . . . . . . . 242
Vehicle tool kit* . . . . . . . . . . . . . . . . . . . . . . . . . 244
Changing a wheel* . . . . . . . . . . . . . . . . . . . . . . . 246
Tyre repair . . . . . . . . . . . . . . . . . . . . . . . . . . . . . . 250
Starting assistance . . . . . . . . . . . . . . . . . . . . . . 253
Towing and tow starting . . . . . . . . . . . . . . . . . . . 255
3
Page 50 of 305
Operation
■ Activation
■ Programme On / Off
■ Disconnection
■ Timer 1-3
■ Day
■ Time
■ Minute
■ Activate
■ Duration
■ Operating mode
■ Heat
■ Ventilation
■ Day
■ Default setting
■ Vehicle condition
›
›› page 49
■ Configuration ››› page 51
■ Multifunction display data
■ Journey duration
■ Current fuel consumption
■ Average fuel consumption
■ Distance covered
■ Operating range
■ Average speed
■ Digital display of speed
■ Speed warning
■ Compass
■ Convenience ››› page 52
■ Central locking system (Central locking)
■Automatic lock (Auto. lock) On / Off ■
Automatic unlocking (Auto. unlock.)
On / Off
■ Unlocking doors (Door unlock.: All,
One door, Vehicle side, Individual)
■ Back
■ Electric windows
■ Off
■ All
■ Driver
■ Back
■ Mirror angle (Mirror angle) On / Off
■ Adjusting mirrors (Adjust. mirrors)
■ Individual
■ Synchronised
■ Back
■ Factory settings (Factory settings)
■ Back
■ Lights & visibility ››› page 52
■ Coming Home
■ Leaving Home
■ Footwell light
■ Convenience turn signals On / Off
■ Default setting
■ Tourist light On / Off
■ Time
■ Winter tyres
■ Language
■ Units
■ Second speed display On / Off ■
Autohold
■ Service
■ Info
■ Reset
■ Default setting
48
Page 52 of 305
OperationMenuFunctionSee
Tele-
phoneMobile telephone pre-installa-
tion set up information and
options
›››
Book-
let Radio
or ››› Book-
let Naviga- tion sys- tem
Parking
heating
Information and configura-
tions of the parking heating:
switching the parking heating
on or off. Select the operating
mode and duration.
››› page
128
Vehicle
condition
Current warning or informa-
tion texts.
This option only appears
when one of the following
texts is available. The number
of available messages is dis-
played. Example 1/1 or 2/2.
››› page 40
Configu-
ration
Different setting options, for
example, the Convenience,
Lighting & Visibility menus,
and the time, speed warning
with winter tyres, language,
units of measurement, or “Dis-
play off”.
››› page
51 MFI
(multifunction display) menu The multifunction display (MFI) has two auto-
matic memories:
1 - Partial memory and 2 -
T ot
al memory . The selected memory will be shown in the upper right-hand corner of the
display.
With the ignition switched on, and memory 1 or
2 displayed, briefly press
OK to change from
one memory to another.
1
Trip
memory
(for a
single
jour-
ney).
The memory stores the values for the
journey and the consumption from the
moment the ignition is switched on until
it is switched off again.
If the journey is broken for more than 2
hours, the memory is automatically
erased. If the journey is continued in less
than 2 hours after the ignition is switch-
ed off, the new data is added to the data
already stored in the memory.
2
Total
memory
(for all
jour-
neys).
The memory records the values for a spe-
cific number of partial trips, up to a total
of 19 hours and 59 minutes or 99 hours
and 59 minutes, or 1999.9 km (or miles)
for 9999 km (or miles), depending on the
model of instrument panel. On reaching
either of these limits, the memory is au-
tomatically erased and starts to count
from 0 again. Possible displays
MenuFunction
Journey dura-
tionThis indicates the hours (h) and mi-
nutes (min) since the ignition was
switched on.
MenuFunction
Current fuel
consumption
The current fuel consumption while
driving is displayed in l/100 km (or
miles per gallon, mpg); when the en-
gine is running but the vehicle is not
moving, in l/h (or gallons per hour).
Average fuel
consumption
When the ignition is switched on, the
average consumption (in l/100 km or in mpg) is displayed after the vehicle
has moved approximately 100 metres
(328 feet). Otherwise horizontal lines
are displayed. The value shown is up-
dated approximately every 5 seconds.
Operating
range
Approximate distance in km (or miles)
that can still be travelled with the fuel
remaining in the tank, assuming the
same style of driving is maintained.
This is calculated using the current fuel
consumption.
Distance cov-
eredDistance travelled, after ignition is
switched on, in km (or miles).
Average speed
After the ignition is switched on, the
average speed will be shown after a
distance of approximately 100 metres
(328 feet) has been travelled. Other-
wise horizontal lines are displayed. The
value shown is updated approximately
every 5 seconds.
Digital display
of speedCurrent speed displayed digitally.
Oil tempera-
ture digital
displayUpdated engine oil temperature digital
display 50
Page 53 of 305
CockpitMenuFunction
Speed warn-
ing at --- km/hIf the stored speed is exceeded (be-
tween 30 - 250 km/h, or 18 -
155 mph), an audible warning is given
together with a visual warning. Changing between display modes
● In vehicles without multifunction steering
wheel: press the lever.
● Vehicle
s with a multifunction steering
wheel:
press or
.
Storing a speed for the speed warning
● Select the display Speed warning at --- km/h
.
● Press OK to store the current speed and
switch off the warning.
● In addition, set the required speed by
pressing the rocker switch on the windscreen
wiper lever or buttons or
on the multi-
function steering wheel for 5 seconds. Next,
press OK again or wait a few seconds. The
speed is stored and the warning activated.
● To switch off , press OK . The stored speed is
deleted.
Manually erasing memory 1 or 2
● Select the memory to be erased.
● Press and hold OK for approximately 2 sec-
onds. Personalising the displays
It is possible to select which of the displays
in the multifunction display you wish to see
on the instrument panel in the
settings
menu. The units of measurement can also be
modified ››› page 51 .
C onfigur
ation Menu
Configu-
ration
MenuFunction
Multi-
function
display
dataConfiguration of the multifunction display
data that you wish to see on the instrument
panel display ››› page 50.
Compass
Changing the magnetic region and calibra-
tion of the compass. To calibrate the com-
pass, please follow the instructions given
on the instrument panel display.
Conven-
ienceChanging vehicle convenience functions
››› page 52.
Lights &
visibilityConfiguration of vehicle lighting
››› page 52.
Time
Changing the hours and minutes of the in-
strument panel clock and the navigation
system. The time can be set here and the
choice can be made between the 24-hour
and 12-hour display. The S in the upper
part of the display indicates that the clock
is set to summer time.
Configu-
ration
MenuFunction
Winter
tyres
Changing the visual and audible speed
warnings. This function should only be
used when the vehicle is fitted with winter
tyres, which are not designed for travel at
high speeds.
LanguageChanging the language of the display texts
and the navigation system.
UnitsChanging the units of measurement for the
temperature, consumption and distance.
Second
speedSwitching second speed display on and off.
Auto-HoldSelect if the Auto-Hold function should be
on permanently.
ServiceCheck the service notifications or reset the
service intervals to zero.
Factory
settingsSome functions of the Configuration menu
will be reset to the factory value.
BackThe main menu is displayed again. 51
Technical specifications
Advice
Operation
Safety
Page 152 of 305
Operation
Think ahead and “flow” with the traffic
Frequent acceleration and braking considera-
bly increase fuel consumption. If you think
ahead as you drive and keep a safe distance
from the vehicle in front, it is possible to slow
down by simply lifting your foot off the accel-
erator. This eliminates the need for constant
braking and acceleration.
Calm and steady driving
Constancy is more important than speed: The
more you drive at a constant speed, the lower
the fuel consumption.
When driving on the motorway, it is more effi-
cient to drive at a constant and more moder-
ate speed than to be continuously accelerat-
ing and braking. As a general rule, you will
reach your destination just as quickly when
you drive at a constant speed.
The cruise control function helps you to ach-
ieve a constant style of driving.
Moderate use of additional devices
It is important to travel in comfort, but con-
venience systems should be used ecological-
ly.
Some equipment, when connected, increase
fuel consumption considerably, for example:
● Air conditioning cooling system: If the air
conditioning system is required to cool to
significantly lower temperatures than the true outside temperature, it will require a large
amount of energy from the engine. Therefore,
we recommend that the selected temperature
for the vehicle is not too different to the out-
side temperature. It is a good idea to air the
vehicle before starting your journey and to
drive a short distance with all the windows
open. Only then should you close all the win-
dows and switch on the air conditioning.
Keep windows closed when travelling at high
speeds. Driving with the windows open in-
creases fuel consumption.
●
Switch off the seat heating when the seats
have warmed up.
● Switch off the heated rear window and the
windscreen heating when the windows have
demisted and are free of ice.
● Do not leave the auxiliary heater switched
on when the vehicle is moving ››› page 128.
Avoid short journeys
Fuel consumption is much higher when the
engine is cold, immediately after it has been
started. It takes a few kilometres of driving
for the engine to warm up and to normalise
consumption.
The engine and catalytic converter need to
reach their proper working temperature in or-
der t o minimi
se fuel consumption and emis-
sions. The ambient temperature has a deci-
sive influence. Fig. 133 shows the difference in consump-
tion for the same journey at +20 °C (+68 °F)
and at -10 °C (+14 °F).
Therefore, unnecessary short journeys
should be avoided. Try to combine trips.
The vehicle uses more fuel in winter than in
summer, even when other conditions are the
same.
“Warming” the engine is not only forbidden
in some countries, but in practice it is techni-
cally superfluous as it is a waste of fuel.
Adjusting type pressures.
Having the correct pressure in your tyres
helps to reduce rolling resistance and, as a
result reduces fuel consumption. Increasing
the tyre pressure slightly (+0.2 bar
[2.9 psi/20 kPa]) can help to save fuel.
If you are prepared to accept a slight reduc-
tion in comfort, the tyres may be filled to the
pressures recommended for a fully-loaded
vehicle. This is also valid when driving alone
without luggage.
When you buy new tyres, make sure they are
optimised for minimum rolling resistance.
Use low friction engine oil
The use of low viscosity totally synthetic oils,
known as low friction engine oil, helps to re-
duce fuel consumption. These oils reduce the
resistance caused by friction in the engine,
150
Page 181 of 305
Towing bracket device
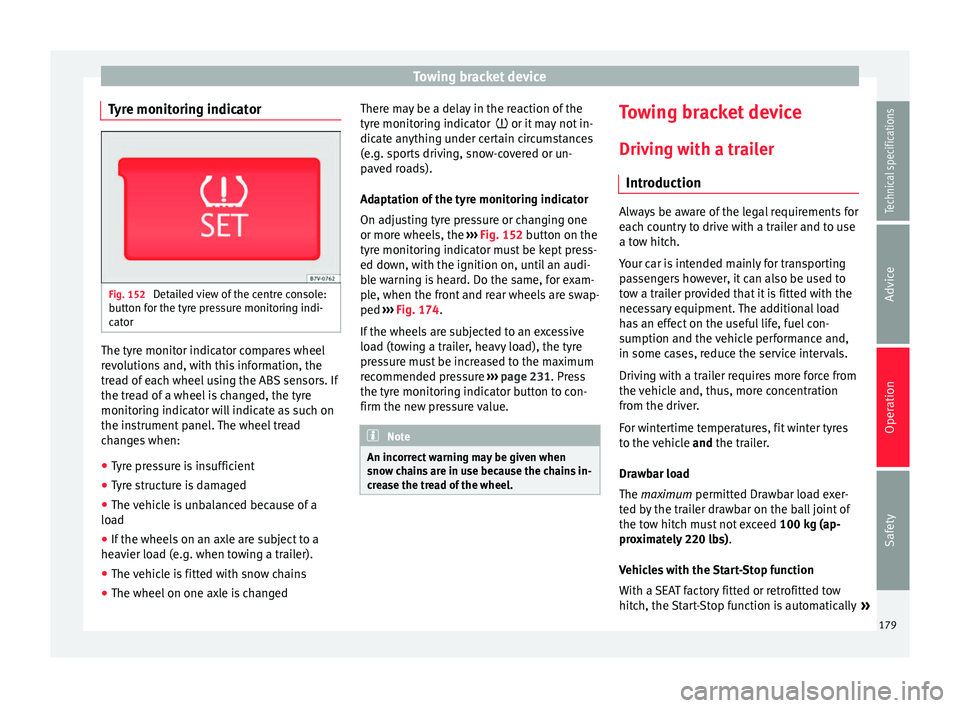
Tyre monitoring indicator Fig. 152
Detailed view of the centre console:
button for the tyre pressure monitoring indi-
cator The tyre monitor indicator compares wheel
revolutions and, with this information, the
tread of each wheel using the ABS sensors. If
the tread of a wheel is changed, the tyre
monitoring indicator will indicate as such on
the instrument panel. The wheel tread
changes when:
● Tyre pressure is insufficient
● Tyre structure is damaged
● The vehicle is unbalanced because of a
load
● If the wheels on an axle are subject to a
heavier load (e.g. when towing a trailer).
● The vehicle is fitted with snow chains
● The wheel on one axle is changed There may be a delay in the reaction of the
tyre monitoring indicator
or it may not in-
dic
ate anything under certain circumstances
(e.g. sports driving, snow-covered or un-
paved roads).
Adaptation of the tyre monitoring indicator
On adjusting tyre pressure or changing one
or more wheels, the ››› Fig. 152
button on the
tyre monitoring indicator must be kept press-
ed down, with the ignition on, until an audi-
ble warning is heard. Do the same, for exam-
ple, when the front and rear wheels are swap-
ped ››› Fig. 174
.
If the wheels are subjected to an excessive
load (towing a trailer, heavy load), the tyre
pressure must be increased to the maximum
recommended pressure ››› page 231. Press
the tyre monitoring indicator button to con-
firm the new pressure value. Note
An incorrect warning may be given when
snow chains are in use because the chains in-
crease the tread of the wheel. Towing bracket device
Driving with a trailer Introduction Always be aware of the legal requirements for
each country to drive with a trailer and to use
a tow hitch.
Your car is intended mainly for transporting
passengers however, it can also be used to
tow a trailer provided that it is fitted with the
necessary equipment. The additional load
has an effect on the useful life, fuel con-
sumption and the vehicle performance and,
in some cases, reduce the service intervals.
Driving with a trailer requires more force from
the vehicle and, thus, more concentration
from the driver.
For wintertime temperatures, fit winter tyres
to the vehicle
and
the trailer.
Dr a
wbar load
The
maximum permitted Drawbar load exer-
ted by the trailer drawbar on the ball joint of
the tow hitch must not exceed 100 kg (ap-
proximately 220 lbs).
Vehicles with the Start-Stop function
With a SEAT factory fitted or retrofitted tow
hitch, the Start-Stop function is automatically »
179
Technical specifications
Advice
Operation
Safety
Page 198 of 305
Advice
Automatic car washes
Always observe the instructions provided at
the automatic car wash. The standard pre-
cautionary measures prior to entering the car
wash should be taken to avoid damage to
the vehicle (close all windows, fold in exterior
mirrors). If the vehicle is fitted with additional
components (spoiler, roof-rack, aerial, etc.),
check with the car wash supervisor whether
these can enter the car wash ››› .
The vehicle paintwork is so durable that the
vehicle can normally be washed without
problems in an automatic car wash tunnel.
However, wear and damage to the paintwork
will depend on the type of car wash used.
SEAT recommends the use of car washes
without brushes.
To remove traces of wax on windows and to
prevent wiper blades from scratching, please
observe the following ››› page 197, Cleaning
windows and exterior mirrors .
Washing the car by hand
When washing the car by hand, use plenty of
water to soften the dirt first, and rinse off as
well as possible.
Then clean the vehicle with a soft sponge,
glove or brush using only slight pressure.
St ar
t at the roof and work downwards. Spe-
cial car shampoo should only be used for
ver
y persistent dirt. Rinse the sponge or glove thoroughly and of-
ten.
Wheels, sills and similar should be cleaned
last. Use a second sponge for this.
WARNING
Sharp components on the vehicle may cause
injury.
● Protect arms and hands from sharp edges
when cleaning the vehicle undercarriage or
the interior of the wheel hubs. WARNING
After the vehicle has been washed, the brak-
ing effect will be reduced (and the braking
distance increased) due to moisture (and ice
in winter) on the brakes.
● “Dry the brakes and remove ice” by braking
carefully. Ensure that you are not endanger-
ing other road-users or breaking traffic regu-
lations in the process. CAUTION
● The temperature of the water must not ex-
ceed +60 °C (+140 °F).
● To avoid damage to the paintwork, do not
wash the vehicle in full sun.
● Do not use rough sponges or similar which
could damage the surface to clean away the
traces of insects. ●
Never wipe the headlights with a dry cloth
or sponge, always moisten first. It is best to
use soapy water.
● Washing the vehicle in low temperatures:
When washing the vehicle with a hose, do
not direct water into the lock cylinders or the
gaps around the doors or roof. Locks and
seals could freeze! CAUTION
To prevent damage to the vehicle, please ob-
serve the following before entering an auto-
matic car wash: ● Compare the distance between the vehicle
wheels and the distance between the guide-
rails of the car wash to prevent damage to the
wheels and tyres!
● Switch off the rain sensor and the Au-
to Hold function before entering a car wash.
● Compare the height and width of your vehi-
cle with the available height and width when
entering and driving through the car wash.
● Fold in exterior mirrors Electrically retracta-
ble exterior mirrors must not be folded in or
out by hand. Always use the electrical power
control.
● To avoid damaging the bonnet paintwork,
rest the wipers on the windscreen after dry-
ing them. Do not let them fall!
● Lock the rear lid to prevent it from opening
unexpectedly while inside the car wash. 196
Page 199 of 305
Care and maintenance
Washing the vehicle with high
pressure cleaning equipment When cleaning the vehicle with a high-pres-
sure cleaner, always follow the operating in-
structions for the equipment. Pay special at-
tention to the required pressure of the jet
and the distance
between the jet and the ve-
hic
le ››› .
Keep a suitable distance from soft materials,
such as rubber hoses or insulating material,
and from the parking distance warning sys-
tem sensors. The parking distance sensors
are fitted in the rear bumpers and, where ap-
plicable, in the front bumpers ››› .
Do not use a nozzle that sprays the water out
in a direct stream
or one th
at
has a rotating
jet for forcing off dirt ››› .
WARNING
The incorrect use of high pressure cleaning
equipment could result in permanent dam-
age, visible or invisible, to the tyres or other
materials. This could result in a serious acci-
dent.
● Ensure there is a suitable distance between
the nozzle and the tyres.
● Never wash tyres with a concentrated jet or
so-called “dirt blasters”. Even at large spray-
ing distances and short cleaning times, you
may damage the tyres. WARNING
After the vehicle has been washed, the brak-
ing effect will be reduced (and the braking
distance increased) due to moisture (and ice
in winter) on the brakes.
● “Dry the brakes and remove ice” by braking
carefully. Ensure that you are not endanger-
ing other road-users or breaking traffic regu-
lations in the process. CAUTION
● The temperature of the water must not be
above +60 °C (+140 °F).
● To avoid damage to the paintwork, do not
wash the vehicle in full sun.
● The sensors on the bumpers should be kept
clean and free of ice at all times to ensure the parking distance warning system and the
parking aid system operate correctly. When
cleaning with pressure hoses and steam
cleaners, the sensors should be sprayed only
briefly. A distance of 10 cm between the sen-
sors and the steam / hose nozzle must be ob-
served.
● Do not use a high pressure cleaner to re-
move ice or snow from windows
● Washing the vehicle in low temperatures:
When washing the vehicle with a hose, do
not direct water into the lock cylinders or the
gaps around the doors or roof. Locks and
seals could freeze! Cleaning windows and exterior
mirrors
Cleaning windows and exterior mirrors
Spray windows and exterior windows with a
standard window cleaner containing alcohol.
Dry the windows with a clean chamois leath-
er or a lint-free cloth. The chamois leathers
used on painted surfaces are not suitable for
cleaning windows because they are soiled
with wax deposits which could smear the
windows.
Use window cleaner or a silicone remover to
clean rubber, oil, grease and silicone depos-
its off
››› .
Removing wax deposits
Automatic car washes and certain car care
products may leave wax deposits on the win-
dows. These deposits can only be removed
with a special product or cleaning cloths.
Wax deposits on the windscreen could cause
the wiper blades to judder. SEAT recom-
mends you wipe the wax deposits off the
windscreen with a soft cloth each time after
you have washed the vehicle.
A window cleaning detergent which helps to
dissolve the wax may be added to the wind-
screen washer fluid to prevent the wiper
blades from scratching the windscreen.
Please ensure you add the cleaning product
in the correct proportions. Products for »
197
Technical specifications
Advice
Operation
Safety
Page 237 of 305
Wheels and tyres
●
If you use tyres that are approved by SEAT,
you can be sure that the true tyre dimensions
will be correct for your vehicle. For other tyre
models, the tyre vendor should provide the
manufacturer's certificate with the tyre, indi-
cating that this type of tyre is suitable for
your vehicle. This certificate should always
be carried with the vehicle. Tyre pressures
Fig. 175
Position of tyre pressure specifica-
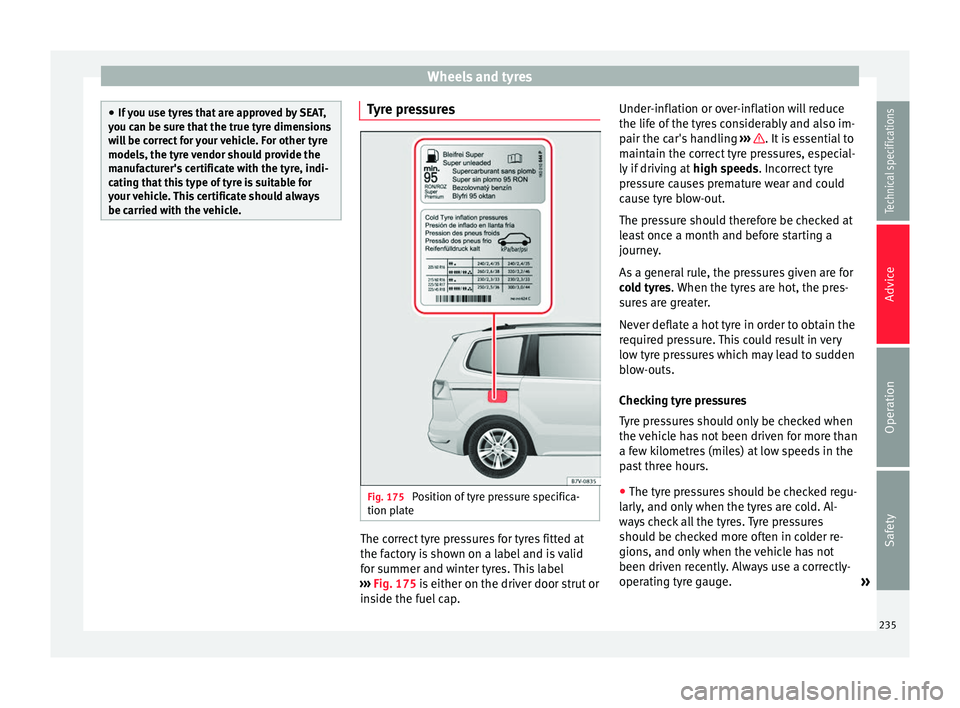
tion plate The correct tyre pressures for tyres fitted at
the factory is shown on a label and is valid
for summer and winter tyres. This label
››› Fig. 175 is either on the driver door strut or
in s
ide the fuel cap. Under-inflation or over-inflation will reduce
the life of the tyres considerably and also im-
pair the car's handling
››› . It is essential to
maintain the correct tyre pressures, especial-
ly if driving at high speeds. Incorrect tyre
pressure causes premature wear and could
cause tyre blow-out.
The pressure should therefore be checked at
least once a month and before starting a
journey.
As a general rule, the pressures given are for
cold tyres . When the tyres are hot, the pres-
s ur
es are greater.
Never deflate a hot tyre in order to obtain the
required pressure. This could result in very
low tyre pressures which may lead to sudden
blow-outs.
Checking tyre pressures
Tyre pressures should only be checked when
the vehicle has not been driven for more than
a few kilometres (miles) at low speeds in the
past three hours.
● The tyre pressures should be checked regu-
larly, and only when the tyres are cold. Al-
ways check all the tyres. Tyre pressures
should be checked more often in colder re-
gions, and only when the vehicle has not
been driven recently. Always use a correctly-
operating tyre gauge. »
235
Technical specifications
Advice
Operation
Safety
Page 238 of 305
Advice
● Adjust tyre pressures to the loads carried in
the vehicle.
● After checking the pressure, always replace
the valve caps, and where applicable, ob-
serve the instructions given for adjusting the
tyre control system ››› page 177. WARNING
If tyre pressures are too high or too low, the
tyre may deflate or burst suddenly while driv-
ing. This could result in a serious accident.
● If the tyre pressure is too low, they could
overheat, resulting in tread detachment or
even burst tyres.
● When driving at high speeds and/or fully
loaded, the tyre could suddenly overheat,
burst or be subject to tread detachment, with
the resultant loss of control of the vehicle.
● Tyre pressures which are too high or too
low reduce the service life of the tyre, affect-
ing the vehicle's performance.
● Tyre pressures should be checked regularly,
at least once a month and before long jour-
neys.
● Adjust the pressures of all the tyres to the
vehicle load.
● Never deflate excess pressure from hot
tyres. CAUTION
● Take care not to tilt the manometer when
placing it on the valve. Otherwise, the valve
may be damaged.
● If tyre valves are not protected by caps, or if
the caps are not screwed on correctly, they
may become damaged. Check that the caps
are identical to the standard caps and have
been correctly tightened. For the sake of the environment
Under-inflated tyres will increase fuel con-
sumption. Note
When checking tyre pressures, please ob-
serve the instructions for the tyre control sys-
tem ››› page 177. Tread depth and wear indicators
Fig. 176
Tyre tread: tread wear indicators Tread depth
Certain driving conditions require a deeper
tread, as well as needing the tread to be ap-
proximately the same on the front and rear
tyres. This is particularly important when
driving in winter, in cold temperatures and on
wet roads
››› .
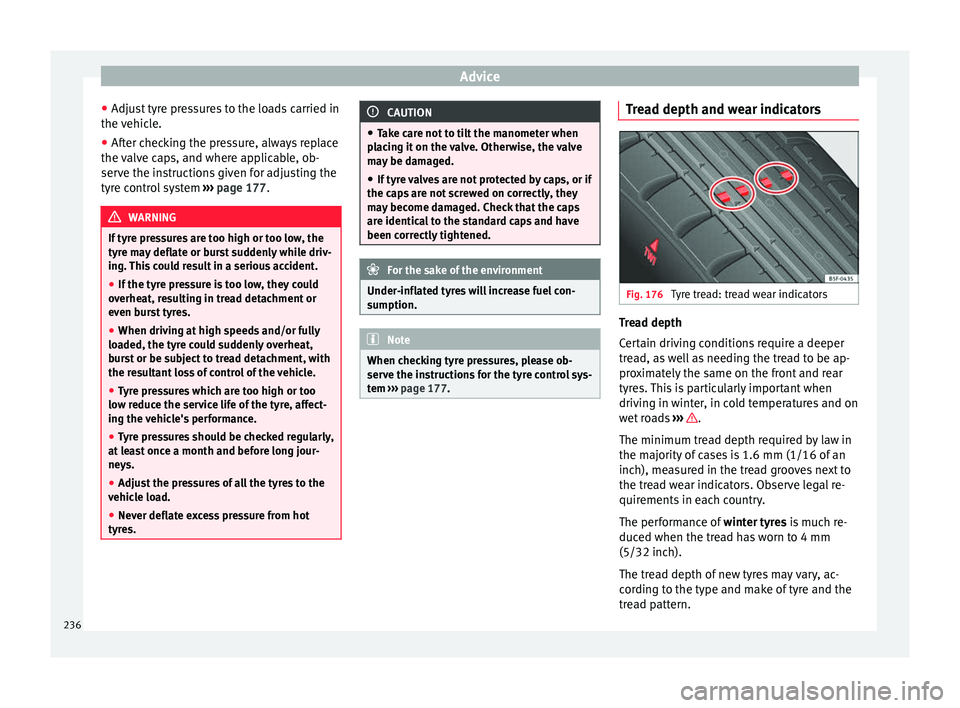
The minimum tread depth required by law in
the majority of cases is 1.6 mm (1/16 of an
inch), measured in the tread grooves next to
the tread wear indicators. Observe legal re-
quirements in each country.
The performance of winter tyres is much re-
duced when the tread has worn to 4 mm
(5/32 inch).
The tread depth of new tyres may vary, ac-
cording to the type and make of tyre and the
tread pattern.
236