buttons Seat Alhambra 2017 Owner's Manual
[x] Cancel search | Manufacturer: SEAT, Model Year: 2017, Model line: Alhambra, Model: Seat Alhambra 2017Pages: 320, PDF Size: 6.88 MB
Page 10 of 320
The essentials
How it works
Un loc
k
ing and locking
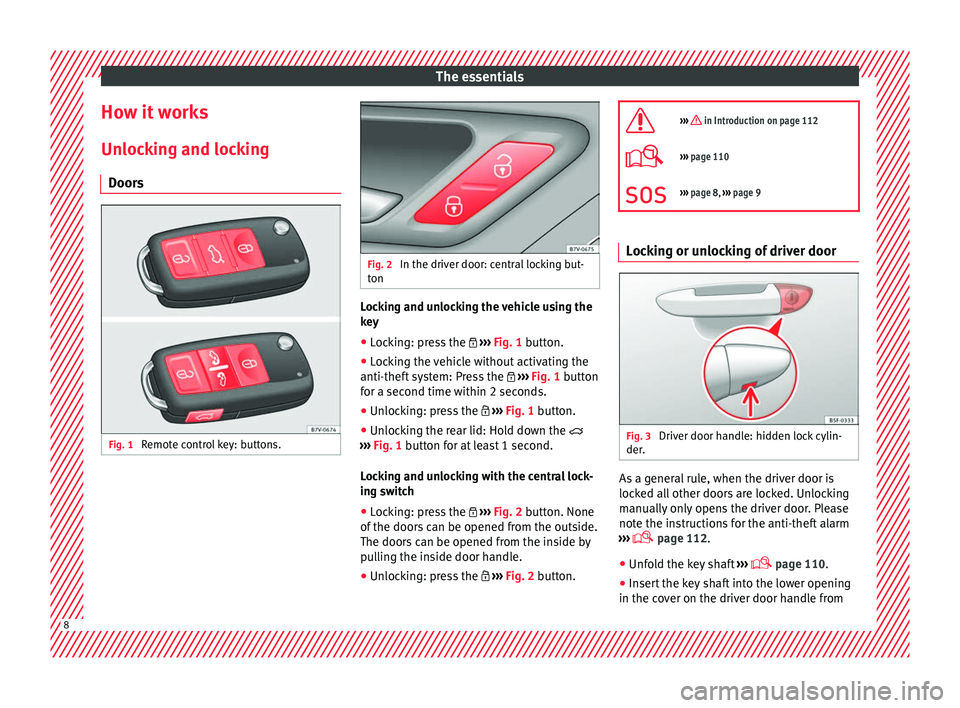
Doors Fig. 1
Remote control key: buttons. Fig. 2
In the driver door: central locking but-
ton Locking and unlocking the vehicle using the
k
ey
â Loc
king: press the ï½ âºâºâº
Fig. 1 button.
â Locking the vehicle without activating the
anti-theft sy
stem: Press the ï½ âºâºâº Fig. 1 button
for a second time within 2 seconds.
â Unlocking: press the ï¼ âºâºâº
Fig. 1 button.
â Unlocking the rear lid: Hold down the ï²
âºâºâº
Fig. 1 button for at least 1 second.
Locking and unlocking with the central lock-
ing switch
â Locking: press the ï½ âºâºâº
Fig. 2 button. None
of the doors can be opened from the outside.
The doors can be opened from the inside by
pulling the inside door handle.
â Unlocking: press the ï¼ âºâºâº
Fig. 2 button. ïª
âºâºâº in Introduction on page 112
ï©âºâºâº
page 110
ïªâºâºâº page 8, âºâºâº page 9 Locking or unlocking of driver door
Fig. 3
Driver door handle: hidden lock cylin-
der . As a general rule, when the driver door is
loc
k
ed al
l other doors are locked. Unlocking
manually only opens the driver door. Please
note the instructions for the anti-theft alarm
âºâºâº ï© page 112.
â Unfold the key shaft âºâºâº
ï© page 110.
â Insert the key shaft into the lower opening
in the cov
er on the driver door handle from8
Page 13 of 320
The essentials
â Pu
sh the r
elease lever âºâºâº Fig. 9 A in the di-
r ection of
the arr
ow to unlock the boot.
â Manually open the rear lid.
ïª
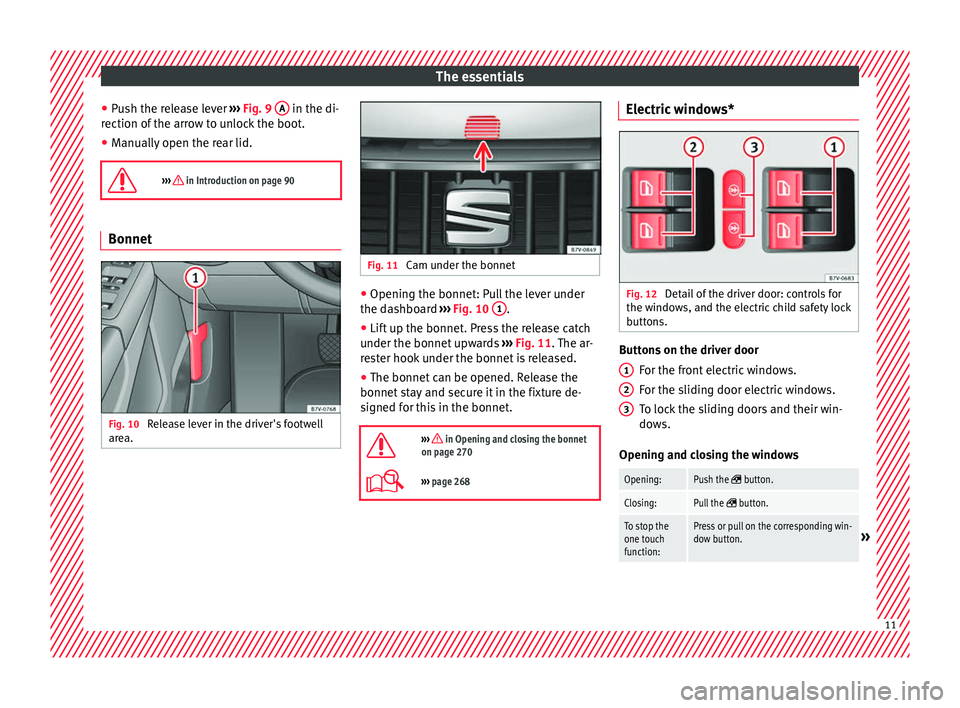
âºâºâº in Introduction on page 90 Bonnet
Fig. 10
Release lever in the driver's footwell
ar e
a. Fig. 11
Cam under the bonnet â
Opening the bonnet: Pull the lever under
the d a
shbo
ard âºâºâº Fig. 10 1 .
â Lift up the bonnet. Press the release catch
u nder the bonnet
up
wards âºâºâº Fig. 11. The ar-
rester hook under the bonnet is released.
â The bonnet can be opened. Release the
bonnet st
ay and secure it in the fixture de-
signed for this in the bonnet.
ïª
âºâºâº in Opening and closing the bonnet
on page 270
ï©âºâºâº page 268 Electric windows*
Fig. 12
Detail of the driver door: controls for
the w indo
w
s, and the electric child safety lock
buttons. Buttons on the driver door
For the fr
ont
electric windows.
For the sliding door electric windows.
To lock the sliding doors and their win-
dows.
Opening and closing the windows
Opening:Push the ïµ button.
Closing:Pull the ïµ button.
To stop the
one touch
function:Press or pull on the corresponding win-
dow button.» 1
2
3
11
Page 28 of 320
The essentials
Interior lightsButton/Position: Function ï
Switches interior lights off.
ïº
Switches interior lights on.
ï´
Switches door contact control on (central
position).
The interior lights come on automatically
when the vehicle is unlocked, a door is
opened or the key is removed from the igni-
tion.
The lights go off a few seconds after all the
doors are closed, the vehicle is locked or
the ignition is switched on.
ï»
Turning the reading light on and off
Ambient light: in the door panel, it changes
c
o
lour (whit
e or red) depending on the driv-
ing mode.
ï©
âºâºâº page 134 Windscreen wipers and window wiper
b
l
a
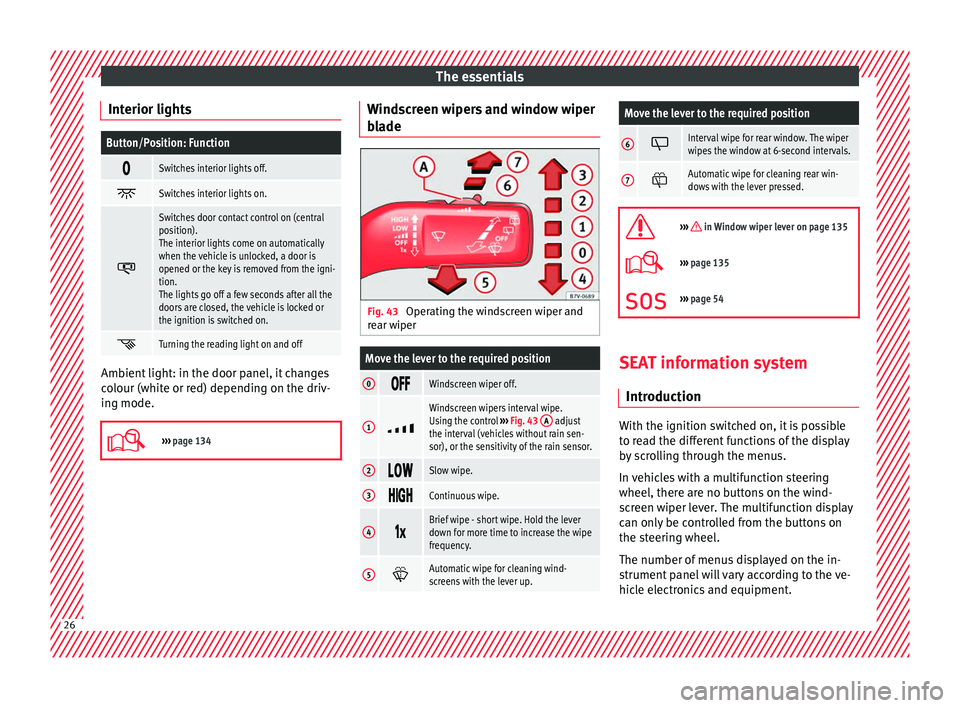
de Fig. 43
Operating the windscreen wiper and
r e
ar w
iper
Move the lever to the required position
0 ïïïWindscreen wiper off.
1
ïº
Windscreen wipers interval wipe.
Using the control
âºâºâº Fig. 43 A adjust
the interval (vehicles without rain sen-
sor), or the sensitivity of the rain sensor.
2 ïïïSlow wipe.
3
ïïïïContinuous wipe.
4
ï±ï³Brief wipe - short wipe. Hold the lever
down for more time to increase the wipe
frequency.
5
ï·Automatic wipe for cleaning wind-
screens with the lever up.
Move the lever to the required position
6 ïºInterval wipe for rear window. The wiper
wipes the window at 6-second intervals.
7
ï¼Automatic wipe for cleaning rear win-
dows with the lever pressed.
ïª
âºâºâº in Window wiper lever on page 135
ï©âºâºâº
page 135
ïªâºâºâº page 54 SEAT information system
Intr oduction With the ignition switched on, it is possible
t
o r
e
ad the different functions of the display
by scrolling through the menus.
In vehicles with a multifunction steering
wheel, there are no buttons on the wind-
screen wiper lever. The multifunction display
can only be controlled from the buttons on
the steering wheel.
The number of menus displayed on the in-
strument panel will vary according to the ve-
hicle electronics and equipment. 26
Page 30 of 320
The essentials
â Aut oho
l
d
â Service
â Info
â Reset
â Default setting
Using the menus on the instrument
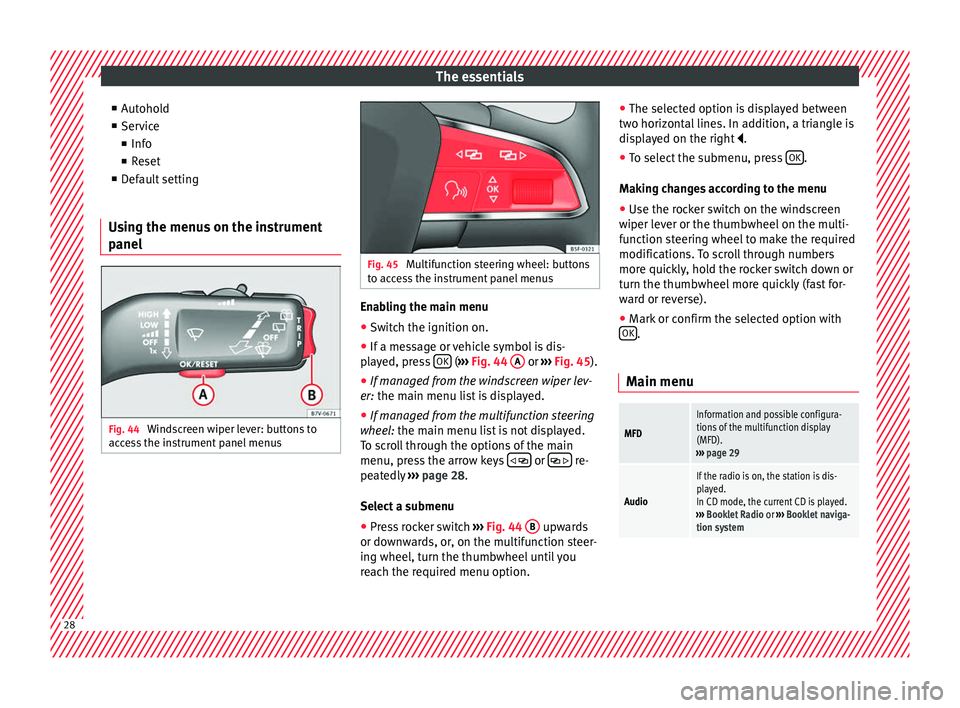
panel Fig. 44
Windscreen wiper lever: buttons to
ac c
e
ss the instrument panel menus Fig. 45
Multifunction steering wheel: buttons
to ac c
ess the instrument panel menus Enabling the main menu
â Switch the ignition on.
â If a message or vehicle symbol is dis-
p l
a
yed, press OK (
âºâº
⺠Fig. 44 A or
âºâº
⺠Fig. 45 ).
â If managed from the windscreen wiper lev-
er: the main menu lis
t is displayed.
â If managed from the multifunction steering
wheel:
the main menu list is not displayed.
To scroll through the options of the main
menu, press the arrow keys ï ï¨ or
ï¨ ï re-
pe at
edly
âºâºâº page 28.
Select a submenu â Press rocker switch âºâºâº
Fig. 44 B upwards
or do wn
w
ards, or, on the multifunction steer-
ing wheel, turn the thumbwheel until you
reach the required menu option. â
The selected option i
s displayed between
two horizontal lines. In addition, a triangle is
displayed on the right ï
.
â To select the submenu, press OK .
M ak
in
g changes according to the menu
â Use the rocker switch on the windscreen
wiper lev
er or the thumbwheel on the multi-
function steering wheel to make the required
modifications. To scroll through numbers
more quickly, hold the rocker switch down or
turn the thumbwheel more quickly (fast for-
ward or reverse).
â Mark or confirm the selected option with
OK .
Main menu
MFD
Information and possible configura-
tions of the multifunction display
(MFD).
âºâºâº page 29
Audio
If the radio is on, the station is dis-
played.
In CD mode, the current CD is played.
âºâºâº Booklet Radio or âºâºâº Booklet naviga-
tion system 28
Page 32 of 320
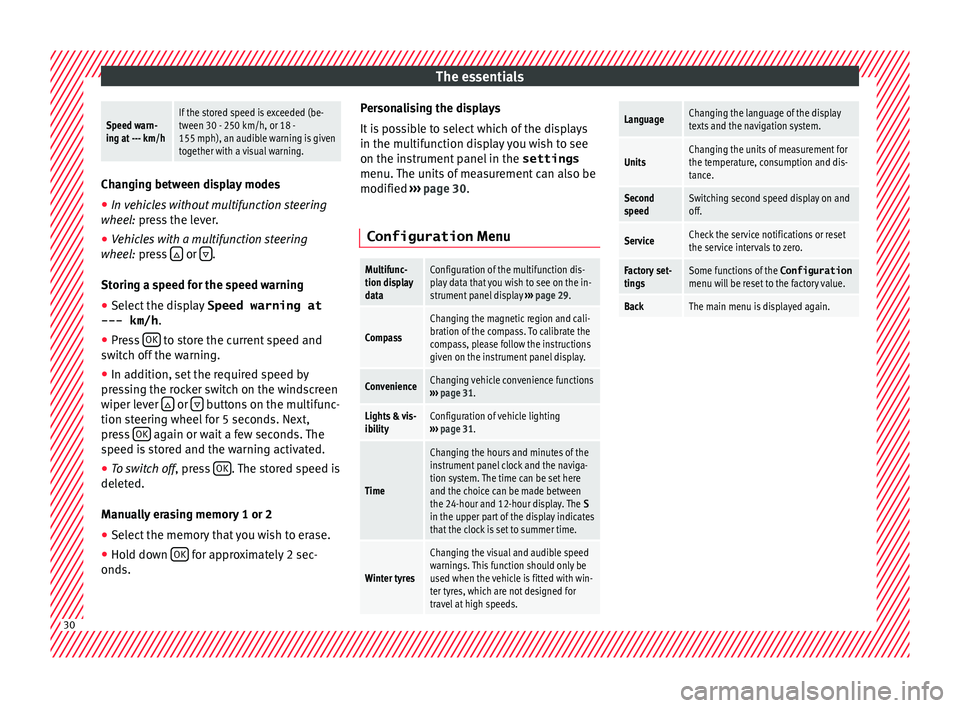
The essentialsSpeed warn-
ing at --- km/hIf the stored speed is exceeded (be-
tween 30 - 250 km/h, or 18 -
155 mph), an audible warning is given
together with a visual warning.
Changing between display modes
â In vehicles without multifunction steering
whee l:
press the lever.
â Vehicles with a multifunction steering
wheel:
press ï¢ or
ï£ .
Storin g a s
peed for the speed warning
â Select the display Speed warning at
--- km/h .
â Pr e
ss OK to store the current speed and
sw it
c
h off the warning.
â In addition, set the required speed by
pres
sing the rocker switch on the windscreen
wiper lever ï¢ or
ï£ buttons on the multifunc-
tion s t
eerin
g wheel for 5 seconds. Next,
press OK again or wait a few seconds. The
s peed i
s
stored and the warning activated.
â To switch off , pres
s OK . The stored speed is
del et
ed.
M
anually erasing memory 1 or 2
â Select the memory that you wish to erase.
â Hold down OK for approximately 2 sec-
ond s. P
er
sonalising the displays
It is
possible to select which of the displays
in the multifunction display you wish to see
on the instrument panel in the settings
menu. The units of measurement can also be
modified âºâºâº page 30.
Configuration Menu
Multifunc-
tion display
dataConfiguration of the multifunction dis-
play data that you wish to see on the in-
strument panel display âºâºâº page 29.
Compass
Changing the magnetic region and cali-
bration of the compass. To calibrate the
compass, please follow the instructions
given on the instrument panel display.
ConvenienceChanging vehicle convenience functions
âºâºâº page 31.
Lights & vis-
ibilityConfiguration of vehicle lighting
âºâºâº page 31.
Time
Changing the hours and minutes of the
instrument panel clock and the naviga-
tion system. The time can be set here
and the choice can be made between
the 24-hour and 12-hour display. The S
in the upper part of the display indicates
that the clock is set to summer time.
Winter tyres
Changing the visual and audible speed
warnings. This function should only be
used when the vehicle is fitted with win-
ter tyres, which are not designed for
travel at high speeds.
LanguageChanging the language of the display
texts and the navigation system.
UnitsChanging the units of measurement for
the temperature, consumption and dis-
tance.
Second
speedSwitching second speed display on and
off.
ServiceCheck the service notifications or reset
the service intervals to zero.
Factory set-
tingsSome functions of the Configuration
menu will be reset to the factory value.
BackThe main menu is displayed again. 30
Page 39 of 320
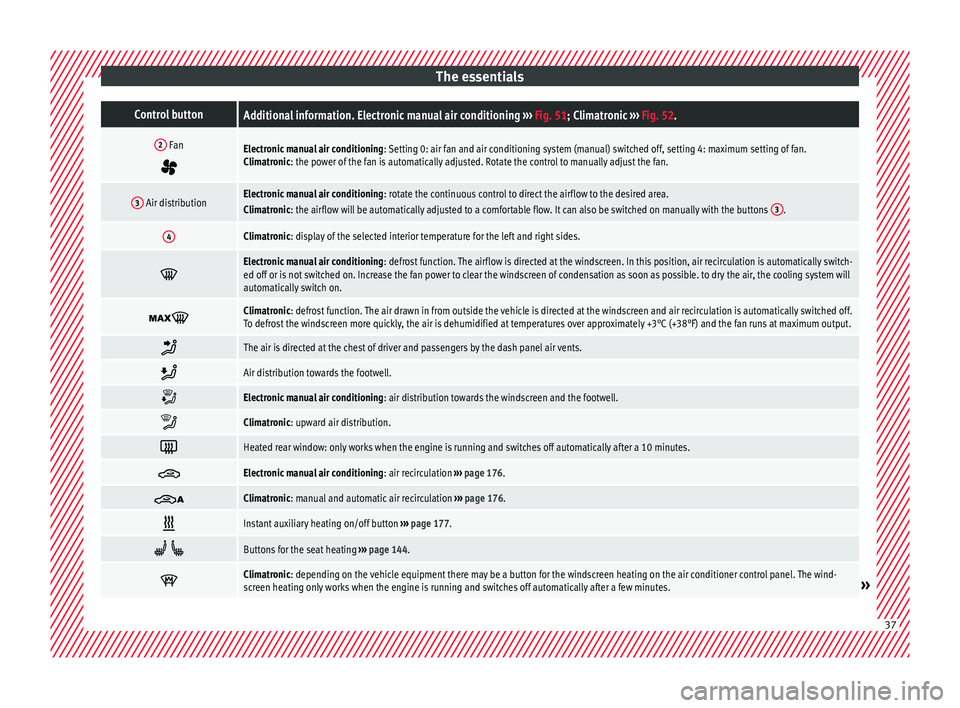
The essentialsControl buttonAdditional information. Electronic manual air conditioning
âºâºâº Fig. 51; Climatronic âºâºâº Fig. 52.
2 Fan
ï¦
Electronic manual air conditioning : Setting 0: air fan and air conditioning system (manual) switched off, setting 4: maximum setting of fan.
Climatronic: the power of the fan is automatically adjusted. Rotate the control to manually adjust the fan.
3 Air distributionElectronic manual air conditioning : rotate the continuous control to direct the airflow to the desired area.
Climatronic: the airflow will be automatically adjusted to a comfortable flow. It can also be switched on manually with the buttons 3.
4Climatronic: display of the selected interior temperature for the left and right sides.ï
Electronic manual air conditioning
: defrost function. The airflow is directed at the windscreen. In this position, air recirculation is automatically switch-
ed off or is not switched on. Increase the fan power to clear the windscreen of condensation as soon as possible. to dry the air, the cooling system will
automatically switch on. ïº
Climatronic: defrost function. The air drawn in from outside the vehicle is directed at the windscreen and air recirculation is automatically switched off.
To defrost the windscreen more quickly, the air is dehumidified at temperatures over approximately +3°C (+38°F) and the fan runs at maximum output.
ï±
The air is directed at the chest of driver and passengers by the dash panel air vents.
ï²
Air distribution towards the footwell.
ï·
Electronic manual air conditioning
: air distribution towards the windscreen and the footwell.ï¨
Climatronic: upward air distribution.
ï
Heated rear window: only works when the engine is running and switches off automatically after a 10 minutes.
ï»
Electronic manual air conditioning
: air recirculation âºâºâº page 176. ï¼
Climatronic: manual and automatic air recirculation
âºâºâº page 176. ï
Instant auxiliary heating on/off button
âºâºâº page 177. ï¡ ï
Buttons for the seat heating
âºâºâº page 144. ï¶
Climatronic: depending on the vehicle equipment there may be a button for the windscreen heating on the air conditioner control panel. The wind-
screen heating only works when the engine is running and switches off automatically after a few minutes.»
37
Page 101 of 320

General instrument panel
Operation
Gener a
l
instrument panel
Instrument panel Interior door release lever
. . . . . . . . .119
Central lock button ï ï ï . . . . . . . . . . 112
Switch for adjusting the exterior
mirror s . . . . . . . . . . . . . . . . . . . . . . . . . . . 137
â Exterior mirr or a
djustment ï ï ï ï ï°
â Heated exterior mirrors ï
â Folding exterior mirrors ï
Instrument panel controls and light-
ing control ï¼ . . . . . . . . . . . . . . . . . . . . . 128
Headlamp range adjustment ï¦ . . . 128
Light switch ï£ . . . . . . . . . . . . . . . . . . . 128
â Light off - ï°-
â Aut
omatic dipped beam head-
light control - ïïïï-
â Side/dipped lights ï¨ ï¥
â Fog lights ï© ï
Lever for . . . . . . . . . . . . . . . . . . . . . . . . . 128
â Main beam he
adlights ï¤
â Headlight flasher ï¤
â Turn signals ï®
â Parking lights ï«
Instrument panel:
1 2
3
4
5
6
7
8 â
Ins
truments . . . . . . . . . . . . . . . . . . . . 100
â Digit
al di
splay . . . . . . . . . . . . . . . . . . 100
â Warning and indic
ation lamps . . .105
Steering wheel with horn and â Driver airbag . . . . . . . . . . . . . . . . . . . 17
â On-bo
ard c
omputer controls . . . .26
â Contro
ls for radio, telephone,
navigation and speech dialogue
system âºâºâº Booklet Radio
â Paddle levers for tiptronic gear-
shift (automatic gearbox) . . . . . . .195
Windscreen wiper/ windscreen
wash l
ever . . . . . . . . . . . . . . . . . . . . . . . 135
â Wind s
creen wipers ïïïï â ïïï
â Intermittent wipe ïº
â âBrief wipeâ ï±x
â Windscreen wipers ïµ
â Automatic windscreen wash/wipe
ï·
â Rear window wiper ïº
â Automatic rear window
wash/wipe ï¼
â Lever with buttons for controlling
the SEAT information system ïïïï- ,
ïï/ïï
ïï
ï . . . . . . . . . . . . . . . . . . . . . . . . . 26
Left seat heating controls ï¡ . . . . . . . 144
Radio or navigation system (fitted
at fact
ory) âºâºâº Booklet Radio or
âºâºâº Booklet Navigation system
9
10
11
12 Storage compartment
. . . . . . . . . . . . .163
Hazard warning lights switch ï¾ . . . 82
Switches for:
â Electr
onic
manual air condition-
ing . . . . . . . . . . . . . . . . . . . . . . . . . . . . . 173
â Climatr
onic . . . . . . . . . . . . . . . . . . . . . 173
Right seat heating controls ï¡ . . . . . 144
Button for:
â Anti-slip r
egulation (ASR) ï¶ ïïï. .187
â Start
-Stop operation ï§ . . . . . . . . . .205
â Park in
g distance warning system
(Park Pilot) ï . . . . . . . . . . . . . . . . . . 208
â Park As
sist system ïª . . . . . . . . . . . 211
â Tyr
e pressure monitor ï ïï
ï . . . . .231
â Dyn
amic chassis control (DCC) ï ï·
ï
â Opening the rear lid ï² . . . . . . . . .122
â Opening and clo
sing of electric
sliding doors ï . . . . . . . . . . . . . . . . 119
Locking lever to open glove com-
par tment . . . . . . . . . . . . . . . . . . . . . . . . . 163
P
osition of passenger front airbag
on the dash p
anel . . . . . . . . . . . . . . . . 17
Key-operated switch in glove com-
partment
for deactivating front pas-
senger front airbag . . . . . . . . . . . . . . .18
Passenger front airbag off warning
lamp . . . . . . . . . . . . . . . . . . . . . . . . . . . . . 72
L ev
er for: »
13 14
15
16
17
18
19
20
21
22
99
Technical data
Advice
Operation
Emergencies
Safety
Page 115 of 320

Opening and closing
Description of the central locking sys-
t em The central locking system allows all doors
and the re
ar lid t
o be locked and unlocked
centrally.
â From outside, using the vehicle key.
â From outside with the Keyless Access sys-
tem âºâº
⺠page 115,
â From inside, by pushing the central locking
button âº
âºâº page 114.
In the submenu Convenience in the Con-
figuration menu, or by visiting a special-
ised workshop, special functions of the cen-
tral locking system can be switched on or off
âºâºâº ï¨ page 26.
In case of a vehicle key fault or central lock-
ing system fault, all doors can be locked or
unlocked manually.
Automatic locking (Auto Lock)
In this instance, the vehicle locks automati-
cally when moving at speeds above approx.
15 km/h (10 mph) âºâºâº
ï¨ page 26. When the
vehicle is locked, the control lamp ï of the
central locking button âºâºâº
Fig. 130 lights up in
yellow. Automatic unlocking (Auto Unlock)
When the key
i
s removed from the ignition
slot, here the vehicle unlocks all doors and
the boot automatically âºâºâº
ï¨ page 26.
Locking the vehicle after the airbags have
been deployed
If the airbags are deployed due to an acci-
dent, the vehicle will be automatically and
completely unlocked. Depending on the
amount of damage, it can be locked follow-
ing an accident in the following ways:
FunctionAction
Lock the vehicle
by pushing the
central locking
button:â Switch off the ignition.
â Open a door of the vehicle and
close it again.
â Push the central locking button
ï.
Lock the vehicle
with the vehicle
key:â Disconnect the ignition button.
OR: remove the key from the igni-
tion.
â Open a door once.
â Lock the vehicle with the key. Note
If the vehicle key buttons are pressed
âºâº âº
Fig. 129 or one of the central locking but-
tons is pressed âºâºâº Fig. 130 several times in
quick succession, the central locking feature
is disabled briefly to protect from overload-
ing. The vehicle will then remain unlocked for
around 30 seconds. If no door nor the boot is opened during this time, the vehicle will then
autom
atic
ally unlock. Unlocking and locking the vehicle
from out
s
ide Fig. 129
Buttons on the vehicle key
FunctionHandling the buttons on
the vehicle
Unlocking the vehicle.Press button ï. Keep it
pushed for the convenience
opening.
Lock the vehicle.Press button ï. Keep it push-
ed for the convenience lock-
ing function.
» 113
Technical data
Advice
Operation
Emergencies
Safety
Page 116 of 320
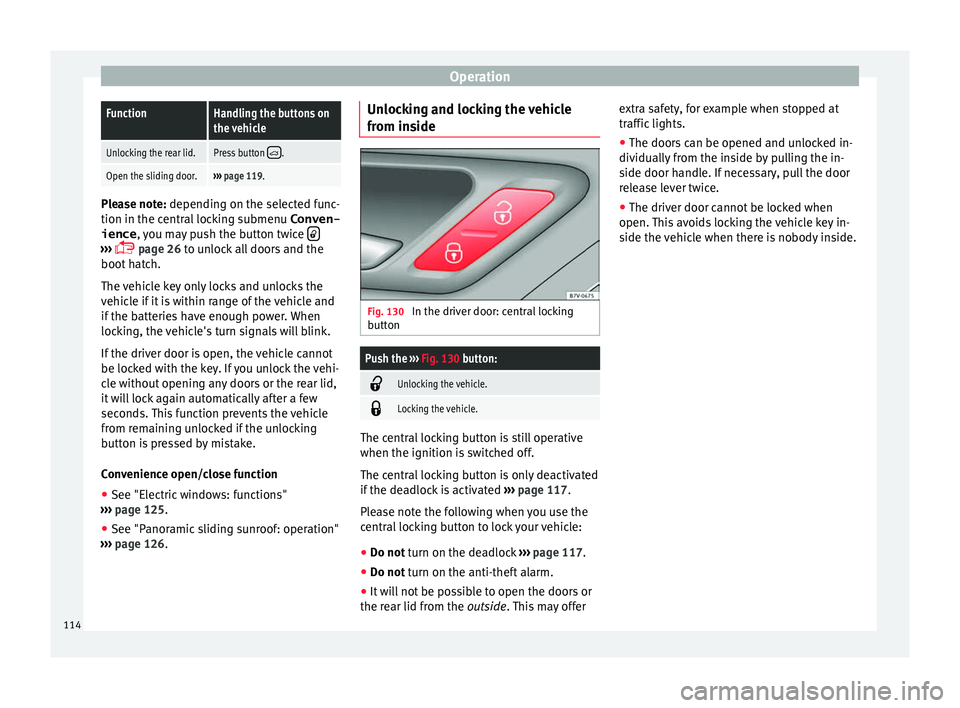
OperationFunctionHandling the buttons on
the vehicle
Unlocking the rear lid.Press button ï².
Open the sliding door.âºâºâº
page 119. Please note: depending on the sel
ect
ed func-
tion in the central locking submenu Conven-
ience , you may push the button twice ïâºâºâº
ï¨ page 26 to unlock all doors and the
boot h
atch.
The vehicle key only locks and unlocks the
vehicle if it is within range of the vehicle and
if the batteries have enough power. When
locking, the vehicle's turn signals will blink.
If the driver door is open, the vehicle cannot
be locked with the key. If you unlock the vehi-
cle without opening any doors or the rear lid,
it will lock again automatically after a few
seconds. This function prevents the vehicle
from remaining unlocked if the unlocking
button is pressed by mistake.
Convenience open/close function
â See "Electric windows: functions"
âºâº âº
page 125.
â See "Panoramic sliding sunroof: operation"
âºâºâº
page 126. Unlocking and locking the vehicle
from ins
ide Fig. 130
In the driver door: central locking
b utt
on
Push the âºâºâº Fig. 130 button: ï
Unlocking the vehicle.
ï
Locking the vehicle.
The central locking button is still operative
when the ignition i
s
sw
itched off.
The central locking button is only deactivated
if the deadlock is activated âºâºâº page 117.
Please note the following when you use the
central locking button to lock your vehicle:
â Do not turn on the deadlock âºâº
⺠page 117.
â Do not turn on the anti-theft alarm.
â It w
ill not be possible to open the doors or
the re ar lid fr
om the outside. This may offer extra safety, for example when stopped at
traffic lights.
â
The door
s can be opened and unlocked in-
dividually
from the inside by pulling the in-
side door handle. If necessary, pull the door
release lever twice.
â The driver door cannot be locked when
open. This
avoids locking the vehicle key in-
side the vehicle when there is nobody inside.
114
Page 123 of 320

Opening and closing
Rollback anti-trap function of the elec-
tric s
lidin
g doorsThe rollback anti-trap function of the electric
slidin
g door
s can reduce the risk of injury
when opening and closing the sliding doors
âºâºâº .
If an o b
ject gets in the way of the sliding
door while it is closing, it will open again.
If an object gets in the way of the sliding
door while it is opening, the door will be im-
mobilised at this point.
â Check the reason for which the sliding door
does not
open or close.
â Try to open or close the sliding door again.
To clo
se the sliding door without the rollback
anti-trap function
â Turn off the ignition and turn it on again.
â Press and hold the ï
⺠âº
âº
Fig. 135 button.
The sliding door closes with full force. WARNING
Closing the electric windows without the an-
ti-trap f u
nction can cause serious injury.
â Always close the sliding doors carefully.
â Nobody should ever get in the way of the
electric s
liding doors, especially when clos-
ing without the anti-trap function. â
The anti-trap f u
nction does not prevent fin-
gers or other parts of the body getting
pinched against the window frame and caus-
ing injury. Electric child safety lock
Fig. 136
In the driver door: electric child safe-
ty loc
k
s buttons The electric child safety lock avoids opening
and loc
k
in
g of the sliding door and its elec-
tric windows from the inside so that children
cannot accidentally open the door while the
vehicle is being driven. Using the left-hand
âºâºâº Fig. 136 1 or right-hand side
2 button,
the c hi
l
dproof lock is activated on the left- or
right-hand side respectively. Turning on and off the electric child safety
FunctionNecessary operations
To switch sys-
tem on:Press the button
âºâºâº Fig. 136 1 or
2.
To switch sys-
tem off:Press the button again. The yellow control lamp
ï· indicate
s that the
feature is on for the corresponding button. WARNING
When the electric child safety function is acti-
vat ed, the s
liding door can be opened from
the outside only.
â Never leave children or disabled people
alone in the v
ehicle if the doors are to be
locked. Therefore, passengers will be locked
inside the vehicle. They could be trapped in
the car in an emergency and will not be able
to get themselves to safety. Individuals
locked in the vehicle can be exposed to very
high or very low temperatures.
â Depending on the time of the year, temper-
ature
s inside a locked and closed vehicle can
be extremely high or extremely low resulting
in serious injuries and illness or even death,
particularly for young children. 121
Technical data
Advice
Operation
Emergencies
Safety