Panel Seat Altea XL 2010 Workshop Manual
[x] Cancel search | Manufacturer: SEAT, Model Year: 2010, Model line: Altea XL, Model: Seat Altea XL 2010Pages: 312, PDF Size: 8.41 MB
Page 123 of 312
Lights and visibility121
Safety First
Operating instructions
Practical tips
Technical Data
•The main beam headlights can only be switched on if the dipped beam
headlights are already on. The warning lamp
then lights up on the dash
panel.
•The headlight flasher comes on for as long as you pull the lever – even if
no other lights are switched on. The warning lamp
then lights up on the
dash panel.
•When the parking lights are switched on, the headlight and the rear light
on the corresponding side of the vehicle light up. The parking lights will only
work if the key is removed from the ignition. If the lights are switched on, a
buzzer gives an audible warning while the driver door is open.•If the turn signal lever is left on after the key has been taken out of the
ignition lock, an acoustic signal sounds when the driver door is opened. This
is a reminder to switch off the turn signal, unless of course you wish to leave
the parking light on.
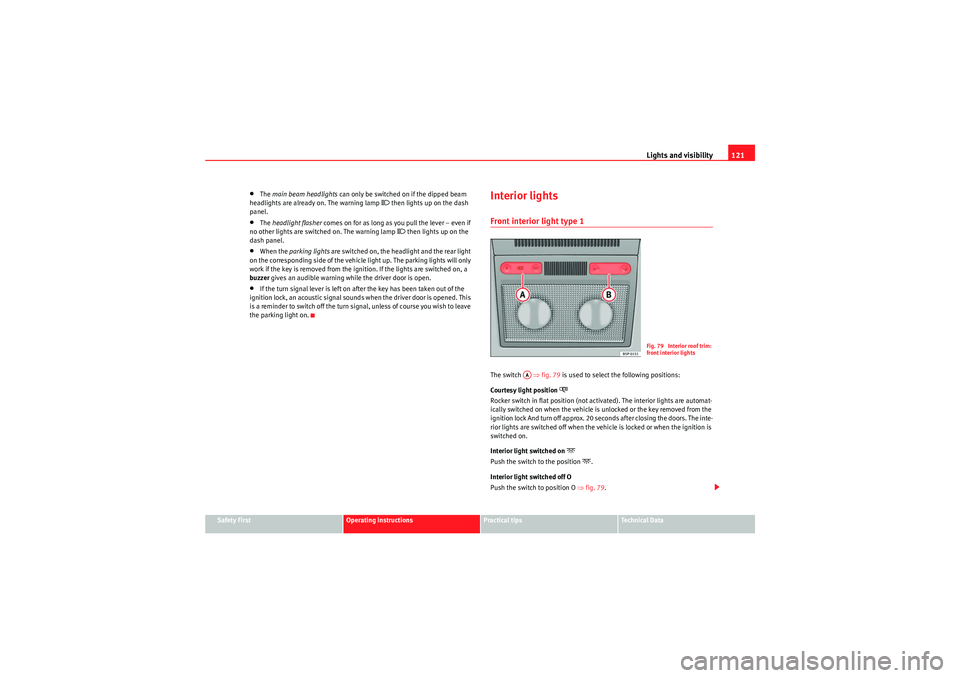
Interior lightsFront interior light type 1The switch ⇒fig. 79 is used to select the following positions:
Courtesy light position
Rocker switch in flat position (not activated). The interior lights are automat-
ically switched on when the vehicle is unlocked or the key removed from the
ignition lock And turn off approx. 20 seconds after closing the doors. The inte-
rior lights are switched off when the vehicle is locked or when the ignition is
switched on.
Interior light switched on
Push the switch to the position
.
Interior light switched off O
Push the switch to position O ⇒fig. 79.
Fig. 79 Interior roof trim:
front interior lights
AA
AlteaXL_EN.book Seite 121 Dienstag, 1. September 2009 10:37 10
Page 134 of 312
Seats and stowage
132Seats and stowageThe importance of correct seat adjustmentProper seat adjustment optimises the level of protection
offered by seat belts and airbags.Your vehicle has five passenger places, two individual front seats and three
places on the rear seat. Each seat is equipped with a three-point seat belt.
The driver seat and the front passenger seat can be adjusted in many ways to
suit the physical requirements of the vehicle occupants. The correct seat
position is very important for:•a fast and easy operation of all controls on the instrument panel,•a relaxed posture which does not cause drowsiness,•safe driving ⇒ page 7,•and to ensure that the seat belts and airbag system provide maximum
protection ⇒page 19.WARNING
•If the driver and passengers assume improper sitting positions, they
may sustain critical injuries.•More people than available seats must never be transported in your
vehicle.•Every passenger in the vehicle must properly fasten and wear the seat
belt belonging to his or her seat. Chil dren must be protected with an appro-
priate child restraint system ⇒page 46, “Child safety”.•The front seats and all head restraints must always be adjusted to body
size and the seat belt must always be properly adjusted to provide you and
your passengers with optimum protection.
•Always keep your feet on the foot well when the vehicle is moving;
never rest them on the dash panel, out of the window or on the seat. This
is also applied to passengers. An incorrect sitting position exposes you to
an increased risk of injur y in case of a sudden braking or an accident. If the
airbag is triggered, you could sustain severe injuries due to an incorrect
sitting position.•It is important for the driver and front passenger to keep a distance of
at least 25 cm from the steering wheel or dash panel. Failure to respect the
minimum distance means that the airbag will not protect you. Risk of fatal
injury. The distance between the driver and the steering wheel or between
the front passenger and the dash panel should always be as great as
possible.•Adjust the driver or front passenger seat only when the vehicle is
stationary. This also applies to the forwards/backwards adjustment of the
rear seats. Otherwise, your seat could move unexpectedly while the vehicle
is moving. This could increase the risk of an accident and therefore, injury.
In addition, while adjusting your seat, you will assume an incorrect sitting
position. Risk of fatal accidents.•Special guidelines apply to installing a child seat on the front
passenger seat. When installing a child seat, observe the warning note in
the ⇒page 46, “Child safety”.WARNING (continued)
AlteaXL_EN.book Seite 132 Dienstag, 1. September 2009 10:37 10
Page 157 of 312
Heating, Ventilation and Air conditioning155
Safety First
Operating instructions
Practical tips
Technical Data
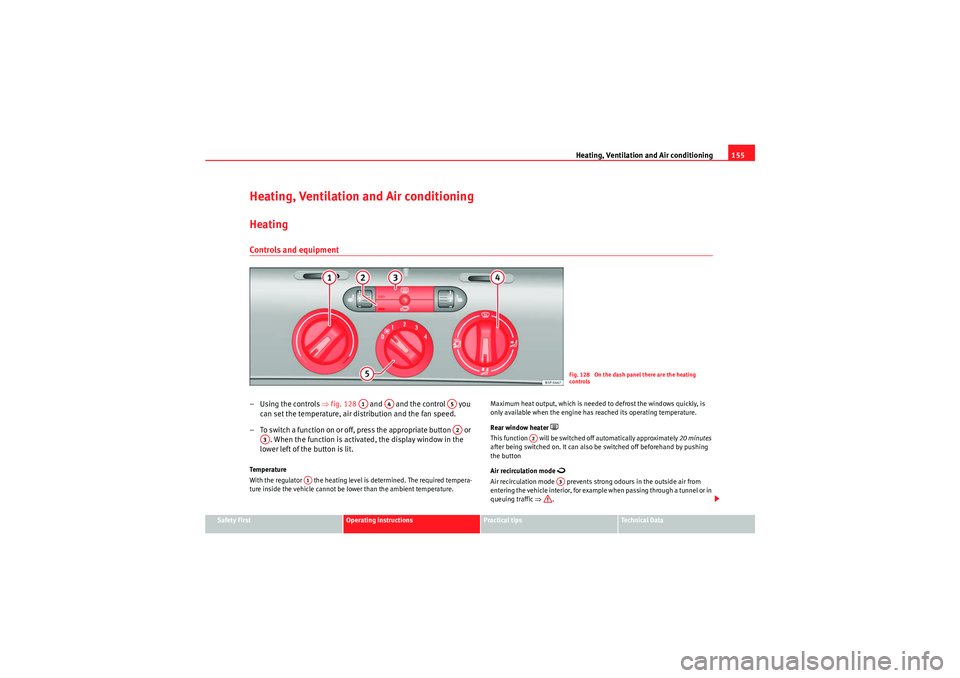
Heating, Ventilation and Air conditioningHeatingControls and equipment– Using the controls ⇒fig. 128 and and the control you
can set the temperature, air distribution and the fan speed.
– To switch a function on or off, press the appropriate button or . When the function is activated, the display window in the
lower left of the button is lit.Te m p e r a t u r e
With the regulator the heating level is determined. The required tempera-
ture inside the vehicle cannot be lower than the ambient temperature. Maximum heat output, which is needed to defrost the windows quickly, is
only available when the engine has reached its operating temperature.
Rear window heater
This function will be switched off automatically approximately
20 minutes
after being switched on. It can also be switched off beforehand by pushing
the button
Air recirculation mode
Air recirculation mode prevents strong odours in the outside air from
entering the vehicle interior, for example when passing through a tunnel or in
queuing traffic ⇒.
Fig. 128 On the dash panel there are the heating
controls
A1
A4
A5A2
A3
A1
A2
A3
AlteaXL_EN.book Seite 155 Dienstag, 1. September 2009 10:37 10
Page 159 of 312
Heating, Ventilation and Air conditioning157
Safety First
Operating instructions
Practical tips
Technical Data
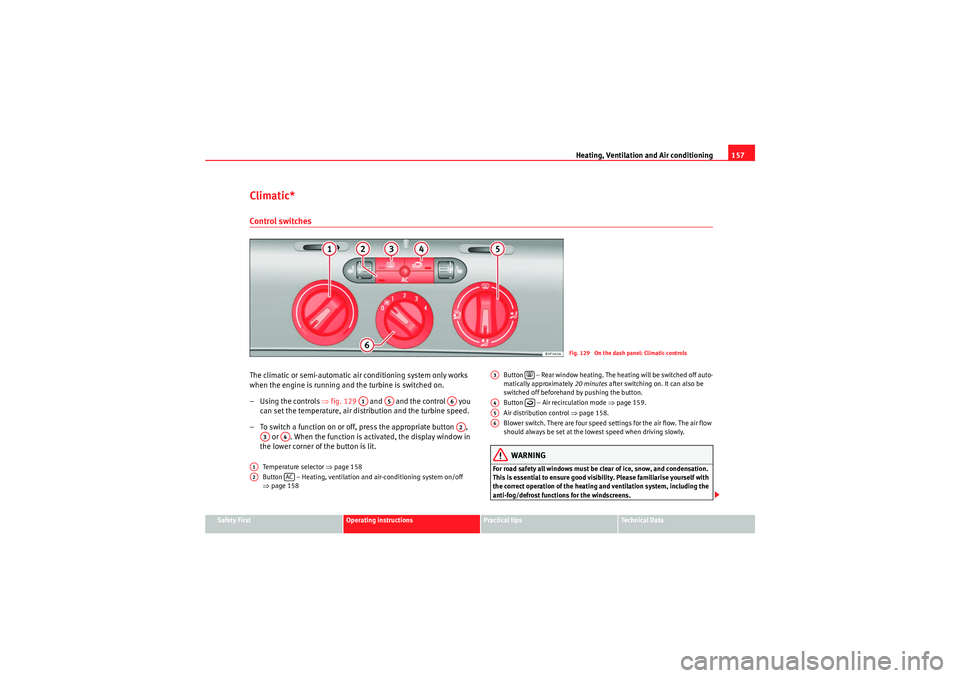
Climatic*Control switchesThe climatic or semi-automatic air conditioning system only works
when the engine is running and the turbine is switched on.
– Using the controls ⇒fig. 129 and and the control you
can set the temperature, air distribution and the turbine speed.
– To switch a function on or off, press the appropriate button , or . When the function is activated, the display window in
the lower corner of the button is lit.
Temperature selector ⇒page 158
Button – Heating, ventilation and air-conditioning system on/off
⇒ page 158 Button – Rear window heating. The heating will be switched off auto-
matically approximately
20 minutes after switching on. It can also be
switched off beforehand by pushing the button.
Button – Air recirculation mode ⇒page 159.
Air distribution control ⇒page 158.
Blower switch. There are four speed settings for the air flow. The air flow
should always be set at the lowest speed when driving slowly.
WARNING
For road safety all windows must be clear of ice, snow, and condensation.
This is essential to ensure good visibility. Please familiarise yourself with
the correct operation of the heating and ventilation system, including the
anti-fog/defrost functions for the windscreens.
Fig. 129 On the dash panel: Climatic controls
A1
A5
A6A2
A3
A4
A1A2
AC
A3
A4
A5A6
AlteaXL_EN.book Seite 157 Dienstag, 1. September 2009 10:37 10
Page 160 of 312
Heating, Ventilation and Air conditioning
158
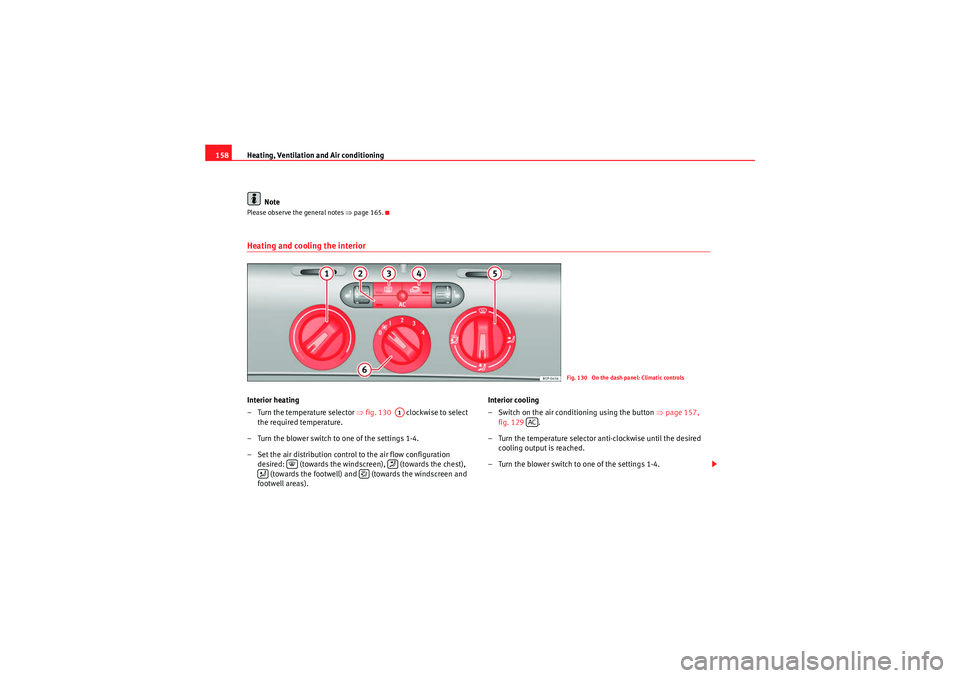
NotePlease observe the general notes ⇒page 165.Heating and cooling the interiorInterior heating
– Turn the temperature selector ⇒fig. 130 clockwise to select
the required temperature.
– Turn the blower switch to one of the settings 1-4.
– Set the air distribution control to the air flow configuration desired: (towards the windscreen), (towards the chest), (towards the footwell) and (towards the windscreen and
footwell areas). Interior cooling
– Switch on the air conditioning using the button
⇒page 157,
fig. 129 .
– Turn the temperature selector anti-clockwise until the desired cooling output is reached.
– Turn the blower switch to one of the settings 1-4.
Fig. 130 On the dash panel: Climatic controls
A1
AC
AlteaXL_EN.book Seite 158 Dienstag, 1. September 2009 10:37 10
Page 161 of 312
Heating, Ventilation and Air conditioning159
Safety First
Operating instructions
Practical tips
Technical Data
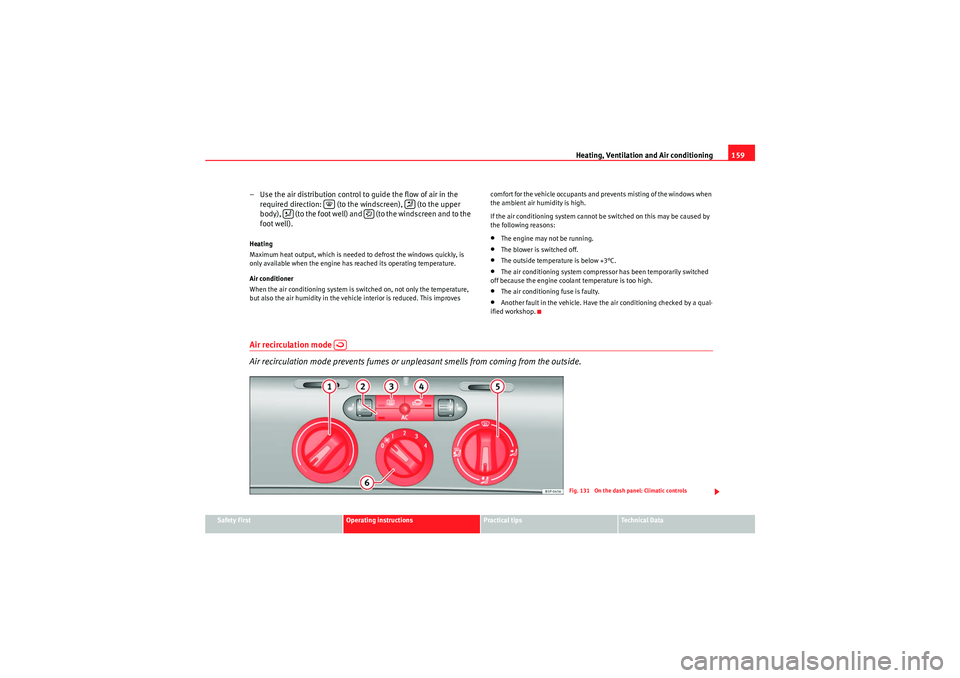
– Use the air distribution control to guide the flow of air in the
required direction: (to the windscreen), (to the upper
body), (to the foot well) and (to the windscreen and to the
foot well).Heating
Maximum heat output, which is needed to defrost the windows quickly, is
only available when the engine has reached its operating temperature.
Air conditioner
When the air conditioning system is switched on, not only the temperature,
but also the air humidity in the vehicle interior is reduced. This improves comfort for the vehicle occupants and prevents misting of the windows when
the ambient air humidity is high.
If the air conditioning system cannot be switched on this may be caused by
the following reasons:
•The engine may not be running.•The blower is switched off.•The outside temperature is below +3°C.•The air conditioning system compressor has been temporarily switched
off because the engine coolant temperature is too high.•The air conditioning fuse is faulty.•Another fault in the vehicle. Have the air conditioning checked by a qual-
ified workshop.
Air recirculation mode
Air recirculation mode prevents fumes or unpleasant smells from coming from the outside.
Fig. 131 On the dash panel: Climatic controls
AlteaXL_EN.book Seite 159 Dienstag, 1. September 2009 10:37 10
Page 163 of 312
Heating, Ventilation and Air conditioning161
Safety First
Operating instructions
Practical tips
Technical Data
2C-Climatronic*Control switches
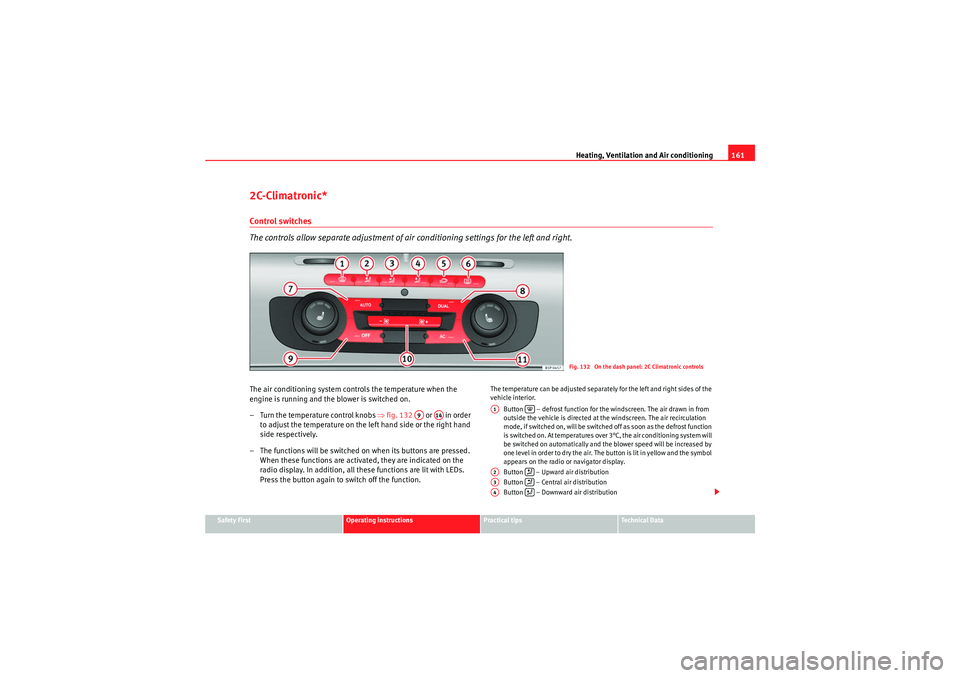
The controls allow separate adjustment of air conditioning settings for the left and right.The air conditioning system controls the temperature when the
engine is running and the blower is switched on.
– Turn the temperature control knobs ⇒fig. 132 or in order
to adjust the temperature on the left hand side or the right hand
side respectively.
– The functions will be switched on when its buttons are pressed. When these functions are activated, they are indicated on the
radio display. In addition, all these functions are lit with LEDs.
Press the button again to switch off the function.
The temperature can be adjusted separately for the left and right sides of the
vehicle interior.
Button – defrost function for the windscreen. The air drawn in from
outside the vehicle is directed at the windscreen. The air recirculation
mode, if switched on, will be switched off as soon as the defrost function
is switched on. At temperatures over 3°C, the air conditioning system will
be switched on automatically and the blower speed will be increased by
one level in order to dry the air. The button is lit in yellow and the symbol
appears on the radio or navigator display.
Button – Upward air distribution
Button – Central air distribution
Button – Downward air distribution
Fig. 132 On the dash panel: 2C Climatronic controls
A9
A14
A1
A2
A3
A4
AlteaXL_EN.book Seite 161 Dienstag, 1. September 2009 10:37 10
Page 166 of 312
Heating, Ventilation and Air conditioning
164Manual mode
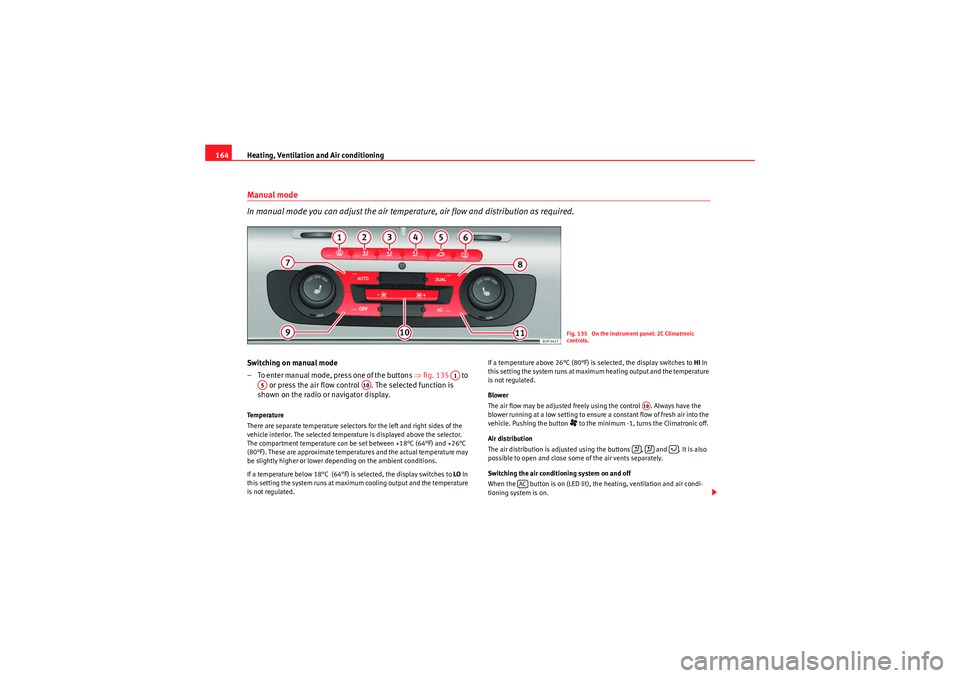
In manual mode you can adjust the air temperature, air flow and distribution as required.Switching on manual mode
– To enter manual mode, press one of the buttons ⇒ fig. 135 to
or press the air flow control . The selected function is
shown on the radio or navigator display.Te m p e r a t u r e
There are separate temperature selectors for the left and right sides of the
vehicle interior. The selected temperature is displayed above the selector.
The compartment temperature can be set between +18°C (64°F) and +26°C
(80°F). These are approximate temperatures and the actual temperature may
be slightly higher or lower depending on the ambient conditions.
If a temperature below 18°C (64°F) is selected, the display switches to LO In
this setting the system runs at maximum cooling output and the temperature
is not regulated. If a temperature above 26°C (80°F) is selected, the display switches to
HI In
this setting the system runs at maximum heating output and the temperature
is not regulated.
Blower
The air flow may be adjusted freely using the control . Always have the
blower running at a low setting to ensure a constant flow of fresh air into the
vehicle. Pushing the button
to the minimum -1, turns the Climatronic off.
Air distribution
The air distribution is adjusted using the buttons , and . It is also
possible to open and close some of the air vents separately.
Switching the air conditioning system on and off
When the button is on (LED lit), the heating, ventilation and air condi-
tioning system is on.Fig. 135 On the instrument panel: 2C Climatronic
controls.
A1
A5
A10
A10
AC
AlteaXL_EN.book Seite 164 Dienstag, 1. September 2009 10:37 10
Page 176 of 312
Driving
174•If there is a fault in the LPG system.•At very low temperatures below minus 10°C.
Manual switch from petrol to LPG
Press the GAS button to switch modes. When the necessary conditions are
met, the system switches to LPG mode and the ON lamp is lit. If the ON
lamp flashes, the following conditions have not been met:•There is enough LPG in the tank.•The temperature of the vehicle coolant is above 30°C.•Engine speed while driving is above 1200 rpm.
When these conditions are met, the system switches to LPG mode and the ON
lamp is lit .
Manual switch from LPG to petrol
Press the button to switch modes. When the OFF lamp is lit, the
vehicle is running on petrol.
Running on petrol
Run the engine with petrol for short journeys at regular intervals to avoid
problems in the petrol system.WARNING
LPG is a highly explosive and inflammable substance. It may cause severe
burns and other injury.•Due care must be taken to avoid any risk of fire or explosion.•When parking the vehicle in a closed area (for example in a garage),
make sure that there is adequate ventilation, either natural or mechanical,
to neutralise the LPG in the event of a leak.
Note
•If frequent short journeys are made, especially when the outside temper-
ature is low, the vehicle will tend to run on petrol more often than on LPG.
Therefore, the petrol tank may empty before the LPG tank.Start-Stop function*Description and operationThe Start-Stop function stops the engine when the vehicle is
stopped and starts it automatically when required.
– When the vehicle is stopped, put it in neutral and release the clutch pedal. The engine will stop.
– When the clutch pedal is pressed, the engine starts again.
– The instrument panel screen displays information about the status of the Start-Stop function ⇒page 176, fig. 142 .Start-Stop function conditions•The driver's seat belt must be buckled.•The engine hood must be closed.•The engine must be at operating temperature•The steering wheel must be straight.•The vehicle must be on flat ground.•The vehicle must not be in reverse.•A trailer must not be connected.
A1
A3
A3A3GAS
A1
A2
AlteaXL_EN.book Seite 174 Dienstag, 1. September 2009 10:37 10
Page 177 of 312
Driving175
Safety First
Operating instructions
Practical tips
Technical Data
•The temperature of the passenger compartment must be within the
convenience limits (button ⇒page 164, fig. 135 should be selected).•The windscreen de-mist function must be off.•If not , it requires an increase in airflow ⇒page 164, fig. 135 for more
than three presses.•Either of the temperature settings, HI or LO must not be set.•The driver's door must be closed.•The diesel particulate filter must not be in regeneration mode, for diesel
engines.•The battery charge must not be low for the next start.•The battery temperature must be between -1°C and 55°C.•The parking assistant, Park Assist* must not be activated.
Interrupting the Start-Stop function
In the following situations, the Start-Stop function will be interrupted and the
engine will automatically start:•The vehicle is moving.•The brake pedal is pressed several times in a row.•The battery has been discharged excessively.•The Start-Stop System has been manually deactivated.•The windscreen de-mist function is turned on.•The temperature of the passenger compartment exceeds the convenience
limits (button ⇒page 164, fig. 135 should be selected).•If in an increase in airflow ⇒page 164, fig. 135 is required for more
than three presses.•Either of the temperature settings, HI or LO, is selected.•The engine coolant temperature is insufficient.•The alternator is faulty, for example the V-belt has ruptured.•If any of the conditions described in the previous section are not fulfilled.
WARNING
Never allow the vehicle to move with the engine off for any reason. You
could lose control of your vehicle. This could cause an accident and serious
injury.•The brake servo does not work when the engine is not running. You
need more force to stop the vehicle.•Power assisted steering does not work when the engine is not running.
That is why it is much more difficult to turn the steering wheel.Note
•For vehicles with the Start-Stop function and a manual gearbox, when the
engine is started, the clutch must be pressed.•When the conditions for the Start-Stop function are not fulfilled, the dash
panel displays the Start-Stop indicator dimmed.•The vehicle can be restarted by rotating the steering wheel three times,
that is, more than 270°.
ACA11
A10
ACA11
A10
AlteaXL_EN.book Seite 175 Dienstag, 1. September 2009 10:37 10