Seat Altea XL 2015 Repair Manual
Manufacturer: SEAT, Model Year: 2015, Model line: Altea XL, Model: Seat Altea XL 2015Pages: 236, PDF Size: 4.23 MB
Page 61 of 236
Steering wheel controls*
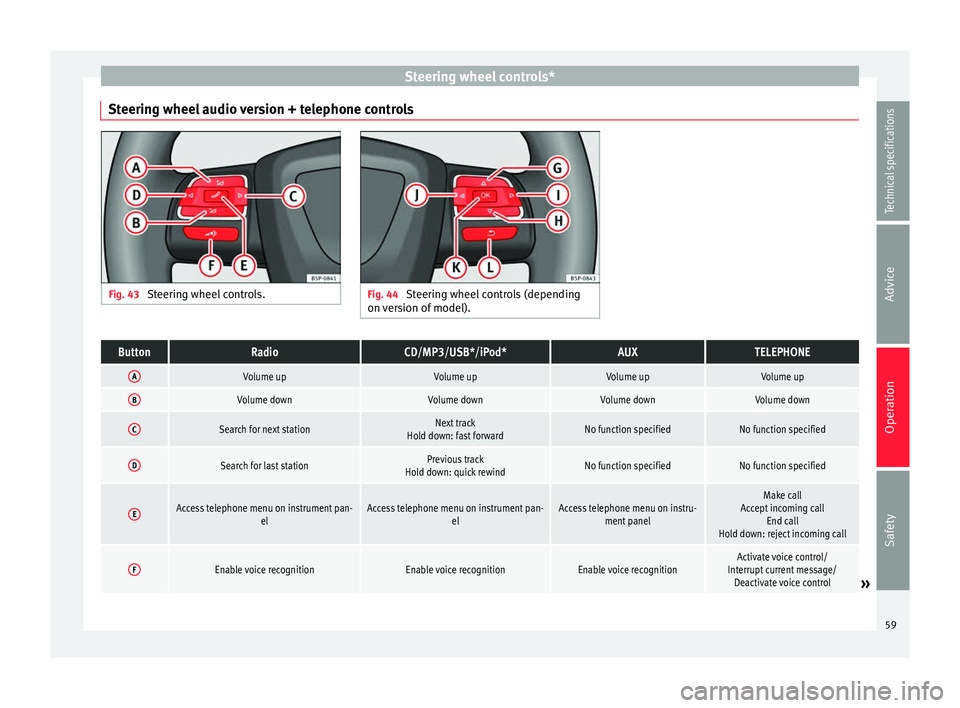
Steering wheel audio version + telephone controls Fig. 43
Steering wheel controls. Fig. 44
Steering wheel controls (depending
on version of model).ButtonRadioCD/MP3/USB*/iPod*AUXTELEPHONE
AVolume upVolume upVolume upVolume up
BVolume downVolume downVolume downVolume down
CSearch for next stationNext track
Hold down: fast forwardNo function specifiedNo function specified
DSearch for last stationPrevious track
Hold down: quick rewindNo function specifiedNo function specified
EAccess telephone menu on instrument pan- elAccess telephone menu on instrument pan-elAccess telephone menu on instru-ment panelMake call
Accept incoming call End call
Hold down: reject incoming call
FEnable voice recognitionEnable voice recognitionEnable voice recognitionActivate voice control/
Interrupt current message/ Deactivate voice control
» 59
Technical specifications
Advice
Operation
Safety
Page 62 of 236
OperationButtonRadioCD/MP3/USB*/iPod*AUXTELEPHONE
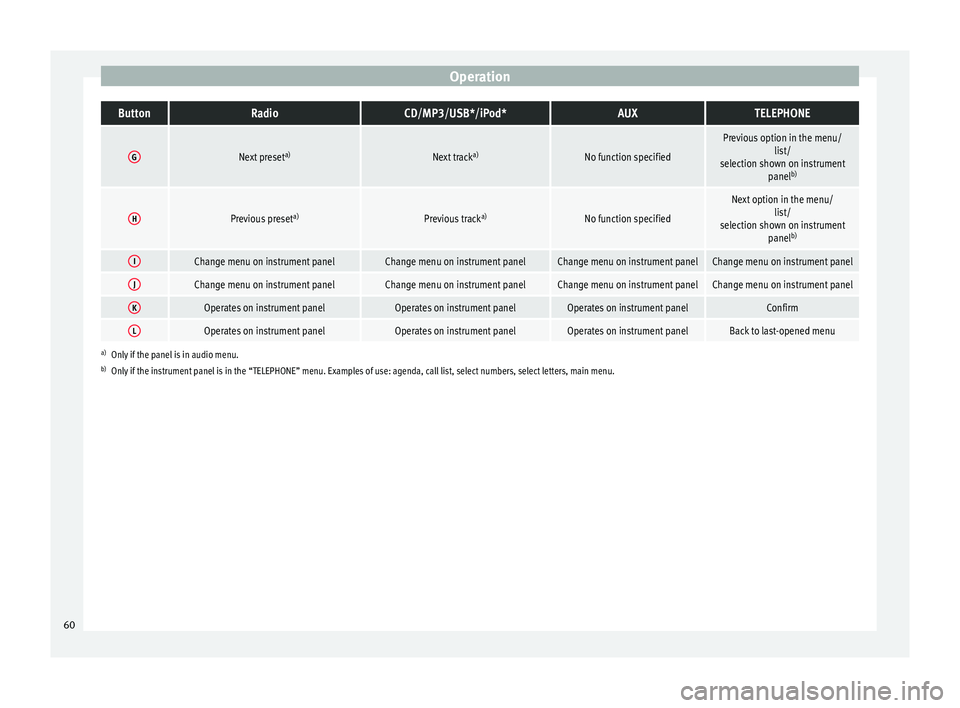
GNext preset
a)Next tracka)No function specified
Previous option in the menu/
list/
selection shown on instrument panelb)
HPrevious preset a)Previous tracka)No function specified
Next option in the menu/
list/
selection shown on instrument panelb)
IChange menu on instrument panelChange menu on instrument panelChange menu on instrument panelChange menu on instrument panel
JChange menu on instrument panelChange menu on instrument panelChange menu on instrument panelChange menu on instrument panel
KOperates on instrument panelOperates on instrument panelOperates on instrument panelConfirm
LOperates on instrument panelOperates on instrument panelOperates on instrument panelBack to last-opened menu
a)
Only if the panel is in audio menu.
b) Only if the instrument panel is in the “TELEPHONE” menu. Examples of use: agenda, call list, select numbers, select letters, main menu.
60
Page 63 of 236
Steering wheel controls*
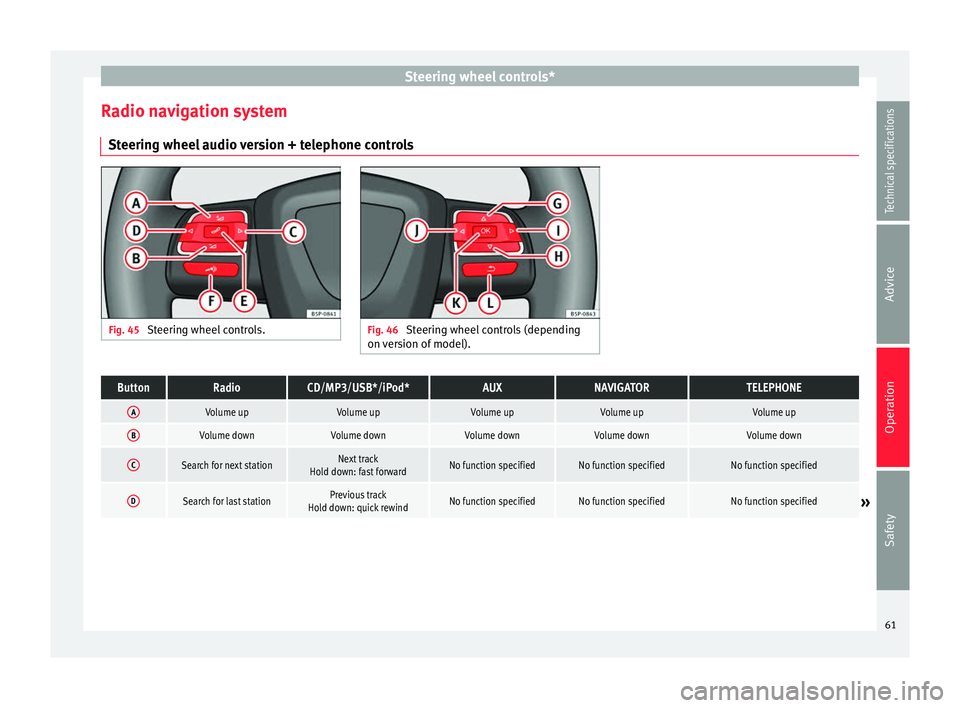
Radio navigation system Steering wheel audio version + telephone controls Fig. 45
Steering wheel controls. Fig. 46
Steering wheel controls (depending
on version of model).ButtonRadioCD/MP3/USB*/iPod*AUXNAVIGATORTELEPHONE
AVolume upVolume upVolume upVolume upVolume up
BVolume downVolume downVolume downVolume downVolume down
CSearch for next stationNext track
Hold down: fast forwardNo function specifiedNo function specifiedNo function specified
DSearch for last stationPrevious track
Hold down: quick rewindNo function specifiedNo function specifiedNo function specified» 61
Technical specifications
Advice
Operation
Safety
Page 64 of 236
OperationButtonRadioCD/MP3/USB*/iPod*AUXNAVIGATORTELEPHONE
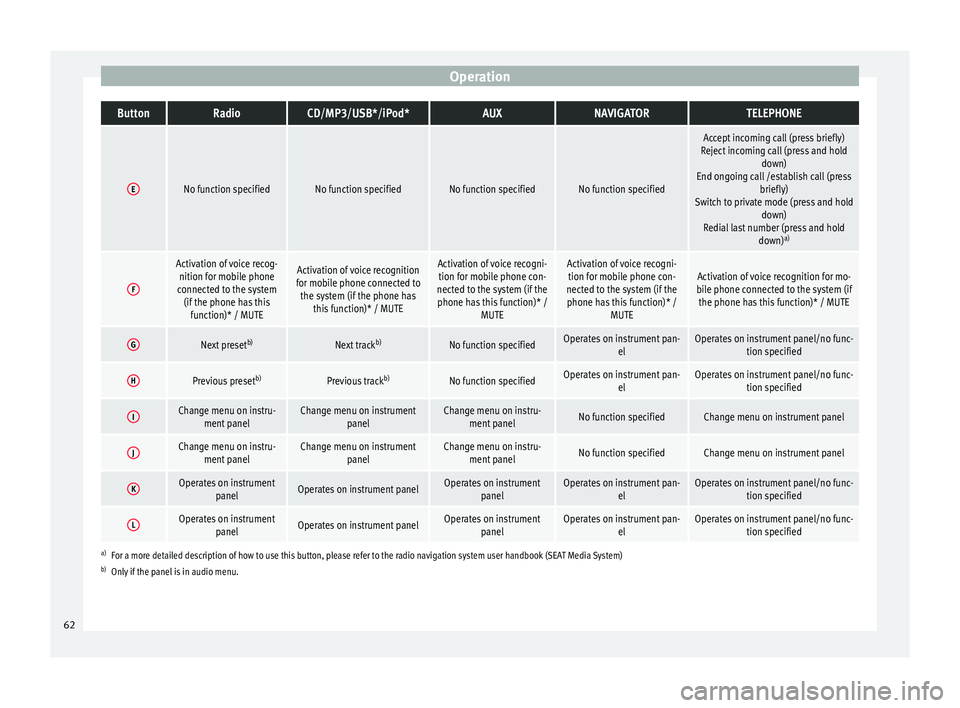
ENo function specifiedNo function specifiedNo function specifiedNo function specified
Accept incoming call (press briefly)
Reject incoming call (press and hold down)
End ongoing call /establish call (press briefly)
Switch to private mode (press and hold down)
Redial last number (press and hold down)a)
F
Activation of voice recog-
nition for mobile phone
connected to the system (if the phone has this function)* / MUTEActivation of voice recognition
for mobile phone connected to the system (if the phone has this function)* / MUTEActivation of voice recogni-tion for mobile phone con-
nected to the system (if the phone has this function)* / MUTEActivation of voice recogni-tion for mobile phone con-
nected to the system (if the phone has this function)* / MUTEActivation of voice recognition for mo-
bile phone connected to the system (if the phone has this function)* / MUTE
GNext preset b)Next trackb)No function specifiedOperates on instrument pan-
elOperates on instrument panel/no func-tion specified
HPrevious preset b)Previous trackb)No function specifiedOperates on instrument pan-
elOperates on instrument panel/no func-tion specified
IChange menu on instru-ment panelChange menu on instrument panelChange menu on instru-ment panelNo function specifiedChange menu on instrument panel
JChange menu on instru-ment panelChange menu on instrument panelChange menu on instru-ment panelNo function specifiedChange menu on instrument panel
KOperates on instrument panelOperates on instrument panelOperates on instrumentpanelOperates on instrument pan- elOperates on instrument panel/no func-tion specified
LOperates on instrumentpanelOperates on instrument panelOperates on instrumentpanelOperates on instrument pan- elOperates on instrument panel/no func-tion specified
a)For a more detailed description of how to use this button, please refer to the radio navigation system user handbook (SEAT Media System)
b) Only if the panel is in audio menu. 62
Page 65 of 236
Opening and closing
Opening and closing Central locking Basic functions The central locking system enables you to
lock and unlock all doors and the rear lid by
just pushing the button.
Description
Central locking can be activated by using any
of the following options:
● the key , by inserting it into the driver door
cylinder and r ot
ating it manually,
● the central lock button in the vehicle interi-
or ›››
page 65
.
● the radio frequency remote control , using
the buttons on the key ›››
page 67.
Various functions are available to improve
the vehicle safety: “Safe” locking system
Selective unlocking system*
Automatic speed-dependent locking and
unlocking system*
Self-locking system to prevent involunta-
ry unlocking
Emergency unlocking system
–
–
–
–
– Unlocking the vehicle*
Press button
››› Fig. 50 on remote
c ontr
ol to unlock all the doors and rear
lid.
Locking the vehicle* Press button
››› Fig. 50 on the remote
c ontr
ol to lock all doors and the rear lid
or turn the key in the door to lock all
doors and the rear lid. WARNING
● Never leave children or disabled persons in
the vehicle. In case of emergency, they may
not be able to leave the vehicle or manage on
their own.
● Never allow children to play in or around
the vehicle. A locked vehicle can be subjected
to extremely high and low temperatures, de-
pending on the time of year, thus causing se-
rious injuries/illness. It could even have fatal
consequences. Close and lock both the rear
lid and all the other doors when you are not
using the vehicle.
● Always take you car keys with you when
you leave the vehicle. Misuse of the keys, for
example, by children, may result in serious
damage and accident.
– The engine may accidentally be started
and be out of control.
– If the ignition is switched on, the electric
equipment could be activated with risk of –
– injury, for example, in the electric win-
dows.
– The doors can be locked using the remote
control key. This could become an obsta-
cle for assistance in an emergency situa-
tion.
– Always take the key with you when you
leave the vehicle.
● Never remove the key from the ignition if
the vehicle is in motion. The steering lock
could suddenly engage, and you would not be
able to steer the vehicle. Note
● While the driver door is open, the vehicle
cannot be locked with the remote control.
This avoids the user from forgetting his key
inside the vehicle.
● If the driver door is unlocked with the key
shaft, only the driver door is unlocked, the
rest of the doors remain locked. When the ig-
nition is switched on, the door “deadlock”
function is deactivated (although the doors
remain locked) and the central lock button is
activated. See ››› page 68.
● If the c
entral locking or anti-theft alarm are
faulty, the driver door control lamp remains
lit for approx. 30 seconds after the vehicle
locks.
● For anti-theft security, only the driver door
is fitted with a lock cylinder. 63
Technical specifications
Advice
Operation
Safety
Page 66 of 236
Operation
“Safe” security system* This is an anti-theft device which consists of
a double lock for the door locks and a deacti-
vation function for the boot in order to pre-
vent forced entry.
Activating the “deadlock”
– Press once the locking button on the re-
mote control. or
– Turn the k
ey once in the driver door lock to
lock. A w
arning lamp in the driver door
flashes to indicate the “deadlock” is work-
ing. The warning lamp flashes for approx. 2
seconds at short intervals and then more
slowly.
Deactivating the “deadlock” when the
vehicle is locked
– Press the lock button on the remote con-
trol twice within 2 seconds. The vehicle is
loc k
ed without activating the “deadlock”.
The driver door warning lamp flashes for
approx. 2 seconds and then goes out. It
flashes again after around 30 seconds.
The doors can be unlocked and opened from
the inside if the “deadlock” has not been ac-
tivated. You will have to pull the door release
lever once. When the “deadlock” is off, the
anti-theft alarm* ›››
page 68 remains active.
The v
ehicle interior monitoring system* and
the anti-tow system are deactivated*. WARNING
Nobody should remain in the vehicle if the
“deadlock” system mechanism has been acti-
vated. It is not possible to open the doors
from the inside. Locked doors could delay as-
sistance in an emergency. People could be-
come trapped inside in an emergency. Selective unlocking system*
This system allows to unlock either just the
driver door or all the vehicle.
Using the remote control, press the unlock
button on the remote
once. The “Safe”
system for all the vehicle is deactivated, only
the driver door is unlocked and both the
alarm and the warning lamp are also turned
off.
Unlocking all doors and the luggage
compartment
The unlock button on the remote control
must be pressed twice so that all doors
and the luggage compartment can be
opened.
Press twice within 2 seconds to deactivate
the “Safe” system for all vehicle, to unlock all
doors and to use the luggage compartment.
The warning lamp and the alarm (only vehi-
cles fitted with one) are turned off. Automatic speed-dependent locking
and unlocking system* This is a safety system which prevents access
to the vehicle from the outside when it is run-
ning (e.g. when stopped at a traffic light).
Locking
The doors and boot will lock automatically if
the speed of 15 km/h (9 mph) is exceeded.
If the vehicle is stopped and one of the doors
is opened, when the vehicle moves off again
and exceeds a speed of 15 km/h (9 mph),
the unlocked door(s) will lock once more.
Unlocking
The driver door automatically unlocks when
the key is removed from the ignition.
Each door can be unlocked and opened inde-
pendently from the inside (for example, when
a passenger gets out). To do it, simply oper-
ate the lever inside the door.
WARNING
The door handles must not be operated when
the vehicle is running: the door would open. 64
Page 67 of 236
Opening and closing
Automatic locking system for
involuntary unlocking* It is an anti-theft system and prevents the un-
intentional unlocking of the vehicle.
If the vehicle is unlocked and none of the
doors (including the boot) are opened within
30 seconds, it re-locks automatically. This
function prevents the vehicle from remaining
unlocked if the unlock button is pressed by
mistake.
Emergency unlocking system If the airbags are triggered during an acci-
dent, the vehicle is unlocked, except for the
luggage compartment. It is possible to lock
the vehicle from inside with the central lock-
ing, after turning the ignition off and back on
again.
If the doors must be locked from the outside,
see “Emergency locking of the doors”.
Unlocking and locking - Manual
personalisation Activating selective unlocking
With the driver door open, turn the key to un-
lock for approx. 3 seconds. Deactivating selective unlocking
With the driver door open, turn the key to
lock for approx. 3 seconds.
The turn signal lamps flash to confirm activa-
tion or deactivation.
Activation of automatic locking
Press the lock button
on the central lock-
ing button for 3 seconds.
Deactivation of automatic locking
Press the unlock button on the central
locking button for 3 seconds.
The lock button lamp flashes to confirm acti-
vation or deactivation.
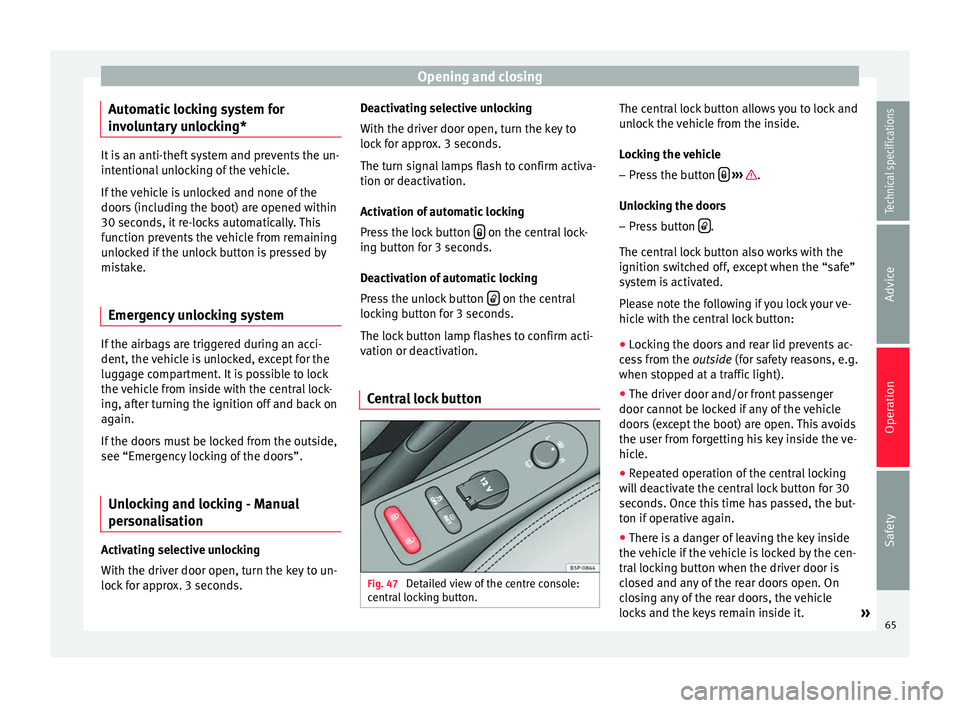
Central lock button Fig. 47
Detailed view of the centre console:
central locking button. The central lock button allows you to lock and
unlock the vehicle from the inside.
Locking the vehicle
– Press the button
››› .
Unlocking the doors
– Press button .
The central lock button also works with the
ignition switched off, except when the “safe”
system is activated.
Please note the following if you lock your ve-
hicle with the central lock button: ● Locking the doors and rear lid prevents ac-
cess from the outside (for safety reasons, e.g.
when s t
opped at a traffic light).
● The driver door and/or front passenger
door cannot be locked if any of the vehicle
doors (except the boot) are open. This avoids
the user from forgetting his key inside the ve-
hicle.
● Repeated operation of the central locking
will deactivate the central lock button for 30
seconds. Once this time has passed, the but-
ton if operative again.
● There is a danger of leaving the key inside
the vehicle if the vehicle is locked by the cen-
tral locking button when the driver door is
closed and any of the rear doors open. On
closing any of the rear doors, the vehicle
locks and the keys remain inside it. »
65
Technical specifications
Advice
Operation
Safety
Page 68 of 236
Operation
● All doors can be unlocked separately from
inside the vehicle. Do this by pulling the door
release lever once
. WARNING
● If the vehicle is locked, children and disa-
bled people may be trapped inside it.
● The central lock button is not operative in
the following cases:
● When the vehicle is locked from the outside
(with the remote control or the key).
● While the ignition is not activated after un-
locking the door lock cylinder with the key. Note
● Vehicle locked, amber button .
● Vehicle unlocked, red button . Childproof lock
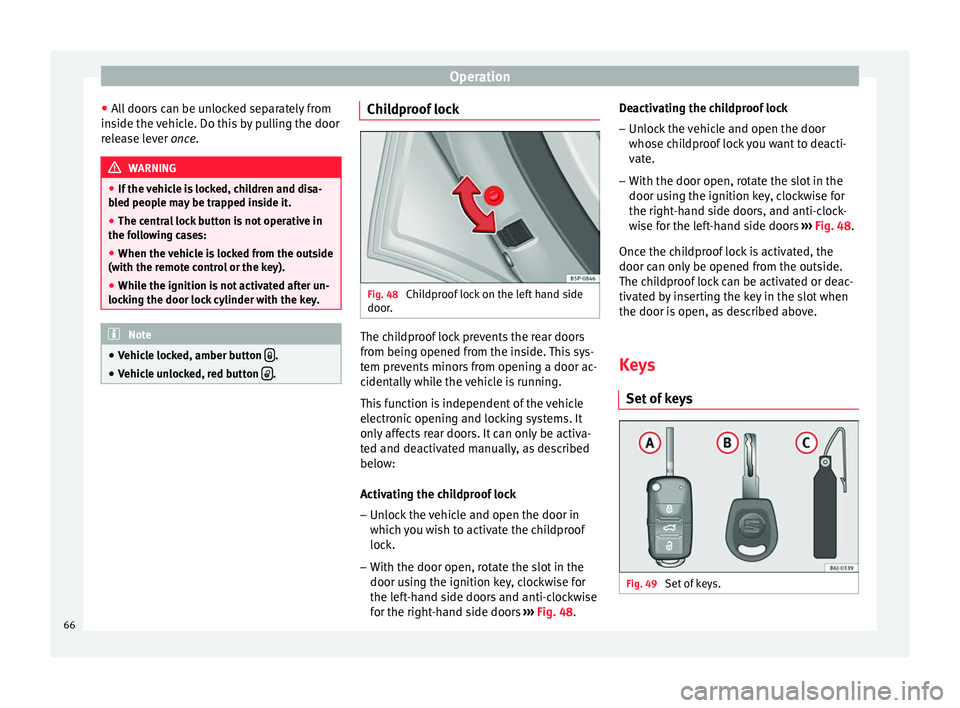
Fig. 48
Childproof lock on the left hand side
door. The childproof lock prevents the rear doors
from being opened from the inside. This sys-
tem prevents minors from opening a door ac-
cidentally while the vehicle is running.
This function is independent of the vehicle
electronic opening and locking systems. It
only affects rear doors. It can only be activa-
ted and deactivated manually, as described
below:
Activating the childproof lock
– Unlock the vehicle and open the door in
which you wish to activate the childproof
lock.
– With the door open, rotate the slot in the
door using the ignition key, clockwise for
the left-hand side doors and anti-clockwise
for the right-hand side doors ››› Fig. 48 . D
e activating the childproof lock
– Unlock the vehicle and open the door
whose childproof lock you want to deacti-
vate.
– With the door open, rotate the slot in the
door using the ignition key, clockwise for
the right-hand side doors, and anti-clock-
wise for the left-hand side doors ››› Fig. 48.
Once the c
hildproof lock is activated, the
door can only be opened from the outside.
The childproof lock can be activated or deac-
tivated by inserting the key in the slot when
the door is open, as described above.
Keys
Set of keys Fig. 49
Set of keys.66
Page 69 of 236
Opening and closing
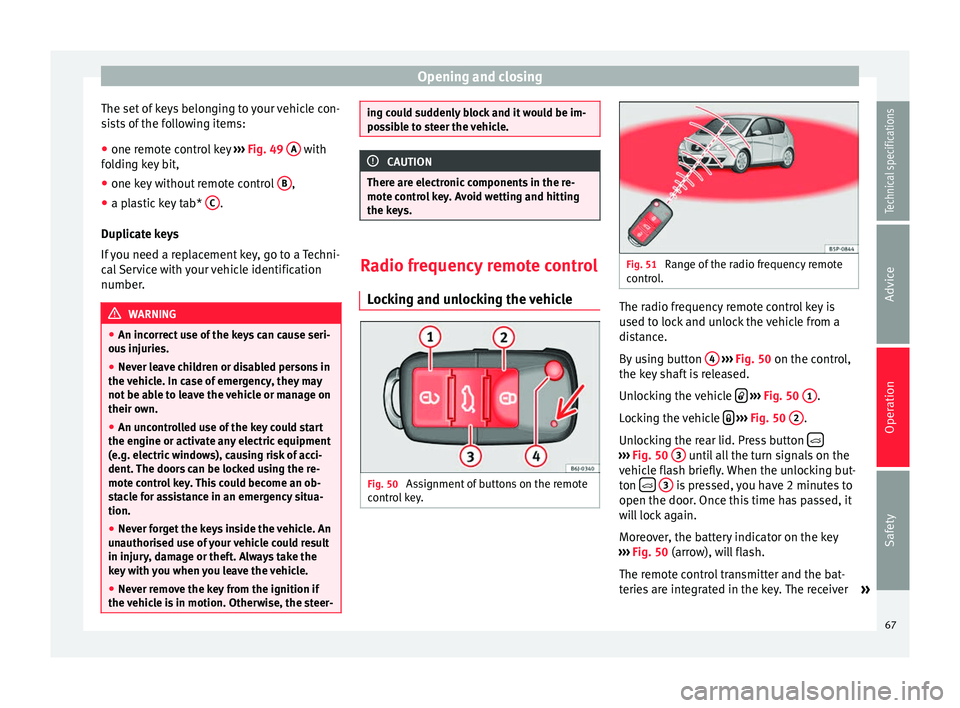
The set of keys belonging to your vehicle con-
sists of the following items:
● one remote control key ››› Fig. 49 A with
folding key bit,
● one key without remote control B ,
● a plastic key tab* C .
Duplicate keys
If you need a replacement key, go to a Techni-
cal Service with your vehicle identification
number. WARNING
● An incorrect use of the keys can cause seri-
ous injuries.
● Never leave children or disabled persons in
the vehicle. In case of emergency, they may
not be able to leave the vehicle or manage on
their own.
● An uncontrolled use of the key could start
the engine or activate any electric equipment
(e.g. electric windows), causing risk of acci-
dent. The doors can be locked using the re-
mote control key. This could become an ob-
stacle for assistance in an emergency situa-
tion.
● Never forget the keys inside the vehicle. An
unauthorised use of your vehicle could result
in injury, damage or theft. Always take the
key with you when you leave the vehicle.
● Never remove the key from the ignition if
the vehicle is in motion. Otherwise, the steer- ing could suddenly block and it would be im-
possible to steer the vehicle.
CAUTION
There are electronic components in the re-
mote control key. Avoid wetting and hitting
the keys. Radio frequency remote control
Locking and unlocking the vehicle Fig. 50
Assignment of buttons on the remote
control key. Fig. 51
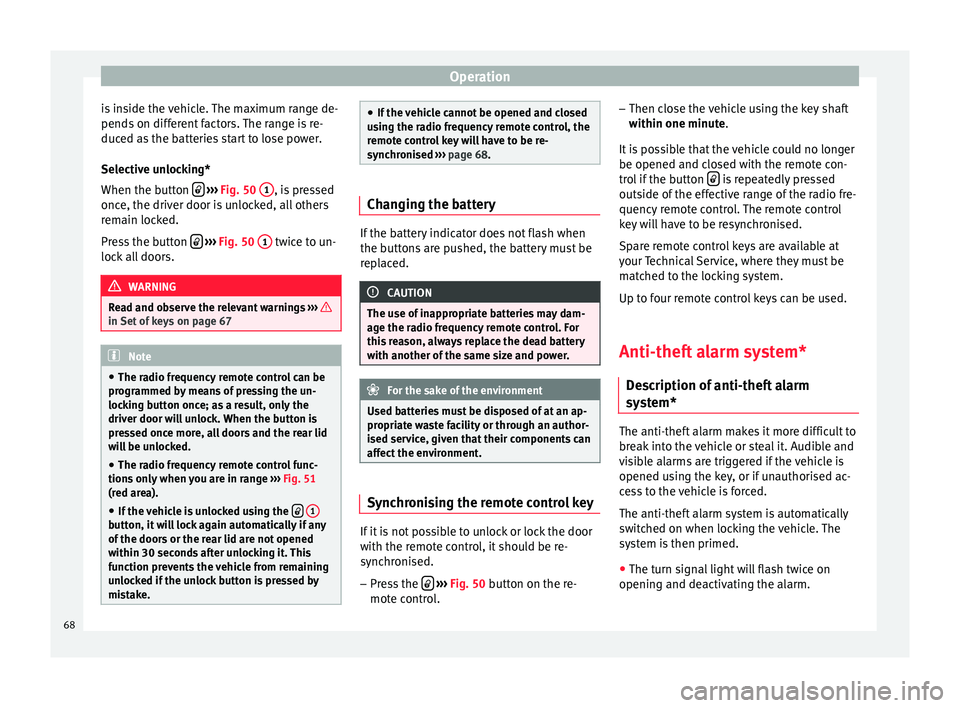
Range of the radio frequency remote
control. The radio frequency remote control key is
used to lock and unlock the vehicle from a
distance.
By using button
4
››› Fig. 50 on the control,
the k ey
shaft is released.
Unlocking the vehicle
››› Fig. 50 1 .
Locking the vehicle
››› Fig. 50 2 .
Unlocking the rear lid. Press button ›››
Fig. 50 3 until all the turn signals on the
vehicle flash briefly. When the unlocking but-
ton
3 is pressed, you have 2 minutes to
open the door. Once this time has passed, it
will lock again.
Moreover, the battery indicator on the key
››› Fig. 50 (arrow), will flash.
The r emot
e control transmitter and the bat-
teries are integrated in the key. The receiver »
67
Technical specifications
Advice
Operation
Safety
Page 70 of 236
Operation
is inside the vehicle. The maximum range de-
pends on different factors. The range is re-
duced as the batteries start to lose power.
Selective unlocking*
When the button
››› Fig. 50 1 , is pressed
once, the driver door is unlocked, all others
remain locked.
Press the button
››› Fig. 50 1 twice to un-
lock all doors. WARNING
Read and observe the relevant warnings ››› in Set of keys on page 67
Note
● The radio frequency remote control can be
programmed by means of pressing the un-
locking button once; as a result, only the
driver door will unlock. When the button is
pressed once more, all doors and the rear lid
will be unlocked.
● The radio frequency remote control func-
tions only when you are in range ››› Fig. 51
(red area).
● If the vehicle is unlocked using the
1 button, it will lock again automatically if any
of the doors or the rear lid are not opened
within 30 seconds after unlocking it. This
function prevents the vehicle from remaining
unlocked if the unlock button is pressed by
mistake. ●
If the vehicle cannot be opened and closed
using the radio frequency remote control, the
remote control key will have to be re-
synchronised ››› page 68. Changing the battery
If the battery indicator does not flash when
the buttons are pushed, the battery must be
replaced.
CAUTION
The use of inappropriate batteries may dam-
age the radio frequency remote control. For
this reason, always replace the dead battery
with another of the same size and power. For the sake of the environment
Used batteries must be disposed of at an ap-
propriate waste facility or through an author-
ised service, given that their components can
affect the environment. Synchronising the remote control key
If it is not possible to unlock or lock the door
with the remote control, it should be re-
synchronised.
– Press the
›››
Fig. 50 button on the re-
mot e c
ontrol. –
Then close the vehicle using the key shaft
within one minute.
It i
s possible that the vehicle could no longer
be opened and closed with the remote con-
trol if the button is repeatedly pressed
outside of the effective range of the radio fre-
quency remote control. The remote control
key will have to be resynchronised.
Spare remote control keys are available at
your Technical Service, where they must be
matched to the locking system.
Up to four remote control keys can be used.
Anti-theft alarm system* Description of anti-theft alarm
system* The anti-theft alarm makes it more difficult to
break into the vehicle or steal it. Audible and
visible alarms are triggered if the vehicle is
opened using the key, or if unauthorised ac-
cess to the vehicle is forced.
The anti-theft alarm system is automatically
switched on when locking the vehicle. The
system is then primed.
● The turn signal light will flash twice on
opening and deactivating the alarm.
68