display Seat Arona 2017 User Guide
[x] Cancel search | Manufacturer: SEAT, Model Year: 2017, Model line: Arona, Model: Seat Arona 2017Pages: 308, PDF Size: 6.66 MB
Page 43 of 308
The essentials
● Vehicle
s
with Easy Connect : press the but-
ton Systems or else Vehicle systems >
Driver assistant > Speed warning.
The warning limit can be set from 30 to
240 km/h (20 to 149 mph). The adjustment
is made at 10 km/h (5 mph) intervals. Note
● Ple a
se bear in mind that, even with the
speed warning function, it is still important
to keep an eye on the vehicle speed with the
speedometer and to observe the legal speed
limits.
● The speed limit warning function in the ver-
sion for some c
ountries warns you at a speed
of 120 km/h (75 mph). This is a factory-set
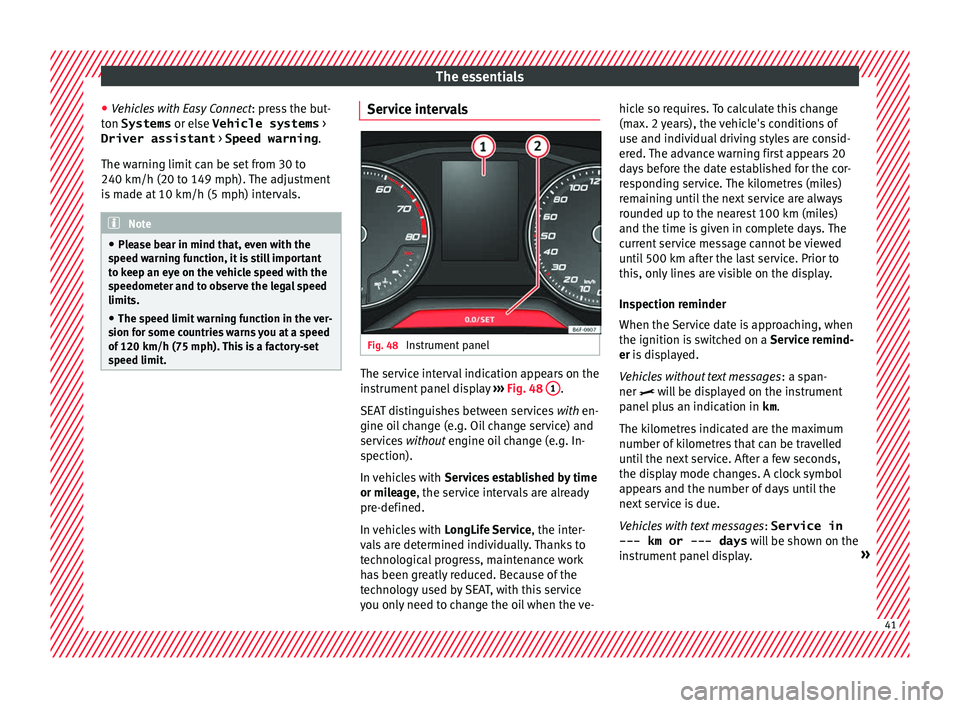
speed limit. Service intervals
Fig. 48
Instrument panel The service interval indication appears on the
in
s
trument
panel display ››› Fig. 48 1 .
S EA
T di
stinguishes between services with en-
gine oil change (e.g. Oil change service) and
services without engine oil change (e.g. In-
spection).
In vehicles with Services established by time
or mileage, the service intervals are already
pre-defined.
In vehicles with LongLife Service , the inter-
vals are determined individually. Thanks to
technological progress, maintenance work
has been greatly reduced. Because of the
technology used by SEAT, with this service
you only need to change the oil when the ve- hicle so requires. To calculate this change
(max. 2 y
ears), the vehicle's conditions of
use and individual driving styles are consid-
ered. The advance warning first appears 20
days before the date established for the cor-
responding service. The kilometres (miles)
remaining until the next service are always
rounded up to the nearest 100 km (miles)
and the time is given in complete days. The
current service message cannot be viewed
until 500 km after the last service. Prior to
this, only lines are visible on the display.
Inspection reminder
When the Service date is approaching, when
the ignition is switched on a Service remind-
er is displayed.
Vehicles without text messages : a span-
ner will be displayed on the instrument
panel plus an indication in km.
The kilometres indicated are the maximum
number of kilometres that can be travelled
until the next service. After a few seconds,
the display mode changes. A clock symbol
appears and the number of days until the
next service is due.
Vehicles with text messages : Service in
--- km or --- days will be shown on the
instrument panel display. » 41
Page 44 of 308
The essentials
Service due
When the ser v
ic
e date is due, an audible
warning is given when the ignition is switch-
ed on and the spanner displayed on the
screen flashes for a few seconds .
Vehicles with text messages : Service now
will be shown on the instrument panel dis-
play.
Reading a service notification
With the ignition switched on, the engine off
and the vehicle at a standstill, the current
service notification can be read:
Press and hold the button 2 for more than 5
sec ond
s
to consult the service message.
When the service date has passed , a minus
sign is displayed in front of the number of kil-
ometres or days.
Vehicles with text messages : the following
message is displayed: Service --- km
(miles) or --- days ago .
The time can also be set via the button
and the S
ET
TINGS function button in the Easy
C onnect
sy
stem ››› page 33. Resetting service interval display
If the serv
ice was not carried out by a SEAT
dealership, the display can be reset as fol-
lows:
● Switch off the ignition, press and hold but-
ton 2 .
● Switch ignition back on.
● Release the 2 button and press it again
f or the ne
xt
20 seconds. Note
● The serv ic
e message disappears after a few
seconds, when the engine is started or when OK/RESET is pressed on the windscreen wiper
lev er
, or OK on the multifunction steering
wheel.
● In v
ehicles with the LongLife system in
which the batt
ery has been disconnected for
a long period of time, it is not possible to cal-
culate the date of the next service. Therefore
the service interval display may not be cor- rect. In this case, bear in mind the maximum
service intervals permitted in the ››› Book-
let Maintenance Programme. ●
If y
ou reset the display manually, the next
service interval will be indicated as in vehi-
cles with fixed service intervals. For this rea-
son we recommend that the service interval
display be reset by a SEAT authorised Dealer. Cruise control
Rel at
ed video Fig. 49
Dash panel42
Page 47 of 308
The essentials
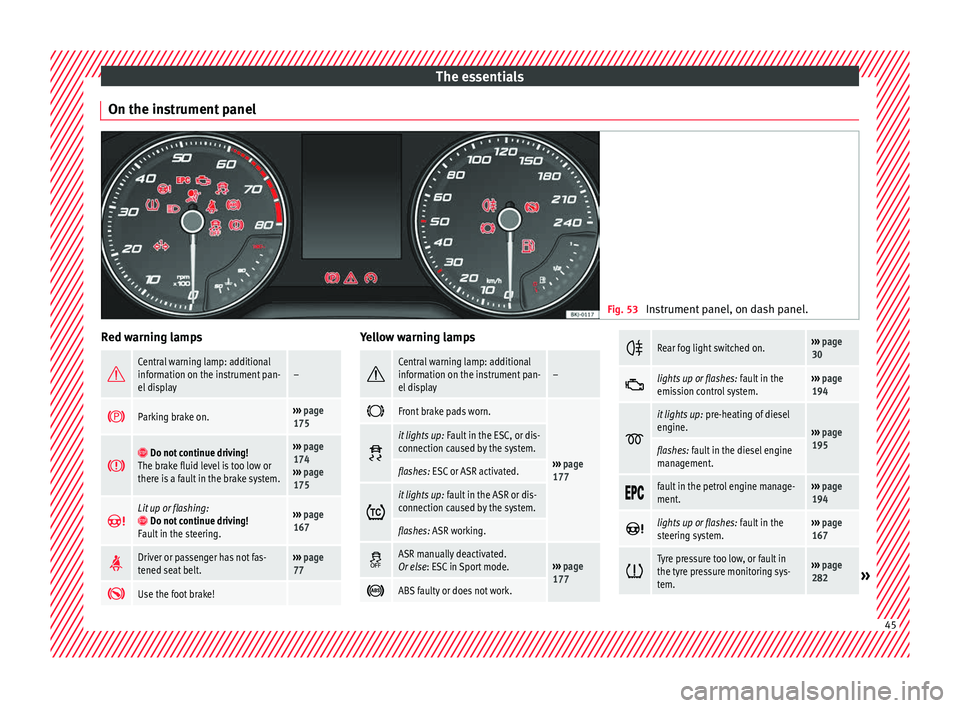
On the instrument panel Fig. 53
Instrument panel, on dash panel. Red warning lamps
Central warning lamp: additional
information on the instrument pan-
el display–
Parking brake on.›››
page
175
Do not continue driving!
The brake fluid level is too low or
there is a fault in the brake system.››› page
174
››› page
175
Lit up or flashing: Do not continue driving!
Fault in the steering.››› page
167
Driver or passenger has not fas-
tened seat belt.›››
page
77
Use the foot brake! Yellow warning lamps
Central warning lamp: additional
information on the instrument pan-
el display–
Front brake pads worn.
›››
page
177
it lights up:
Fault in the ESC, or dis-
connection caused by the system.
flashes: ESC or ASR activated.
it lights up:
fault in the ASR or dis-
connection caused by the system.
flashes: ASR working.
ASR manually deactivated.
Or else
: ESC in Sport mode.››› page
177
ABS faulty or does not work.
Rear fog light switched on.›››
page
30
lights up or flashes:
fault in the
emission control system.››› page
194
it lights up:
pre-heating of diesel
engine.
››› page
195
flashes: fault in the diesel engine
management.
fault in the petrol engine manage-
ment.›››
page
194
lights up or flashes:
fault in the
steering system.››› page
167
Tyre pressure too low, or fault in
the tyre pressure monitoring sys-
tem.›››
page
282» 45
Page 48 of 308
The essentials
Fuel tank almost empty.›››
page
117
Fault in airbag system and seat
belt tensioners.›››
page
82 Other warning lamps
Left or right turn signal.›››
page
31
Hazard warning lights on.››› page
141
Trailer turn signals›››
page
245
it lights up green:
Press the brake
pedal!
It blinks in green: the selector lever
locking button has not engaged.››› page
183
it lights up green:
cruise control ac-
tivated or speed limiter switched
on and active.
››› page
42
››› page
200
it blinks in green: the speed set by
the speed limiter has been excee-
ded.
Main beam on or flasher on.›››
page
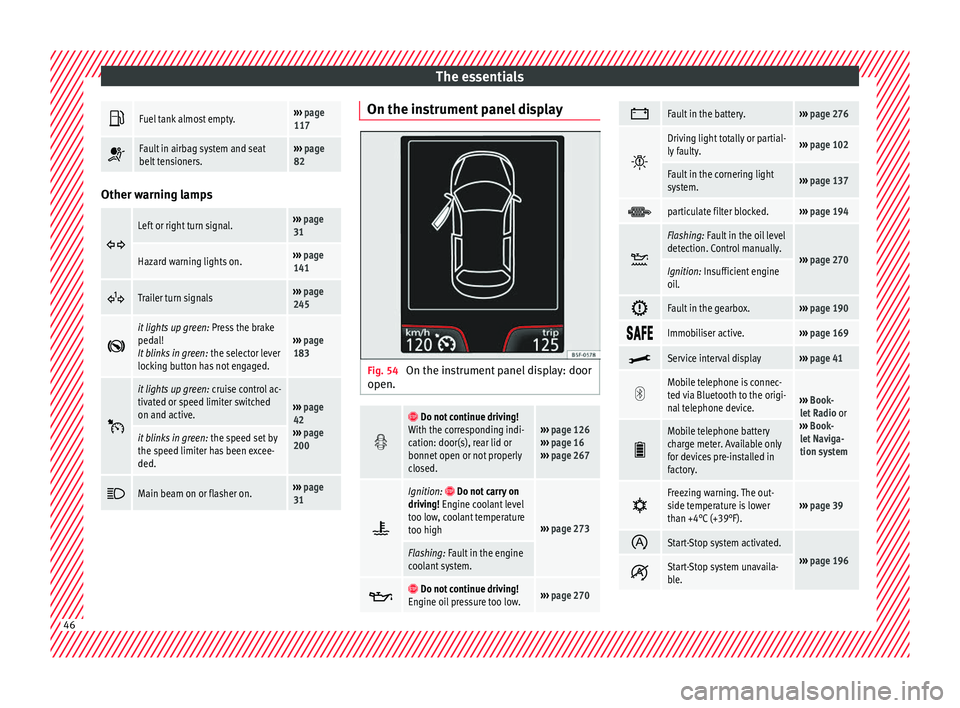
31 On the instrument panel display
Fig. 54
On the instrument panel display: door
open.
Do not continue driving!
With the corresponding indi-
cation: door(s), rear lid or
bonnet open or not properly
closed.››› page 126
››› page 16
››› page 267
Ignition: Do not carry on
driving! Engine coolant level
too low, coolant temperature
too high
››› page 273
Flashing: Fault in the engine
coolant system.
Do not continue driving!
Engine oil pressure too low.››› page 270
Fault in the battery.›››
page 276
Driving light totally or partial-
ly faulty.›››
page 102
Fault in the cornering light
system.››› page 137
particulate filter blocked.›››
page 194
Flashing: Fault in the oil level
detection. Control manually.
›››
page 270Ignition: Insufficient engine
oil.
Fault in the gearbox.›››
page 190
Immobiliser active.›››
page 169
Service interval display›››
page 41
Mobile telephone is connec-
ted via Bluetooth to the origi-
nal telephone device.
›››
Book-
let Radio or
››› Book-
let Naviga-
tion system
Mobile telephone battery
charge meter. Available only
for devices pre-installed in
factory.
Freezing warning. The out-
side temperature is lower
than +4°C (+39°F).›››
page 39
Start-Stop system activated.
›››
page 196 Start-Stop system unavaila-
ble.
46
Page 51 of 308
The essentials
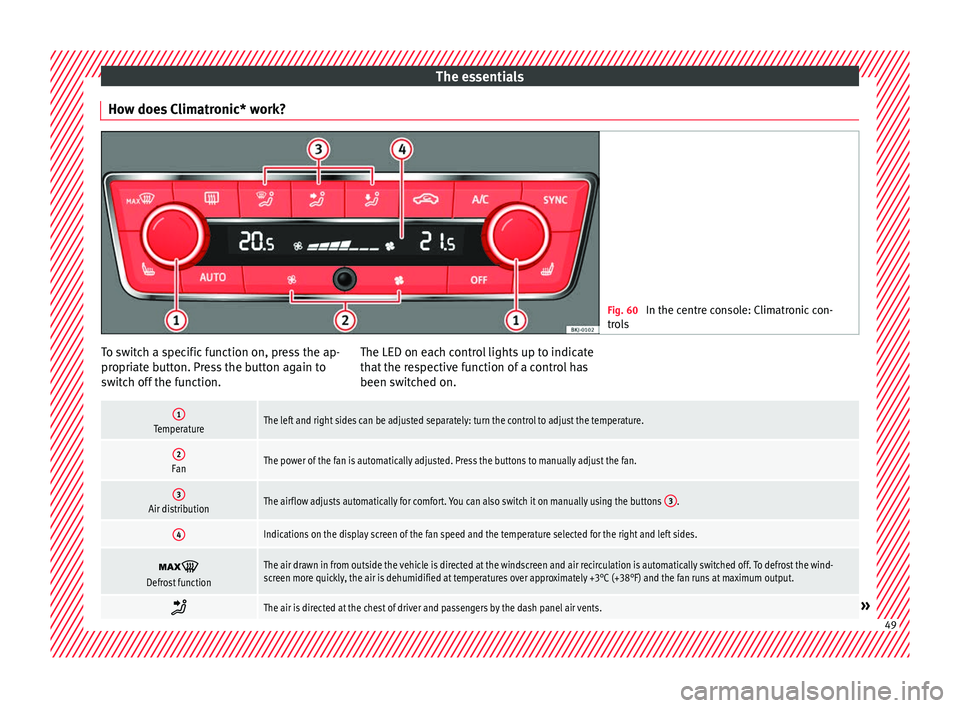
How does Climatronic* work? Fig. 60
In the centre console: Climatronic con-
tro l
s To switch a specific function on, press the ap-
pr
opri
at
e button. Press the button again to
switch off the function. The LED on each control lights up to indicate
that the r
espective function of a control has
been switched on.
1TemperatureThe left and right sides can be adjusted separately: turn the control to adjust the temperature.
2FanThe power of the fan is automatically adjusted. Press the buttons to manually adjust the fan.
3Air distributionThe airflow adjusts automatically for comfort. You can also switch it on manually using the buttons 3.
4Indications on the display screen of the fan speed and the temperature selected for the right and left sides.
Defrost functionThe air drawn in from outside the vehicle is directed at the windscreen and air recirculation is automatically switched off. To defrost the wind-
screen more quickly, the air is dehumidified at temperatures over approximately +3°C (+38°F) and the fan runs at maximum output.
The air is directed at the chest of driver and passengers by the dash panel air vents.»
49
Page 79 of 308
Seat belts
Seat belts
Wh y
w
ear a seat belt?
Number of seats Your vehicle has
five se
ats, two in the front
and three in the rear. Each seat is equipped
with a three-point seat belt. WARNING
● Never tr an
sport more than the permitted
amount of people in your vehicle.
● Every vehicle occupant must properly fas-
ten and we
ar the seat belt belonging to his or
her seat. Children must be protected with an
appropriate child restraint system. Seat belt lamp*
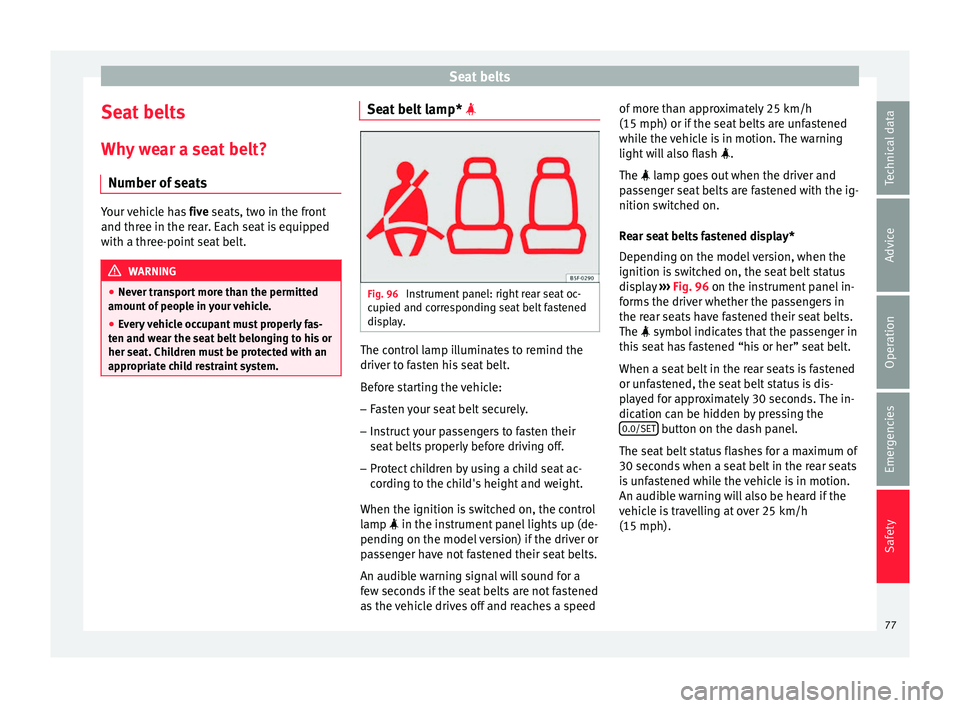
Fig. 96
Instrument panel: right rear seat oc-
c upied and c
orr
esponding seat belt fastened
display. The control lamp illuminates to remind the
driv
er t
o f
asten his seat belt.
Before starting the vehicle: – Fasten your seat belt securely.
– Instruct your passengers to fasten their
seat belts
properly before driving off.
– Protect children by using a child seat ac-
cordin
g to the child's height and weight.
When the ignition is switched on, the control
lamp in the instrument panel lights up (de-
pending on the model version) if the driver or
passenger have not fastened their seat belts.
An audible warning signal will sound for a
few seconds if the seat belts are not fastened
as the vehicle drives off and reaches a speed of more than approximately 25 km/h
(15 mph) or if the seat
belts are unfastened
while the vehicle is in motion. The warning
light will also flash .
The lamp goes out when the driver and
passenger seat belts are fastened with the ig-
nition switched on.
Rear seat belts fastened display*
Depending on the model version, when the
ignition is switched on, the seat belt status
display ››› Fig. 96 on the instrument panel in-
forms the driver whether the passengers in
the rear seats have fastened their seat belts.
The symbol indicates that the passenger in
this seat has fastened “his or her” seat belt.
When a seat belt in the rear seats is fastened
or unfastened, the seat belt status is dis-
played for approximately 30 seconds. The in-
dication can be hidden by pressing the 0.0/SET button on the dash panel.
The se at
belt
status flashes for a maximum of
30 seconds when a seat belt in the rear seats
is unfastened while the vehicle is in motion.
An audible warning will also be heard if the
vehicle is travelling at over 25 km/h
(15 mph).
77
Technical data
Advice
Operation
Emergencies
Safety
Page 103 of 308
Fuses and bulbsNo.Consumer/Amps
13Lights switch, steering column LSS
and SMLS, diagnostic port, rain/light
sensor7.5
14steering column LSS: wiper controls10
15Instrument panel7.5
16Right Lights Power Supply40
17Right Door Window Control30
18Windscreen wipers30
19Radio, Multimedia System25
20Heated Rear Window30
21SCR Control Unit30
23Rear View Camera7.5
24Connectivity Box, external audio
source wiring (Double USB-Aux IN),
telephone amplifier, MIB display5
25Steering Column Electronics (MFL)7.5
26Gateway7.5
27Active Suspension Control Unit7.5
28DWA Sensor7.5
29DWA Horn7.5
319AA/9AB climate control unit7.5
9AK Climatronic control unit15
32Steering Column LSS, without Kessy7.5
No.Consumer/Amps
33Left Door Window Control30
35Left Lights Power Supply40
36Signal Horn20
37Heated seats control unit30
38BCM Power C6330
39BSD, PDC, MRR10
40
Lights switch, diagnostic port, head-
light range control, steering column
LSS: Lights, halogen headlights, re-
verse light switch
7.5
41Electrochromic mirror, regulation of
unfolded rear view mirrors, RKA with-
out radio7.5
42Clutch pedal, ignition relays, CNG re-
lay coil7.5
43DWP relay coil, rear window wiper mo-
tor15
44Airbag7.5
45Leimo Plus left headlight7.5
46Leimo Plus right headlight7.5
48Steering Column Lock, Kessy Control
Unit7.5
49SCR Relay Coil7.5
51AA Pressure Sensor, heated jets7.5
No.Consumer/Amps
53Automatic gearbox lever, ZSS7.5
58Double Water Pump7.5
59Heated rear view mirrors10
60Tow Hook30
61Tow Hook30
Fuse arrangement in engine compart-
ment
Read the additional information carefully
› ›
›
page 58
Only replace fuses with a fuse of the same
amperage (same colour and markings) and
size.
No.Consumer/Amps
1Engine Injection Module30
2
Fuel metering valve (TJ4/T6P/TJ7), Low
temperature coolant pump
(TJ4/T6P/TJ7); Oil Pressure Regulating
Valve (TJ1), Coolant Valve AGR (TJ1),
High and Low Water Bumps (TJ1), SCR
relay coil
7.5
3Lambda probes15
4Petrol engine pump relay (MPI), Gauge
control unit (TSI and Diesel)15» 101
Technical data
Advice
Operation
Emergencies
Safety
Page 113 of 308
Controls and displays
Operation
C ontr
o
ls and displays
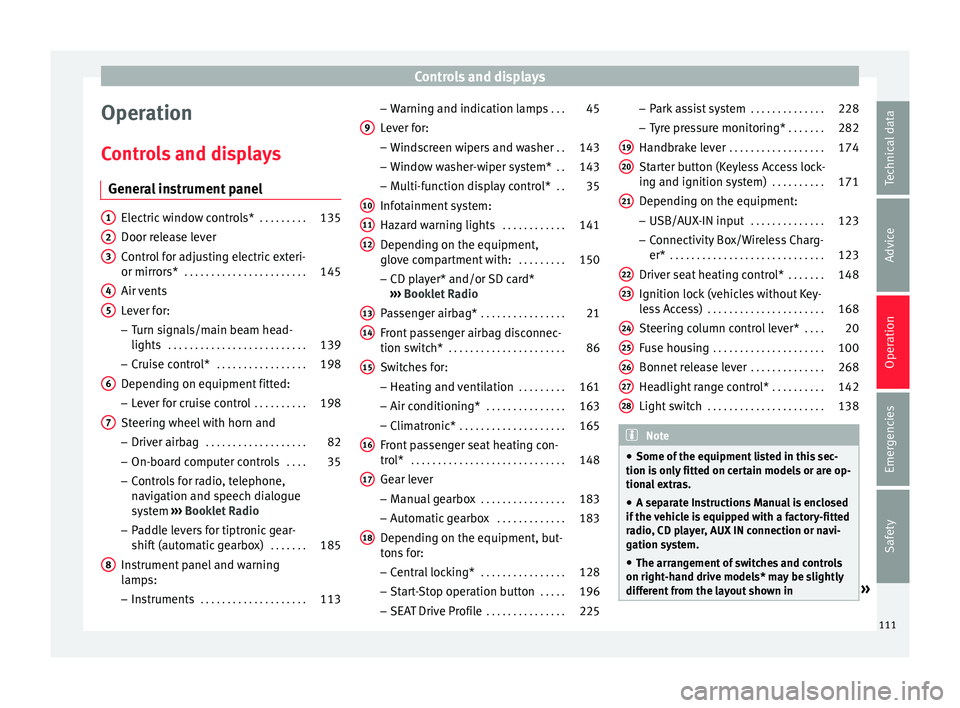
General instrument panel Electric window controls*
. . . . . . . . .135
Door release lever
Contr o
l for adjusting electric exteri-
or mirrors* . . . . . . . . . . . . . . . . . . . . . . . 145
Air vents
Lev er f
or:
– Turn signals/main beam head-
lights . . . . . . . . . . . . . . . . . . . . . . . . . . 139
– Crui se c
ontrol* . . . . . . . . . . . . . . . . . 198
Depending on equipment fitted:
– Lev er f
or cruise control . . . . . . . . . .198
Steering wheel with horn and – Driver airbag . . . . . . . . . . . . . . . . . . . 82
– On-boar d c
omputer controls . . . .35
– Contro
ls for radio, telephone,
navigation and speech dialogue
system ›››
Booklet Radio
– Paddle levers for tiptronic gear-
shift (automatic gearbox) . . . . . . .185
Instrument panel and warning
lamp s:
– In
struments . . . . . . . . . . . . . . . . . . . . 113
1 2
3
4
5
6
7
8 –
Warnin
g and indic
ation lamps . . .45
Lever for:
– Winds
creen wipers and washer . .143
– Window w
asher-wiper system* . .143
– Multi-f
unction display control* . .35
Infotainment system:
Hazard w
arning lights . . . . . . . . . . . . 141
Depending on the equipment,
glove c
ompartment with: . . . . . . . . .150
– CD pla
yer* and/or SD card*
››› Booklet Radio
Passenger airbag* . . . . . . . . . . . . . . . . 21
Front passenger airbag disconnec-
tion switc
h* . . . . . . . . . . . . . . . . . . . . . . 86
Switches for:
– Heating and
ventilation . . . . . . . . . 161
– Air conditionin g* . . . . . . . . . . . . . . . 163
– C
limatr
onic* . . . . . . . . . . . . . . . . . . . . 165
Front passenger seat heating con-
tro l* . . . . . . . . . . . . . . . . . . . . . . . . . . . . . 148
Ge
ar lever
– Manual g
earbox . . . . . . . . . . . . . . . . 183
– Autom atic
gearbox . . . . . . . . . . . . . 183
Depending on the equipment, but-
ton s
for:
– Central locking* . . . . . . . . . . . . . . . . 128
– Star t
-Stop operation button . . . . .196
– SEAT Driv
e Profile . . . . . . . . . . . . . . . 225
9
10
11
12
13
14
15
16
17
18 –
Park
a
ssist system . . . . . . . . . . . . . . 228
– Tyr
e pressure monitoring* . . . . . . .282
Handbrake lever . . . . . . . . . . . . . . . . . . 174
Starter button (Keyless Access lock-
ing and ignition sys
tem) . . . . . . . . . . 171
Depending on the equipment:
– USB/AUX-IN inp
ut . . . . . . . . . . . . . . 123
– Connectivity
Box/Wireless Charg-
er* . . . . . . . . . . . . . . . . . . . . . . . . . . . . . 123
Driver seat heating control* . . . . . . .148
Ignition lock (vehicles without Key-
les
s Access) . . . . . . . . . . . . . . . . . . . . . . 168
Steering column control lever* . . . .20
Fuse housing . . . . . . . . . . . . . . . . . . . . . 100
Bonnet release lever . . . . . . . . . . . . . .268
Headlight range control* . . . . . . . . . .142
Light switch . . . . . . . . . . . . . . . . . . . . . . 138 Note
● Some of the equipment li
sted in this sec-
tion is only fitted on certain models or are op-
tional extras.
● A separate Instructions Manual is enclosed
if the v
ehicle is equipped with a factory-fitted
radio, CD player, AUX IN connection or navi-
gation system.
● The arrangement of switches and controls
on right-hand driv
e models* may be slightly
different from the layout shown in » 19
20
21
22
23
24
25
26
27
28
111
Technical data
Advice
Operation
Emergencies
Safety
Page 115 of 308
Instruments and warning/control lamps
Instruments and warning/control lamps
In s
trument
s
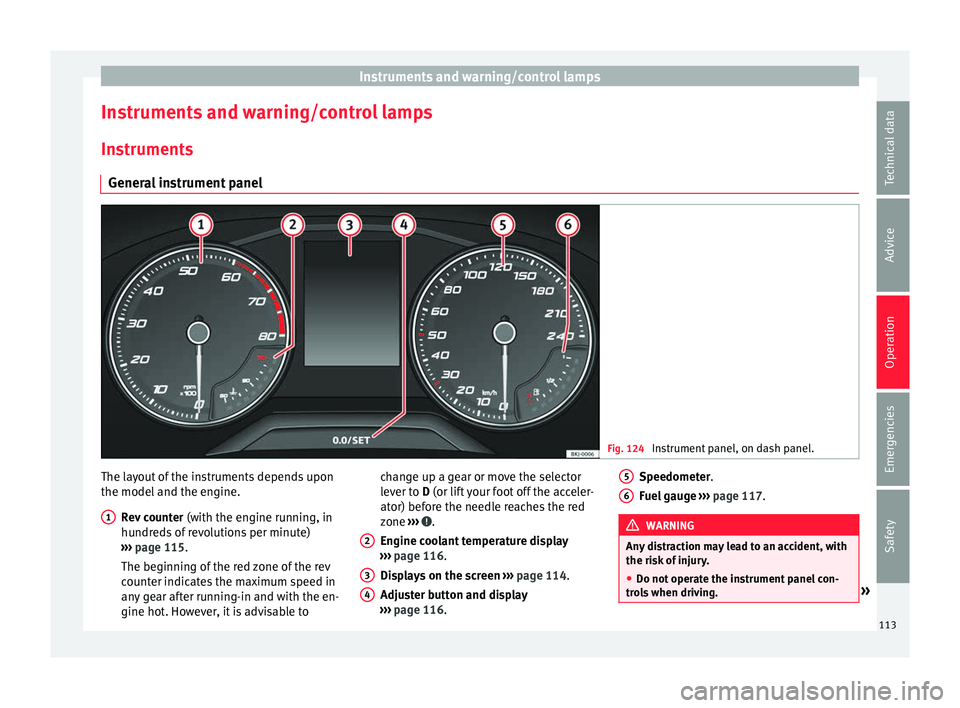
General instrument panel Fig. 124
Instrument panel, on dash panel. The layout of the instruments depends upon
the model
and the en
gine.
R
ev counter (with the engine running, in
hundreds of revolutions per minute)
››› page 115.
The beginning of the red zone of the rev
counter indicates the maximum speed in
any gear after running-in and with the en-
gine hot. However, it is advisable to
1 change up a gear or move the selector
l
ev
er t
o D (or lift your foot off the acceler-
ator) before the needle reaches the red
zone ››› .
En gine c
oo
lant temperature display
››› page 116.
Displays on the screen ››› page 114.
Adjuster button and display
››› page 116.
2 3
4 Speedometer.
F
uel
g
auge ››› page 117. WARNING
Any distraction may lead to an accident, with
the risk of
injury.
● Do not operate the instrument panel con-
trol
s when driving. » 5
6
113
Technical data
Advice
Operation
Emergencies
Safety
Page 116 of 308
Operation
CAUTION
● When the engine i s
cold, avoid high revs
and heavy acceleration and do not make the
engine work hard. Indications on the display
A variety of information can be viewed on the
ins
trument
panel display ››› Fig. 124 3 de-
pending on the v
ehicle equipment:
● Bonnet, rear lid and doors open
›› ›
page 38.
● Information and warning texts.
● Mileage.
● Time.
● Navigation instructions.
● Outside temperature.
● Compass.
● Shift lever position ›››
page 183.
● Recommended gear (manual gearbox)
›››
page 39.
● Multifunction display (MFD) and menus
with differ
ent setting options ›››
page 35.
● Service interval display ›››
page 41.
● Second speed display ›››
page 35.
● Speed warning function ›››
page 40.
● Start-Stop system status display
›››
page 196. ●
Identifyin
g letters on engine (MKB).
Distance travelled
The odometer registers the total distance
travelled by the car.
The odometer (trip ) shows the distance
travelled since the last odometer reset. The
last digit of the trip recorder indicates distan-
ces of 100 metres or one tenths of a mile.
● Briefly press the button ›››
Fig. 124 4 to re-
set the trip r
ec
order to 0.
● Keep the button 4 pressed for about 3
sec ond
s
and the previous value will be dis-
played.
Time
● To set the time, keep the button ›››
Fig. 124
4 pressed for more than 3 seconds to select
the hour or minut e di
s
play.
● To continue setting the time, press button
4 . Hold button down to scroll through the
number s
quic
kly.
● Press the button 4 again in order to finish
settin g the time.
The time c an al
so be set via the button
and the S
ET
TINGS function button in the Easy
C onnect
sy
stem ››› page 118. Compass
With the ignition on and the nav
igation sys-
tem on, the cardinal point corresponding to
the direction of travel of the vehicle is dis-
played on the instrument panel.
Selector lever position
The selected gear is displayed on the side of
the selector lever and on the instrument pan-
el display. In positions D and S, and with the
Tiptronic, the corresponding gear is also dis-
played.
Recommended gear (manual gearbox)
The recommended gear in order to save fuel
is displayed on the instrument panel while
you are driving ›››
page 39.
Second speed display (mph or km/h)
In addition to the speedometer, the speed
can also be displayed in a different unit of
measurement (in miles or in km per hour).
This option cannot be deactivated in models
destined for countries in which the second
speed must always be visible.
The second speed display can be adjusted in
the Easy Connect system via the button
and the S
ET
TINGS function button
› ›
›
page 118.
114